FORM & VISUALISATION // DN1011 // PROJECT 2A – OBJECT & WEAVE TECHNIQUE STUDIES
Task 1 – Object Studies: Electric Kettle


Orthographic drawing

Perspective drawing


Task 2 – Weave Technique Studies
For this task, I chose the 2D flat pattern as I could complete it in Malaysia while I was back for visiting. I also saw this article online of a particular weave and wanted to try my hand at it.

Attempt 1
Location: Singapore, Singapore
I first attempted with the provided rattan and a Chinese New Year mandarin orange box that I found at home.
Preparing the “frame”:
Cutting out a 20x20cm square from the box.


Measuring 3/4 inch intervals and poking holes with this tool I found in my mum’s baking drawer. (Afterwards, I widened the holes with a pencil as the rattan was too wide.)


Weaving:

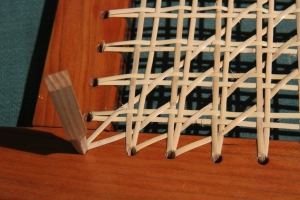
Soaking the rattan strips in water before weaving to make them “supple”.


Weaving vertical strips and using pencils as the “pegs” to hold the strips tight. Immediately, I found that the cardboard was not sturdy enough for me to bend the strips around to the next hole or maintain tightness/straightness of each strip.


“Tying off” a strip of rattan, and starting a new one.

A timelapse of my process:
 I got to this point before I admitted to myself that this was not going to be a successful piece as I would either have to create a wooden frame and drill holes or source for a more flexible and thinner rattan.
I was pretty upset with myself because I wanted to finish this task before I had to fly off to Sibu the next day. But I guess it was fine as I managed to source for a more suitable cane.
Attempt 2:
Location: Sibu, Sarawak

I had to ask my Ahma for a shop that sells cane in Sibu and we went to it. The auntie seemed reluctant to sell my her raw/stripped cane strips and not her actual woven furniture haha.


But we still managed to get this bundle (sold by weight but possible with foreigner surcharge) for 10RM.
This cane is stripped and thus flat and more flexible and thus ideal for the weave I was trying to achieve.

Preparing the “frame”:
 My uncle’s old cardboard computer box.
Marking out the 3/4 inch interval holes around a 20x20cm square.


Once I punctured the holes with my pencil I realised that I did not make a point to ensure they were aligned. I decided to continue as I did not want to redo (hahaha little did I know).
Soaking the flat strips of rattan.


A timelapse of me laying three vertical strips before hating that all three of the strips were not parallel and deciding to restart.
Attempt 3
Weaving & Preparing the Frame:
Luckily there was still the other side of the box so I did the same process again.
Timelapse: Most of it is me measuring where holes would be as I wanted them to be perfectly aligned and the first two “steps” of the weave pattern (vertical and horizontal, laying on top of each other).
Product of the above timelapse:

Timelapse: Further weaving.
Product:

“Step 4” where the fourth “row” is added – this is the row that creates the woven aspect of the pattern.

Completed step four: at this point I realised that the weave was very tight and if I were to add the two more diagonal rows.

 Credit: Mike Elliott, Kettle River Canoes

Even after adjusting the strips to lie parallel with a screwdriver, I decided to finish the weave at step four.
 An attempt at adding a diagonal strand and seeing how it basically destroyed the square pattern so far.
The final step in the seat weaving is to do the usual “couching” to cover the holes in the seat frame. The couching is held in place with loops of cane in every second hole around the seat frame.
Couching process:


Final Product:
Adapted Octagonal Pattern (Yatsume ami) into Cross Pattern
(Yotsume ami)


Strengths:
The 4-piece interwoven pattern makes a very strong and durable surface (even more so if the frame was wood rather than cardboard). The symmetrical property of the weave allows for no weak points and the tightness of the strips is ideal for carrying small items.


Weakness:
 As I am using cardboard and the strips overlay, there is a lot of shifting in the strips – this means that the weave does not hold its squarish pattern and makes the weave look messy. I would have to adjust it every so often to make sure the weave is neat.
3-D, 20x20x20cm (min. size) object on Charmaine’s OSS. https://oss.adm.ntu.edu.sg/char0087/
Ortho drawings and Perspective
– Generally a good set of drawings. The slight curvature of the top portion of the kettle should also be captured in you Right view as drawn in Front view.
Weave
– Appreciate the documentation of the process and the reflections.
(Refer to Charmaine’s post for further comments)