Going deeper into the more cinematographic aspects of the process; I realized just how unaware I was that making a fully CG video can still be very rooted in reality.

From the start I knew that I would have to learn elements of graphic design to create a strong image, but for some reason I didn’t think of it more akin to film.

Even though one of the things I picked up regarding Cinema 4D’s camera was to be mindful of the focal length, I somehow, while fixated on the technical aspects of texturing and lighting the scene, I just ended up just gravitating to 50mm every time i started a new scene. It was functional and so I didn’t question it.

For a few days now I’ve been trying to dial in the camera movement for the ‘Fetus Room’ scene, as I call it.

And something is just a little off about the way the camera moves. So I went about looking into how people handle the camera in Cinema 4D and I came across this podcast episode. They talked about how Pixar would make the decision to stay away from ‘impossible’ camera moves that the digital medium would allow; They make camera moves that would exist in real life. Doing so helps emotionally connect with their characters.

Even though my FYP isn’t a conventional narrative, I do think in having a sensibility for cinematography and real world film language is something quite integral to what I’m trying to achieve in my FYP, precisely because it still is intended to be an emotive experience.

Here are some Gifs I made of me trying to work out the camera move in the scene

Too slow at the start

https://drive.google.com/open?id=1cYUDH27p45QJx_HAP14tO20_pojt0xZG

(^ sorry gif size was too big, but the pan up at the end was waay too slow here ^)

I tried to repeat the lights speeding by to compensate for the long pan up. I think I’ll probably integrate it as a textural aspect to the video at various points in time

Other things I’ve taken away from the podcast were

a) an awareness of focal lengths and their effect

b) Angle of approach

Having the opportunity of being on some friends Film shoots has helped me gain more awareness as to the sensibilities of actual shoots.

Helping other friends shoot their own fun little project as first time filmmakers made me dive deep into film making itself and cinematography; as well as the assortment of things that we as viewers subconsciously know though the established film language.

I would say these little off-shoots, no pun intended, have unexpectedly helped me with aspects of my FYP, and that’s pretty swell.


These posts are now out of chronological order, I felt like I needed to get this post out while my thoughts were still fresh in my head.

I still haven’t covered what I’ve done up till now, the prev post of the Red/Blue exploration was still some time last semester. Subsequent posts will be

1. The work i did in modules last semester that are linked to my FYP

2. Changing Render engines

3. Motion Blur Tests

4. Some process pictures of me putting together the fetus room scene

5. Audio

Cheerio!
 

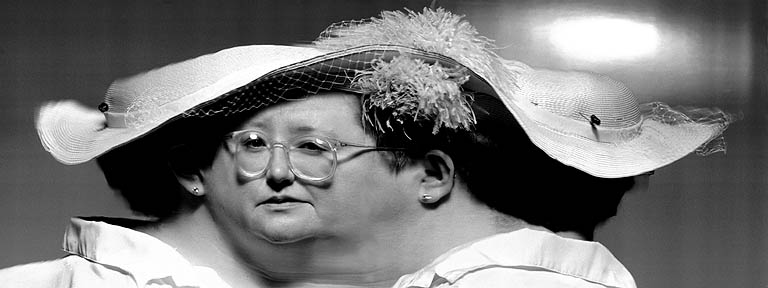
The Slit Scan Effect is the work of both Cher See and myself in trying to achieve the slit scan technique used in photography and occasionally in video.

The visuals that come of this technique are quite fascinating

But it requires quite a technical setup for photography, or a lot of post-processing in video to achieve the effect

Very rarely do we get to see the effect occur with live video, and so we thought it’d be fun to attempt to recreate the effect in Max

Above is the final patcher window, with video input on the left and the different modes into the final output window on the right.

There are 8 variations, stillscan being similar to the photography style of slit scan, each line is being printed into the screen line by line.

Our idea was to store the frames that were coming in and then play them back in slices, each slice being delayed by incremental amounts.

In our attempts to get the final effect, we went through quite a few methods, most of which did not work with us at key critical moments JUST before we’d be able to achieve the effect.

We looked into things such as matrix, matrixset, and the src/usrdisdim nodes.

Finally we found some success in the matrixset node and it’s ability to store frames and play them back

The next step was to figure out how to store the frames in a way that we could delay each individual one by a set amount

This was also another critical moment of getting stuck

Eventually we found a jit.scissor and jit.glue node combination. We found that we could essentially get input media cut and pasted back in rows and columns

Along with a matrixset delay method we achieved our first iteration of the effect

Unfortunately we were unable to get the node to accept more than ~15 inputs/outputs, making the effect not as smooth as we’d have liked

Thanks to an ingenious breakthrough we managed to get multiple instances of the node combo to run simultaneously and thus we increased the number of slices and essentially our final effect.

The effect was pushed to it’s limits with this method in Max, but the processing speed started to chug at 120 slices and prior to that the effect at 60 slices was starting to get unnoticeable gains at first glance, hence this was our end zone.

I will be using the tri-cut mode as the following example.

The bang node triggers the toggle node that counts to 3 and multiplies it by a user-set-amount to achieve our choice of delay for optimal fun/effect

The scissor and glue nodes calculates how to cut and piece the slices back together.

The delay node gets the integers from the previous images multiplied numbers and tells each slice how much to be delayed by

This slice goes back out into the final jit.glue node and pieced back together with the rest of the slices in the final effect.

Though it there were some rather technical methods to achieving the effect, it was pretty satisfying and fun to have been able to recreate the effect through an alternative method that pretty much looks identical to the more technical computive methods.

Cheers all!

GROUP: Goh Cher See, Nicholas Makoto

Week 01: Split pre-rendered video into half with delayed time

Week 02: Live video integration with more segments

Week 03: Fine tuning of the live video effect

Project Idea: Live video input + slit scan technique

We plan to create a video with time distortion for people to interact to create interesting effects and pictures

Examples of the slit scan technique.

url.jpg

url.jpg