Tag Archives: 3D Model

3D_002_Inspiration_and_Process: Sound Texturizer Trial and Error

Hi!
Okay so we are supposed to create our own sound texturizer, and looking through past years references, it is indeed not gonna be an easy one :’)


THE IDEATION

At first I tried to Youtube a lot of videos for inspiration.
This video is the one that somehow inspired and motivated me the most.

My favorite instrument is actually number 8 ‘Chateau Paulie’. It was not really an instrument but a village-sized art and musical installation.
It is basically the idea of using wind to move pipes which create sounds. And people can pull some ropes to adjust the ‘fan’ creating the sound they wants.
This makes me want to create a customizable sound texturizer.

My very first idea was to use water, and using the idea of water having different pitch when having different level. However as I thought more of it, I had the idea of sound travelling through water.

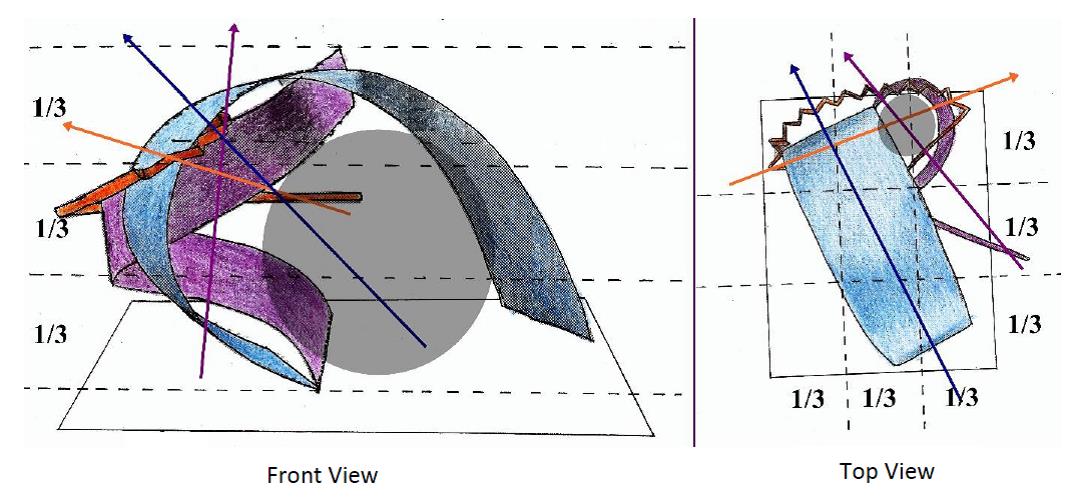
After some long thought, I finally decided to use the idea of sound texturized by being reflected through long tube and cylinder. And for the source of the sound, instead of the initial idea to blow something, I decided to move things around.


THE PROCESS

A. MATERIALS

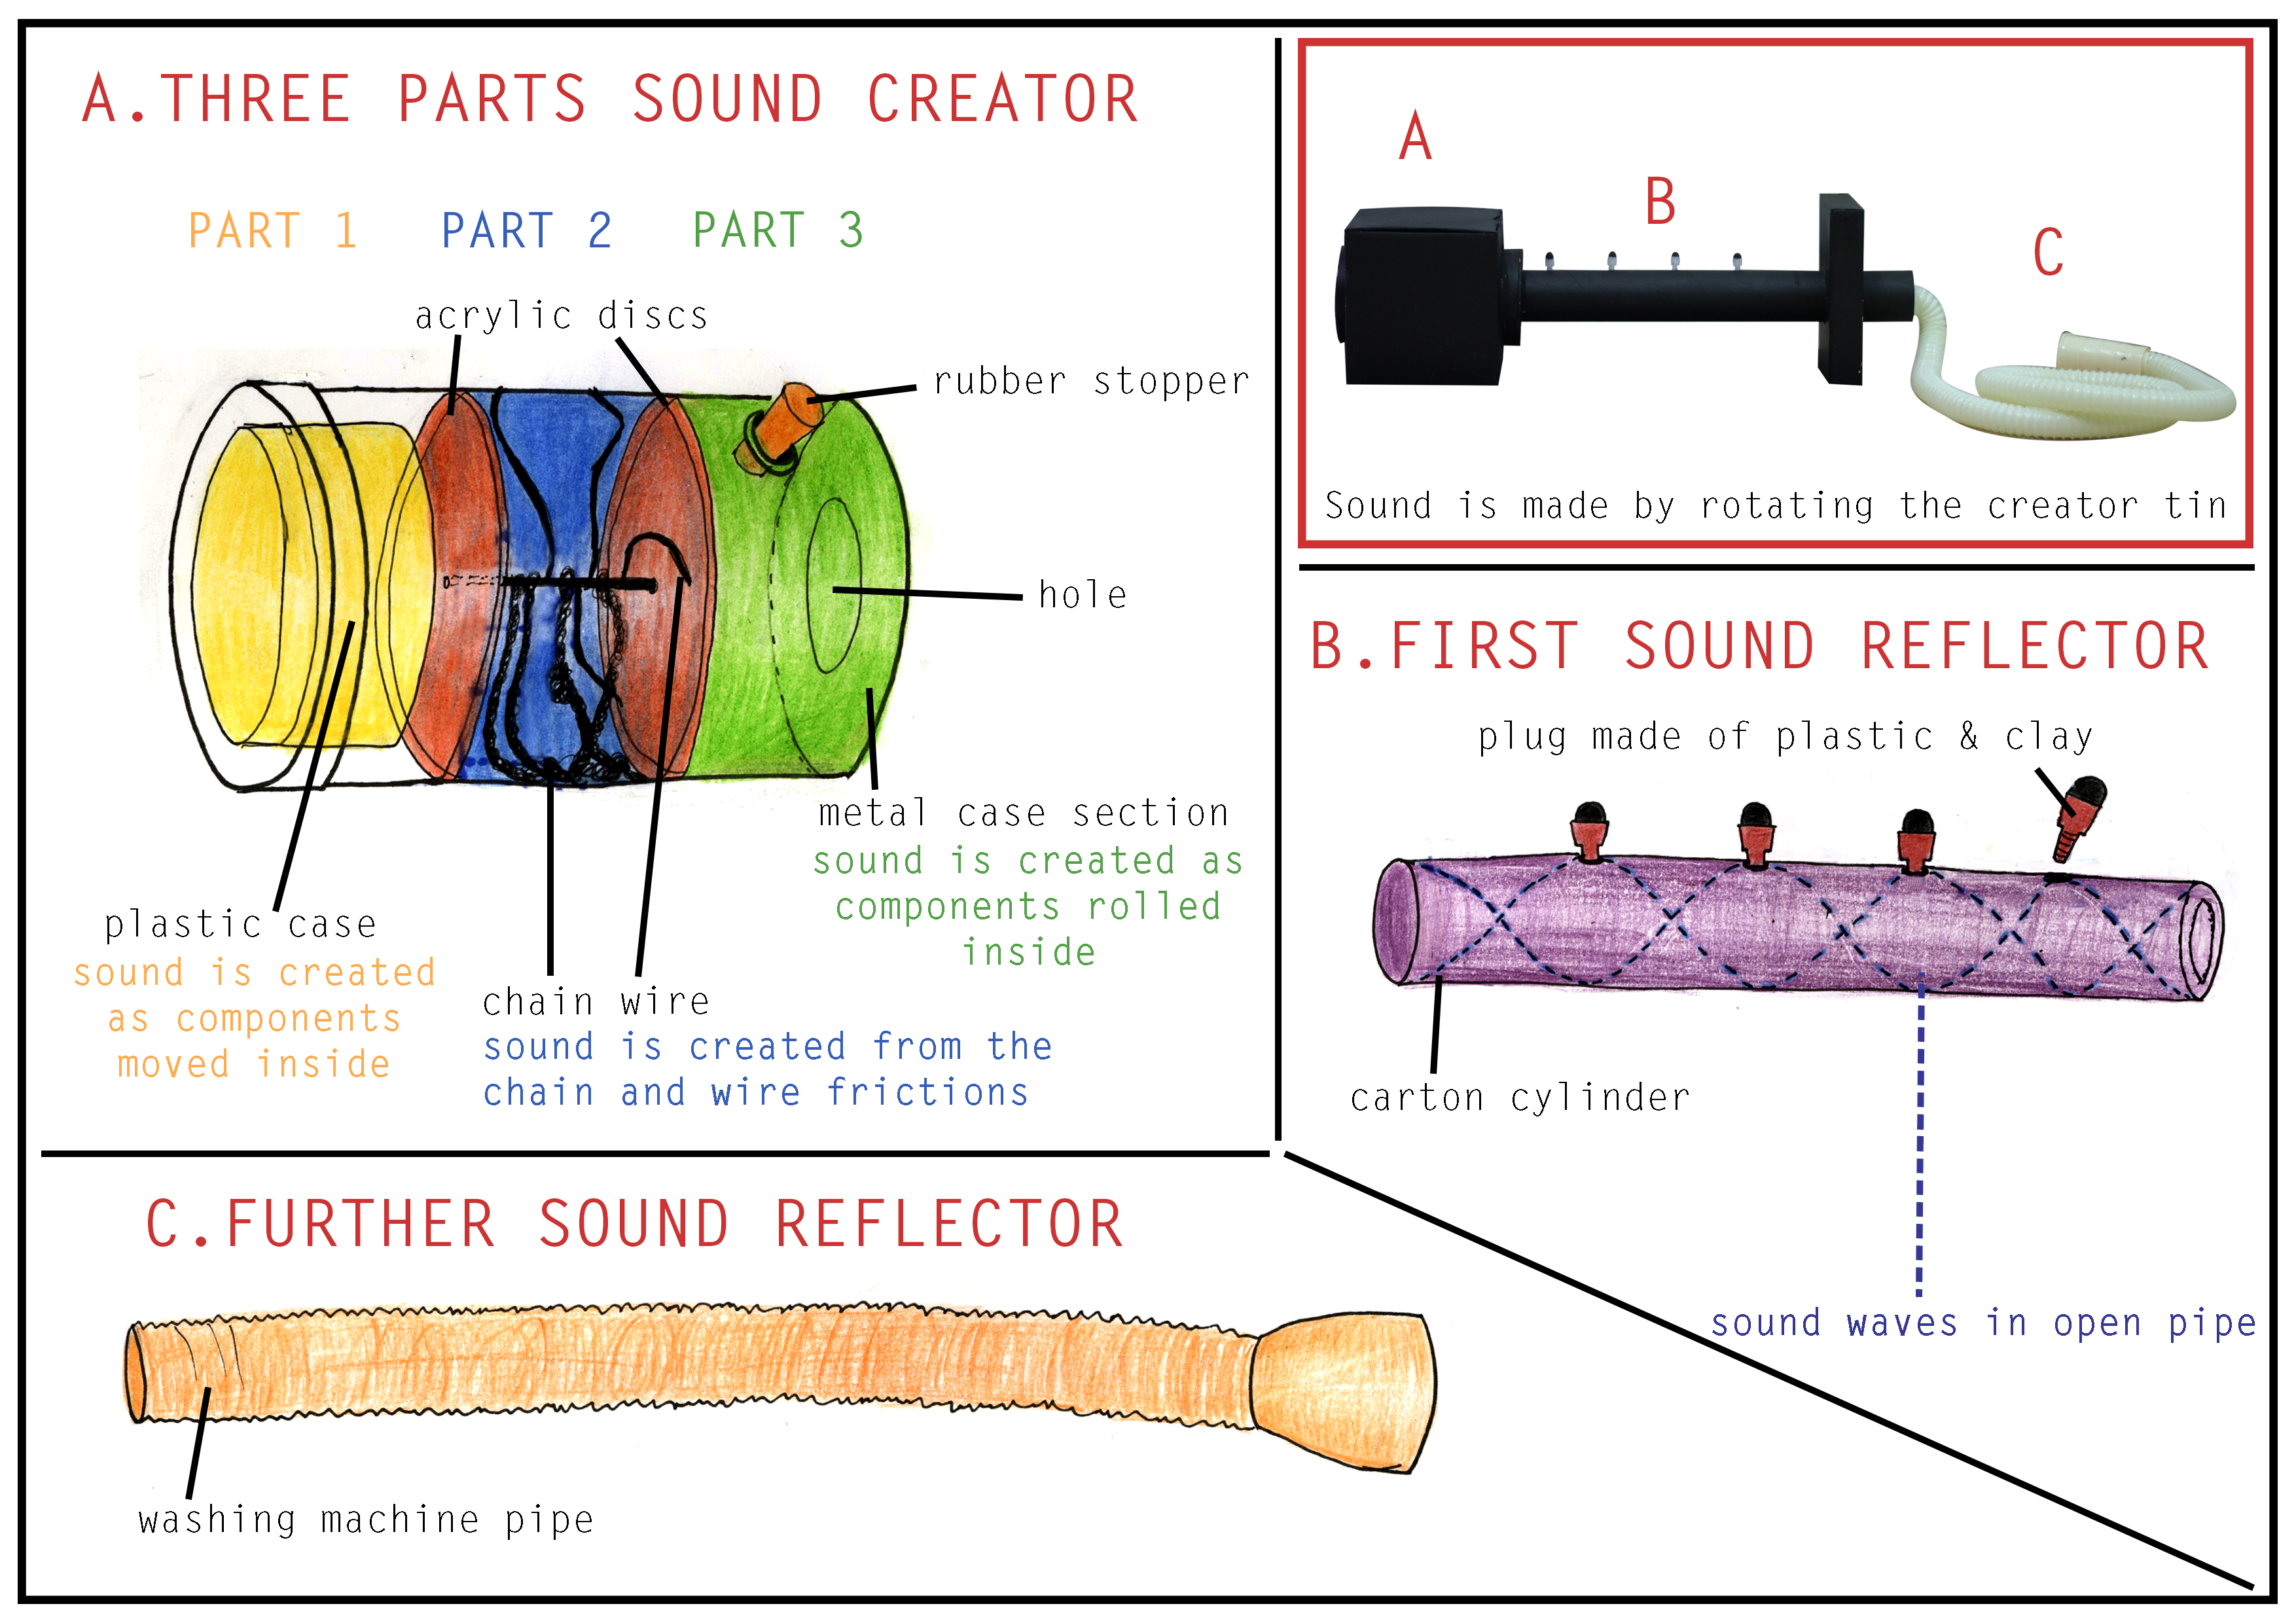
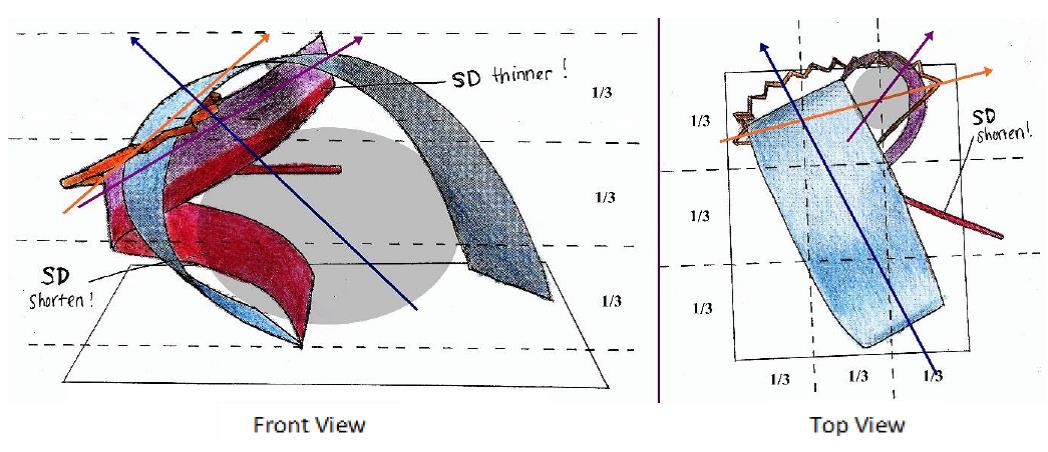
First step is to find the sound reflectors: the carton cylinder and washing machine pipe.
Both have texturizing effect, with the washing machine pipe having a more hollow and deeper effect.

Next is to find the sound creator. I decided to make use of a biscuit tin can, creating a hole on the end to connect with the cylinder.
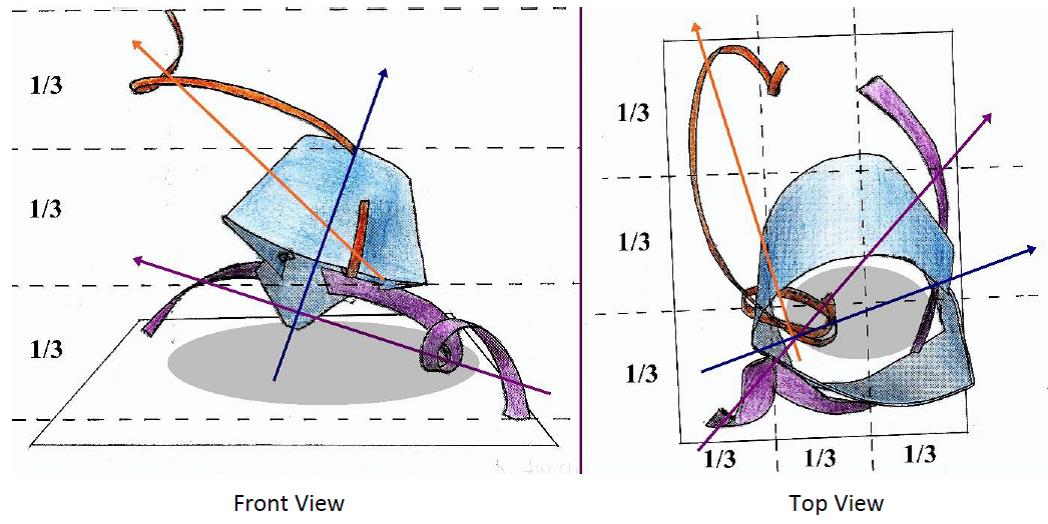
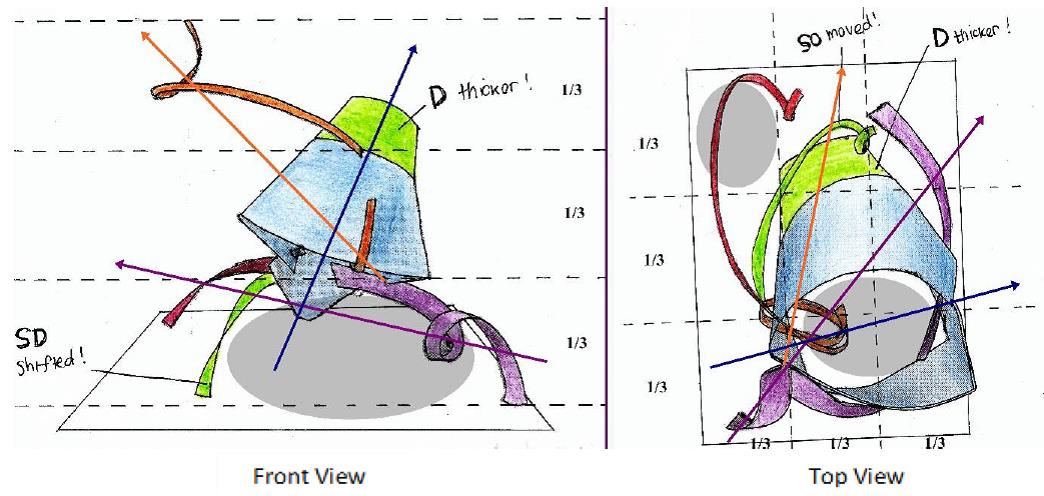
B. CREATION

Firstly, I drilled hole in the metal tin. It was quite time-consuming as we need to drill shape holes one by one before creating

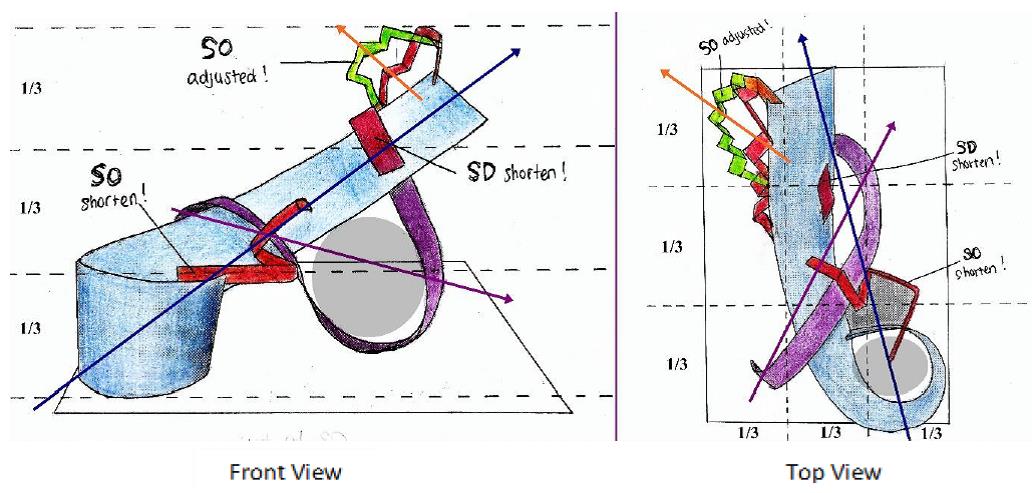
Then, I created the insert part of the sound creator by dividing them into 3 different layers.

  1. Part 1: plastic case part to put in customisable things inside  and sound is created from friction between components and plastic
  2. Part 2: middle part to put in chains and wire sound dragging around the metal can
  3. Part 3: metal part to put in customisable components and the sound is created form friction between components and metal

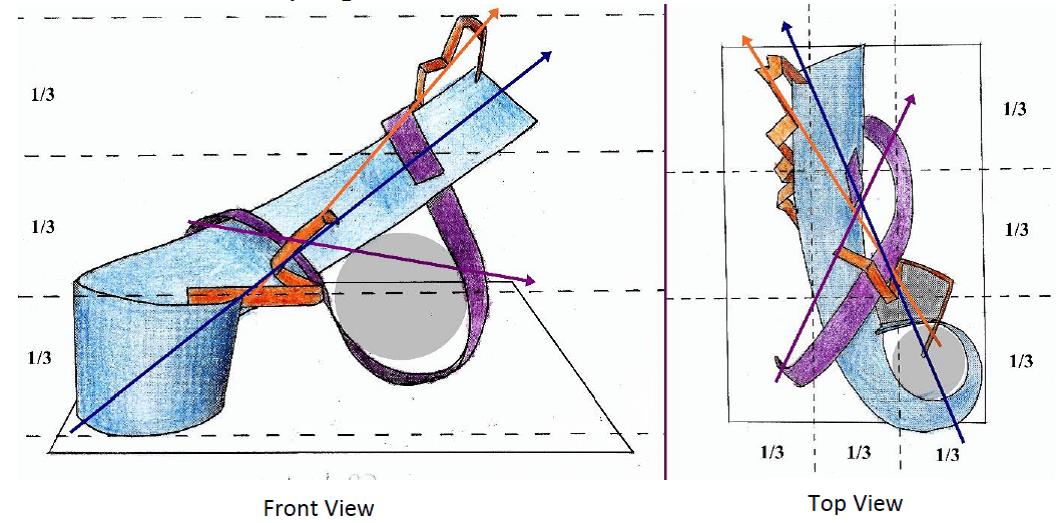
Next, is to create the support for the cylinder and tin, they are made of boxes.

Then the next step is to connect the can tin—carton cylinder—washing machine pipe and put them on the support! YEAY

I also created ways to take out the components and allow customising them without taking out the whole thing.

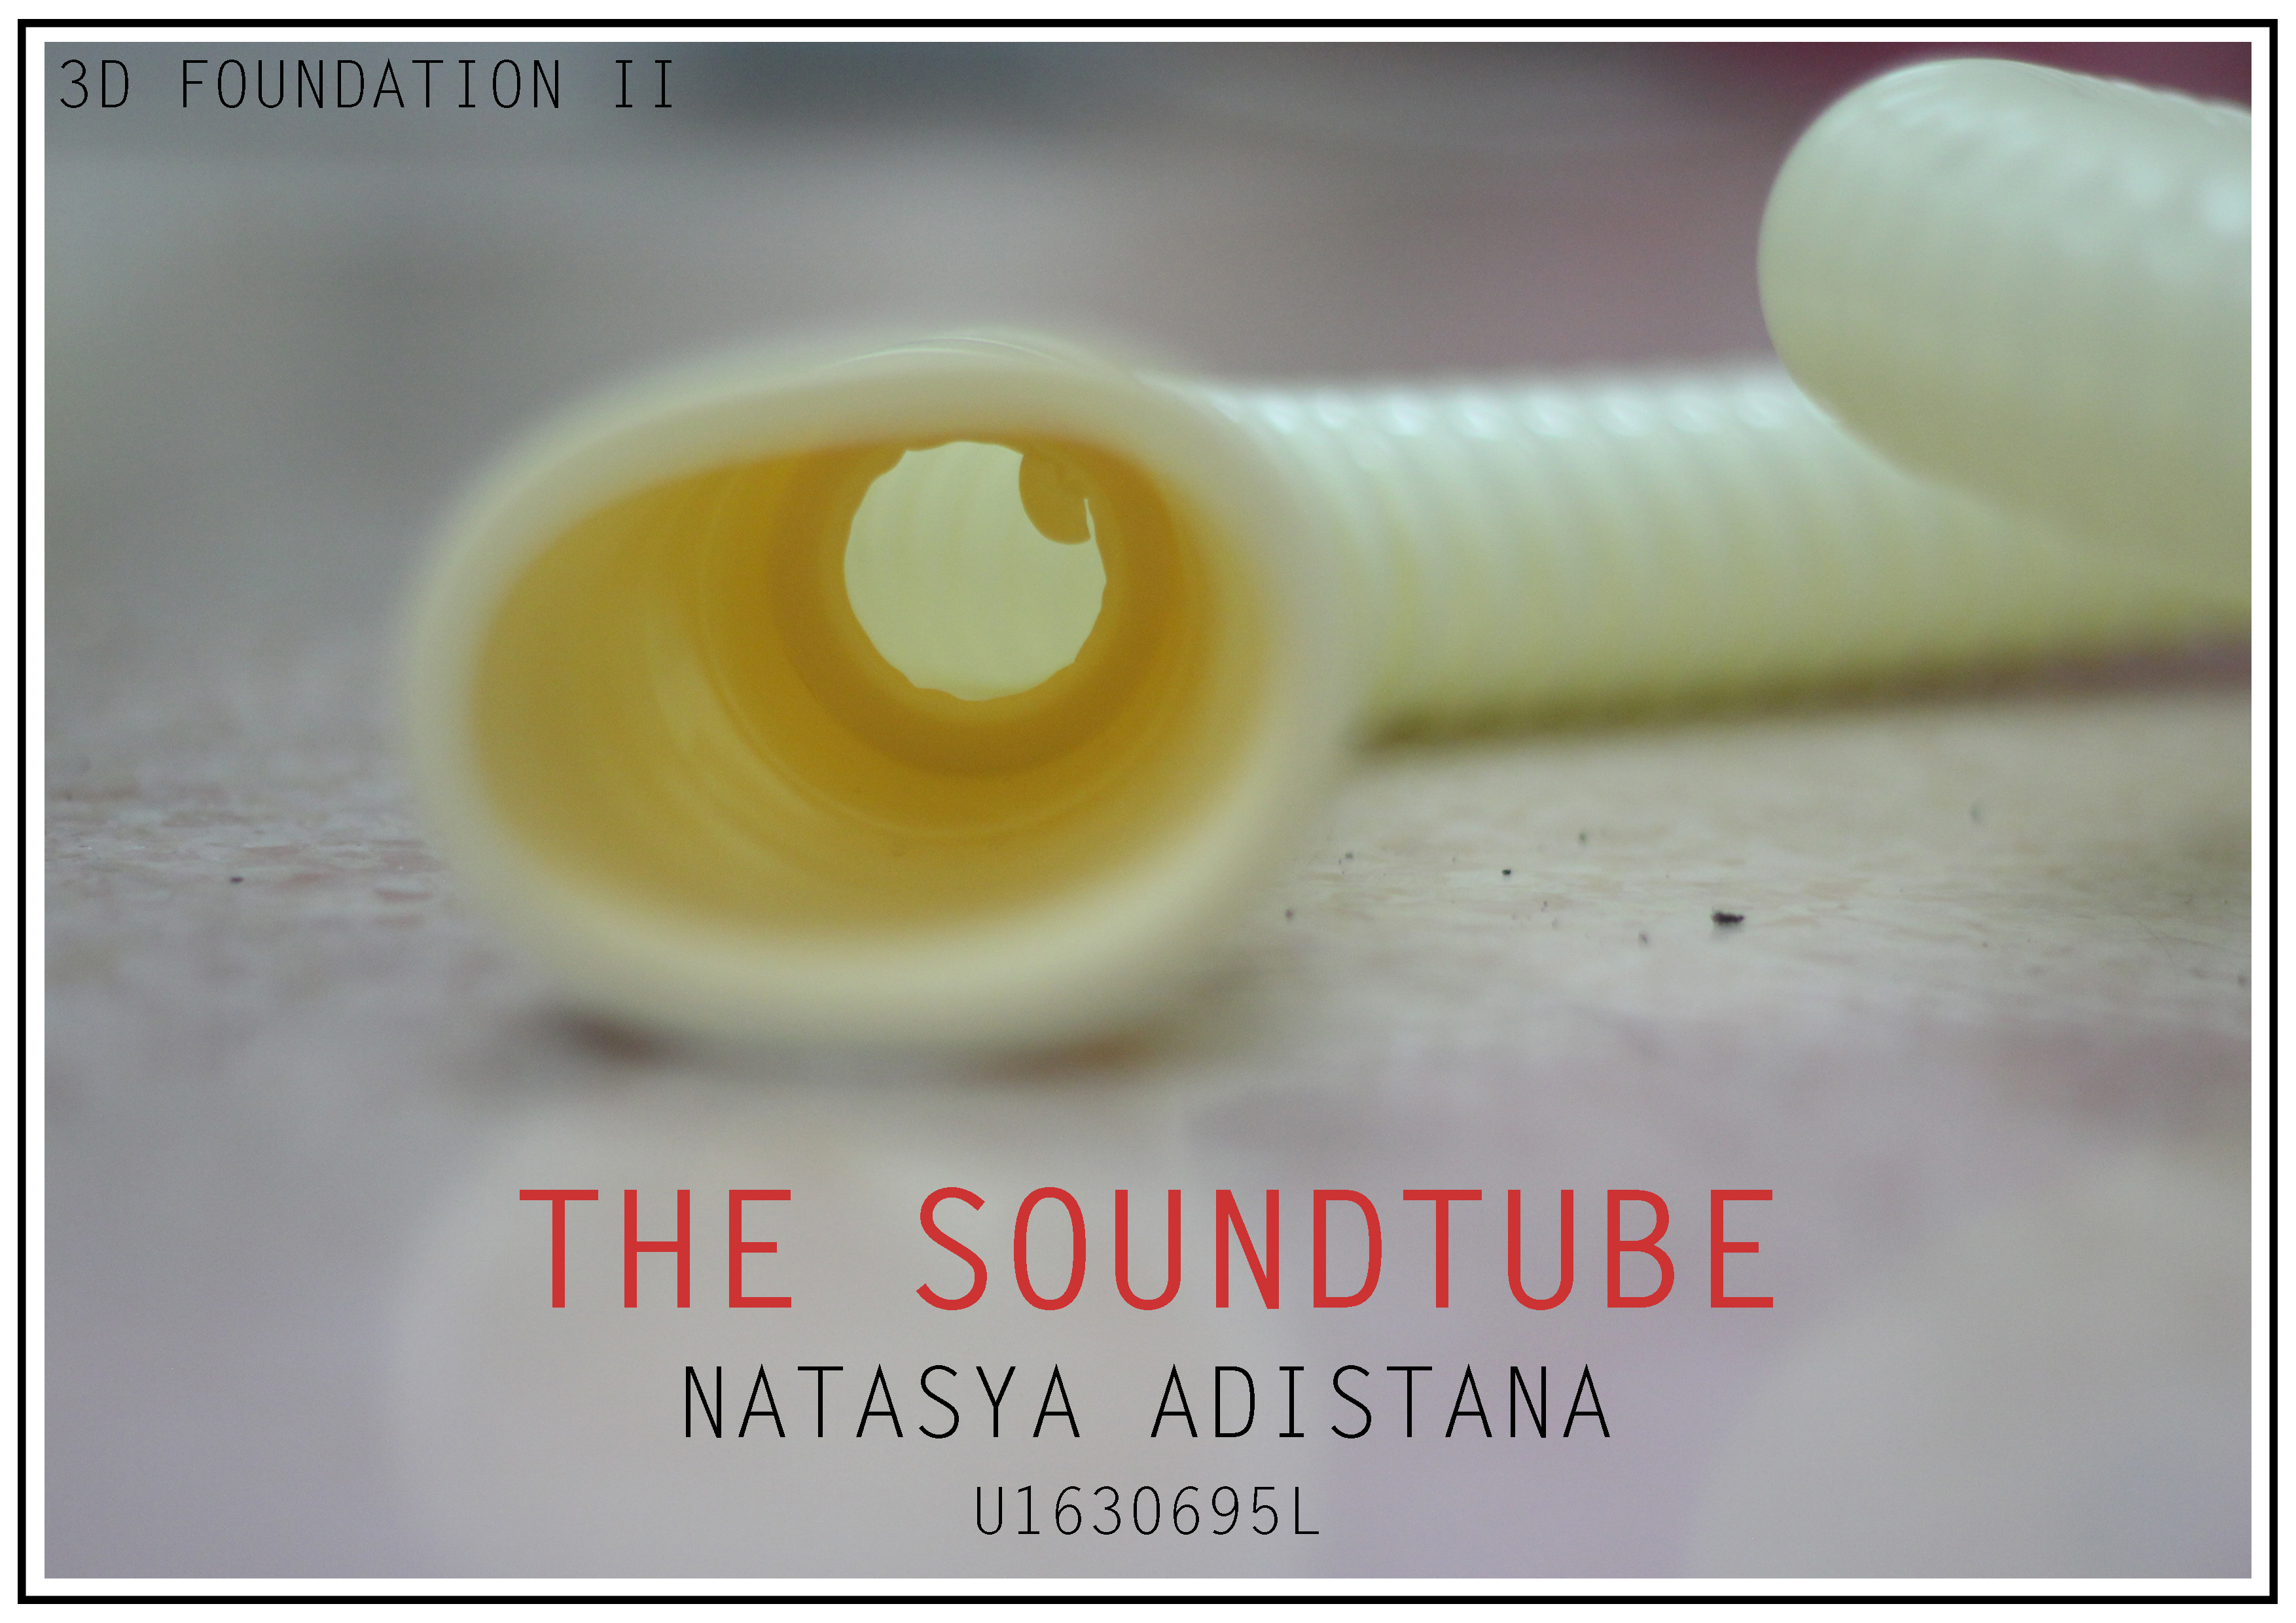
TADAA the Soundtube is created!

C. INNER COMPONENTS

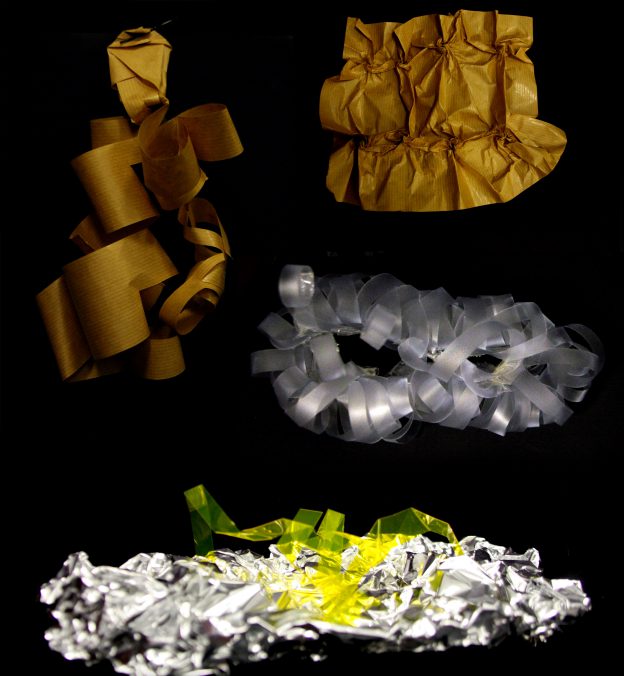
I want to have various type of components made of different type of materials.
Ranging from those creating louder friction sound like coins and macaroni to those creating softer friction sound like foam balls and foam pieces.

D. HOW SOUNDTUBE WORKS

The player rotate the sound creator either to rotate it in one direction or changing the direction repetitively.
When it is rotated, the components inside the sound creator will create sound out of friction. This sound will be reflected in the carton cylinder, changing it’s frequency as the sound becomes deeper and hollower. Afterwards, the sound will further reflected inside the washing machine pipe before being heard by the listener.
The rhythm and beat are adjusted by modifying the tempo of rotation.

E. HOW SOUNDTUBE SOUNDS
(Precaution! Sound recorded are loud! Better lower your computer volume)

At first the plastic case was filled with water.
I expected the sound to be like when I shake the plastic case only:

However after realising that the plastic case kind of dampen the water sound and the rotation create much slower movement than shaking the plastic case (which result in less intense sound being created). The sound became like this:

As the water sound became really soft and almost unheard, I decided to use solid components as the friction sound is louder.

And here is some different experiments on sound recording of the Soundtube!

Finally, out of curiosity, I put in my phone inside the whole sound creator and set an alarm and recorded the sounds.

Conclusions:

  • Switching the components between part 1 and part 3 caused differences! (most likely only when it has loud friction sound component i.e. no affect when both are soft friction sound components)
  • Adding components increased the intensity of the sound to a certain extent only i.e. the addition of component is not proportional to the increase of intensity (most likely because the surface area is already full of components and the speed of rotation is slow)
  • Using soft friction sound components did not really make the sound softer and dampened (maybe because the chains and wire frictions and part 2 still contributed loud sound)
  • For the alarm, the sound creator only actually amplified sound inside as it is made of metal and reflects sound! And the sound reflectors make the alarm sounds heavier and more further away, it also somehow created a limitation for the pitch of the sound i.e. sound at high pitch is limited and created like ‘echo-y’ effect (the sound reflectors really changed and texturised the initial sound!)

Thank you!


3D Project 2
Research: Hearing and Touch
In Class: Sound Fabrics and Soundscape
Inspiration and Process: Sound Texturizer Trial and Error
Final: THE SOUNDTUBE

3D_002_Final: THE SOUNDTUBE

Hi!

Here is the the final sound texturizer: THE SOUNDTUBE and its possible applications!
For PDF version: 002_NATASYA

I learnt to experiment a lot during this exercise! It was actually fascinating to try out different sounds 😀
I liked how it turned out to be really customizable.

An improvement I could do is to change the carton cylinder into PVC type or even metal cylinder so as to minimize the sound dampening and get a more echo-y sound. I imagined it to have an even more hollow and crisp sound. Then maybe the effect of the plug might be more obvious.
Another thing might be to change the method of creating sound by rotating to shaking the tube. Shaking might create a more intense and interesting sound instead of the plain rotation. Moreover, if I keep the idea of water inside, shaking it might allow the water sound to be heard more clearly.

Well, it was fun 😀
Will post the process and ideation real soon!

P.S. I was really scared that the texturizer will get confiscated at the airport as I bring them as hand carry, it has a lot of sharp wires and other metal elements! (I planned to do some updates at home but couldn’t find the time, sorry:( ). But good thing it didn’t get confiscated and I still have it with me now :’)


3D Project 2
Research: Hearing and Touch
In Class: Sound Fabrics and Soundscape
Inspiration and Process: Sound Texturizer Trial and Error
Final: THE SOUNDTUBE

3D_002_In_Class: Sound Fabrics and Soundscape

Hi!

A soundscape is a sound or combination of sounds that forms or arises from an immersive environment.

Part 1: In class Activity – Sound Fabric

During the in class activity, we listened to some sound and used the brown paper to express it in 3D form, sound fabric.

Pleasant sound: ADM Water Fountain

This sound is pleasant for me as it is somehow calming and give me the feeling of a japanese onsen and mountain area. So relaxing.

Peasant - ADM Water Fountain Sound Fabric
Pleasant Sound – ADM Water Fountain Sound Fabric

For me each water drop feels like it is in the shape of a line being curled (spiral) as it falls on another water surface.

spiral
spiral

I also feel like there are two significant water sound:
-the dominant one with lower pitch and heavier feeling
-the much less dominant with higher pitch and lower intensity

As such, I separate it into two main part (with roughly same overall size to say that both are equally important. One has thicker width representing the one with heavier feeling and the other has thinner width representing the lower intensity. Both has the same principle of spiral as each sound shaped like that in my mind.

The shape is being hung and the composition looks like it has a movement from up to down, representing the ‘fall’ of the water.

Unpleasant sound: Buzzer alarm

This sound is unpleasant for me as it is the sound of my annoying alarm. It really gives me the cringe and feels like each buzz is pierced through my hearing.

Unpleasant Sound - Buzzer Alarm
Unpleasant Sound – Buzzer Alarm Sound Fabric

So the twirl and pointy part represent the annoying and endless cringe of me whilelistening to that alarm. Each twirl represents one buzz and it is being twisted as it sounds like my hearing is being crumpled by it. I put them at constant distance as the duration between each buzz is constant. Also, the shape is a closed square showing that the buzz is enclosed and keep on repeating endlessly.

Part 2: Soundscapes

After the lesson, we were asked to create two A4 size soundscapes for two soundscape (can be different from in class activity).

Pleasant sound: ADM Water Fountain (same as previous part)

I decided to use the same sound as somehow, I like it more as I listen more to it. And somehow the sound sounds like the rain sound while I am inside a car/ room. It reminds me of my hometown, Bandung and childhood when I was inside a car and it was raining. It’s like being inside a warm and comforting place, feeling secure even though it was raining outside.

sdfs
Pleasant Sound – ADM Water Fountain Soundscape

I decide to use that thick plastic material that has a kinda neutral pitch with a quite heavy sound as previously I wanted to use thin plastic (the sound is too high pitch) or paper (the sound too light).

Still keeping the concept of the spiral, I cut all part to lines and spiral it. Then I connect both end to create an enclosed shape which represent the endless loop of the water as long as the fountain is turned on.

Unpleasant sound: Rolling Chair

This sound is unpleasant as it is quite annoying. Somehow when I listen to it, I picture myself studying/doing project in a room and there is someone who keeps on rolling the chair, disturbing my concentration.

2
Unpleasant Sound – Rolling Chair Soundscape

The sound of the rolling chair gives the sound of heavy friction between the wheel and surface. As such I used crumpled alumunium foil to show the uneven sound and friction. I chose this material as it has the friction with heavy feeling if i move my hand brushing through it.

And then there is the ‘ngik ngik’ squeaking  sound from the chair. This sound is not so significant hence it is only represented by small strip of transparent colored paper being folded into random direction unevenly (as the ‘ngik’ sound is uneven and irregular. I chose the material as the ‘ngik’ sound was clear and the color is not so dominating and can blend with the foil.

It was actually a fun activity for me as I have to try new things and use my imagination. Some sound evokes random memory while some just sound like a common sound with not much significant memory :D.


3D Project 2
Research: Hearing and Touch
In Class: Sound Fabrics and Soundscape
Inspiration and Process: Sound Texturizer Trial and Error
Final: THE SOUNDTUBE

3D_004B: Group A’s Final Mood Box and Obscure City of Kirithra

Together with Gloria and Gerald, we managed to finally create our final mood box and final model of our city: Kirithra!

whatsapp-image-2016-11-11-at-1-08-15-pm

Here is the combined sound file (variation 1 to variation 2) :

Here is the our Mood box and Final Model! (click g7_a_004b for pdf version) 😀

g7_a_004b2-page-002 g7_a_004b2-page-003 g7_a_004b2-page-004 g7_a_004b2-page-005 g7_a_004b2-page-006 g7_a_004b2-page-007 g7_a_004b2-page-008 g7_a_004b2-page-009 g7_a_004b2-page-010 g7_a_004b2-page-011 g7_a_004b2-page-012 g7_a_004b2-page-013 g7_a_004b2-page-014 g7_a_004b2-page-015 g7_a_004b2-page-016 g7_a_004b2-page-017 g7_a_004b2-page-018

VOILA! So that was it! Hope you enjoy and learn something from it. This will be my last post on the bitter sweet journey of 3D Foundation I. Thanks for reading! :’)

3D_004A: Group A Individual Mood Box (PDF)

Hi!laughing

So for this project I am in the same group with Gloria and Gerald, basically we are to come up with 3 things:

  1. Sound
  2. Mood Box
  3. Obscure City

Here is our 2 sound variations:

Variation 1: Egg Shaker (D), Finger Cymbals (SD), Rhythm Sticks (SO)

Variation 2: Rhythm Sticks (D), Egg Shaker (SD), Finger Cymbals (SO)


So, based on the sounds, each of us created our individual Mood Box (it is how we personally interpret the sound and create it into a 3D).

Here is our personal sound interpretation and Mood Box (click g7_a_004a for PDF version):


g7_a_004a-page-002 g7_a_004a-page-003 g7_a_004a-page-004 g7_a_004a-page-005g7_a_004a-page-006 g7_a_004a-page-007 g7_a_004a-page-008 g7_a_004a-page-009g7_a_004a-page-010 g7_a_004a-page-011 g7_a_004a-page-012

Thanks for reading! Our group Mood Box and Obscure City are coming soon!  laughing

3D_003B: The Final Model and Applications

Hi!

Following up the previous 3D post about individual model, group B revised and revised and finally came up with our submission for 3D Final Model and PDF.

Here is some photo taken of the final model:

Artcard Model Front VIew
Artcard Model Top View
Application Model Front View - Bright
Application Model Front View – Bright
Application Model Front - Dark
Application Model Front – Dark
Application Model - Shadow
Application Model – Shadow

Then we decided to make the model neater:

1jpg
Updated application model – Front
Updated application model - Side
Updated application model – Side
Updated application model - Back
Updated application model – Back
Updated application model - Side 2
Updated application model – Side 2
Updated application model - Shadow
Updated application model – Shadow
Updated application model - Shadow 2
Updated application model – Shadow 2

Here is some photos of us preparing for the Application Model:

whatsapp-image-2016-10-07-at-9-25-18-pm
Tools and Materials

20161006_213202 20161006_213159 20161006_213139

Here is our PDF:

PDF cover page
PDF cover page
PDF page 1: Original model
PDF page 2: Individual model inspired by original model
PDF page 3: Final model and analysis
PDF page 4: Application #1
PDF page 4: Application 1
PDF page 5: Application 2 and 3

The PDF format can be opened here: g7_b_003 !

Thank you for reading 😀

20161006_213121
Thanks guys! We did it !! 😀

3D_003B: The 3 Individual Models and Combined Final Model

Hi!

So below is group B (Candy, Najiha, Natasya) members’ individual model for the simplified version of our Peacock Model.

Individual Models

legend

Candy's Model
Candy’s Model
Najihah's Model
Najiha’s Model
Natasya's Model
Natasya’s Model

Final Model

For our final model, we decided to combine all three models. The Dominant is taken from Candy’s D, Sub-Dominant of Natasya’s SD and Subordinate of Najiha’s SO.

This is roughly how it will look like followed by the improvements we will do when we make the final model.

Group B Final Model First Sketch
Group B final model sketch

Dominant: A curved plane from Candy’s D.
Comment: It is not so dominating as the cluster of activity from SD and SO occupy almost half of the area and because D is vertically the shortest also.
Improvement: We will make the D a lot bigger (vertically) so that the cluster of activity will only occur at the right one-third area. Also, it will increase the void and make D more interesting. Also, maybe we can adjust the shape of the part that touch the base to the be more pointy so that it act like a tripod instead of being a wall.

Sub-Dominant: A broken plane from Natasya’s SD, some part pierced through D.
Comment: From above, the SD may look like from the same family as SO
Improvement: We will adjust the SD to have more presence than SO from top view. Also, to make SD more interesting, more part can be pierced through D.

Subordinate: A bent plane from Najiha’s SO, pierced through D at the middle and cut to at the top part to keep the signature from the Peacock Model.
Comment: It has an interesting shape that cut the D void. However piercing it at half making it looks common.
Improvement: We will adjust the positioning of SO to make one-third only being pierced instead of half.

Final Model Application #1: The Seats that Float

3b-nyala
The Seats that Float

It is a 2 level night outdoor movie screening exhibition.

The Dominant is used as the main building as well as the screen for level 1. The people who watch in level one is watching in a picnic style (seating on a mat on grass field).

While the Sub-Dominant is for staircase to go to level 2 as well as screen for the VIP Screening at level 2.

Lastly, the Subordinate has two part. the bottom part is for the VIP seating which is open for everyone but has limited space. The other part is VIP Seat Availability Indicator. Basically the LED light will turn on when the seat in VIP Area is occupied. It is to indicate to people outside whether there is still space in VIP Area.

Seat Availability Indicator

Proposed Materials

For real application, Dominant  is made of straws, inspired by an exhibition at National Museum in 2013.

img-20160930-wa0005
The Exhibition building that inspires us

For the model, we are using wire as the skeleton, covered by a piece of burlap.

dscn1382
Burlap

For the Sub-Dominant, the real application is  made of glass treads with a multiple colors LED lighting, preferably dark colour.

contemporary-property-turkey-15-910x910
Glass treads staircase

While for the model, we are using colorful acetate papers.

55503-0059-2ww-m
Acetate papers

For the Subordinate, the real application is using fully tempered clear glass, like those used for skyscrapers’ skydeck.

The Ledge of Chicago, a skydeck.

And for the model we are using thick a PVC matte sheet.


PVC Matte Sheet
PVC Matte Sheets

Thank you! Really appreciate your comment and feedback 😀

3D_003: In-Class Planar Construction

Hi!

So we were asked to bring an A2 size artcard for the previous 3D class. Then, keeping in mind the D-SD-SO relationship, we were told construct a model without separating any piece out of it. Basically we could cut, fold, etc etc as long as we keep the paper connected. There was a time limit of 30 minutes!

My Model: The Sweet Mountain

Front view of Model
side
Side view of Model
top
Top view of Model

Personally, I really enjoy this exercise as I could explore many interesting and new ways in creating a model. It was fun and free as I could just keep on cutting and folding without having any end-model in mind.

Have a great recess week!

3D_003A: Individual 3D Models and 2D Sketch Analysis

Hi!

So for project 3 we learnt about planar construction. Basically we are using art card to create a model made of 3 strips of different sizes. Keeping the concept of Dominant (D), Sub-Dominant (SD) and Subordinate (SO) (posted here), we aim to obtain a dynamic flow of planar relationships in space. A plane is an element that has surface direction and slant without mass, tupes of plane:

2D Planes (characterized by their axes):
Straight axis plane: The axis moves in a straight line across the plane.
Bent axis plane: The axis moves across the surface of the plane in one direction and then shifts direction.
Curved axis plane: The edges are curved, causing the axis to curve.
Complex axis planes: The axis changes direction (infinitely) but the outer edges of the plane visually “add up” to the course of the movements of the plane.

3D Planes (characterized by their transitions in space):
Curved plane: A simple curved surface where the surface curves into more than one plane but does not twist through its transition .
Broken plane: A plane that bends in space at a hard edge through its transition.
Twisted plane: A plane that twists though its transition, shifting the axis on its surface.
Grouped planes: 3 or more planes create a group movement of gesture

So here is my three 3D Models for this planar construction (side view, top view, other view) :

The 3 Models (front view, top view, other view)

legend

MODEL 1: The Curvy Bridge

Model 1 Sketch
Sketch of Model 1
  • Relationship: D is a curved axis plane, SD is a bent axis plane, and SO is a broken plane
  • Method: SO is wedged to D
  • Comment: The model has a complementary contrast in types of planes. Even though it looks not-so-interesting and heavy (high positive space) if seen from top, the model has a quite remarkable negative space and void shape from front view.
  • Things to improve: From front view, the SD is too thick and vertically too long, making it too dominant from some angle. From top view, the direction of axis of SD and D are not distinct enough, creating some kind of high tension at the top one-third area.
    Also, the area of SO is a bit too much and too dominant.
  • Improvement: From front view, need to make SD thinner to reduce the activity on left side and increase the void to around two-third. Shorten the length of SD to two-third in order to change the axis direction of SD which make SD less dominant and the activity to be at the top one third only (from top view). Shorten the SO until it touches the SD only (front view) and shift it to make a smaller void (top view) with purpose of reducing the presence of SO.
Sketch of improved Model 1

MODEL 2: The Smoky Pipe

Sketch of Model 2
Sketch of Model 2
  • Relationship: D is curved plane, SD is a twisted plane, and SO is a 3D broken plane.
  • Method: SD is pierced through D while SO is pierced and wedged through D.
  • Comment: The D, SD, SO relationship can be clearly seen. The model has good contrast in term of plane shape and proportion.
  • Things to improve: The direction axis between D and SO are very similar. In term of height, the SO occupy two-third, which is too much.
    The same thing happen to SD as well, making it too vertically dominant if seen from front.
  • Improvement: Adjust the shape of SO to change its axis direction which also create an interesting negative space. Shorten bottom part of SO to make it occupy the top one-third only, creating less tension at the bottom part of the model. Cut off the top part of the SD, creating a just nice vertical height for it.
Sketch of improved Model 2

MODEL 3: The Insect

Sketch of Model 3
Sketch of Model 3
  • Relationship: D is a broken plane, SD is a twisted plane, and SO is a twisted plane.
  • Method: SD is pierced through D while SO is pierced and wedged through D.
  • Comment: With contrasting plane shape and proportion, the D, SD, SO relationship is obvious and constant throughout. It also has distinct axis direction, making it looks balanced. The front view really remind me of an insect, which make it the most interesting model for me. From top, I like the negative space the D
  • Things to improve: From front view, the bottom one-third looks quite low, maybe a more vertical negative space can make it more interesting and more alike to an insect feet. Also, the D is not so dominant as it vertically occupy one third only. From top view, the model looks a bit too much positive space and full as it occupy all the area, it lacks of negative space.
  • Improvement: Position the both end of SD closer to make the model higher and vertically has more negative space, this will make the model more interesting. Make the D piece thicker to create a more dominant D. Shift the direction of SO to occupy to leave the left corner area empty, creating a negative space for the model to breathe.
Sketch of improved Model 3

Hope you enjoy the post!