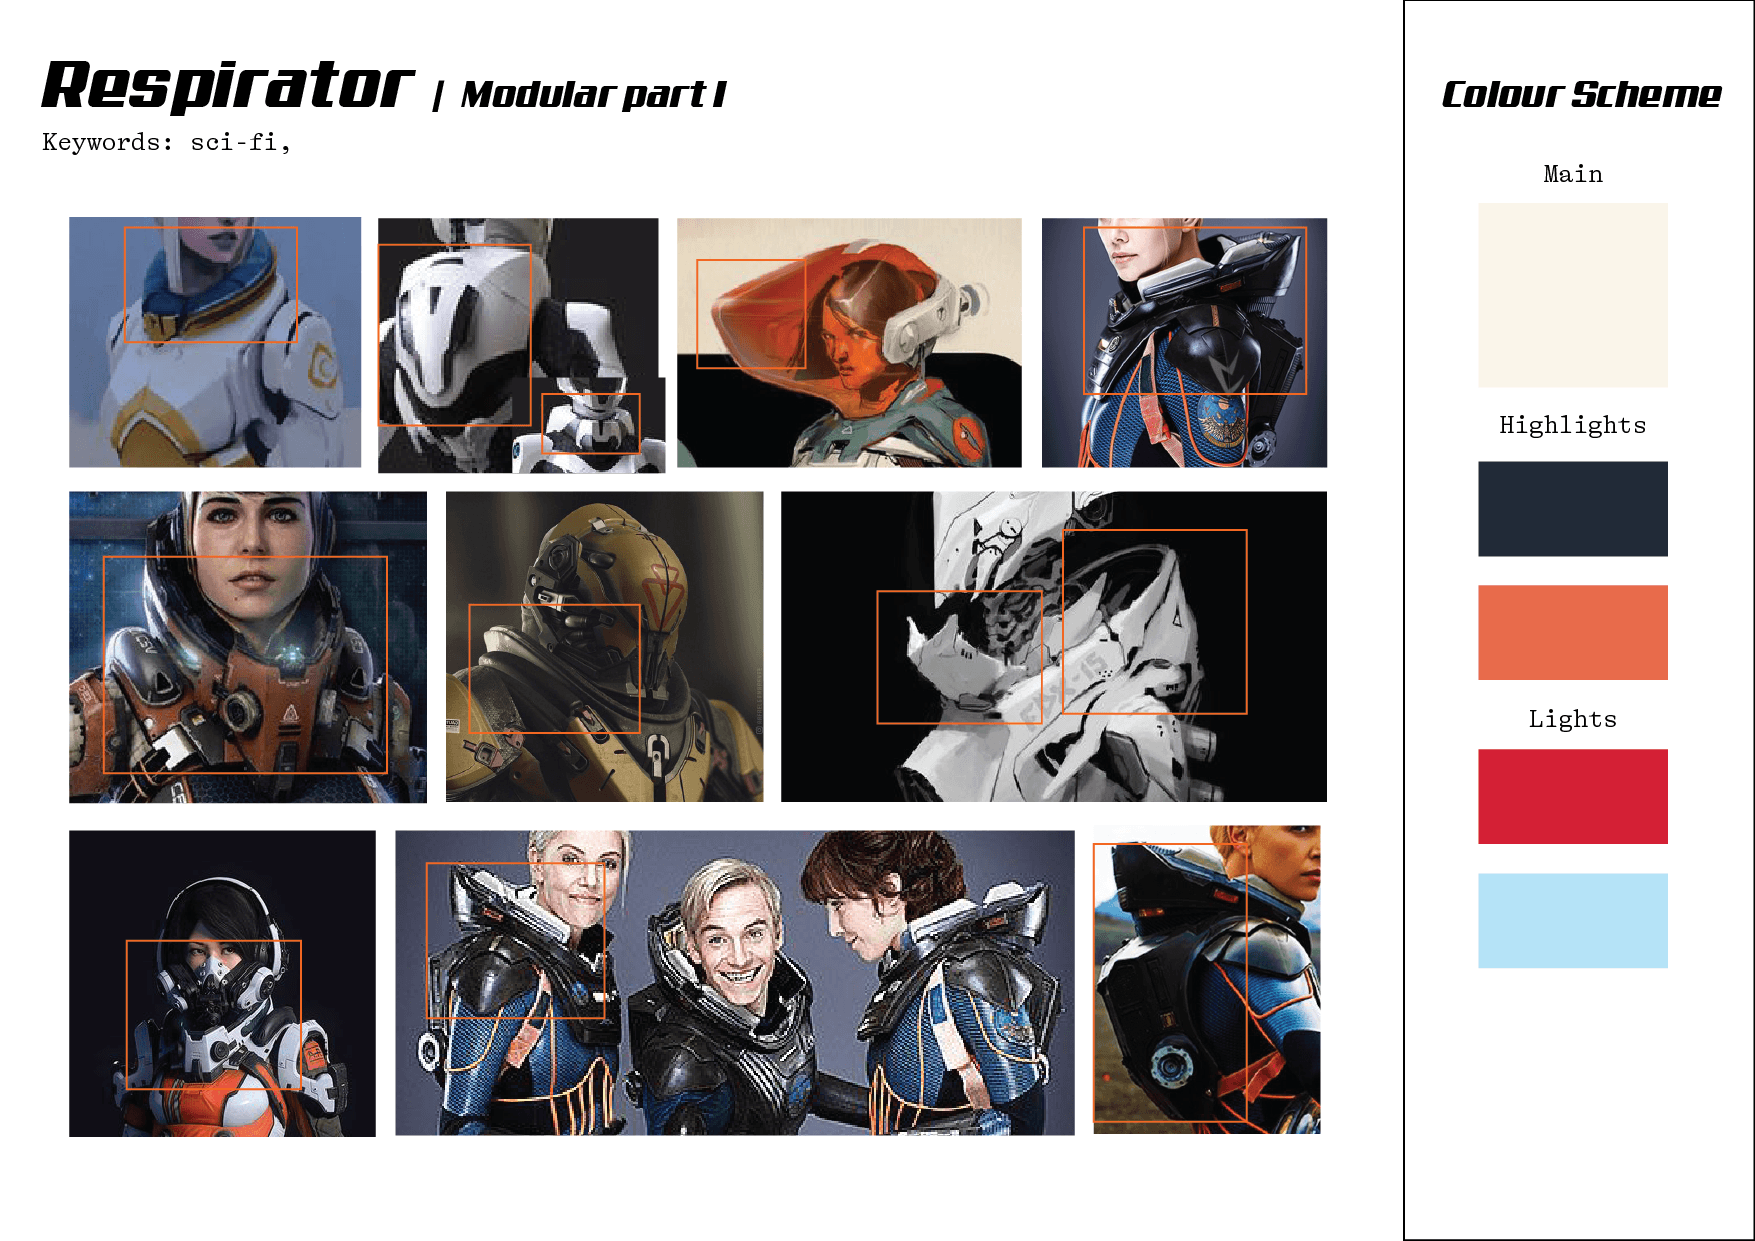
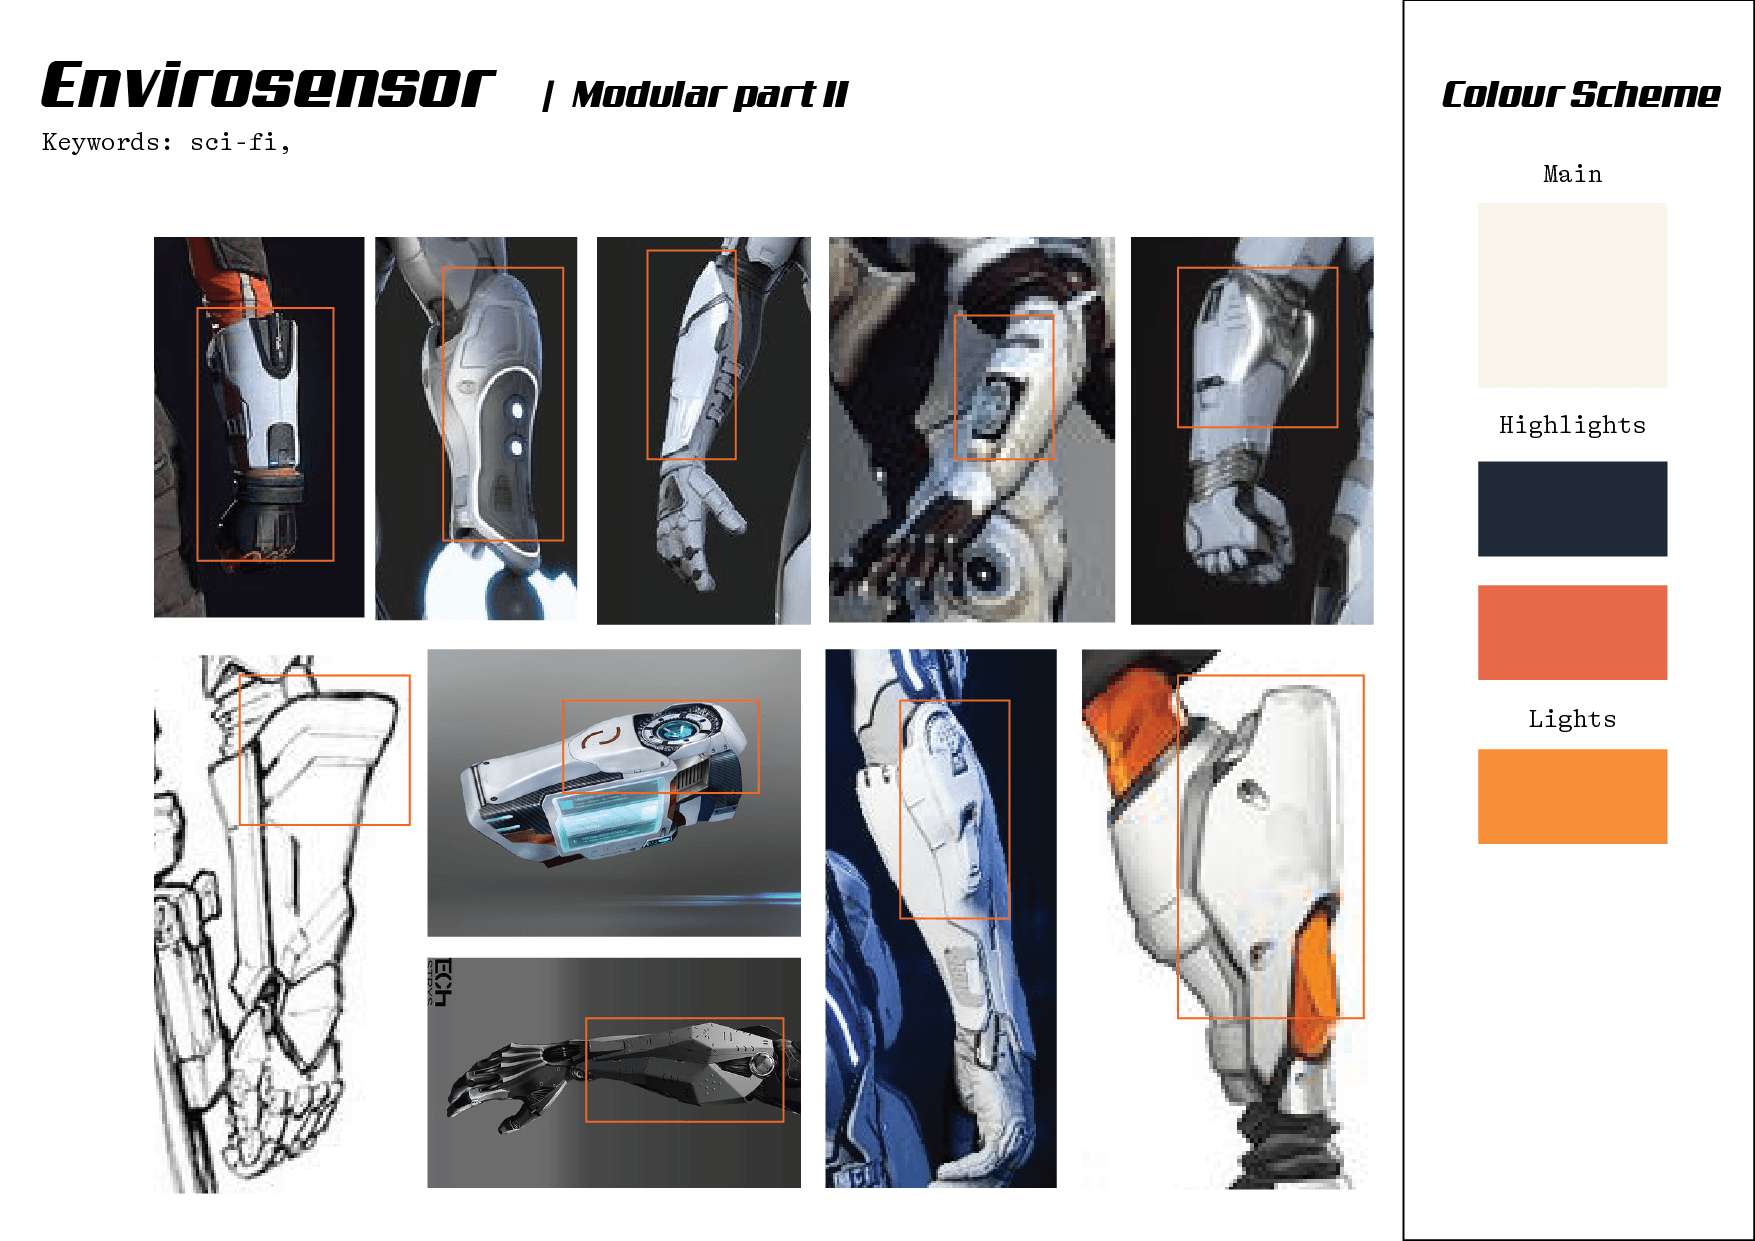
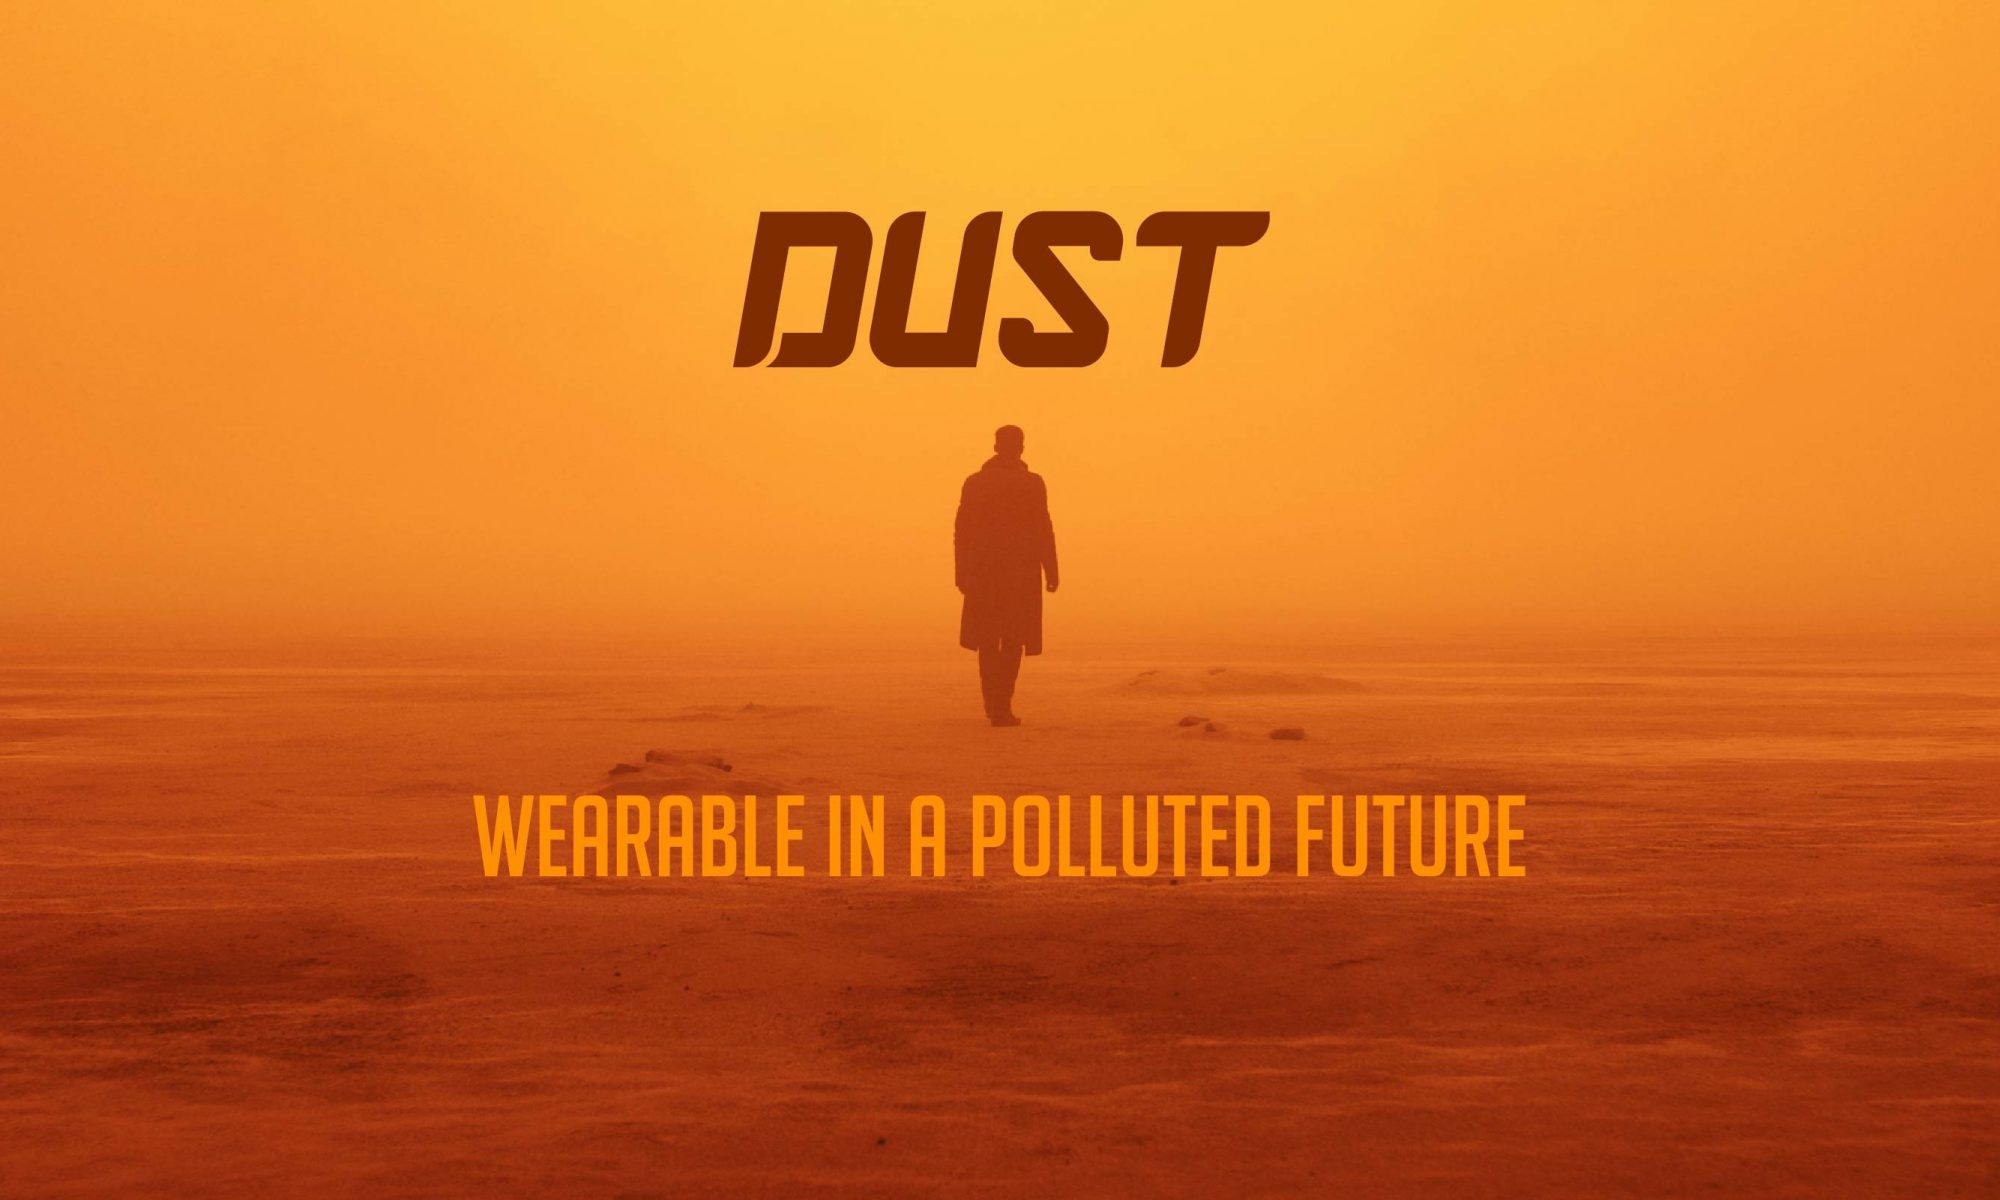
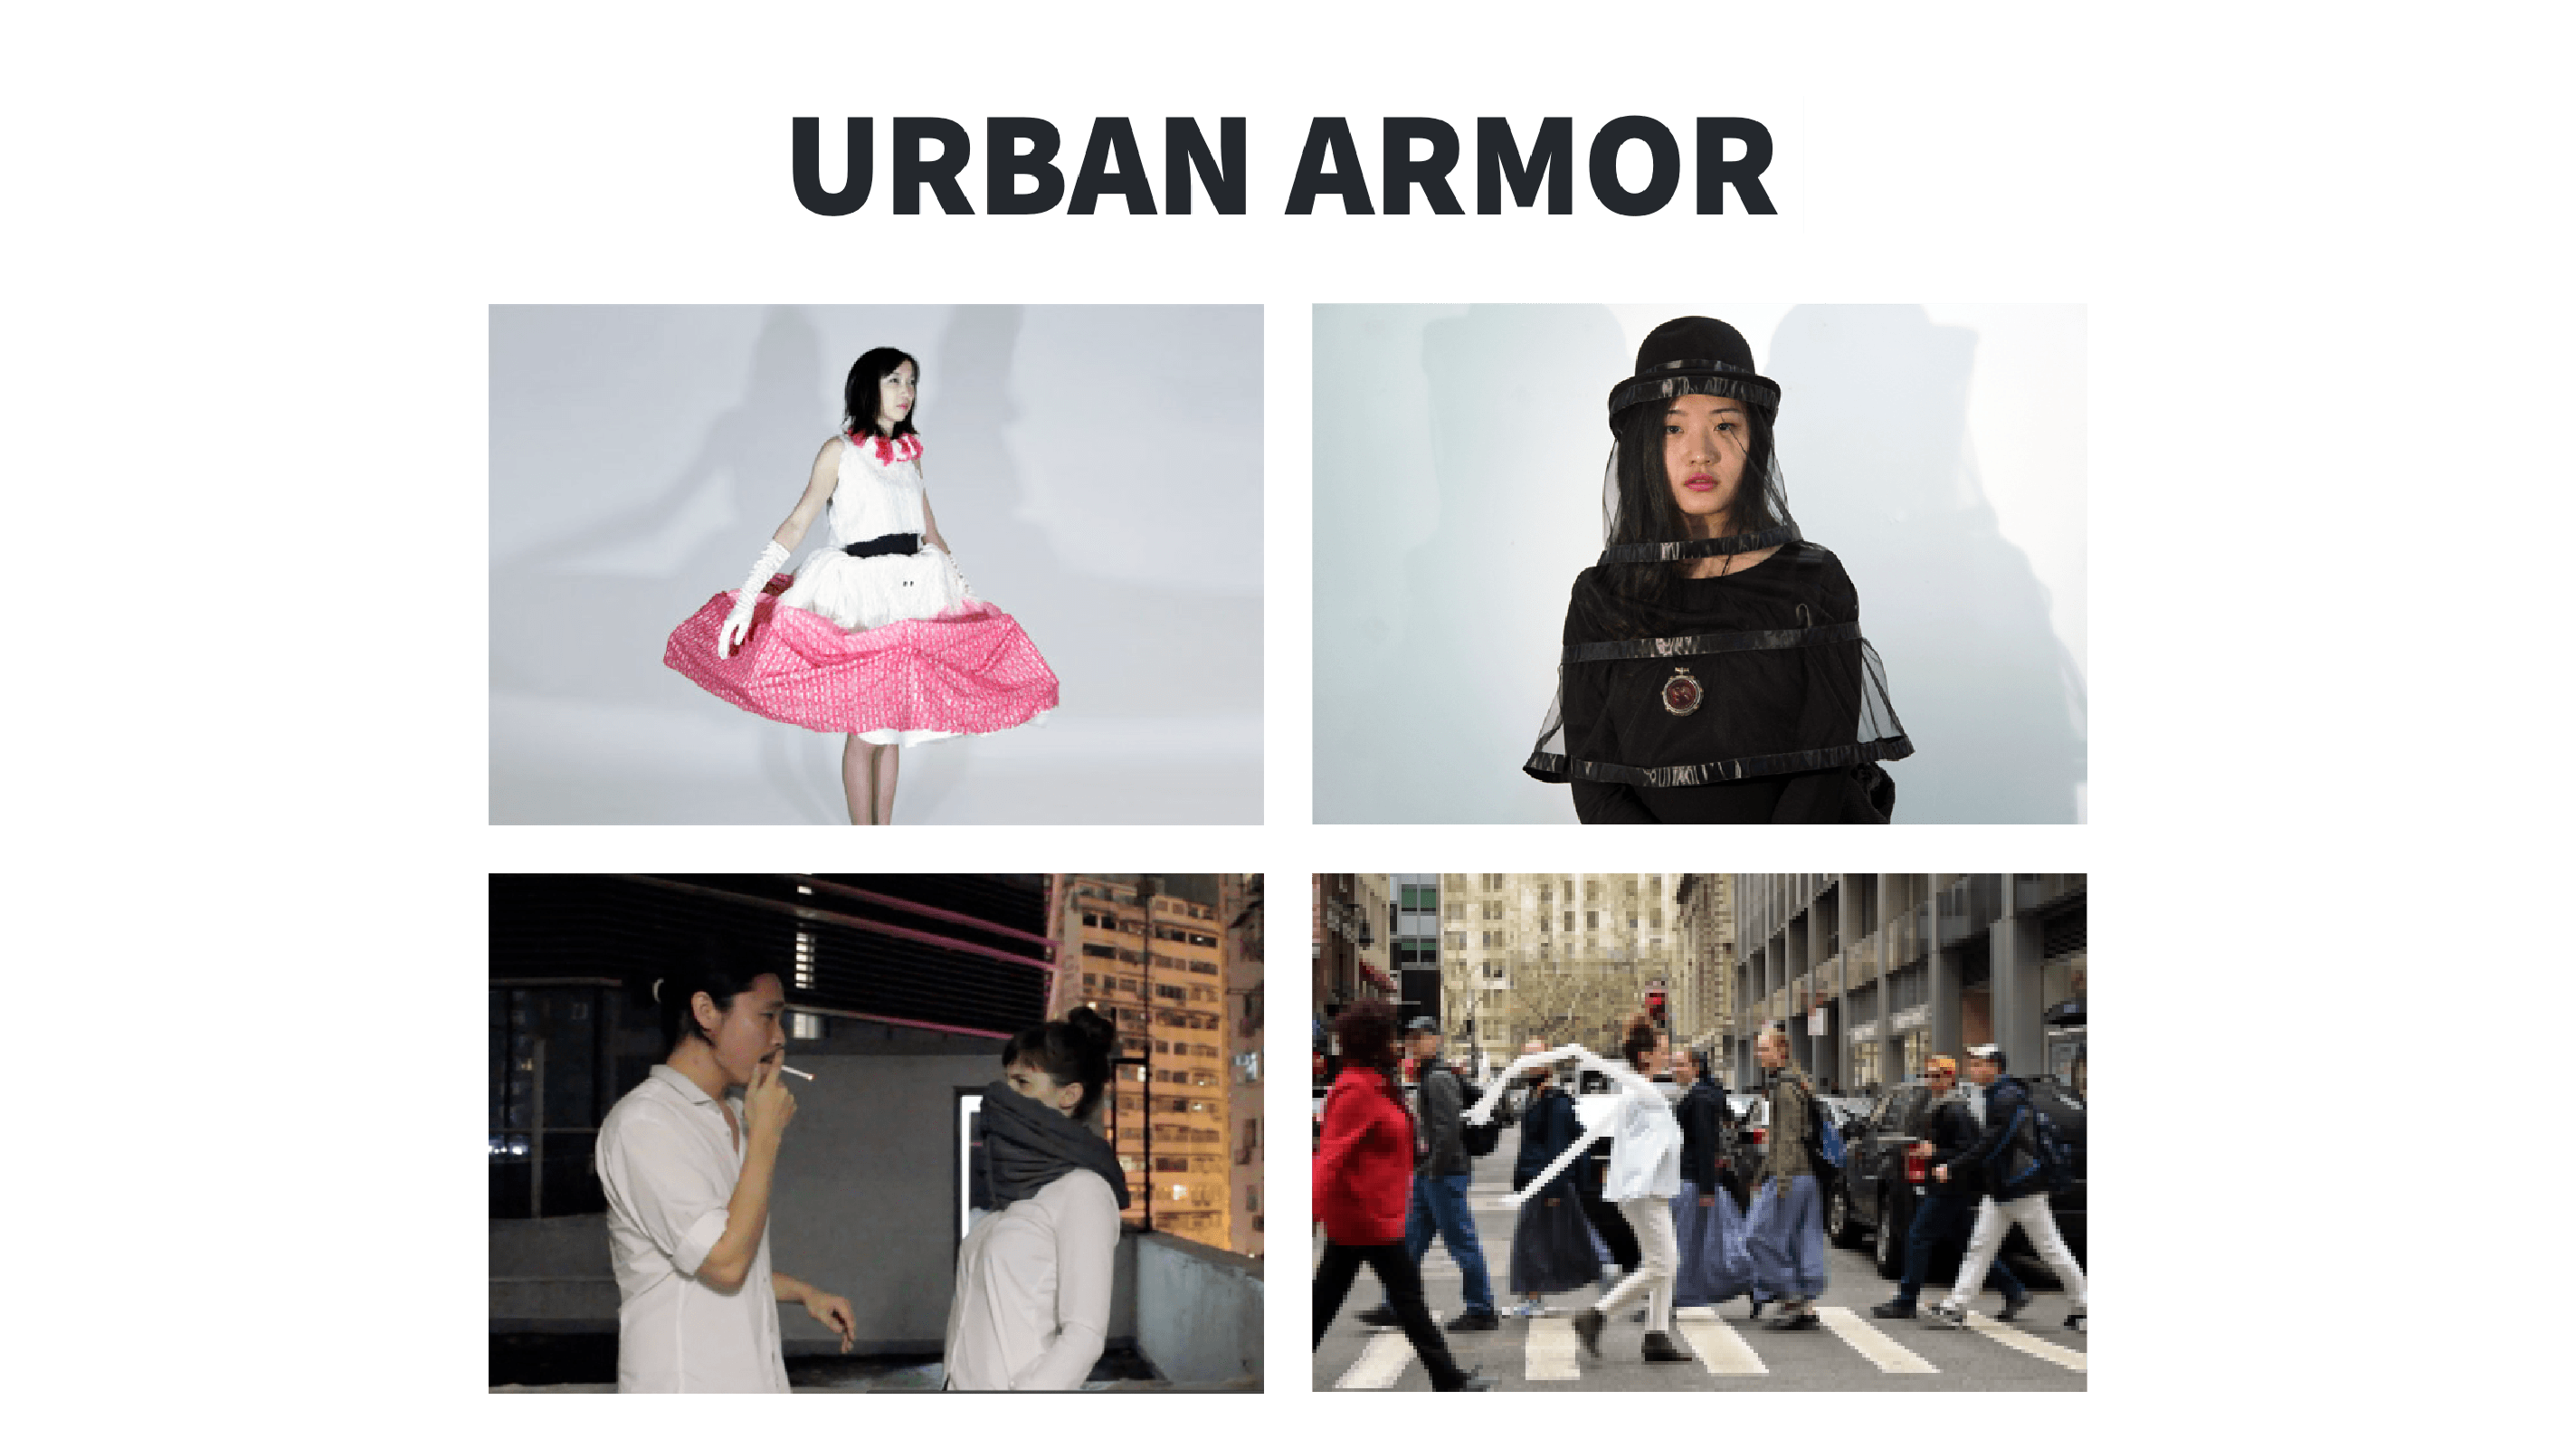
Metropollutan

Metropollutan

Metropollutan is a wordplay on two words “Metropolitan” and “pollutant”, signifying the idea of a citizen in a city surrounded by pollution.

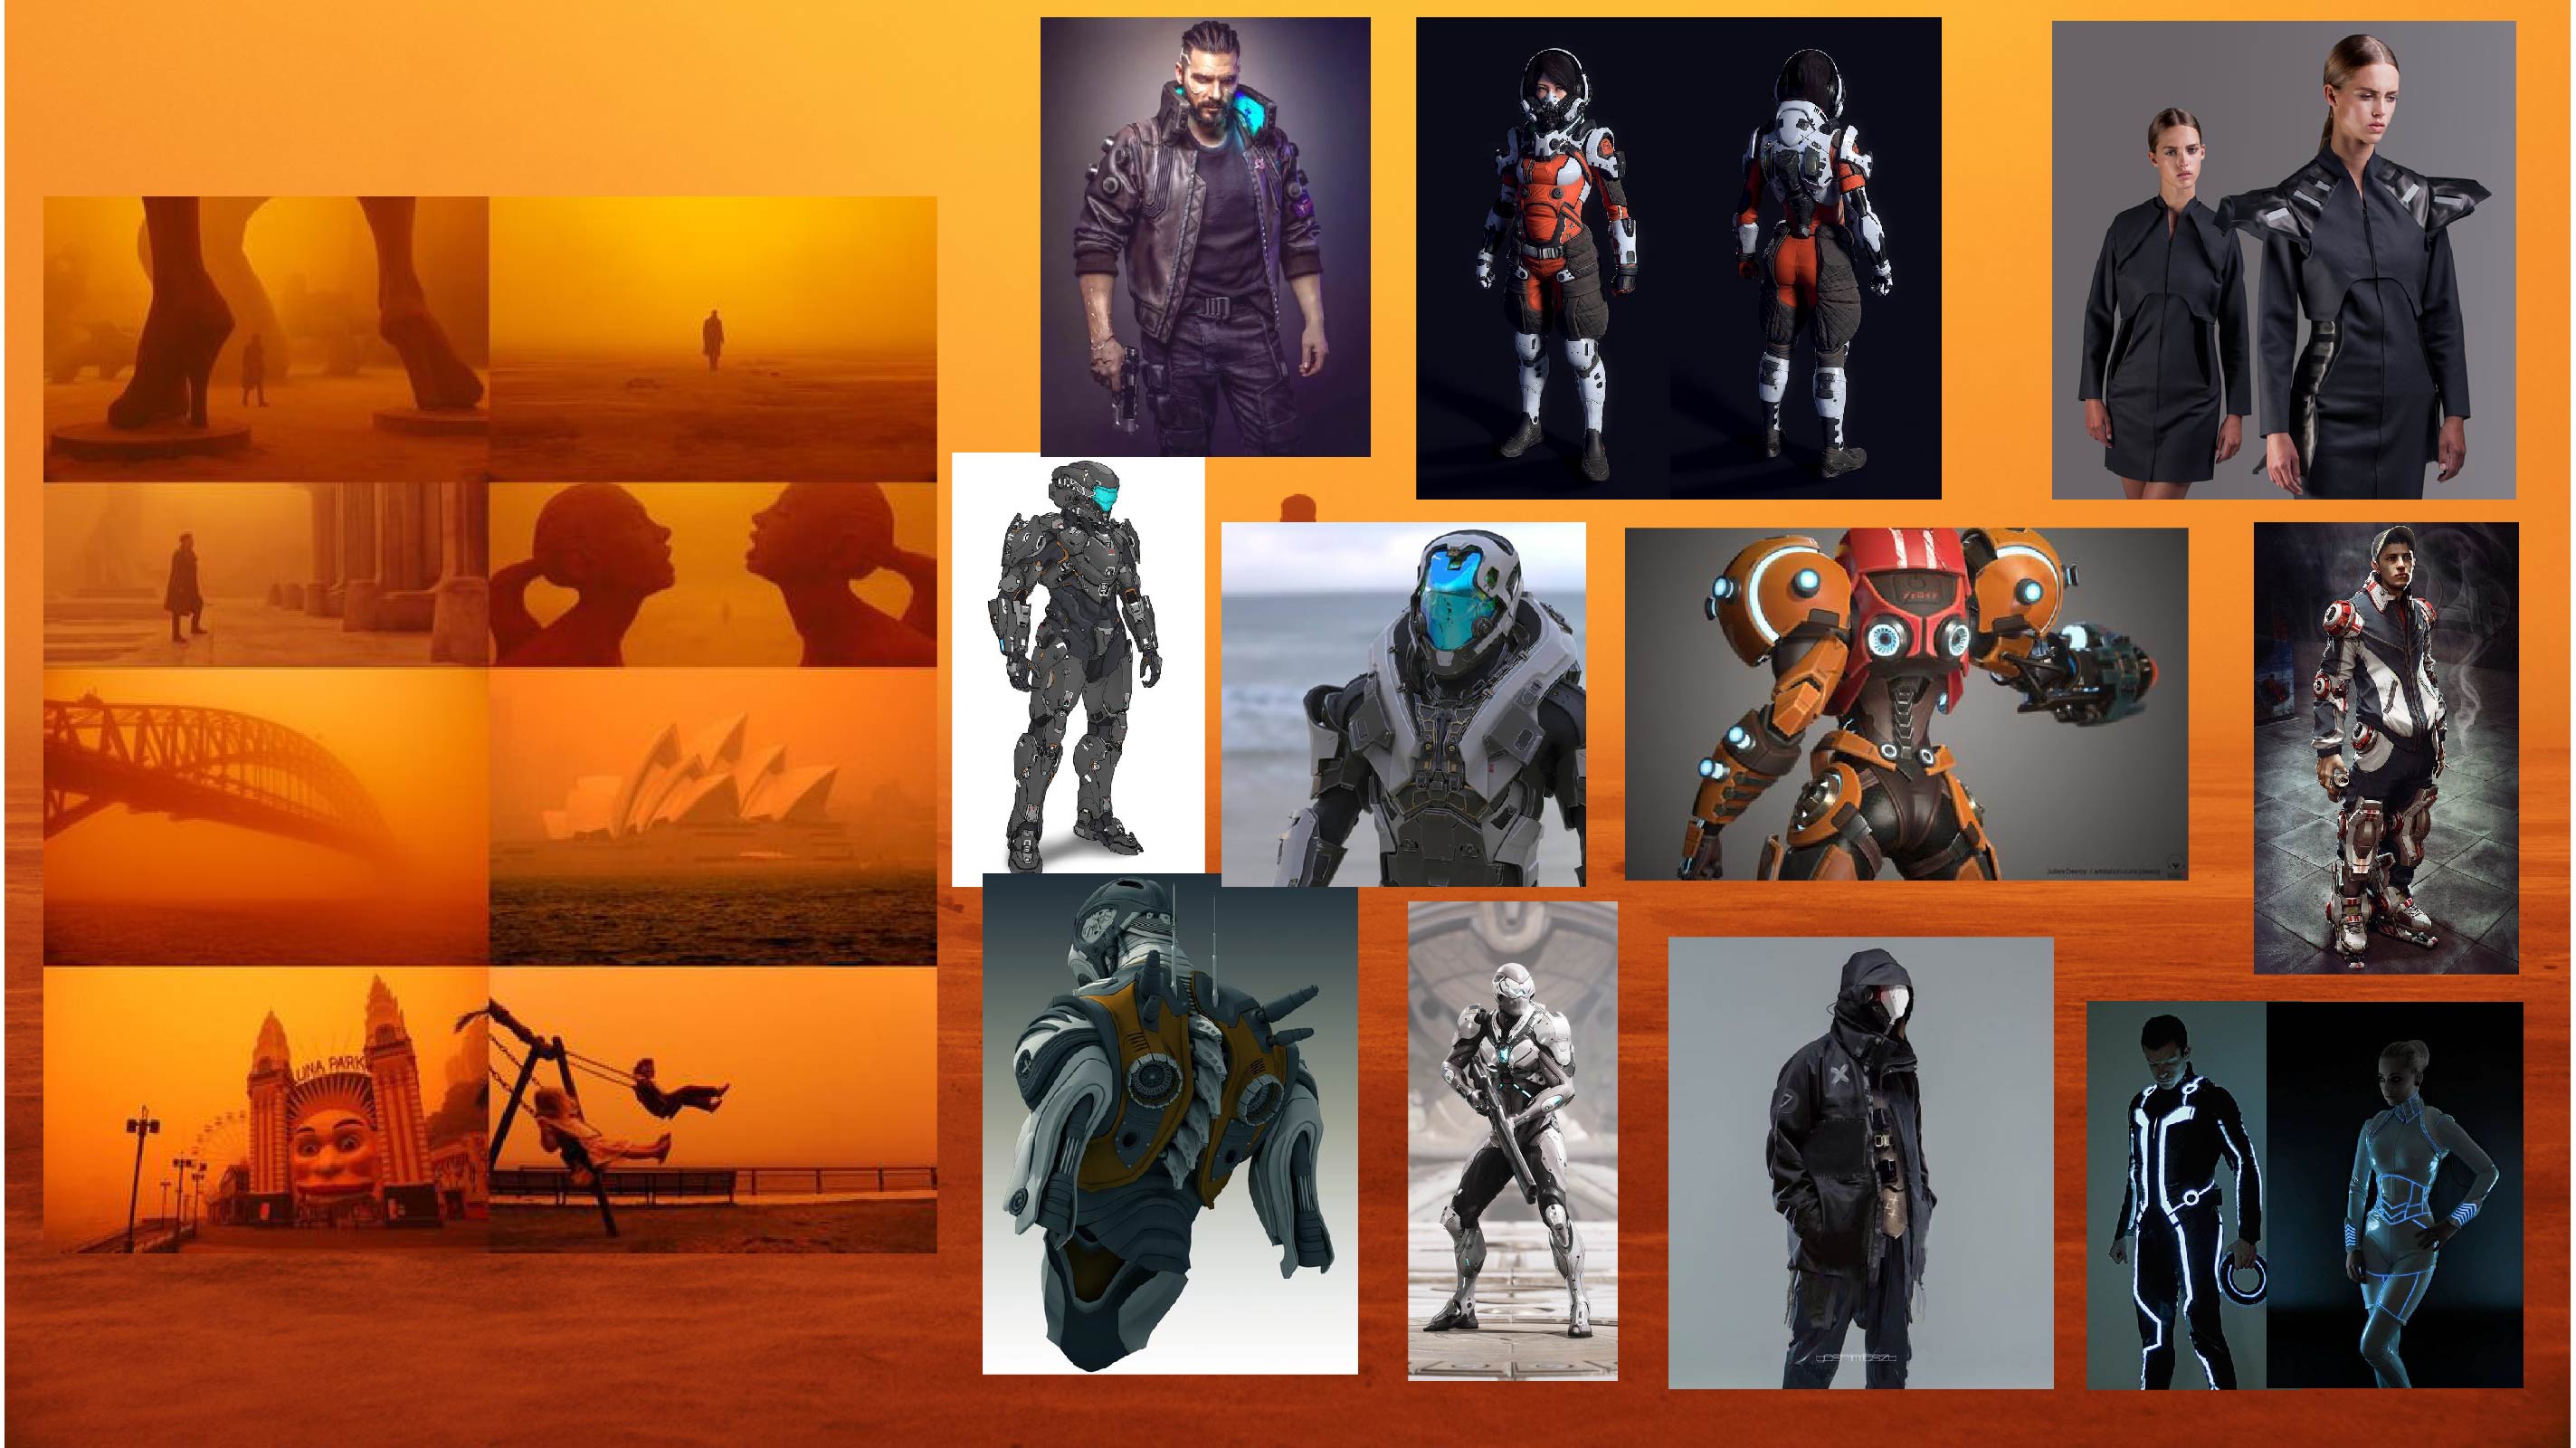
In the distant future, global warming have desertified Earth. Temperatures are always high and dust storms frequently hit urban cities, forcing its population to adapt. The garment is an imaginative reflection of the clothings that people in this dystopian future wear, referencing elements from desert wear and the clothings from Cyberpunk genre in Science Fiction.

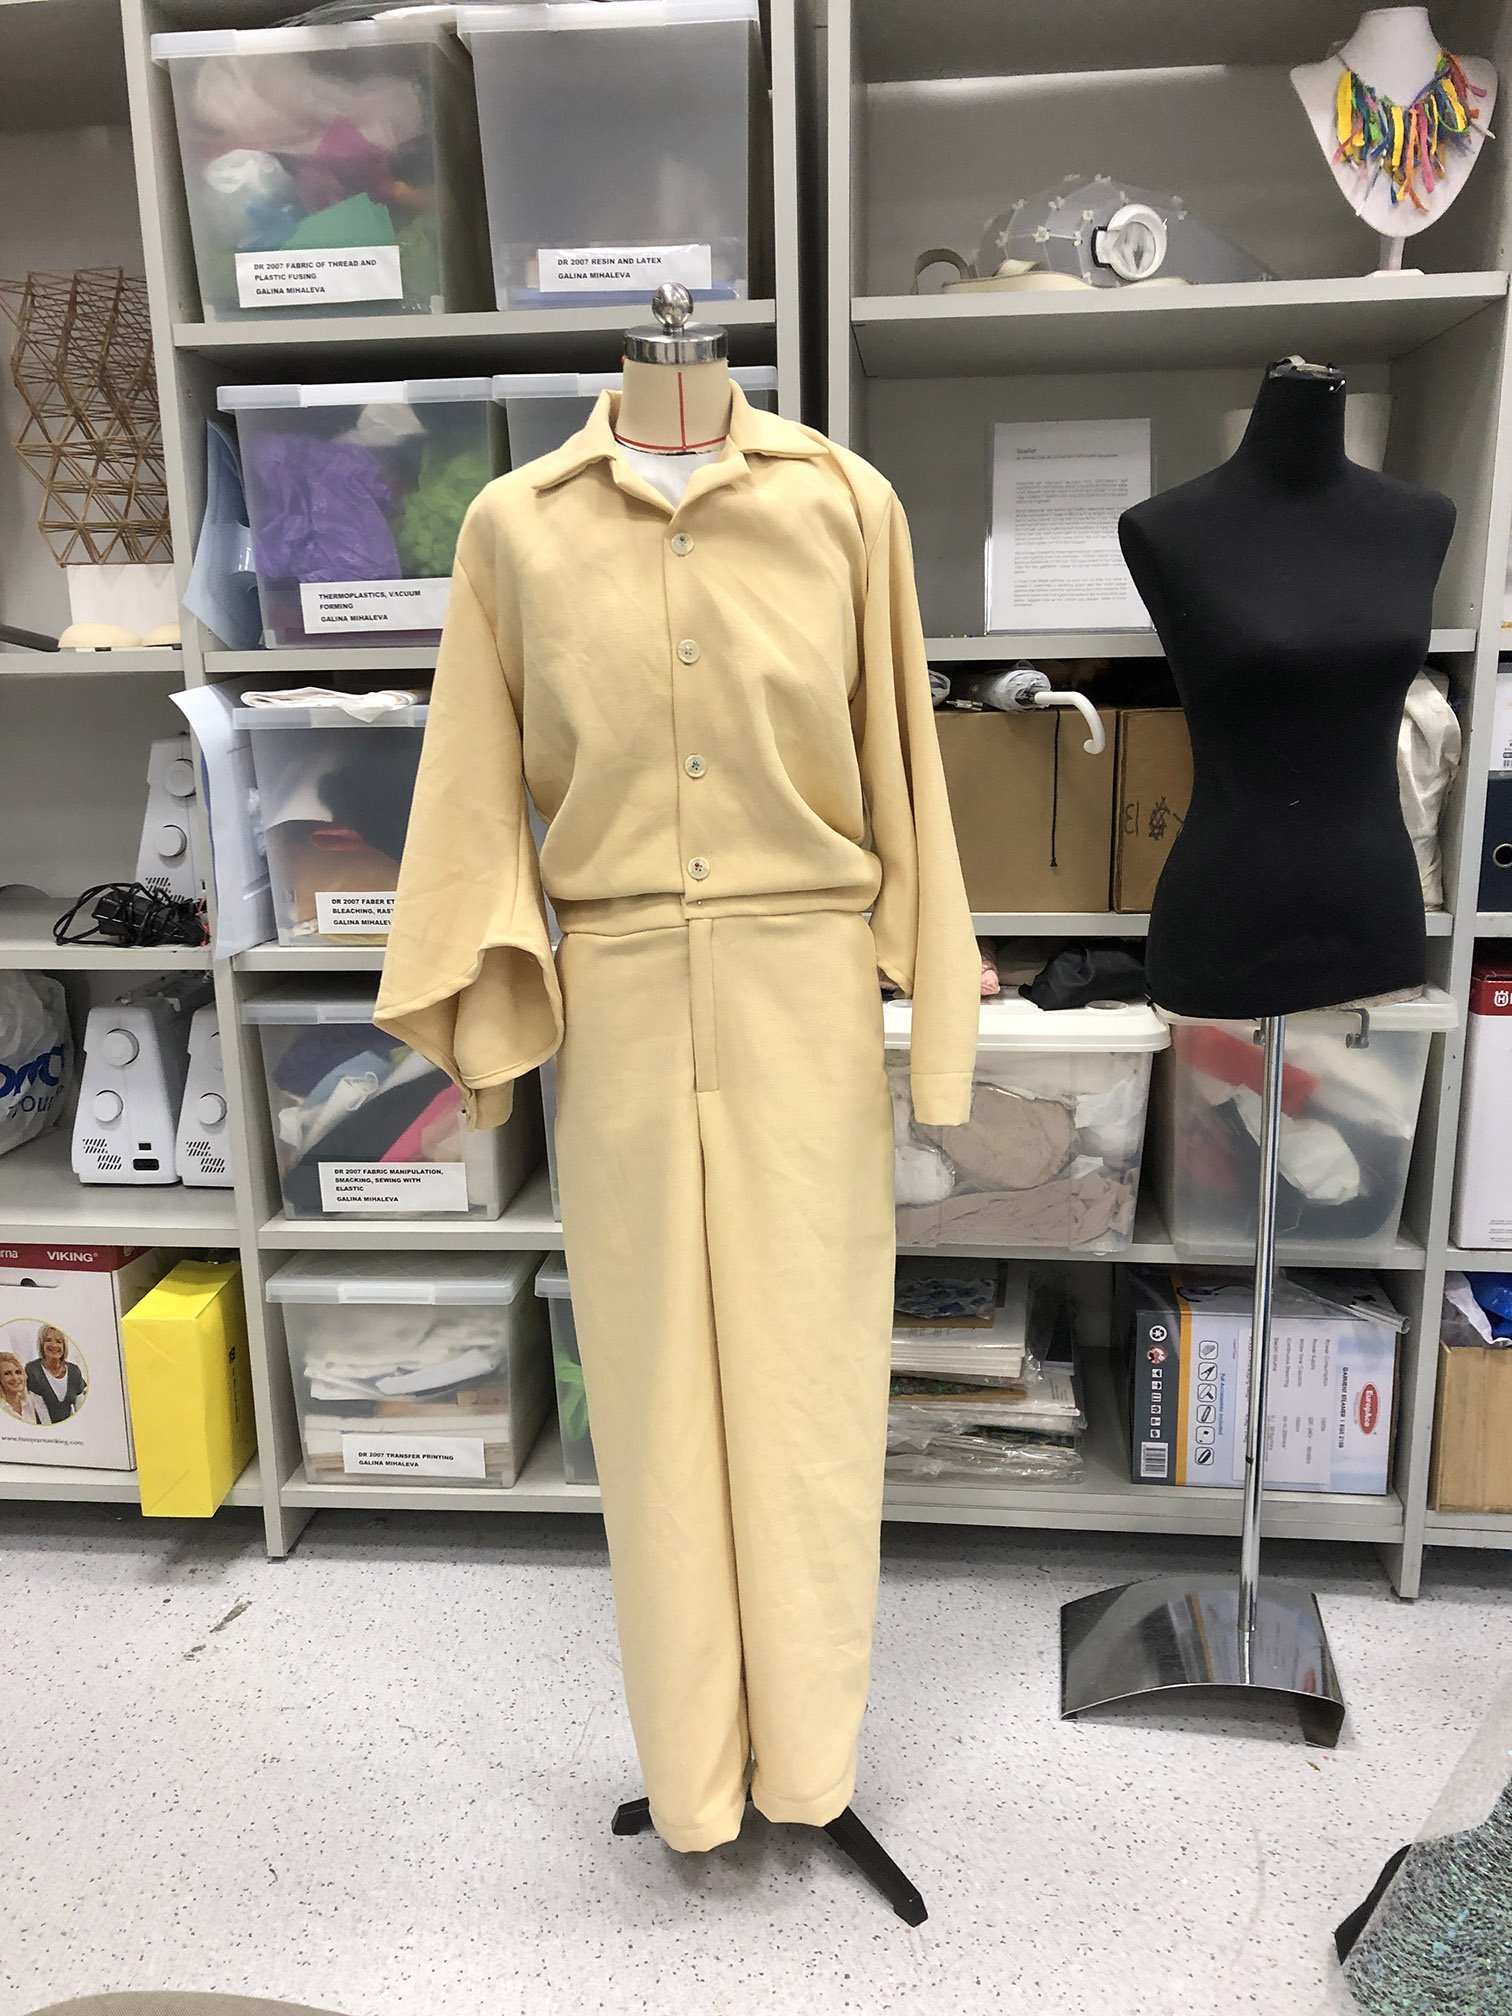
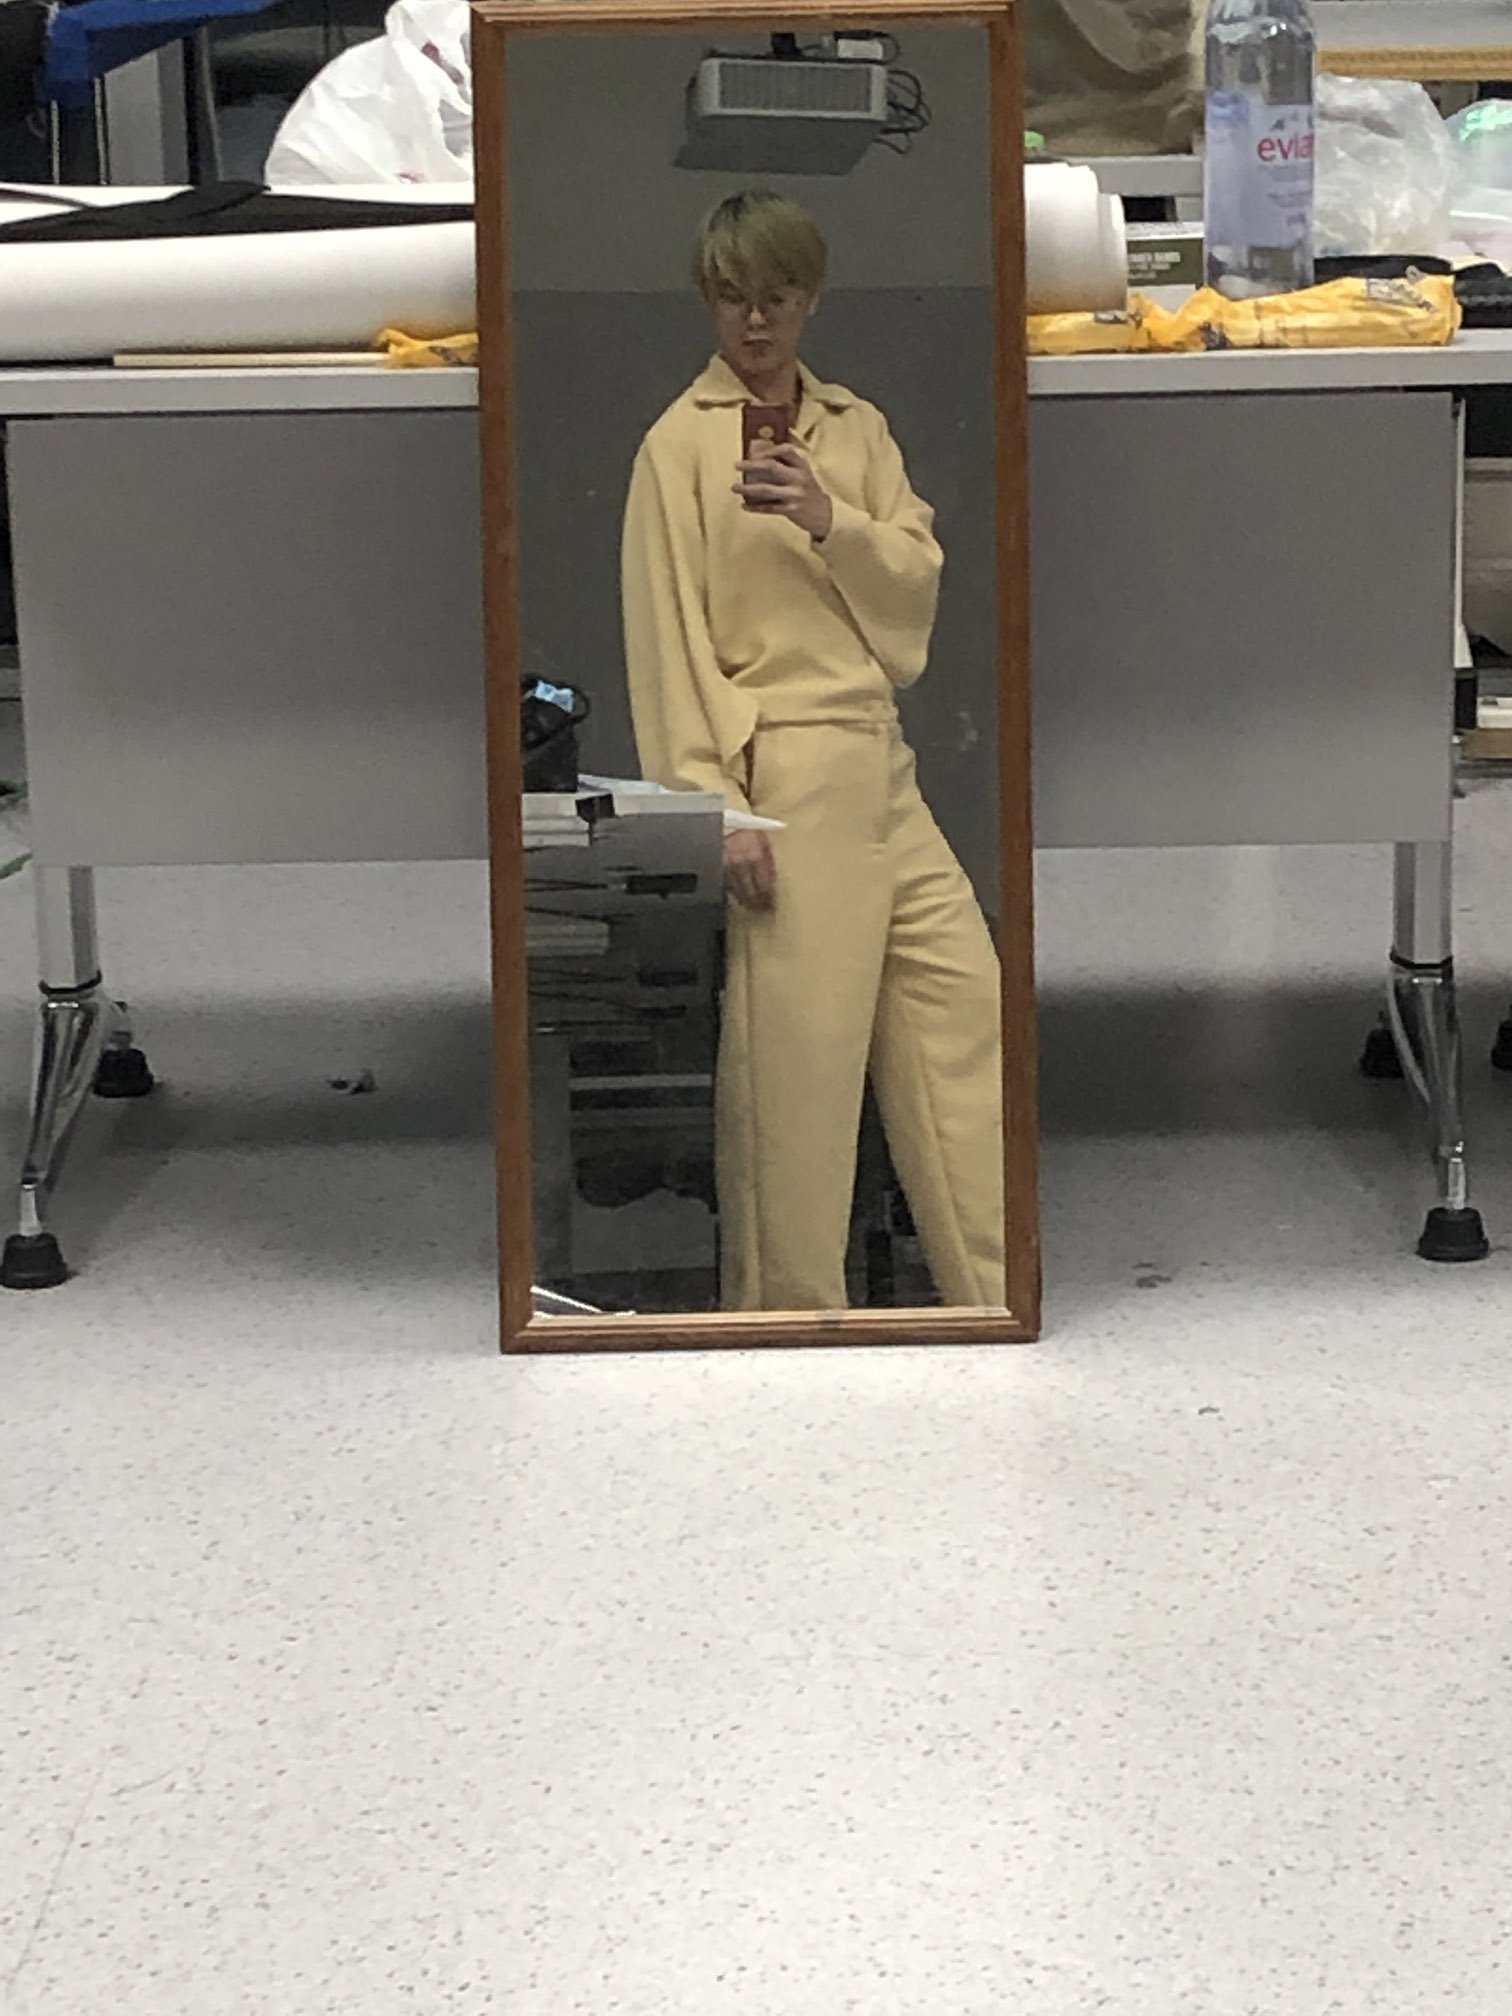
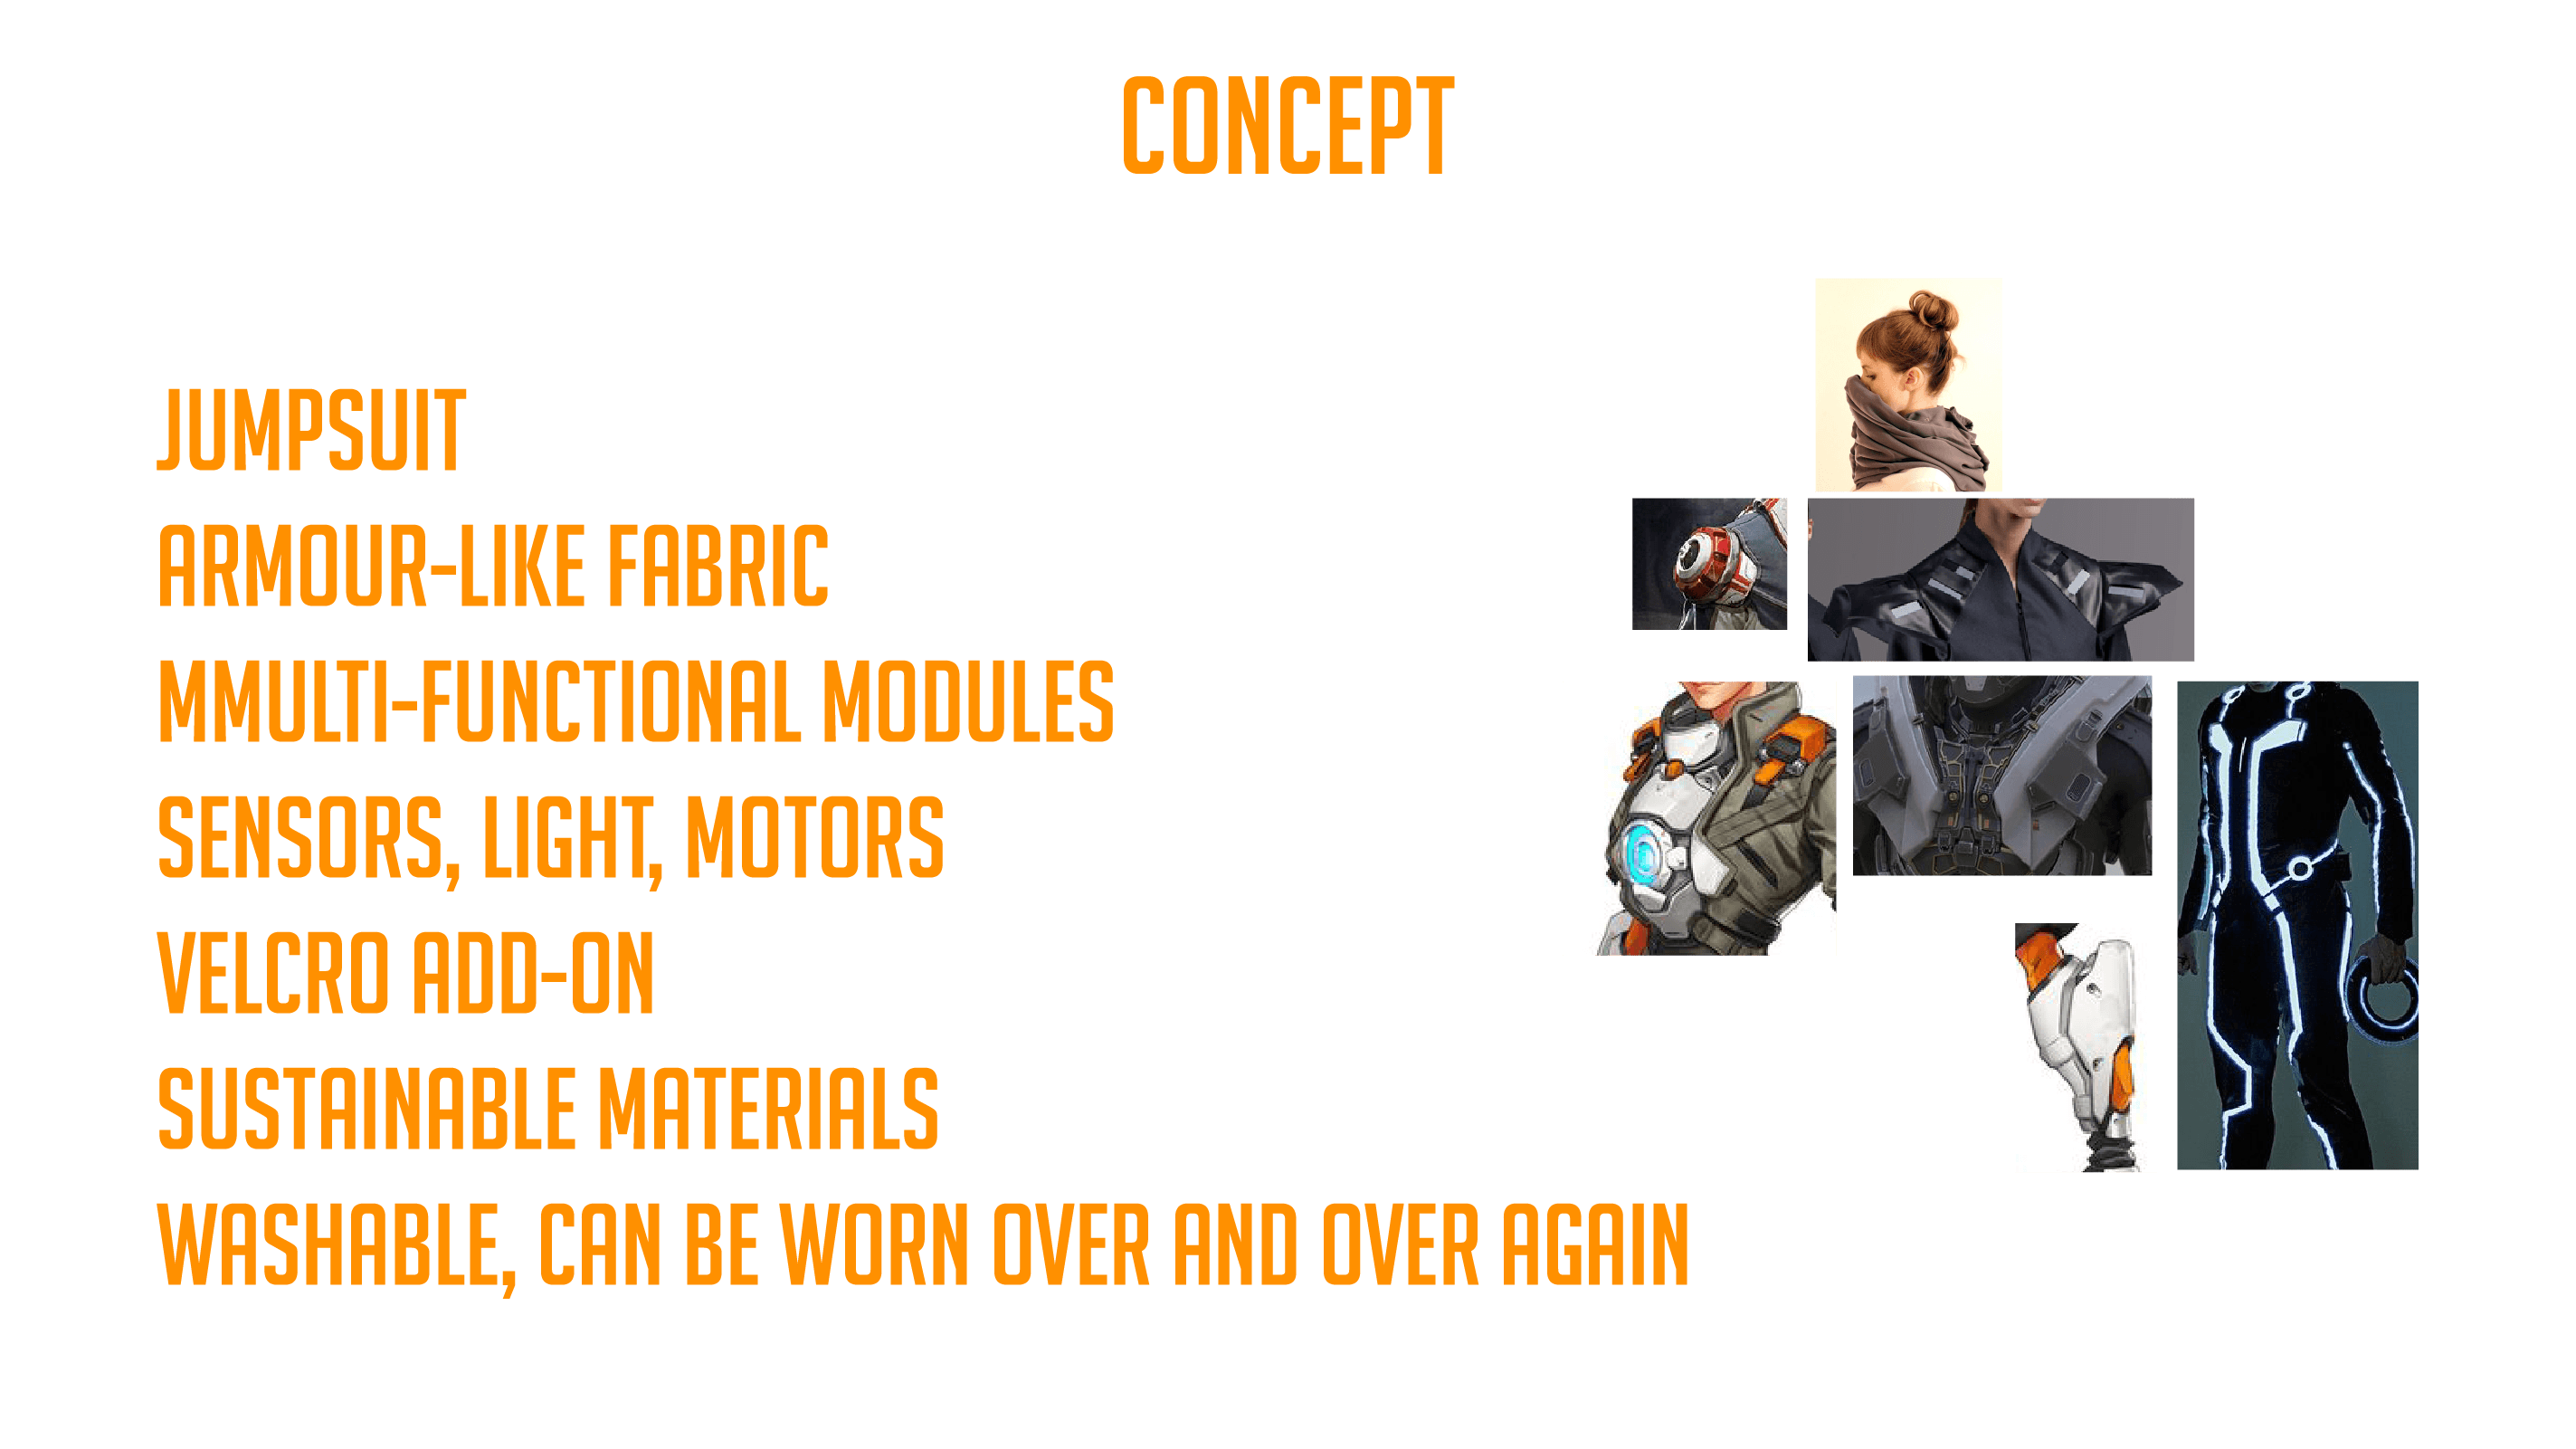
The jumpsuit is the innermost layer of the garment, and is made of a comfortable and breathable fabric which helps the wearer feel cool. The sleeves are made broader to make it more cooling, which can also be buttoned off when a dust storm hits.

The poncho is the next layer, covering half the wearer’s body. This is inspired by the garments worn by desert dwellers. The poncho can be further extended to cover the wearer more if needed.

The outermost layer is the armour, which is used to protect the wearer and to perform functions such as detecting environmental changes, and responding using lights and motion. The armour pieces are also inspired by beetles in the way they are designed and the way they are segmented. For example, the arm pieces look like beetle legs while the shoulder pieces look like antennas. The armour also has an iridescent shine like beetles, which also coincides with cyberpunk aesthetics.

The garment is thus able to allow wearers, the Metropollutans, to adapt to the dusty yet urban environment.

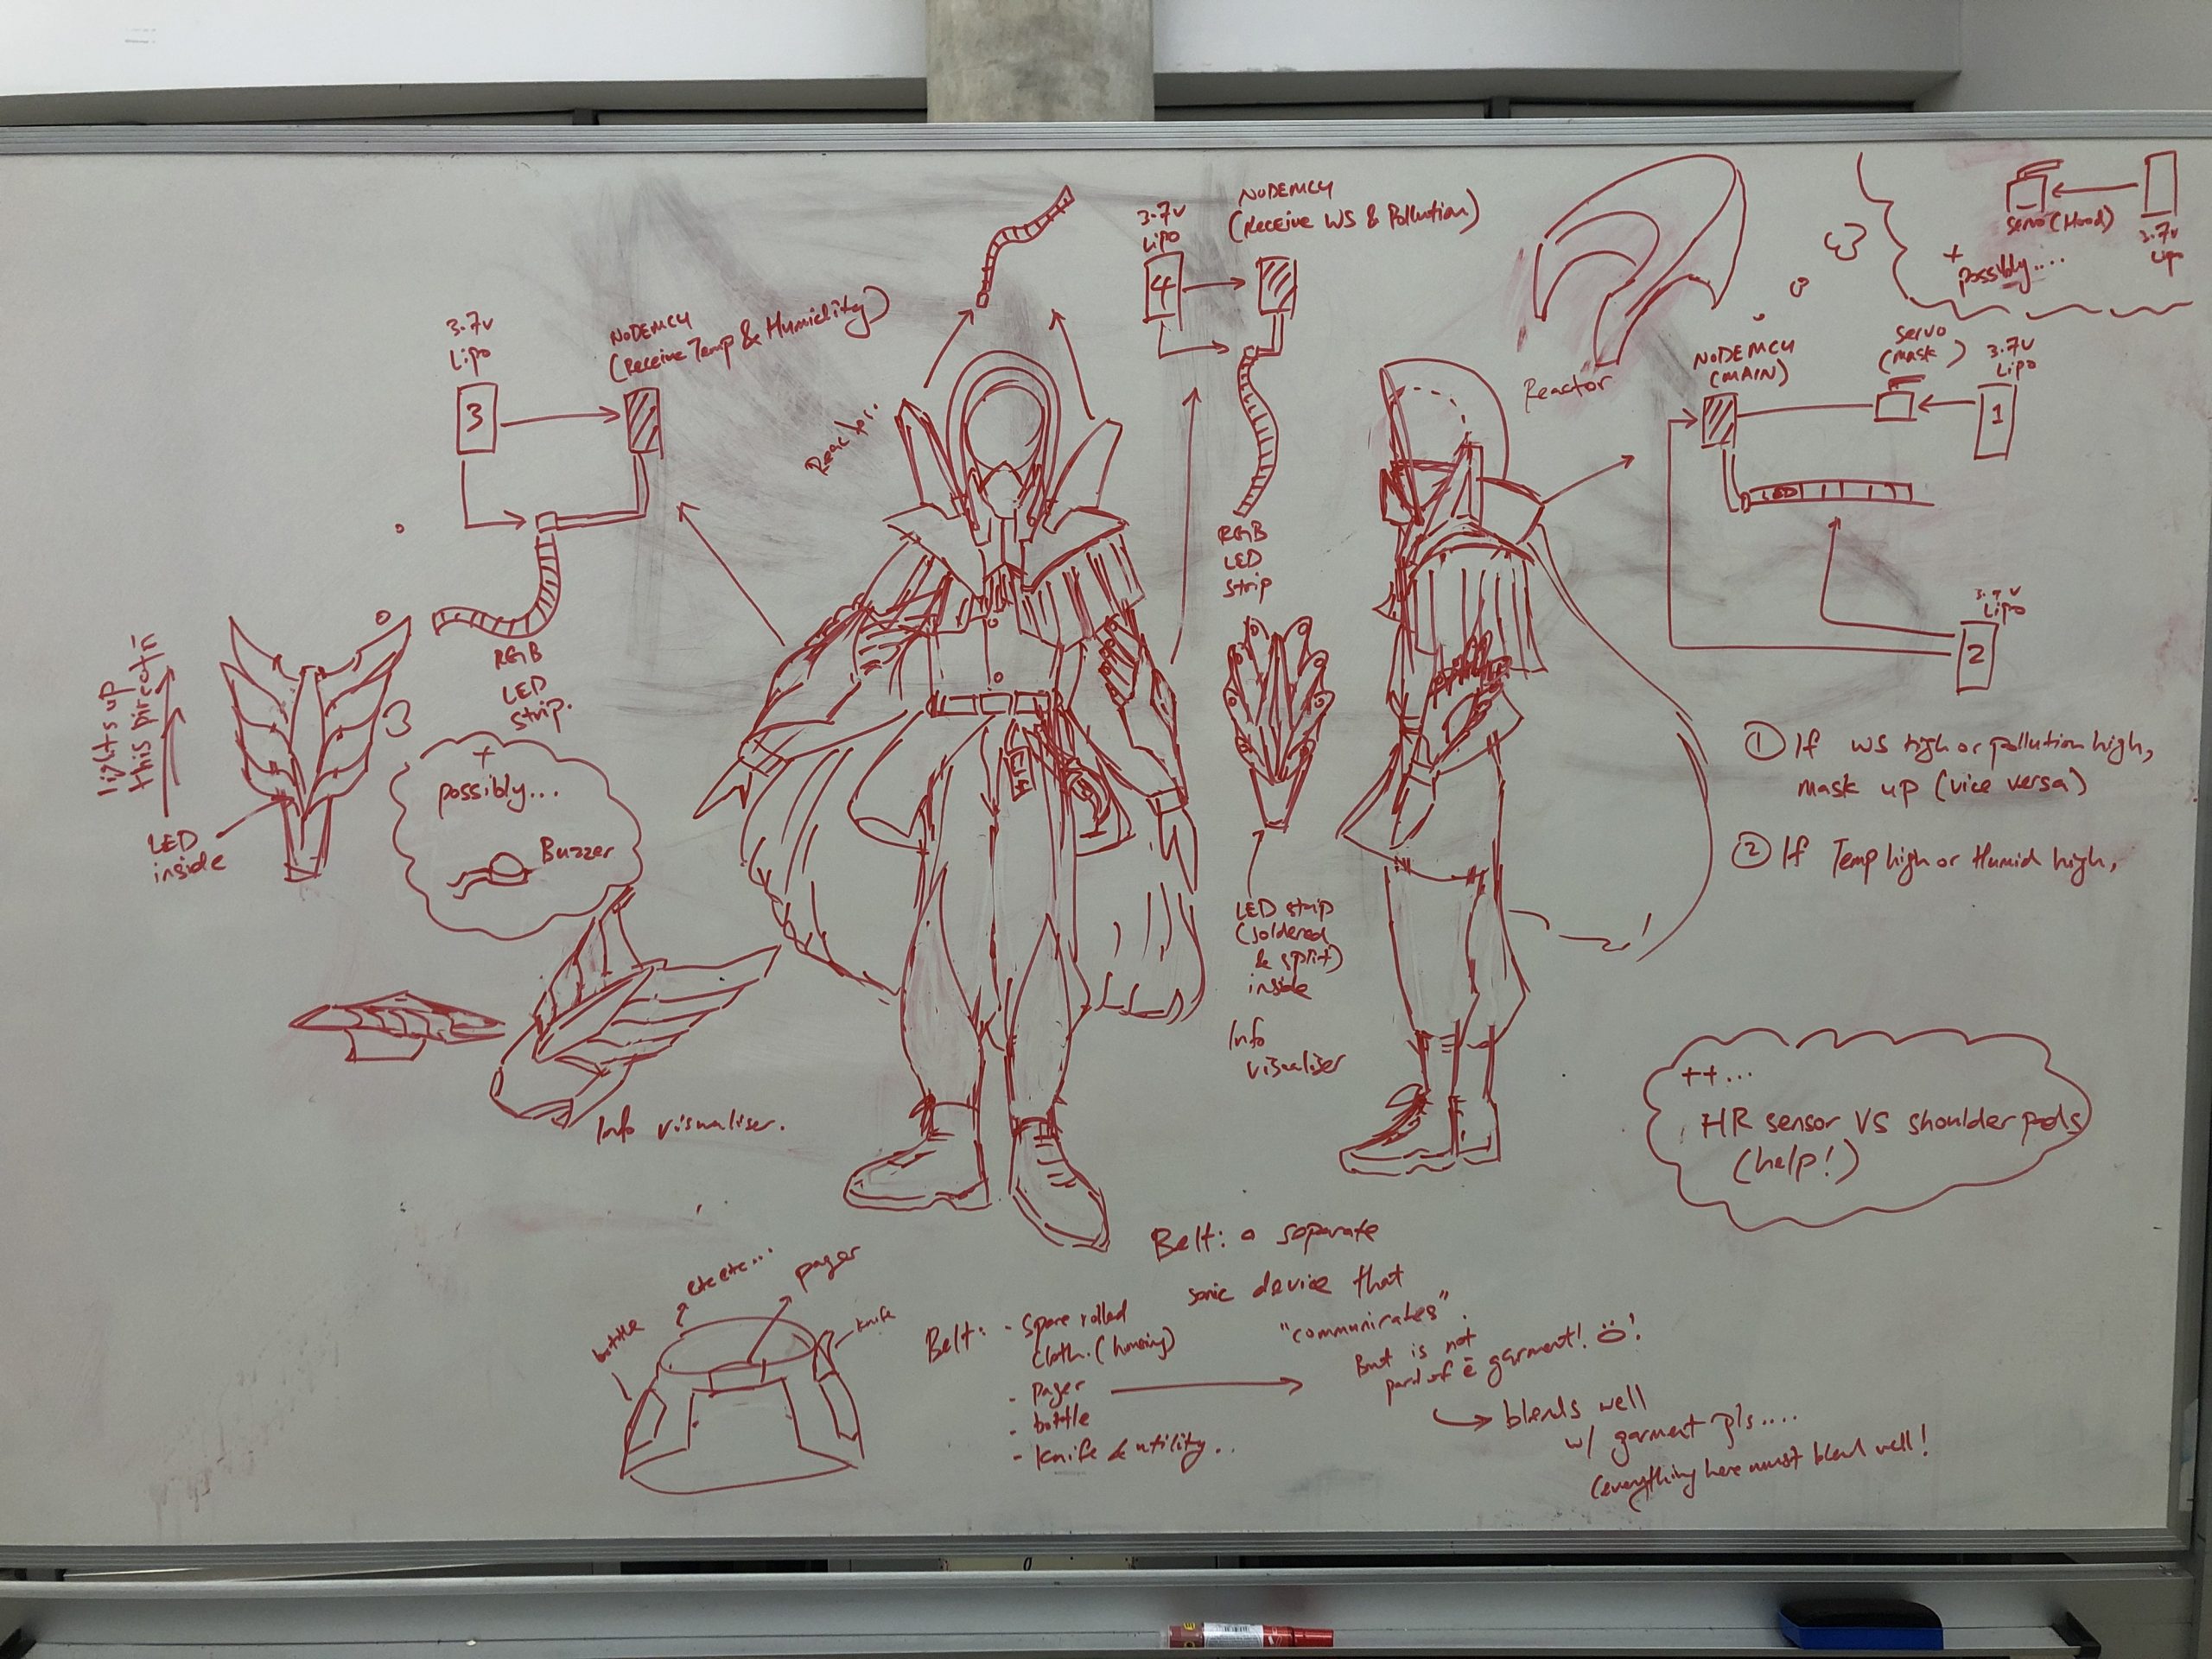
The different parts and their functions:

The hood and the mask helps the wearer to protect their face against dust. When high pollution is detected, the motor moves and the mask comes up to cover the face.

The shoulder pieces are called the “Illumunators” which lights up into bright green light when there is high pollution so as to increase visibility.

The chest and neck piece houses the electronics and helps keep every other armour piece together.

The arm pieces help the wearer to visualise the environmental information in the form of light. The left arm piece responds to pollution changes, where in low pollution, it glows in blue and green, while in high pollution, it glows in pink and purple. The right arm piece responds to temperature changes, where in average temperature, it glows in blue and green, while in higher temperature, it glows in orange and red. These changes notify the wearer of the changes in environment, while also preparing them for the change in the garment pieces’ movements.

Finally, the belt allows the wearer to hold more things as it acts like a utility belt.

How it works

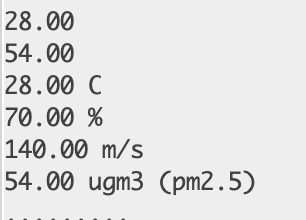
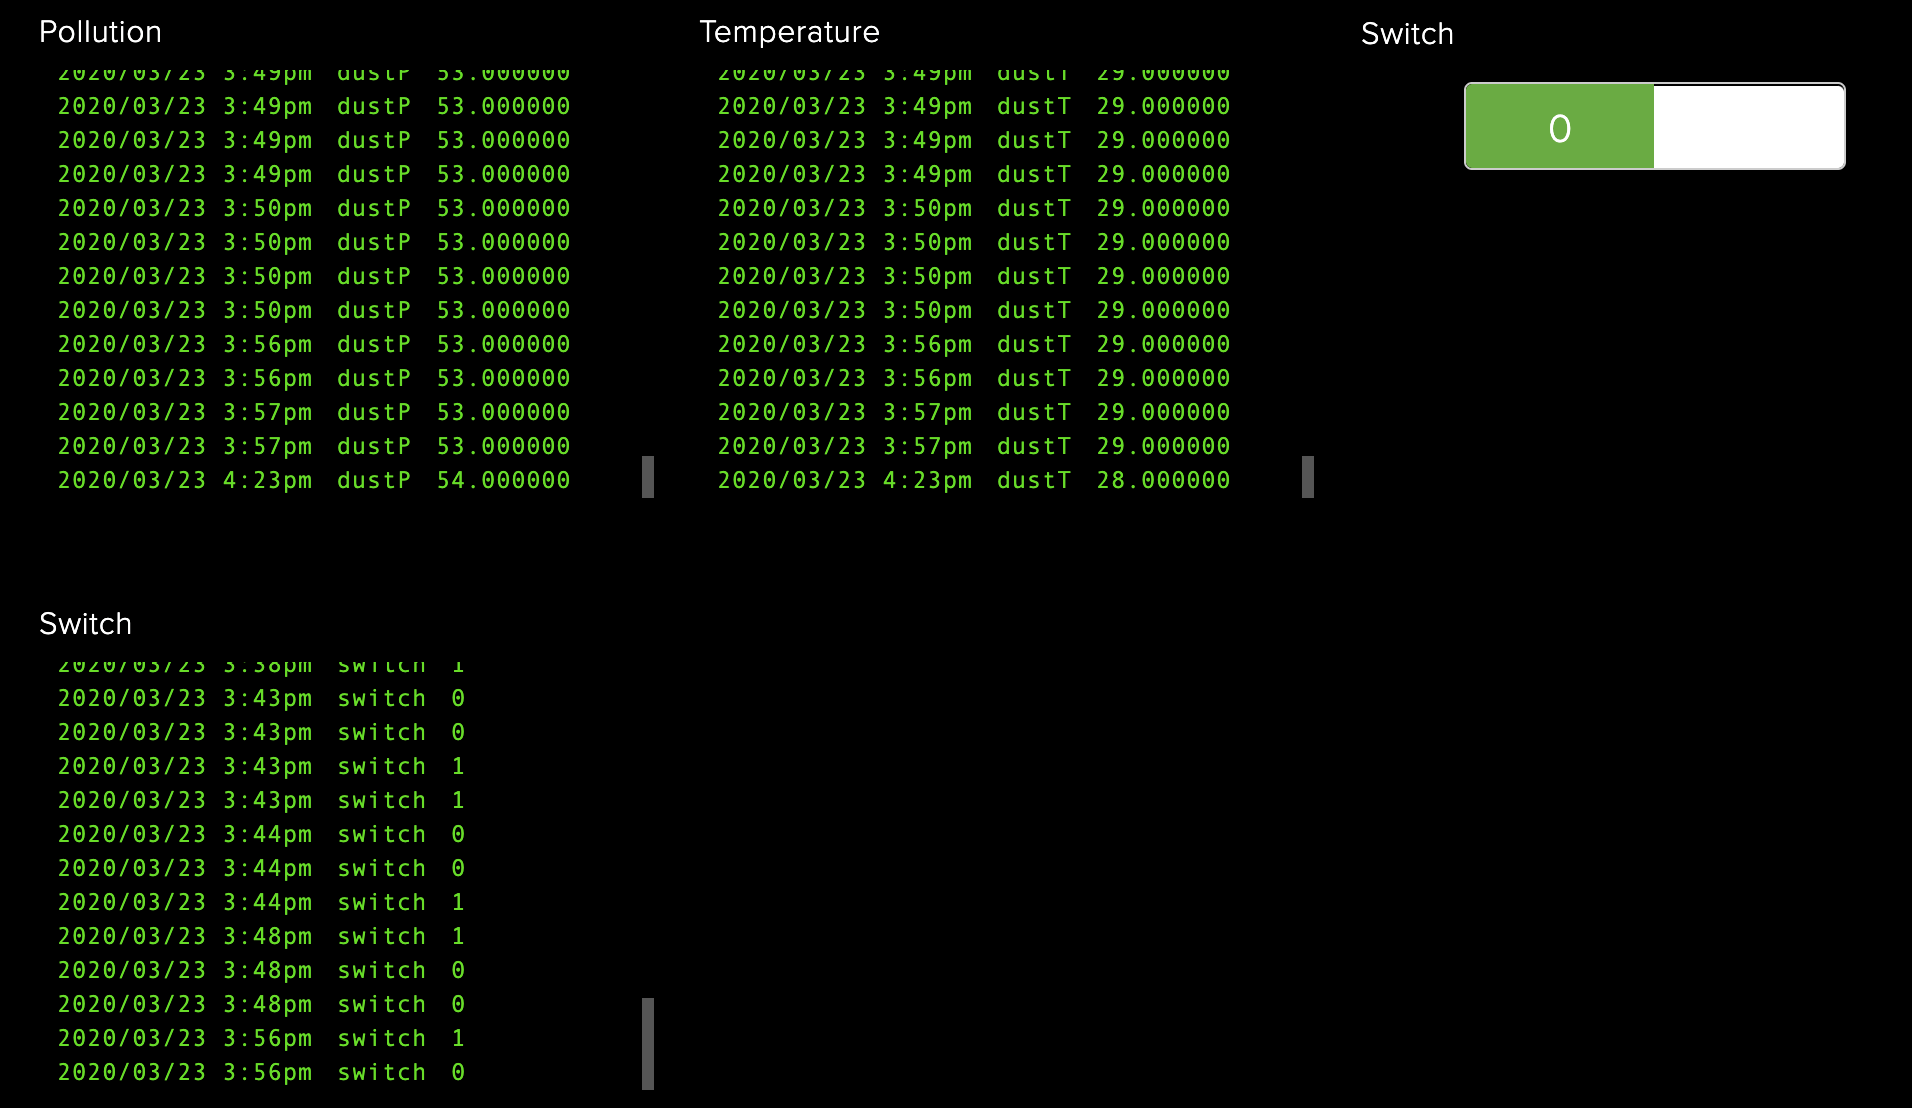
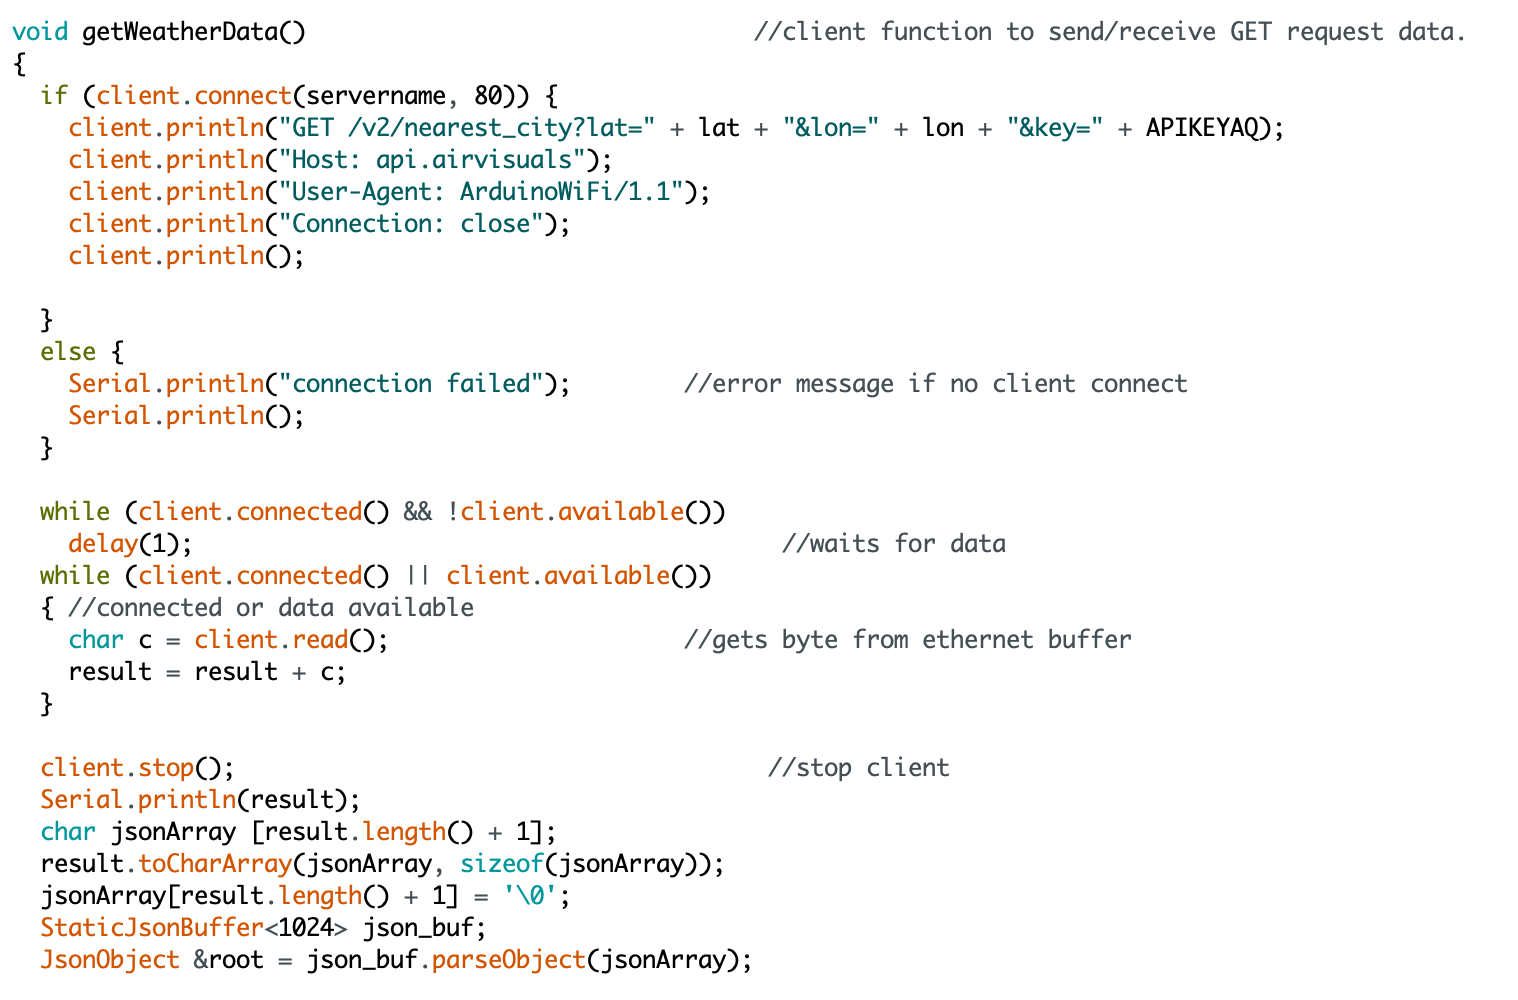
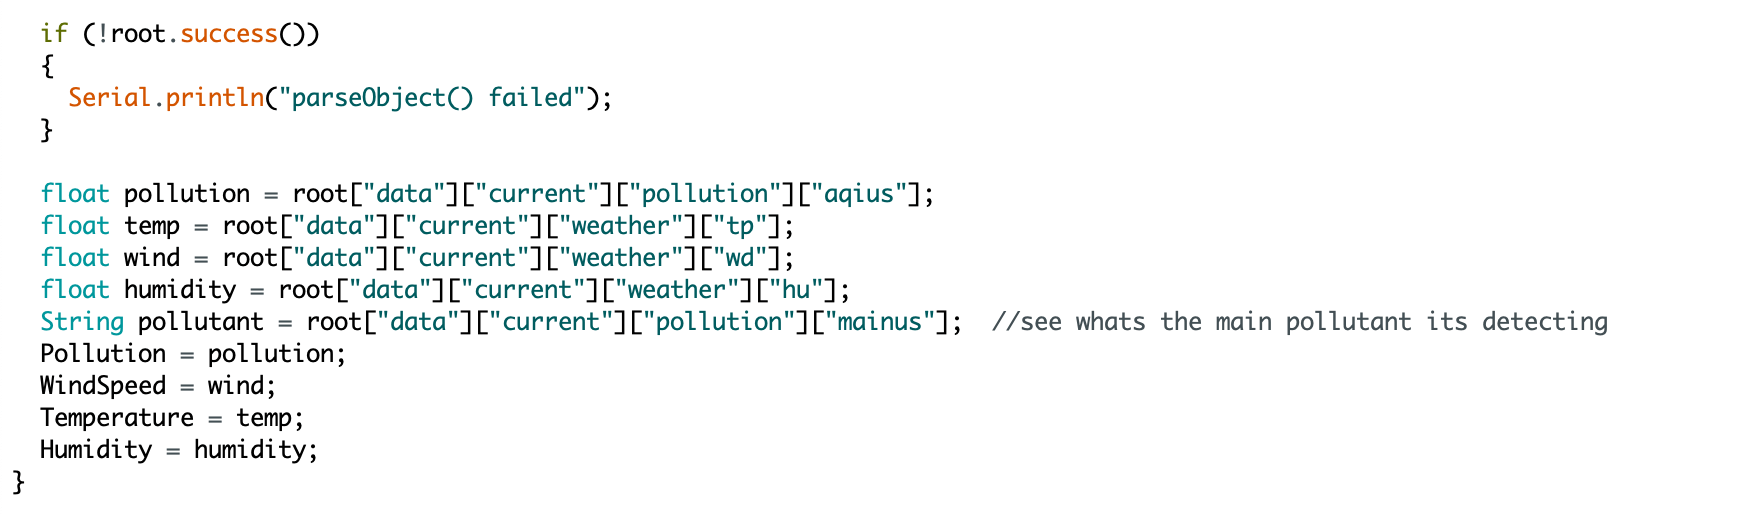
The garment uses Internet of Things (IoT) services to collect, send, and receive data to alter the state of the garment. Data is collected from Air Visuals, a weather data API. The data is sent to Adafruit.io, which stores all the data. The stored data is then sent to microcontrollers, NodeMCU Amica, inside different parts of the garment, controlling different LED strips and servo motors.

As IoT data do not reflect the imagined world’s environment very well, the garment is also controlled by a switch on Adafruit.io which changes the state of the garment. There are two states that works on my garment currently: high pollution and low pollution. On high pollution, the mask will move up to cover the wearer’s mouth, the Illuminator will switch on, and the arm piece colour will turn from blue/green to red/orange; vice versa for low pollution.

Photos of final state:

As I didn’t have the tools (and drive 🙁 ) to continue working on the garment, this is the final state of my work.

Current state: With a piece of armour

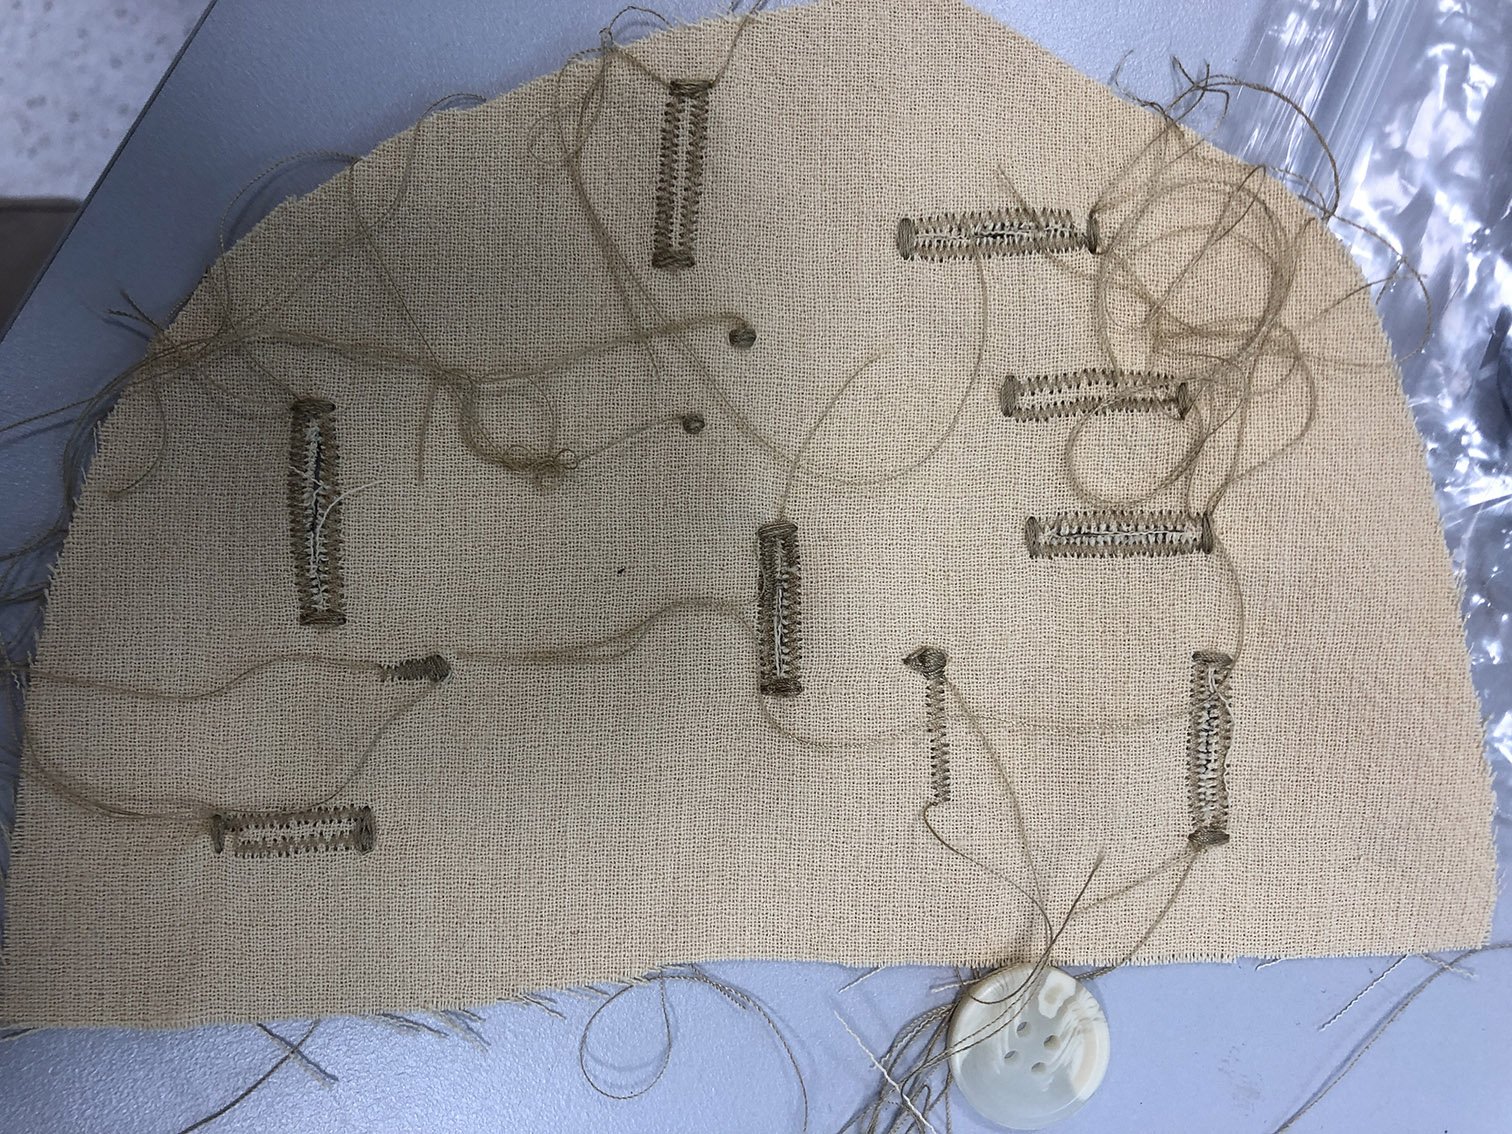
Additionally, I’ve worked on the mask and the electronics at home.

Mockups, Sketches:

To make up for the lack of finalised project, I used sketching and mockups to imagine the way the armour pieces look.

Video of Electronics / Interaction:


Role and Future Aspiration in Fashion Show

I would remain in the role I was assigned, doing the stage. I wish to do projection for the show, and had discussed with Shah before about it and we think it’s a good idea. I think we can project the quirks of the different garments, like for example, mine could be a desert world, while Fizah’s can be snakes.

The stage design will also include logistics like smoke machine placement, decorations, etc. This should tie in with the theme, but that’s undecided yet.

Circuit Breaker Process Updates

Not much happened. Here are some small scale mockups I made to visualise the pattern to cut on the actual piece:

I used Illustrator to create some patterns. Yet to really test them out properly but I’m planning to trace these out on drafting paper (which I forgot to bring home 🙁 ) and test them instead of testing them on the actual PVC leather first because its EXPENSIVE.

Chest piece
Shoulder piece and mask
belt
Hood and eyepiece
Neckpiece

Here are some progress with the shiny PVC leather:

Hi yes I’m wearing the Mcdonald’s pyjamas

I only managed to make a mask. Put all the electronics on it and it works! Video is on my final post.

Electronics

I documented before but I’ll reiterate.

I used a code that brings info from AirVisuals, an open source API that lets you collect info from the internet.

This code collects the data
This code prints the data out for me to see its values

It works, but as weather is always consistent, the results may not be the most exciting for a fashion show. As such, I created a virtual button on Adafruit.io to toggle the effect from “green” to “red”. Green represents healthier air quality, while red represents dangerous air quality.

Servo motor code
Code for virtual switch to work on my device

Final setup:

More to be done… This is only the main part. The motors will be on the chest piece, and I need 2 more pieces of LED strip for the shoulders.

The LED light here is for the arms, and I also need 1 more piece for the arm.

I already have the materials so I’ll continue working on it over the sem break or even, if I need to continue after sem starts.

Adafruit.io interface showing the values of pollution, temperature, and the switch position

For concept updates and all, see final post.

Week 11 Wearable Tech Updates

Last week, I was drawing this to collect my thoughts and it helped me figure out the logistics of my tech

Last week’s electronics setup:

LED + wifi
Servo + wifi

Last week’s progress:

I managed to complete the jumpsuit with help from Galina for the zippers and connecting the 2 pieces together!

Galina also taught me how to sew button holes which was very fun!!

What’s left for the jump suit is for me to hand sew the buttons, to create button holes for the sleeves, to add front pockets, and belt holding thing. But that’s not my priority now.

This week, I’m working on the cape and armour pieces.

This Week’s Progress: (incomplete as theres more days this week to work on this!)

I was playing with the materials to create the look of desert beetles, but it failed so I will just stick to the pvc without material alterations.

putting pins before heating it to create round bumps but it ended up folding
only heating the PVC creates this effect

Cutting and putting things together: I was experimenting with the materials and turns out its more flimsy than I previously thought. It’s also much thinner than I thought so it doesn’t look as good if it’s single layered. Sewing 2 pieces together makes it look better, which means now I need 2x the amount of PVC ($$$$$$$!!!!!!) but at least I have 1m left of the pink piece which I’m not gonna use as pink contrasts too much with my garment. I’m switching to green instead.

What was previously the neck piece was tested on the shoulder to see how it looks like as a shoulder piece.

I was having a hard time trying to figure out which cloth to use. Using both cloth together with the armour will make the whole look very weird. Too much is going on. Using only 1 cloth and the armour works, but I need to decide which to remove. In the end, I removed the metallic mesh cloth.

The final decision (except the pink parts will now be green)\

I also started sewing the cape piece to make it more frilly / have pleats. So yeah. (no pics tho)

So in conclusion, this week was more of a start of the next phase, and I am more or less confirmed for the entire design and I’m happy with it. I’m gonna continue the cape till I’m happy with it then I’ll start with the armour which is gonna be a pain 🙁 and I need to go buy the PVC also. Hopefully finish this by week 12 end so I can finish the electronics and have time to finish up the small details. And also work with Shah with the fashion runway!!! AHHHH!!!

Oh and also Mayle was working on a PVC vest and I took a pic of the pattern so I can tweak it (thanks Mayle!!!)

it’s actually just a pants pattern but if you drape it over the shoulder it becomes some kind of vest which looks like my chest armour!

My sketch of how I think it will look like:

The perfect vision of my garment

Ok out of topic but I think what helped me a lot was to imagine my concept as an Overwatch character. Anyway, here’s an updated concept:

Concept: nomad from a future dystopia city which is covered in dust from sandstorm due to desertification and global warming. Cyberpunk elements (iridescent armour + tech) to create a sense of urban-ness (because he’s still from a city) and sandy garment to blend with the desert city. A bit of inspiration from beetles also (in terms of their colour and appearance)

ALSO… I’m thinking what if the controller on my belt can control which city to look at. And because different cities have different temperatures and pollution levels, the values will cause the garment to react to it. Hmmm…

More Updates & Electronics

Presentation

https://docs.google.com/presentation/d/17-Pvo66K8ttybAE1qZW7n7R4OzupP-roymF4opGizro/edit?usp=sharing

Updates

I would really like to thank Galina for helping me with the sleeves, collars, and the fitting! Also… IT HAZ POCKETS NOW!!! The pockets are really useless for my concept but having them makes the garment looks really whole and useable after the show, AND I LOVE IT! THANK YOU MOTHER GALINA :’))) Without you my garment will be just a floppy beige thing that’ll be thrown to a corner after the show…

Anw, so here are images of the growth of my garment…

It starts from me working on my “final” on my own and….. turns out many things I’m doing is wrong.

Although I got some parts correct, the overall look is quite shabby. I’m ok with it, but turns out it can be much much better.

I went to buy more fabric as I ran out, but then I saw a nicer fabric and it costs $8/m at Gim Joo. I thought I can redo it and do better so I Bought 3m. Came back to school to cut. Lucky Galina spotted that I was cutting it in the wrong direction (not along the grain) so she flipped it for me. After cutting, I went to sew the back and front pieces together, then Galina started teaching everyone on how to work on the sleeves.

I then worked on the other sleeve of the shirt (note: this image may not be the sleeves part cos I didnt document the process :’) )

After finishing the sleeves, the garment looks like this:

So afterwards we worked on the lapels, then the collar. Again, not well documented process, but heres an image of Galina ironing the collar!

nice!

To finish the collar, I have to handstitch the collar and facing so it will be nice and invisible. Galina showed me how to do it and I brought it back to hall to finish it.

Here’s some photos of me looking at the mirror after sewing!

After being happy about the collar, I sew the pants and wore the pieces together:

I m the star in mario games — i forgot who said it

Galina helped me with the fitting afterwards to make sure that I can bend my body with it.

Can’t really see much here, but the fitting is better. The sides are tucked in cos they’re cut and restitched, while the front and back are slack to allow bending

Then, we begin with the pockets. There’s nothing much to see cos I didnt document this also :’)

Now, I’m just left with the zipper and buttons and then I’ll refine the sleeve ends and pants ends and I think I’m done with the garment. Then… the tech part. Which I’m working on right now.

Concept

Ok you see, although my concept have always been revolving around the futuristic cyberpunkish desert, I haven’t really gotten the hang of the exact things I want. So today I clarified it. I also tuned it to fit what I can do and what’s best for a wearable, while also noting that this is a 13 week school project.

Previously, I had an illuminator, respirator, a cape, and sensors on arm that are like armour. Now, I want to make use of the belt and tone down on the components on the garment itself, so I can still impact viewers with the show, make it easy for me, and also stick to the theme.

  • The illuminator now lights up all the time.
  • The temperature and pollution sensors now uses IoT so I dont need actual sensors anymore
  • The mask is the only part that has a motor. This is because motor costs a lot of electricity and very bulky to wear on
  • The belt will now be a piece of armour, and it conceals the utility items (knife, bottle, device)

Code & Electronics

I was playing with OpenWeatherMap API, after Naga recommended it to me. I tried many codes but it doesn’t work and was going to give up. But yesterday, I consulted Zi Feng and we figured out a bit of the code, and I think it was like those kind of moment where you dont look at code for a while and come back and you realised how things work… Yeah… So it worked for me.

So basically, I used the api with the api key and I ran it in arduino and the code will generate the information and pluck out what’s relevant (temperature, humidity, wind speed, etc)

http://api.openweathermap.org/data/2.5/weather?q=singapore,sg&appid=[insertAPIkeyhere]

Then I switched to this other API called Air Visual which has much more information (including pollution)

http://api.airvisual.com/v2/nearest_city?lat=1.3521&lon=103.8198&key=[insertAPIkeyhere]

So after figuring out how API works, I’m able to draw relevant information directly from the website to my NodeMCU wifi module. This means that I don’t even need an external program (eg. Python) to feed my program.

Here it’s taking temperature and humidity

So I’ve decided to use this instead of components so I can lessen the wires and energy. I worked long enough with wifi to have enough faith with it i guess…

So I tried using the data to control servos and LEDs, it worked. But after a while I think the servos burnt out (SORRY ZIFENG I WILL Buy BACK FOR U :((( ) so I needed to plan properly for the power and components.

Photo documentation of code:

Circuit

Prototype main component with servo and LED
Prototype arm component with LED

Electronics Logistics:

  • 3x NodeMCU (ESP8266 wifi modules)
    • Main controller
    • Temperature arm armour
    • Pollution arm armour
    • IF POSSIBLE: 1 more for Device controller
  • 4x 3.7V Lipo batteries (or higher but not more than 5V) 
    • Main NodeMCU + main LED
    • Mask servo motor
    • Temperature arm armour NodeMCU + temperature LED
    • Pollution arm armour NodeMCU + pollution LED
    • IF POSSIBLE: 1 more for Device controller
  • 4x LED strips
    • Main LED (10 bulbs)
    • Shoulders LED (50 bulbs)
    • Temperature LED (20 bulbs)
    • Pollution LED (20 bulbs)
    • IF POSSIBLE: a few bulbs for Device controller
  • 1x servo motor
    • Mask servo
    • IF NEED: another one for mask servo to make it more reliable. (if that’s so, need add 1 more Lipo)

What’s next?

After today’s breakthrough, I’m gonna start getting the necessary stuffs

  • Code for individual electronics
  • Buy whatever’s left that I need
  • Work on final armour pieces
  • Put electronic together
  • Refine garment
  • Test test test! and also charge my batteries.

So for today’s presentation, I’ll show my progress with electronics and my plans.

Moodboard (Updated!)

Update: After biomimicry research critique, I kinda wanna change some of the elements in my design to make them more sustainable rather than just copying a certain retro-futuristic style (even though I love it).

Also: I REALISED I NEVER EDIT THE KEYWORDS PART SO IM GONNA WORK ON THAT.

Information Arts: Intersection of Art, Science and Technology

This encyclopedia-like book by Stephen Wilson investigates the relationship between art, technology, research, and science to discover that they are interconnected in many ways.

A brief introduction

Technology is always associated with science, and science is always associated with the frontiers of technological advancements. But this notion of the specialisation of roles in science and art is a idea that only started since the Renaissance. Art making and scientific research actually goes through similar methodologies, as well as pushes the boundaries of technology. For the longest time, people have always been creating and inventing, figuring out how something works before knowing why it does. This intuitiveness and creativity generate new ways of using technology, while a deeper understanding of its mechanisms further pushes it; all in all improving and generating new technology. In this manner, art and science worked hand-in-hand in the creation of technology. Are we able to break away from the notion of art being “creative” and science being “technical”? This book aims to address that issue and see how art and science is coming together in the information age.

The book

Included in the book are some of the best research-inspired artworks that Wilson believes to be thought-provoking and revolutionary, in hopes to challenges our notion of art and science.

Wilson explains the relevant ideas in understandable chunks in the introduction, followed by a categorisation of works based on a group of topics (eg. “Biology: Microbiology, Animals and Plants, Ecology, and Medicine and the Body”). Within the categories, Wilson further explains information that is relevant to the topics and lists a few artists that uses such ideas.

Example, in the Biology category, Wilson explains Bionics and stated examples like a nerve chip that Stanford researchers created which reads nerve signals, decodes them, and operate prosthetics. Wilson then goes further in depth to look at individual artists what delves in different aspects of biology. For example, in the “Medicine and the Body” subcategory, he lists down notable artists like Stelarc, Marcel.li Antunez Roca, ORLAN, and their notable works with a brief description and other relevant information.

In “Third Hand”, A manipulable robotic arm is attached to the body activated by the host via EMG (sometimes from other body areas) or tele-operated by others. Images taken from https://stelarc.org/?catID=20265

Personal thoughts

I had no time to read through everything, but I was really interested in many of the examples and ideas he listed, especially under the “Medicine and the Body” section as that is within my current interest. It is a very comprehensive and informative book which talks about a really relevant topic in our current time.

I am also interested to learn more about what he said about science, art, and technology. I guess I find it relatable as pop-science (despite its bad reputation as being too watered down) really inspires me. Video channels like VSauce and Kurzgesagt shaped my ideas and thoughts to where I am now, and I love to base my project and works around these ideas.

Source:

Wilson, Stephen. Information Arts: Intersections of Art, Science and Technology. Cambridge, MA: The MIT Press, 2002.