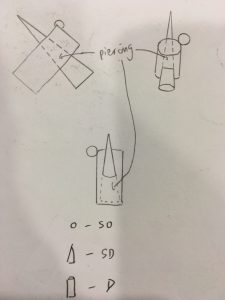
Model 1

851440807_5640533802262653871

851518213_16052241341946294056 851517925_8850676307237332428
851519075_7547660850948697585
851516823_14215454072343682306
For this model, I was eager to try piercing as previously we had only worked with rectangular volumes which are not as dynamic and complex. However one major flaw of this model was that the D and SD were not easily differentiable as they appeared to be of about the same mass. Ms Cheryl suggested that to make it more apparent which is the SD and D, I should make the cone the D instead and make it 3 times as long as the diameter of the cylinder as seen in the last photo. She also suggested that I allow the cone to “float” by decreasing the angle between the cone and the base.

One other mistake I had made was that to pierce the cone, I did not remove a section of the middle of the cone but instead just cut it in half and pinned the 2 ends to the cylinder to mimic piercing. I had not thought about how in actual piercing, a part of the cone would be concealed inside the cylinder! This is something to remember for future projects because had I remembered to remove the middle part of the cone, it would have been shorter and perhaps the SD and D would be more apparent.

Model 2

851517995_1820093921589199284
851517861_9206025160904373027 851518944_11167141746433318546851519115_12093995305881288601

851439473_13748689629148984279

This was the model I chose to work on as my final model, but major changes were made to it such that it doesn’t really look like the same thing any more haha. In the final model the roles of D and SO were switched so in the final piece, the cylinder is the D and the sphere was majorly decreased in size so that it was barely even visible between the cylinder and sphere.

For this model, I tried to give it good proportions by making the cone base 2/3 the diameter of the sphere while the cylinder base was 1/3 the diameter of the cone.

I was not keen on this model at first and did not attempt any piercing or wedging. However, Ms Cheryl showed an interest in this model and I found the arrangement of the pieces to be interesting hence I decided to work on it for the final piece (seen below).

851516832_9205591319517536730

curvilinear-volumes-pg-3-plain

curvilinear-volumes-pg-3-plain-compressed

(please click the link to view larger version)

As you can see, it looks nothing like the above figures. It really goes to show how much difference just a few small changes on paper can make to the model. (:

Fire & Ice


thinking sequentially 2

“Some say the world will end in fire, Some say in ice”

thinking sequentially 1

“From what I’ve tasted of desire, I hold with those who favor fire.”

thinking sequentially 3

“But if it had to perish twice, I think I know enough of hate”

thinking sequentially 4

“To say that for destruction ice Is also great, And would suffice.”


We chose to go with a darker theme while editing our images to match the dark theme of the poem. For this set of photos, we chose to evoke the emotions when someone reads the poem, such as loneliness and desolation.

Done by: Viena & Bridgel

Props as Signifier

For this project, the object that I used was my iBanking token. I thought it would be an interesting item to photograph because who doesn’t love money and most importantly, spending it?

Object as icon

851440515_14304660432148985678

For this set, the first photo I took was of the token against a plain background, showing it as merely an inanimate object which on the surface is not very meaningful

851440057_16867505721408177509

Then, I chose to take a photo of the back part of the token. The interesting thing about this token is that at the back of it there is a sticker with my name on it. It was put there by my best friend when I passed it to her for safekeeping a while ago, and she labelled it so that it would not be mixed up with her own token which looks exactly the same as this.

851439971_7040293468817585914

A photo of the token performing its primary function, which is to display a random set of number allowing people to access their money on their devices.

Object as signifier

850515464_97375764373578978

I wanted to show the token as a decorative item, in this case a keychain attached to the wallet. The token is representative of money, and using it as a decorative item represents how people tend to flaunt their money and show their wealth to their world, especially when they have a lot of it. The fact that it’s attached to a wallet also gives it a double meaning, as it contrasts the wallet which represents traditional money (cash, coins etc.) with “digitised” money which has only come about in recent years (iBanking, electronic banking etc.)

850515744_7480011781905540810

This photo was taken with help from a classmate and it shows me hiding in the stairwell behind the door, trying to use the iBanking token. I tried to convey a sense of secrecy by having it taken through the small glass panel on the door, kind of like a paparazzi taking a secret photo of somebody HAHA. The photo is to represent the secrecy that a lot of people have about their money, for instance one might try to hide it from others if they have a spending or gambling problem or are financially unstable, as some people feel there is a stigma against those who are financially disadvantaged.

850519444_5511581330408496692

This photo is a shot of the token lying among other electronic devices which I found in the 4D room. Like the remotes and DVD player, the token is also an electronic device and I thought it would be interesting to juxtapose them together since in a way, the token is also like the “remote control” of one’s money.

Curating Self

Task 1: Me

For this task, I wanted to show a more mysterious, brooding side of myself. While I wouldn’t consider myself to be a very “mysterious” person normally, I believe this is a side that everyone has but most keep to themselves. With this photoset, I had aimed to embrace this aspect of my personality. By choosing photos that were taken in the dark, I attempted to amp up the “mysteriousness” factor in the photos.

DSC00391

This photo was taken at the Botanic Gardens. I attempted to convey a sense of myself stepping into the unknown, from a dark area to a lit area and pulling apart the hanging tree stems. Because I have my back facing the camera and am in action, it gives the feeling that I am venturing somewhere or looking at something. To me, this photo represents myself venturing into new territories, especially since recently coming into uni as a freshman and starting a whole new chapter of life.

DSC00386

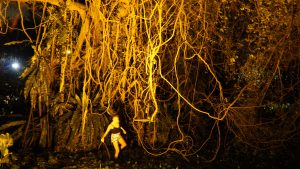
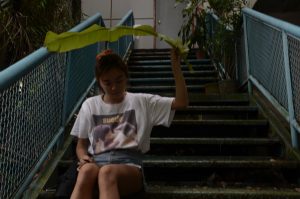
This photo, also taken at Botanic Gardens on the same night, depicts me in motion underneath a tree with messy, knotted and tangled branches. One thing I enjoyed about the Botanic Gardens is that there are lamps around the trees which light up at night, and they are not all the same colour which gives interesting effects as seen in this photo and the previous one. In this picture I attempted to show a more sprite-like and playful side of myself on top of the mysterious one, and also represents my love for exploring.

SAM_0086-2

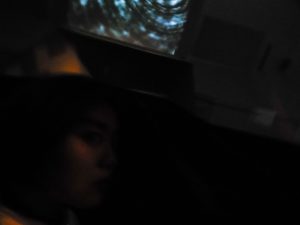
This is the final photo of this set which is of myself at a free exhibition at the Art Science Museum. Not only was the surroundings dark at the time, but the atmosphere was also gloomy and slightly macabre as the exhibition showed videos that were unsettling and slightly macabre (you can see it in the background of the photo) and my friend and I were the only ones there. As such, the room at the time felt like it was shrouded in mystery and uncertainty. By having myself in the bottom corner of the photo with my face partly hidden by the darkness, this photo to me is a direct representation of the “mystery” in my personality.

Task 2: Object and representation of self

DSC00062

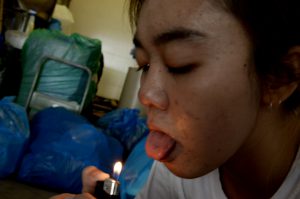
My chosen object was a cigarette or rather a packet of cigarettes. Initially I hesitated to choose this as my object for the task as smoking is an activity which has certain stigma attached to it and as such some people may not feel comfortable with me talking about it. However, my story of why I picked up smoking is something that I am often asked and I guess smoking is something ingrained in my life because while I would not say I am an addict, at times it does seem like I am dependent on it for stress relief/boredom/social interaction purposes. Hence I decided to go ahead with this object as it would be interesting and somewhat “meaningful”.

DSC00417

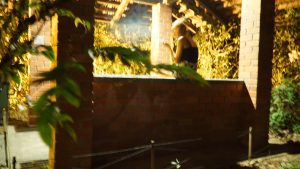
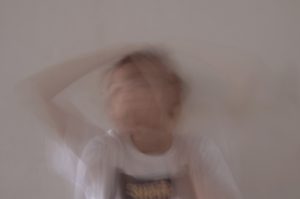
While this was not a very well taken shot (camera was moved hence blurry shot, bad lighting), I feel like this is part of the charm of the photo and it kind of depicts the hidden aspect of smoking. As I stated earlier, there is a stigma attached to smoking hence some smokers would try to hide their habit from their friends and family to avoid being judged. The photograph, which is taken from my back view with me looking over my shoulder, makes it look like I have been “caught in the act” of smoking, especially with the plant in the foreground which conceals part of the picture.

DSC00019

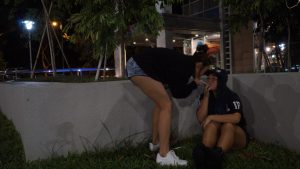
This photo shows me lighting a cigarette using a friend’s cigarette and is meant to show the social aspect of smoking. For some people smoking is just a social activity, personally I have made quite a number of good friends through smoking as well. This photo depicts the close bond between my friend and I as you would normally only light your cigarette this way with someone who you are very close to.


For this set of photos, I was especially inspired by the photos taken by Nan Goldin that were showed to us in tutorial. Nan Goldin’s photos were often of the grittier, grimier side of life and she did not take photos that were visually aesthetic but instead showing the realities and ugly side of life. Many of her photos featured people partaking in activities such as drinking or smoking, or people that had been abused. Ms Lei mentioned that I could emulate Nan Goldin’s style more effectively by using flash in the photos as this was a technique Nan Goldin used so I will attempt it in the future.

Task 3: My World

For this task, the location I chose was East Coast Park. Living in the east, my home is a short distance away from ECP (30 mins if I skate) so I go there often to relieve stress or to chill with friends and it’s my “good vibes” place.

Photo of the sky at ECP. ECP is situated near Changi Airport so if you lie on the beach and stare into the sky, you will see and hear many planes such as this one. Because it is an airspace, certain activities are prohibited at the park such as kite flying.

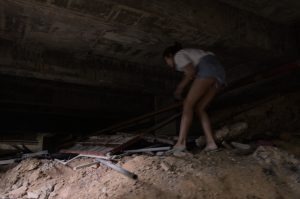
These 2 pictures were taken at the newly completed underpass at ECP. While I am extremely familiar with ECP and have explored it many times over, this part was new to me as it had just completed construction so for me it was an interesting experience to explore it.

This photo was taken at ECP during one of my brother’s races as he is a competitive sailor. Because he is a sailor, sailing is important to my family and a lot of our weekend activities revolve around the beach and his training schedules. I attempted to do a long shot for this photo but Ms Lei commented that it may have been more appropriate to take a portrait-style shot as I have done with the top 3 photographs so that the photos will look more coherent as a set.

Rectilinear Volumes

Sketch Model 1

850615113_14856070889637946217

The first sketch model was the one my final model was mostly based off of. In this model I attempted both the wedging and piercing techniques, by piercing the SD piece through the D and wedging the SO into the D.

As seen from figure 2, the D and SD were of almost equal thickness, due to having been cut out from the same piece of foam. Hence in the final model I re-cut the D from a thicker piece of foam.

Sketch Model 2

850617300_3662170729148968250

My final model was also partly based off this sketch model, as I wanted to attempt a model where the SO is placed on the SD rather then the D. In this model, I also attempted both piercing and wedging but applied it in different ways. The dotted line in figure 1 shows where the SO was pierced into the SD, while the SD was then wedged into the D.

This model is flawed as the SO is too long, hence from some views such as the one in figure 3, it appears longer than the SD which causes some confusion. While I attempted to avoid this confusion by making the SO 1/3 the thickness of the SD, it was still significantly longer as it had to be pierced into the SD. Learning from this experience, in my final model I chose to wedge the SO into the SD rather than piercing it so that I would be able to use a SO that was less significant than the SD from all angles.

Sketch Model 3

850619417_13447468185732959998

This model was least like the final model as I preferred to work with a D that was more block-like and not as long as this one. In this model, only wedging technique was used.

This model was not viable as you can see from figure 1, where the SD appears to be much smaller than the SO. This is because while the SD was a longer piece, it was also very narrow and its width corresponded with the length of the SO. Furthermore, in figure 3, the SO is only very barely visible due to being wedged too far into the D. Hence from that angle it might not be readily apparently to a viewer that there is a SO piece.

Nevertheless, the model is not without merits. Figures 1 and 2 show that the placement of the SD is such that it is placed exactly 1/3 down the D, giving it more visual coherence.

Conclusion

While all models have their pros and cons, ultimately the model I favoured most and chose to base the final model off is Sketch Model 1. This is due to the flaws in models 2 and 3 which I had stated above, but also because it was the only model which had D, SD and SO facing 3 different axes (x, y and z) which makes it visually the most coherent of the 3 models.