Clock time exercise
Video of lift going down the storeys at regular intervals.
https://drive.google.com/file/d/1KZ-Tic1ymN0FlTtjRsviswqB-Ibqc9mi/view?usp=sharing
Just another Open Source Studio site
Clock time exercise
Video of lift going down the storeys at regular intervals.
https://drive.google.com/file/d/1KZ-Tic1ymN0FlTtjRsviswqB-Ibqc9mi/view?usp=sharing
For this project we were tasked to create a 1min video and soundscape to depict a location that we have never been to before. After brainstorming a list of places, I finally chose for my location to be the suitcase.
1.Storyboarding
My plan initially for this storyboard was for the subject to explore the suitcase as if it were a spy movie using a mix of photography and illustration. In class ,we brainstormed the different types of sounds we could hear in the named location. Some examples are,
In order to create the soundscape, Ms Lei recommended layering sounds and to keep in mind the background,mid-ground and foreground noises to create sense of space.For the storyboard, she recommended including a mix of close up shots and wide shots .After storyboarding I realised I could not produce the video effectively, So I decided to change the idea to me being kidnapped in the suitcase. I imagined the suitcase to be a dark,scary claustrophobic space and wanted to convey that in the final video.I collected a bunch of sounds found online and started by piecing my soundscape together on audacity and then basing my video off of it.
Scene 1:Locking up of suitcase

BG: Airport announcement system , People chattering and walking FG: Keys and lock Close-up shot
Scene 2: Suitcase Being taken into the departure hall


BG: Same as scene 1                                                                                                  FG: wheels of luggage rolling
Wide-shot- Provides more information that it is happening at an airport
Scene 3: Struggling within the suitcase

BG: Muffled wheels rolling
MG: music to induce fear
FG: Clothes rustling,Breathing,whimpering
Scene 4: Escaping the suitcase

BG:Muffled wheels rolling
MG:Panting
FG:nails scratching against nylon
Close up shot

Mid-shot
Glimmer of light to show suitcase is being opened

FG:Zippers being opened ,Gasping for air
2.Soundscape
To create the soundscape i pieced together a few sounds i downloaded and adjusted them to how loud or soft i wanted the, at different scenes using the effects found on audacity. Also keeping in mind how the distance of the sound would affect the loudness and how different the sounds would be if i were listening them from inside the suitcase (muffled).For example the background sounds will be much quieter as compared to the foreground sounds.
3.Video
For the video i took burst photos of an action,like rolling a suitcase and chose a few in-between pictures and assembled them to match the scenes in the story board. I was inspired by stop motion animation videos,where multiple photos are taken and objects are moved between frames, creating the illusion of movement.

For the scenes inside the suitcase,i took photos of the suitcase with clothes inside to act as a background.Then i took burst photos of myself in a position where it seems as though I’m in a squeezey place and struggling.Then i proceeded to photoshop myself into the background picture.


Ms Lei Pointed out that the struggle scene was a bit too long and to include the subject coming out of the suitcase at the end of my video.My classmates gave more ideas for sounds like the conveyor belt and throwing of the suitcase.

For this project we were tasked to subvert an object.I drew the word “lamp”,So I had to find a way to change the meaning of the object itself by either juxtaposing it with another item or bring the lamp into a new environment.Since the lamp was fixed in the garden area of my home I decided to show how the lamp loses its function depending on the timing of the day.
TASK 1: Physical attributes and function


In these two pictures you can compare how the lamp loses its function during the day.It is turned off as it is the environment is well lit compared to the picture taken at night.The shadows in the background help emphasise the function of the lamp which is to provide light.The pictures are also symmetrical which makes it more stable and aesthetically pleasing.The shape, form and material of the lamp can also be seen due to the close up shots

The lamp is used to light the flowers in garden area when it gets dark.I wanted to show that by capturing the amount of light on the flower itself. The background is dark and slightly blur which draws the viewers attention to the flower.The lamp is still visible in the background but has little presence.
TASK 2: Connotation


I decided to pair my lamp with a wooden figurine. The lamp is a source of light and light symbolises “life”, and proceeded to work about this idea.It is as if the figure is trying to hang on to his “life” so the lamp acts as support for the wooden figure.The shadows add a dramatic effect and the canted angle makes the pictures slightly more dynamic.Also taking the last picture from a high range made the subject look small and helpless.
TASK 3: Text

I wanted to clarify the context,which is seeing the lamp as “life”.Thus,I chose “cherish the light of life” which acts as an anchorage.
Overall,there is room for improvement.I could consider reducing the size of the figurine as its quite large compared to the lamp.Also I could work on including more types of shots, extreme closeups and wide shots to give my work some variety.

I had a very direct approach to this project, But after the presentation I realised the areas I could improve on and I will discuss it later in this post.
Task 1:
For task 1, I was interested in capturing the essence of me,which I feel translates into my friendships,my love for food and loud bright fun colours and prints. Some of the test shots I took for this task are below.


The picture on the top was taken much too close, resulting in my body being cropped in a stranger manner. The focus would be more on my expression which I was not trying to emphasise in that picture itself.It also did not fully capture the colour range of the pillars as they were too close together and not well aligned.Further,the expression on my face was not as friendly as I would have liked. In the following picture my expression did not match up with the vibes I was going for.However, I did enjoy how extensive the pillars looked in this picture but it was not a focus of mine.The last picture managed to capture the cheery and relaxed feel I was going for from my expression and neutral angle it was taken.Overall, I felt that the long shot showed off the environment and the saturation brought out the colours which was the picture I eventually chose to include in task 1.

Next, I decided to include a picture that expressed my love for food. I captured the intensity of the force at which I was shoving the donut into my mouth, from the facial expression and the frosting being smeared on my face. Therefore, a close up shot would be apt in showing the details of the shot.I also ensured a white background and high exposure to make the colours pop from contrast.Ill discuss the test shots for this picture below.
In the test shot above , the lighting casted a shadow on my face which gave the picture a mysterious and scary effect.Also it defined the bumpiness of the wall behind me which I found to be quite distracting. So I opted for more direct lighting on my face and a simple white wall.
Lastly for task 1, I decided to include a picture of me and my friends.I cropped the picture to minimise distractions.I increased the exposure of the picture and also darkened the background slightly to draw the viewers to the focal point of the picture.
Task 2:
The object I chose was a donut,because since school started I’ve been eating it regularly because it’s brightly coloured,convenient and not to mention tasty.It was pretty straightforward to me photograph the donut on a plain white background to bring out its colours,and the details with an extreme close up shot.


The other two pictures I selected for task 2 were pretty similar. I used close up shots to bring the attention to my expression, and a slightly blurred picture as well.I felt that the blurriness made the excitement look more genuine because of the “motion” in that picture.
Task 3:
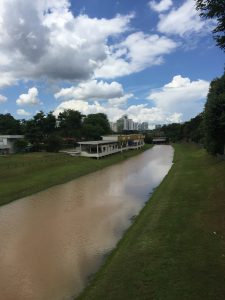

This is one of the areas in between sunset way and Clementi, which i find myself at very often because of the tranquil, peaceful atmosphere.In the original photos above i felt that the colour of the water was quite unappealing.Thus i added a filter and increased the contrast and saturation to colour correct the water and draw attention to the blue skies as i see blue itself as a very chill relaxing colour.Moreover i think the idea of symmetry added to the sense of balance/calmness.Hence, i selected the picture below as one of the final pictures for task 3.

Next I wanted to close task 3 by trying to capture as much of Clementi as I could. I went to one of my secret hangouts as I felt that it was more authentic to me and it had a high vantage point.I liked the idea of the train track as they lead your eyes down Clementi,taking you through the area.However I wanted a more warm tone to the picture,in this case everything is very blue,cold and rather impersonal.So i took to editing and turned up the warm cast.
Before:

After:

I will move on to the bakery photos..
 On the left was one of the test shots, I felt that it was quite impersonal and also there were too many distractions.

This picture was taken in a way where it seems like the viewer is in the bakery itself. I was also lucky enough to capture the owner which gives the picture a human touch as compared to the rest of my photos. The owner is not looking at the camera which makes it seem casual,as if he’s just doing his day to day activities. The warm glow emphasises the cozy nature of the bakery and adds a “nostalgic” effect.The long-shot aided in capturing more of the environment and the shelves are lined up to give the photo more stability.
As mentioned in the introduction,improvements can be made, especially in task 3. I feel that i could’ve gone more in depth into bakery itself as opposed to me taking pictures of various areas in my estate.For example,I only noticed the alter placed onto of the shelves due to the test shots, despite religiously visiting this bakery since childhood.I thought it gave off a rather spooky vibe because of the soot accumulating on the celling and the bright red light which makes it slightly unusual compared to the environment of the bakery itself. A low angle would have captured the dark soot and also made the statue of the god look more daunting.Also one of my favourites from the bakery was the pandan chiffon cake because of its bright green colour and soft fluffy texture.Placing it on a red background would have brought out the green and the texture would be emphasised with an extreme close up shot.
Today i was told to take photos of my partner which best represented the attributes that i liked about them.Out of twelve shots i had to select the best three, which are below.


I felt that Esther had a shy and quirky character which can be seen in the first picture because of her pose.It was a candid picture so i thought it was more genuine.
In the second picture Esther has a friendly expression so a close up shot with minimal distractions in the background, would be apt in showing the details in her facial expression.Also the angle of the picture is eye level, to maintain the friendly nature of the picture.
In the third picture i was trying to capture esthers confident and mysterious side.I decided to photograph her silhouette leaving out details of her emotion and facial features. A low angle made her look more powerful and confident.i felt that with the sky and the greenery in the background it contrasted well with the black silhouette making it stand out more.
One of the challenges i faced was the lack of experience using a DSLR camera.I was taught how to manually focus on an object and adjusting the iso to the appropriate level(around 1600).Since i sort of know the basics of using a camera, practising would be much easier.