DN1010 EXPERIMENTAL INTERACTION
FINAL PROJECT DOCUMENTATION
DN1010 G02 – Ginnie Lee, Nicole Chen
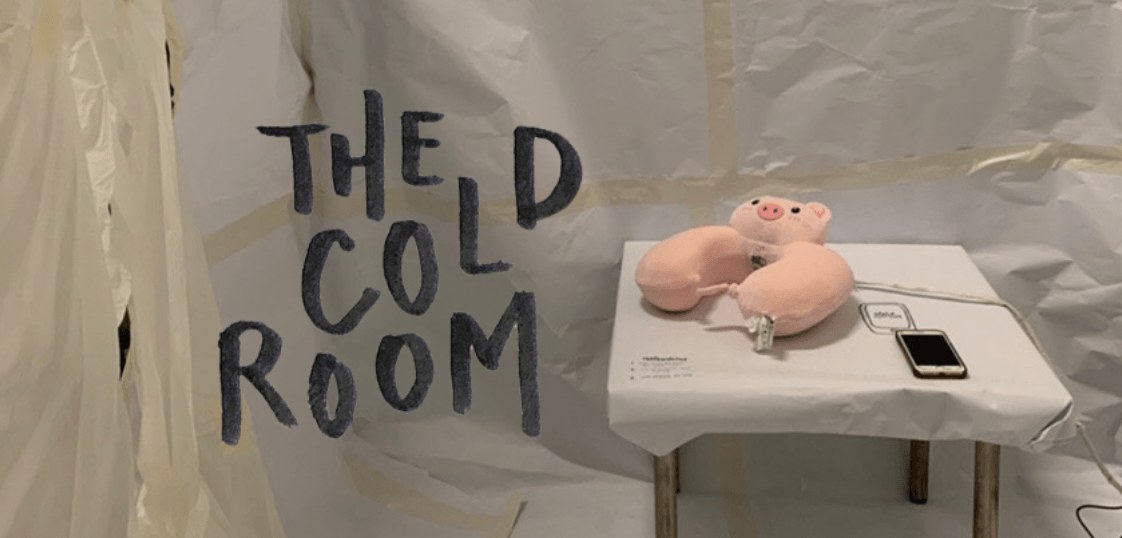
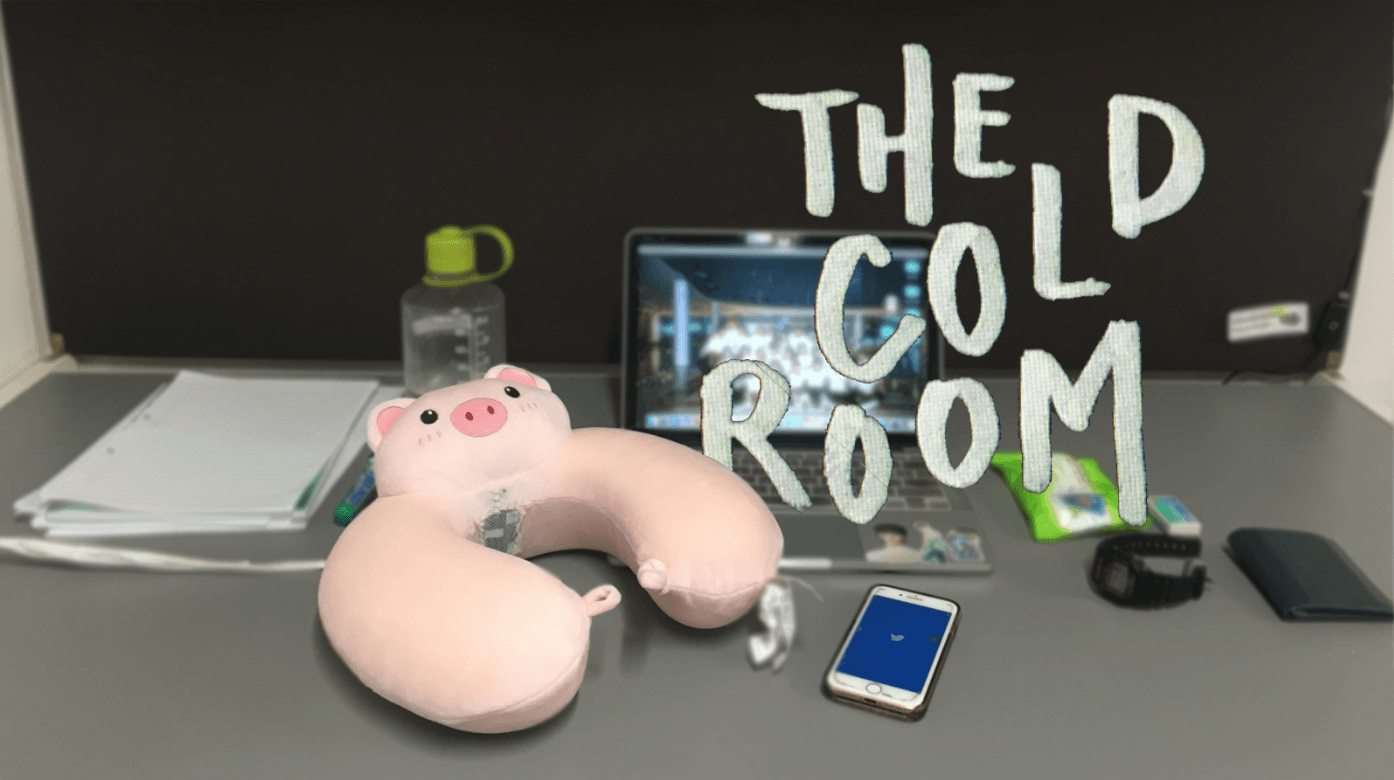
“The Cold Room”
Project brief:
Dark Object – Design and build an object that facilitates emotions of loss, loneliness, and self-pity associated with a person who has just been abandoned by someone they loved.
Our project:
Nowadays, people are getting connected more and more online and even during meal times or time spent with your loves ones, we stare down at our phones and use social media / messaging applications instead of attempting to connect with our loved ones with us physically. The more we are on our phones to stay connected online, the more we neglect those around us, creating a disconnection in real life. This project aims to bring out the loneliness we feel when we are “abandoned” by our loved ones or when we “abandon” our loved ones in exchange for connectivity online. The more we wish to be connected online, the lonelier we feel offline.
Video describing your project and showing in the actual place or context of use:
Please click here for the video.
Observational documentation for user tests:
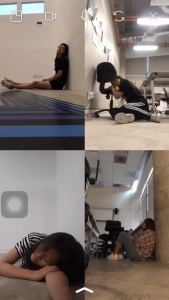
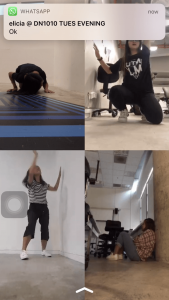
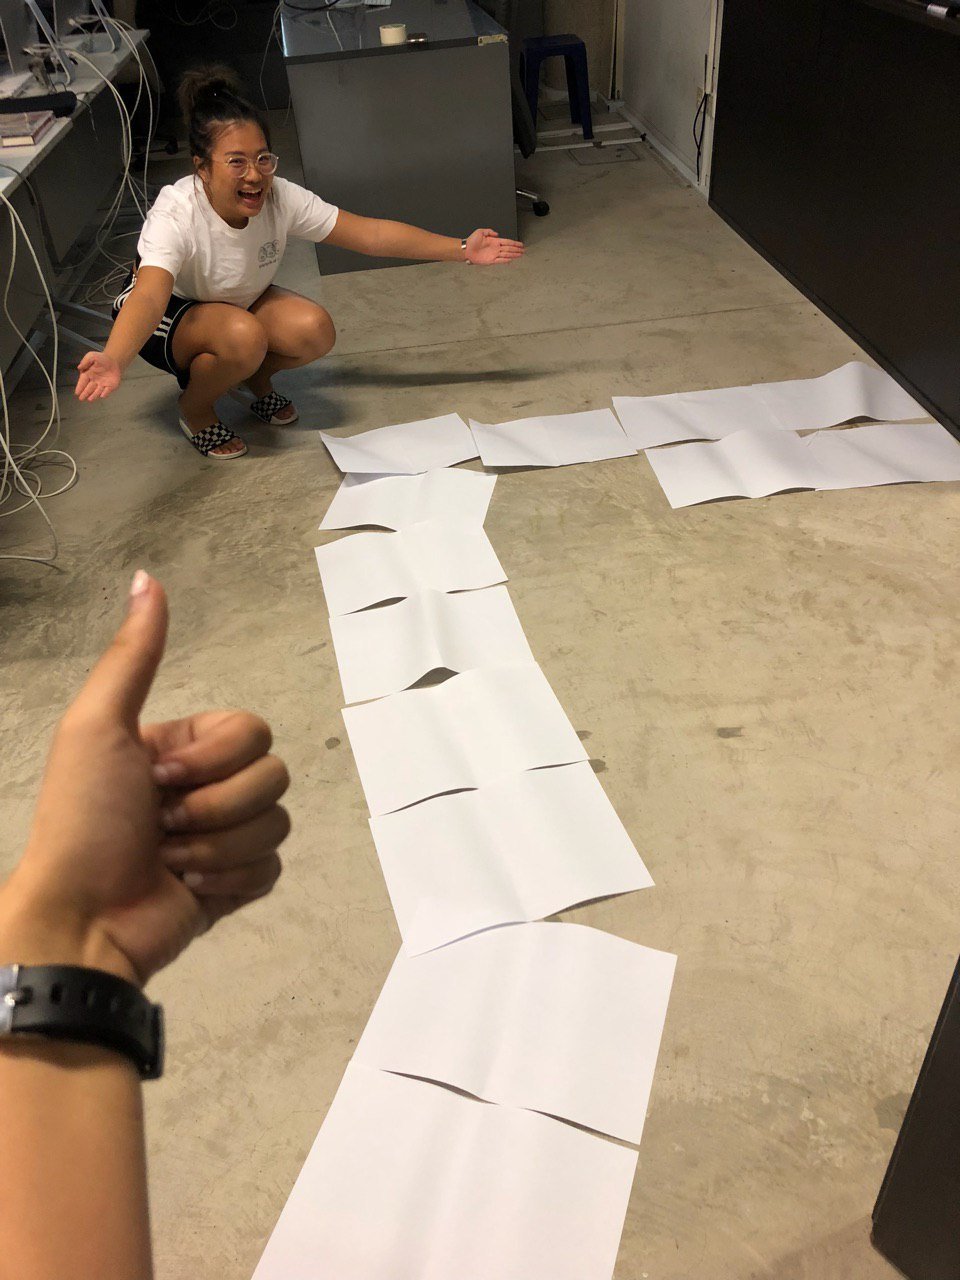
Body storming (Week 10)
During body-storming, we brought in a jacket and simulated the test with the use of cardboard. 2 of our classmates helped us test the process of the interaction, and based on the comments given, we refined and improved on our idea.
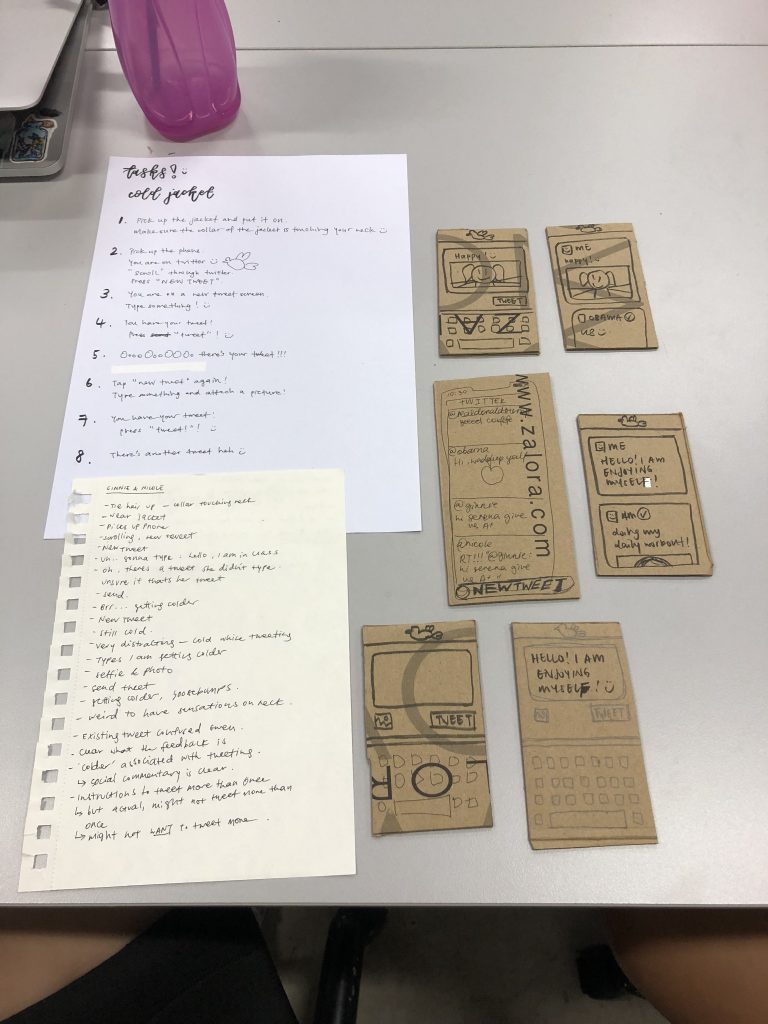
The documentation and reflections of the Body-storming process can be found here.
Play Test (Week 12)
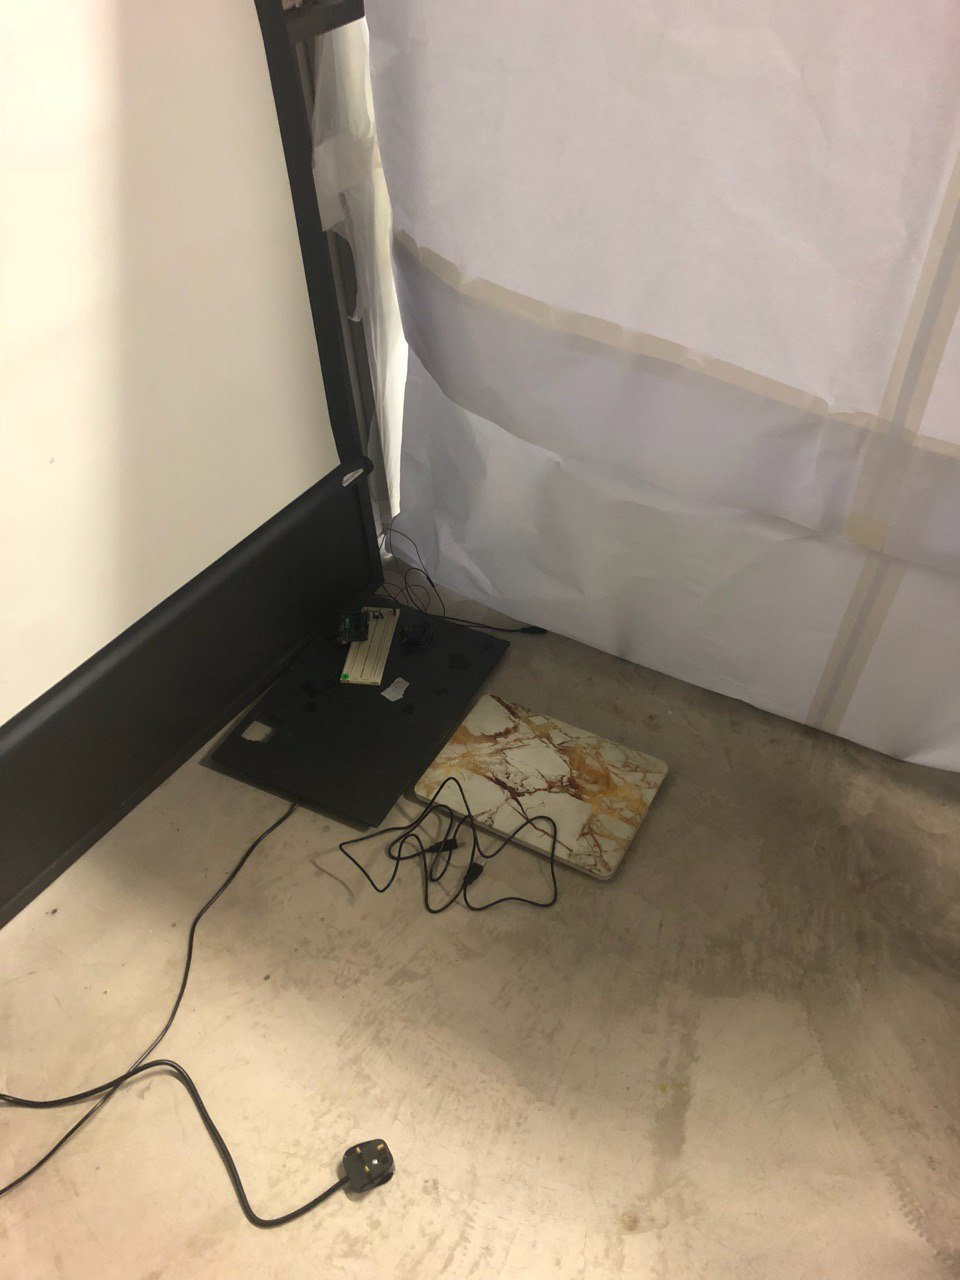
For the Play Test, we didn’t manage to complete the entire set up of connecting twitter to Arduino and hence only brought in our circuit with Arduino connected to the Peltier module. To simulate the process of tweeting causing the Peltier to react, we manually pressed the button in the circuit when a new tweet is sent to close the circuit and hence allowing the Peltier to turn cold. Below is the circuit we brought in into class for the Play Test (with the fan under the heat sink).
Participants tested our circuit during the play test, and tweeted while placing a finger on the Peltier module to test it’s temperature.
Attached below is the video taken during the play test.
Notes taken during the play test (curtesy of Mun Cheng) :
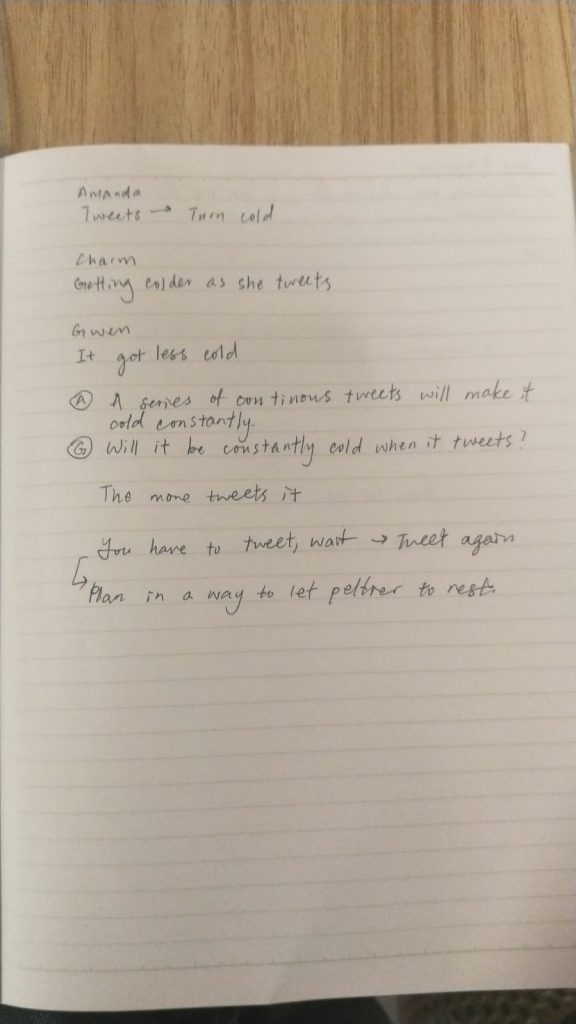
Amanda
Tweets –> turn cold
A series of continuous tweets will make it cold constantly
Charm
Getting colder as she tweets
Gwen
It gets less cold
The more tweets there are, the Peltier will just remain cold // The Peltier will not get colder with each new tweet
You have to tweet, wait –> tweet again
The interaction have to be planned in a way where Peltier can rest (to cool down) before next user uses it.
———————————————————————————————-
After the play test, we decided that there were some things we wanted to improve on based on our current idea. Firstly, we decided to change the jacket to a head pillow, as we realised that there was a significant weight when the Peltier module is attached to the heat sink and the cooling fan. This weight would cause the already flimsy collar to flap downwards and not be able to have contact the user’s neck when the Peltier is attached to the collar of the jacket. The neck pillow was also a better choice as we could cut out the filling of the pillow and insert the Peltier module attached to the heat sink and the cooling fan into the pillow itself. That way, we can have a better finishing and also at the same time combat the problem of the Peltier not being able to have contact with the participants’ neck.
A problem brought up during the play test was also that (as seen in the notes) the Peltier module tends to get less cold as time passes and the Peltier needs time to cool down before the original effect of cooling can be achieved again. We considered getting a bigger fan to help dissipate the hate faster, but decided against it as the entire Peltier combo would then become even bulkier and heavier and will not be able to fit into the neck pillow comfortably/ let the participant using the neck pillow use it comfortably. During the process of inserting the Peltier into the neck pillow, we tried to time the length of time the Peltier takes to lose the coldness (to reach room temperature), and initially, it was only able to stay cold for 1.5 minutes due to the fan being inside the neck pillow with the hot air sucked in by the cooling fan trapped inside the neck pillow.
Hence, we decided to cut an opening through the back of the neck pillow to allow the hot air to dissipate out. After cutting the opening, the Peltier could stay cold twice (up to 3 mins) as long as when the neck pillow didn’t have an opening.
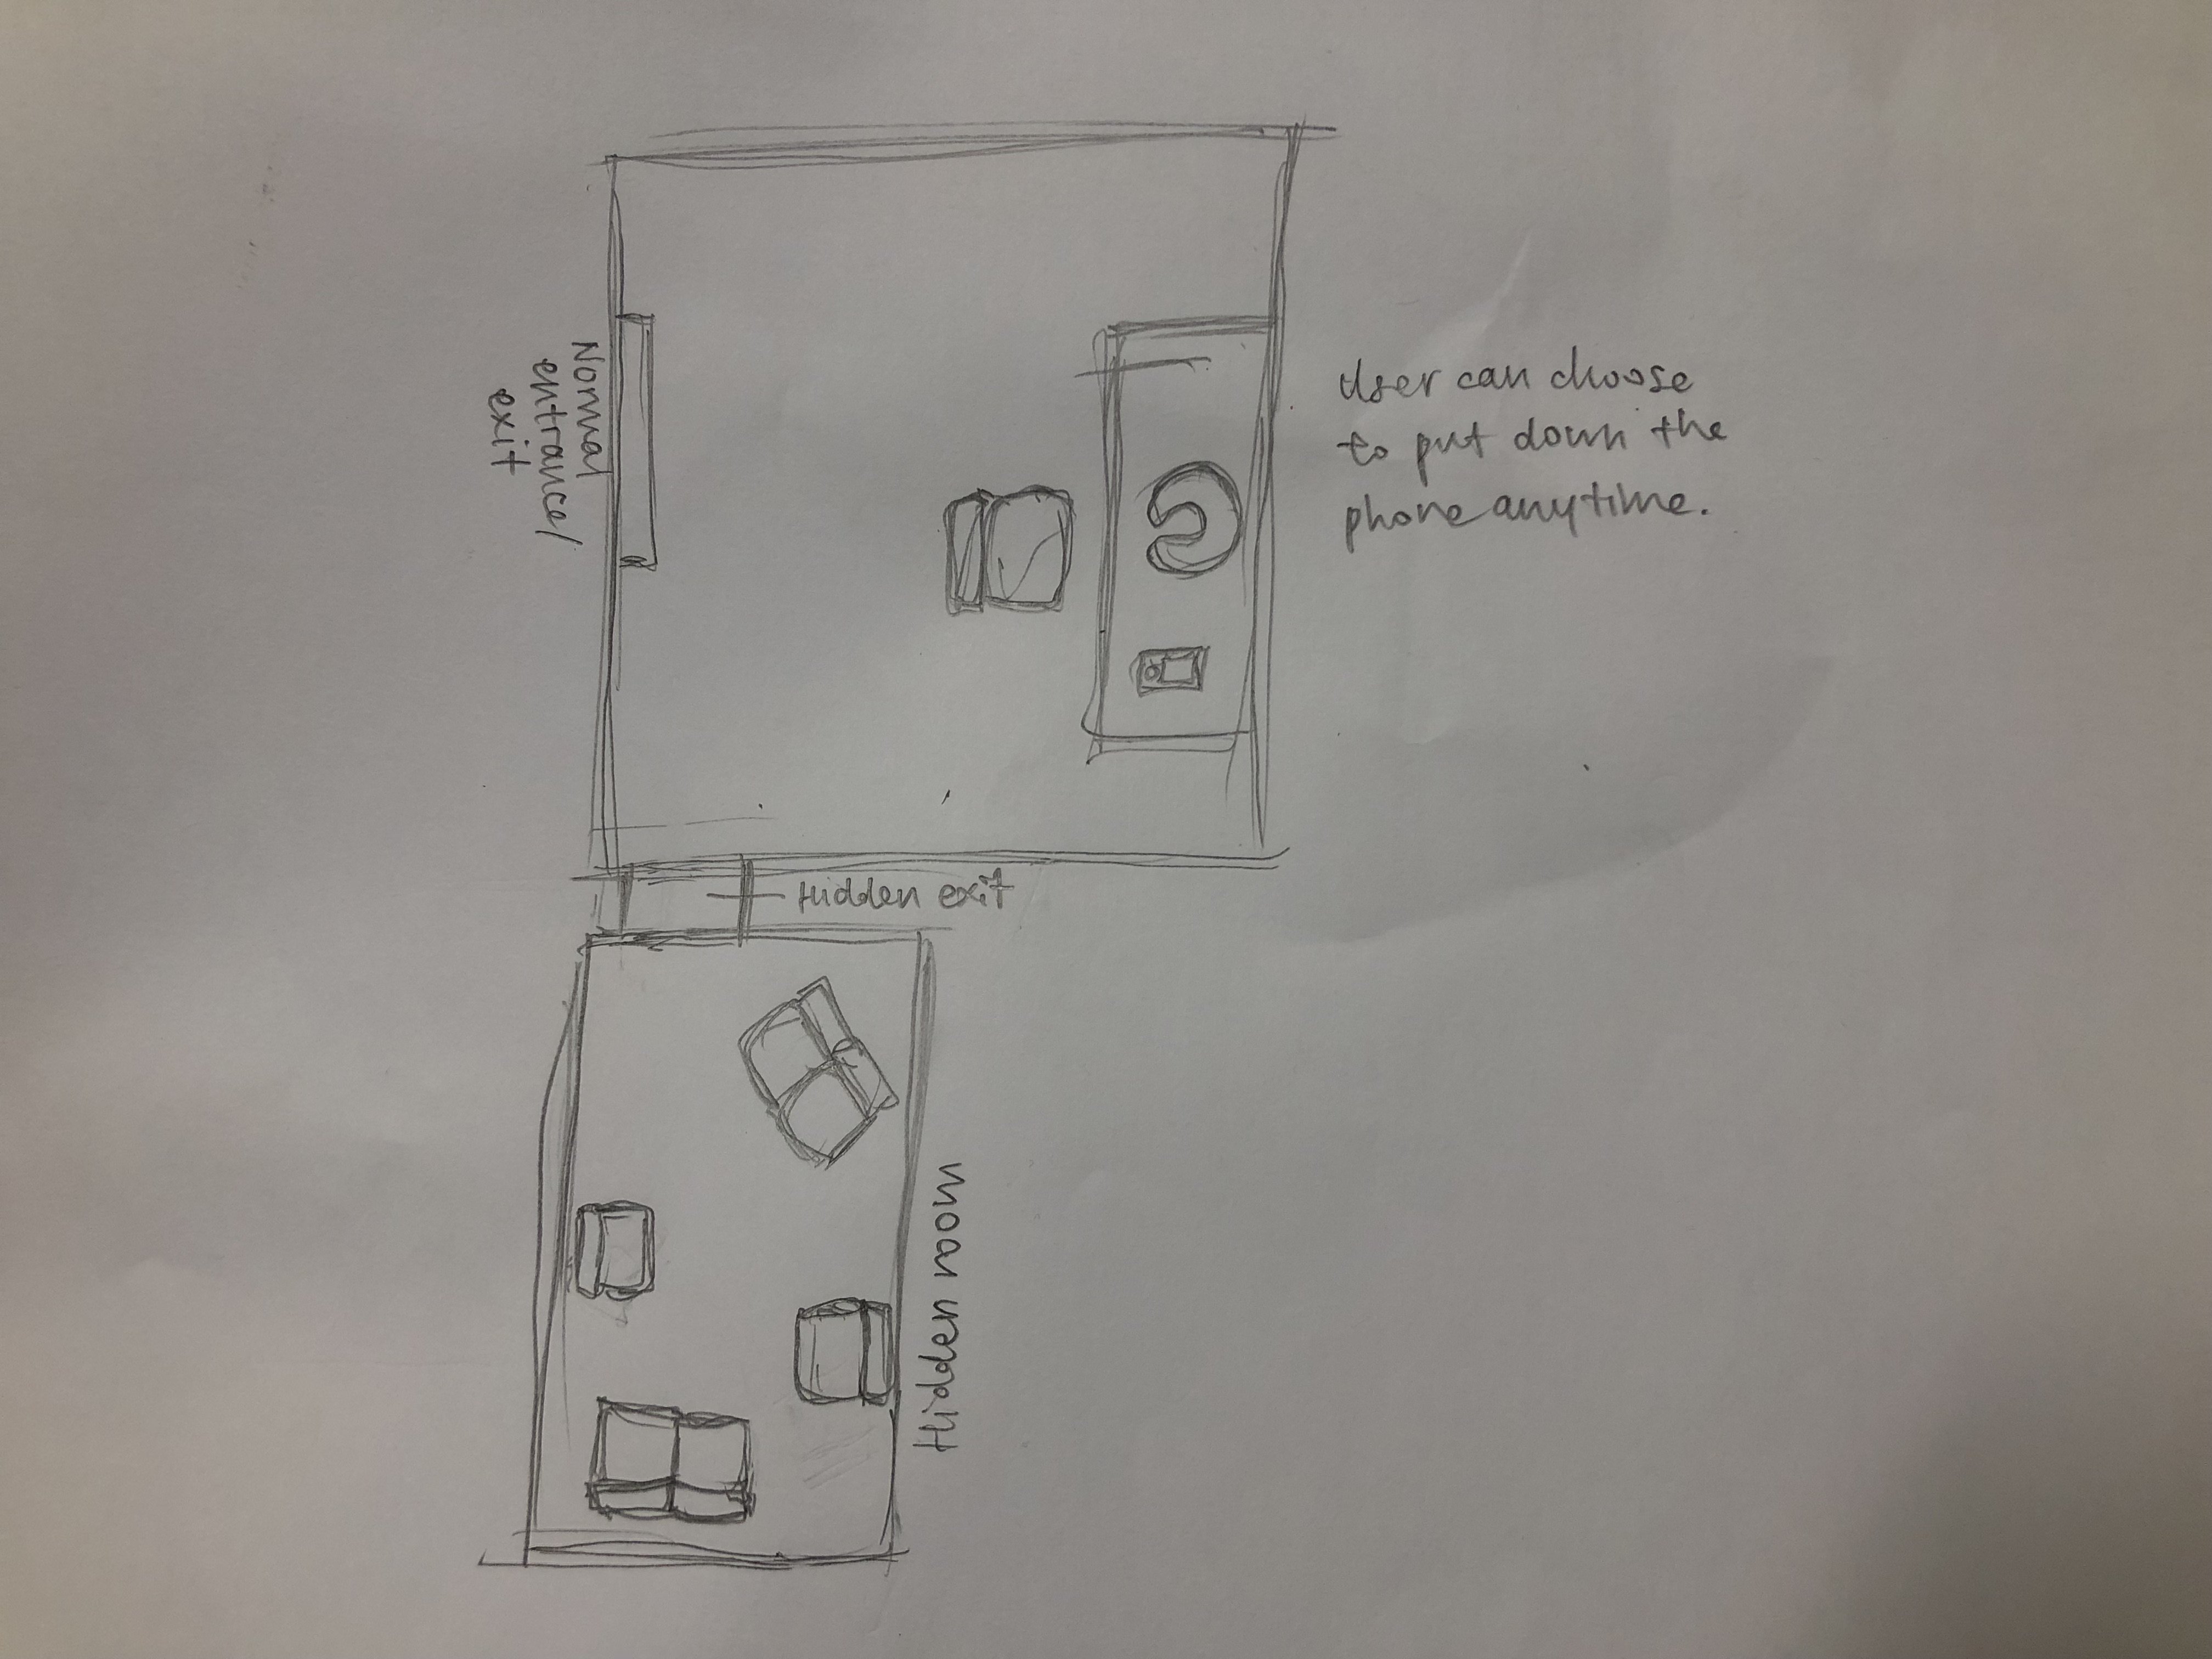
Thereafter, we also came up with the idea of building a room with 2 exits, one being the entrance the participants come in from and one hidden exit that leads to another room. The other room will have people and other previous participants in it, allowing the participants who exit through the hidden exit to connect with those people, hence alluding to connecting with people physically offline, away from social media and our phones.
Design Process Documentation:
Initial Ideation
“Cold Jacket”
Our original idea was to create a jacket, something that is made to provide warmth, to turn cold when a certain volume of activity is detected in the mobile phone (in terms of notifications). The jacket, made to keep us warm, can ironically make us cold with the increase in activity in our phones.
The cold felt from the jacket is a physical manifestation of the loneliness. Furthermore, based on a study by Psychologists Chen-Bo Zhong and Geoffrey Leonardelli from the University of Toronto’s Rotman School of Management, social isolation can actually allow people to feel cold physically. A group of volunteers were divided into 2, with one group recalling the personal experience of being socially excluded and the feelings of loneliness and isolation, and the other recalling an experience of being socially included (in other words, being accepted and hence not being isolated). The 2 groups were then asked to enter the same room and estimate the temperature in the room. Those who were told to think about a socially isolating experience gave lower estimates of the room temperature. In other words, the recalled memories of being ostracised actually made people feel colder and experience the ambient temperature as colder.
Hence, we wanted to amplify on the feelings of loneliness and isolation through the drop in temperature. The loneliness we wanted to project when we are getting “abandoned” or “abandoning” others in exchange to be connected online is translated into physical coldness.
(Refer to Project Development Drawings for more details on initial ideation.)
Final Ideation
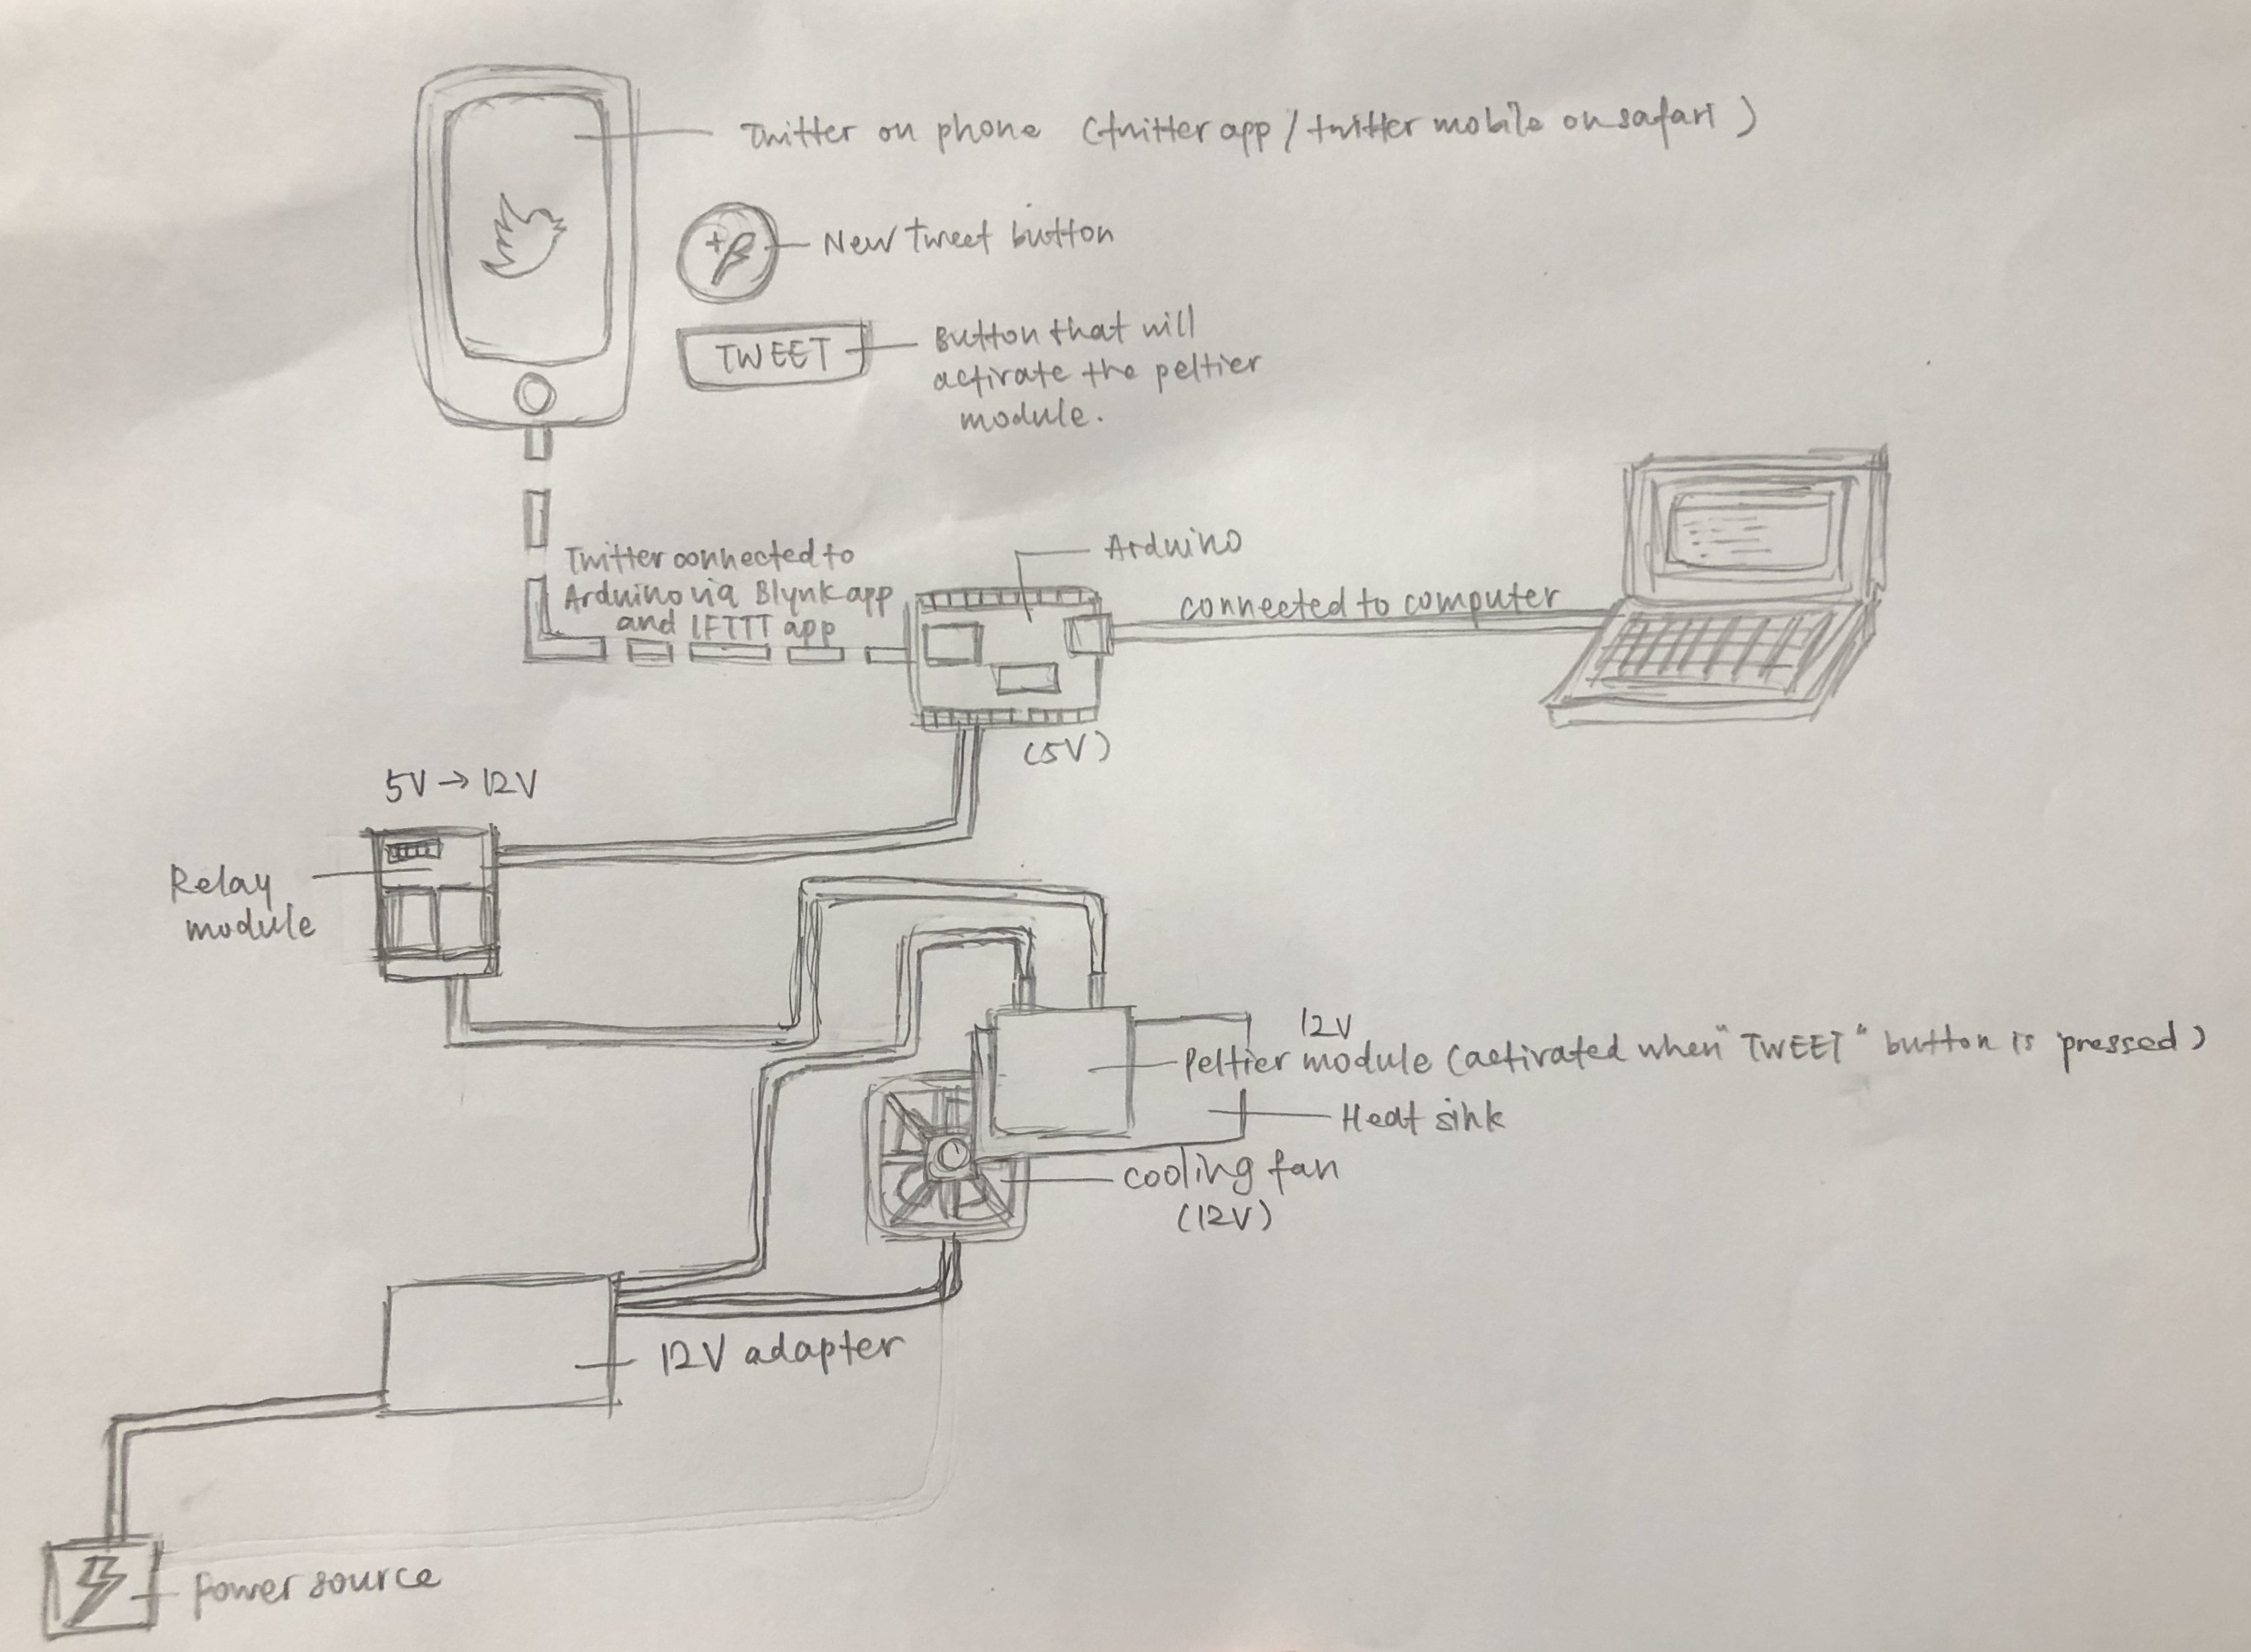
Below is the plan for how the circuit will be connected, from Twitter to Arduino (through blynk and IFTTT app) to the Peltier Module via the relay module and with an external power source.
Furthermore, we wanted to create a room that can help to enhance our object, with the room having a lone table and having a hidden exit that leads to another room in which participant can connect with others.
Below is the room plan for the proposed room.
Instructables (Making of the work) :
For a neater and more organised version of the same instructables, please refer to the document below.
The Cold Room
A Peltier module connected to Arduino which is connected to Twitter and hence controllable through Twitter. The Peltier module is inserted into a neck pillow and the neck pillow is situated in a all white room, which has a hidden exit that leads to a secret room.
Step 1: Get materials
Materials needed for this project:
- Arduino
- Breadboard
- 12V Peltier Module
- Relay Module
- Jumper wires
- Male to female jumper wires
- 12V Power adapter
- Heat sink
- Cooling fan
- 10V resistor
- Crocodile / alligator clips
- Button
- Testpen
- Blynk app
- IFTTT app
- Mahjong paper
- White trash bag
- Tape
- Table
Step 2: Connecting the Peltier module to Arduino
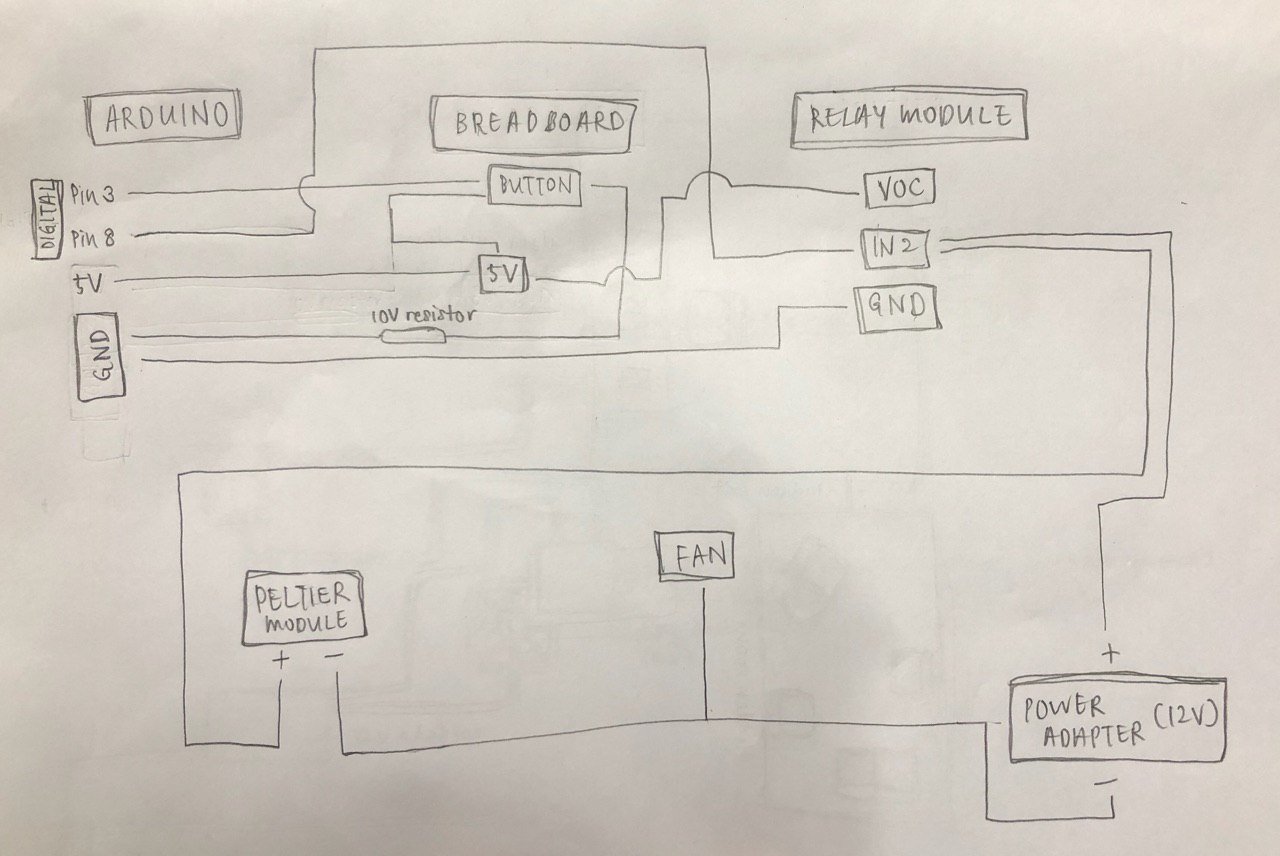
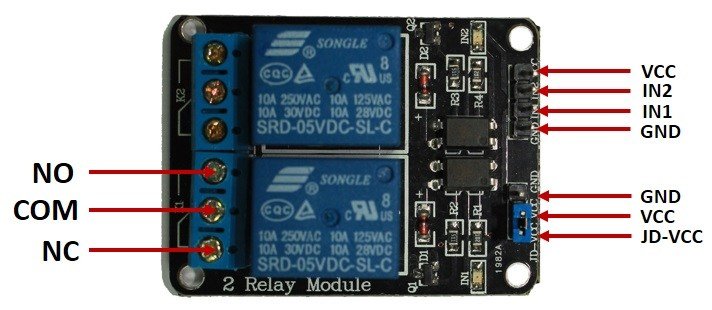
Based on the above drawing, the positive end of the Peltier module (denoted by the red wire), is connected to the Common of 2nd relay module on our 2 module relay. The negative end of the Peltier module (denoted by the black wire), is connected to the negative end of the 12V Power adapter. The positive end of the 12V power adapter is then connected to NC (Normally Closed) of the 2nd relay module. The IN2 pin of the relay module is then connected to Digital Pin 8 on Arduino with a female to male jumper wire. The GND (Ground) of the Relay module is connected to the GND of Arduino.
Next, the 5V of Arduino is drawn to the Breadboard. This 5V that is drawn to the Breadboard is then connected to VOC on the relay module and to one side of the button. The other side of the button is connected to GND through a 10V resistor and to Digital Pin 8 of Arduino.
This is to connect the Peltier module to Arduino and to the button, which controls the opening and closing of the circuit. When the button is pressed, the circuit is closed and it is then will the Peltier module react with a drop in temperature.
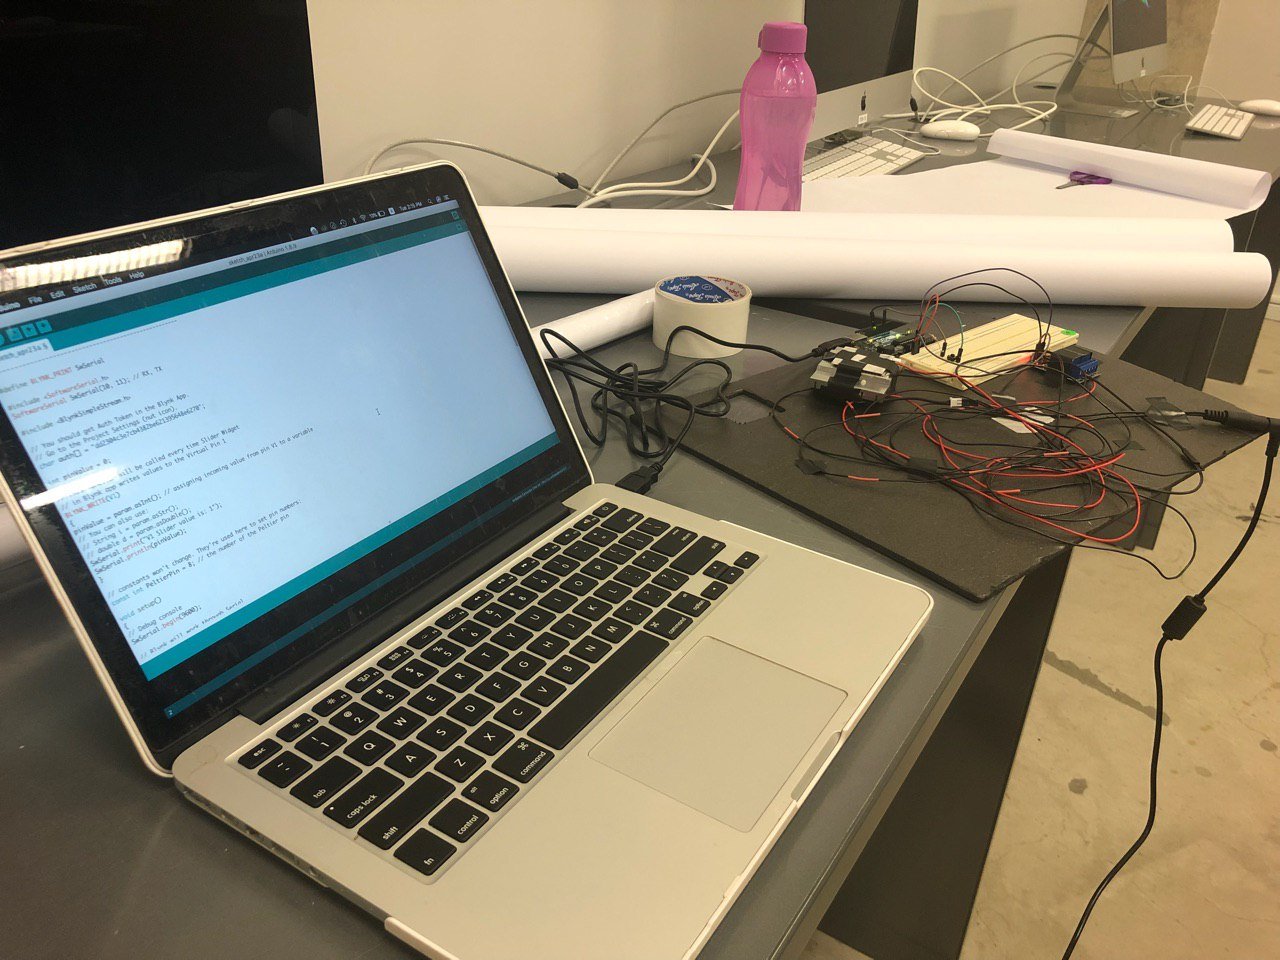
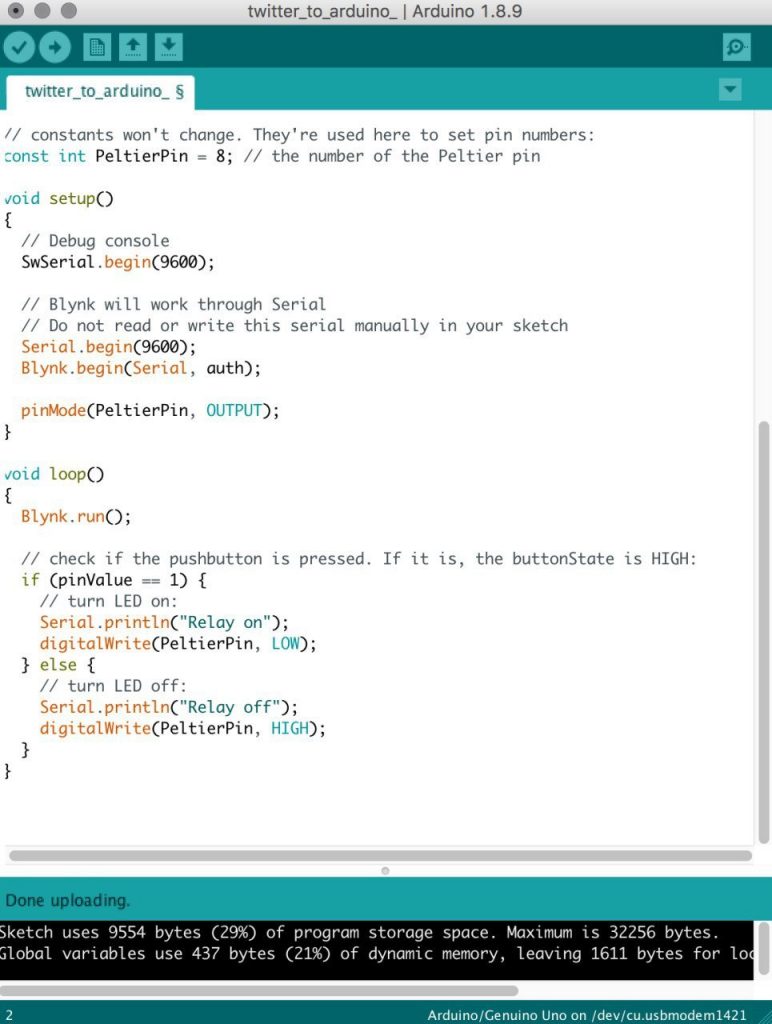
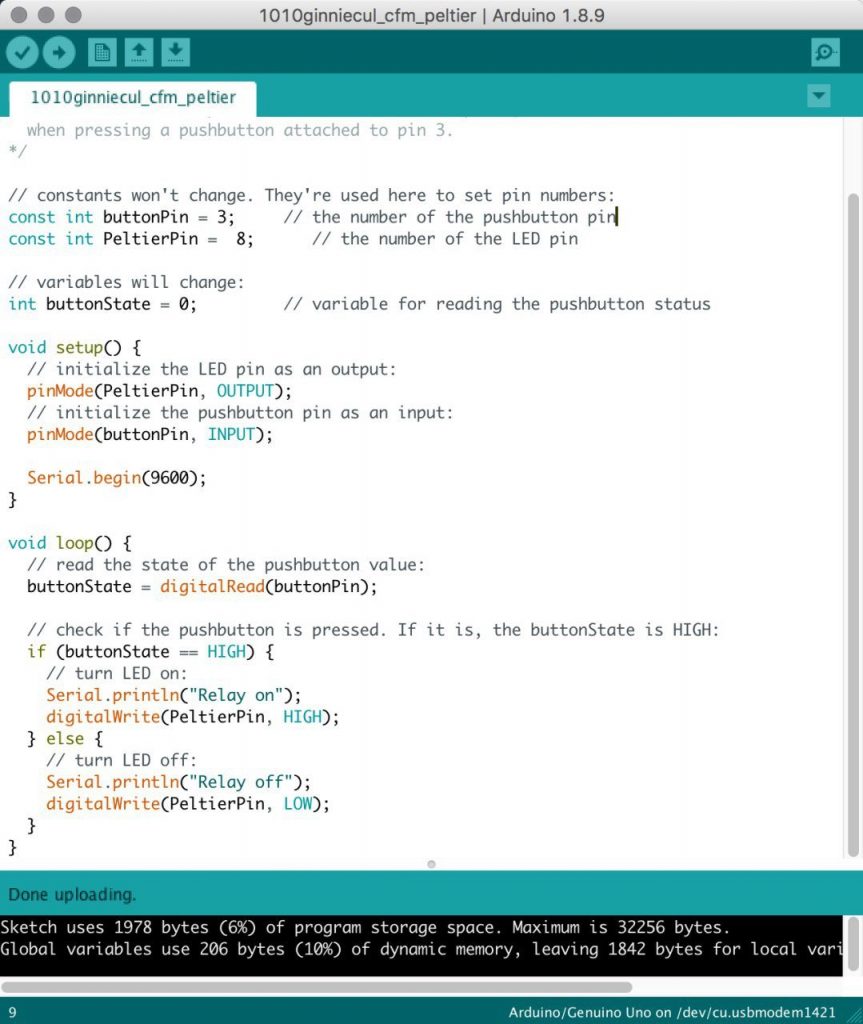
Step 3: Input of the code in Arduino
The code below is keyed in into Arduino on computer and thereafter sent to Arduino.
_____________________________________________________________________
/*
Button
Turns on and off a peltier module attached at pin 8,
when pressing a pushbutton attached to pin 3.
*/
// constants won’t change. They’re used here to set pin numbers:
const int buttonPin = 3; // the number of the pushbutton pin
const int PeltierPin = 8; // the number of the LED pin
// variables will change:
int buttonState = 0; // variable for reading the pushbutton status
void setup() {
// initialize the LED pin as an output:
pinMode(PeltierPin, OUTPUT);
// initialize the pushbutton pin as an input:
pinMode(buttonPin, INPUT);
Serial.begin(9600);
}
void loop() {
// read the state of the pushbutton value:
buttonState = digitalRead(buttonPin);
// check if the pushbutton is pressed. If it is, the buttonState is HIGH:
if (buttonState == HIGH) {
// turn LED on:
Serial.println(“Relay on”);
digitalWrite(PeltierPin, LOW);
} else {
// turn LED off:
Serial.println(“Relay off”);
digitalWrite(PeltierPin, HIGH);
}
}
_____________________________________________________________________
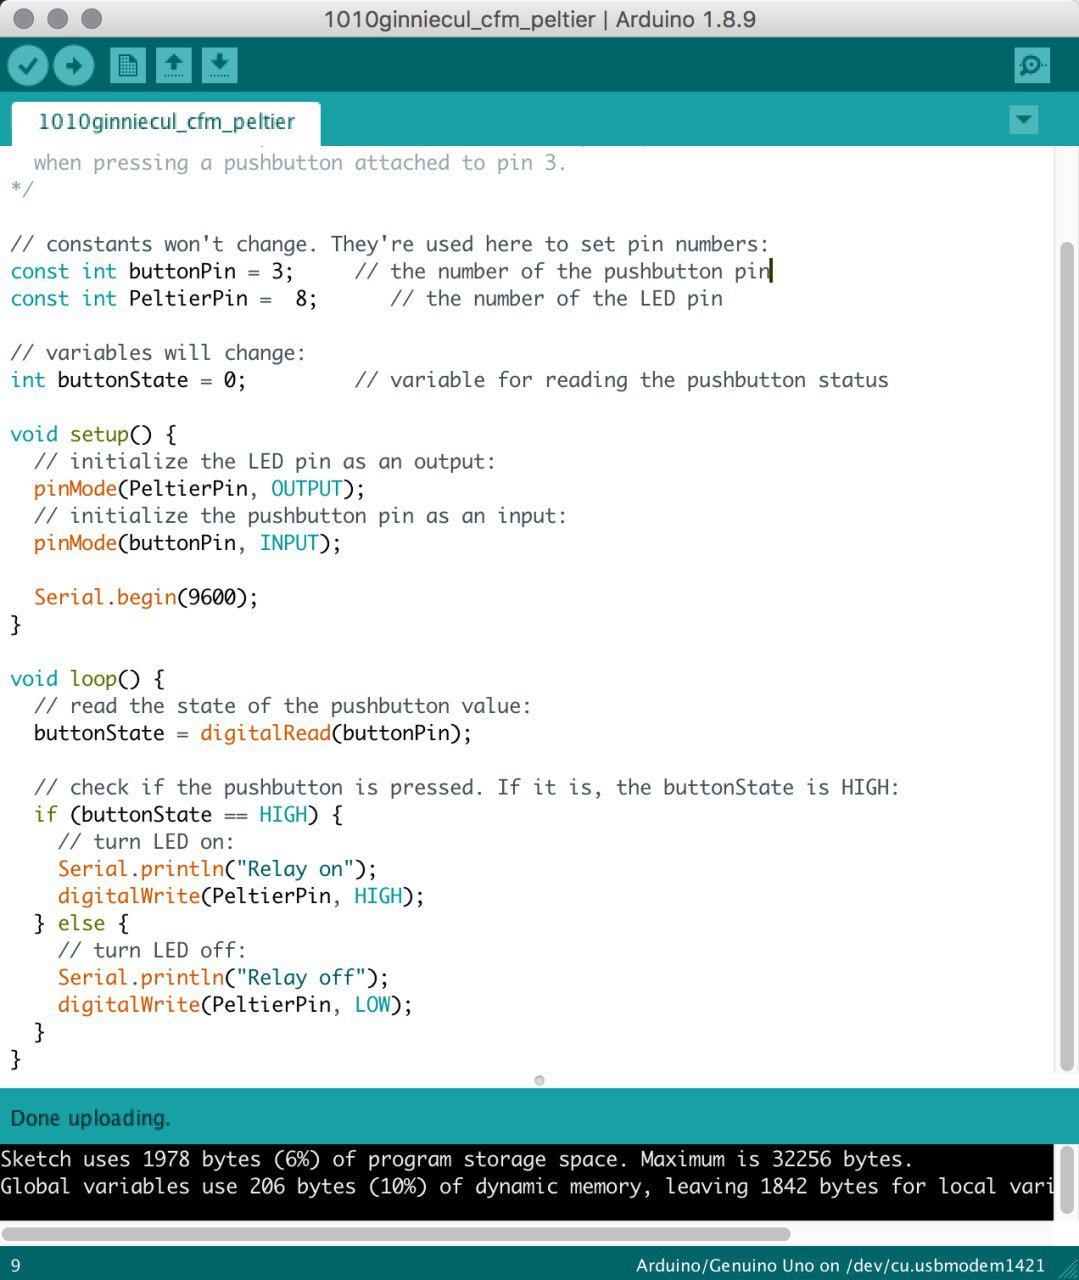
With this code sent to Arduino, the Peltier module is then able to react with a drop in temperature when the button is pressed.
Step 4: Connect the cooling fan (12V) to the power source.
By connecting the cooling fan to the power adapter, the fan will then work when the power adapter is connected and hence is able to help suck out the heat produced on the other side of the Peltier module to ensure the cold side can stay cold for a longer time.
As the fan need not be controlled by Arduino and only needs to work to cool down the Peltier, it can be directly connected to the power adapter that supplies the 12V needed for the fan.
Step 5: Attaching the fan and the heat sink to the Peltier module.
We then placed the Peltier module onto the heat sink with the hot side down and attached the cooling fan under the heat sink. The entire thing is bounded together by insulating tape.
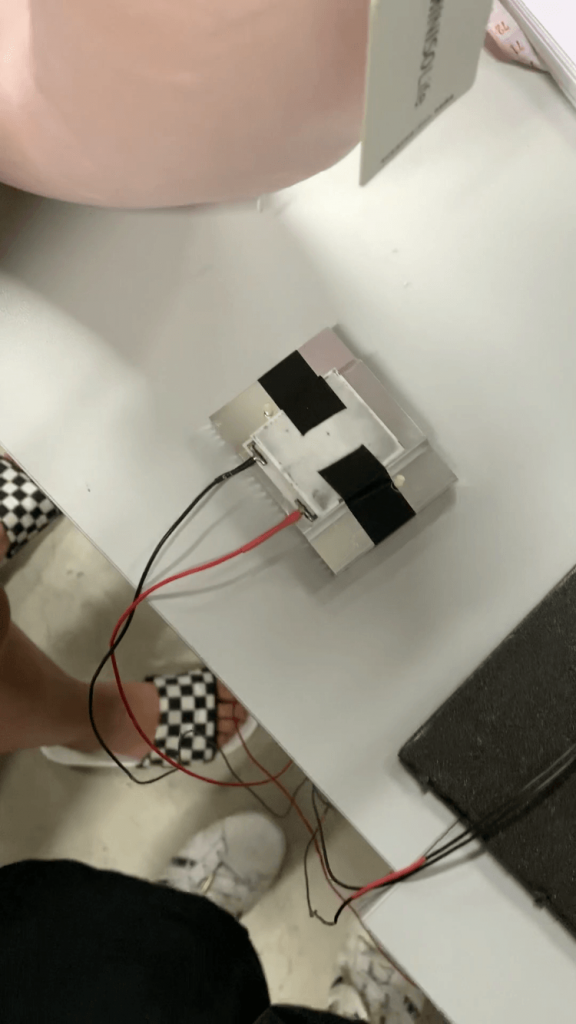
The circuit can now be tested for workability through the use of the button.
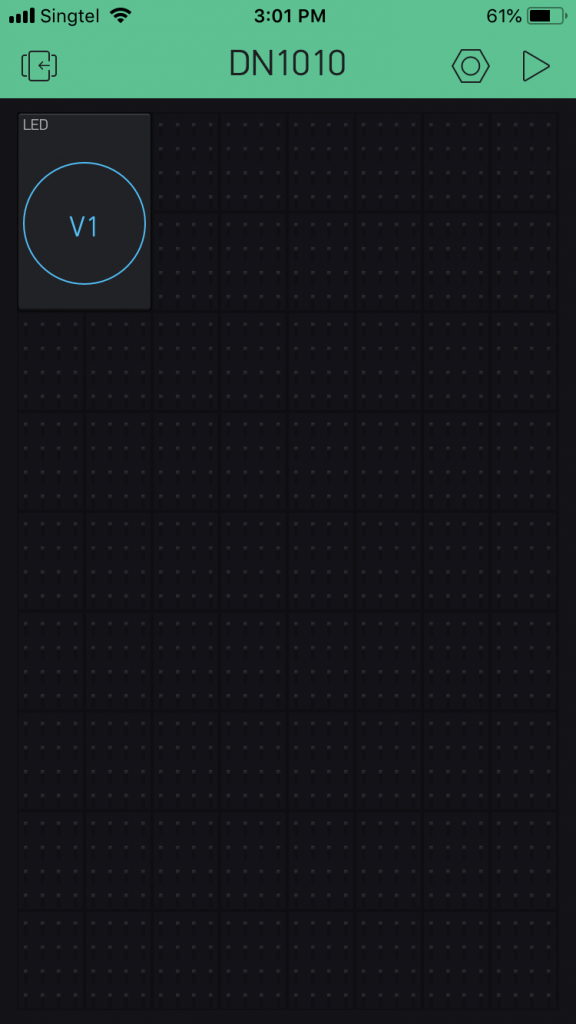
Step 6: Connecting Blynk to the computer
Following instructions on OSS, we then connected the Blynk app to the computer. We tested the workability of the Blynk app afterwards with a LED light.
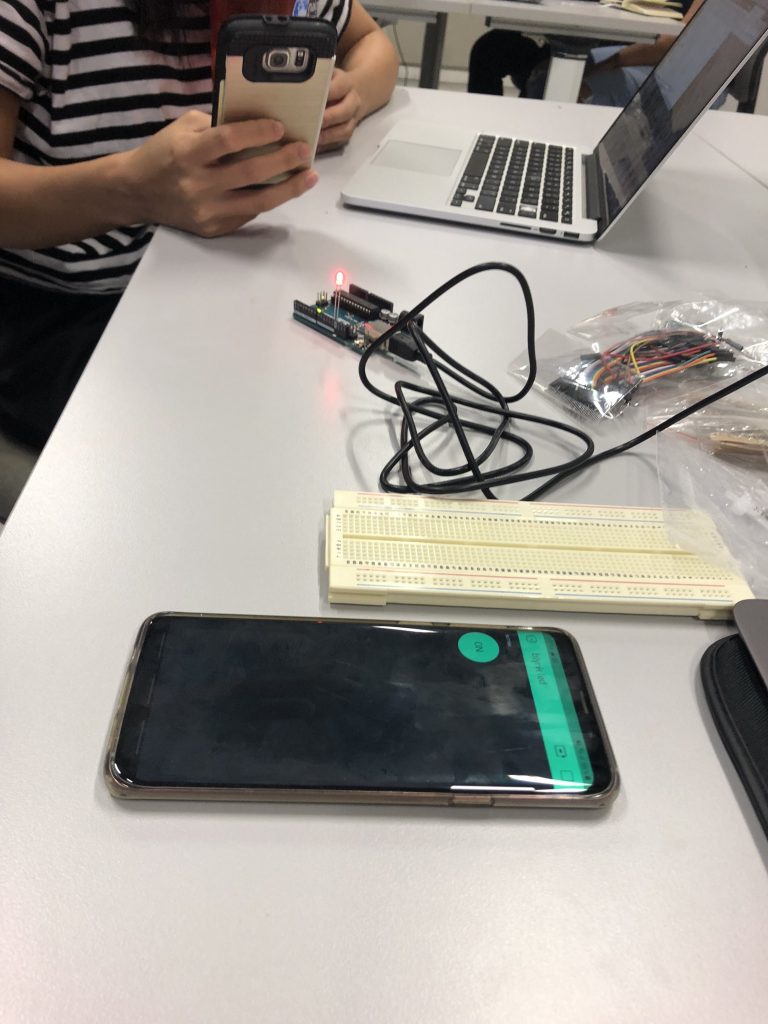
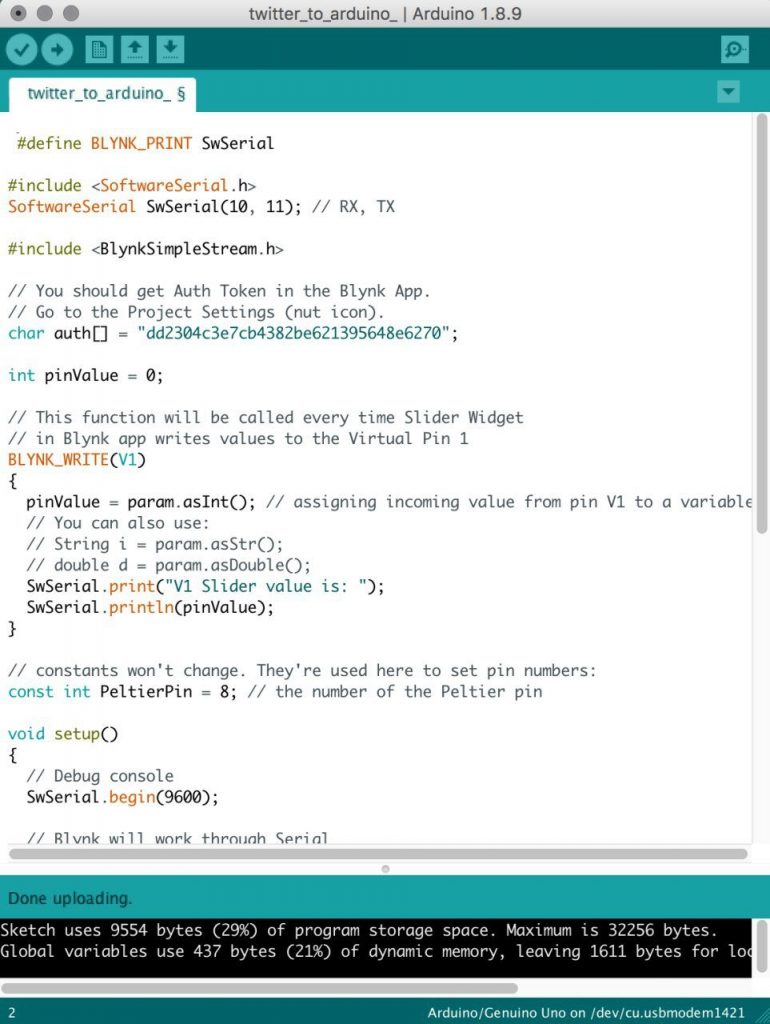
Step 7: Connecting Twitter to Arduino via the IFTTT app and Blynk.
Thereafter, we created a separate project for the Peltier and connected the button to V1 (Virtual 1). This allows Blynk to control the Peltier module via Arduino.
Video – Connecting Blynk app to Arduino
We then created a link via webhooks on IFTTT to connect Twitter to Arduino.
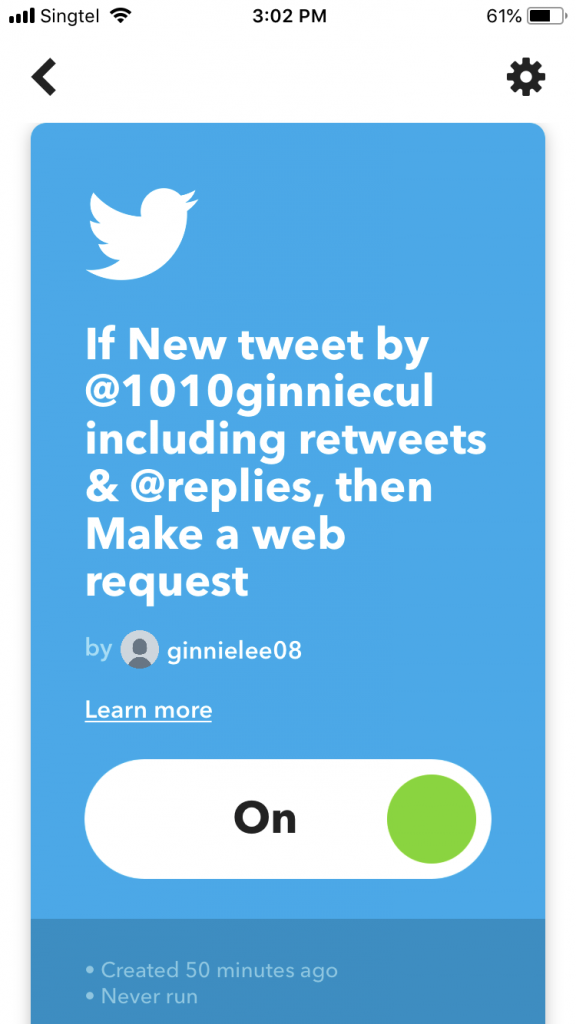
Video – Connecting Twitter to Arduino
The code below is used to allow Twitter to control the Peltier module through Arduino.
_____________________________________________________________________
#define BLYNK_PRINT SwSerial
#include <SoftwareSerial.h>
SoftwareSerial SwSerial(10, 11); // RX, TX
#include <BlynkSimpleStream.h>
// You should get Auth Token in the Blynk App.
// Go to the Project Settings (nut icon).
char auth[] = “dd2304c3e7cb4382be621395648e6270”;
int pinValue = 0;
// This function will be called every time Slider Widget
// in Blynk app writes values to the Virtual Pin 1
BLYNK_WRITE(V1)
{
pinValue = param.asInt(); // assigning incoming value from pin V1 to a variable
// You can also use:
// String i = param.asStr();
// double d = param.asDouble();
SwSerial.print(“V1 Slider value is: “);
SwSerial.println(pinValue);
}
// constants won’t change. They’re used here to set pin numbers:
const int PeltierPin = 8; // the number of the Peltier pin
void setup()
{
// Debug console
SwSerial.begin(9600);
// Blynk will work through Serial
// Do not read or write this serial manually in your sketch
Serial.begin(9600);
Blynk.begin(Serial, auth);
pinMode(PeltierPin, OUTPUT);
}
void loop()
{
Blynk.run();
// check if the pushbutton is pressed. If it is, the buttonState is HIGH:
if (pinValue == 1) {
// turn LED on:
Serial.println(“Relay on”);
digitalWrite(PeltierPin, LOW);
} else {
// turn LED off:
Serial.println(“Relay off”);
digitalWrite(PeltierPin, HIGH);
}
}
_____________________________________________________________________


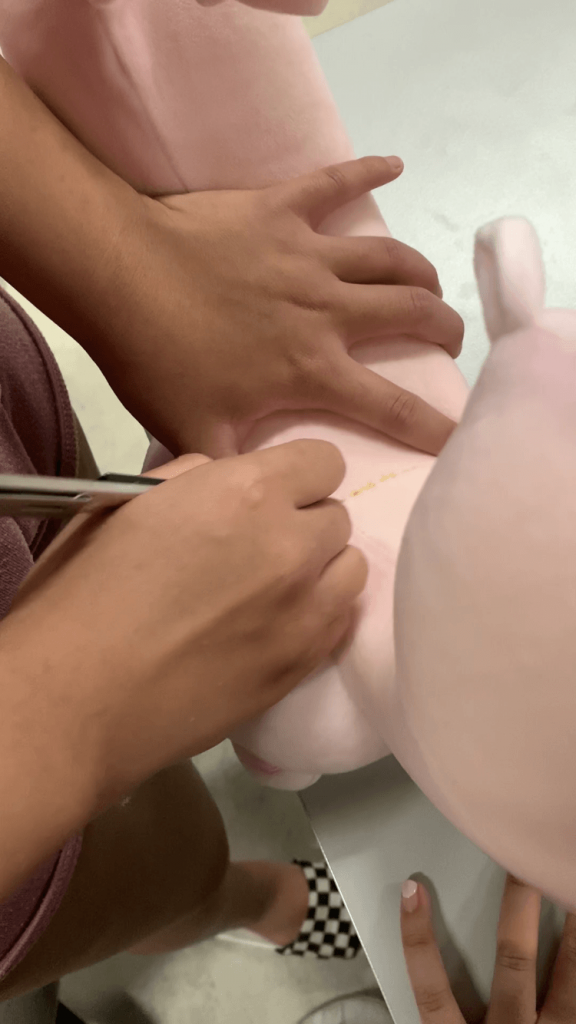
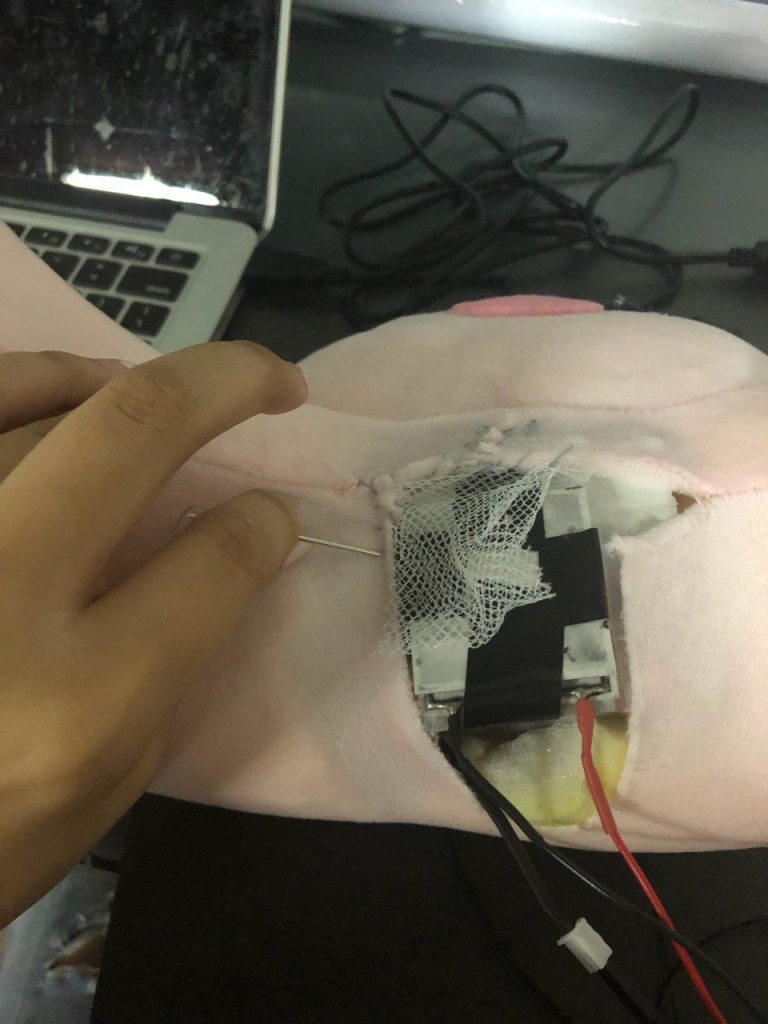
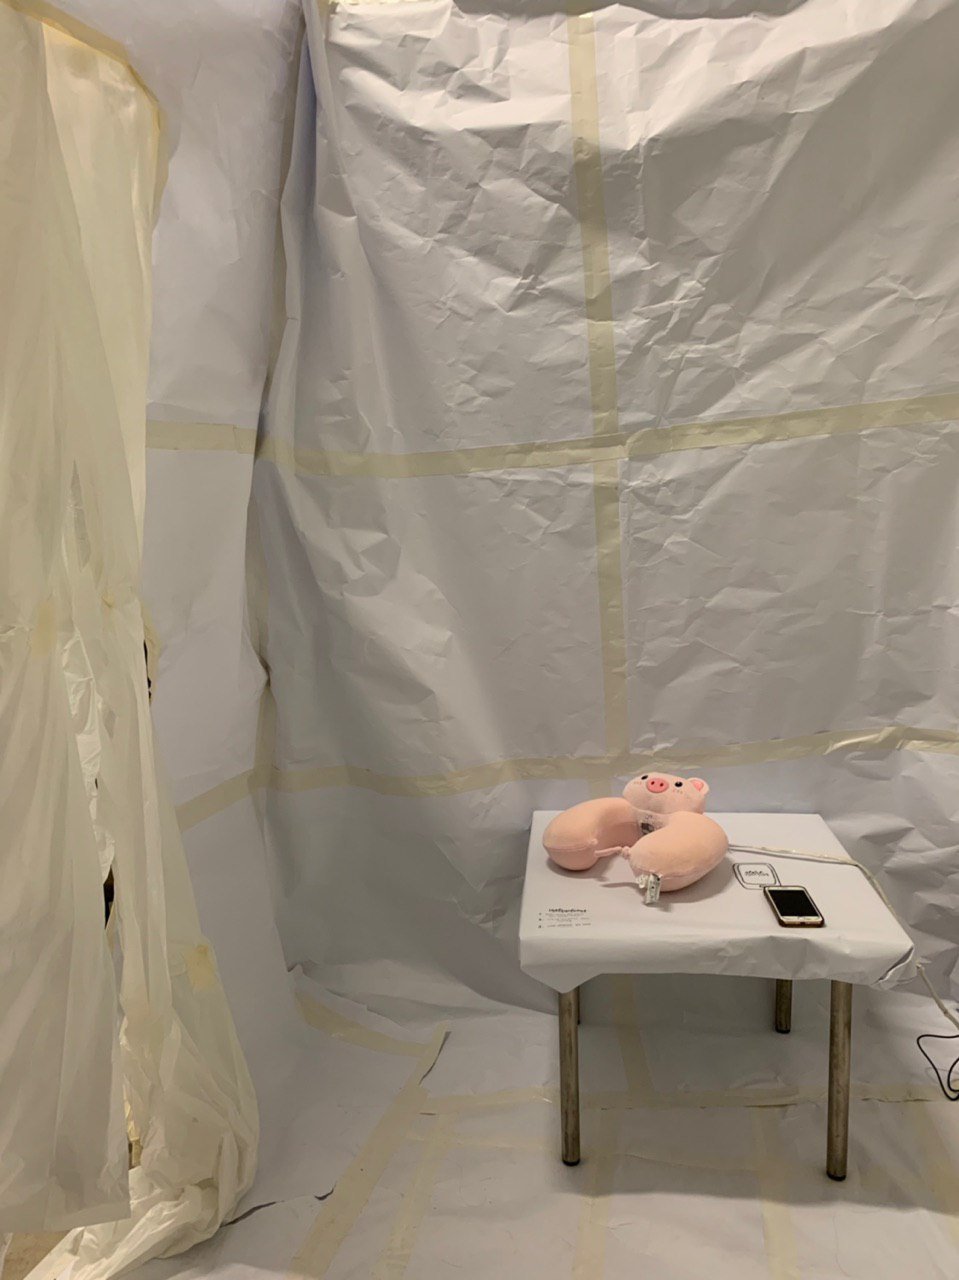
Step 8: Packaging the Peltier module into the neck pillow
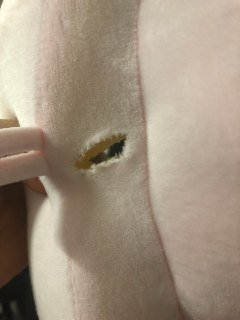
Thereafter, we cut a hole in the neck pillow where the neck would be and pulled out the stuffing in that area to fit the Peltier module in as well as allow space for the fan to spin inside the neck pillow.
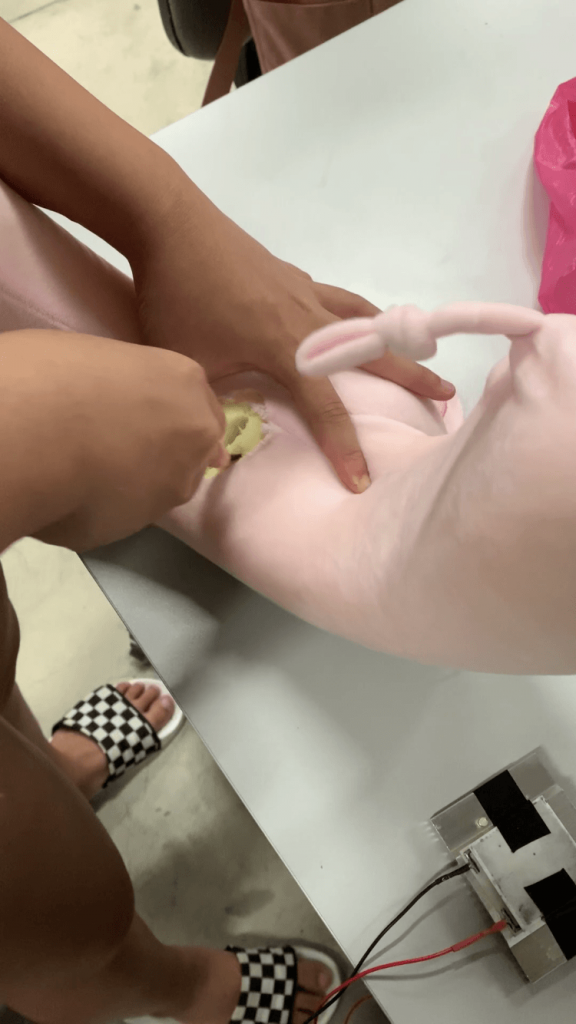
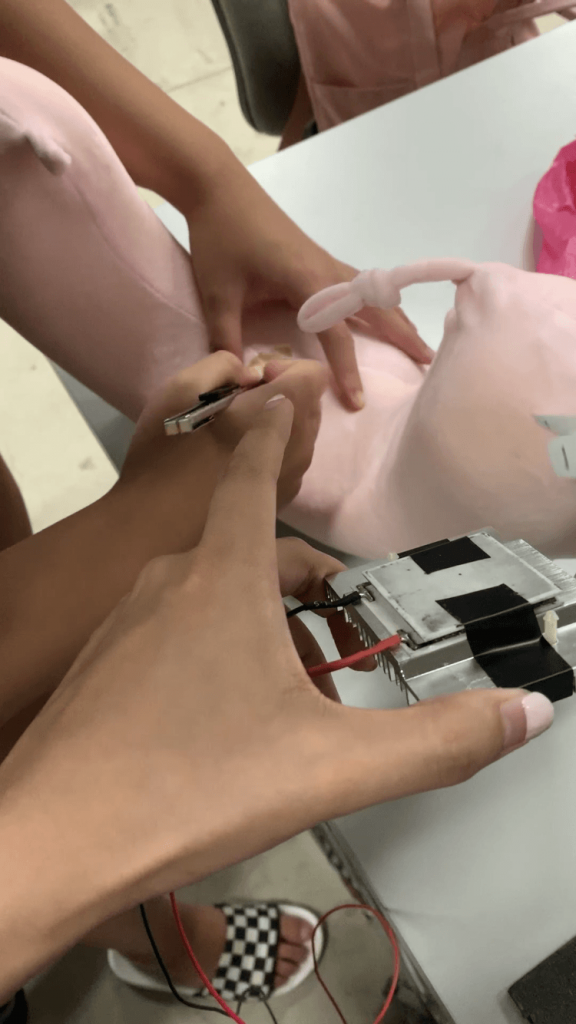
Step 9: Cutting a hole through the back of the neck pillow
By cutting a hole through the back of the neck pillow, the heat generated by the other side of the Peltier module is then allowed to escape.

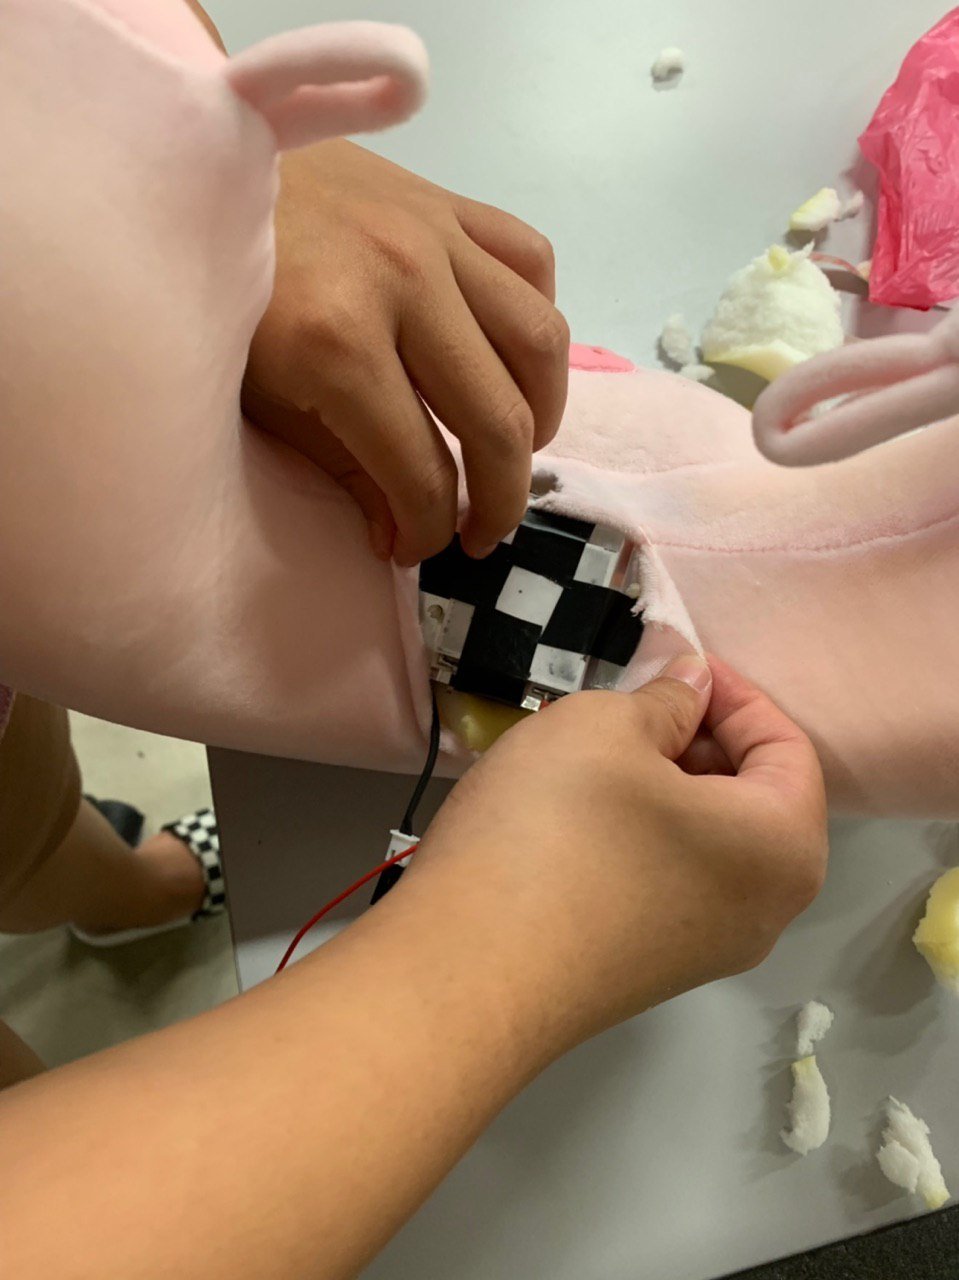
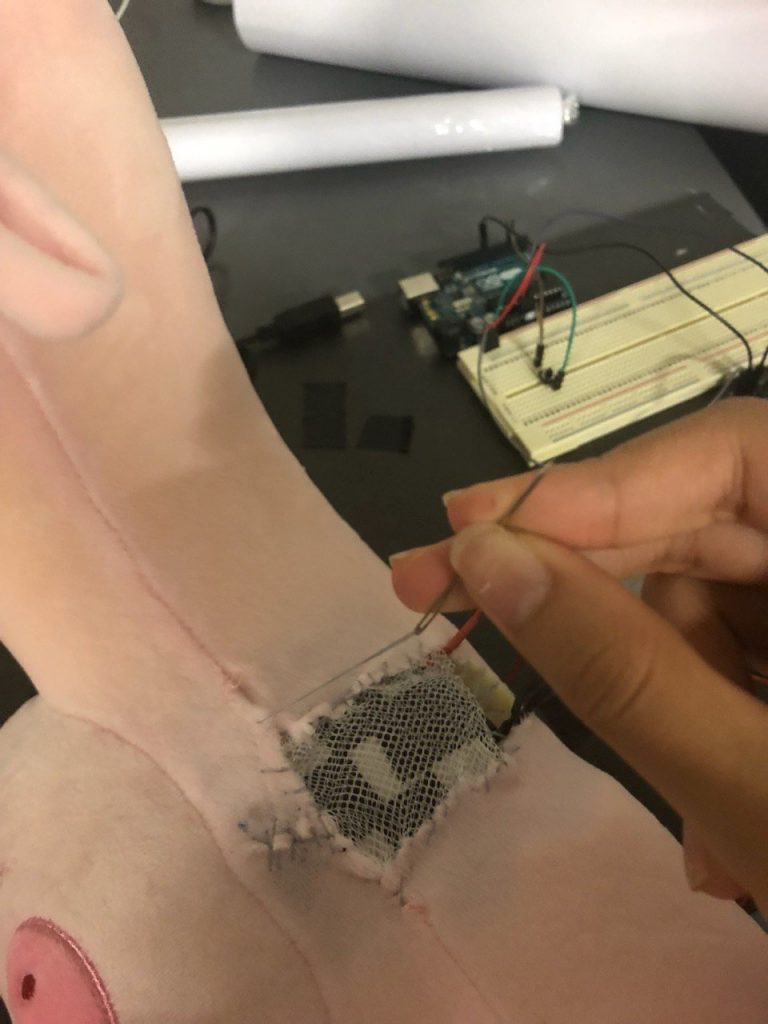
Step 10: Stitching the neck pillow back together
Thereafter, the neck pillow is sewed back together, with a mesh covering the Peltier to ensure that the temperature can be felt but at the same time ensure that the user does not get burnt if the heat is not dissipated fast enough and affects the cold side of the Peltier too.
Step 11: Setting up of the room
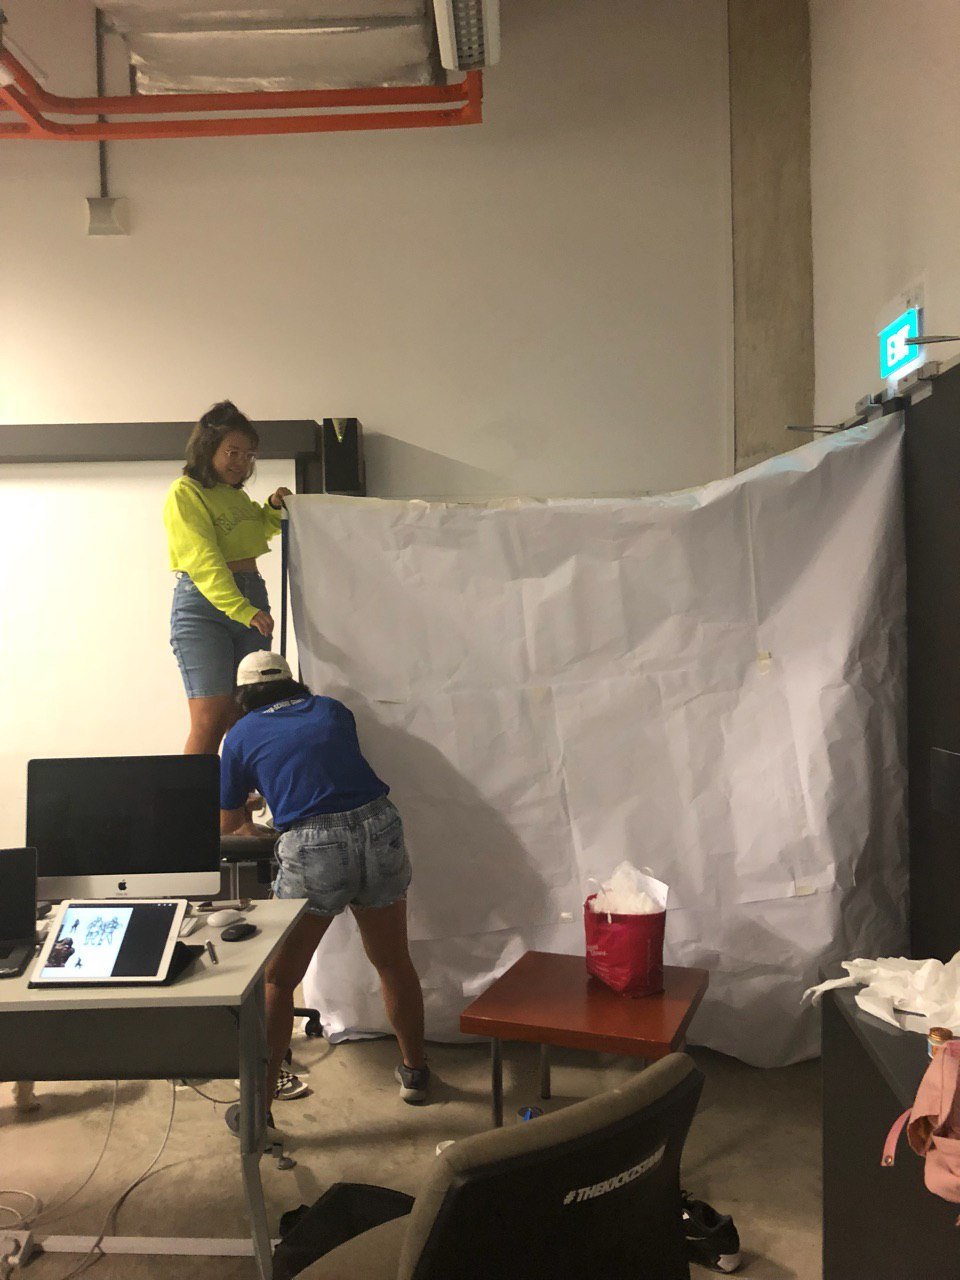
Thereafter, we started setting up the room. As we wanted the entire room to be white, we bought mahjong paper and sourced for white trash bags to cover / create the walls and floor for the room. We selected a room to build our room in and since there was a mirror, covered the mirror with white trash bags so that the entire wall is covered.
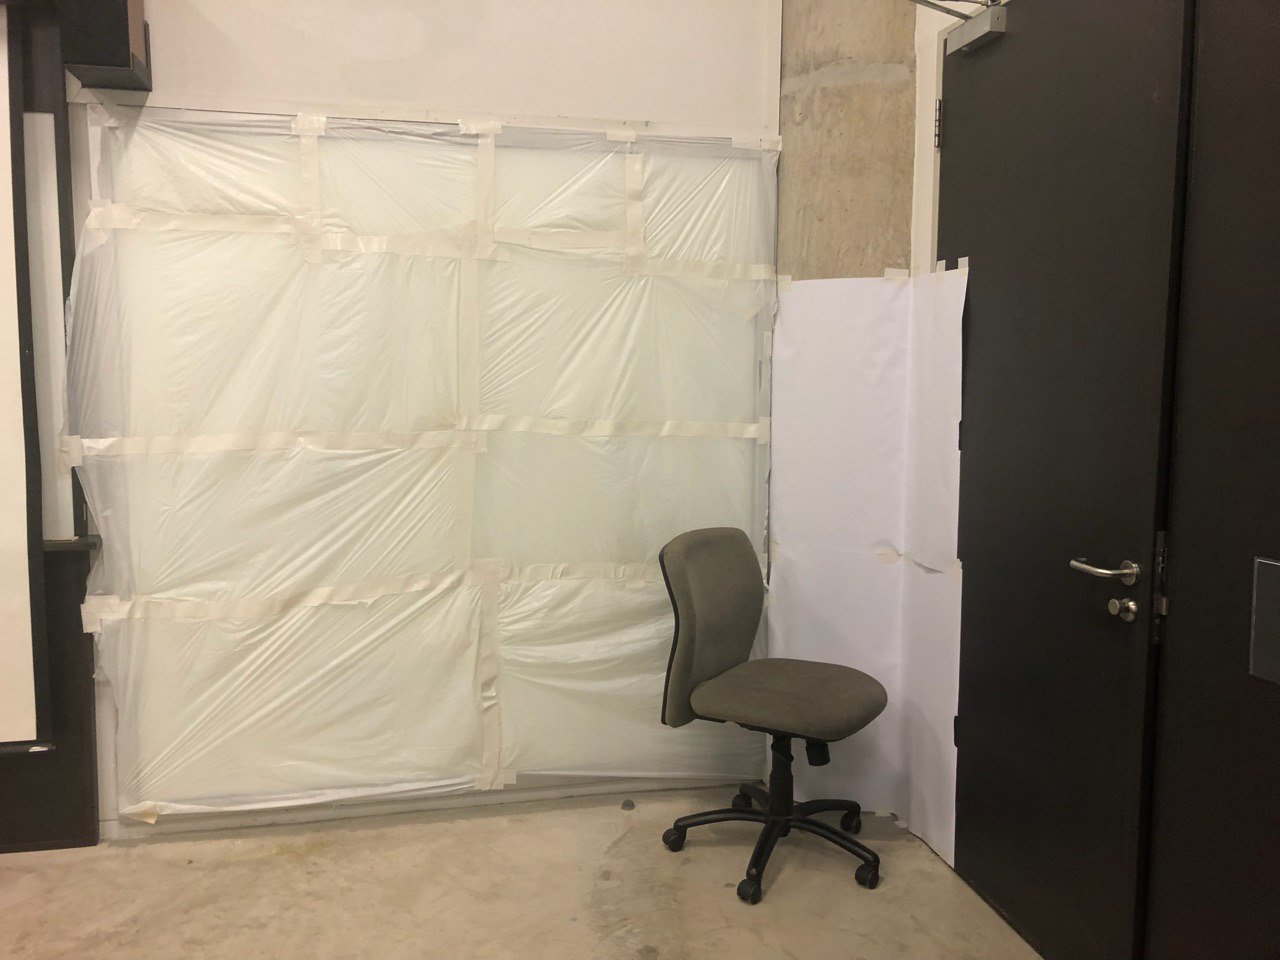
We then used mahjong paper to cover the floor of our room, and similarly used mahjong paper to build the remaining walls of the room.

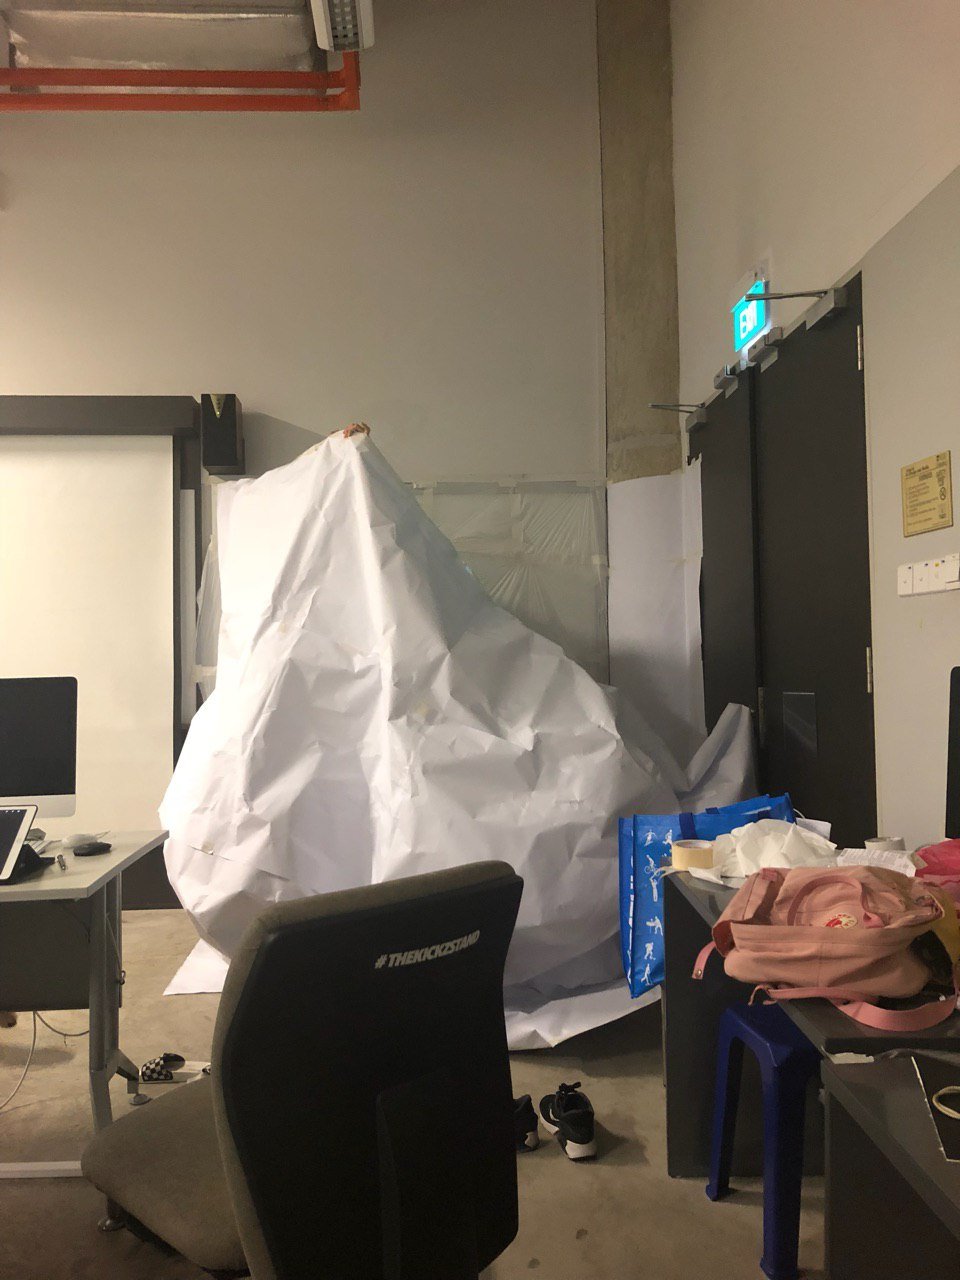

For the hidden exit, we cut a hole in the mahjong paper wall and replaced the opening with cascading white trash bags.
Step 12: Setting up within the room
The table was then brought into the white room and covered with white mahjong paper. Simple instructions was then written on the table surface.
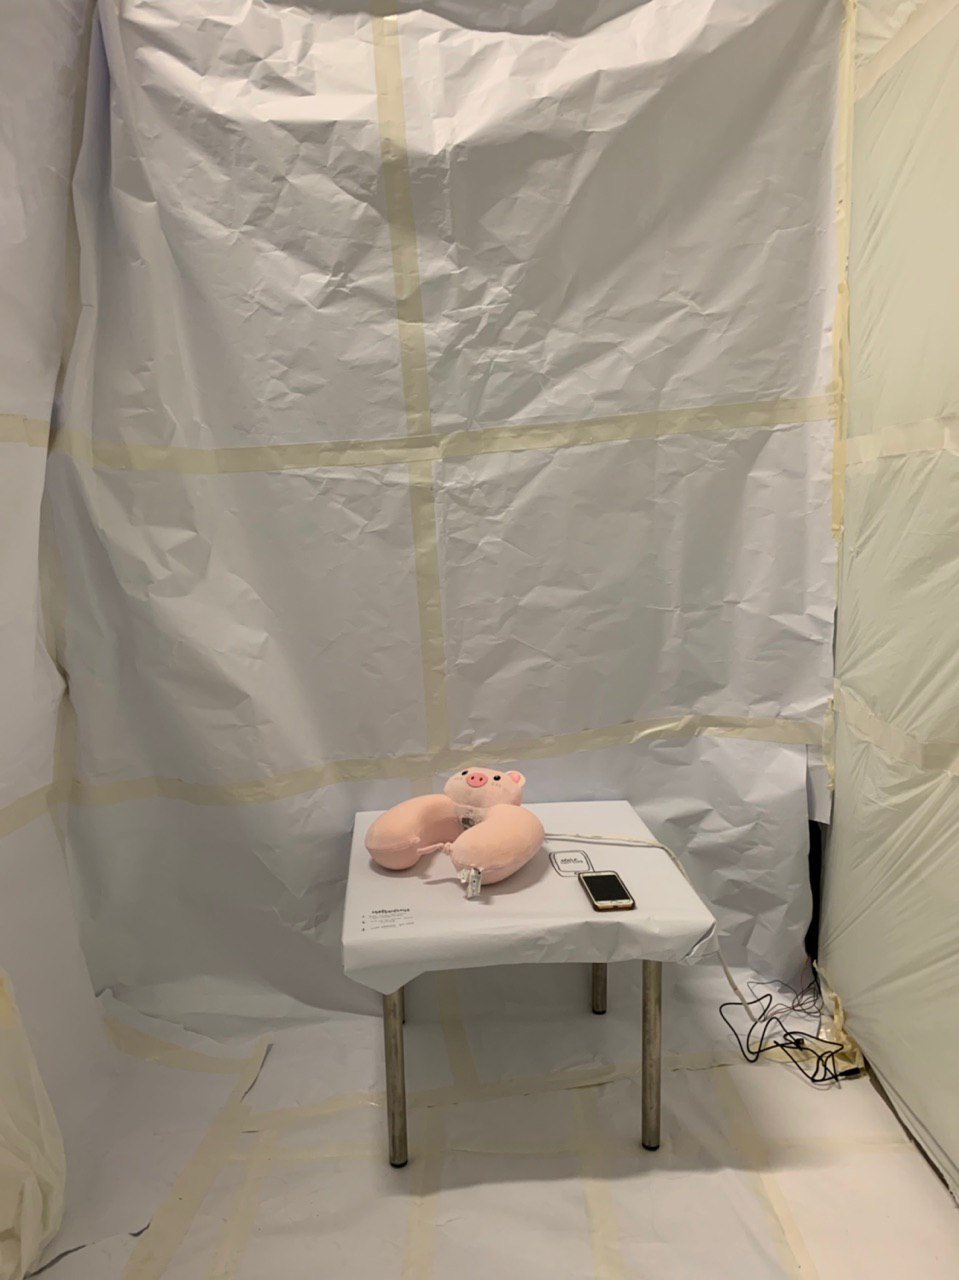
Instructions include:
- Pick up the phone. Start tweeting.
- Reply all responses to your tweet. Interact online.
- Leave whenever you want.
We then placed the neck pillow on the table, taping visible wires with white cloth tape before hiding the entire rest of the circuit behind the white wall.
Step 13: Set up of the hidden room
Chairs were arranged in a semi circle behind the hidden door and some seats were filled with people to welcome the participants who walk through the hidden door.
Step 14: Placing of the neck pillow
The neck pillow was then placed on the table with the rest of the circuit placed behind one of the white walls. The installation is now ready for its participants!

Codes / Circuit design used to build prototype:
Below is the code used for the project. Coding was done with help from Lei.
Original code used for the circuit that was controlled by a button (when Twitter was still not connected) :
Circuit design:
Above is the drawing and photo of how the circuit is connected.
Final Presentation
Videos from final presentation:
Notes from final presentation (curtesy of Natalie):
No access to camera
Left when it got hot
People more connected online due to phones, talk to real life people less
White room for isolation – neck pillow is comfort (but uncomfortable cos it gets cold)
– pink, for the warmth but it doesn’t give warmth
– People planted at another exit, another option instead of leaving through the main way
Exit made abit more clear – but creators did not want it to be obvious – more on the participants to look carefully around themselves
Gwen’s thoughts: can see wires so more careful, first time tweeted then got colder, but after that not much diff, tweeted more & more to see if got diff
Introduced to room so wouldn’t look around much
Munch thought she wasn’t allowed to go another way
Wires make participants frightened in case they ruin it
Small space made people not want to disturb the space and maybe not look around the room as much
Can afford another type of entry like got curtain or people you planted are talking (about why the participant is always on their phone) to get the participants curious and want to exit that way
Reflections
As we have never learnt coding and have never been exposed to Arduino or coding beforehand, the setting up of the circuit and coding was extremely challenging for us. With no sense of direction, I headed to Sim Lim Tower for the first time to get additional materials we needed. Not knowing what exactly was needed, I asked around the store and everyone referred me to someone else in the store until I got referred to a young technician. The technician was kind enough to explain to me how I should connect the circuit and even drew out the circuit for me.
However, when I came back and we tried to connect the circuit, we realise that I bought a wrong wire (was supposed to buy a female power connector but got a male power connector instead), and ended up not being able to connect the power adapter to the circuit.
Even after buying the right power connector, we still weren’t able to make our circuit work and hence we went for consult. During consult, our code was checked and there was indeed problems with our code, when we coded HIGH when it was supposed to be LOW and vice versa. The circuit was then able to work after that.
The connecting of Twitter to Arduino was also very challenging. Initially when we tried with the code Lei sent us to help us, the Peltier module reacted immediately after the code was sent to Arduino although no button was pressed / no tweets were sent. We tried changing the code and the circuit but yet still unable to succeed.
We then consulted Lei again and figured out how to connect Twitter properly to Arduino, and it was because we didn’t configure the computer to connect to Blynk properly.
Also, tapping on experience with the previous micro-project where we didn’t solder the wires and had to tape the wires together to connect them, we went for consults and with Serena’s help, soldered our wires together and hence had stronger wires connected compared to our micro-project.
During the Final Presentation, our plan to have the participants enter the secret room did not happen, as participants were unsure of whether they can enter the room or not. If there are further developments of this project, it would be best if there were clues that can lead the participants to the secret room (through sound/ visual cues).
Throughout the duration of this project, we went for consult many times and the professors helped us a lot during the process. While it was challenging learning something completely new, I learnt a lot through trying the many different (wrong) ways and through failing and asking questions. The basic knowledge of Arduino I gained will be useful for me as a designer in the future, and I’m glad to have went through this learning process, albeit stressful. I’ve learnt how to overcome adversities and have learnt the importance of time management through this and the things learnt would definitely help me in the future.