3D Model Making

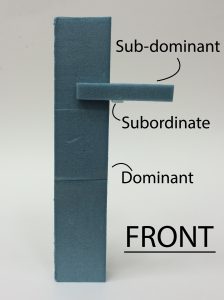
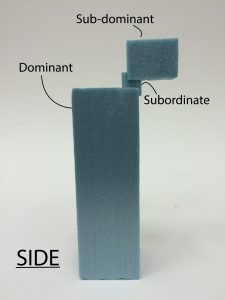
Failure. Lots of Failure. It started off trying to find the right kind of wood that could balance the SD. I settled for Basswood. Getting wood of the right size also proved equally challenging. I settled for ones with a similar surface area but shorter height. I would have to glue 2 pieces of wood together.

File_005(3)

I sawed one piece of wood and glued the two together.

File_000(2)

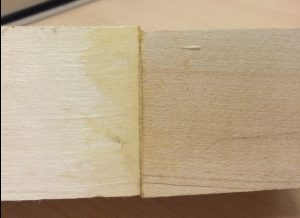
The quality was far from desirable. I had to file it down.

File_004(2)

File_007(1)
Wood dust from sanding

With that, the D was done.

Moving on to the SO. I bought a whole bunch of wire in hopes that I could fashion it into a spring- Don’t use wire to make springs. The material is just wrong for that purpose.

File_003(3)

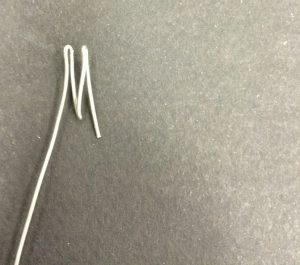
As a compromise, I bought pens so that I could use the springs to form the SO.

File_001(3)

I foolishly tried using one piece as the SO, completely disregarding the fact that SD would be heavier. I soon realised my mistake.

File_000 (4)

I used multiple springs to create the above. This would have to embedded into the SD.

SD was supposed to be easy but proved to be the most challenging.

File_002(2)

I used silicone putty to make a mould for epoxy to be the SD. After that, I had to fit the springs into the epoxy, but since the epoxy was still liquid, I needed to levitate the springs.

All was good until Wednesday when I realised that I had to start fitting all the pieces together on Thursday. The Epoxy was still liquid so I had to come up with a back-up. I used some resin that was recommended to me by the storeowner at the Hobby Shop (where I got Balsa wood for David). It would prove to be my saving grace. I made another putty mould for the resin to be fit in. Because the resin could only turn more malleable when put in hot water, I had to work fast to fit the springs inside before it hardened. It worked.

File_002
Resin, 30min of drying
File_001(2)
Epoxy, 72 hours of drying

The epoxy did not dry in time so I used the resin instead. I might have messed up the proportions. I had to create a small hold in the basswood to fit the springs inside. I picked out the wood filing and carving tools for the first time.

File_004(1) File_003(1)

It might have looked a little rough but I thought it was good enough. I jammed the springs in and used hot glue to bind it all together. The final product:

File_006(1)

The resin could definitely look neater but I think that this was an enlightening experience overall.

3D Model Progress

After a couple of days of re-evaluating everything that I thought I knew about 3D, I came up with 2 entirely new models while improving on with the “spray bottle” model.

Model 1:

2ndModelFront1.1 2ndmodelSide1 2ndmodelTOP1

I thought it was interesting to see the D floating above ground from the SD as seen in the FRONT and SIDE view. That said, the SO piece is way too long and needs to be shaved off by so much more. I should also increase the thickness of the D and reduce the thickness of SD just slightly.

Model 2:

3rdmodelfront1 3rdmodelSide1 3rdmodelTOP1

The SO can hardly be seen from the front side. Currently it looks like there is one D and two SO. I have to increase the presence of the SD. It might also work better if I Increased the presence of the SO.

Model 3:

FinalModelFront1 FinalmodelSide1 FinalModeTop1

I have improved on this model from the last time, adding more presence to the SD. The SO can now be seen from the top too.

I will post the 2D sketch analyses of the models to improve on them in the future.

3D Model Initial models

Model 1:

Model1.2

I thought that it would have been interesting if the SD and SO cradled the D. However, the result was multiple elements with similar thickness. Other than adjusting the thickness of the pieces, I adjust the SD so that it does not run parallel to the D.

Model 2

model2.1

In this model, I wanted to have a larger SD piece and instead making use of voids to give the D more presence. To make this work, I would still have to make the D bigger. Just like in model 1, the SD run parallel to D. This time, the SD is around the halfway mark of the D. It might look more interesting if it was smaller and was closer to 1/3 of D.

Model 3:

model3.1

I feel that model 3 is the most interesting because it works and it floats and the SD brings balance to the model. I could improve this by creating a bigger emphasis of the SD because the height looks similar to the SO. The SO cannot be seen from the top view so I could make it a little wider so that it can be see from being wedged in the D.