1 – Creating New Student and Class Sites
This tutorial explains how to create new OSS sites using the multi-site system, in order to populate a class site with student sites.
First go to the Network Admin Dashboard where all network wide management is done, including the creation of new sites, new users, new themes, plugins, etc. Only the OSS Administrator has access to this configuration as a “super-administrator.” The Network Admin drop down menu can be found under the key icon on the WordPress Admin Bar.
The Sites area of the Dashboard is where all new student and class sites are created. Every OSS site is listed here in the Sites list. Bulk Actions can be taken to delete sites and eliminate any spam that may have entered the system.

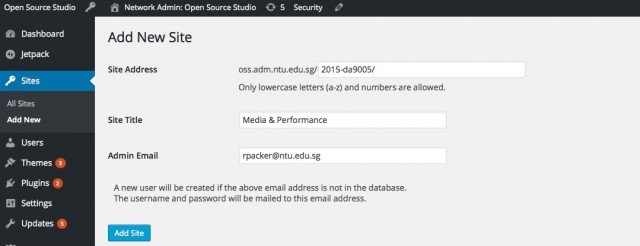
Clicking on the “Add New” button opens up the add new form, where student or class sites can be entered into OSS. For student sites, use the their NTU id lower case for the site address and name of the site (students will change this later), and then include the entire student email address, including the “e.” before ntu.edu.sg as this is a necessary part of the student email address. Click on “Add Site” to complete the action.

For the class site, use the following nomenclature: 2015-da9005 for the site Address. The Site Address nomenclature is comprised of the year followed by the class code number. Use this same convention for the Class Category in the class site Dashboard, which will be explained in more detail later. If the class site is for an FYP group, the following nomenclature is recommended: 2015-16-fyp-im-rp/: academic year, fyp, initials of the area (Interactive media), initials of the instructor (Randall Packer).
The site title is the name of the class, and the Admin email is the instructor’s email. Generally the class site and the instructor’s site are one and the same, whereas students have separate sites outside of the class site.
Once the student or class site is created, the student or faculty member will receive an OSS notification indicating the site has been created. They will be then be able to login into their site for their training sessions. There are also tutorials: Getting Started for Students and Getting Started for Faculty, to provide students and faculty with instruction for setting up their sites.
 2 – Registering the Site

The next step is to register the site just created either as a student site or a class site. This insures that the student site receives the default WordPress theme (currently 2015), or that the class site is installed with the OSS theme. Go to Register OSS Sites on the Network Dashboard where any new classes created will be highlighted red, indicating they have not yet been assigned. Click on Class or Student and the red highlight will go away and the site will be appropriately registered.
 3 – Adding Students to the Class Site

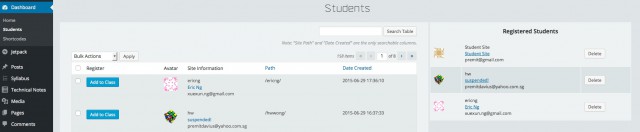
Once student sites and a class site have been registered, student sites can be entered into the class site. You do this by going to the class site Dashboard, where you click on Students to enter the directory page where they can be added to the class. Click on the “Add to Class” button in the list of students on the left side and they will show up in the list of Registered Students on the right side, as seen in the example below. You can also use bulk actions to add a larger number of students to a class as registered students. Searching through the student list is done with their NTU id, found in each student’s email address. The NTU id can also be found on the class roster.
 4 – The Class Category

The Class Category is critical to the database organization in OSS because it filters all posts within a specific class to be directed only to that class site.
The category needs to be entered into the Class Category form by scrolling down the main page of the Dashboard of the Class Site. The Class Category is the sub-directory of the site URL (i.e. http://oss.adm.ntu.edu.sg/2015-16-fyp-im-rp/), and will be used as the “Parent” category for every “Child” category created by students and faculty to direct all of their posts into the class site. See the Getting Started for Students and Getting Started for Faculty tutorials for more information about using parent and child categories in OSS. Below is an example of the Class Category for an FYP group.
 5 – The Homepage Feed & OSS Aggregator

Once all the students have been registered in a class site, the OSS Aggregator plugin is used to integrate student posts in numerous ways. The OSS aggregator can be applied either as a widget or shortcode to be configured to display specific WordPress metadata, and can be inserted into the various class site sidebars (widgets) or pages (shortcode). The student sites do not contain the OSS Aggregator, rather, their posts are directed to the class site and received by the Aggregator so long as they are using the appropriate Parent category.
The “Homepage Feed” is an OSS Aggregator hardwired into the center column of the home page of the OSS Theme, where recent posts created by students are displayed. The setup for the Homepage Feed is on the main dashboard page, and does not require a widget. Scrolling down the main page of the Dashboard will reveal the “Homepage Feed” (see below).
The Homepage Feed has been configured to display posts by Registered Students (other options are explained later), while displaying the featured image at high resolution in a 1 column layout. The layout can be changed according to visual needs, such as in multiple columns.
 The remaining fields in the OSS Aggregator include the custom post type (post), the Class Category as created above, any tags that might be used to filter the feed, the sorting order (generally in descending chronology, Newest to Oldest), and all the various meta information, such as the post title, avatar, date, etc. Lastly, the comments are generally left hidden by default, requiring that they be opened up by the user to display. Once the Homepage Feed is configured, all recent posts will be displayed in the center column of an OSS class site according to the specifications.
Be sure and save the Homepage Feed at the bottom of the window or else it won’t be activated for recent posts.
 6 – Installing OSS Widgets for Displaying Students

From this point on, it is up to the Admin or faculty member to configure the OSS class site to meet the particular needs of a class. The following examples have been common practice in OSS, but it is ultimately decided by faculty how they want their class site to display information.
First, we will install the OSS Authors plugin in the Homepage Left Sidebar, in order to display students on the homepage of the class site. The OSS Authors plugin specifically displays all profile data from each student site, such as their name, avatar, etc.. On the Dashboard of the class site, go to Appearance/Widgets. Note that the OSS widgets can be accessed here. Drag the OSS Authors widget into the Homepage left sidebar as in the example below.
 Open up the Widget form and fill in the appropriate information. Use “Students” as the title, Layout is List with meta info, which displays the information in list form, the avatar size in pixels, the Aggregation Source, which must be Registered Students in order for students to appear. You can then list the Meta you want to display in Advanced Options, generally what is listed below for OSS Authors, including the name, site URL and bio (avatar is defaulted).
 Once this is completed, Save” the OSS Authors widget and the students will be listed in the left sidebar, their avatars displayed along with the checked metadata. Note also that the “Recent Posts” includes a student post displaying the title, featured image, avatar, and meta.
 7 – Creating an Announcements Feed

In the right homepage sidebar, we will place an OSS Posts Aggregator widget as a feed for faculty announcements. Returning to the Widgets page in the Dashboard, drag the OSS Posts Aggregator widget into the Homepage right sidebar.
 Open up the OSS Posts Aggregator so it can be configured. Give the Widget the Announcements title, use “My Posts” as the Aggregration Source. This means that only posts by users of the class site, such as the instructor, will be displayed by this Widget. The Widget is also configured to display the featured image at high resolution in a single column.
 Continuing with the configuration, include the class category as well as the announcement category. Note: be sure that all announcement posts are assigned the “Announcements” category. See Getting Started for Faculty for additional information on creating announcement posts including the category structure.

Note also that the posts are sorted Newest to Oldest, that the feed is set to “10” posts, and that specific Meta information is used to include the Post Title, Avatar, Excerpt, Categories, and Tags.

Once the Announcements feed is in place, all posts with the Parent Category “Class Category” and Child Category “Announcements” will be directed to the feed.
Now that all the home page feeds are in place, the example below shows the main functionality of the class home page from left to right: students, recent posts, and announcements.
 8 – Changing the Site Title

Although the name of the class was originally designated when the site was created, this can be changed in the Settings. In the “General” section of Settings in the Dashboard, you can change the Site Title, as well as the Tagline, which is commonly used for the name of the instructor.
 9 – Creating Additional Content

While it is ultimately up to faculty to decide if they want to include any course content to appear in the main menu of the site, the Admin may decide to include a single “Resources” page to get faculty started. Create a new page entitled “Resources,” leaving it blank for the faculty member to author.
 Once the “Resources” page has been created, go to the Menus section of the Dashboard, create a new menu entitled “Main Menu,” click “Select” to the right of “Select a Menu to Edit” so that you are selecting the Main Menu, and add the Resources page to the menu and “Save Menu.”
 When the Main Menu has been completed as in the example above, the faculty member will have a header on their home page that includes a link to a Resources page, which they can use as a starter for posting their syllabus, assignments, etc. Faculty can refer to the Getting Started for Faculty tutorial for authoring content pages. For more advanced users, faculty can use the Syllabus custom post template to take full advantage of this functionality.
9 – Conclusion
At this point point, the class site should be sufficiently prepared so that faculty can use OSS in their classes, allowing them to list their students and access their sites, integrate student posts in a recent posts feed, broadcast announcements with notifications and display as a feed, and participate in class discussion through commenting.
