
Downloadable Faculty Quick Guides
Table of Contents
- Introduction
- On Being a NetArtizen
- Accessing The Class Website & Login
- The User Profile
- The First Post: Making an Announcement
- Taxonomies for Student Sites (Categories & Tags)
- Duplicating Content
- Navigation
- Overview of The Class Site
- Discussion & Commenting
- Posting A Syllabus
- Posting Additional Material
- Creating A Gallery
- Private vs Public
- Area Site
- OSS Support
1. Introduction

Open Source Studio (OSS) is a collaborative, online teaching environment created for and by faculty and students in the School of Art, Design and Media at Nanyang Technological University. It is designed as our system to meet our specific needs as artists, designers, and art historians.
If used properly, it will SAVE YOU TIME. I emphasise this point because OSS will help you access, organise, and track student work. How many times have you asked a student to provide you with a media assignment, which turned into a tedious and complicated process of transferring and storing files. How many times have you needed to present student work and spent hours formatting files into a Powerpoint presentation. OSS resolves all of that because students participate and contribute to these tasks, and you as the instructor have powerful database tools for filtering, accessing and viewing their work.
In your class site, students will be able to access teaching materials, aggregate and share their work, and collaborate with fellow students through commenting and discussion. You will also be able to showcase their work and final projects in virtual galleries.
I invite you to go through this tutorial, which will hopefully spark your interest and imagination as to how media arts teaching can be expanded online. If you envision new improvements or new possibilities, please let me know (Randall Packer: rpacker@ntu.edu.sg), and we will make every effort to incorporate your ideas into OSS.
2. On Being a NetArtizen
OSS is not just another e-learning system, it is about being a NetArtizen for the 21st century: that is, teaching students best practices for using networked media in a fast-paced tele-connected world. OSS is essentially an integrated system of WordPress Websites that form an online suite of virtual studios for you and your students to share work, assignments, and ideas. It teaches students how to create and maintain a portfolio website, essential to their professional development and life on the network.
Since work in OSS is published on the Web, it is important to note that part of what it means to be a NetArtizen is to incorporate values of outstanding internet etiquette in our students. In order to use OSS as a constructive platform for creating and documenting artwork, we will discuss techniques for privacy as well to insure that students use OSS a tool to research, create and collaborate in a safe online learning environment.
So let’s get started!
3. Accessing the Class Website & Login
By now you should have received an email notification from the OSS administrator with account information, so consider yourself an official member! Guard this email with your life, it contains all the relevant information to access your class Website.
- Accessing your Class site: Your notification email contains the following information that includes your Class Site URL, which is made up of the year of the class and the module number, such as below:
Your new Open Source Studio site has been successfully set up at:
http://oss.adm.ntu.edu.sg/2016-da9005
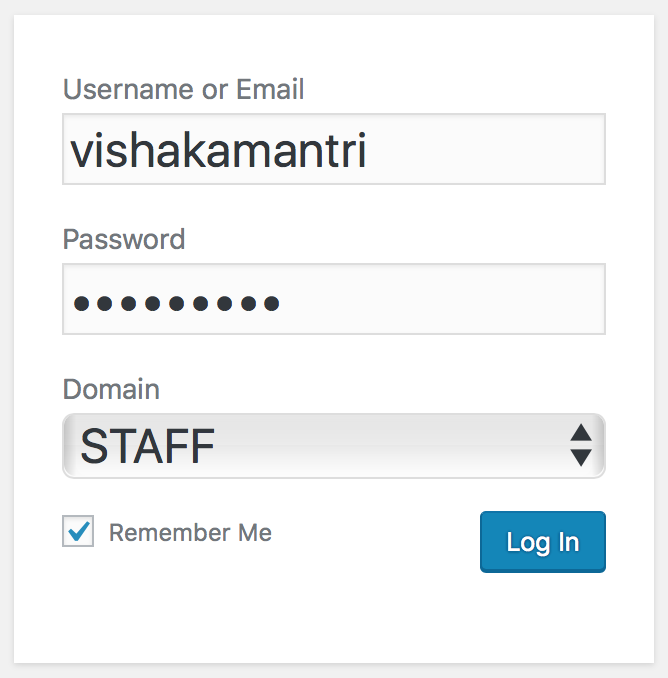
- Login: After accessing the site, click on the “Log in” button above the title of your class.
 Now you are on the WordPress login screen: enter your NTU username, password, select STAFF as the Domain, check Remember Me, click on “Log In” and you will enter the Dashboard of your class site. (Sometimes WordPress will ask you to “prove your humanity” with a simple mathematical problem.)
#NOTE: IT IS ADVISED TO REGISTER YOUR MOBILE NUMBER WITH NTU’S COMPUTER CENTRE (CITS) SO YOU CAN EASILY RESET YOUR PASSWORD IN CASE YOU LOSE IT. FOLLOW THESE INSTRUCTIONS IF YOU NEED TO REGISTER YOUR NUMBER OR IF YOU LOSE YOUR PASSWORD.
4. The User Profile
Now the interesting part begins, you can invent your own virtual identity! If you have ever created a Facebook profile, we do the same thing in OSS.
After you have logged into your WordPress site, you should be on the Dashboard (black sidebar on the left) and select Users/Your Profile.

OK, now this is pretty easy, just fill out the following:
- First and Last Name
- Nickname: what do people call you? Be sure the nickname is different from your user id. WordPress requires the nickname so it needs to be filled out.
- Display name publicly: how do you want your name to appear online?
- Email: don’t change this or you will be locked out of OSS forever!
- Website: if you have a site other than OSS
- Biographical info: write about yourself, inform your students!
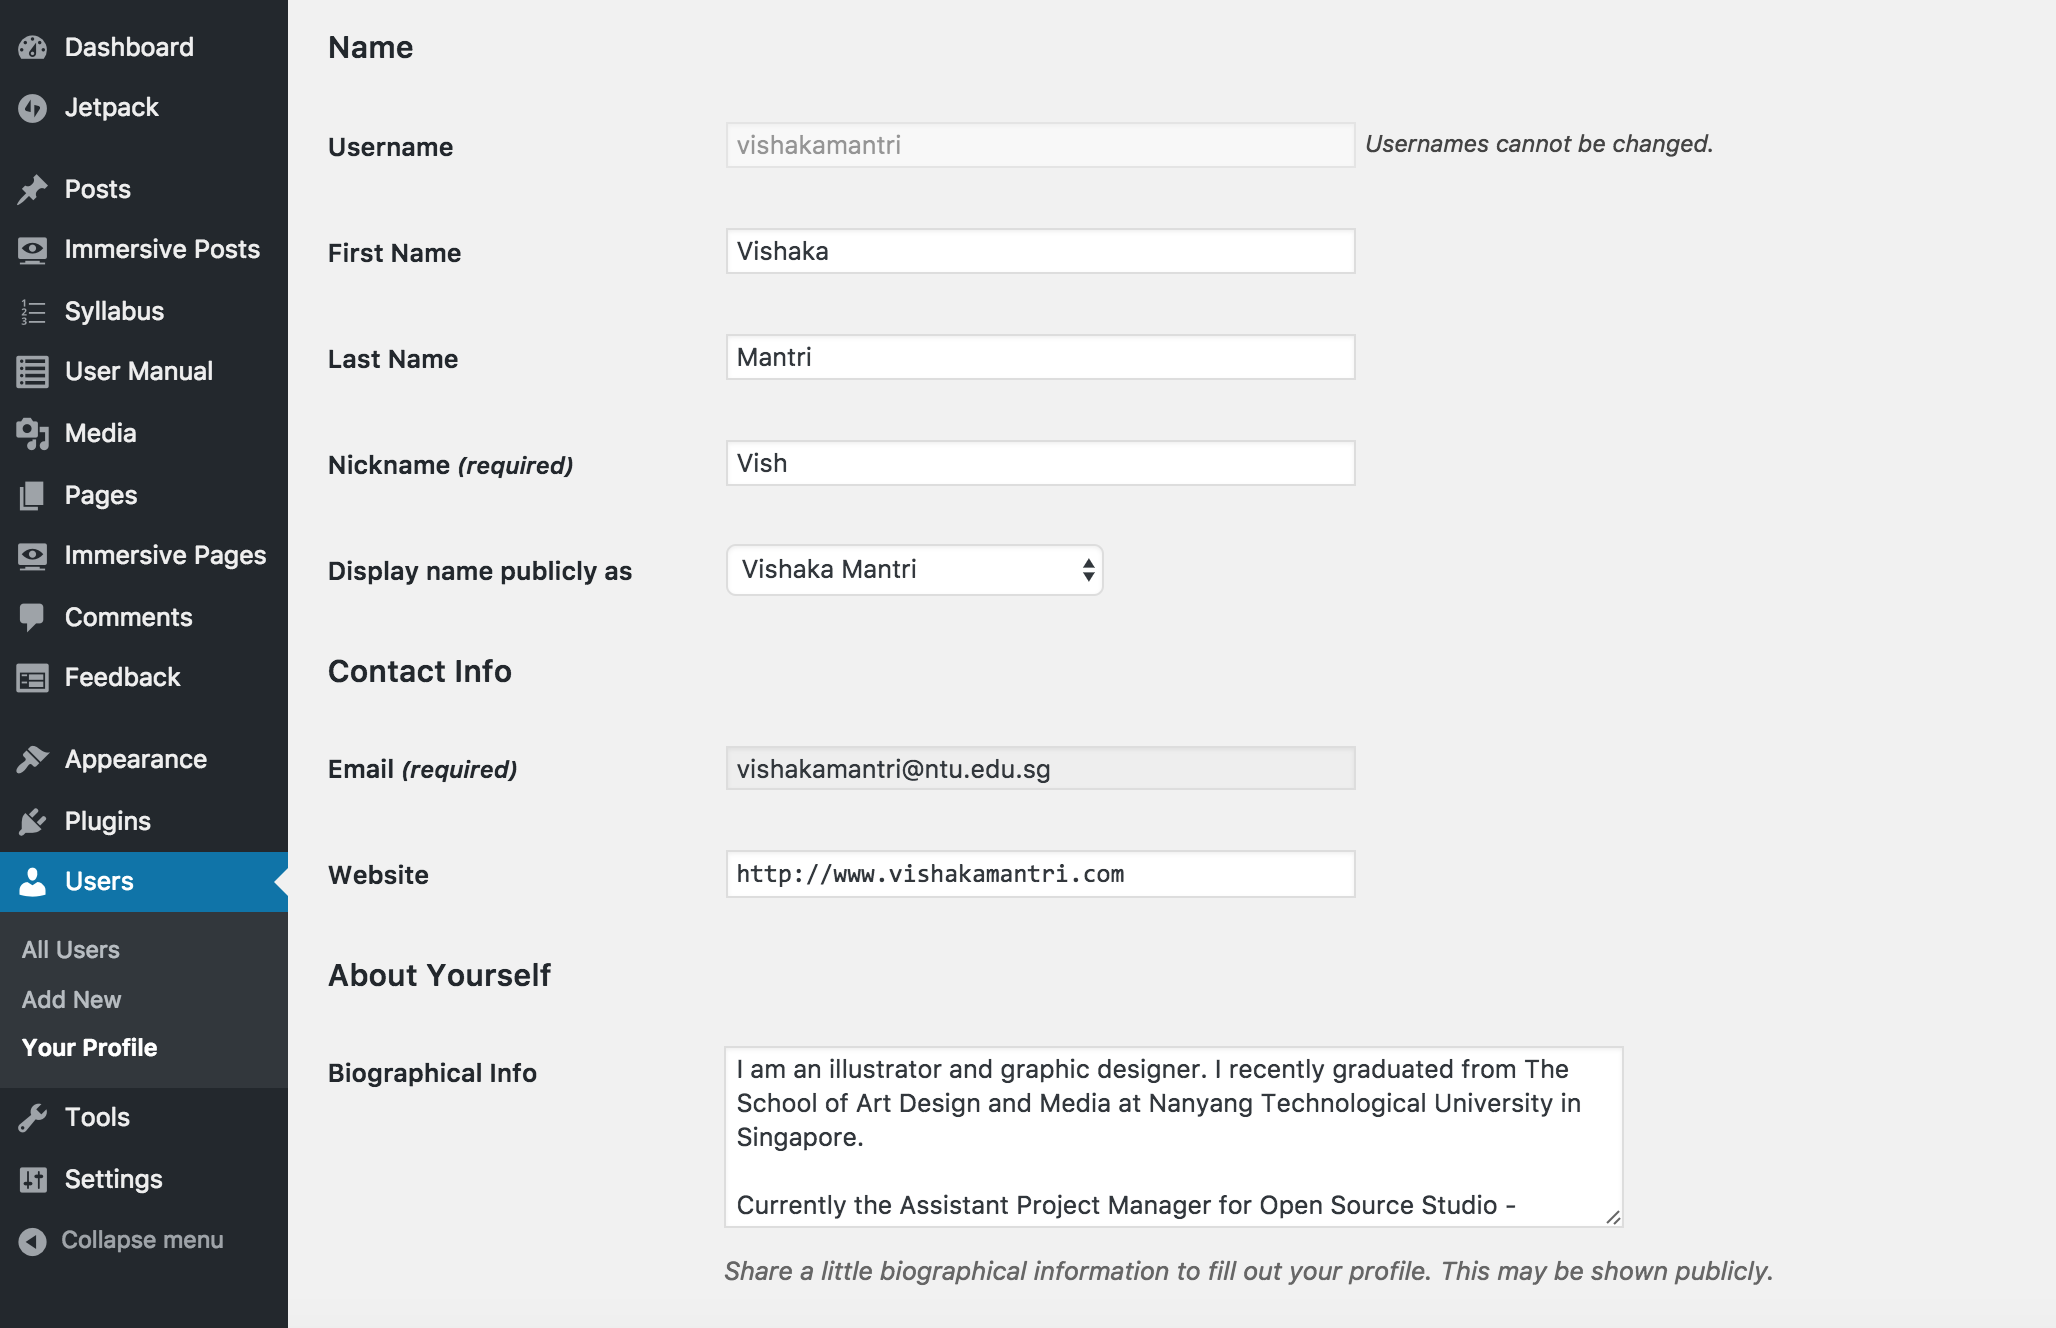
- Avatar: Select Custom (not Gravatar), click on the “Browse” button and upload an avatar image, which will appear on your posts.

- Saving your Profile: Last but not least, click on “Update Profile” at the bottom of the screen to save your profile or everything you just did will be lost and you certainly don’t want that to happen because you’ll have to start all over again.
5. The First Post – Making an Announcement
Creating a post is really what WordPress is all about, it’s where you have the opportunity to post an announcement, and upload your syllabus, assignments, readings, class resources, etc. For now, we are only concerned with posting announcements, which is fine if that is all you want to post on your class site.
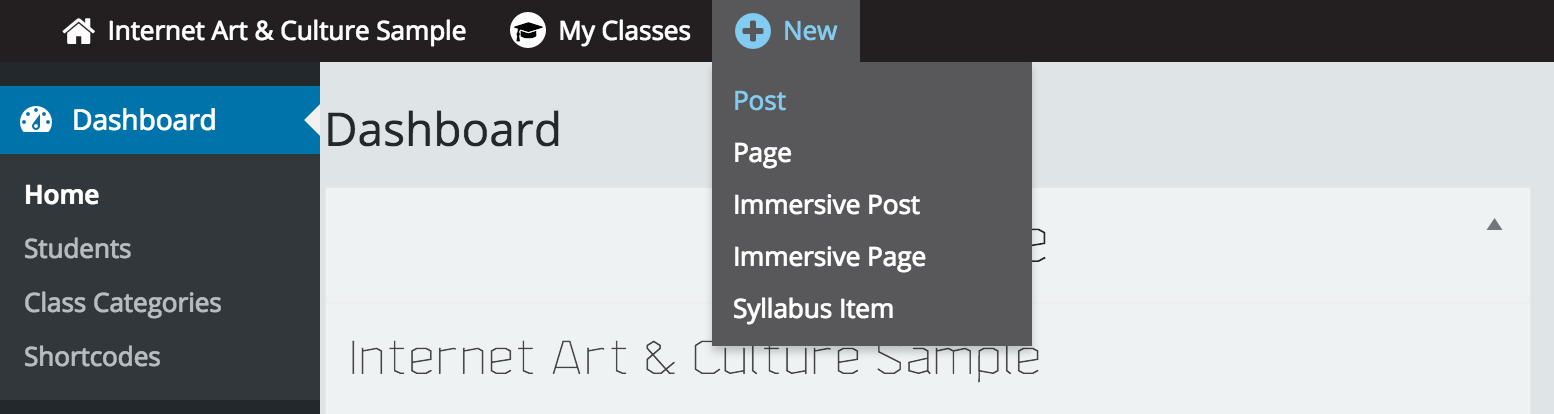
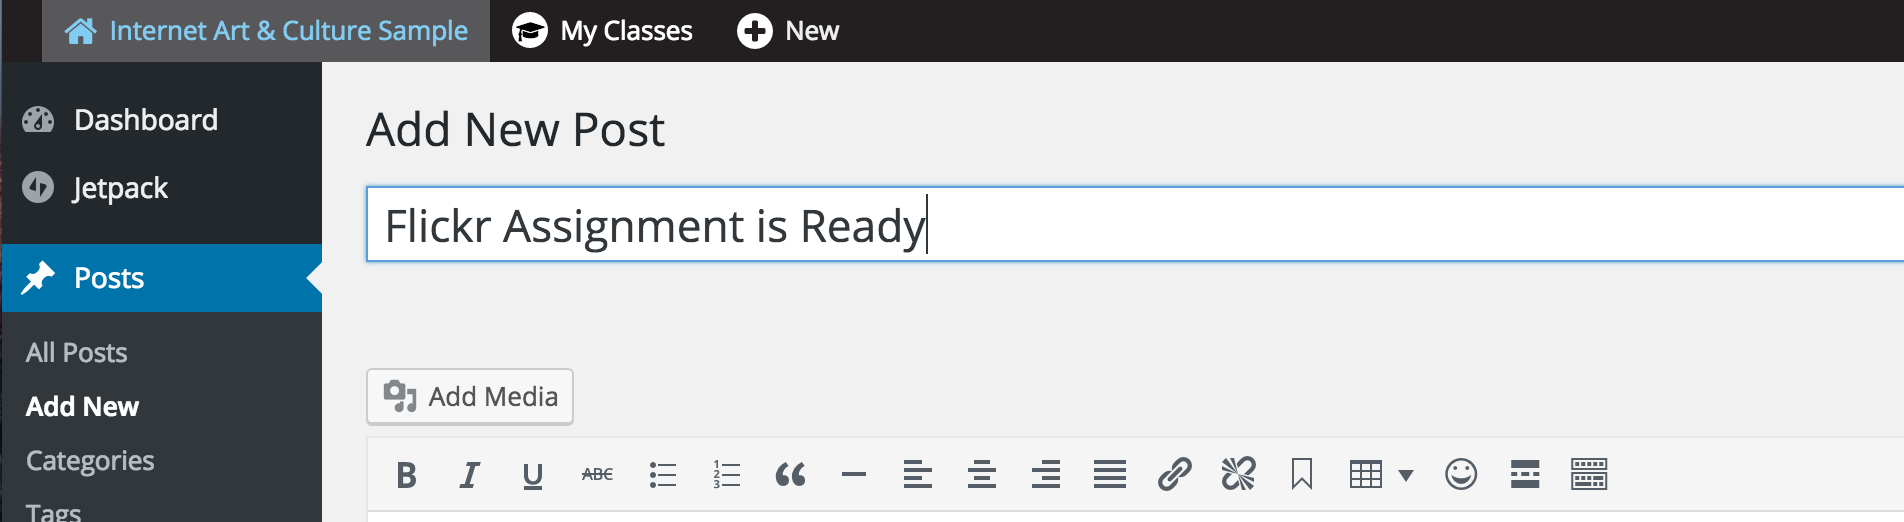
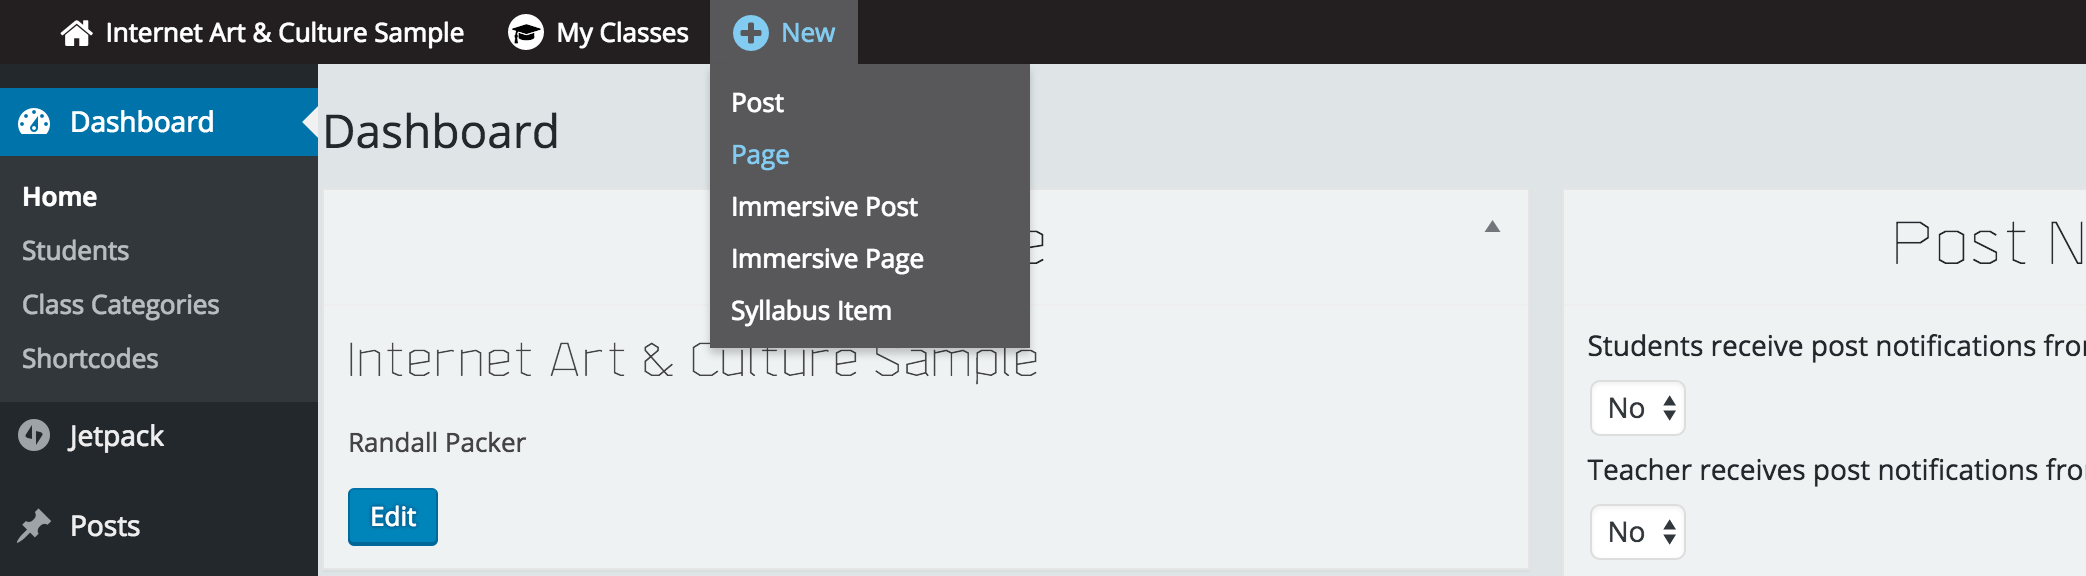
- New Post: Be sure you are on your Dashboard. There are many ways to make a new post, but let’s focus on the following. Roll your mouse over the “+ New” menu item at the top of the black Faculty admin bar, and select Post from the drop menu.
- WordPress editor: have a look around, you’ll be spending a lot of time on this page. Note the toolbar where you can format text, create links, add media, etc. It’s not unlike the Microsoft Word toolbar. Roll your mouse over them to see what they do.
- Title: Give your Announcement post a title, how about something like “Flickr Assignment is Ready” or you can just welcome your students if this is the first announcement.

- Creating Text: Now click in the main editor below and start typing away, using formatting, links, etc., from the toolbar as needed. Again, if you have used Microsoft Word, you should be able to format text, embed hyperlinks, etc.

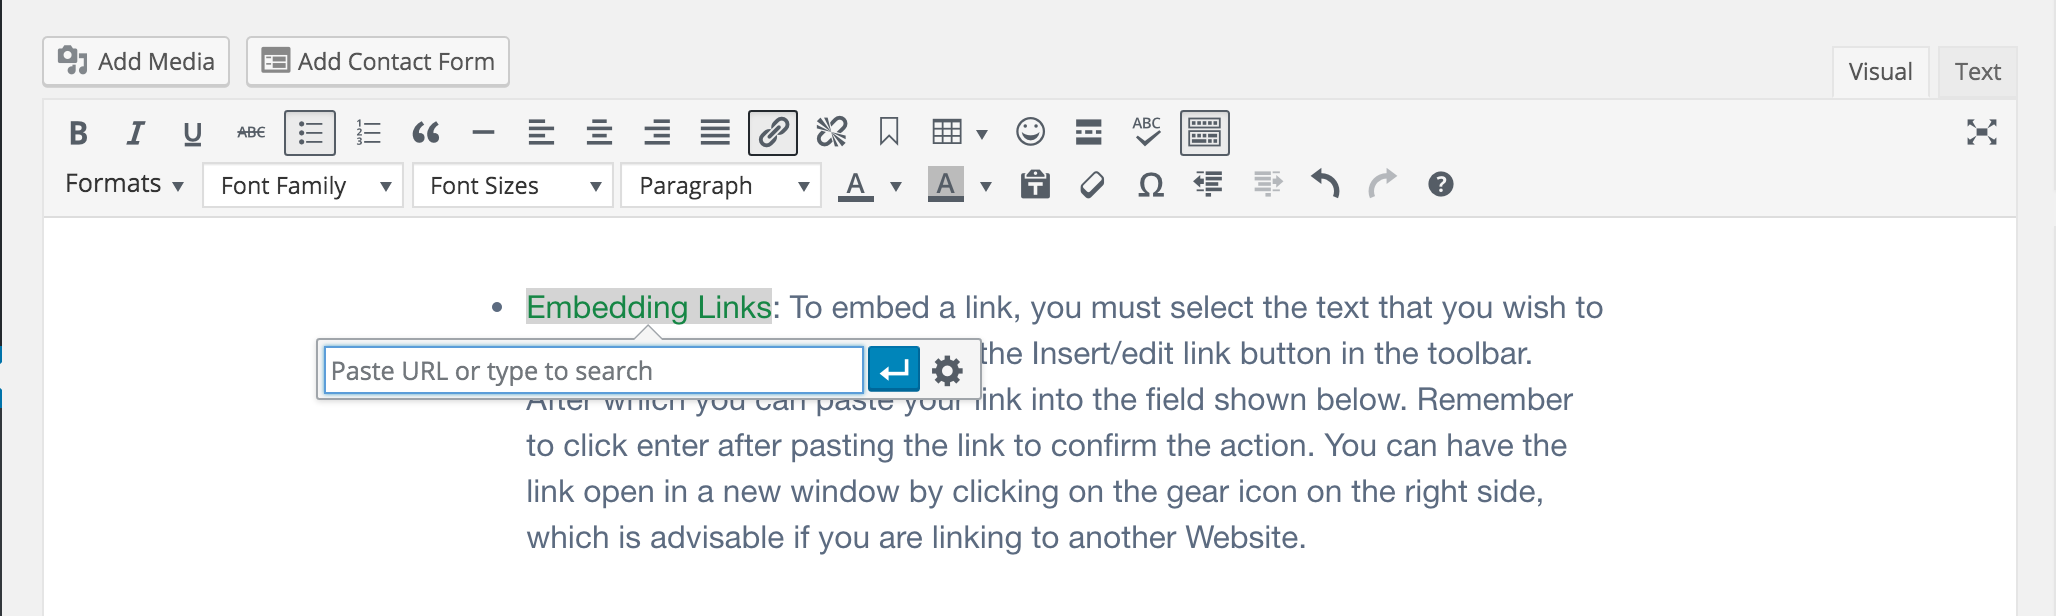
- Embedding Links: To embed a link, you must select the text that you wish to link to another page. Then click the Insert/edit link button in the toolbar. After which you can paste your link into the field shown below. Remember to click enter after pasting the link to confirm the action. You can have the link open in a new window by clicking on the gear icon on the right side, which is advisable if you are linking to another Website.
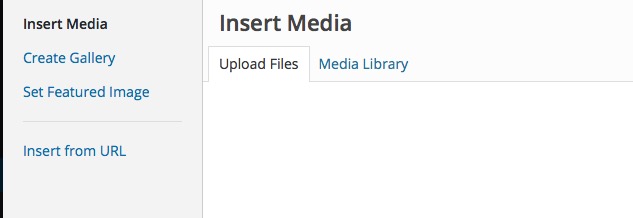
- Add Image: Now you may want to add an image. You can directly embed an image from the web into the editor by copy pasting the link to the image directly into the editor. If you want to upload your own image click on the Add Media button above the toolbar and you will enter the Media Library where you can insert media into your post. Since you might not yet have any images in your Media Library just yet, click on Upload Files.
- Upload Image: now click on Select Files, and grab an image from your hard drive. Make sure your image is a .jpg or a .png or a .gif (usually .jpg) and not too large in size (note the 3 MB file size limit), but also not too small as well. Generally an image of around 1000-1920 pixels in width is a good size. WordPress is very smart as it will create several different sizes of the image for you.

- Sizing Image: Once your image is uploaded, look in the lower right hand corner where you will see a drop down menu to select from the many sizes WordPress has created for you (you can always change this later), be sure the Alignment is set to None, don’t change Link to Media File, choose a file size, and then click on Insert Into Post.
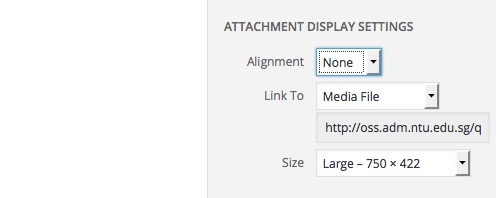
The size of the image will become clearer over time as you see how to best integrate images into your posts. Suggestion: generally the “Large” size is good, which WordPress will generally resize so that it fits in the window, so long as it is at least as wide as the column width (Approx 900px.)
You now have text and image combined together. Note that if you want to move things around, you can’t just drag the elements, you need to cut and paste. Experimentation is the only way to master the WordPress editor, which over time you’ll find very easy to use.

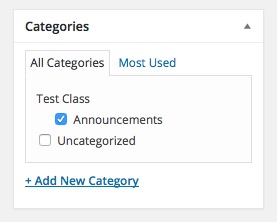
- Assigning Announcement Category: You must now assign a category to your post in order for it to appear in the right section of your site. The Announcements category has already been created for you. On the right side of the editor under “Categories” select the Announcement which is a child category, while the name of your class is called the parent category. This is mission critical because using the child category will tell WordPress to display your post in the right column of your class site under “Announcements,” which you will be able to see shortly.
- Create and Assign Tags: So let’s make some tags. What’s a tag? It’s a taxonomy, keywords for filtering and labelling your posts that enable you to keep track of ideas and concepts. Are there a few keywords in your post, for example: appropriation, Flickr, etc, which represent ideas or concepts in your post? Add these words as tags separated by commas. Click on the Add button to enter the tags.

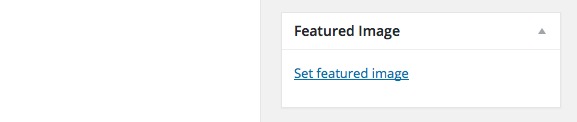
- Featured Image: Last but not least, the featured image. If you care about design and aesthetics (we assume so!), you’ll love this. Click on the Set Featured Image button in the lower right hand side of the editor, and select an image. It could be the one you inserted into your post (if you did include an image), or a new one that visually represents your post. It’s just like adding an image, so go through the same routine with the Media Library, upload an image, and then click on the Set Featured Image button in the lower right hand side.
Once you have set the image, it will show up in the Featured Image window as seen below. Don’t worry, you can always change it. Later, when you go to the class site you’ll see the image featured prominently and will you ever be pleased with the visual quality it adds to the site! We’ll get to this later.

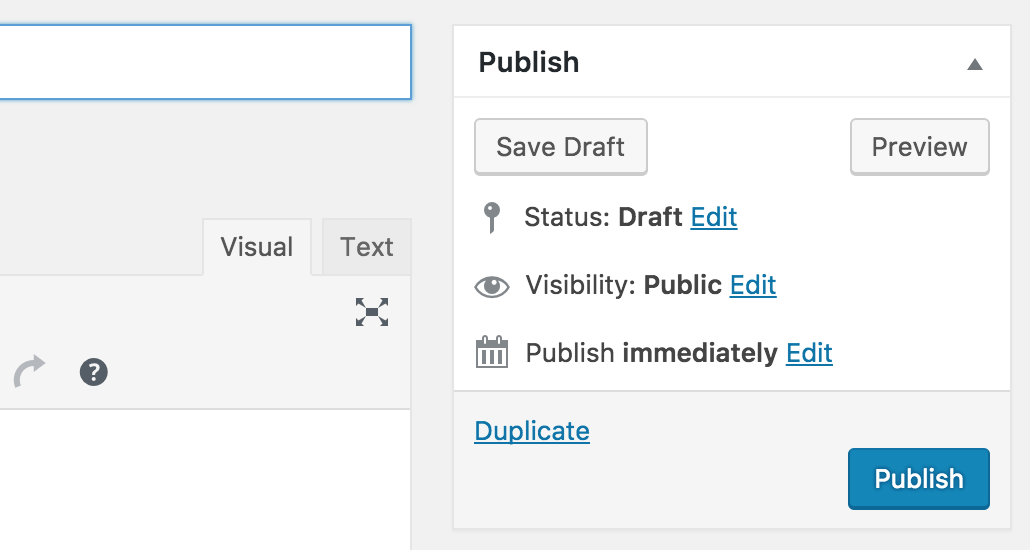
- Publish: This is the moment you have been waiting for: click on the big blue “Publish” button in the upper right hand corner of the editor and you will be publishing your post so that it appears on the Class Site and the World Wide Web. This is the power of OSS, you can publish instantaneously and share your post online with your students, viewable to the ADM community, and the Internet for sharing with colleagues. And of course, your students’ posts will be shared similarly. And guess what, your students in the class will receive an email notification so they know you have posted an announcement. You’re probably saying, not another notification! But notifications are good, they help build community and inform your students that you have posted. You’ll appreciate the immediacy of OSS posting and sharing of information.
You can always go back into a post and edit it further. When you do this, the big blue “Publish button” will become a big blue “Update” button.
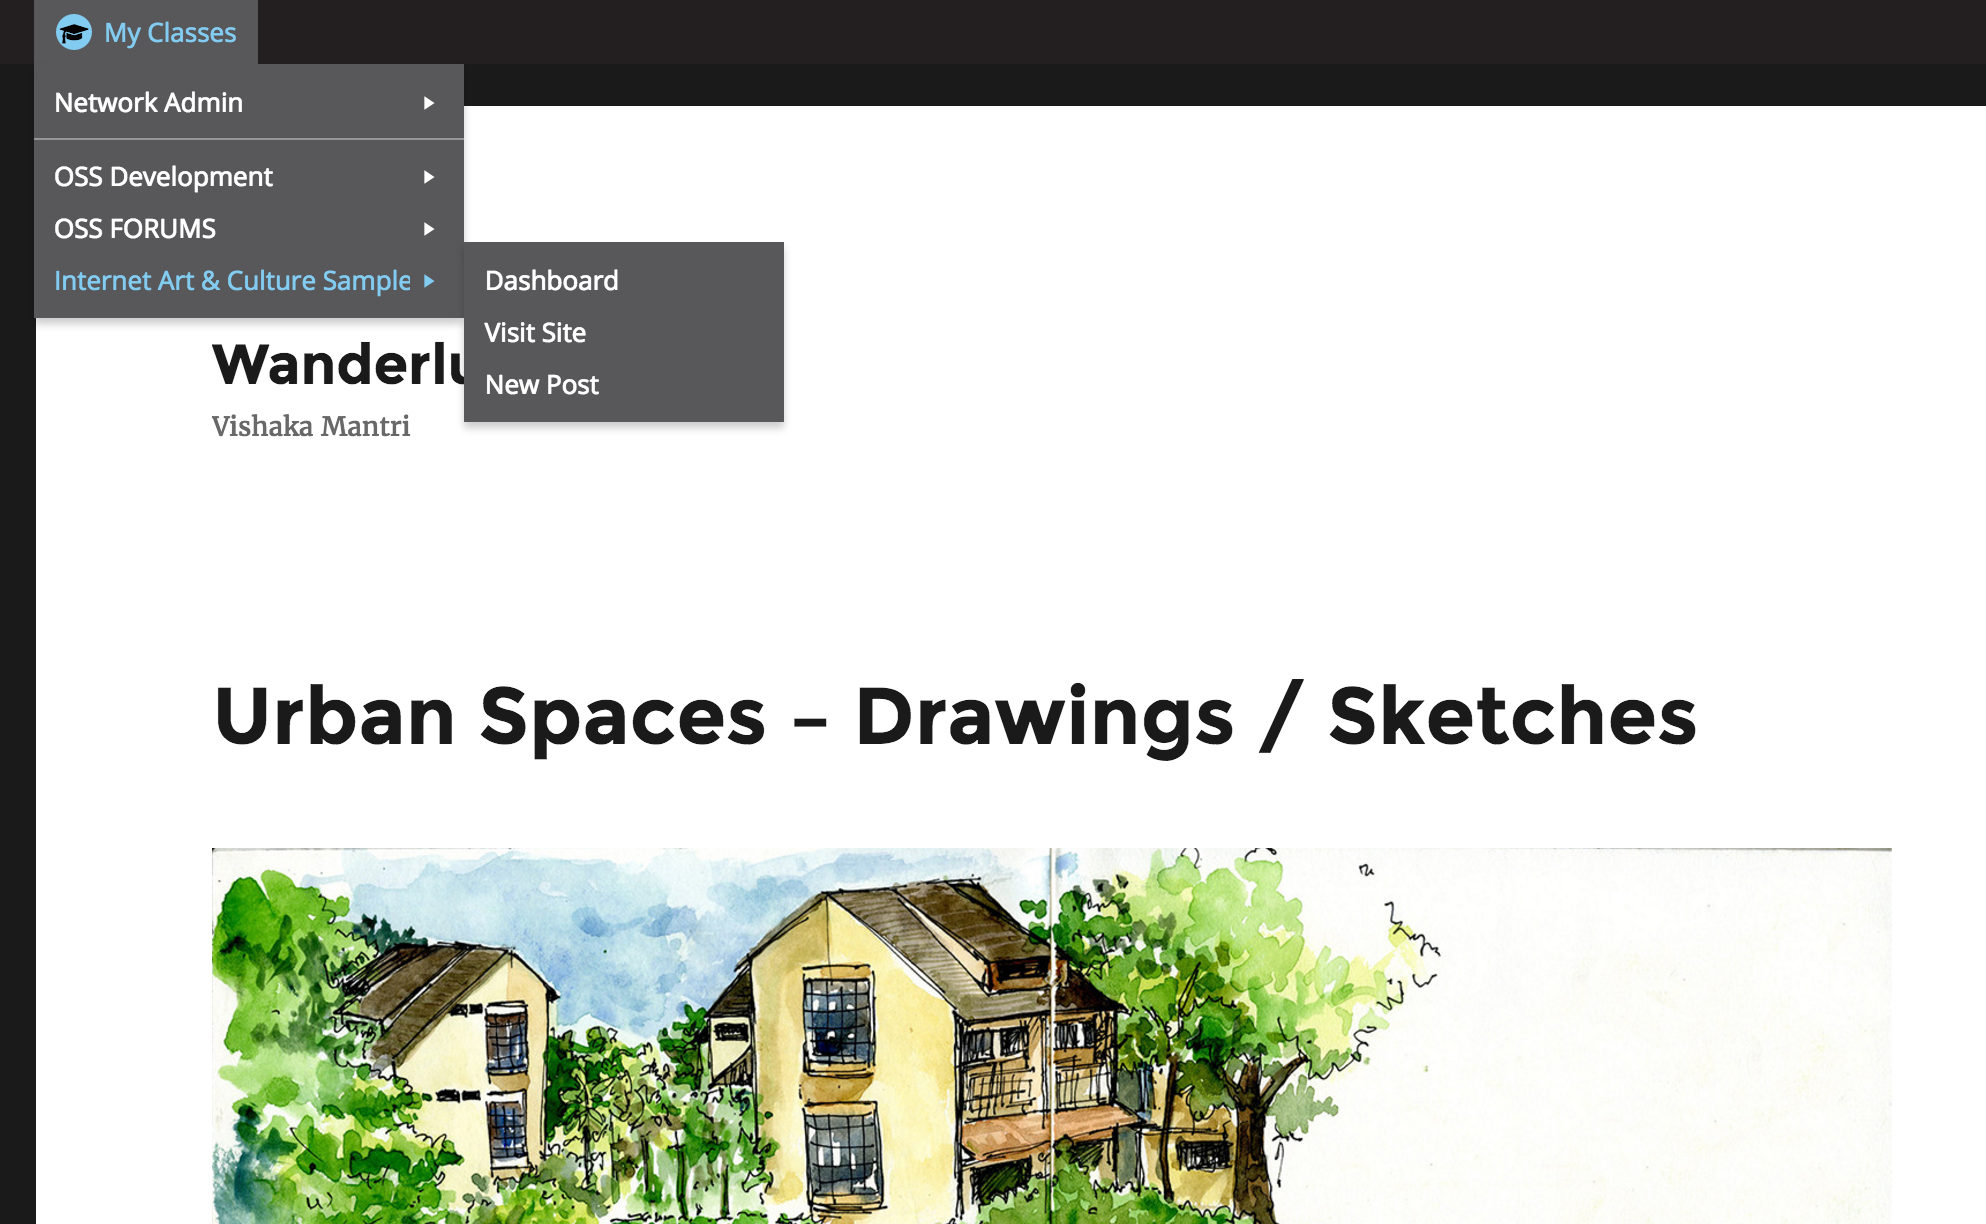
- Go Live: So far we have only been using the Dashboard, but now that you have published you are ready to a look at the front end of your site to see the announcement post you have just published. How do you get there? On the top menu of your Dashboard, you’ll see a little house icon to the left of the name of your class site on the Faculty admin bar: in the figure below called “Internet Art and Culture Sample.” Clicking on this icon should take you to your class site.
 You can now view the front end of the class site. Note that your announcement has appeared under “Announcements” in the right sidebar, complete with the name of the post, featured image, date, author, and post excerpt. This is just one way that OSS aggregates posts and places them on the home page of the class site.

Congratulations: You now have your first OSS announcement! Although it may seem as though there are many steps, with practice, you can create an announcement very quickly and they will all be archived.
6. Taxonomies for Student Sites (Categories & Tags)
Overview
Now you are wondering, what’s a taxonomy, what’s a category, what’s a tag? I promise to keep it short and sweet: a category is a taxonomy, which is a word or phrase that categorizes or groups ideas and concepts together. Like “Research” for example, in which every student post that uses this category is grouped as part of their ongoing research.
You decide the categories you want your students to use. You could also use a project name, such as “Animation” or “Short Film” or “Nightscape” in order to organize student work by project. Categories can be added throughout the semester as you assign student work.
Creating Student
Categories
We have analyzed the use of OSS by students over the last few years and come to the conclusion that almost all classes use the following categories: Research, Process, and Final Project. Therefore we have provided all classes and students with these three default categories.
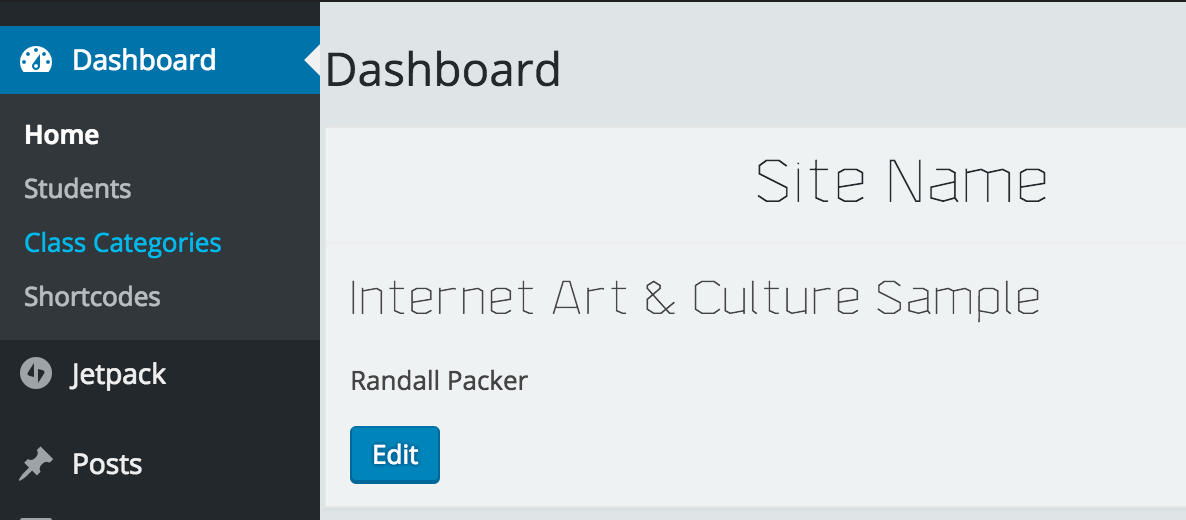
However, we strongly encourage faculty to add new categories of their own by assigning categories in addition to the default categories. To be able to do this you should go to your Dashboard and then to Class Categories. Here you can add categories that will show up on all your student sites – therefore the students do not make their own categories instead you assign categories for them.
Once you are in Class Categories, you can simply make a category by typing in the name. For example here we have the category ‘Sand Animation.’ Please remember to pick the right parent category from the drop down menu which is the name of your class.
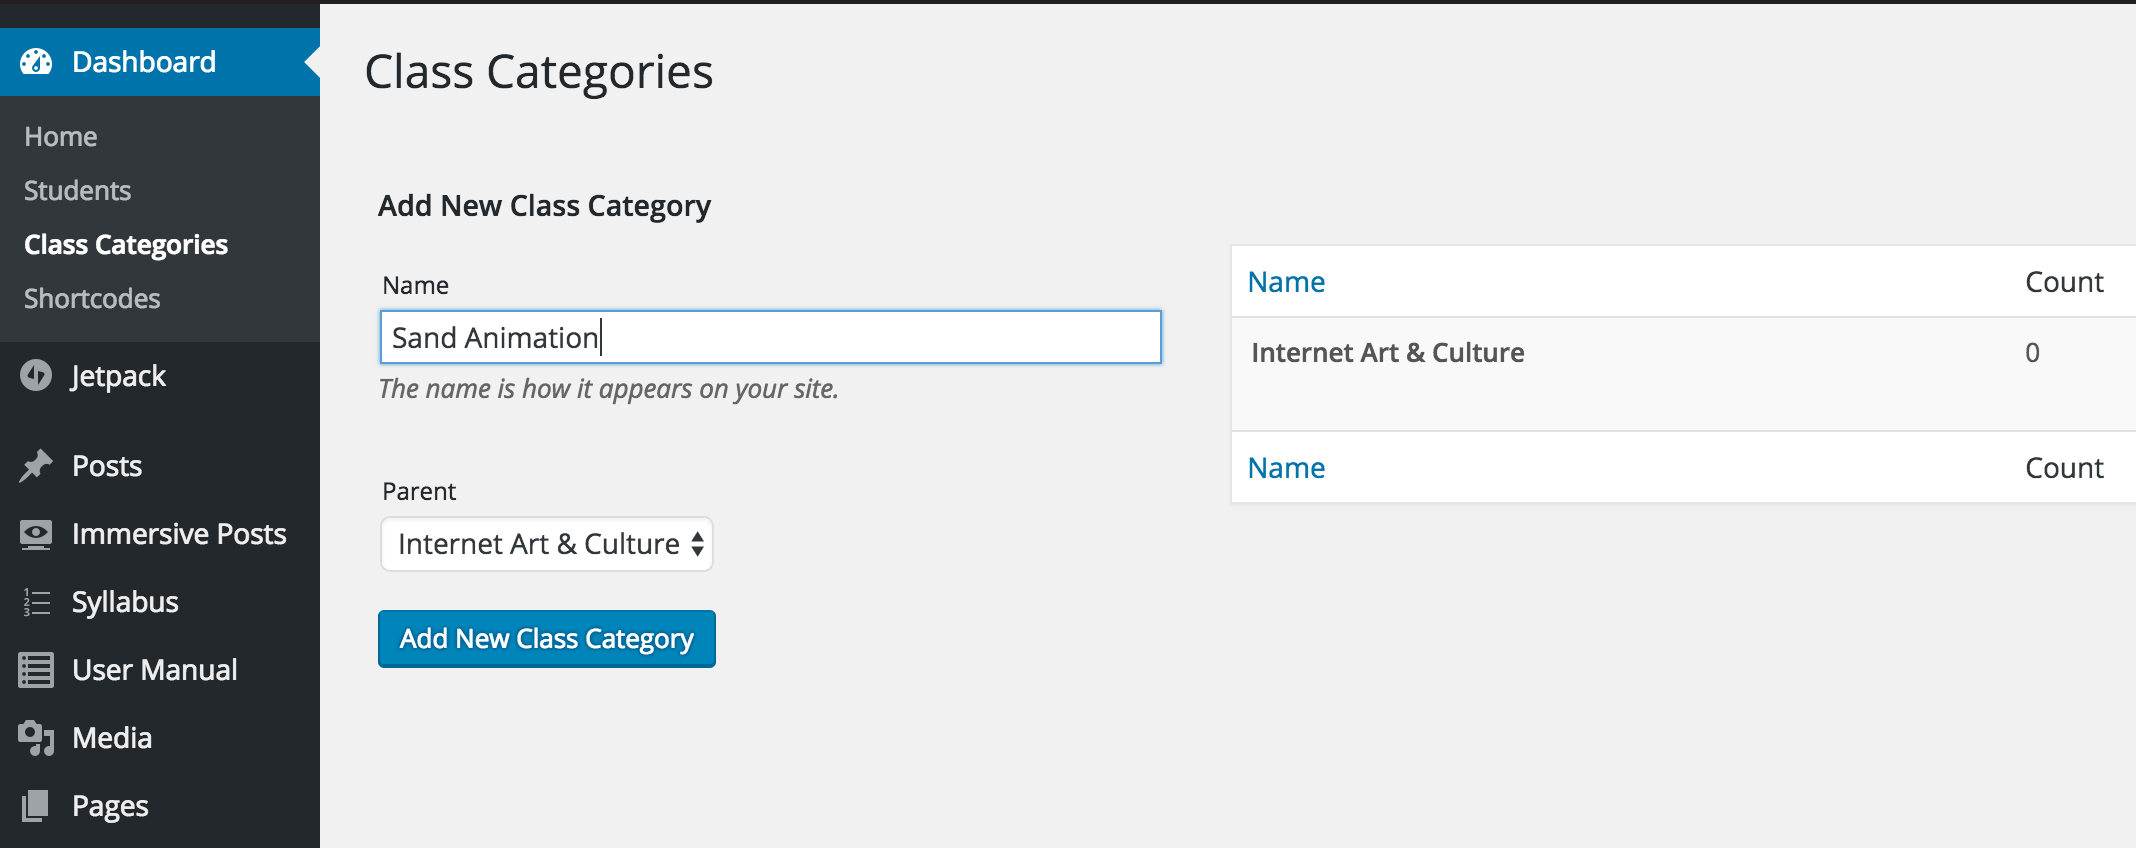
Once you make the category under the parent category of your class it should look something like this:
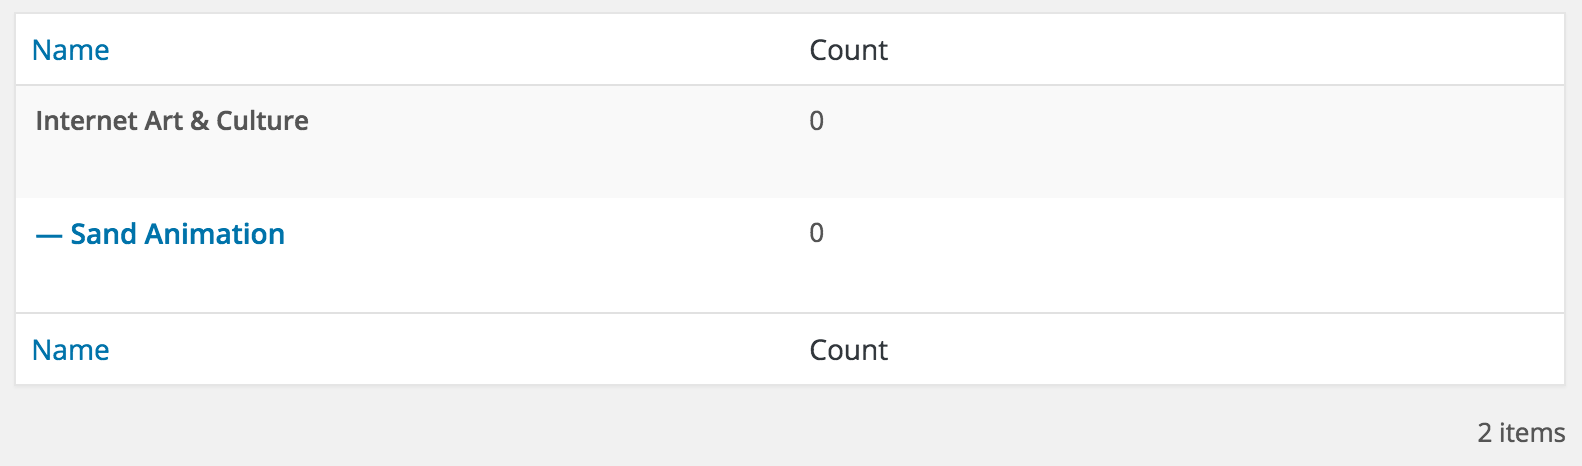 Once you have made new categories they will show up on your student’s dashboard under categories, so they can assign them to their posts. For example: the ‘Sand Animation’ category that you created earlier shows up like this on the student dashboard when they make a post.

Remember to include the name of the category in the student assignment so the students know which category to select.
If your students use categories correctly, you’ll be able to find your students’ assignments and projects, such as in the example below.
Student Tags
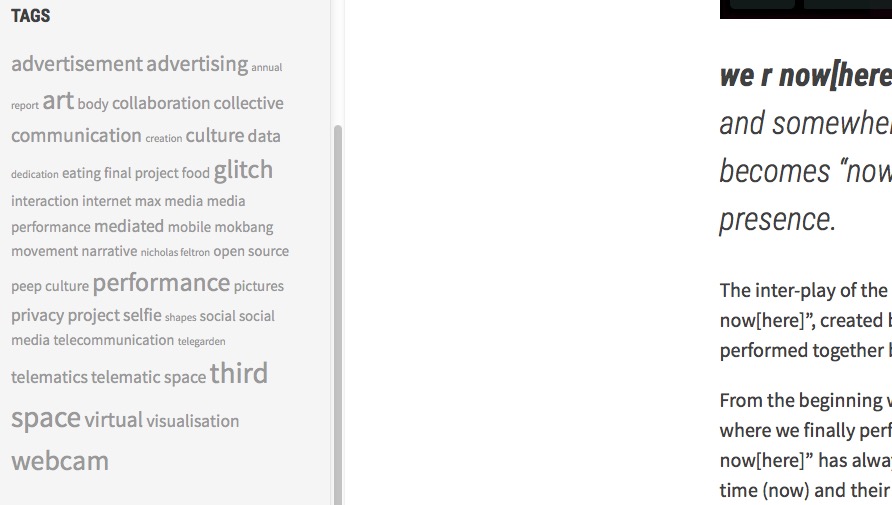
Students use tags along with categories to keep a track of major concepts and ideas which are integral to their work. Unlike categories, students choose tags of their own choice. Over time these tags can represent the general aesthetic or design sensibility of a student as they show the major ideas that the student has developed over the period of a semester – revealed in the tag cloud.
- Tag Cloud: One of the main reasons why you tag your posts, is to create what is called a tag cloud. We do not yet have a tag cloud for the class site, but your students will each have one on their site, so it is important to know the function of tags from a teaching standpoint. Throughout the semester, after each student has tagged their posts, a cloud of tags will emerge in the sidebar of their site that reveal ideas and concepts contained in posts, such as the example below on the left side. Note that the larger the font size, the more times the tag has been used. The tag cloud is particularly useful to your students on their sites for keeping track of the importance of ideas over the course of a semester. This is one example of the power of the WordPress database, to reveal key ideas through taxonomies.
You might want to consider ways of using tag clouds as part of your assignment. For example, faculty in VisCom have used tags for students to create conceptual mind maps.
7. Duplicating Content
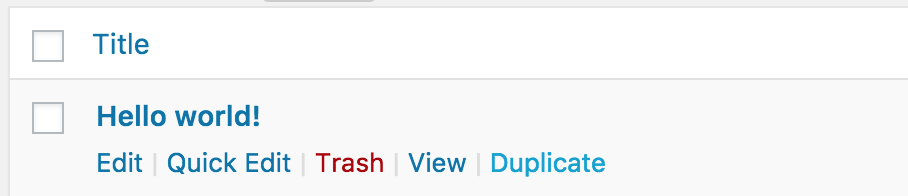
Maybe you are teaching the same class to different groups or have content from a class you taught a year ago on OSS and wish to import it into your new class site. You can do this directly in the post editor by clicking the duplicate button near the publish button in your post.
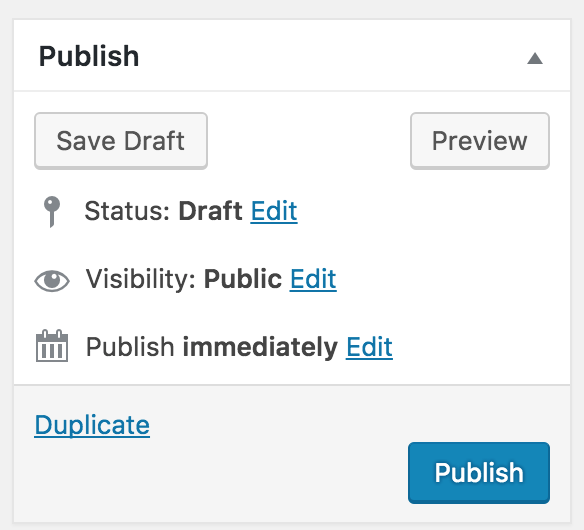
Once you do this you need to check the class you wish to duplicate the post into. You can also decide whether to keep the post in draft mode or publish it directly. Then click the Duplicate button and the post will be duplicated onto another class site while preserving the original formatting and content.
We suggest that you leave the post in draft mode until you have made the necessary changes for the new class and then publish it as your students get notified when you publish a post.
 Another way to duplicate content is by going to the Dashboard and then going Posts > All Posts
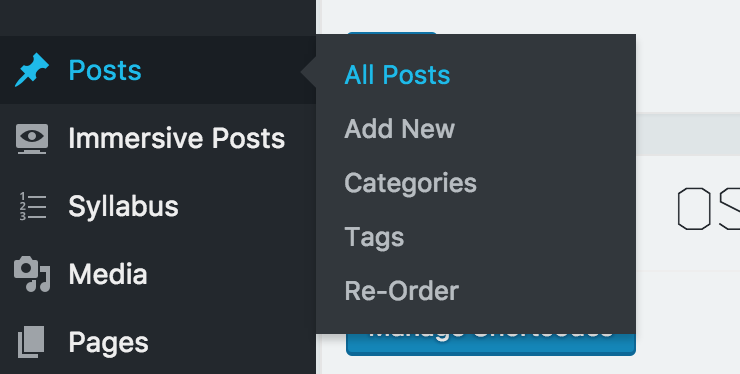
Find the post you want to duplicate and hover over it. You will see the duplicate button appear – click it and repeat the steps above
8. Navigation
You may be wondering about how we get back to the Dashboard from the home page of your class site. Here’s how:
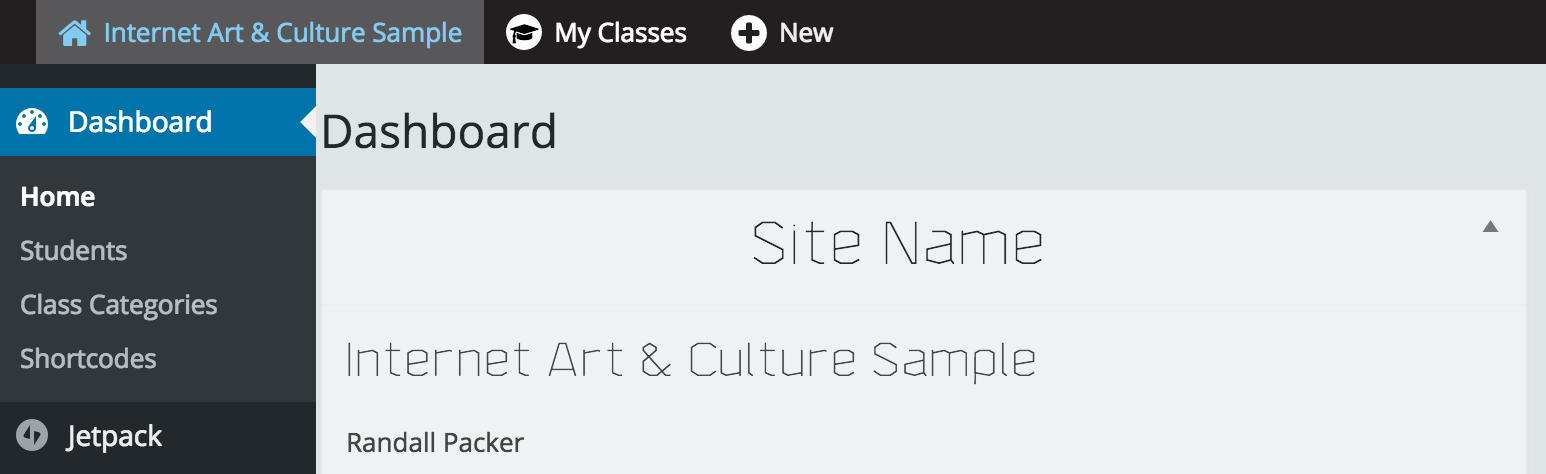
- Dashboard: Just click on the name of your site on the top left corner of the Faculty Admin Bar and it should take you to the dashboard of your site.
- Home Page: When you are on the dashboard you will notice that the icon next to your site name has changed into the ‘home’ icon. Just click on this to go to the homepage of your site.
- Round tripping: Try going between the Dashboard and the home page a few times until you are comfortable with the navigation.
- Accessing a Student Site: In order to access the student site you should go to the left sidebar on your class site and find the student whose site you want to view. Then either click on their Avatar or their Name and it should take you to their site.

- My Classes: Once you are on a student site you are probably wondering how to go back to your class site. You can go to the admin bar and there you will find “My Classes,” which lists all the classes that YOU are teaching that semester. Under “My Classes” you will be able to find the name of your class and clicking this will redirect you back to your class site.
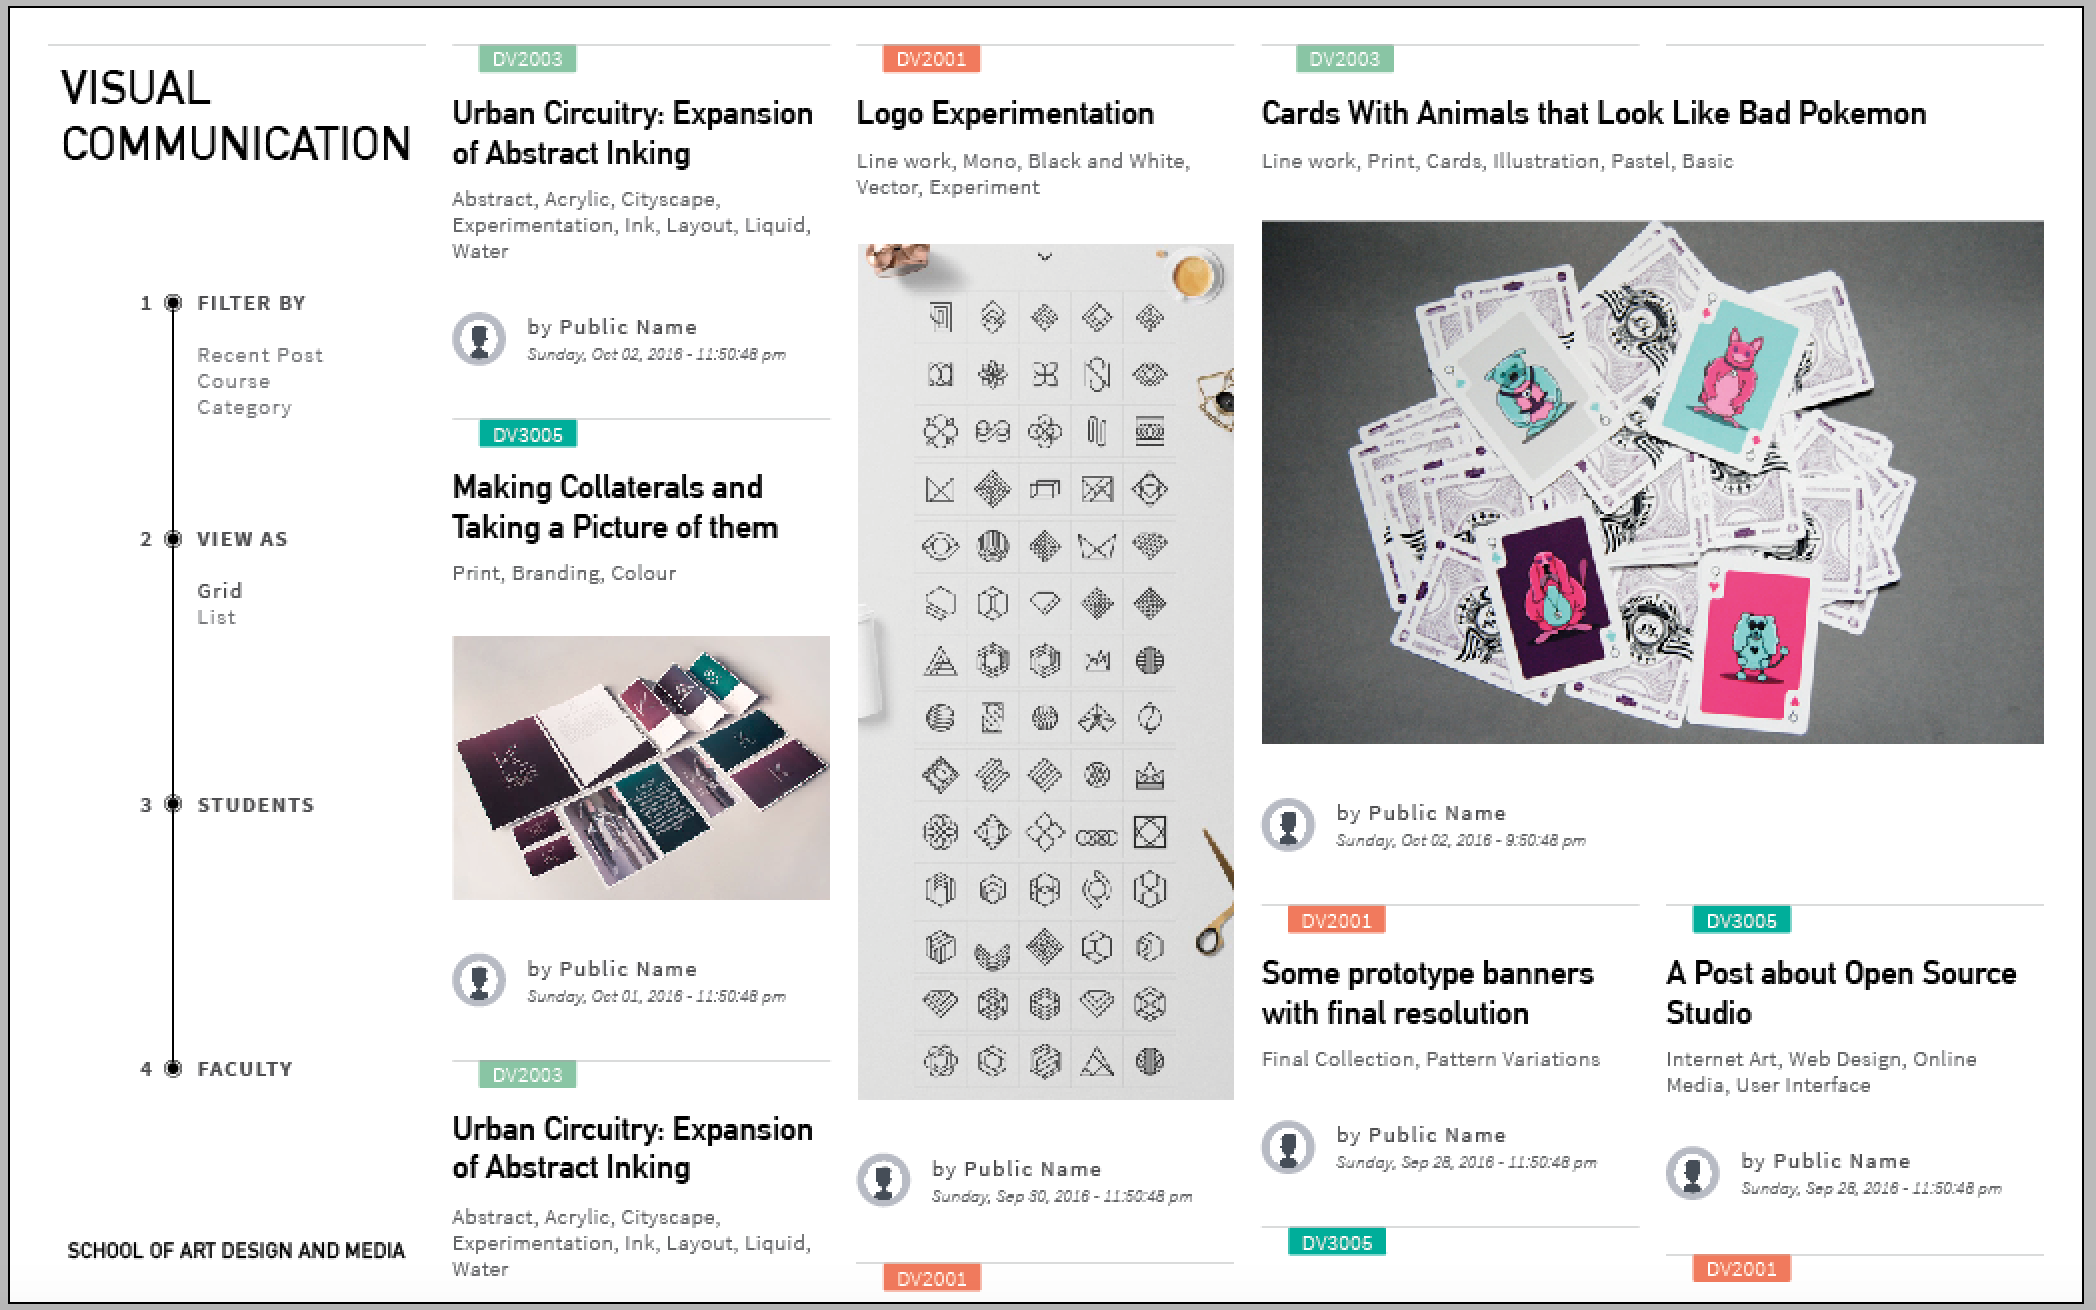
9. Overview of the Class Site
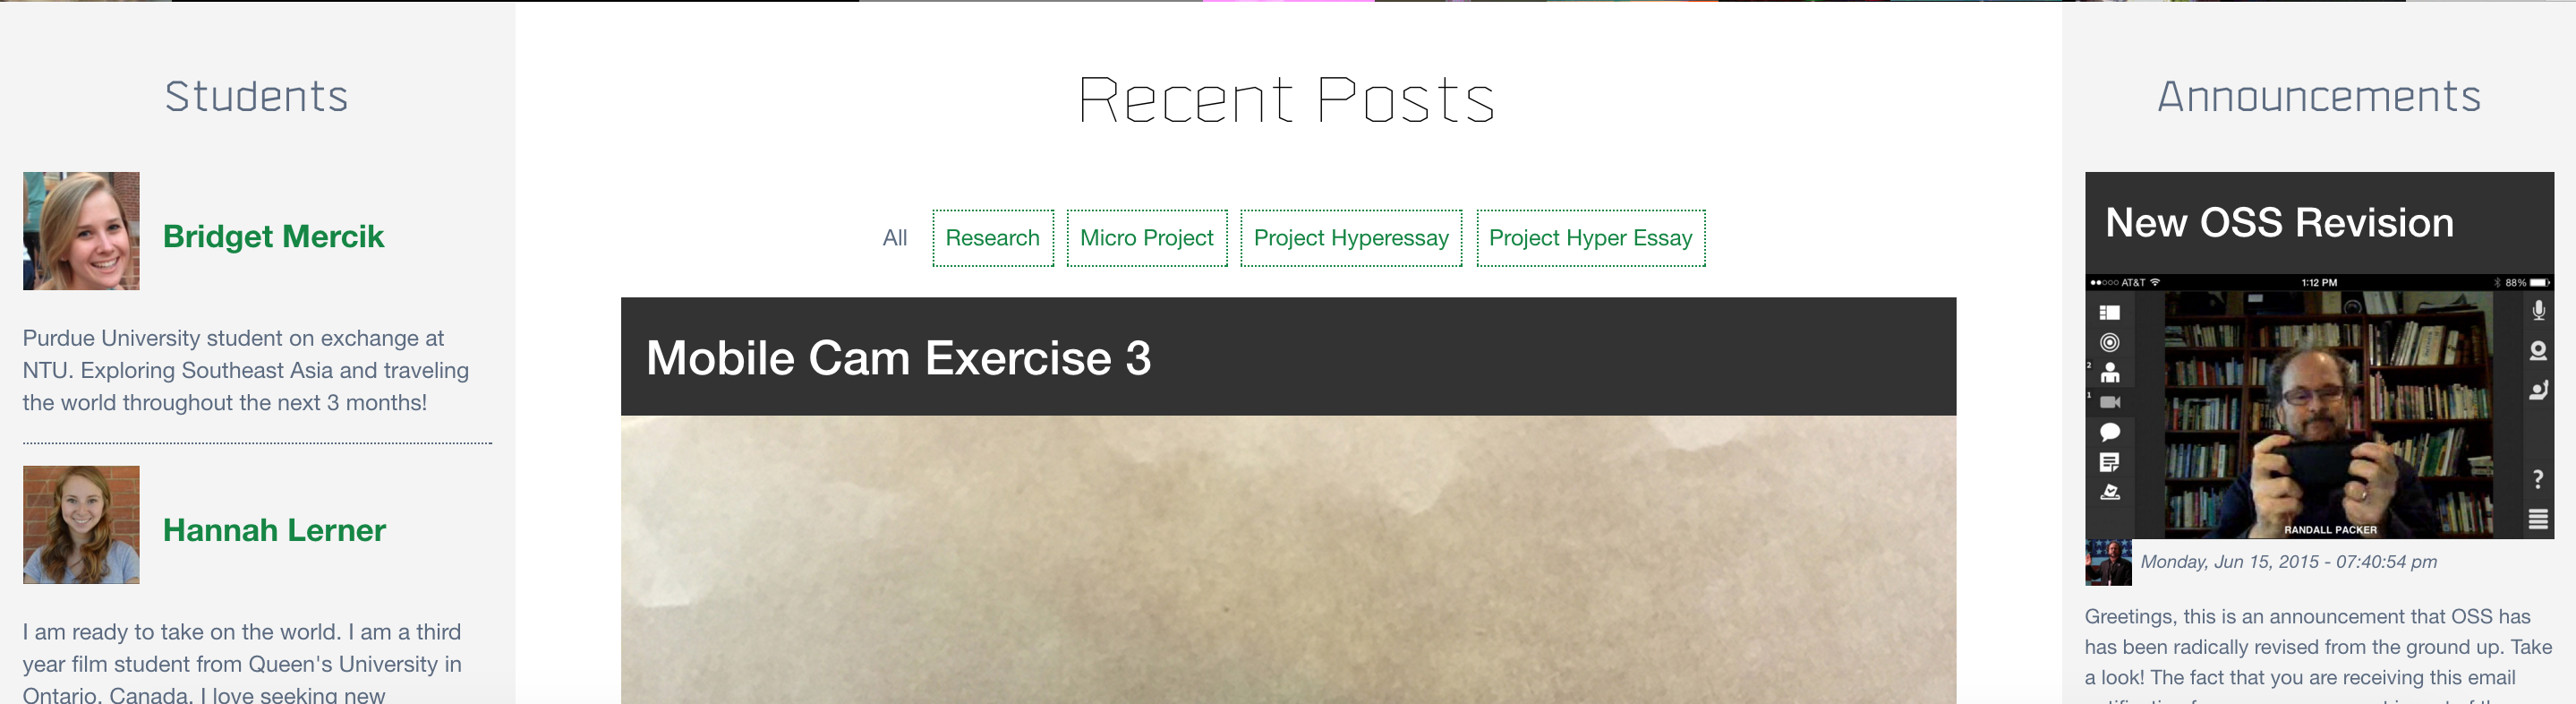
The heart of the OSS virtual studio is the way in which the work of your students is aggregated into the class site. This allows you to access their work in a single location, where you can then link to their individual sites. A quick tour of the home page of the class site includes the following:
- Students: The left sidebar lists your students, including their avatars, bios, name, etc. You can link to their individual sites by clicking on their name.
- Recent Posts: Running down the middle column, you can see the recent posts your students have posted. By clicking on the title of the post or the feature image, you can access the full post.
- Announcements: In the right sidebar are your announcements. By clicking on the title of the post or the feature image, your students can access the full post.

How is this aggregation possible? Because OSS is a very sophisticated database system! But wait, we aren’t done, now that your students’ posts are brought together on the class site, it can be used for discussion. You and your students can discuss everyone’s work and ideas, just like social media, with each post containing a discussion thread. More on this later.
- Anatomy of a Post: before we talk about commenting it’s important to first understand all the elements of a post as it appears on the “Recent Posts” feed of the class site, as well as Announcements. If you take a look at the example below, here is a breakdown of how a post is displayed in OSS:
- Title of the post, clicking on this will take you to the post on the student site
- The featured image, remember how this adds an important design element and visual cue?
- The Avatar is a visual representation of the student
- Student name, date of post, and the name of the student site
- Post text excerpt;
- Categories and tags;
- Last but not least, the comments and reply button at the bottom, note this post doesn’t have any comments yet. We’ll discuss this in the next section.

10. Discussion and Commenting
OSS is designed to not only aggregate and archive student work, it is a system for helping to build community and social engagement in your class. You will find that the more your students use OSS to post their work and critique the work of others, the stronger their sense of community will be. In this regard the ability to discuss and comment on a project extends the social dynamic of the physical classroom experience. This is how it works:
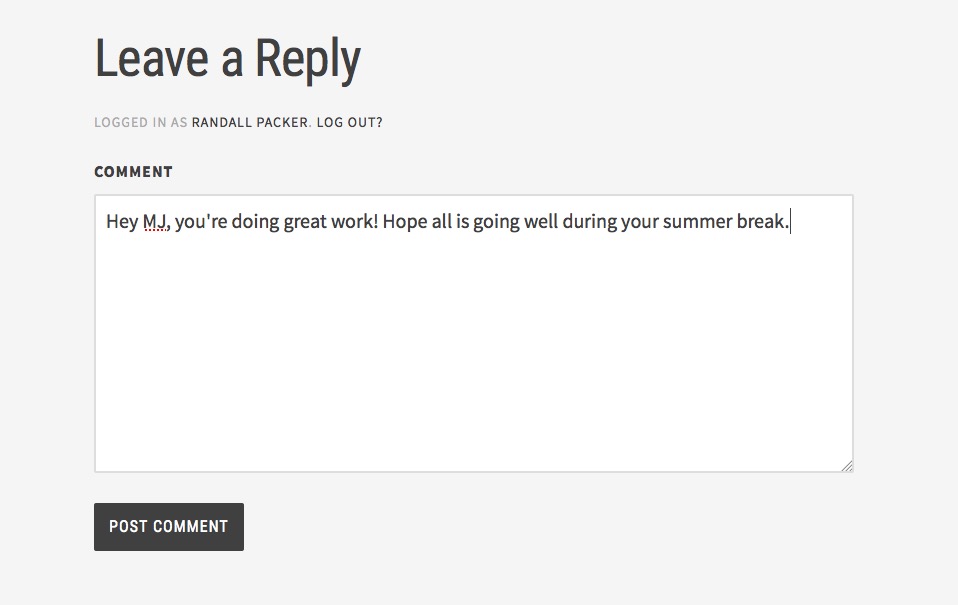
- Comments: Now you are ready to reply to a student’s post. Just pick a post and click on the reply button at the bottom of the post, such as in the example below.

- The Student Site: This will take you to the student site, usually at the comment field where you can type your reply. On this page you can read the whole post and type into the comment window at the bottom of the post to reply. When you are done, and again, remember this is going out to the Web, click on Post Comment, and off it goes! The student recipient of the comment will receive an email notification so they know you have commented.
- Virtual Crit: When you go back to the class site, note that this post now includes a comment. As you can see, OSS is not only a virtual studio to post student work, it is a threaded discussion forum much like an open critique in your class, except it takes place online outside of regular class time.

11. Posting a Syllabus
We have all been through the hassle of printing the syllabus before a class only to find out that someone enrolled for the class at the last minute and that we do not have enough print outs for the whole class. OSS provides an online solution to this problem as it now provides you with a custom template to post your syllabus online. (And it is a way of going green and not using paper!) This online syllabus is modifiable and can be updated throughout the semester. For now, we will discuss the creation of an online syllabus that covers an entire semester, but it is also possible to create a weekly syllabus (you may setup an appointment for this advanced capability). Below is how you can use OSS to upload your syllabus.
- Syllabus Item: Go to your class site where an empty syllabus template has already been created. Click on “Syllabus” on the Main Menu and then click on the Pencil editor Icon that says “Edit Syllabus Item” on the admin bar.
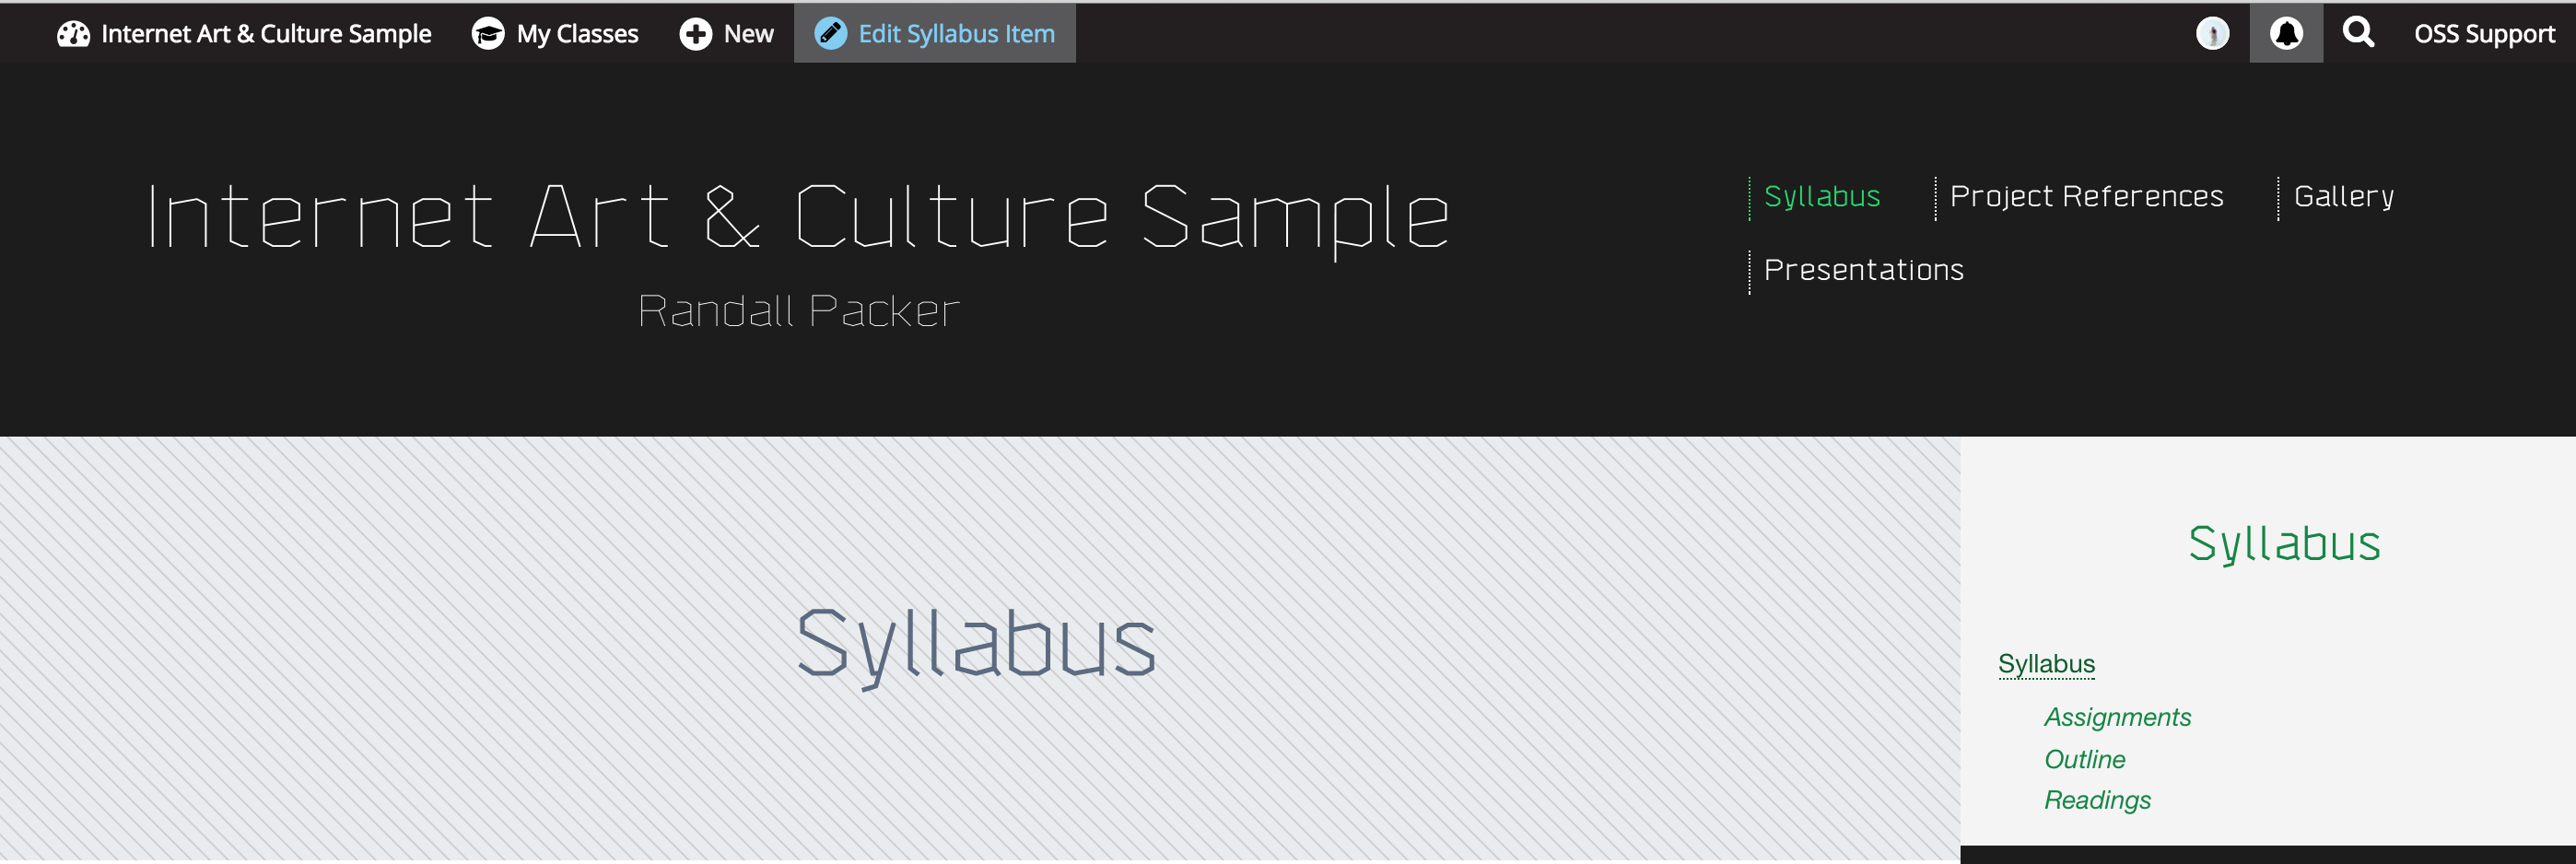
- Syllabus Template: This will open up the template designed for you to fill in all the sections of your syllabus. The sections/tabs on the top of the editor provide typical sections of the syllabus: Description, Assignments, Outline, Readings, and Miscellaneous.
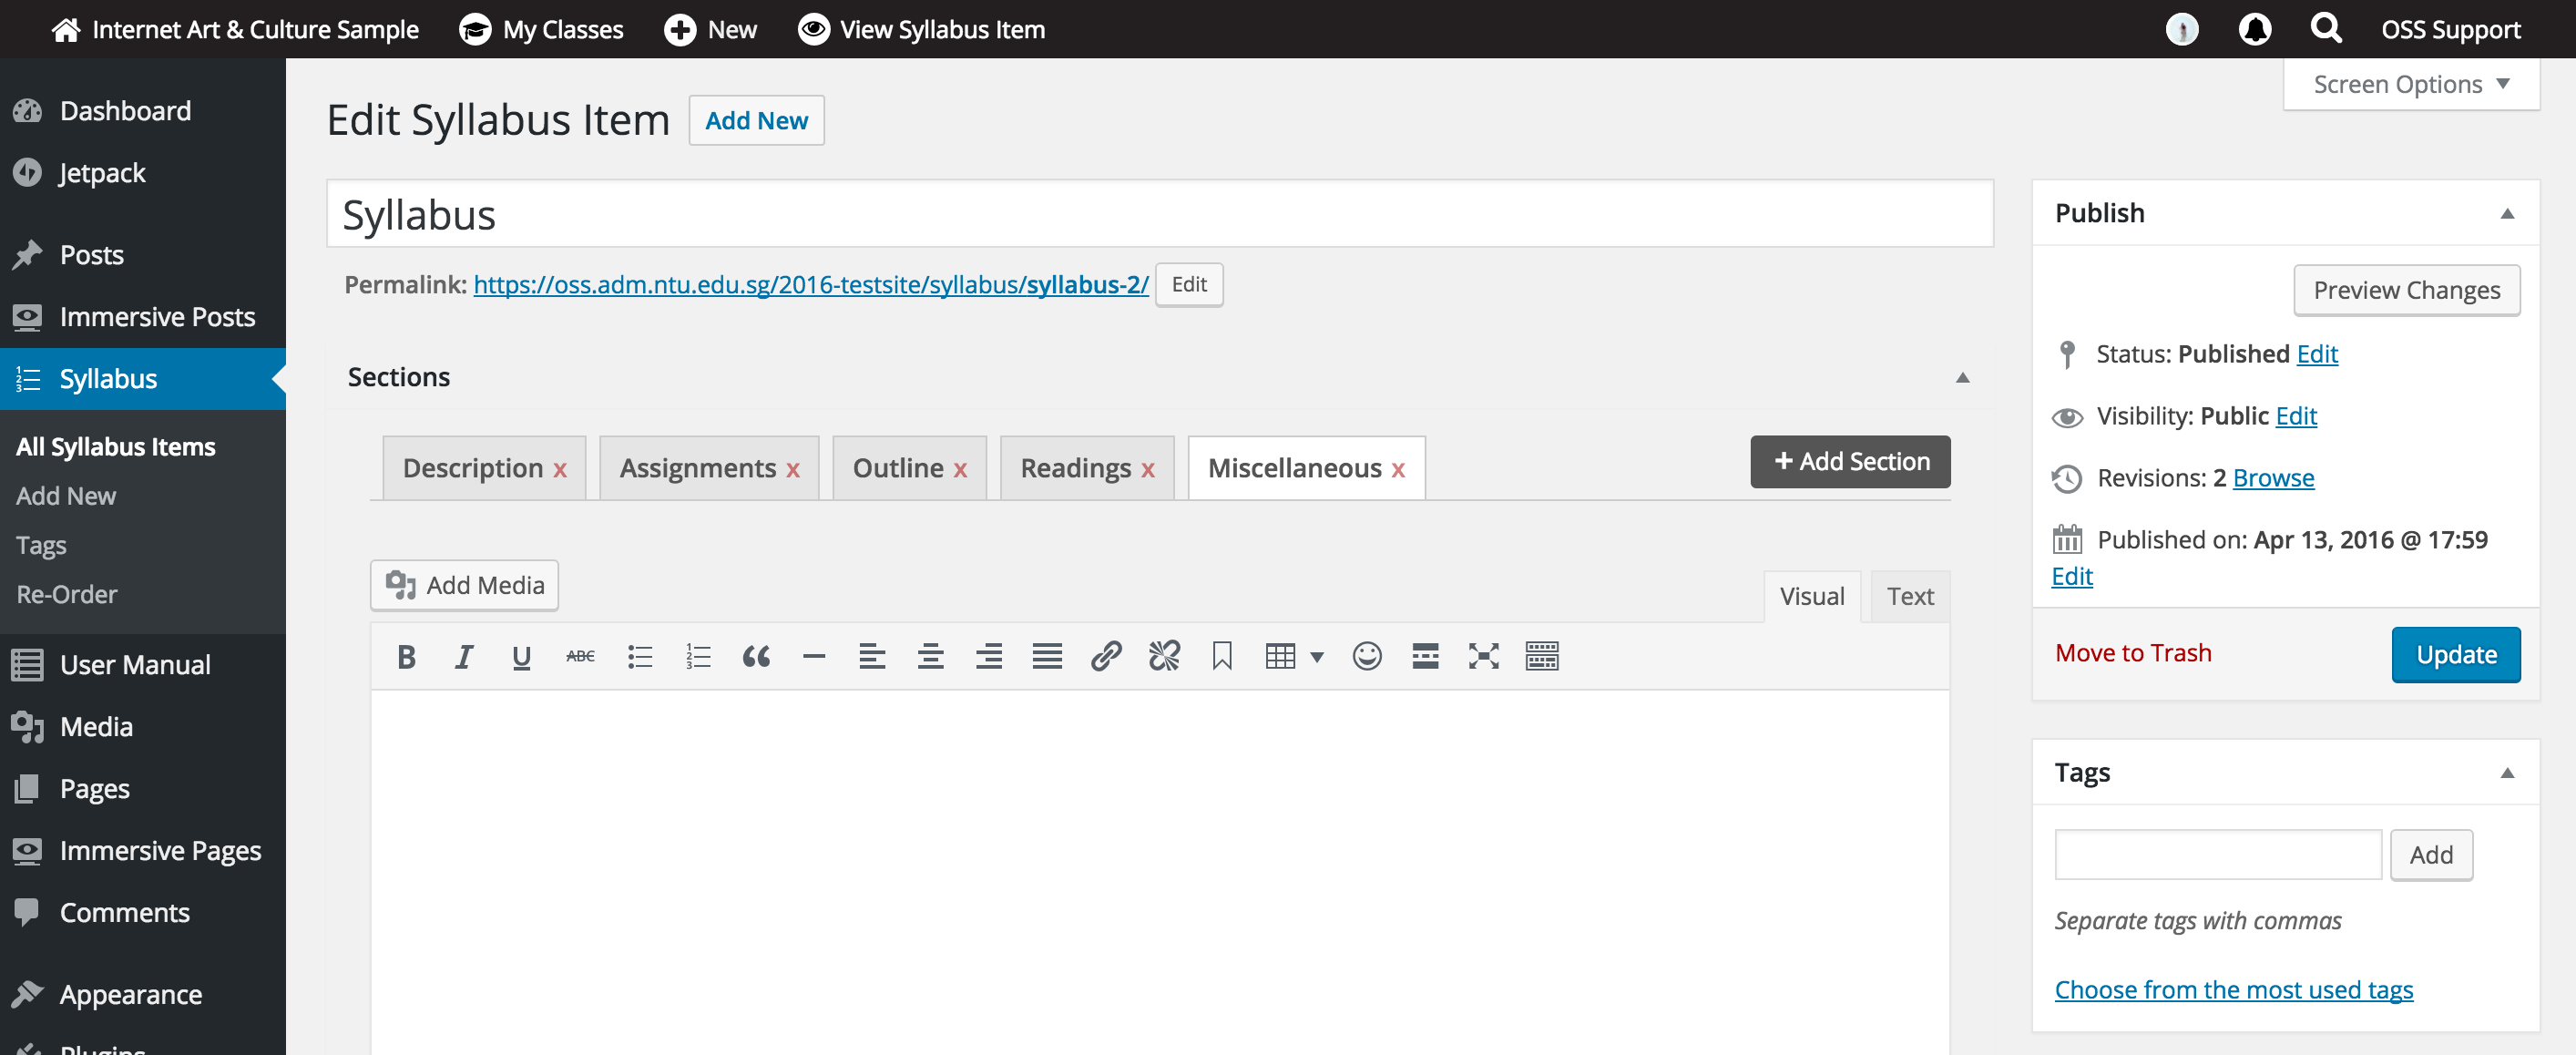
- Editing Sections: You can rename these sections by double clicking on them, change the order by dragging them and in case you don’t need a specific section you can even delete it by clicking the red ‘x’ in the right corner of the section.
- Adding Sections: You can also add a section by clicking the ‘Add Section’ button on the right.
- Copying Your Syllabus: All you need to do now is copy and paste the appropriate sections of your syllabus from a Word (preferred method) or pdf document into the various sections of the template and click on “Publish” when you are done. The syllabus will be accessible on the Main Menu of your class site.
This template can be used to post a semester syllabus or even a weekly syllabus. Here are examples of both:
- Semester Syllabus: http://oss.adm.ntu.edu.sg/2016-testsite/syllabus/syllabus-2/
- Weekly Syllabus: http://oss.adm.ntu.edu.sg/2015-dm3012/syllabus/
To learn how to make the Weekly Syllabus please go to the Advanced Faculty Tutorial (currently under construction).
12. Posting Additional Material
The following is an introduction to placing additional teaching material on a class site. Here you will create a page, which unlike the post which appears on a feed (such as Announcements or the Recent Posts Feed), the page is a standalone document that appears on the main menu.
This page could be used to make accessible additional lecture notes or assignments or references that are relevant to the course. In this example, we will place links and other relevant media into a page called “Project References.” You may also add PDF documents to your class site using Pages like these.
First, go to the Dashboard and under the + New dropdown menu in the faculty admin bar at the top, create a new Page (not a Post).
 First use the WordPress editor to give your page a title and include a description of the documents you are posting.
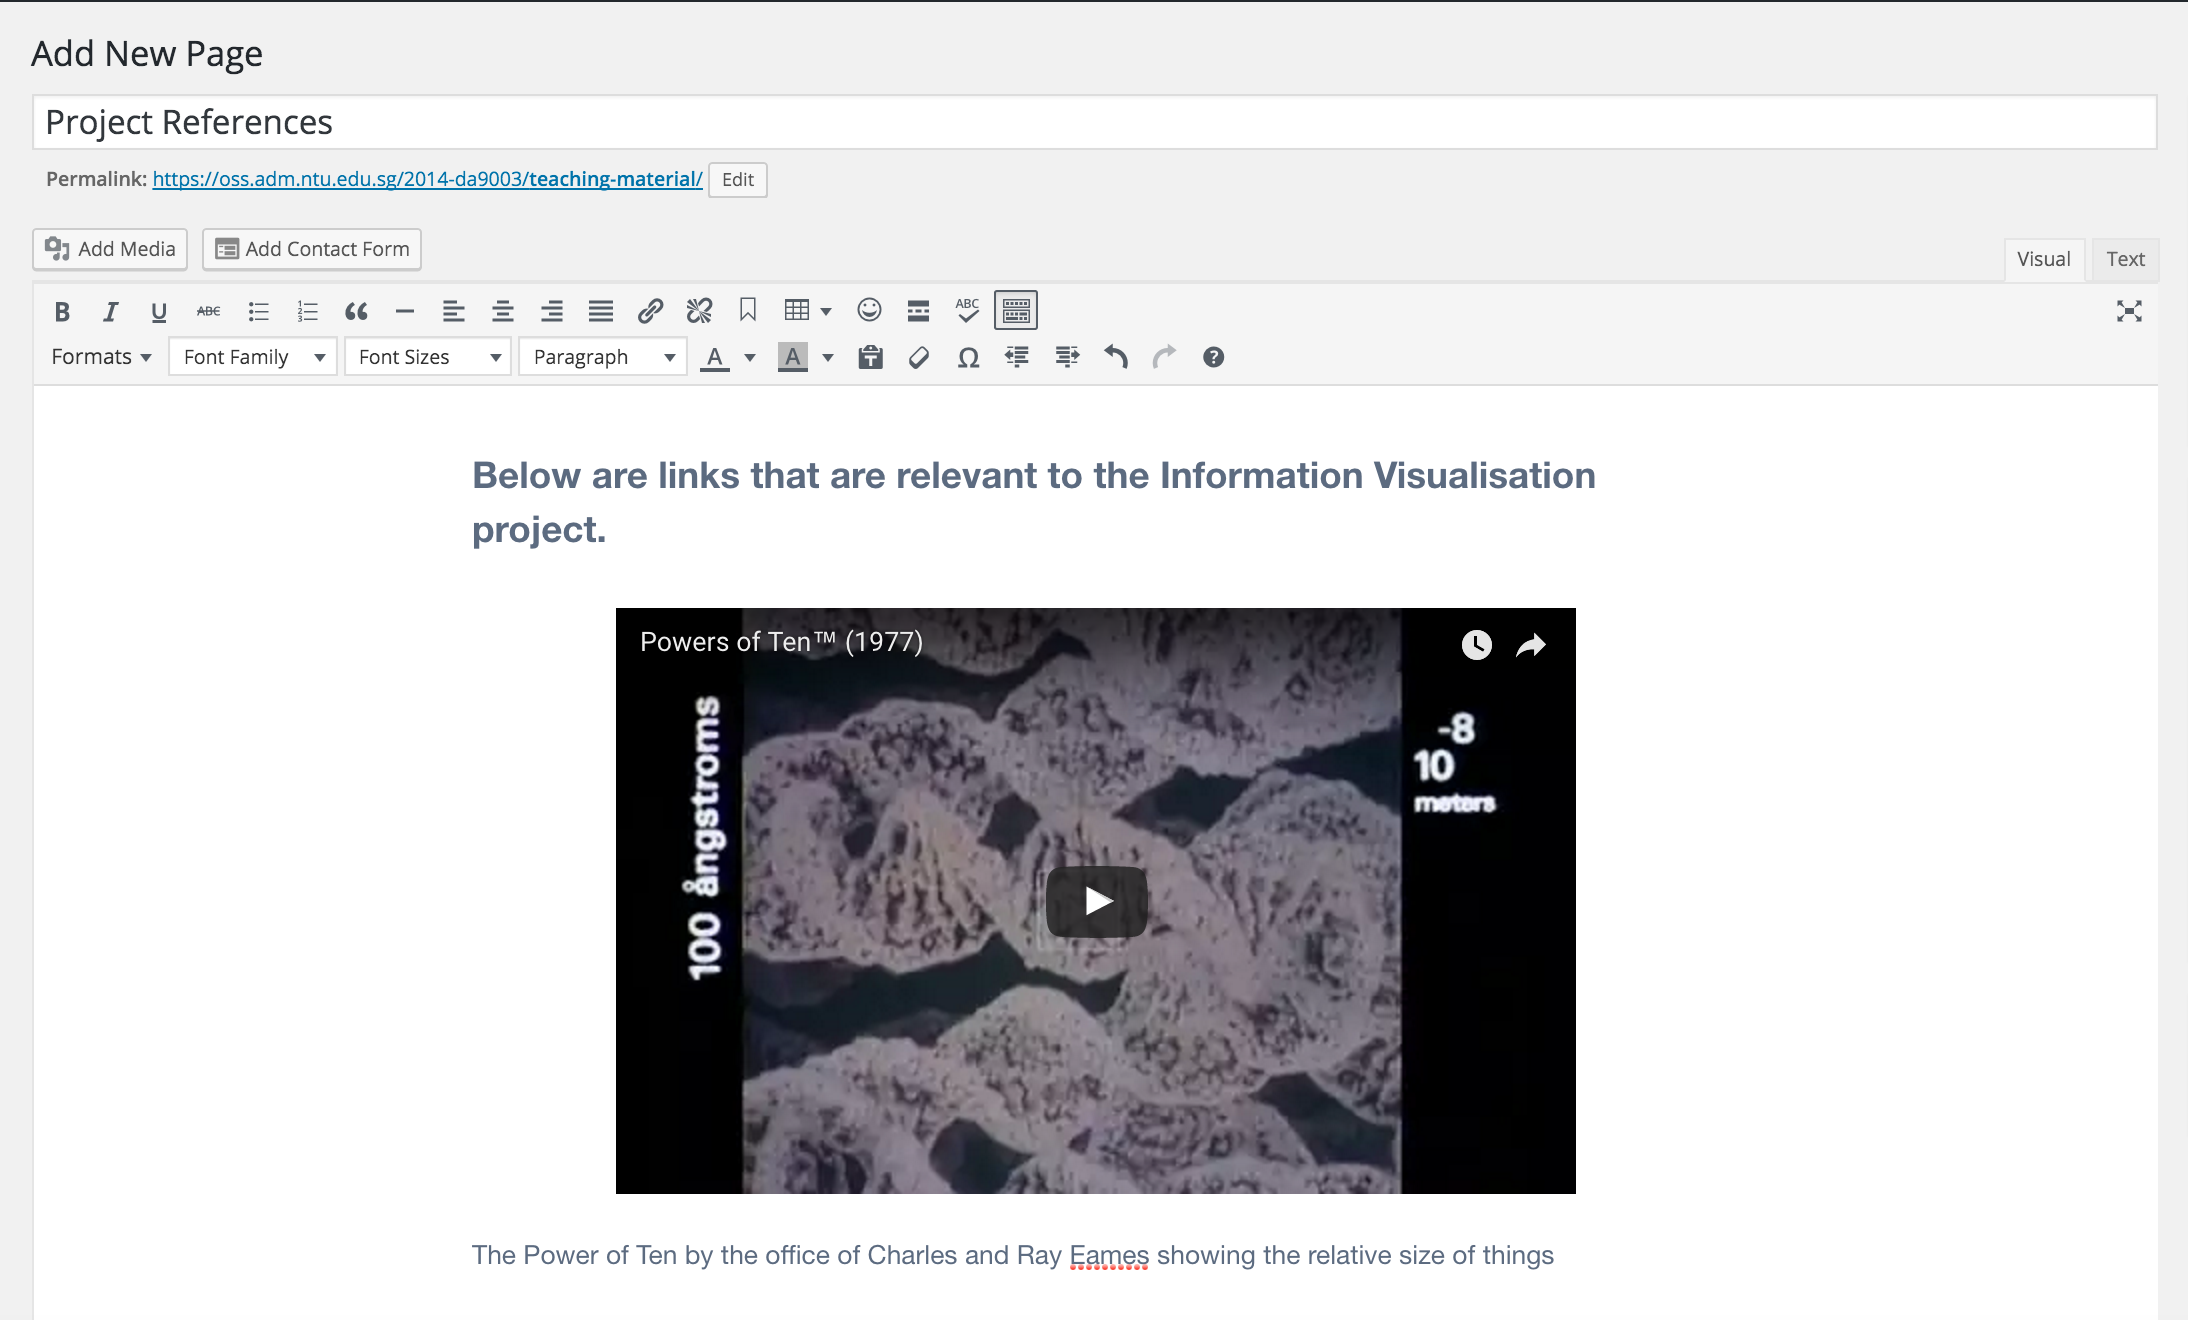
Now you can upload links or even a Vimeo video by just pasting the URL into the editor. Make sure to press enter after pasting the URL so as to embed the video file into the editor. By storing links, video, images, etc., in a resource page, it will make it easier for your students to access this information.
You can also add a pdf document just as you would any other media. Click on the “Add Media” button, select your pdf document, and it will be added to the Media Library with a check mark. (note the icon on the left side)
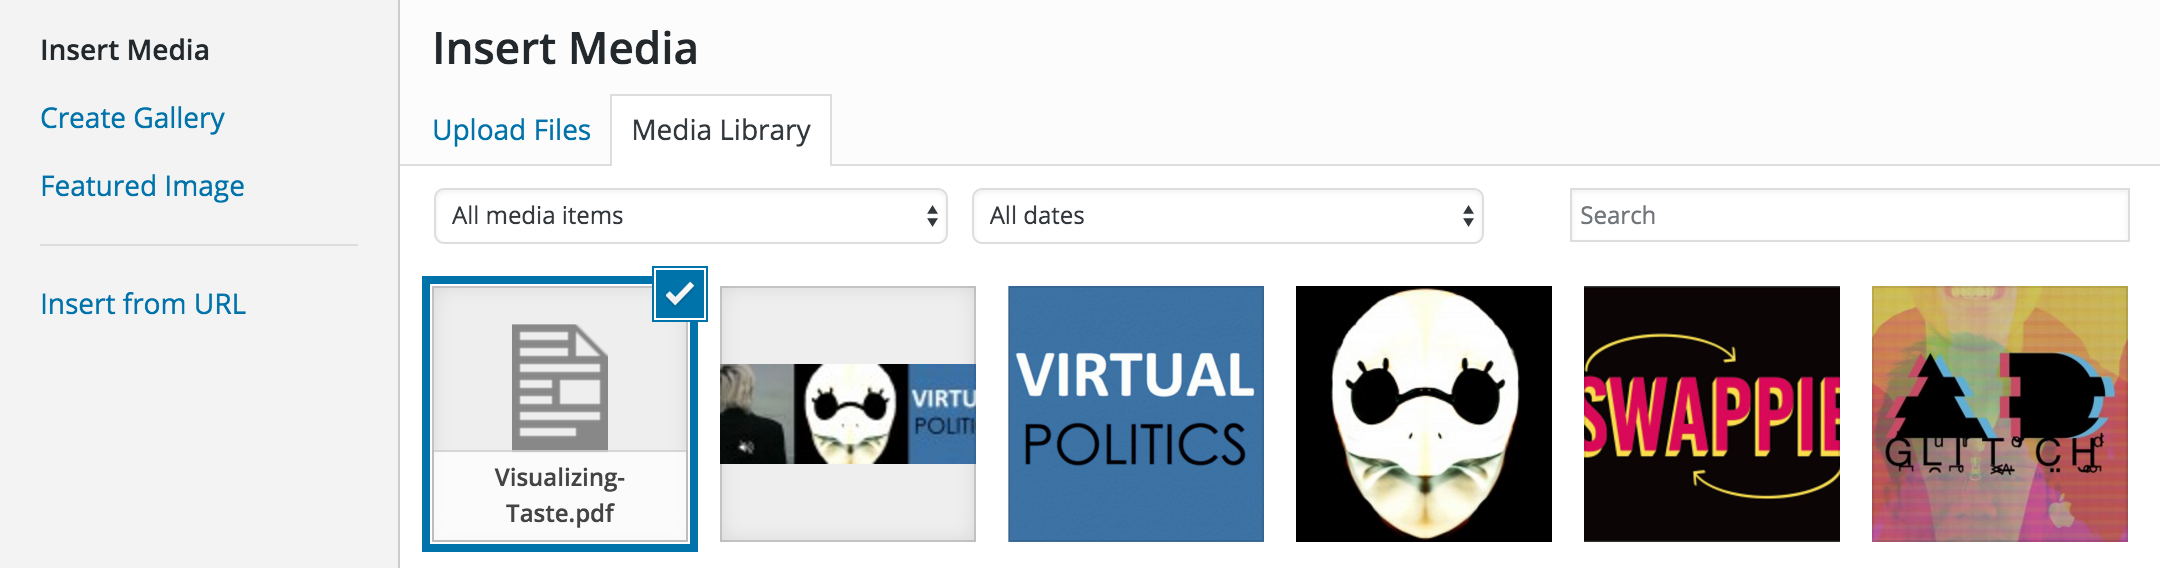
The next step is to insert the pdf document into your page by clicking on the “Insert into page” button in the lower right hand corner of the “Insert Media” screen.

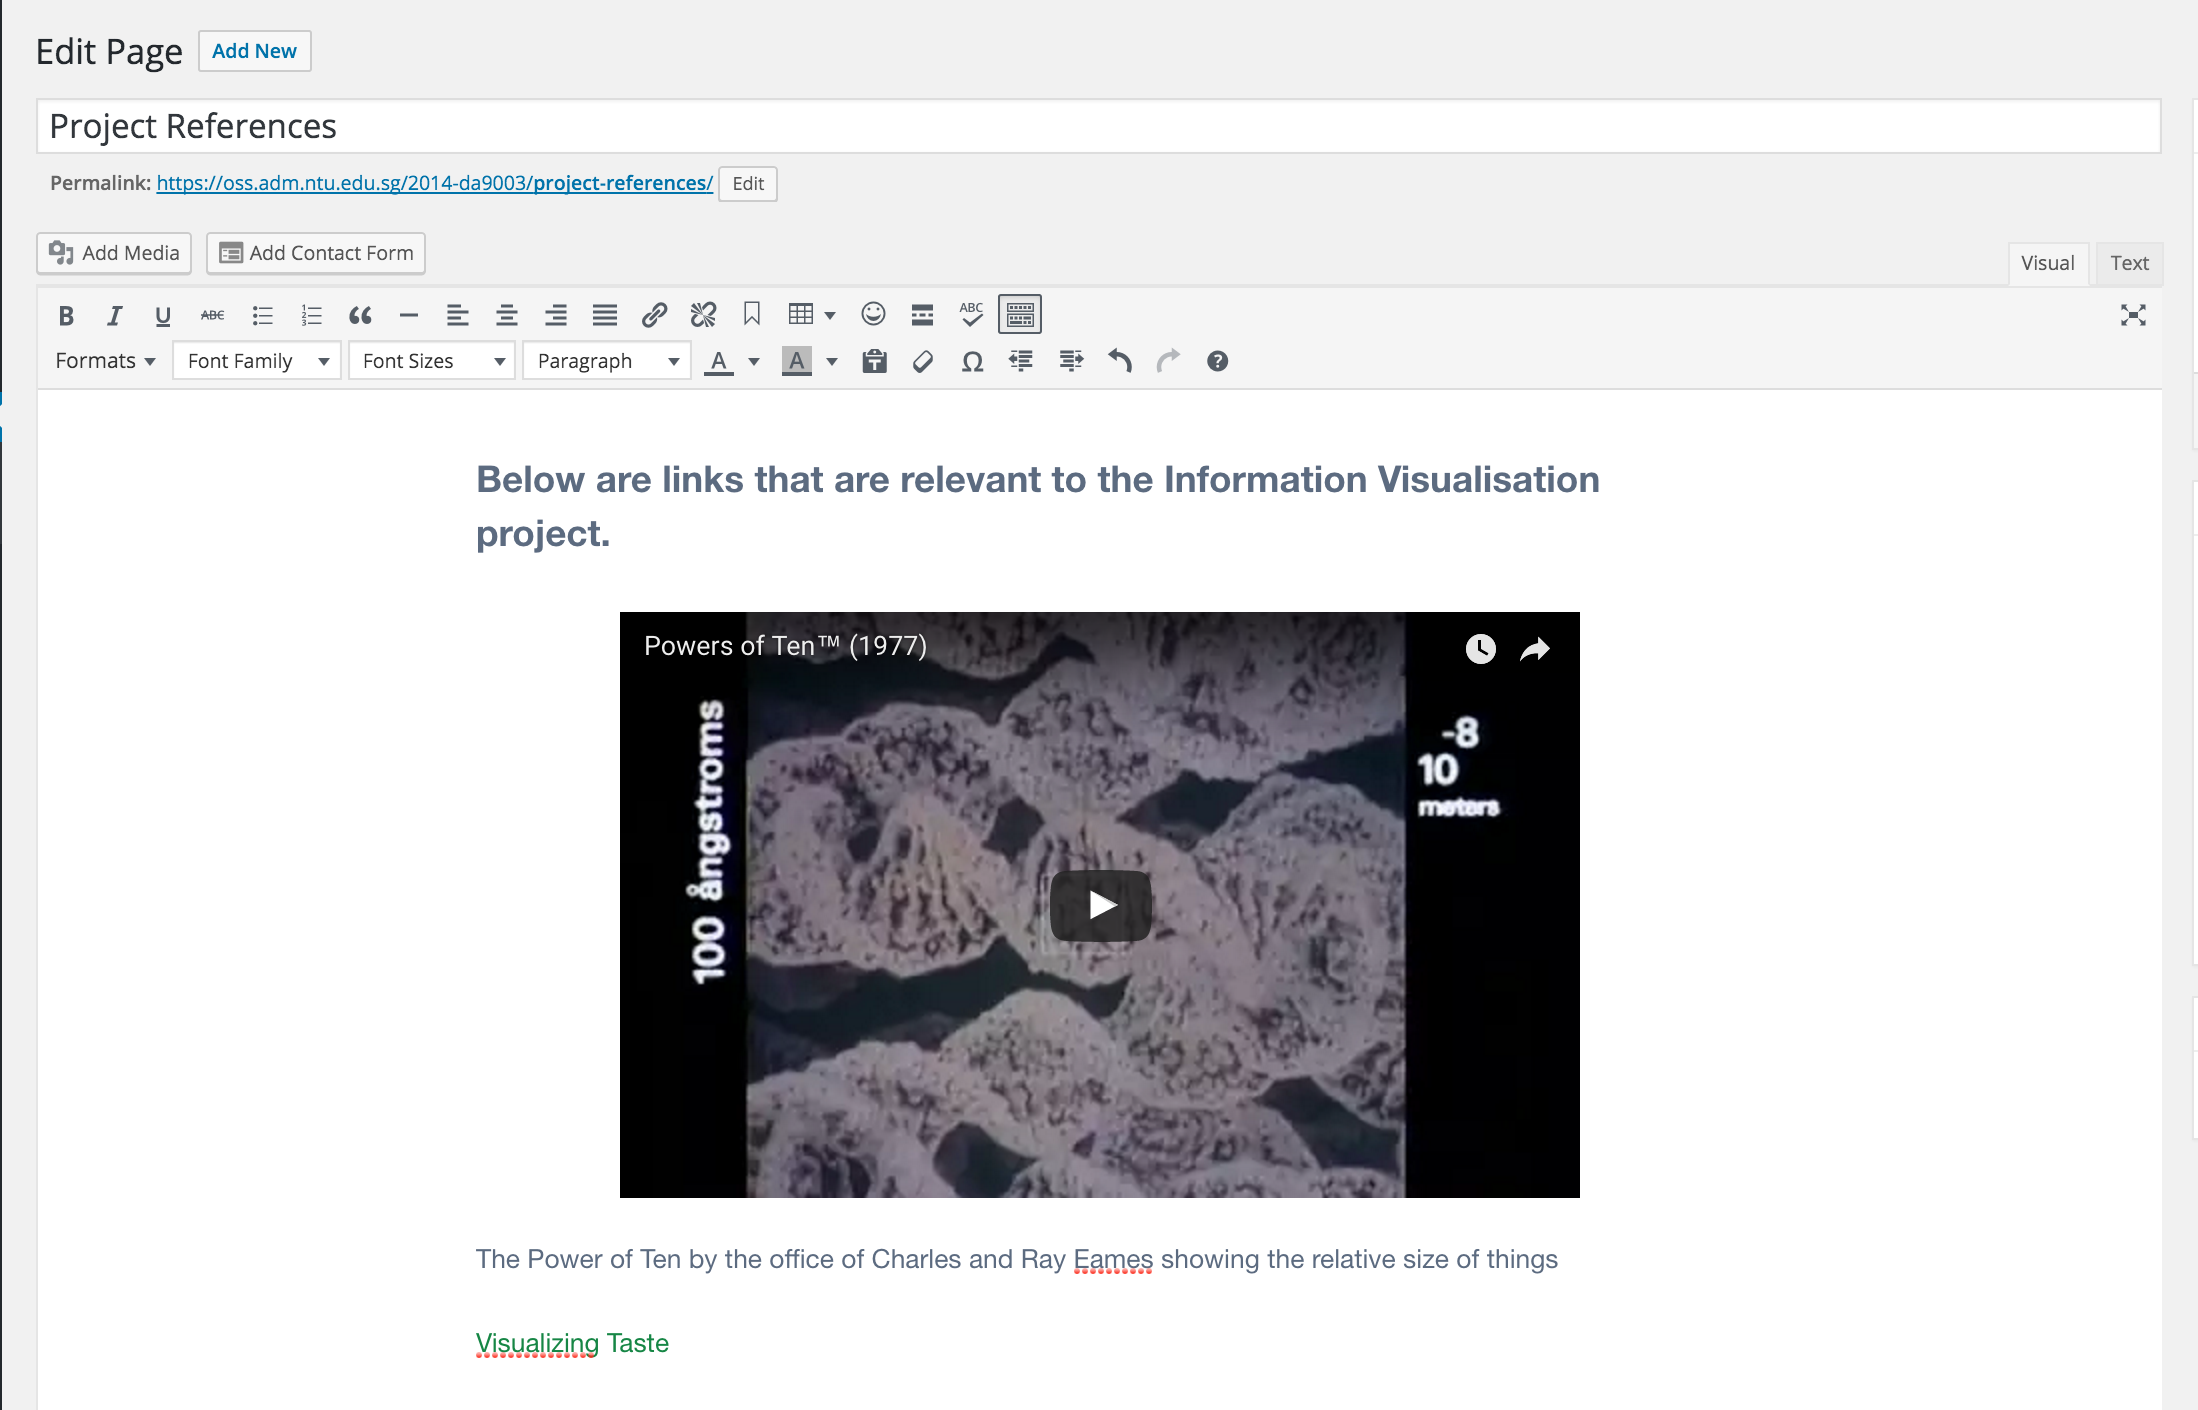
By doing this, you will be creating an embedded link in your page so the document can be accessed and opened by students. Note that the link is automatically named the same as the pdf file, but if you want you can edit this name.
Before you are finished creating the page, you need to publish it by clicking on the “Publish” button on the right hand side of the editor, just as you did when you were creating a post. OSS is designed to automatically add your new page to the Main Menu.
13. Creating a Gallery
The Gallery is a place for you to aggregate and showcase student work for a specific project or an entire semester. This is particularly great as you will always have a page that you can use to show all the work from your class – essentially a class portfolio. The Gallery can be used to aggregate posts from a Final Project assigned to a class and therefore make grading much easier as all the student posts would be in one page and you wouldn’t have to look for them in your email or different folders. It is also a great way to archive work that has been done for a course to show to colleagues or at conferences. OSS has been designed with a default gallery page set up for every class site in the Main Menu. To create the content of the gallery you must follow the following steps:
- Create a Shortcode: A Shortcode is basically a small piece of code that aggregates all the student posts using a specific assigned category. Go to the “Dashboard” and then to “Shortcode” and under the OSS Post Aggregator, create a Shortcode. The example below is called “Research”
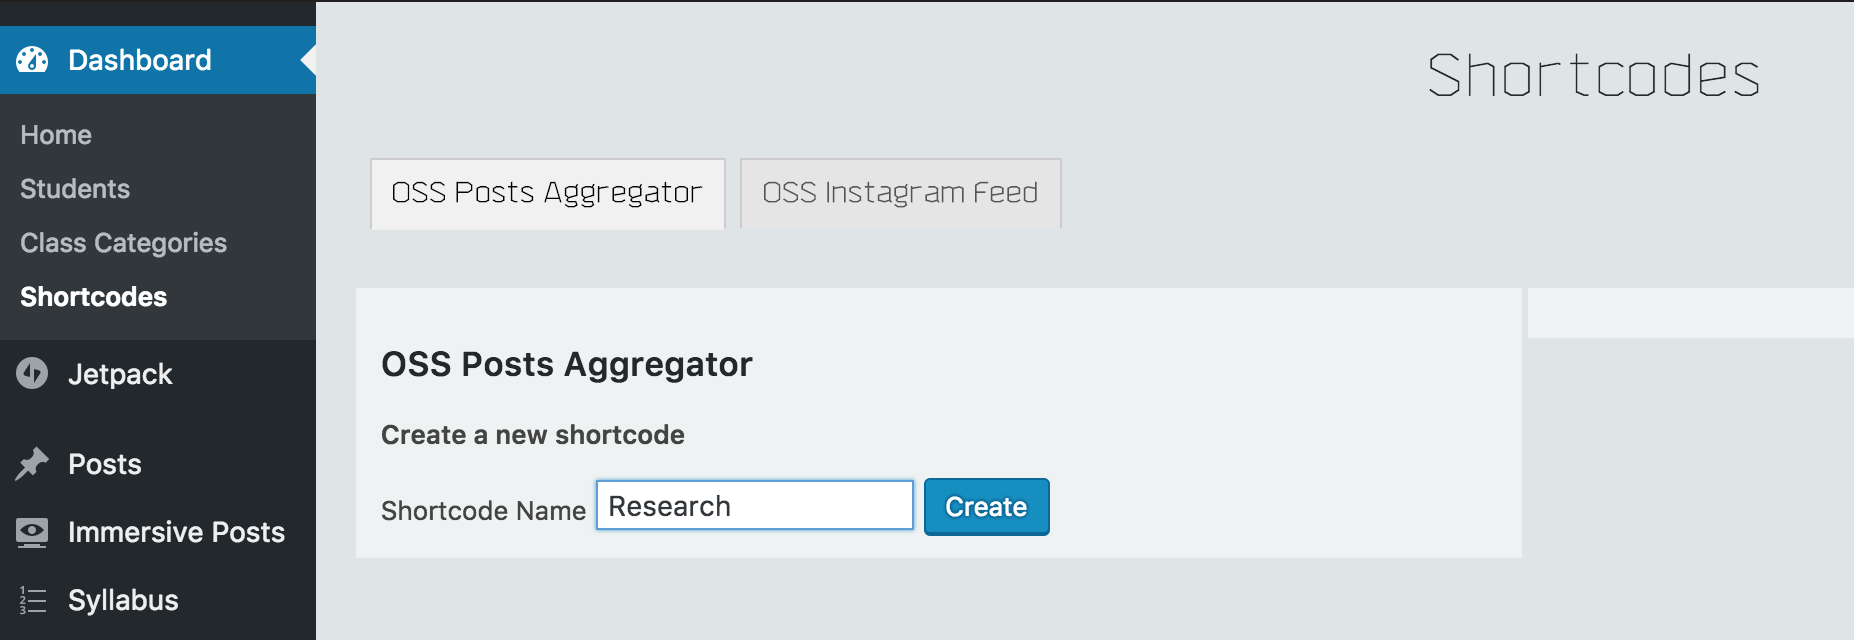
- In the OSS Post Aggregator menu, fill it out in the following way (see example below):
- Title: (Leave Blank)
- Aggregation Source: Registered Students
- Featured Image: yes
- Layout: 4 columns
- Child Categories: This is important as this is where you put the category that you have asked your students to assign to their posts for a specific project. (In the example the category the students used was called “Research”). Please note that the categories are case sensitive.
- Posts per Page: This can be changed according to the number of students in the class.
- Meta Information: Make sure that only the “Post Title” is selected in the Meta Information.
For the gallery to work properly, it is essential that the students have all used featured images, otherwise the gallery won’t display properly.
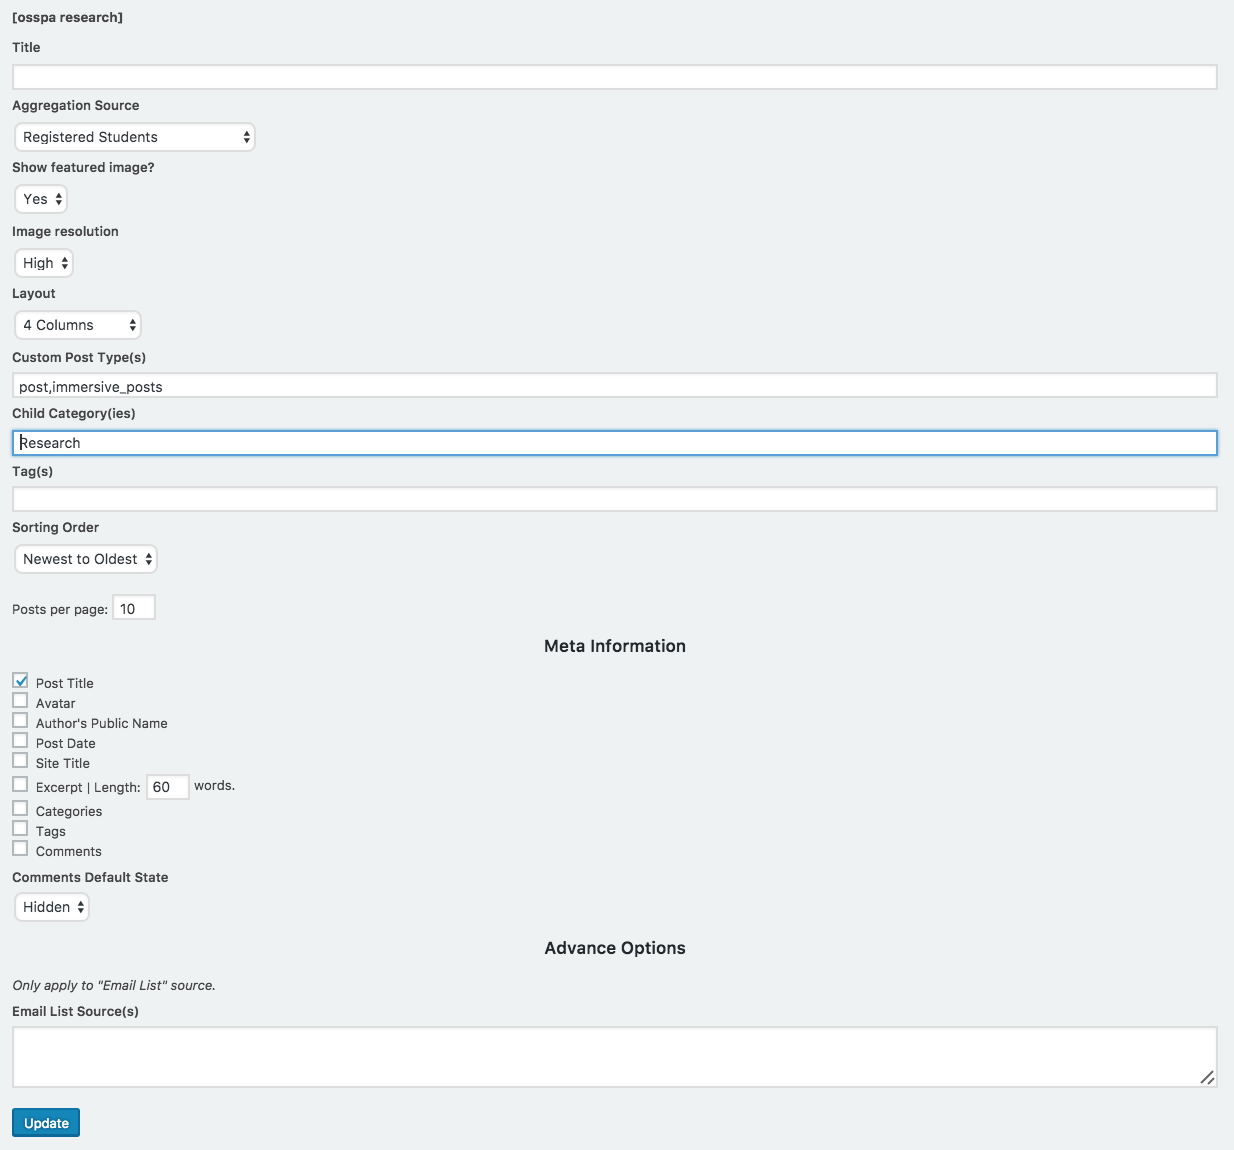
- Save and Copy: Then you must save the modifications to the Shortcode by clicking the “Update” button. Now copy the Shortcode including the brackets, in our case it is .
You can make more than one shortcode should you want to have multiple galleries.
- Making the Gallery Page: Go to the class site and open the default “Gallery” Page from the Main Menu. Now click on the Pencil Icon that says “Edit Page” on the faculty admin bar to edit this page.

- Editing the Gallery Page: You can give a title to the page here we are using the title “Gallery.” Paste the Shortcode in the editor and on the right under “Page Attributes” use the template “Full Screen Gallery.”

Confirm your action by clicking “Update.” The “Travel Stories” example below is what a completed gallery will look like when you have created one after your students have completed their work and assigned the appropriate category.
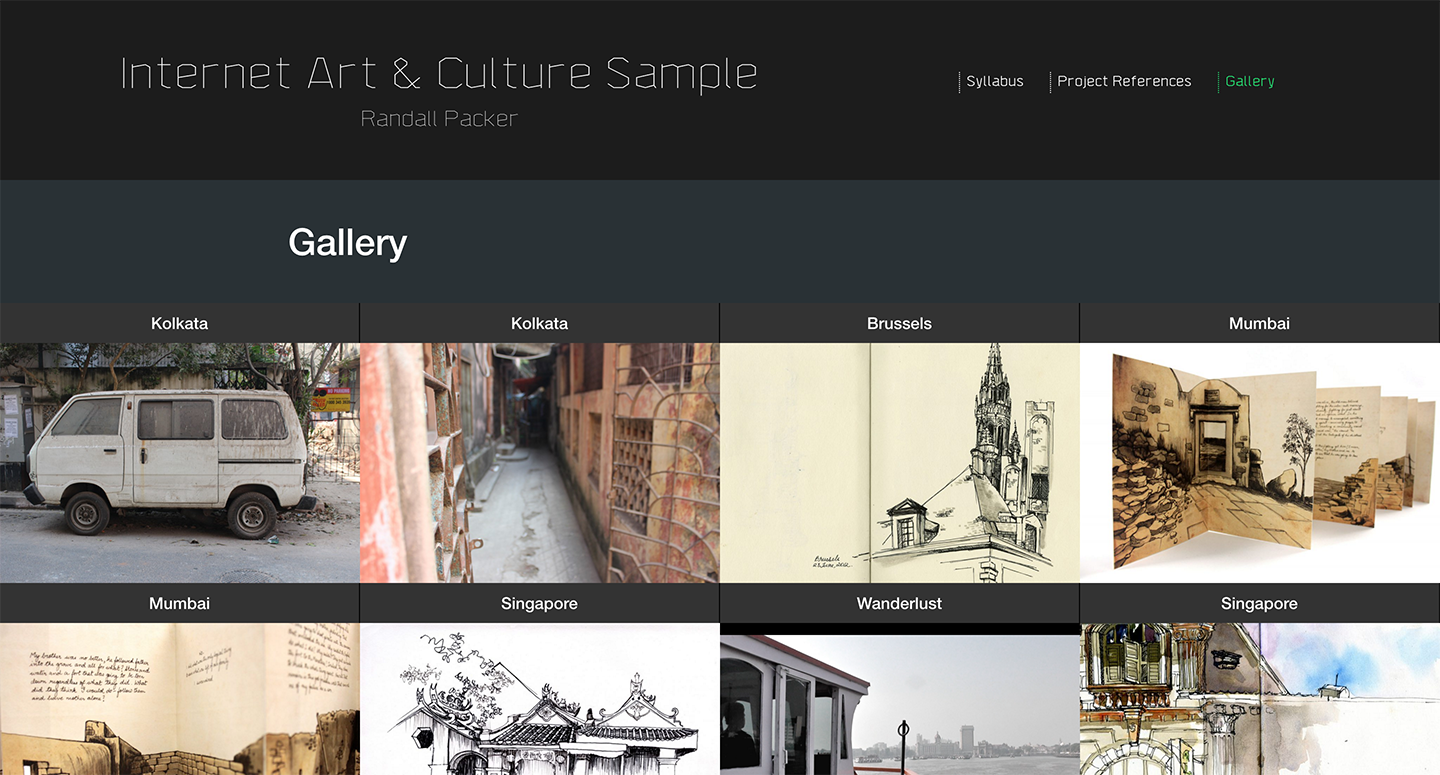
This Gallery was created using Immersive Posts which remove menus, sidebars and showcase the artwork in the full page. You will find more information about Immersive Posts in the Advanced Faculty Tutorial (under construction).
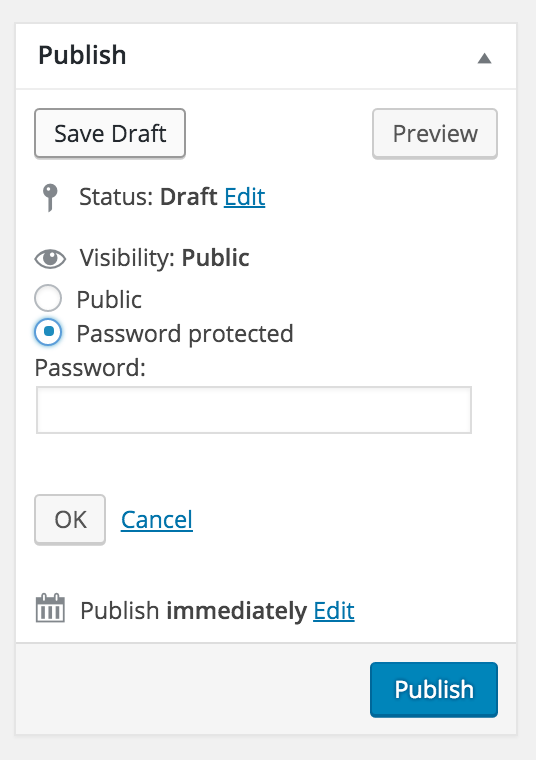
14. Private vs Public
While OSS is an Open Source environment that encourages open sharing of ideas and the growth and enrichment of projects via open online collaboration – we also recognize the importance of allowing our students the option to password protect their posts so that they can control who views them. Privacy is an important issue in the online world and we understand the importance of protecting intellectual property and allowing users time to work on their posts before they are ready to publish them publicly.
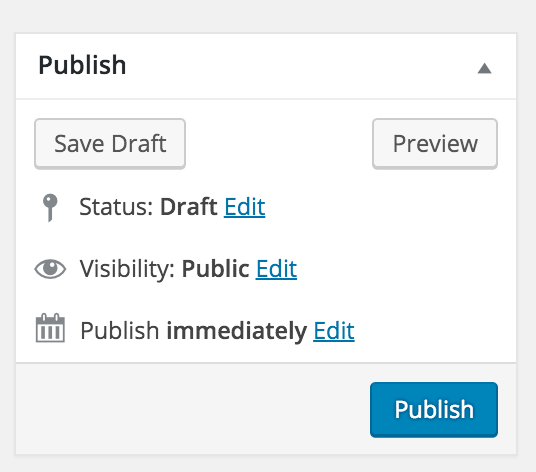
In order to make your posts password protected, you must change its visibility. You can do this in the editor where you are making the post/page. On the top right hand corner is the “Publish” section and here you can “Edit” the “Visibility” and “Password Protect” your posts. If you want to have the whole class private, it is advised to choose one password that everyone will use to protect their posts. You may also password protect your own posts, including the syllabus and any other teaching materials.
15. Area Site
To encourage collaboration between students and to create a virtual end of semester showcase we have decided to aggregate selected student works into what we are calling an Area Site. Just like the physical end of semester showcase you would pick works from students that you would like to feature as a showcase of your course and then ask those students to post that content under an already made category for them – for example: “Interactive Media 2016-17.” This work will then be aggregated into the area site which will look like this:
16. OSS Support
For all OSS Related queries you and your students can use the following lines of defenses!
Ask Your Students
Often the thing you are struggling with may be something that your students have already figured out. So the first line of defense for problem solving is to ask our students. Students can also ask their peers for help, which is generally what they prefer to do.
Getting Started Tutorials
The second line of defense is the Getting Started for Faculty Tutorial and the Getting Started for Students Tutorial! These tutorial were written in great detail and you will usually be able to find answers to your questions here.
Help Desk
If the above two don’t answer your queries then we urge you and your students to use the OSS Helpdesk where our OSS Training Squad answers your questions and OSS related problems within one day generally. To use the Help Desk you must follow these steps:
[You must be logged into OSS to use the forum] The OSS Help Desk is open for all questions, problems, and issues. Click on “Add New” and fill out the topic form. Be clear: provide a link to your student site if you are a student or class site if you are faculty. Add a screenshot or image if necessary by uploading it to your own site, click on “img” and paste in the URL. Once you have posted, our OSS Training Squad will answer your question.
You can also try searching the Help Desk by Googling: “OSS Forums” followed by keywords associated with the problem.
Please ask away!!
OSS Assistant Project Manager
Our final line of defense is Vishaka Mantri, the OSS Assistant Project Manager (vishakamantri@ntu.edu.sg). Feel free to send an email and book an appointment for one on one OSS workshops.
