Do It With Others is another way to label working as a group and being a team player. The difference between DIY and DIWO is that in DIY, I think that you would have to find your resources by yourself and you have to create things from scratch, with your own knowledge (or lack of). I feel that as we grow older and make lesser friends, being part of an organization or community of people that you have similar interests and passions in is important in maintaining your self-identity and purpose. With that, in terms of DIWO maker culture, I feel that it brings like-minded and self-motivated people together and is good way to combine people with different experiences and get inspired by skills that others have. I also feel that through DIWO, it helps make advancements faster, because there are many people looking at the same project, but at different angles.
For me, I have always liked doing work by myself because I prefer being in total control of what is going to be put out. I also like group work, especially in school, and most of the time play the role of the leader. However, what I think is more important is being a team-player, which in this case you do not really need a group leader. For example, during the creation of the final project for experimental interaction, I felt that there was no group leader because we were all pro-active in contributing. In the end, we ended up with a pretty solid outcome, and I enjoyed working with them because it did not cause me any headaches. From here, we can see that like-minded and self-motivated individuals are already in control of the project at hand. However, if the group was made out of people who had no interest, I feel that there needs to be a different approach to leadership, where tasks are assigned by the “boss” of the group. You may also end up with headaches.
All in all, I don’t think DIWO a movement specific to just the interactive industry, but it is more of a life skill that can’t really be taught with a curriculum, but only through experience.
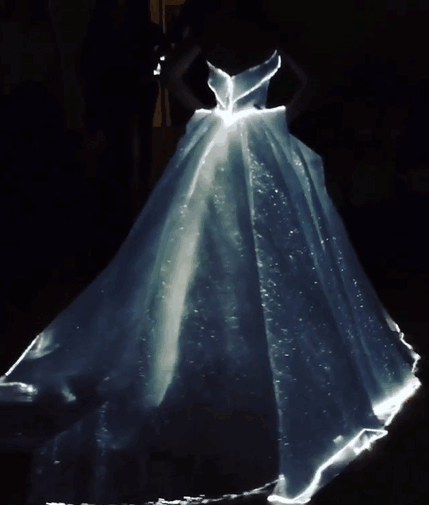
Inspired by Optic fibre dresses, we as a group decided to create one of our own where the lights on the dress would be sensitive to motion and sound.
Our Final:
Tutorial that we followed (click image to be redirected to website)
Process
Buying LED Strips
Buying LED strips were difficult because there were no drivers in Arduino that supported the brands that i bought at Sim Lim. When connected to the Arduino Uno, the microcontroller could support 5v, so the 12v Chinese brand could not be connected properly.
Chinese brand LED stripSingapore brand LED strip
From the video we can see that the lights were not that bright, and even though the led strip was RGB, the lights came out orange. The Singapore brand LED strip (5v) had the same problem as there were no drivers to support it. So we decided to turn to using the Adafruit Circuit Express. After that we tried to use Makecode to control the lights.
Attached Adafruit circuit express playground microcontroller to a neopixel ring
code
In the makecode, i couldnt get the neopixel ring light to be sensitive to the sound, so we used the arduino code to make this happen. (followed from here)
#define COLOR_ORDER GRB
//led strand is soldered to pin 6 //circuit playground’s neopixels live on
// number of LEDs in my strand
// number of neopixels on the circuit
uint8_t brightness = 255; //led strand brightness control
uint8_t cpbrightness = 40; //circuit playground brightness control
int STEPS = 25; //makes the rainbow colors more or less spread out int NUM_MODES = 5; // change this number if you add or subtract modes
CRGB leds[NUM_LEDS]; //I’ve set up different arrays for the neopixel strand and the circuit playground
CRGB cp[NUM_CP]; // so that we can control the brightness separately
int ledMode = 0; //Initial mode bool leftButtonPressed;
bool rightButtonPressed;
// SOUND REACTIVE SETUP ————–
#define MIC_PIN A4 // Analog port for microphone
#define DC_OFFSET 0
offset in mic signal – if unusure, leave 0
// DC
// I
calculated this value by serialprintln lots of mic values
#define NOISE 200 // Noise/hum/interference in mic signal and increased value until it went quiet
#define SAMPLES 60 // Length of buffer for dynamic level adjustment
#define TOP (NUM_LEDS + 2) // Allow dot to go slightly off scale
#define PEAK_FALL 10 // Rate of peak falling dot
byte
peak = 0, //
Used for falling dot
dotCount = 0, //
Frame counter for delaying dot-falling speed
volCount = 0; //
Frame counter for storing past volume data int
vol[SAMPLES], // Collection of prior volume samples
lvl = 10, // Current audio level, change this number to adjust sensitivity
minLvlAvg = 0,
dynamic adjustment of graph low & high
maxLvlAvg = 512;
// MOTION CONTROL SETUP———-
// For
#define MOVE_THRESHOLD 10 // movement sensitivity. lower number = less twinklitude
float X, Y, Z;
// Here is where you can put in your favorite colors that will appear!
// just add new {nnn, nnn, nnn}, lines. They will be picked out randomly
// RGB
uint8_t myFavoriteColors[][3] = {{200, 100, 200}, // I’ve set this for pastel twinkles
{200, 200, 100}, // Change colors by inputting diferent R, G, B values on these lines
{100, 200, 200}, //
// Color pixels based on rainbow gradient — circuit playground for (i=0; i<NUM_CP; i++) {
if (i >= height) cp[i].setRGB( 0, 0,0);
else cp[i] = CHSV(map(i,0,NUM_CP-1,0,255), 255, cpbrightness); //constrain colors here by changing HSV values
}
// Draw peak dot — circuit playground
if (peak > 0 && peak <= NUM_CP-1) cp[peak] = CHSV(map(peak,0,NUM_LEDS-1,0,255), 255, cpbrightness);
// Every few frames, make the peak pixel drop by 1:
if (++dotCount >= PEAK_FALL) { // fall rate
if(peak > 0) peak–;
dotCount = 0; }
vol[volCount] = n; // Save sample for dynamic leveling
// Get volume range of prior frames minLvl = maxLvl = vol[0];
for (i=1; i<SAMPLES; i++) {
if (vol[i] < minLvl) minLvl = vol[i];
else if (vol[i] > maxLvl) maxLvl = vol[i]; }
// minLvl and maxLvl indicate the volume range over prior frames, used
// for vertically scaling the output graph (so it looks interesting
// regardless of volume level). If they’re too close together though
// (e.g. at very low volume levels) the graph becomes super coarse // and ‘jumpy’…so keep some minimum distance between them (this // also lets the graph go to zero when no sound is playing): if((maxLvl – minLvl) < TOP) maxLvl = minLvl + TOP;
minLvlAvg = (minLvlAvg * 63 + minLvl) >> 6; Dampen min/max levels
X = CircuitPlayground.motionX(); Y = CircuitPlayground.motionY();
// //
// Power
Z = CircuitPlayground.motionZ();
// Get the magnitude (length) of the 3 axis vector
// http://en.wikipedia.org/wiki/Euclidean_vector#Length double storedVector = X*X;
storedVector += Y*Y;
storedVector += Z*Z;
storedVector = sqrt(storedVector);
Serial.print(“Len: “); Serial.println(storedVector);
// wait a bit delay(100);
// get new data!
X = CircuitPlayground.motionX();
Y = CircuitPlayground.motionY();
Z = CircuitPlayground.motionZ();
double newVector = X*X;
newVector += Y*Y;
newVector += Z*Z;
newVector = sqrt(newVector);
Serial.print(“New Len: “); Serial.println(newVector);
// are we moving
if (abs(10*newVector – 10*storedVector) > MOVE_THRESHOLD) {
Serial.println(“Twinkle!”);
flashRandom(5, 1); // first number is ‘wait’ delay, shorter num == shorter twinkle
flashRandom(5, 3); // second number is how many neopixels to simultaneously light up
flashRandom(5, 2); }
}
void flashRandom(int wait, uint8_t howmany) {
for(uint16_t i=0; i<howmany; i++) { // pick a random favorite color! int c = random(FAVCOLORS);
int red = myFavoriteColors[c][0]; int green = myFavoriteColors[c][1]; int blue = myFavoriteColors[c][2];
// get a random pixel from the list
int j = random(NUM_LEDS);
//Serial.print(“Lighting up “); Serial.println(j);
// now we will ‘fade’ it in 5 steps for (int x=0; x < 5; x++) {
int r = red * (x+1); r /= 5; int g = green * (x+1); g /= 5; int b = blue * (x+1); b /= 5;