Form and Visualisation: Process of bag making and final

Process 

My focus for this project of bag making (prototype) is on two things:

cushiony and water-resistant

SKETCHES:

(inserts picture of sketches)

PROCESS OF BAG CREATION:

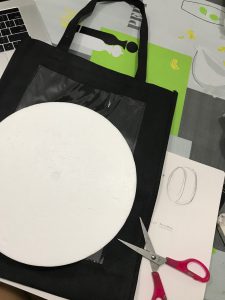
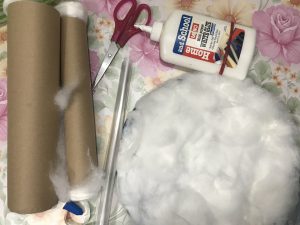
Materials used: black biodegradable bag, round hard styrofoam, hardcover plastic, cotton wool and thin sponges made to slot into bags.

For my cushion bag, I wanted it to be in a circular shape. So I place it on top of the black bag and cut it according to the shape. The back and front cover of my bag will be made out of the black bag cover.

Using double-sided tape to attach the cushion sides. This black fabric portion will serve as the front and back sides of the bag.

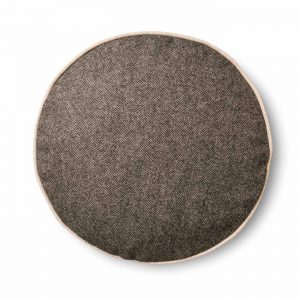
I was inspired by the cushion idea below and I wanted my front bag to look as close as that.

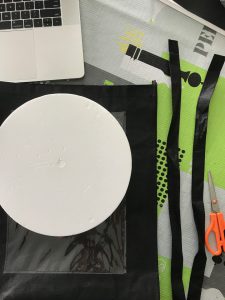
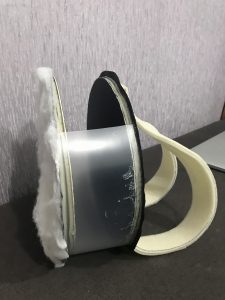
So I cut out the thin sponges in circular sizes, about 4 of them – 2 to be attached to front cover. 2 to be attached to the back.

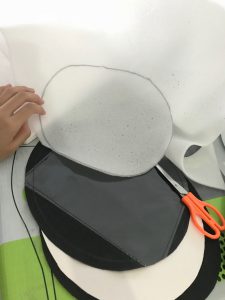
Because I want my bag to feel cushiony and comfortable for users to use, I need those thin cushions to be stuffed in. I also cut out 2 cardboards of the same size and shape to ensure the front and back of my bag has a backbone.

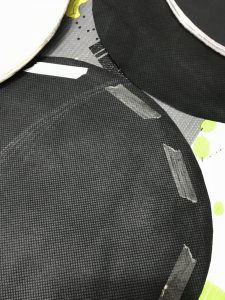
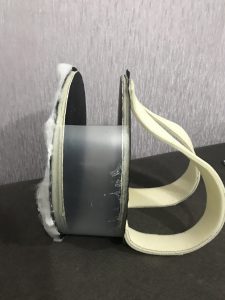
I wanted my prototype to be durable AND sturdy, hence I thought of making use of the hardcover plastic so it wouldn’t be too flimsy. By attaching it to the sides of the circular front and back using super-glue, it ensures the sturdiness, at least at the side of the bag. (as seen below)

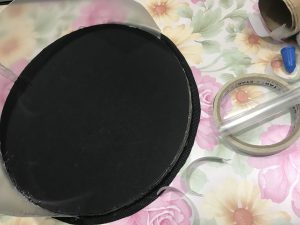
I also used cotton wool as I wanted to show that I want my bag to be as comfy as a cushion so I pasted the wool at the front side of my bag.

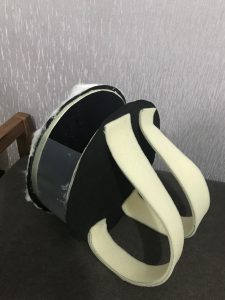
As for the straps, I decided to follow closely to my normal bag’s straps measurement. I then cut the measurement of length 44cm to 5cm breadth out from the sponges.

I glued everything together using super-glue as it was hard to stick real materials together.

In the end, it did not look aesthetically pleasing but that was not the point. I made it in such a way that people (and even me) can see that the material was what I was focusing on the entire time.

And reflection: Making a bag that is actually functional like the way I want it to be and has its aesthetics, is not easy. You gotta work your way around it for quite a while to figure how you want to do it right.

Form and Visualisation: Sketches & Model-Making of Assignment 1

For this assignment, our task was to create a mobile phone dock where the product can not only fit the phone into it but could also function as 2 things:

a speaker, a charging port.

Below are some sketches on the initial ideas I had before choosing which one of it I want to create. My processes into designing the model are below these sketches as well.

Brainstorming ideas: 

For my first idea, it could function as stated above but I didn’t think of making the phone screen obvious for the user to check their phones once in a while when they have to. So I didn’t really like my first idea as it was not a good product design. Hence moving onto the 2nd idea below.

The design above was inspired by my spectacle box.

Instead of keeping spectacles inside, it will be the phone kept in there, especially when needed to charge. Hence the charging port will be inside the box. The speaker is designed in the outer portion of the box. It can serve as an open and close box, for safe-keeping of your phone as well!

But I wanted more of a minimalistic, unique design. A different kind of geometric form, such as an octagon.

I was excited about this idea so I tried executing it. But the first time I did it, I did it without the right measurements so it ended up bad like this:

It did not even have a proper geometric shape hence an unsuccessful attempt. So I did another attempt, using a bigger foam to form an octagon model.

However I didn’t like it that much due to the fact that it has more of a cube form than an octagon.

So I decided to swerve my thought into another idea: a Diamond form. Still a geometric form but uniquely different because of how it will end up to be.

Like the picture above, I wanted to take two pyramids from last semester’s pyramid form I made to create a diamond when attached together.

My pyramid from last year’s Foundation 3D class

It looks perfect and all but i needed to make it in a bigger size to fit my iPhone 7 Plus phone into it. This is where the real challenge starts: I forgot how to create a pyramid form.

So of course my first attempt into creating it becomes this:

Yet again, unsuccessful.

But with my friend’s help and the right measurements and learning again how to cut the cube to a pyramid by slanting the wire from the machine foam cutter, I managed to create the right ones (after 2 hours of cutting and getting it right) and form it into my diamond:

I created the slit to put my phone in it BEFORE i pasted the 2 pyramids together. Hence, i needed to really cut and follow through the right measurements of my phone to let it fit in.
Inspired by superhero movies like Guardians Of Galaxy or Black Panther to come up with the shape and colour.

And here it is, my final model for the mobile phone dock 🙂

Form and Visualisation: Research for Assignment 1

Research 

For this project, we needed a model structure where it could function as two things: a speaker and as a phone holder where the phone could charge as well. I researched on the form and structure – how I imagined it too look like first.

Initially I wanted it flat, something that could be put into a carved out book cover:

Or when the phone could be charged on the palm of a hand, literally:

But I didn’t want it too simple like the book idea, and I was more attracted into the minimal designs that are of both organic and geometrical, and unique like the ones below:

So I decided to cut out the styrofoam into the measurement and styles I wanted as close to above, such as an Octagon form or a Diamond form which could also hold my phone well. (You can see this on my “Sketch and Model-Making” post!)

I also searched up on the usage of speakers and the kinds of structure they come in.