Outline:

  • Origins
  • Content
  • Summary and reflection

Origins:

The Diamond Sutra is acknowledged as the oldest dated printed book,which was approximately 5.3 metres in length. Commissioned by a person named Wang Jie on behalf of his two parents, the Diamond Sutra has been translated, reproduced and its content has been spread throughout the Buddhist world. Dated in the year 868A.D., the text had been discovered in 1900 by a monk in Dunhuang, China, on an old outpost of the Silk Road on the edge of the Gobi Desert. The Diamond Sutra, a Sanskrit text translated into Chinese, was one of 40,000 scrolls and documents hidden in “The Cave of a Thousand Buddhas,” a secret library sealed up around the year 1,000 when the area was threatened by a neighboring kingdom.
In 1907, a British-Hungarian archaeologist by the name of Marc Aurel Stein was on an expedition mapping the ancient Silk Road when he heard about the secret library. He then bribed the abbot of the monastic group in charge of the cave and smuggled away thousands of documents, including the Diamond Sutra.

Content:

The book was named Diamond Sutra – The Diamond That Cuts Through Illusion. Its intent was to help cut through the perception of the world and its illusion. It talks about emptiness(of the world) – among many things discussed as the Diamond Sutra takes the form of a conversation between Buddha’s pupil Subhati and his master.

Reflection:

It is interesting to see the first ever printed book had been poised for reproduction with a religious purpose – Wang Jie added a inscription on the lower right hand side of the scroll reading: ”Reverently made for universal free distribution by Wang Jie on behalf of his two parents”. In Buddhist belief, spreading the image or words of the Buddha was a good deed and way of gaining merit. The Diamond Sutra was the only dated document amongst the thousands of scrolls hidden in the cave, meaning that there could have been an older scroll or book that was kept within the same library. The emergence of printing so many years before the movable type was invented – was proof that technology had been advancing at phenomenal speeds in China. Woodblock print as a method of printing on cloth, dates back to as early as 220A.D. However, the Diamond Sutra is the first completed book to be produced via this method. Moreover, the sealing of the Mogao caves, which prevented neighbouring kingdoms from ransacking and looting the sacred scrolls was proof that the religious documents kept within the caves had more than historic importance. The intricacies of the illustration elevated the beauty of the text – it was well contextualized by the painting, bringing to life the text and its meaning.


Initial thoughts of the installation:

Entering the space where the exhibition was taking place, I was greeted with the sight of what I thought was coffee tables, with the audience occupying the seats and due to the limited seats, many viewers stood around as the live performance unfolded. I was perplexed by the setup, as I went in with little knowledge of what was about to take place. Random, loud noises could be heard at the installation and shortly after, performers accompanied the ‘chaos’ of the noise that filled the environment. The nonchalant performers dawned on a large mask/head set that impeded his vision. It was only later, after reading up on the artist and his thought process of creating such a niche field of art in media that I understood slightly better.

Set up:

The setting inhibited from ‘Disappearance, bar in the gallery’ by Lee Kang So in 1973 involves the display of Korean tables and benches placed in the gallery, as if to re-enact the scene of a Korean bar which involves distant chatter, laughter and shared experiences from daily struggles and accomplishments delivered through conversations. The presence of physical ‘history’, which included alcohol stains, dents and burn marks from cigarettes of the dine-in tables was missing, suggesting that the artist was moving away from the focus of reminiscence and the lingering effects of a location. More evidently, we could see that the artist manages to use the benches and tables not only as props but incorporating them to become an essential element of the exhibition. The bar serves as a place of socialization, a perfect scene for the artist to deliver his message across to his audience. As we continue to unravel the artist’s intention and art direction, we may find that the relevance of location played a crucial role in helping the artist express his thoughts through Life circuit.


Life circuit- concept:

Urich Lau, the artist in question takes on a tangible and performative approach to his artworks. His intention was to create a circuit – which consists of an input and output – between his audience and him through the introduction of an alternate space in which he navigates and ‘interacts’ with his surroundings. While being ‘impeded’ by sight and hearing, one questions whether this is really the case – he is somewhat able to weave through and make his way around by live feed and audio-visual information.

Communication and exchange with the art seems to manifest in a bizarre manner – the layering of ideas that the artist has constantly engaged in his artistic oeuvre where he addresses issues of surveillance and viewer participation(non-participation in this case). The presence of the viewer automatically translates into participation as he connects with them through the medium of his alternate reality – he projects live visuals of the viewers without their permission, which I believe is his way of communicating the lack-thereof privacy and discomfort in being under surveillance.

Critique on Singapore’s art scene – Life Circuit touches on the issues pertaining to the contemporary art and heritage in Singapore’s context. He occasionally flashes the National Art Council(NAC)’s mission statement, which baffled many of us who sat in for the performance work. However, it was not difficult to tell that the artist meant for viewers to question about it relevance and thus understanding the intention of the artist. To us it might have meant nothing, the seemingly abstract display of text actually delivers a strong message – to encourage us to challenge our perception on creating art in Singapore’s context and discovering how much or little we are able to exert our creativeness. Are we then restrained by the boundaries set by council that we are unable to seek a certain direction in art?

To champion the creation and appreciation of the arts as an integral part of our lives.

Commentary on the embrace of technology – we live in an era where mobile phones and social media become far more than simply communication. It is intertwined with entertainment, many of us are so used to this form of entertainment that we become indifferent to it. We are consumed by the visuals and accessibility provided by social media, as we slowly stray away from the need to have real, physical interaction that require effort and time. I asked myself this: in light of the 21st century, why did Lau’s Life circuit gadgets look old-school? He uses basic ear muffs, a gas-mask looking device and small projectors that replace his eye function. In this day an age, was it really necessary to attach the over-the-top amount of wires instead of using wi-fi and bluetooth to make his ‘helmet’ look cleaner?

In hindsight, that may be the whole point – to allow us to see the raw nature of technology – the amass of wires that leaves us wondering whether technology we integrate into our lives actually serves to benefit us or weigh us down.


Introduction

10.000 Moving Cities is an interactive installation by Marc Lee, a Swiss artist born in 1969 who creates network-oriented interactive art objects: interactive installations, media art, internet art, performance art, video art, augmented reality (AR) art and virtual reality (VR) art. He is experimenting with information and communication technologies and within his contemporary art practice, he reflects critically creative, cultural, social, economic and political aspects. Lee experiments using existing information provided by the internet to generate awareness and create an unique experience for his participants. Participants can select any place or city by using a digital interface. At the chosen place, the Internet is searched in real time for latest text, image, video and sound information. Four projectors and eight audio speakers project the results into the space. Visitors are able to walk through the model and experience the information in 3D.

About

Masks of the projections

10.000 moving cities - same but different - ZKM Karlsruhe - Masks

Interface

10.000 Moving Cities - Same but Different - Interface

Exhibition

10.000 Moving Cities – Same but Different, real cubes

Experience

Images, sound, text and video will be displayed in the form of perceived fragmented cubes littered all over the exhibition area. The information and graphic representation constantly changes, providing updates on the location through ever-changing audio and visuals that are juxtaposed to form an identity of that area. Each new change of location always creates new representations of the real world as a combination of visitors and digital matrix. Marc Lee address ”globalization” and how it creates ‘local places without an identity’ through the installation, dispelling it as he reveals the unique factor of each location, be it city or place, through an immersive interaction in which participants are able to capture the essence and beauty of each destination without being in the physical location. The user-generated content is not censored nor chosen by a certain community, creating a genuine and ‘raw’ experience of each location. No two participants would come out with the same experience, even if they’d visited the same locations, as the information is constantly updated and randomized.

In this digital age, the inter-connected world creates a society not defined by geographic location, it is rather hard to pin point what defines society in this day and age. Society has become a mash of cultures, religions and thinking where accessibility to information, whether objective or not, is readily available for everyone to process and dwell on. One could say that the consequence of having such a representation of culture and society, having participants immerse themselves in such a raw scenario and being plunged directly into the circumstances of the certain location can be overwhelming and create a form of realization of how fragile our world has become. Imagining the exhibition in the modern context could mean a great deal of exposure for those uneducated, or sheltered from the injustice and evil that has been occurring in the real world. The Hong Kong crisis, Chinese ban by the US, among many other issues may create discomfort for the participants who are unaware on the ongoing turmoils faced by countries, and have a very real impact on the location through either social media or news media.

This installation invites participants to appreciate and understand the diversity of the world through the sampling of various countries and locations. Lee uses globalization to showcase the beauty of being able to share information, otherwise impossible without it, to create a deeper appreciation and implant the seed in the participant of how important it is to stay true to our culture despite the burgeoning connection that grows tighter between the world as we progress. Lee uses this interaction as a critical commentary on globalization and society in our current age. It is up to the participant to form his/her own thoughts about the progress of our world.

Vive La Vida = Live the life.

In this spatial design project, I explore the juxtaposition of adrenaline and relaxation on a single villa.

This villa consists of:

2x swimming pool

1x carpark

1x wheelchair accessible ramp

3x levels

4x rooms

1x bridge

2x pvc roofs

Reflection for this semester:

I was completely clueless about how to do ideation sketches, isometric, orthographic drawings etc when the semester started. I always felt that I did not have a eye for detail, which I forced myself to challenge that self-perception. In this final project, I decided that learning comes from putting forth your biggest idea and working towards that. Along the way, I faced many difficulties. I felt that the cardboard was almost impossible to cut nicely, my scissors gave me a hard time and I had a sore hand after I finished the project. Ideas felt limited, and I thought that I couldn’t shy away from building a conventional house instead of a place specially designed for relaxation.

All in all, I felt a sense of achievement for having learnt how to work with various materials and mediums in forms and visualization. I am pleasantly surprised with my works as I did not have much expectations at the start of semester. Mr Ka wai encouraged me to step out of my comfort zone and transform a simple lint roller to a giant prototype, then lastly to this villa. I would take this module again if given a choice as I believe there are always things for me to learn from this module.

PTSD Vest

We set out to design a vest that simulates an episode of PTSD experienced by a war veteran. This is a dark object that forces the user to distance himself from others in society due to his seemingly irrational behaviour. We recreated a scenario that encompasses how the veteran: came to develop this disorder, how he acts in a public situation and how people react to him. Scenario: Person A has PTSD, which he had developed from narrowly escaping death from a live grenade explosion. He is being pulled aside by his commander at the point of time, making touch a trigger for his PTSD. He crouches down/ prones to react to the ‘situation’, which triggers different sensors to sound/vibrate. In designing this vest, we are creating an understanding of how one might come about to develop PTSD and hopefully create room for sympathy.


Observational documentation for user tests

3 user tests

Tester A: She was able to get into the vest, albeit the tightness. We gave her verbal instructions to crouch as we didn’t play the video for her.

The circuit ran as intended, the photocell sensor triggered the sound “Grenade!” from processing and she crouched down. In sync with the explosion, the vibration went off as well. We did not tell her about the vibrations beforehand; this will make it a more genuine test to see whether the circuit was able to work properly (and well). She said she could feel vibrations on her chest, but they were subtle. Using this feedback, we decided to put in paddings in the front zipper pouch so that the vibration motor will be closer to the tester’s chest when s/he crouches down.

Tester B: It was a guy, who was rather big sized. He was able to fit into the vest as well as we did not pull the strap too tight. We gave him verbal instructions as per tester A, and this time round he was able to feel the vibration. As he wasn’t taking EI, he didn’t know what the circuit was for and was genuinely intrigued by the PTSD vest. At this point, we knew the circuit was working properly and was satisfied with our testings.

Tester C: Last guy, he is an exchange student and didn’t go through national service. We helped him put on the vest and gave verbal instructions. The test went smoothly; the vibration and sound came out as queued. Tester C said it sounded like “Renade” but we felt that it wasn’t much of an issue because he tested the object in an open environment and wasn’t able to hear clearly. He also mentions that the vest felt light, and didn’t feel like an operational vest. He suggested that we add some weight to it.

Notes:

  1. The grenade sfx and explosion sfx was too far apart, there wouldn’t be a sense of urgency to crouch down.
  2. We also took note of the timing for the entire experiment so that it would not become repetitive.

Improvements

As mentioned, we added the front paddings with stuffings for the rest of the grenade and magazine pouches. This would provide more chest contact. We didn’t use hard material as it would not follow the tester’s bend and would instead make it more difficult for him/her to feel the vibrations.

We added a water canteen(1l water bottle) on the right side, and 1kg dumbbell at the back. These, coupled with the weight of the ipad is similar to the actual weight of an operational vest with hard plates inserted(ours was way more comfortable than the actual).

We cut the videos (introduction brief and day-to-day scenario) to around 2mins. This would consist of about 5-6 triggers, which we felt was just right. On the day itself, Daryl was in charge of guiding the audience around the installation, and I was to help with the participant put on the vest and guide him/her through the scenarios.

Here is the context video for our PTSD Vest.

Here is our final installation.

Feedback from final installation and user test experience:

  1. We can look into using surround sound to make it more realistic and immersive.
  2. The lighting could have been adjusted to see the video better and yet create a realistic environment for the tester.


Design Process documentation

It is important to note that we have chosen the ILBV not only for its representation of an object used it war, but also for its robustness and ability to store and conceal multiple objects. During our initial phase, we had planned where we would place our individual sensors and power source (Daryl’s ipad).

We created a google slide file for our initial research and presentation purposes:

Dark object – PTSD Vest Research and Presentation

For more information on design process, you can refer to: Project Development – Ideation Sketches and Context planning

Step-by-step construction of our PTSD vest

Materials:
1. Arduino Uno
2. Photocell
3. Coin Vibration Motor
4. 220k Resistor
5. Cables
6. Vest
7. Grenade Explosion SFX Files
8. Tablet (that can run processing)

Programmes used: Arduino and Processing

Step 1: We started setting up the circuit. We bought the vibration motor and tested it with the arduino. We used a code from online and used different resistors to test the sensitivity of the vibration motor. It was slightly too strong (which shouldn’t be an issue) but that broke our first vibration motor. We were lucky to have bought a spare, and we taped it to whatever surface we were testing on so that it wouldn’t break apart.

Step 2: We uploaded the Arduino code; the photocell sensor would measure the light exposure in our environment. We set a threshold ”int threshold” so that when the amount of light exposure falls below the threshold, it would active the vibration motor and sending ”1” to Processing.

Step 3: Upload the ”Grenade” and explosion sfx into Processing. When ”1” is read, the ”Grenade sound” will go off. After a delay of a few seconds, the explosion sfx will play.

This was our initial voice recording: it wasn’t clear and created unnecessary ‘chaos’.

This was our final voice recording for ”Grenade”

Step 4: Setting up the arduino/ breadboard to the vest. This required us to construct a simple box to hold and protect the breadboard and arduino, and also 2x 1m wires to allow the photocell to be placed on the shoulder pad, and the vibration motor to place in the inner paddings of the vest. This is how we installed it:


Step 5: Setting up the physical space.

A: represents locality A.

X: Supposedly where the viewers would stand.

This would give us control for our experiment and prevent deviations.

Codes:

Schematics:

Reflections

The process of making this lint roller was tedious. Every step of the way required much thinking, especially when I decided to cut a compartment in the roller casing and then sanding down a slope/triangular shape. I faced many problems on the way and somehow it allowed me to think of unconventional or ingenious methods to solve them. Due to the scale of the object, I had to cut the roller casing into 4 different parts so that i can sand the inner compartments. Afterwards, I had to piece all of them together and sand them again. I was happy with how the model turned out and definitely satisfied with not having taken the shortcut of leaving out some intrinsic details and changing my sketch model to simplify it. The sheer scale of my object meant more work for me but I can now confidently say that I can achieve what I set myself to do. Being practical was very important as I rationed my work into days, knowing that I would need ample time for the putty or glue to dry so that I could continue to my next step. Overall, my inexperience in form made me despise the process but enjoy the outcome. The inability to deal with foam in an efficient manner was really disturbing to me and I constantly use the google search bar to find better methods/solutions to my model. I have learnt a great deal through this project and am excited to do more challenging assignments in the future.

Micro-Project 4: Disobedient Object
ALL by Rui Hong & Daryl

Assignment Brief:
Using Arduino and its sensors and actuators, we were tasked to hack an everyday household object and make it behave in an unexpected/disobedient way.

Ideation:
The object of our choice was a doorbell, or rather the concept of a doorbell (We didn’t want to destroy and pluck out our actual doorbell). We chose the doorbell as it is an object with an obvious purpose and a predictable outcome when interacted with. Placed beside a door, the object, being a button, is easily recognized and participants would immediately know how to use it. The call to action for the interaction is straightforward and participants will assume to know what is the outcome–only when you press the button, the bell will ring once-Ding Dong. Here, we have an opportunity to use that assumption to create a new and unexpected experience.

Hence, the disobedient doorbell was meant to play on that preconceived knowledge of the doorbell mechanism. So instead of a doorbell that activates when you press it, it will activate before the participants presses or even attempts to press the button.

There are 2 stages of this interaction:
1. The participant approaches or comes into close proximity to the door and the doorbell will unexpectedly ring. The doorbell will continue ringing as long as the participant remains in close distance. (We estimated the distance for the bell to sound to be around 15-30cm.) When participants walk away or retract their hand, the ringing will then stop.
2. With the bell already ringing, when the participant chooses to press the doorbell button (we anticipate that participants will assume pressing the button will stop the ringing), the ringing gets louder to an uncomfortable volume with some distortion. Holding onto the button will keep the ringing at the louder volume while releasing the button will bring the ringing back to its original volume. Again, when the participants choose to walk away or retract their hand, then the ringing will stop.

The disobedient doorbell is meant to make the participant feel alarmed, confused and panicky like the participant is not supposed to be there, encouraging the participants to leave the site of interaction.

Realisation & Delivery:
So we started on our building process.

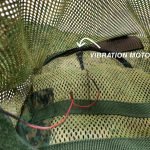
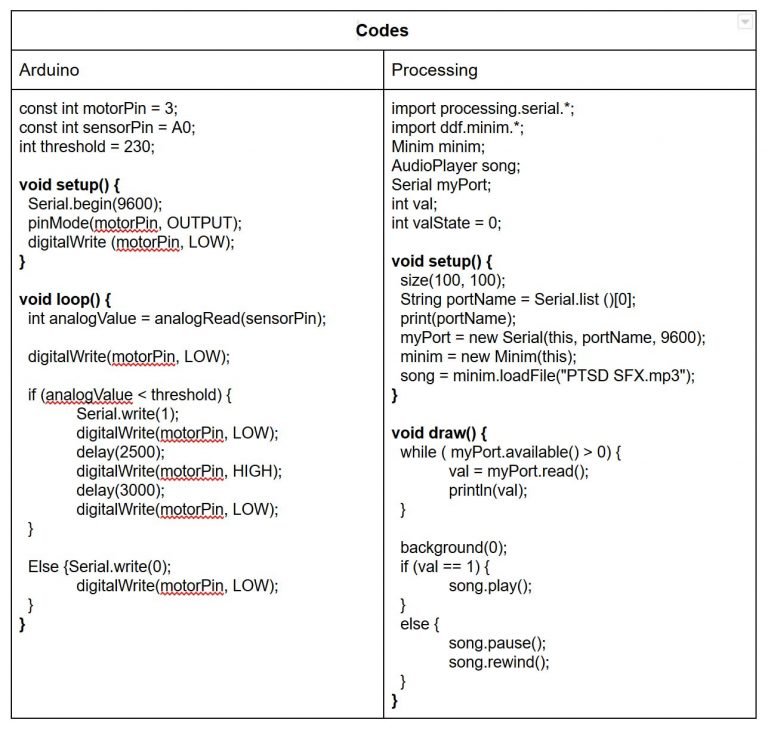
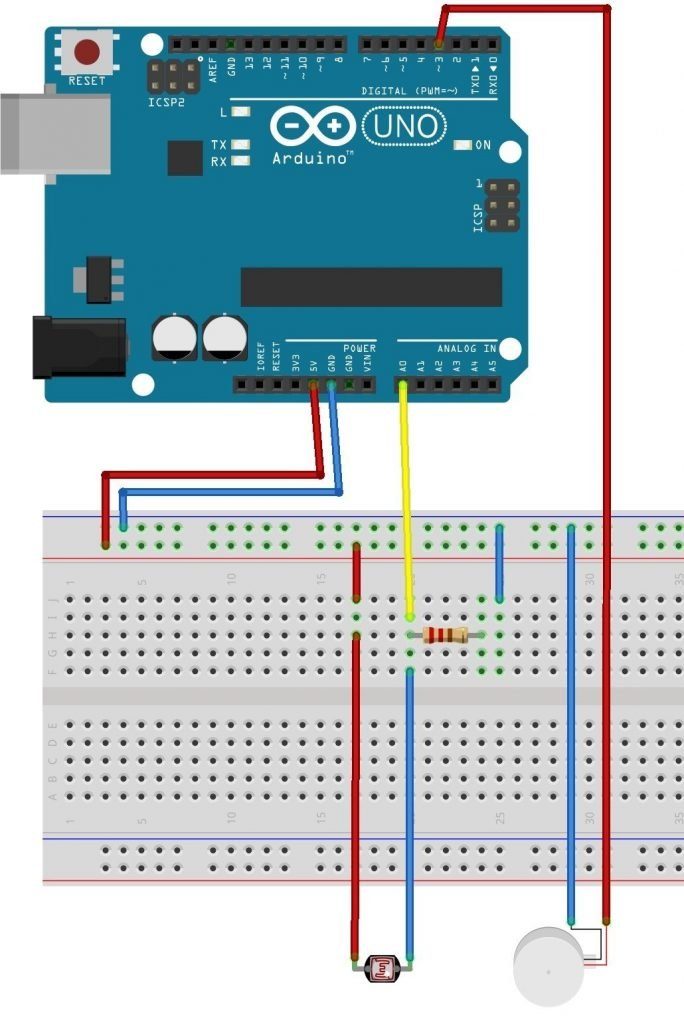
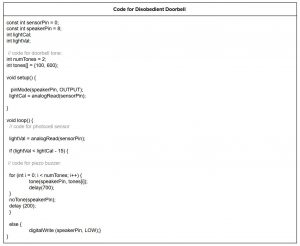
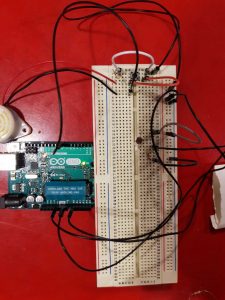
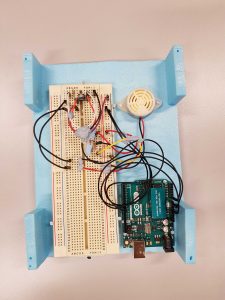
Inspired by the class workshops on the photocell with LED light and piezo buzzer, we combined the codes and modified the circuitry. Instead of the LED lighting up when the threshold of the light reading is low enough, the buzzer will sound. We then coded the buzzer to sound like the average 2-tone doorbell.

Progress & Final:

Video:
In Situ Video here. https://youtu.be/eVCgNR0CAl0


DARYL

What are some reactions you observed from your participants when they interacted with the object?
Participant #1: When #1 approached the bell, she didn’t realise that the bell had already rung when she approached it. She proceeds to press the button, which made the ringing louder, but she remains confused from the interaction. In the feedback session, she mentions that she is intrigued by the bell but wasn’t aware of the bell ringing in advance.

Participant #2: Given that #2 has observed the interaction of #1 with the bell, her interaction with the disobedient bell was closer to what we intended. As she approached the bell, she waves her hand in front of her, trying to test the bells sensitivity. However, the bell only reacted when she tries to press the bell. On multiple tries to press the button, when the bell rang prior to her touching the button, she retracts her hand as if the bell were a buzzer, telling her not to press the bell. She gives up trying to press the button and leaves.

Participant #3: The last participant, having observed the 2 interactions before her, reacted and had the thought process we intended. As she approaches the bell, it sets off even before she lifts her hands to press it. She jumps from the unexpected alarm. She continues to try and press the button. Because the button broke, we simulated the effect of the louder ringing as she pretends to press the bell. In the feedback, she mentions how when the ringing starts, she assumes that the button will stop the continuous ringing, hence she attempts to press the button.

Challenges & Problem Solving:
What are the challenges involved and how did you overcome them? What problems still exist? How might you overcome them eventually?

[Daryl: For the first few classes on Arduino, we were taught to use the arduino board and breadboard, learning how to use specific inputs such as the piezo buzzer, LDR sensor, LED and switch amongst other things. Given our inexperience, we took a while to figure out how the circuits would work, and through errors on writing the sketches we understood coding better.

The first challenge we encountered was starting on the coding. A blank screen can be quite intimidating and we did not know where or how to start. We then decided to work off existing codes we practiced in class. We started with the codes from the photocell workshop then incorporated the codes from the piezo buzzer workshop. We also used the IF & ELSE code from the LED workshop. After a few tries, we manage to get the piezo buzzer to sound.

The second challenges was finding the right sensitivity for the bell. We were not sure how close we wanted the participant to be. On multiple occasions, the bell became unpredictable and started sounding off whenever or did not sound at all to any interaction. We figured it was the angle of the photocell which affected its sensitivity.

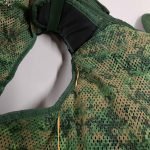
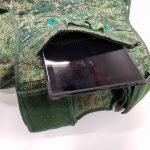
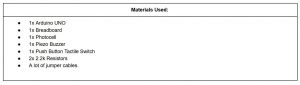
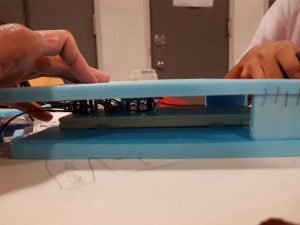
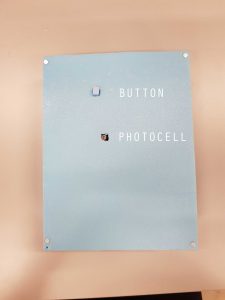
Lastly, we had some difficulty fitting everything into a compact object and creating a button to extend from the breadboard to the cover of the case we built. We took a while to get the correct measurements and finish up the case for the doorbell. (After the in-class test run, we realise that the material of the object can also affect the way people interact with it and how they approach the object. We will consider the effects of materials for the next project.)]

RUI HONG

What are some reactions you observed from your participants when they interacted with the object?

Participant #1: Participant 1, being the real guinea pig in this situation, approached the doorbell with confidence to test out the doorbell. It rang on queue and as there is only 1 button on the foamboard (which was intentional as to lead the participant to try it out on instinct), she pressed it and it gave a secondary beep. She didn’t seem surprised by the louder secondary beep. As we are used to having a ‘click feedback’ when we press a button, the foam button made it hard to feel the ‘click’ and that prompted her to press harder onto the button. What happens afterwards can be seen in the button. Besides the click feedback she was looking for, I felt like she may have expected a different result (such as a louder beep or a different sound) from subsequent presses and that may have prompted her to try again.

Participant #2: Participant 2, having observed participant 1 gained some insight on how the button may work. Approaching the doorbell, she tested out the sensitivity of the photocell by waving her hands in front of it. After that, she attempted to press the doorbell but was prompted by the initial beep of the doorbell to refrain from doing so. She ended up not pressing the doorbell, which I felt may have caused her to be uncomfortable and leave the interaction space (which was one of the intended outcomes).

Participant #3: Our last participant, having observed two interactions, had a similar thought process as us. She startled at the initial beep as she approached the doorbell. Thinking that the doorbell might stop ringing as soon as she presses the button, she is ‘pleasantly’ surprised at how it didn’t stop ringing, but got even louder. The doorbell then obediently invites the participant to leave with the annoying beeping.

What are the challenges involved and how did you overcome them? What problems still exist? How might you overcome them eventually?

For the first few classes on Arduino, we were taught to use the arduino board and breadboard, learning how to use specific inputs such as the piezo buzzer, LDR sensor, LED and switch amongst other things. Given my inexperience, I took awhile to understand how it worked and had to refer back to slides more than just a couple of times. We bumped into a few incompatible sketches which helped us understanding the coding process better.

We started from scratch as we didn’t want to confuse ourselves. The way we revised the arduino coding was to wire the circuit according to the slides and then stare at it until we understood how and why the circuit works. We then read the code and change certain values in the sketches to test out the coding to give ourselves a better understanding. We knew what components we wanted to use, the problem was combining the existing codes to form the correct sketch that would work. We stuck to what we learnt from the workshops, coupled with a few references from existing codes from the google search bar.

The second issue we faced was the ever-changing sensitivity of the photoresistor. Due to the different environments we were in when we worked on the arduino board, we had to tweak the sensitivity according to our classroom to make it workable. This was one we were able to work out easily as we had had a few goes at changing the sensitivity before going to class, so it didn’t seem like much of a hassle.

The third issue was the design of the board; the measurements had to be exact so that the photoresistor could stick out just enough for it appear on the foamboard we made. We took a few tries (shaving down the board) before the photoresistor would stay obediently in place. In hindsight, we could have used crocodile clips and other materials to extend the flexibility of our foamboard. We had decided to keep the design of the foam board as not to confuse our participants. In our test-runs, we realised that we have always tested it while the foam board lies flat on the table. We should have tested it in an upright position for more accurate results.

Area of improvements:

  1. Test runs can include more situations, different angles of testing to ensure an accurate experiment.
  2. Prototype board can be more sturdy and should not obstruct our participants from trying out the doorbell as they are afraid of damaging it.

Thank you for reading!