
SPONGE!!!!!
The sponge was the first material I used. The rough part of the sponge made more sketchy, thin and broken lines. They look a bit like dry brush effect. 

The effect I got was more haphazard. Next, I tried the smoother side of the sponge. More of a bold, strong stroke as this side of the sponge was able to absorb more ink.


I also tried soaking the sponge into the container of ink, and then squeezing the sponge over the paper. This time, I diluted the ink with a little water.

The result was just black drips of ink. Nothing spectacular. I tried to make something more positive(?) and clean cut. I diluted the ink too.

I didn’t like the idea of it being faded so I used saturated ink next.

I prefer it saturated as it comes out bolder and more eye-catching.
Next, palette knife.
I used the sharp edges of the palette knife first and scraped it roughly onto the newsprint. Occasionally there were some tears on the newsprint but I liked the concept of the little tears. Again, the thin sketchy lines along with the tears gave a haphazard effect.

After which, I used the flatter side of the palette knife. A thick, bold straight line was created.

Next I dipped a piece of kook crunch into ink. It has a rough surface and it can’t absorb ink very well so I had trouble even creating ink marks on the newsprint.

So I let the koko crunch soak in the ink for a few minutes and tried again.

The ink came off richer and looked like a crayon effect. The kook crunch became way too soggy to even hold later on so I threw it away.
So I guess these ‘materials’ are more personal to me compared to the above daily items. I see the marks as ‘self-portraits’ as they’re products/results of my bodily parts. But whatever it is, I had fun!!!
The first thing I did was to play with hair. It was quite tricky as I only collected so little strands(mistake no.1), and it didn’t really leave any prominent marks. So I really dipped the whole bunch of hair into the tub of ink, to the point that there was too much ink to even create intricate ‘hair’ marks(mistake no. 2):


Thus I don’t think hair would be of much use to me. I didn’t really fancy the bog blobs, so I moved on to use my hands.
I dipped my palms and fingers into ink and wiped the excess onto tissue. I wouldn’t want dark obvious hand prints.


I like the wispy and faded effect created so I might consider having this element in my final work.
String timeeeee!!
Next, I dipped string into the container of ink. I flung the string onto the paper to leave everything to chance(lol). Surprisingly the effect came out pretty cool, having some overlaps and even creating weird organic marks.


I continued this fun process of constant flinging and picking till I was satisfied with the effect:


MORE FLINGING:


I started dragging the string around. It was quite therapeutic. Do watch this therapeutic process!: https://drive.google.com/open?id=0B_PH7w-k9pGzLXZnZU96My1jMUU
I also tried making repetitive patterns with the string. They turned out like flowers and I LOVE IT!!! I’m probably going to implement this element in one of my final emotions.


I then tried pressing the string on a black painted Lino pad using a roller.

I decided to kill 2 birds with one stone. I tainted the roller with black paint too, so that both sides of the paper had marks. This is the top:

This is the bottom:

I personally like the bottom one more cause it’s interesting with the intersecting lines and varied textures.
SOAP
So then I tried making marks with soap. I first dipped a small part into the ink, then dragged the bar of soap across the paper. I find that the soap makes great dry brush texture:

After a few strokes and messing up the paper, I find parts of the soap starting to dissolve into the ink. This made the ink on paper develop a chalky effect. The paper also smelled nice.

If I press hard enough, bits of the soap will come off and dry with the ink. This creates a kind of bumpy texture.

Finally, I dipped the whole bar into the container of ink. This resulted in wider and bolder dry brush strokes.

I combined the different techniques above. I tried to make haphazard marks to suit a negative emotion. Feel free to watch the short clip below(click the link) of me having fun with the soap!


Video: https://drive.google.com/open?id=0B_PH7w-k9pGzNTlLb1VnSTRtUjQ
Next, glue.
I first squeezed glue onto a palette and slowly added the ink. I used a palette knife to mix both and apply on paper, but I realised this process was too slow for me. So I just squeezed glue straight onto the newsprint.
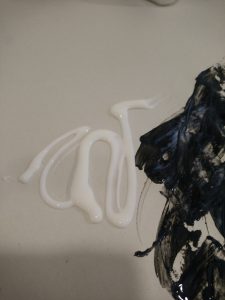


The ink became super shiny and made abstract ‘marble’ patterns. The palette knife didn’t give me the thick, blotchy effect that I expected so I used my hands.


The more glue I added, the more faded and translucent the ink.

Next, I took some dry flowers. I dipped the flowers into ink and dotted it onto the newsprint. Tiny cute organic spots are made!


Next, I dragged the dried bouquet across the paper. They appear very tangled and give a strong sense of direction.


I dipped the bouquet in ink again and rattled it over the newsprint, so that the ink will drip and fling off. The spots created are smaller and random, as compared to the manual, careful dotting. I prefer this effect more.


Next I tried making marks on aluminium foil.


That’s all for now!