Foundation 4D Project 3: Impossibilities of Being

Hogwarts.

That is the place that i’ve chosen for this project.

Hogwarts is the iconic school in the wizarding world of J.K. Rowling which Harry Potter attended to learn magic in the Harry Potter book series.

Having picked Hogwarts as the location and the freedom of choice for the medium of the final product, I was set on creating a video similar to the Harry Potter movies.

Research

So first thing first:

Spells.

Well, you can’t have a Harry Potter film without spells. It’s like how you can’t have raw eggs without the egg yolk in them. So before doing anything else, I went on to research on how to recreate the famous spells seen in all the Harry Potter films.

Here are some of the video tutorials which I learned from:

Seeing that all these people are using After Effects to create the spells, I got my hands on it and started experimenting with it. I had no prior knowledge of After Effects before this project so everything was new and I had to learn  everything from scratch.

After a few hours of testing, here is my first test video:

Alright. This video proved that creating spells for the project is possible and i can move on to implementing it in the storyboard.

Storyboard:

1
2
3
4
5


As seen, i did not go into too much details in the storyboard. As it will be a video, the different shots are subject to on-site adjustments such as the shooting angles and speech lines.

Thus, i kept to the fundamentals of how each scene will look like and placed more importance on technical aspects such as the character’s posture and transition between shots.

Creation

So with the help of classmates Shah and En Cui as actors, filming was done within the ADM library and second floor corridor.  It was supposed to only take 1 hour since the video was only a minute long, but it somehow got dragged to 3 hours. That aside, the actors’ hard work paid off and the video went into post-production.

Special effects:

Throughout the week, I continued testing the spells on After Effects.

And after multiple test compositions and trial and error, i came up with something that is considered decent:

With this technique in hand, I went ahead with applying the spell effects for each of the film footage that featured a spell.

Here is an example of an After Effects composition that has a spell in its scene:

Scene where Shah gets hit by En Cui’s Stupefy

This composition  you see up here is made up of 5 layers:

  1. “Saber effect” spell
  2. Light Flare for the head of the spell
  3. Ripple explosion for the impact
  4. Ripple blur of video for the impact
  5. Blue translucent layer for impact flash

On an extra note: I assigned different colours to each different spell, taking care to assign the right colour based on the character’s role:

  • Stupefy: Blue (En Cui) – ‘Good’ guy
  • Reducto: Orange (Shah) – ‘Bad’ guy
  • Expelliarmus: Red (Shah) – ‘Bad’ guy

It may look like there are many layers in the above composition, but I’m pretty sure that professional special effects editors in the film industry have way more.

The 3rd effect (ripple blur of video) is the effect I’m most proud of as it was an original effect I came up with while learning the other effects from others.

Here it is shown in good extent:

One thing that I could have done better was to increase the contrast of the video to the maximum when the spell hits something/someone. That could have made the impact appear more powerful.

Editing:

For combining all the film footage together, I used the program called Wondershare Filmora.

Sound:

The program also allows for editing of sound so I used it for adding the sound effects and editing the voices of the video.

Here is a screenshot of the video editing composition in the program:

The bulk of the work went into getting all of the sounds right for the video.

All the sounds i used for the spells are completely different from what their files were labeled as too.

For example, i used the downloaded sound file labeled “Avada Kedavra” for the Stupefy spell.

I basically went ahead with what sounded proper based on the visuals of the video.

Most of the time then went to mixing different spell sound effects together such as taking the beginning of one spell and combining it with the back of another spell to create something that fits with the video – explaining all of the short sound clips used.

Dubbing was done for areas of the video were the actor’s voice were not captured/ not said.

It was a great experience seeing Shah and En Cui dub over themselves.

Shah’s panting at the end of the video was actually just a loop of him panting once.

I wanted to do foley as well for all the lost sounds but due to lack of time, I had to make do with sounds downloaded off the internet.

The one part which showcased ‘foley’ best would be the later part of the video where Shah enters the empty dark corridor – The footsteps that imply someone is approaching him really shows the concept of implied meaning through sound.

As mentioned earlier, I’m pretty sure my layers are nothing compared to those found in the film industry.

Music

And a second composition was created for the background music:

This portion of the work was particularly tricky as the original royalty-free music track I used did not quite fit with the pace of the video.

I thus trimmed the track into multiple pieces and rearranged their orders to create a single long background music (bgm) which fits with the visuals of the video.

I have to salute the audio mixing engineers for the film studios for providing us with such well-timed music pieces to go along with our movies – it is not an easy feat. But, still fun overall.

I knew that a well paced bgm was key to a good video sequence through this video:

This is the introduction scene to a psp game called Final Fantasy: Crisis Core which I played ages ago.

The reason why it stuck with me for so long: The absolute synchronization between the bgm and the part of the scene. It gets high paced when it gets to the action, and slow paced when it gets to the conversation – all within a single music track

That to me, is the pinnacle of bgm in film.

And that is why i placed importance in a good piece of bgm.

Well, after all that, here is the video for this project:

Update from class:

Rhythm: 

  • There is repetition in the bgm – 3 different parts of the music follow a transition of moderately paced tempo to high-paced tempo with increasing loudness.

Movement:

  • During the fight scenes, there is successional movement for each of the shots of the characters – eg.  the camera follows Shah who is dashing away from En Cui

Causality:

  • The audience have unclear expectations as the narrative is a battle between 2 people with an unpredictable outcome
  • The video follows a linear narrative which is easy for the audience to track as it follows Shah throughout his escape from En Cui’s confrontation

Duration:

  • The duration of each scene in the video was optimized to fit in an overall composition that lasts 1 minute – the time limit that was imposed for the project
  • The scene of Shah looking at the scroll in the dark corridor could have been longer to allow the audience to properly hear the footsteps in the background .

All in all, I had tons of fun throughout this project.


Foundation 4D Project 2: The Subverted Object

So this time, we are tasked to take photos of an object and subvert its meaning.


The object I was appointed with: Tree.


And here are my photos:


Task 1: Denotation: 


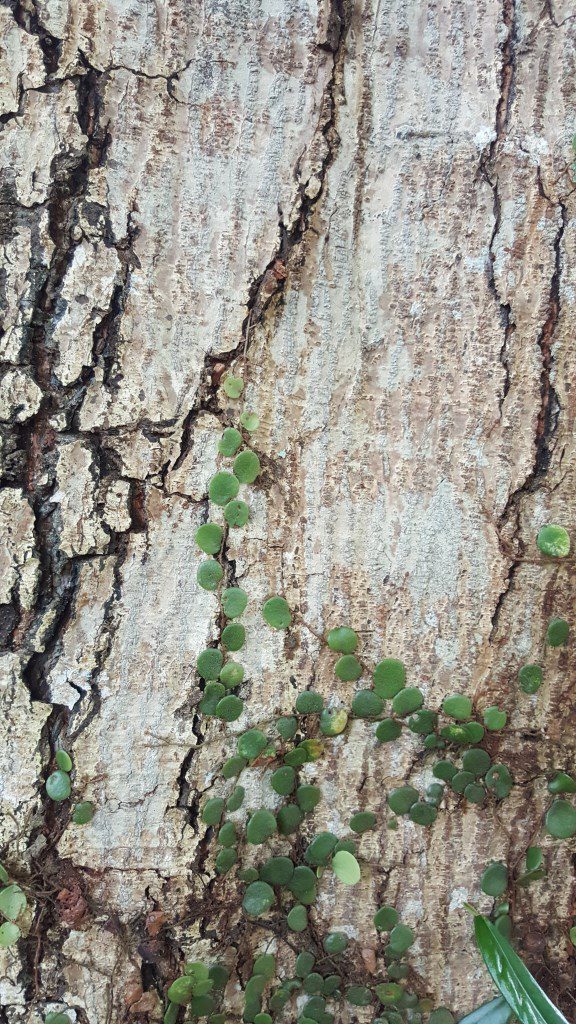
Task 1 Image 1

Context:  Physical attribute of object

  • Photo is a close-up of a tree bark
  • Wanted to capture the texture of the tree
  • The green ‘climber’ plant is incorporated in the photo to provide a hint that the photo is showing a tree as opposed to a cracked wall.

Camera/Photo technique: Close-up

  • Close-up is utilized to capture the details of the texture of the tree which is lost if the camera was further away from the tree


Task 1 Image 2

Context : Practical function of object

  • Photo depicts the tree being used as a shade

Camera/Photo Technique: Wide shot

  • Wide shot is used here to include the patches of grass, some of which are illuminated by the sun while others are not.
  • Emphasizes the point of the tree providing shade
  • Bark of tree is also included to show that the tree is being used


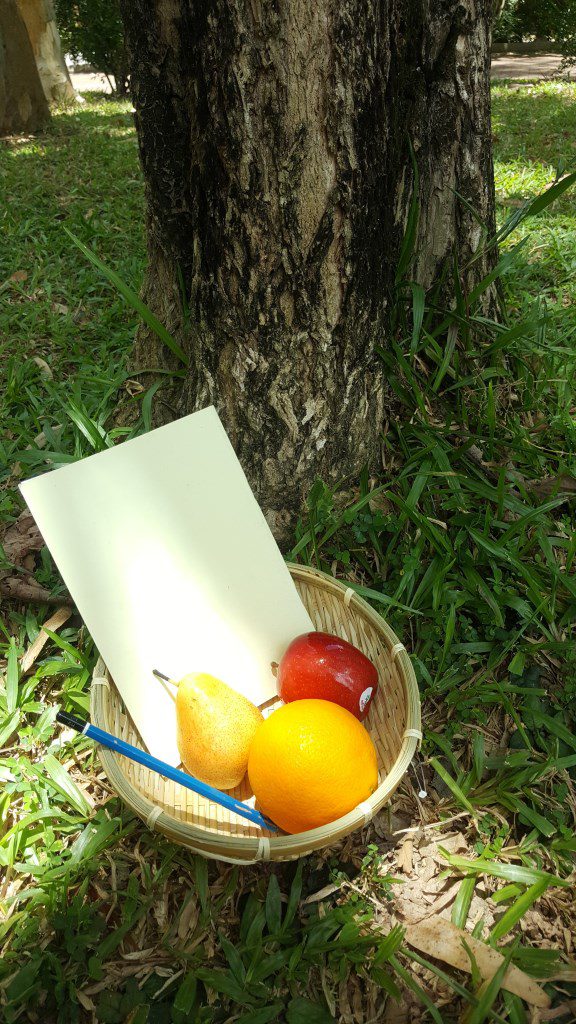
Task 1 Image 3

Context : Practical function of object

  • Basket of items that originates/are made from trees
  • Fruits (Apple, orange, pear) – grown on trees
  • Pencil – Body is made of wood
  • Book – Paper is cultivated from pulp which is processed from wood
  • Basket – Crafted out of wood

Camera/Photo technique: High angled and Middle shot

  • High angle shot is utilized to make the contents of the basket visible
  • Middle shot is used to include the tree bark in the photo to link the items to their origin – the tree


Task 2: Connotation


Task 2 Image 1

Context: Object’s cultural meaning

  • In Indonesia, there is a belief on how humans were created – Man was created by 2 gods cutting vertical slices into a Fig Tree, while woman was created by horizontal slices
  • Photo shows a ‘female’ tree entering the women’s side of a toilet while a ‘male’tree looks on

Camera/Photo technique: Middle shot/ Focus

  • Middle shot is utilized here to incorporate both trees into the photo for comparison
  • Focus is centered on the ‘female’ tree and the toilet as they give context to the photo


Task 2 Image 2

Context: object’s cultural meaning

  • Many early people thought that their ancestors’ souls live in trees
  • Image depicts a photo frame of an old tree – used to represent a tree that has passed on – recreating a photo frame such as those found on ancestor shrines
  • ‘Tim’ in Grandpa Tim is used in reference to the word ‘timber’

Camera/Photo Techniques: Wide shot/ Black-and-white

  • Wide-shot is utilized to include the whole ‘tree’ instead of just a section which may not come across as a tree to the viewer
  • Black-and-white effect was used to portray the tree as being old – photo was taken long ago


Task 2 Image 3

Context: Critiquing the object’s meaning

  • Photo shows a tree shedding blood as it’s being chopped by an axe – represents the idea of a tree having a life like humans do
  • Photo critiques our common perception of trees – a living object but not as animate as that of animals

Camera/Photo Technique: Wide shot/ Focus/ Increased exposure/ Vignette

  • Wide shot is utilized to include the cut tree at the background – illustrates how the situation of chopping is a process happening in the present
  • Focus is centered on the tree and hand holding the axe to emphasize their importance in the photo
  • Exposure is increased to heighten the intensity of the blood color for a more compelling touch to the photo
  • Vignette is applied to create a dark theme to the photo – presenting the situation as grievous


Task 3: Poster

Poster (Edit from Task 1 Image 1)

Context: Screenshot of a computer image file

  • The text “Wallpaper_5.jpg” acts as a relay to the interpretation that the image is a screenshot of a computer file
  • Photo is visually similar to stock background images found in computers
  • Questions our view on trees in everyday life – we don’t usually pay attention to them all the time – they blend into the surroundings like a digital wallpaper in a computer desktop
  • Cracks on tree bark symbolizes the tree’s frailness – signifies how trees are not almighty and can perish in the face of human intervention such as deforestation
  • Accentuates the point that we should cherish trees and protect them – if we don’t, in the future, this kind of wallpaper images will be the only proof that trees existed

Camera/Photo Technique: Text

  • The text “wallpaper_5.jpg” is added at a corner of the image to provoke a second thought in the viewer – contrary to the first thought that may be close to that of “a photo of a tree bark”
  • Second thought leads to the questioning of our view on trees
  • “5” in “wallpaper_5.jpg” provides a hint that this image file is one part of a set of wallpaper image files


Process

Here are some test shots for task 1:

Tree
Tree
Tree
Person with tree


And some photos of the props used for Task 2:

Turning a Broccoli into a tree
Mini studio

Foundation 4D Project 1 : Picture Story – Curating Self

Task 1: Me

Task 1 Photo 1

Context: Representing my past influences.

  • Photo shows me in between a height chart and a stack of manga.
  • The 2 props are used to portray the idea of growing up with the media from young, how I got influenced by reading manga like dragonball passed down from my family.

Camera Angle & Scale: Eye level & Medium shot

  • Eye level is utilized to bring about a closer feeling of understanding between the audience and the person in the photo.
  • Medium shot is utilized to include the 2 props into the photo.

Photo effect: Blur, lowered saturation & color editing.

  • Color is adjusted to a shade of brown to provide an “old photo” feeling – to illustrate the idea of the past.


Task 1 Photo 2

Context: Representing my attitude

  • I’m shown staring at a job search website on a computer to present how I’m serious when it comes to work, and real-life expectations and goals.

Camera Angle & Scale: High Angle & Wide Shot

  • High angle is utilized to show my feeling of frailness and how small I am when compared to the world – that I still have much to learn to keep up with the rest of the crowd
  • Wide Shot is utilized to show my surroundings. (Although feedback has been provided that i should have used a closer shot as the text on the computer screen is not quite visible)

Camera effect: Black & White

  • Black & White effect is used to enforce the sense of seriousness – my attitude


Task 1 Photo 3

Context: Represent my character

  • Photo shows me learning Japanese using a book with the little bit of spare time while traveling.
  • Portrays my trait of constant improvement- cannot afford to stop, need to keep on learning and upgrading.

Camera Angle & Scale: Eye level & Medium Shot

  • Medium shot is utilized to include the Japanese book and myself in the photo

Photo effect : Blur

  • The bus interior at the background is blurred to bring focus to the book and myself


Wrapping up of Task 1 : From being influenced by the stories of manga,  I have built up a character of having a realistic outlook on set expectations and goals in life. And also cultivated this constant hunger for improvement to realize them.


Task 2: Object and Representation of Self

Task 2 Photo 1
Close-up of object in a neutral background

Context: Object is a Nib Pen.

  • The Nib Pen is something that I find myself to be very close to as it allows me to create my favorite thing in the world – manga.
  • As stated in the first task, I was really influenced by manga, and really wanted to produce works that can also be beneficial to others as it was for me.
  • The nib pen to me is like a channel for me to express myself to others – exactly the way I want to – something I’m not very good at in person in my opinion.

Camera angle & scale: Eye level & Close shot

  • Placed object in a way which creates maximum shadow as advised by Professor Lei.
  • Close shot to highlight the details of the Nib Pen.

Photo effect : Increased Brightness and Exposure

  • Brightness and Exposure maxed out to unleash the colors of the Nib Pen.


Task 2 Photo 2
Full figure shot of myself with object

Context: My connection to the Nib Pen

  • I was thinking about how to express my relationship with the nib pen and decided it’s best to utilize the work that I produce with it – which is shown in the background consisting of pages of the manga that I’m currently drawing.

Camera angle & scale: Eye level & Wide shot 

  • Eye level is utilized to create balance in the photo.
  • Wide shot complements with the pages in the background to create a “Larger than life” feel to the photo for impact – as the manga pages look as if they extend infinitely out of the sides of the photo

Camera effect: Vignette

  • Vignette effect is utilized to bring attention to the Nib Pen and Myself


Task 2 Photo 3
Full Figure shot of myself interacting with the object

Context: Nib Pen as a way of communication

  • I use the Nib Pen to express myself in ways where I am unable to do so in person – emotions such as anger and sadness – things which I don’t like to express much outwardly.

Camera angle & scale: Top-down & Wide shot

  • Top-down angle is utilized to include the table, paper and ink bottle into the photo.
  • Wide shot is utilized to incorporate my moving arm into the photo – to show myself expressing my feelings while drawing

Photo effect: Tint adjustment

  • A yellow tint is applied to produce a heated “in the zone” feel to the photo.


Task 2 Photo 4
Mid-range shot of me interacting with object

Context: Representing the significance of the Nib Pen to me

  • I’m shown here cleaning the Nib Pen after using it – displaying how much care I place into it.
  • The Pen nib is like a part of myself – an arm for example – and I have to take good care of it as I continue to use it.

Camera Angle & Scale: Eye Level & Medium Shot

  • Medium shot utilized to include the tissue packet into the photo.

Photo effect: Temperature adjustment

  • Temperature adjusted to the warmer spectrum to release a sense of attachment like you would feel when in the company of someone close.


Task 3 Photo 5
Close-up of me interacting with object

Context: Using the Nib Pen

  • It cannot get any easier to explain than this – the Nib Pen is an object which allows me to draw manga.

Camera Angle & Scale: Low angle &  Extreme close-up 

  • Low angle makes the nib pen look large in the photo to bring out its significance.
  • Extreme close-up showcases the ink marks on the nib pen to show its age and how much it’s been through.

Photo effect: Blur

  • The sides of the photo is blurred to bring focus to the Nib Pen.


Wrapping up of task 2: The nib pen to me is a channel where I can freely express my emotions with control without others cutting in while I’m trying to express something.


Task 3: My World

Task 3 Photo 1

Context: My Table – My World

  • In accordance to the task title : My World,
  • I decided to go with my drawing table – used to be my study table but don’t use it for that anymore – where I create manga.
  • My interpretation of “my world” would be a place where it’s my playground and nobody can  jump in to stop me from doing whatever I want and I can be lost “in my own world” while drawing.

Camera angle & scale: High angle & wide shot

  • High angle and wide shot of the table used to showcase all of the tools I use on the table – pens, fine liners, markers, erasers, correction liquids, rulers and computer etc.
  • Made it a point to group the colours of the stationary together so you don’t see a mess
  • Centered the camera to the table to create a line of symmetry

Photo effect: Glow

  • Glow effect applied to deliver a fairytale-like touch to the photo – portraying the table as “my world”


Task 3 Photo 2

Context: My table is where i also create another “world”

  • Manga pages can be seen pasted on the wall – how i’m creating a world within the manga story.
  • Something akin to “a world within a world”

Camera angle & scale: Low angle & Middle shot

  • Low angle utilized to showcase the wall next to the table to reveal glimpses into the world that I envision in my head and also a bit of the editing that I do on the computer.
  • Middle shot to encompass both the table and the wall but taken from not too far of a distance away so that the content of the manga pages can still be deciphered.

Photo effect: Blur

  • The bottom of the photo – where the table top is shown – is blurred to bring attention to the manga pages on the wall.


Task 3 Photo 3

Context: The location of “My World”

  • That quiet corner of the room is set for complete immersion into the work.

Camera angle & scale: Eye Level & Wide Shot

  • Eye level angle gives the perspective that you are standing in the room yourself to give a real-life impression of the table.
  • Wide Shot is utilized to display the location of the table with the added elements of its surroundings for comparison.

Photo effect: None

  • No effect is utilized in this photo to give a realistic vision of how the table looks like.


Wrapping up task 3: My table is a place where I dive deep into my own world while drawing – like my own little playground – an isolated place where no outer disruption is allowed.