Month: January 2019

ASSIGNMENT 1 – AXONOMETRIC DRAWING

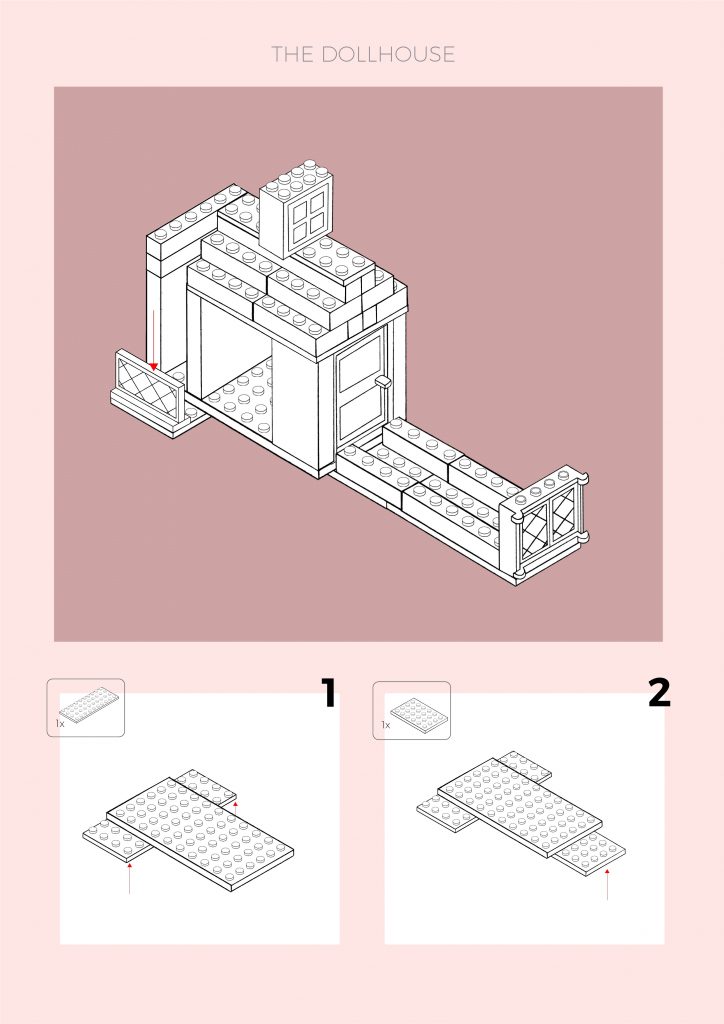
For this first assignment, we learnt Orthographic Projections before attempting to create an instruction manual based on a lego-built of our choice. The objective is to create a clear manual for others to follow and re-create my built.

This was to be done via Axonometric Drawings, specifically, Isometric. Apart from Isometric, Diametric and Trimetric are other branches of Axonometric Drawings. Along with those, we also practiced some Oblique Projection Drawings.

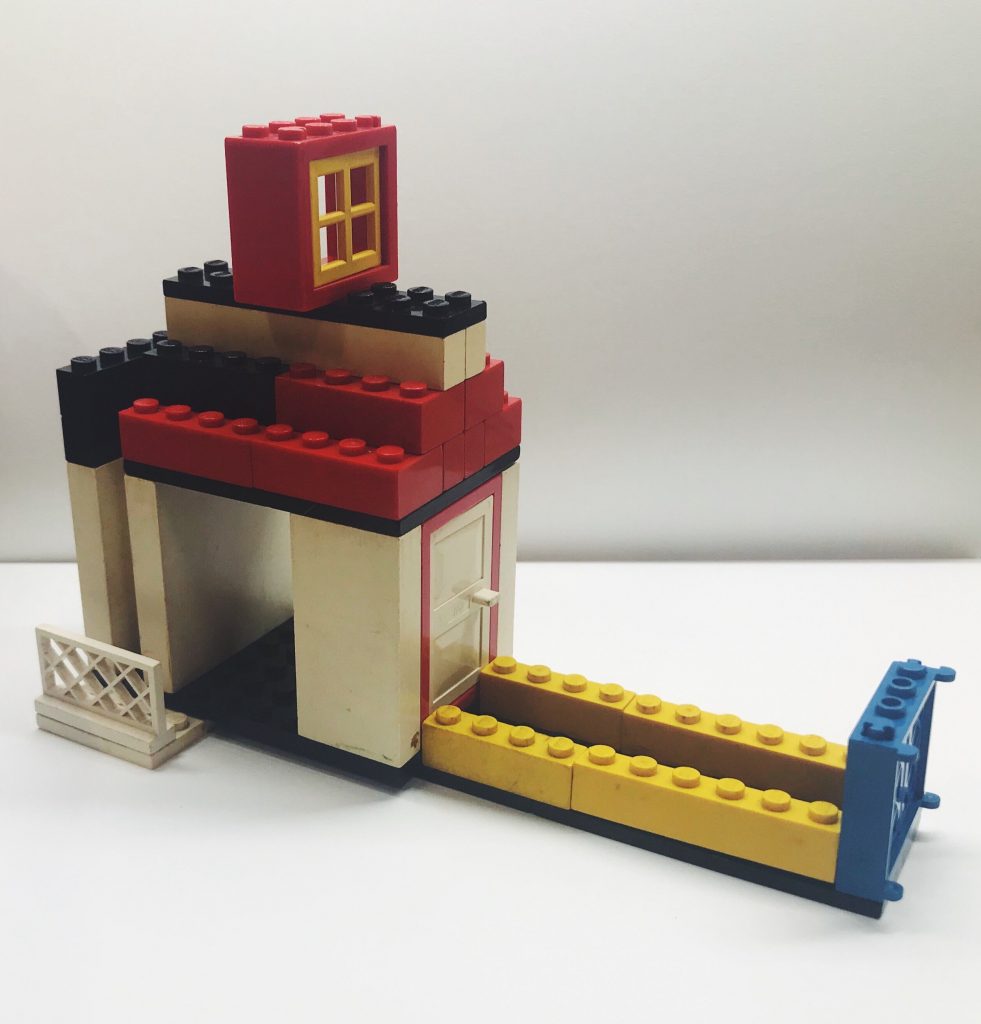
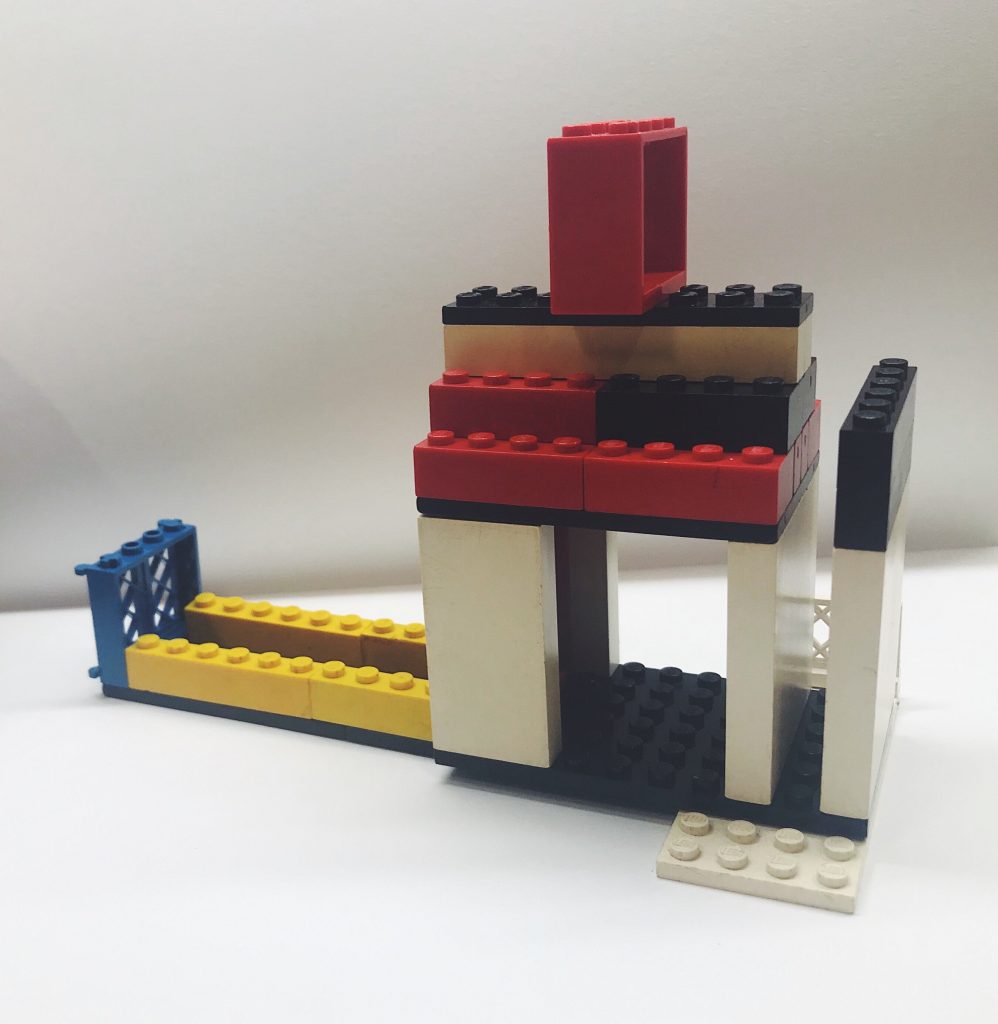
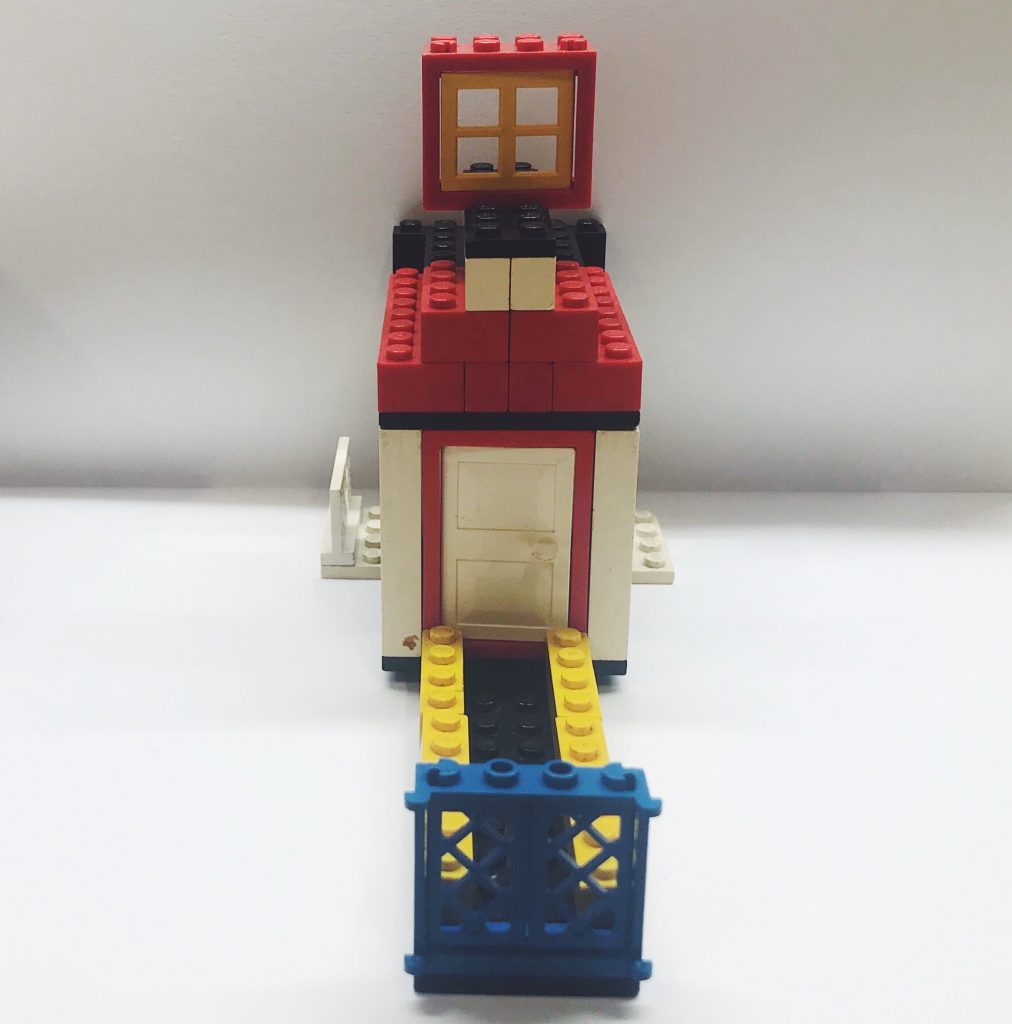
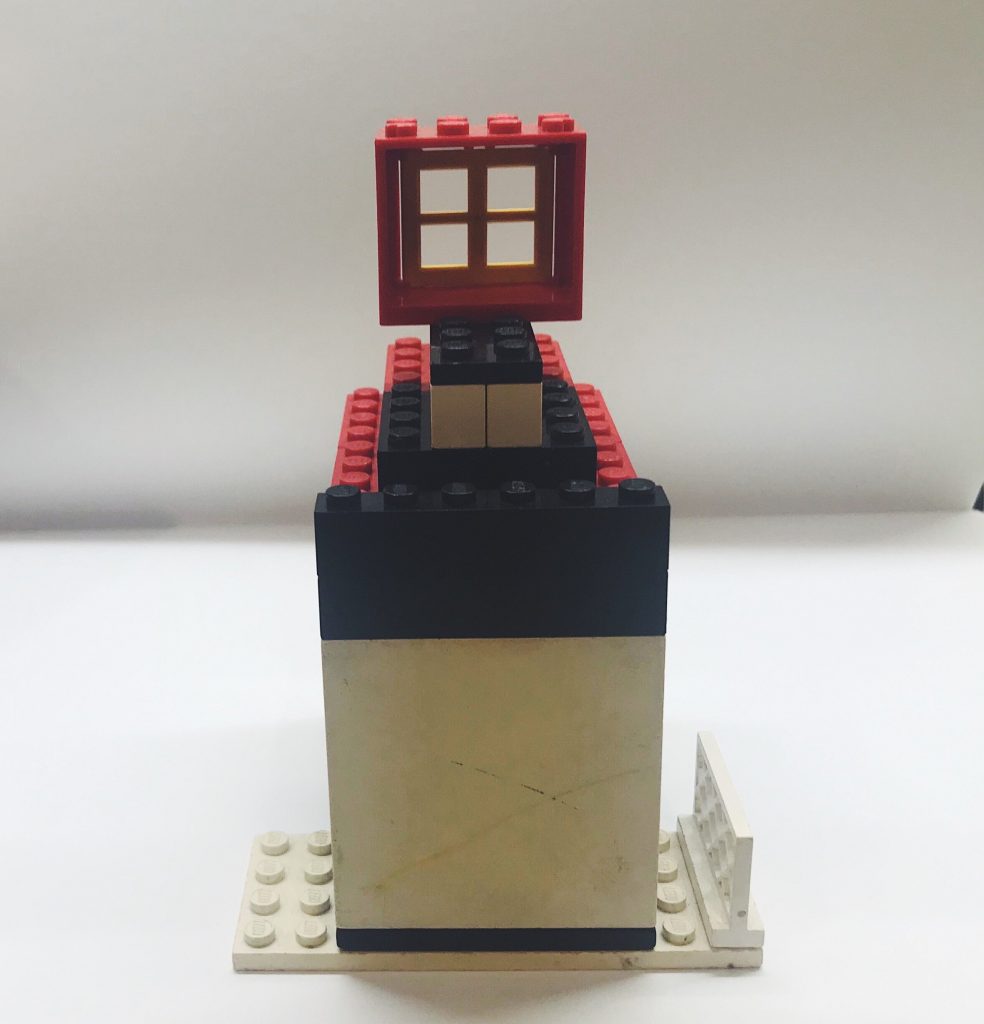
Sherry, our lecturer, provided us with Lego pieces for us to come up with our desired built. I decided to build a Dollhouse. As a kid, I was never really into dolls nor was I into girly things. As I got older, I realise that I missed out on the fun of it all; dressing up dolls, having tea parties in dollhouses. Hence, this is my simple take on a dollhouse that I never had, reliving my childhood as an adult.

Here are the different views of my Lego built.

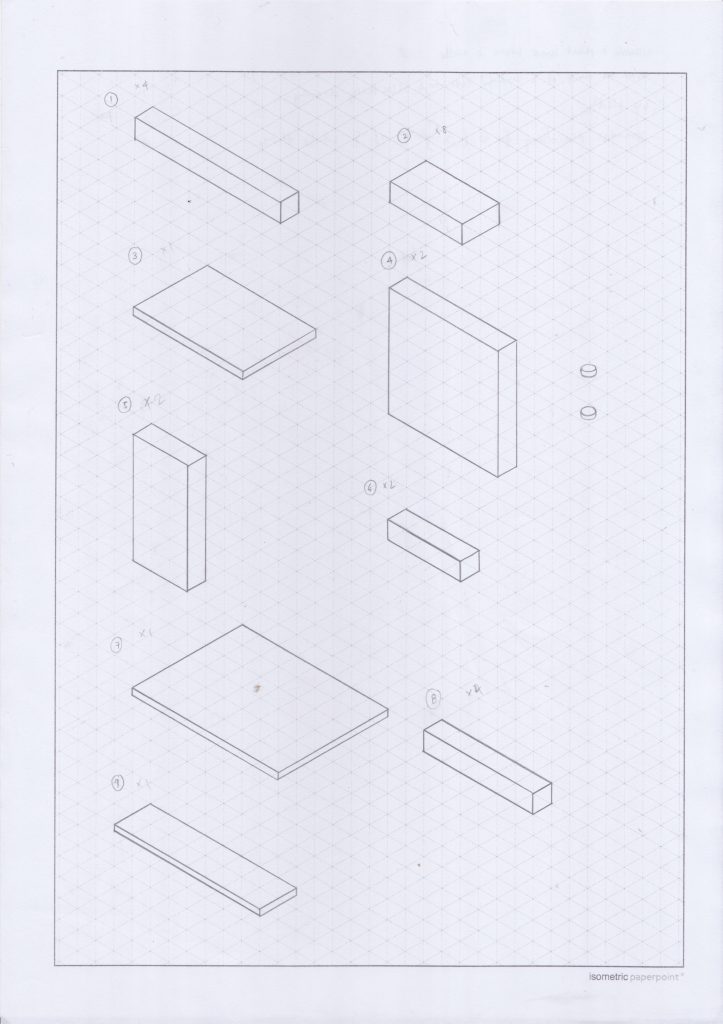
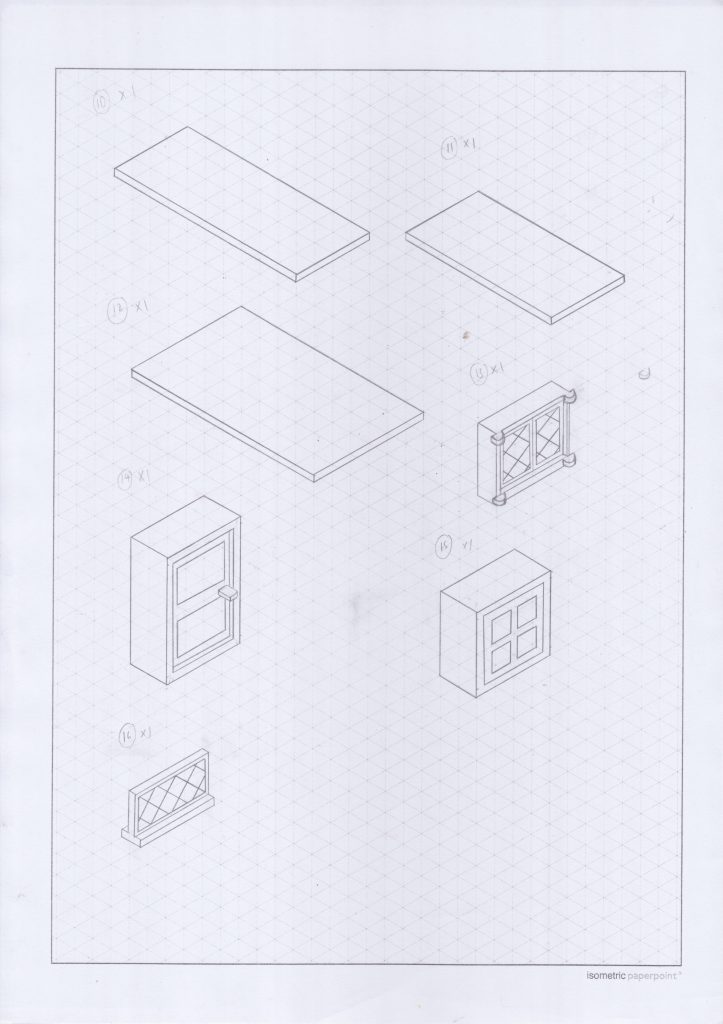
Below are the raw drawings of my Lego pieces.

I realise that although my built looked quite simple and compact, there are many pieces that went into building it as I use quite a bit of “platforms” to raise the height of the built and create bases for my roof and base.

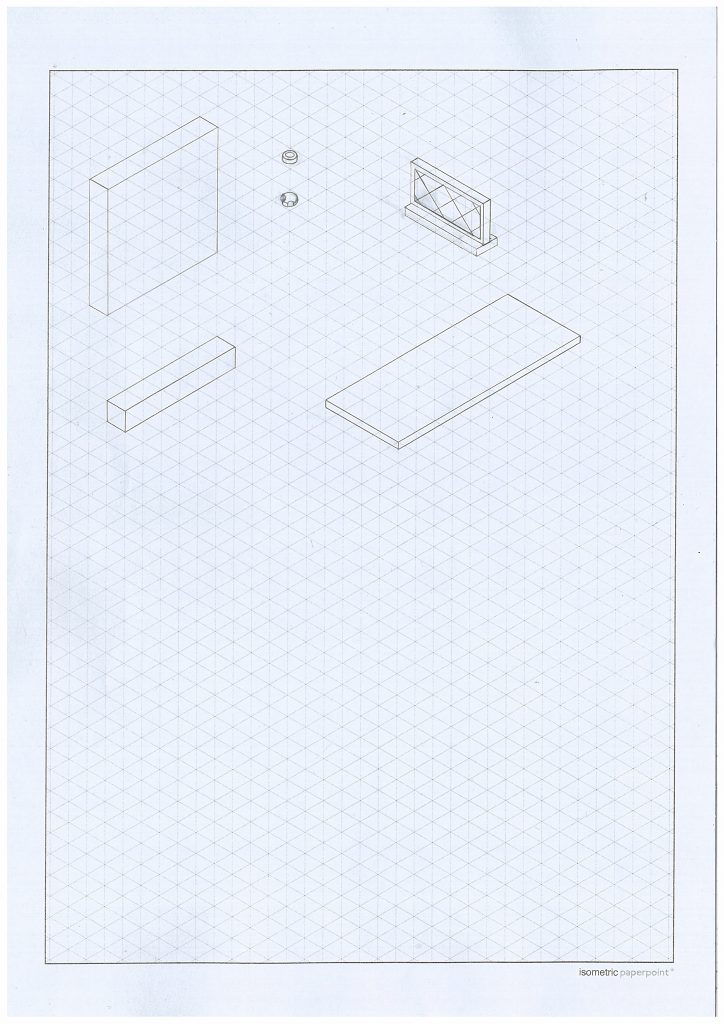
Some pieces from the above drawing were not drawn correctly, which I did not notice at first in Pages 1-2. Page 3 were the corrections of the pieces that were not drawn correctly due to the mistake in perspectives.

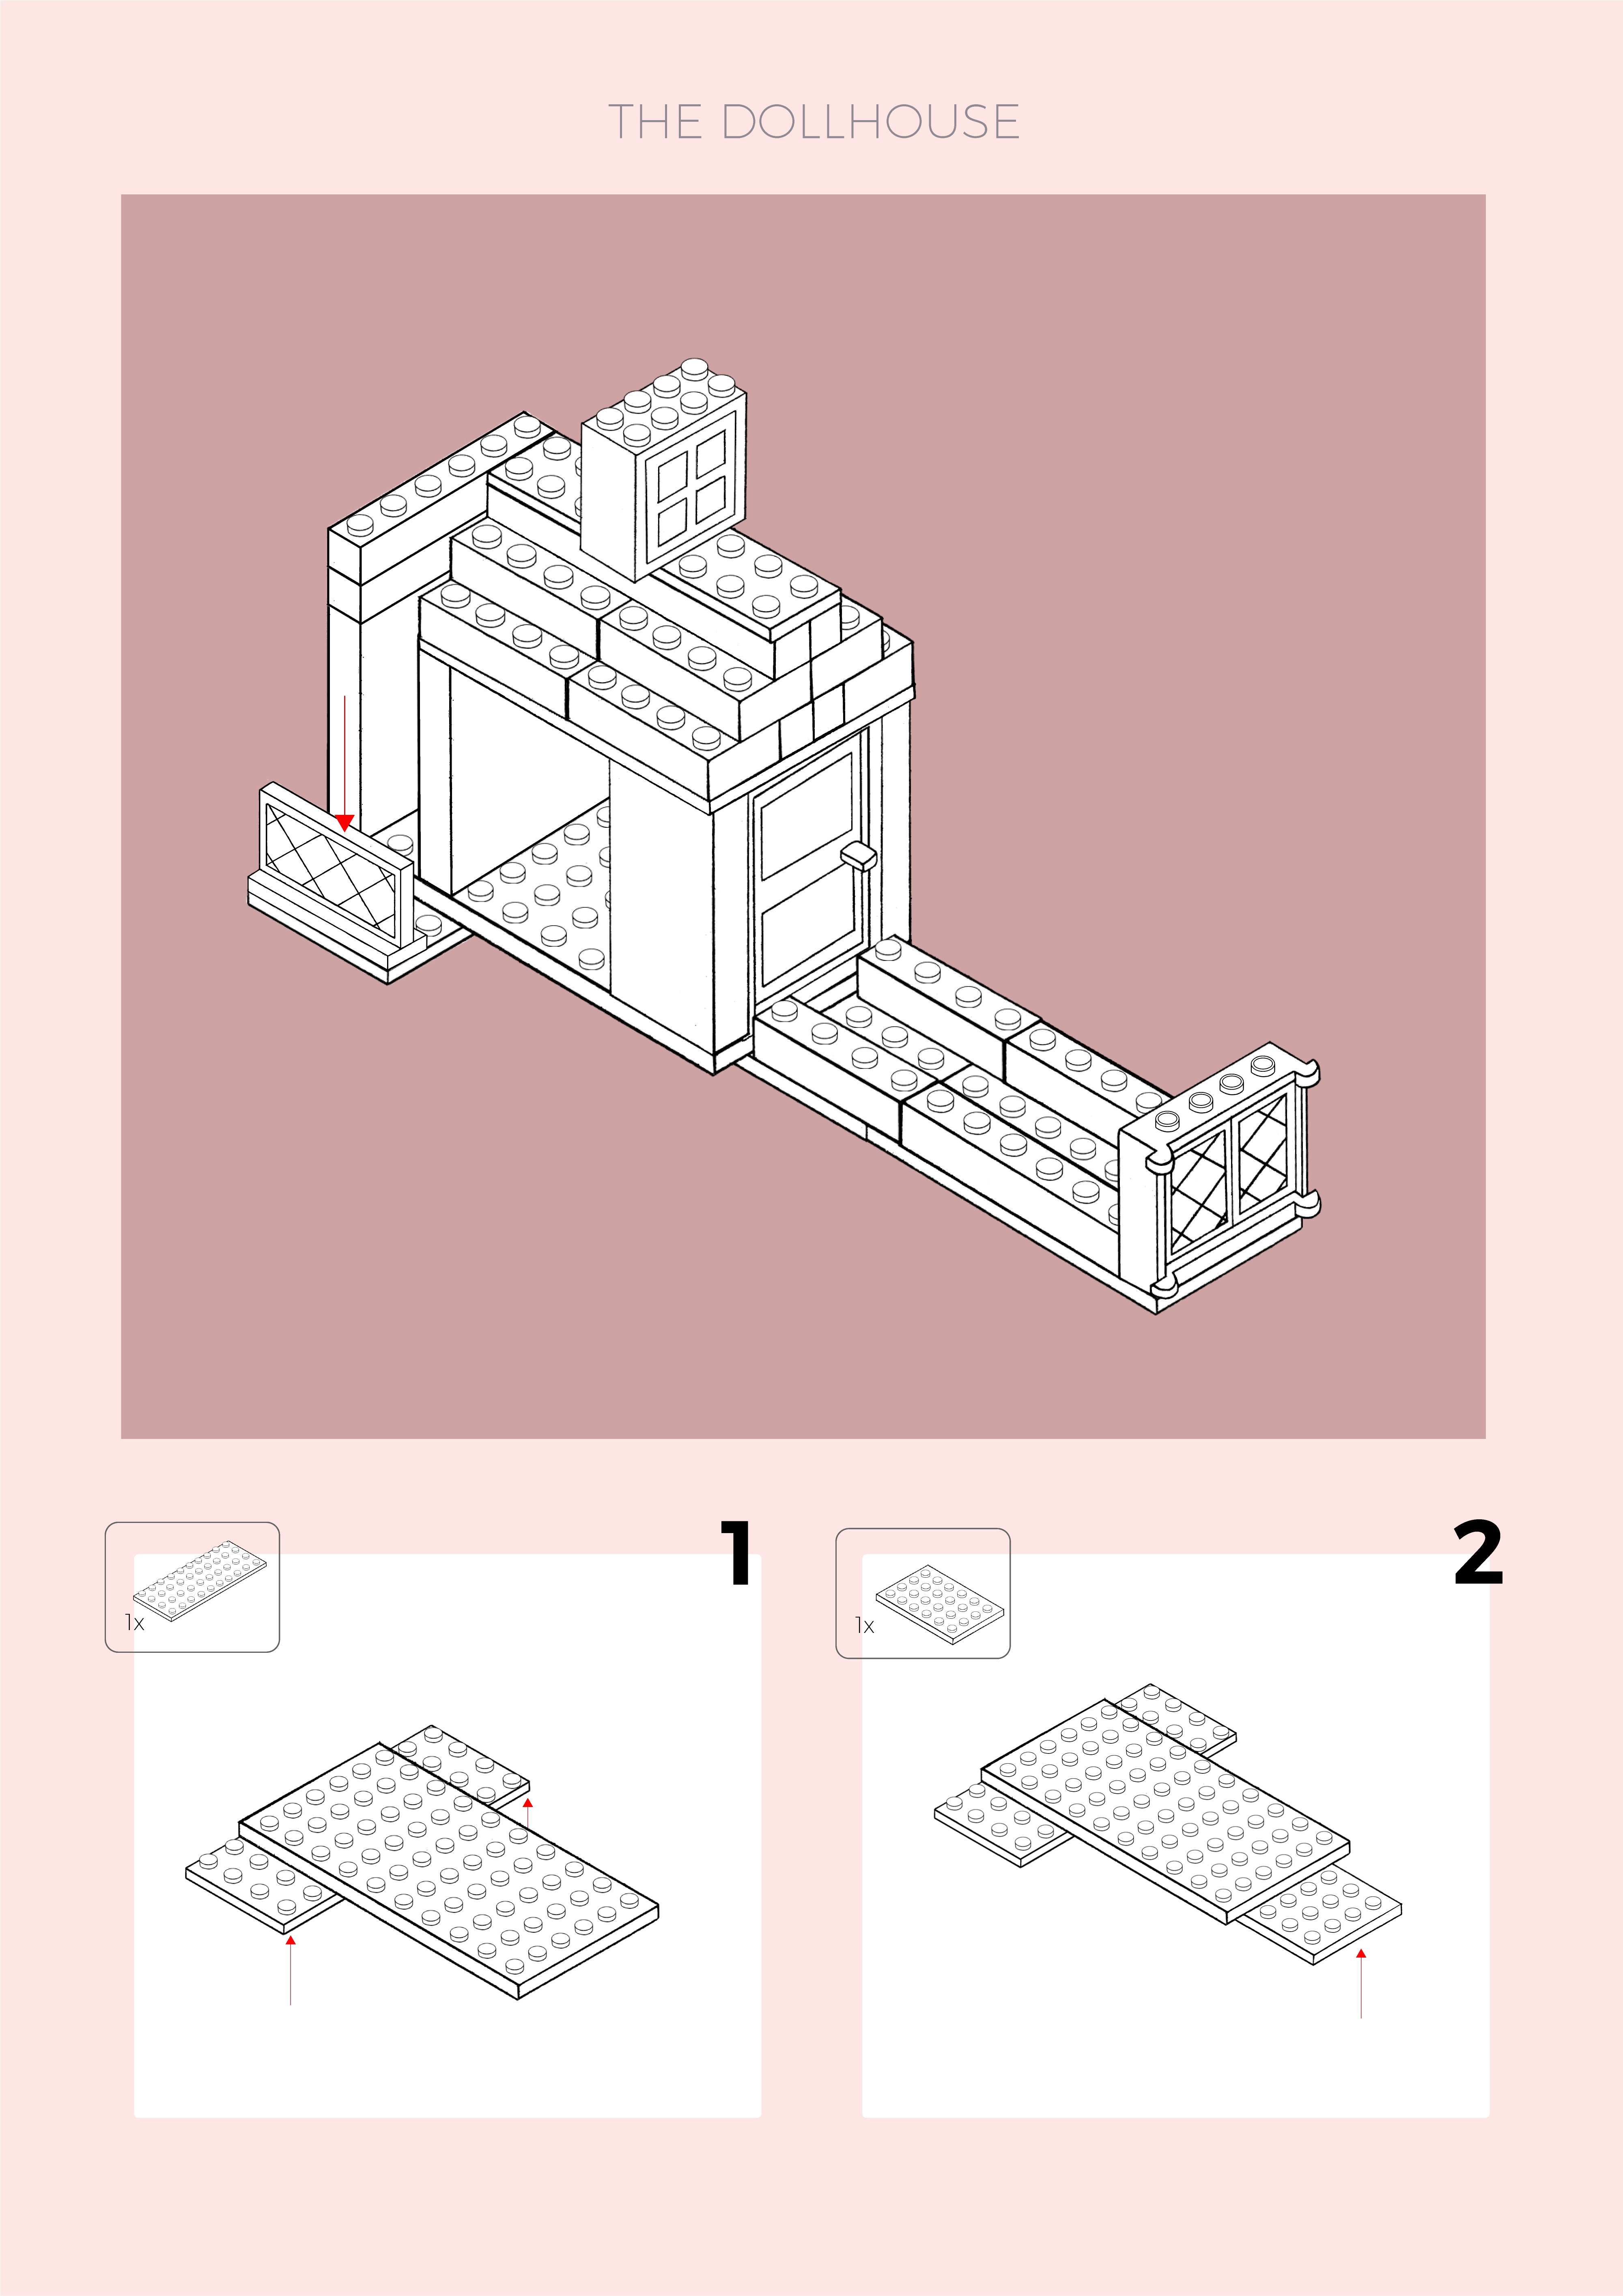
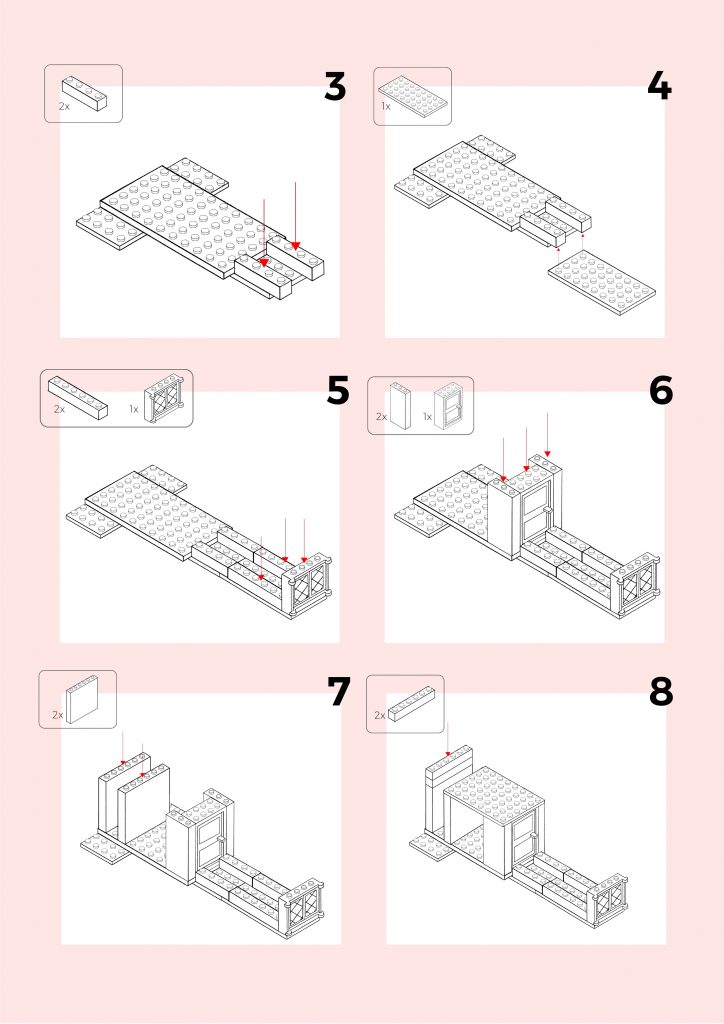
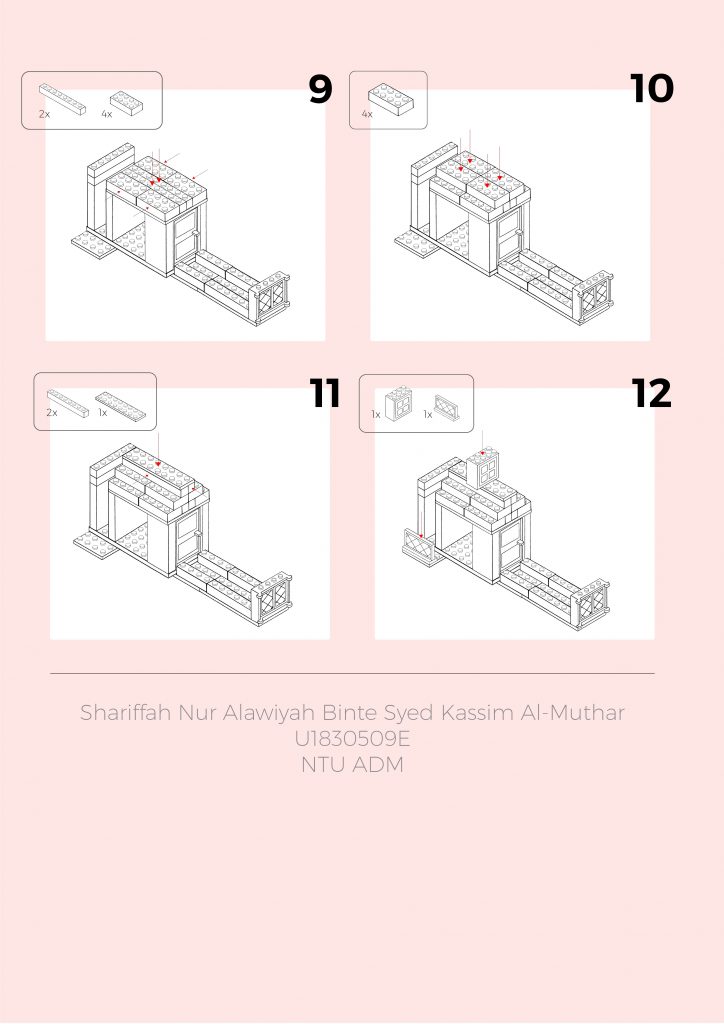
Lastly, the photos below are my Instruction Manual for The Dollhouse. I tried to make it as clear as possible with minimal steps per box. I chose to have a clean design with pastel tones for simplicity and to allow maximum focus to the instruction itself. I added small rounded boxes in each step to indicate the pieces needed for that particular step. In addition to that, I placed arrows to indicate the direction as to where the Lego pieces are supposed to be fixed.

The designs software that I used was Photoshop at first but halfway through, I switched over to Illustrator as Photoshop was too consuming to assemble the pieces.

Micro-Project 2 – Crowd-Sourced Art

Crowd-Sourced Art was the second Micro-Project that was done in class. We needed to build a quick and interactive experience where we required the participation of others via any social media or online platforms.

What is the content of the work and who is creating it?

My partner, Jessie and I first brainstormed ideas. We both agreed that ADM was filled with weird items lying around. That was where our idea started. A classmate from the previous semester had borrowed a cup from Canteen 2 and haven’t returned it ever since. Therefore, we started with that! We both figured that given the short time span given to complete our project, we had to keep the timing of the responses on polling and the posting of the videos/photos in mind.

In general, people are attracted to things that were revolting (just based on experience). It creates a reaction. Henceforth, our idea was to create an experience for our participants where they get to choose edible items that generally don’t go together but will be placed in our drink. The intensity gets higher as the food items get more and more revolting.

Firstly, we went to find the cup at the Basement floor and took a photo of it and posted it along with a poll. The choice was whether to wash the cup first or just take it for use.

The majority of the voters voted for us to just take it for use. After which, we proceeded to give the option to our participants whether we should use tapwater AKA NEWater or get water from the cooler. As expected, most people voted for the NEWater.

To make it more interesting, we then decided to give the option for participants to virtually add M&Ms or Spicy Chilli Tapioca Chips to our drink. Of course, they picked the Tapioca Chips!

We then included a video for them to watch us add the chips into the water. Safe to say, it wasn’t looking good. You could see the oil separating from the chips and into the water.

The second to last option was whether to add Yoghurt or a Tandoori Chicken sandwich to the drink. The majority of them chose the Yoghurt! Along with that also, we added a video to see the extent of the damage done by their choices.

The last and final option came as a surprise for our participants as we wanted to keep the suspense going, knowing that people would probably be wondering if we were going to consume the drink or not. Hence, we made the participants choose whether they wanted me or Jessie to consume it.

For the final option, we decided to have it Live with our real-life participants who were our lovely classmates and lecturer! Majority voted for Jessie to drink it. So we recorded the live session of Jessie consuming the drink! It was not a fun experience for her but certainly so for the rest of us!

Some challenges:

Originally, we wanted to make it more cost efficient while having a higher intensity by using condiments and seasonings provided in Canteen 2 such as chilli flakes, parmesan, soya sauce, etc. However, given the time limitation, we had to resort to being resourceful in ADM itself. Another challenge was also the fact that it took people quite some time to respond. This could be due to the timing when the stories were posted on Instagram.

Now, to answer the rest of the questions that were intended for this post:

Where does this work take place?

It took place via Instagram and we went around ADM to create this interactive online experience!

How does this work involve social interaction?

As mentioned above, people are very much attracted to things that are revolting and suspense. Therefore, by doing polling on Instagram and creating a mini story-line for our viewers, we were able to attract them to participate in our interactive experience done via polling. Collectively, they were given the option to basically determine what goes into our drink.

How is your crowd-sourced project different from one that is created by a single artist/creator?

Our crowd-sourced project differs from a single artist/creator through the unpredictability, biasness as well as the inclusion of the freedom of choice for the participants. In addition to that, it created a virtual interactive experience for our participants.

In our interactive experience, we gave our participants the freedom to choose between two option. Although it’s not necessarily an ideal number of options, we were limited by the features. Hence, there is still a certain biasness to it given that we dictated the two option. However, it was still an unpredictable outcome as it was collectively controlled by our participants as well.

In contrast, if a project was not crowd-sourced and done by a single artist, that would mean that the project would be a lot more bias as it involves the opinions, thoughts, and decision of the creator. The interaction with the participants would be minimal to none which is basically what crowd-sourced art requires.

Both crowd-sourced and single artist artworks have their strengths and weaknesses. It all depends on the message intended to be conveyed as well as the motive of the artist/creator.
Micro Project 1: Creating the Third Space

For this in-class project, we were tasked to go around ADM and take a picture/ pictures of an object or space that holds a meaning and is unique to the individual. We then had to post these photos on Instagram with the hashtag, #1010adm in which the collection of posts from other classmates created a virtual space online. It was pretty cool and interesting seeing the school in the perspective of different individuals. Interesting fact! What we found out was quite amusing! The collection of photos from our class came out to have a thematic flow in which the photos created a mysterious persona.

Here are the collection of photos that I took.

1.Why did I choose this space or object to photograph?

This was a space located in the basement floor of ADM. There is this particular room along the corridor of this floor which holds a very fond memory of my first semester in ADM. It was a place where my classmates and I used to spend our time (and many overnights), mugging for exams, completing projects after projects while having crazy conversations along the way.  They were times that I really looked forward to after lessons in school.

2. What are some of the characteristics of this alternative virtual space I had created collectively?

One of the characteristics include the thematic persona as mentioned above. It created a mysterious outlook from a viewer’s standpoint. This space that my classmates and I created collectively were mostly architectural posts or close-up of objects or space. What stood out was that the posts involved spaces or en route to the space that held a significant memory or experience of individuals. A story lied in every post.

As individual posts, mine, collectively,  were a series of photos that depicted the journey to the my “safe space” and the specific objects or view that I favoured in my secret location. I curated the photos in a way that they involved close-up shots instead of wide shots as I felt that it interpreted my thoughts more exclusively.

3. Under what circumstance will this alternative virtual space change?

I believe that there are a couple of circumstances which I will list below:

  • The turnover of students
  • The change of the physical space due to interior redecoration etc
  • The time period in which the students that took these photos are in – When we have graduated, we would probably feel differently about these spaces and the memory might not be as vivid or it could change in other ways that would change the interpretation and persona of this virtual space that was created collectively
4. How does this project relate to what we discussed in the lecture regarding co-creation, the concept of Do-It-Yourself (DIY), Do-It-With-Others (DIWO)?

In this project, we got to experience both DIY and DIWO in which DIY was when we were given the creative freedom to capture photographs that we had to complete individually. This means that we created were not influenced by anyone else and they were unique individual perspectives. The DIWO comes in after when we looked at the posts collectively under the hashtag #1010adm. These were a collection of posts from other classmates where they were seen as a whole. This was a collaborative effort in creating a virtual space online of ADM through different  perspectives to create a page that represented the insights from the students studying in ADM.

Yoko Ono’s Cut Piece

Yoko Ono is a Japanese Multimedia Artist whose work also encompasses music, poetry, film, sculpture, installation, paintings and performance art.

Yoko Ono – Source: www.biography.com

Diving into one of her most famous pieces, the Yoko Ono’s Cut Piece have been staged five times. This remained a key piece in the Fluxus* Art Movement. This piece first debuted in Kyoto, Japan,  in 1964 at the Yamaichi Concert Hall.

Yoko Ono provided no context to the performance except providing an outline of the instructions which was to have the audience to cut a piece of her clothing, one by one, in which they could take the pieces they cut, home.

The question that will be addressed here is:

How does it alter the way an artist or designer create the work, when there is an interactive component?

First and foremost, having an interactive component, as one may know, will bring about a lasting impact on the participants. This is because, as shared in class, memories are connected to the emotions. It brings about a neurocognitive change. Every experience is unique. There is no possible recreation of the exact experience. Therefore, the experience of one audience member may vary and differ from the next audience member.

In this case, Yoko’s piece may or may not influence the audience members in choosing an area to cut or how much to cut. The actions of the others may influence the ones that come after to participate in the performance. The reason for this is that every audience member may very well cut a piece of Yoko’s clothing on their own terms, according to what they feel is appropriate or what they would like, etc. However, there are others who may be influenced by the actions of the rest that came before them. This highly depends on individuals.

Therefore, the way the artist create the work with an interactive component may involve the manipulation of resources to play to the advantage of the piece. This means to say that if the artist have a specific message that they may want to portray, their piece can be altered in such a way that it could sway the audiences to prove the artist’s standpoint. However, this also depends on the participants because in a way, everything else could be controlled but the audience is taken to be a variability.

This is very much visible in Yoko’s Cut Piece where in the beginning, the participants were hesitant and cut small pieces of her shirt or skirt. As the performance goes on, they became more daring and start cutting up bigger pieces. There were some participants who cut off the front of her undergarment and straps. Highly likely, this happened because people drew inspiration or seek approval of others during the performance. When they witness someone cutting up a bigger piece or a more risque piece of clothing, that is seen as approval or as the ‘okay’ to test waters and experiment further. In my opinion, this also is dependent on the personalities and values of the individuals on whether to experiment, follow or stay in the safe zone.

Hence, in order to create an interactive art that is effective, impactful and provide a long-lasting memory, this involves a proper understanding of human behaviour and psychology. Observational skills will come in handy! In comparison to creating a still art piece, an interactive art piece needs to be able to grasp the attention span of the audience when it is in motion/action.

*Fluxus was an international, interdisciplinary community of artists, composers, designers and poets during the 1960s and 1970s who engaged in experimental art performances which emphasized the artistic process over the finished product.

Direct Source: Wikipedia

Sources:

https://www.moma.org/learn/moma_learning/yoko-ono-cut-piece-1964/

https://uk.phaidon.com/agenda/art/articles/2015/may/18/yoko-ono-s-cut-piece-explained/

https://www.ncbi.nlm.nih.gov/pmc/articles/PMC3334843/

Yoko Ono’s “Cut Piece”