(Failed) Fog Juice and more | #FYP

(Backdated post to 20 Oct ’17)

Overview: Creating new Set-ups
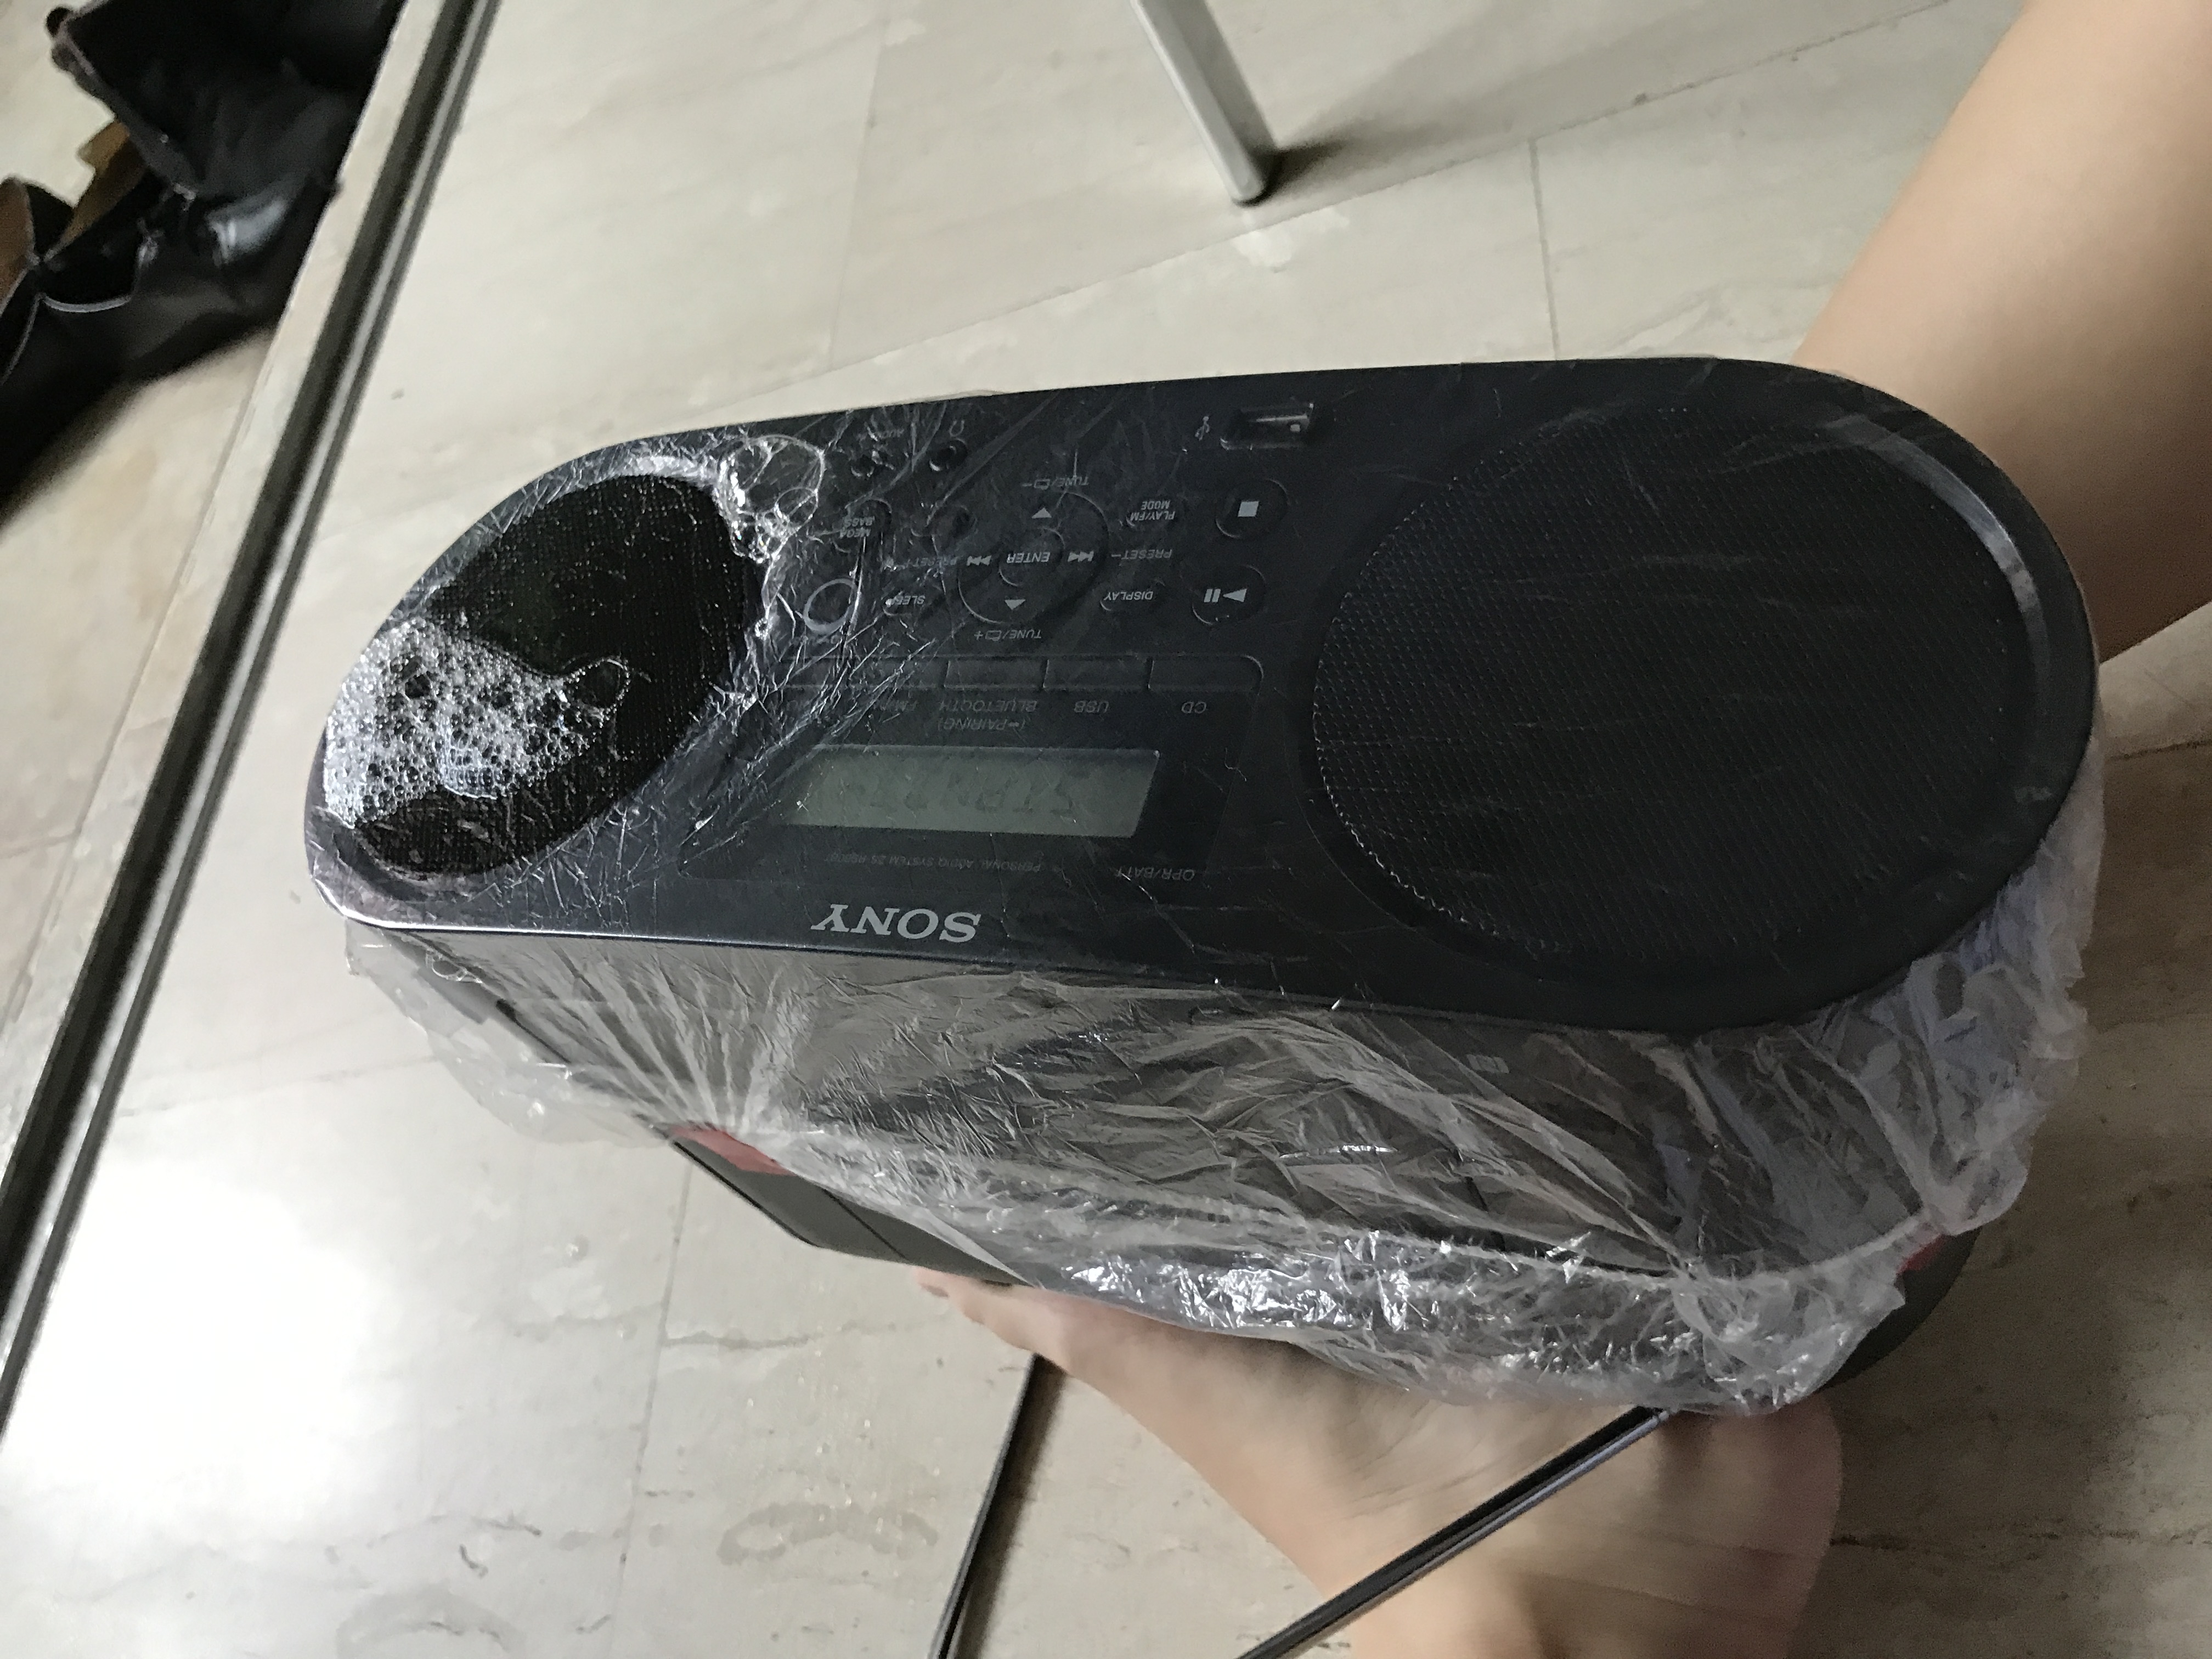
This was a week of toggling with equipment, with the intention of coming up with the final installation setup. I decided to just go back and focus on projection on bubbles. To do this, fog is required, to make the bubble opaque enough for projection to shine on it.

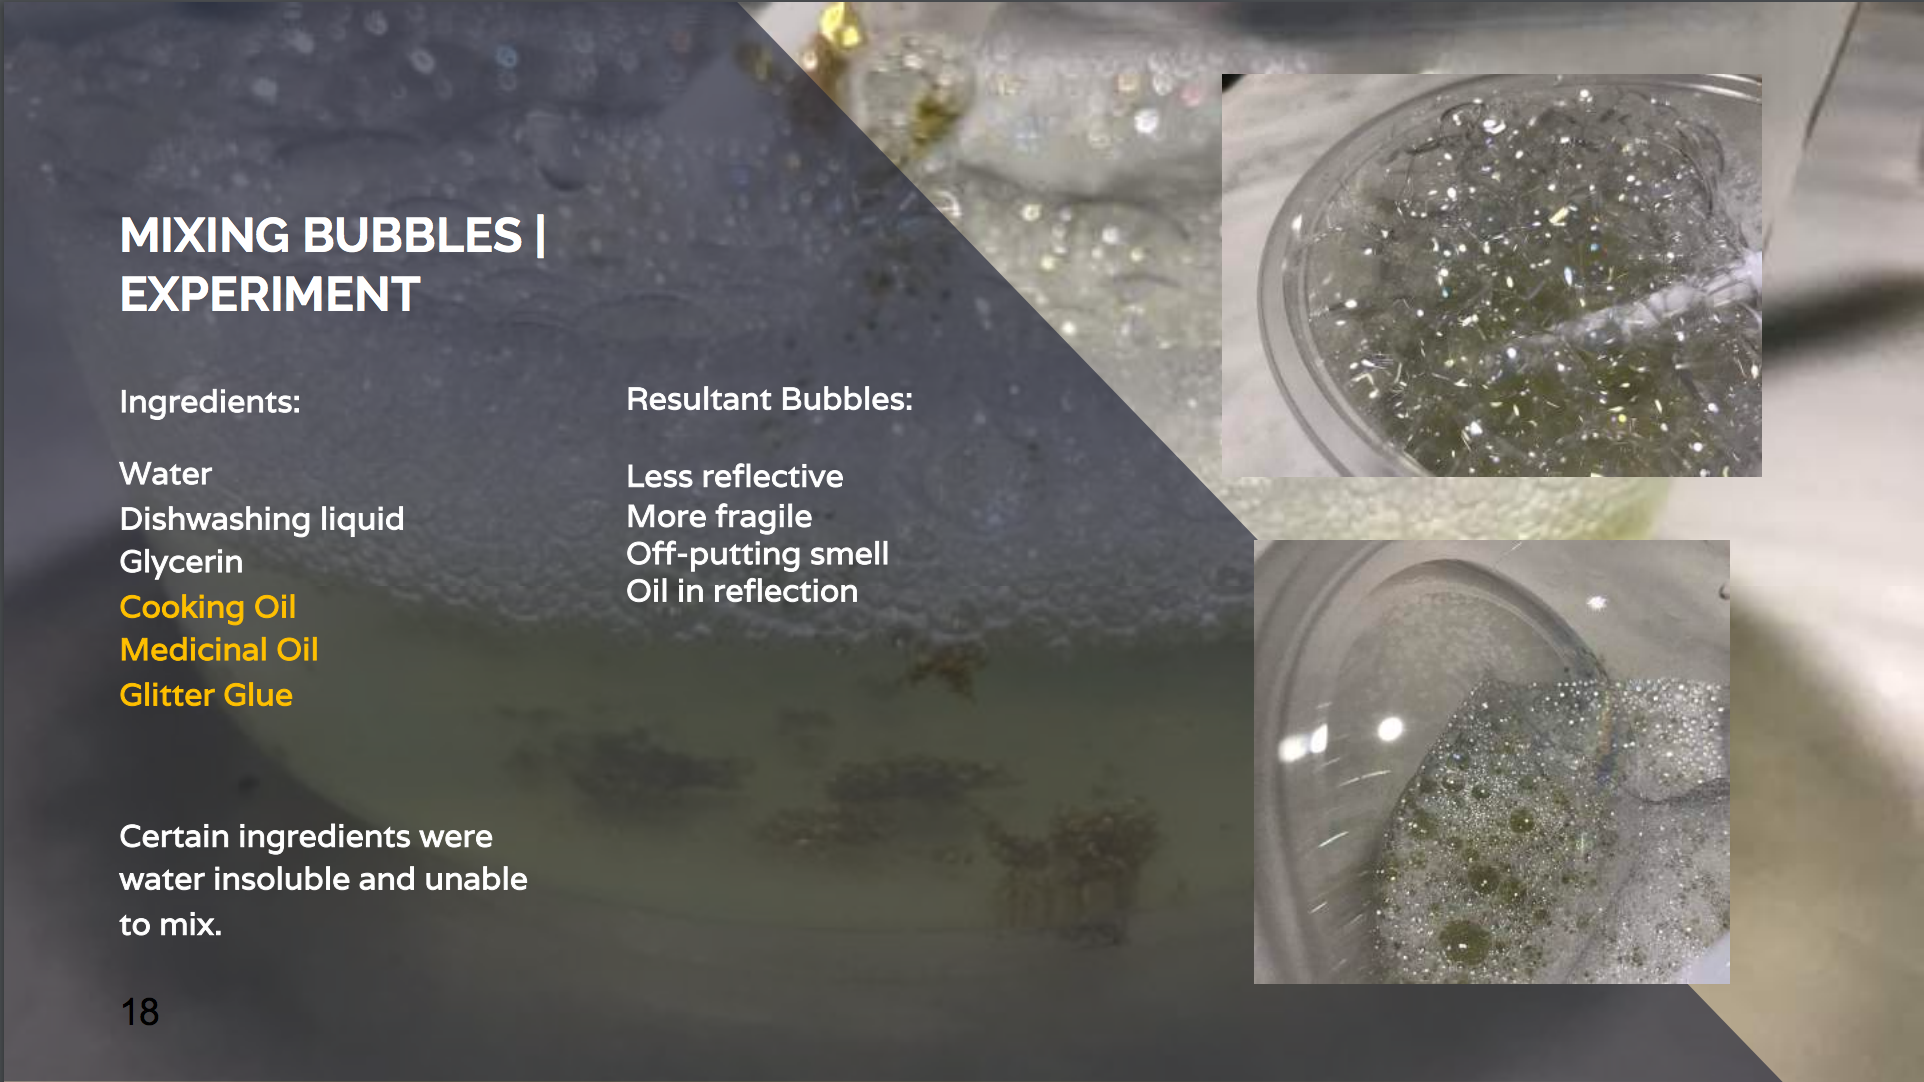
Thus, I tried to make my own fog as buying a fog machine would be much more costly. It was a failure.


Experiment I (out of 2):
Part 1

This experiment’s step by step tutorial was taken from here.

Experiment set-up

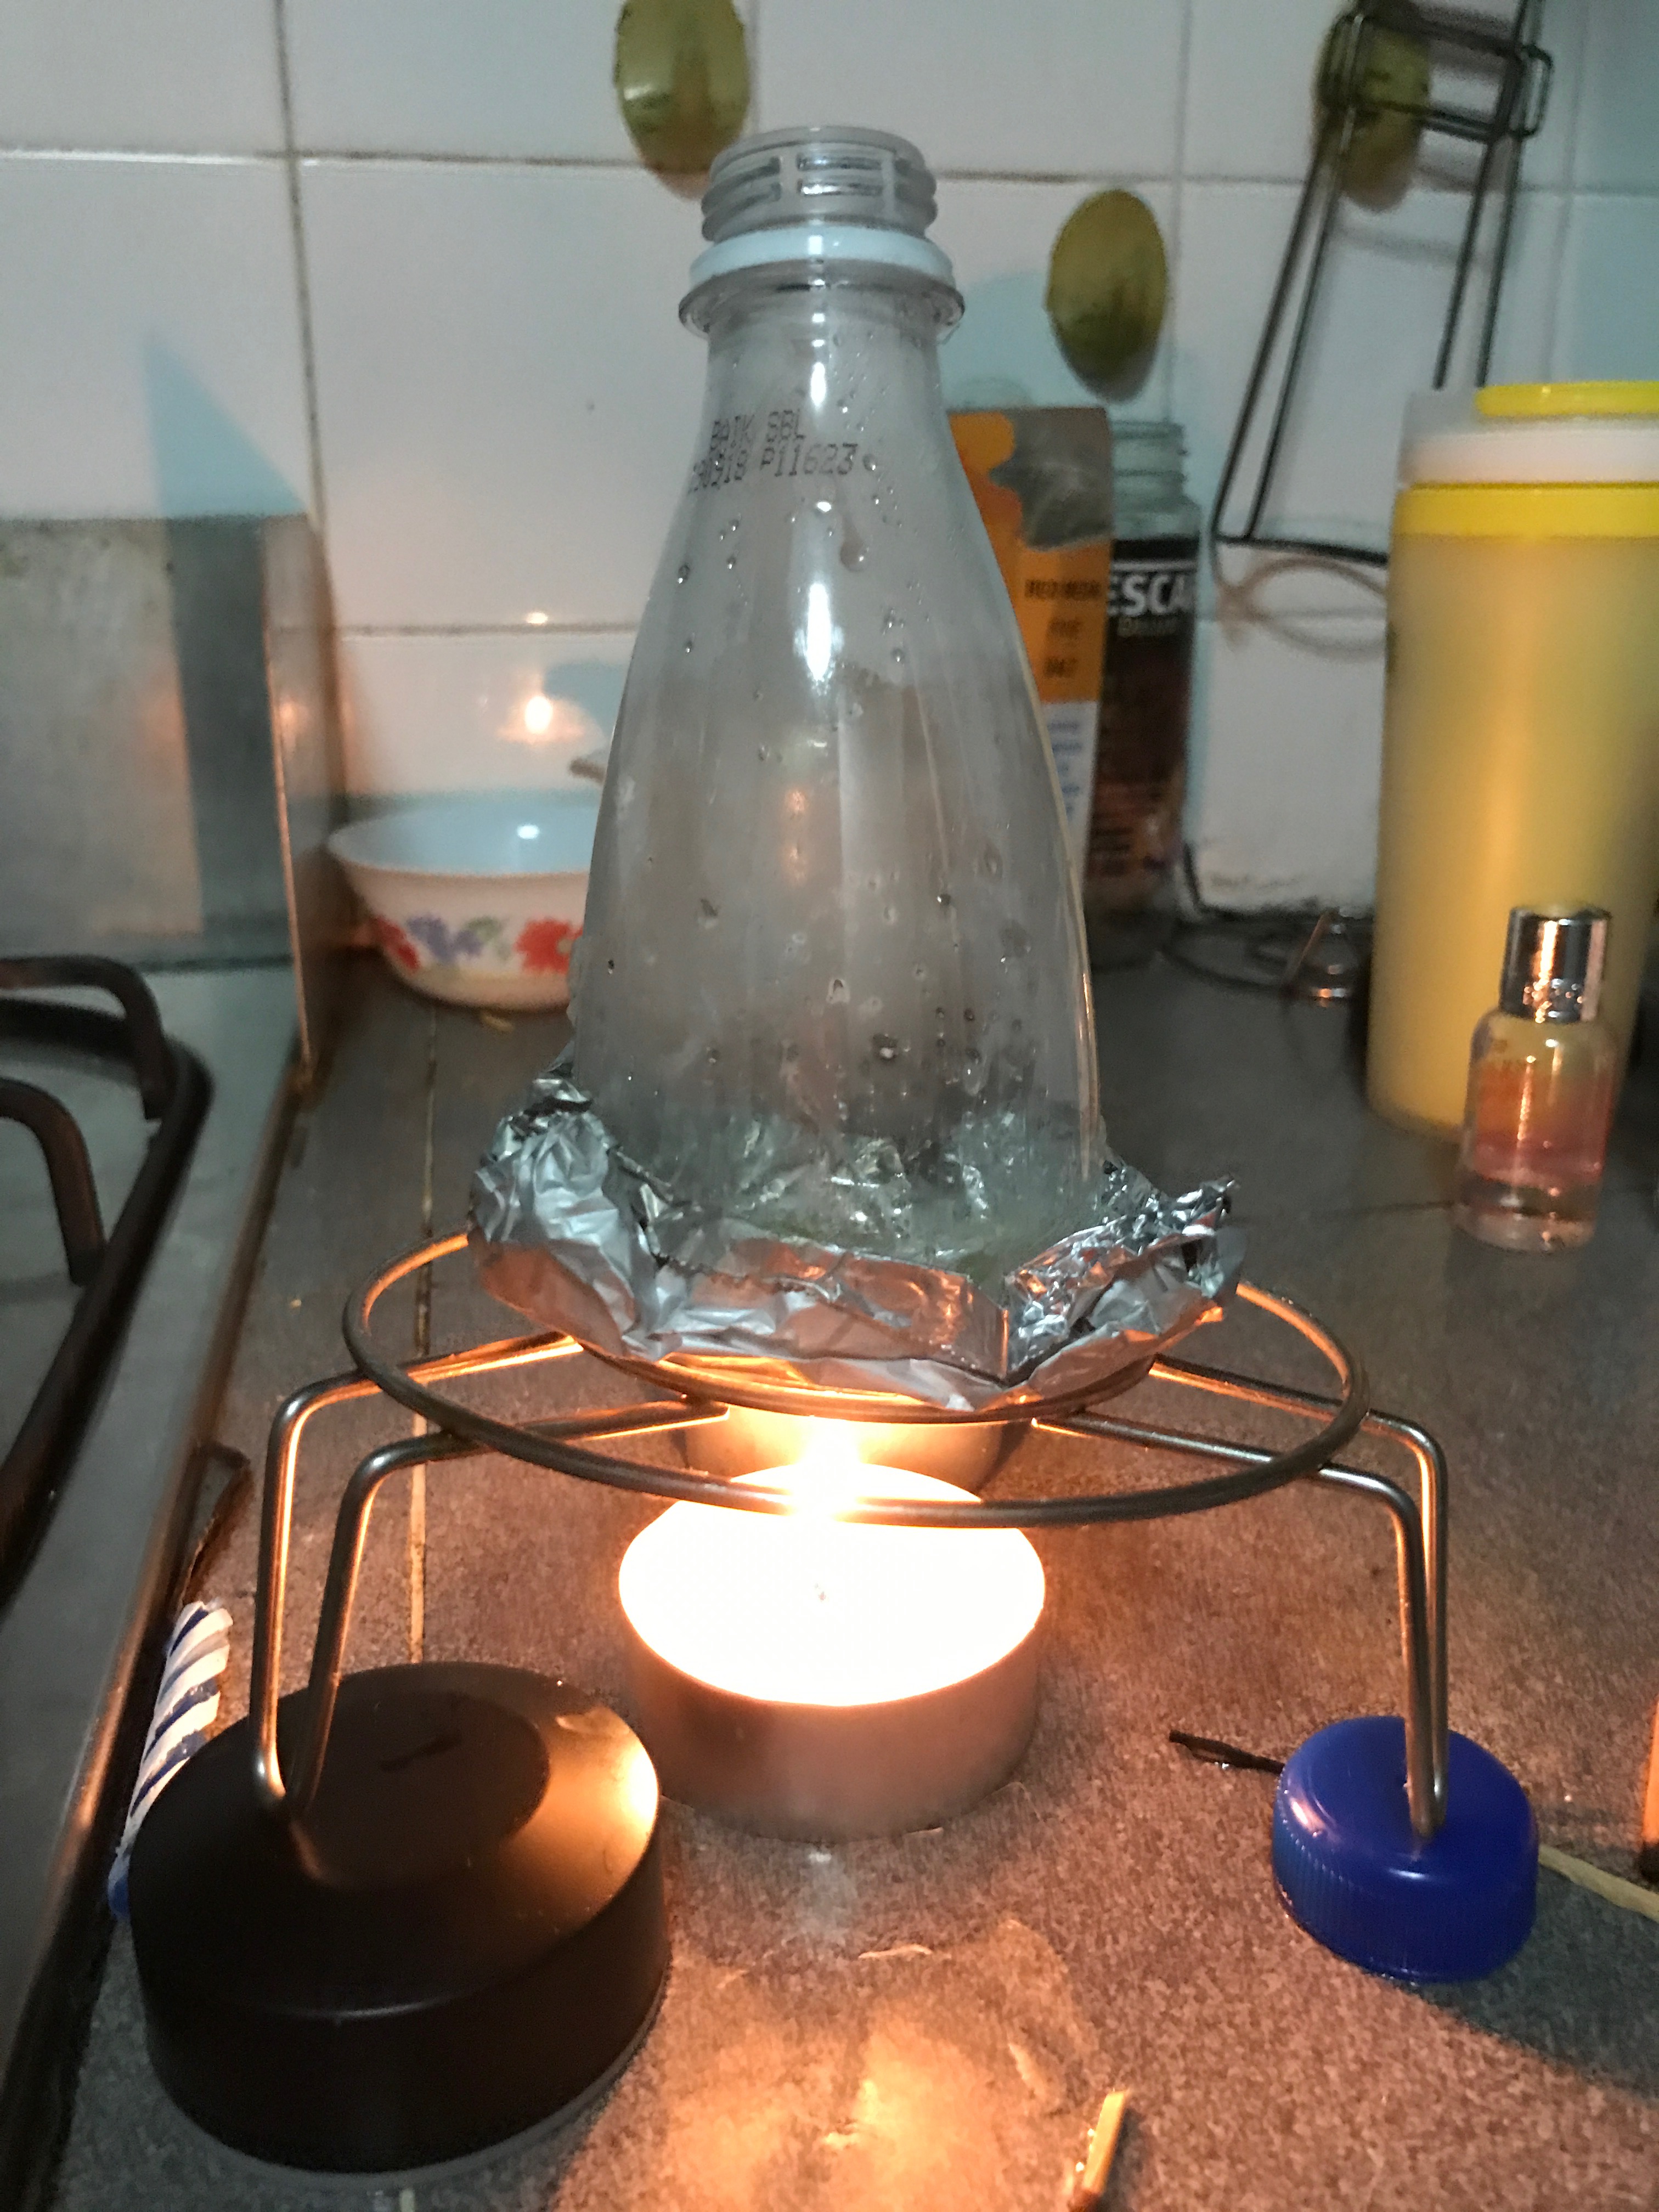
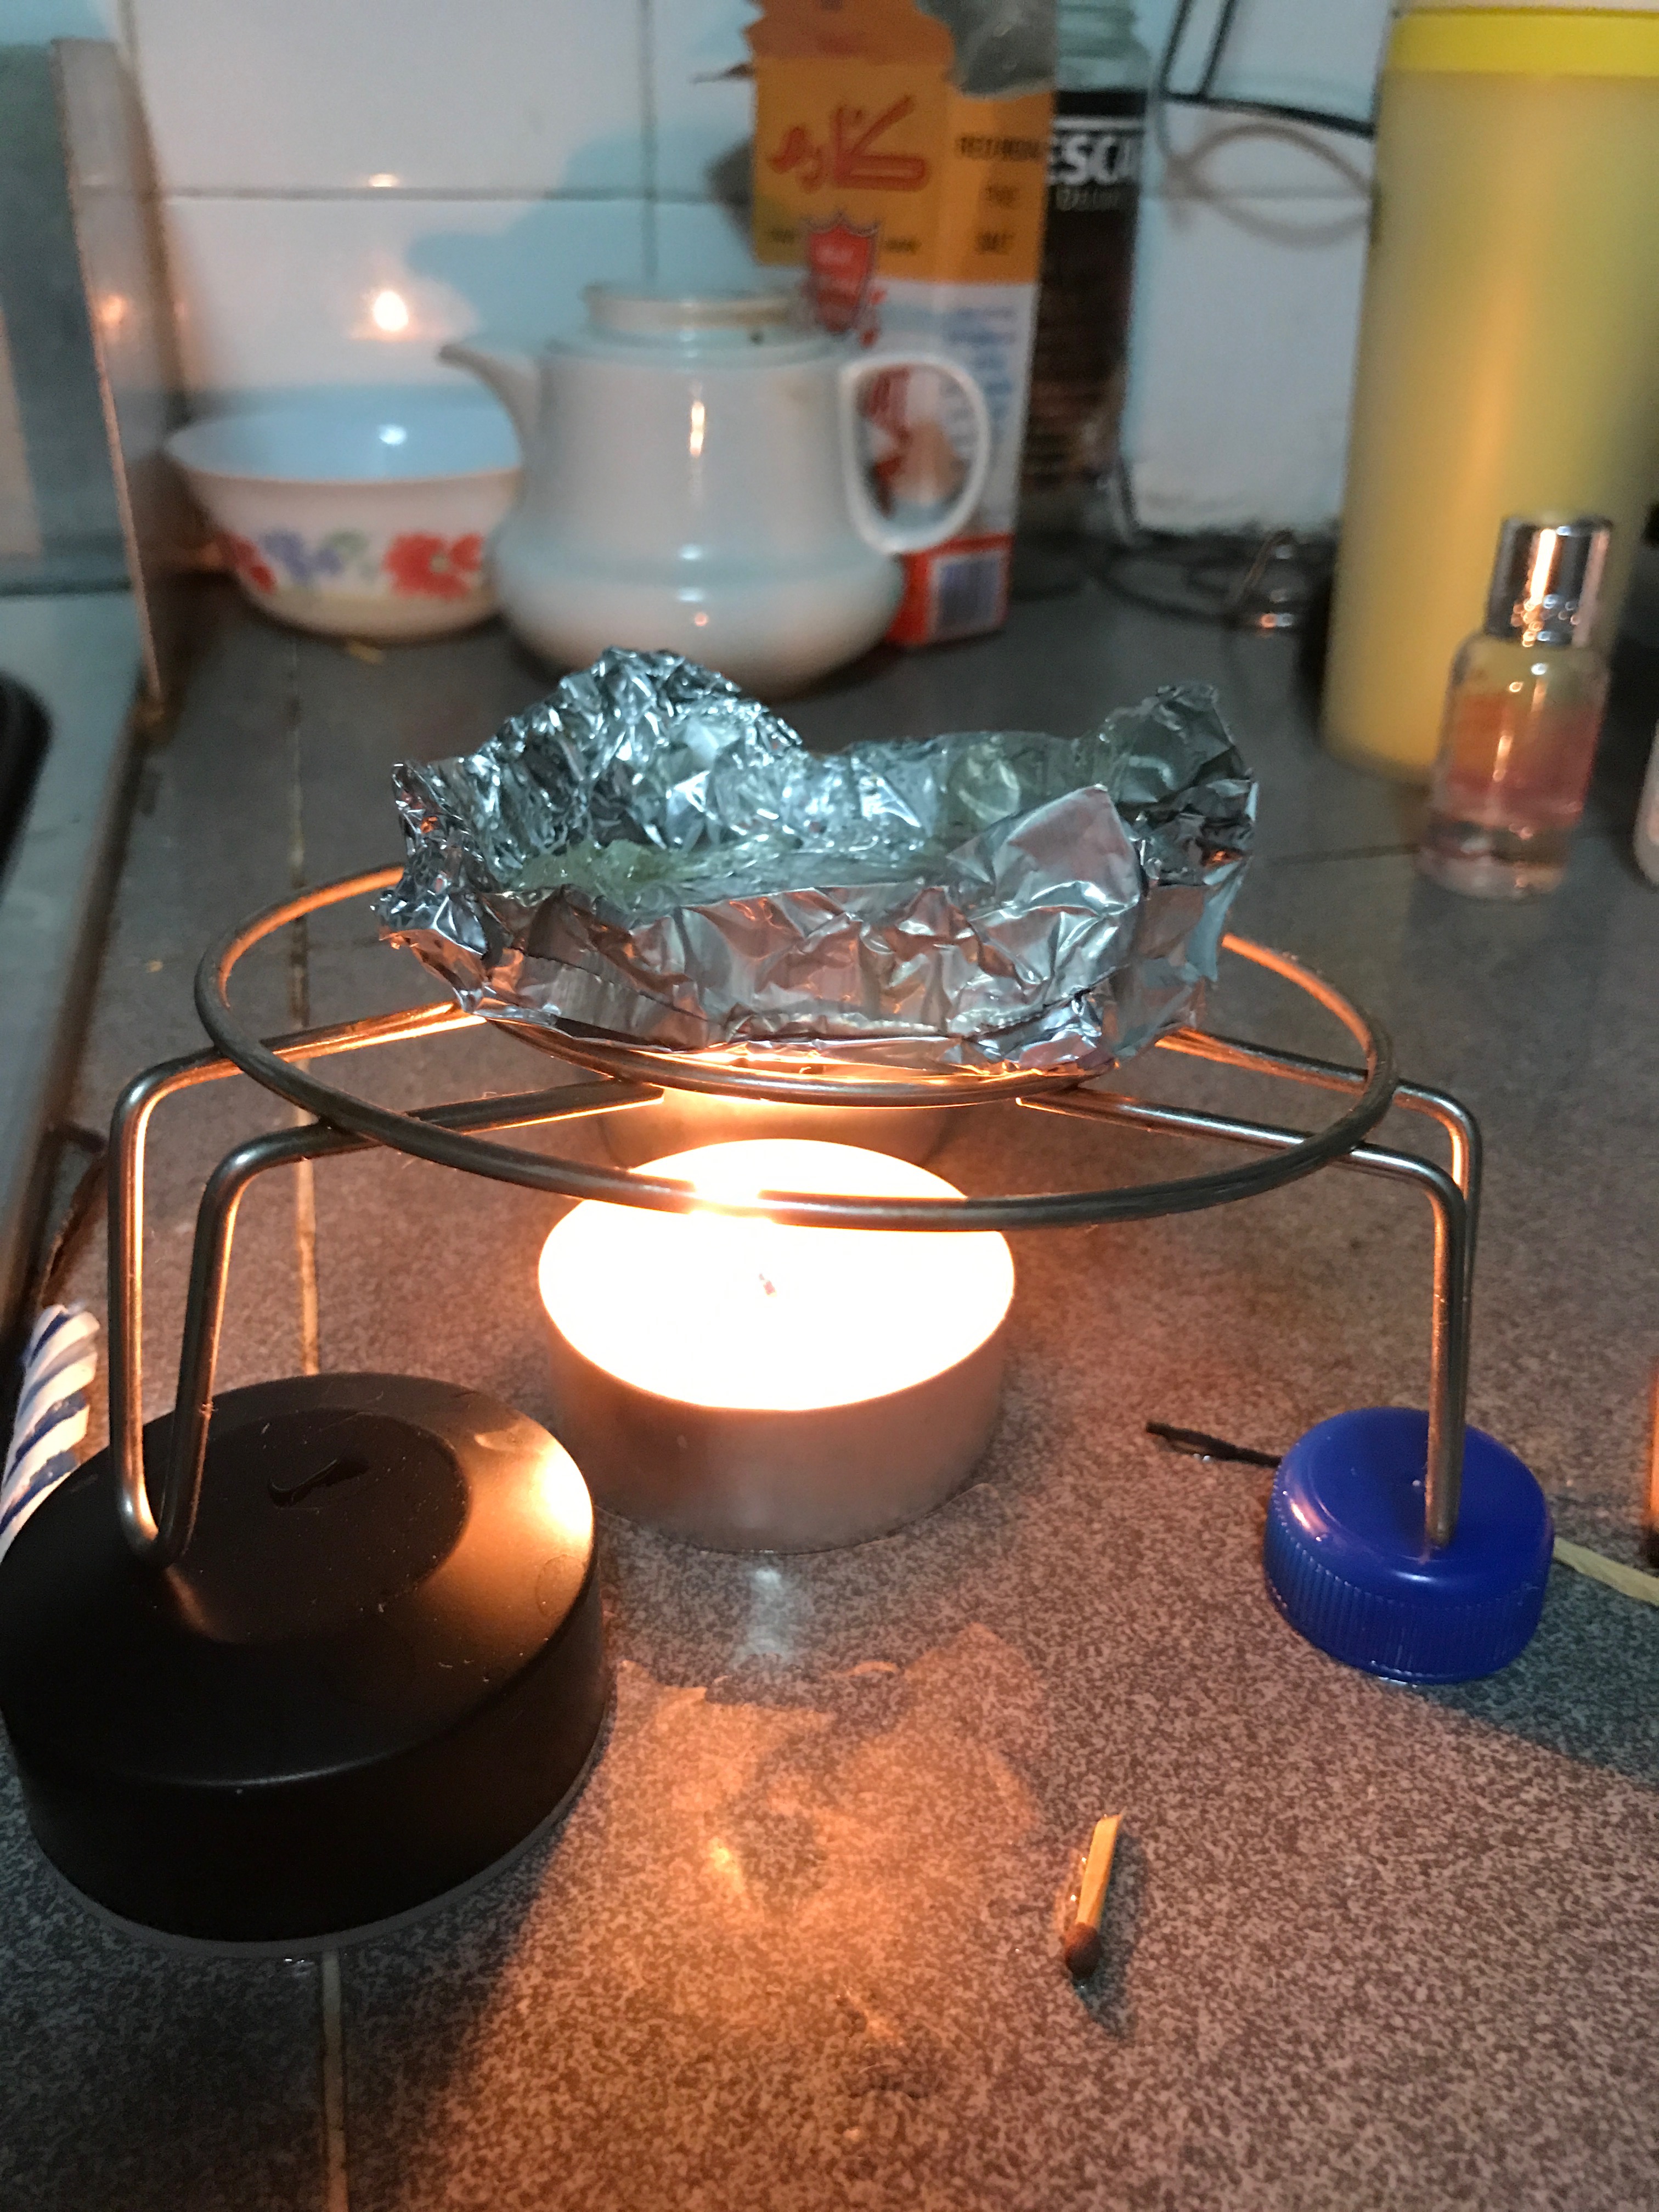
In brief, the experiment required,
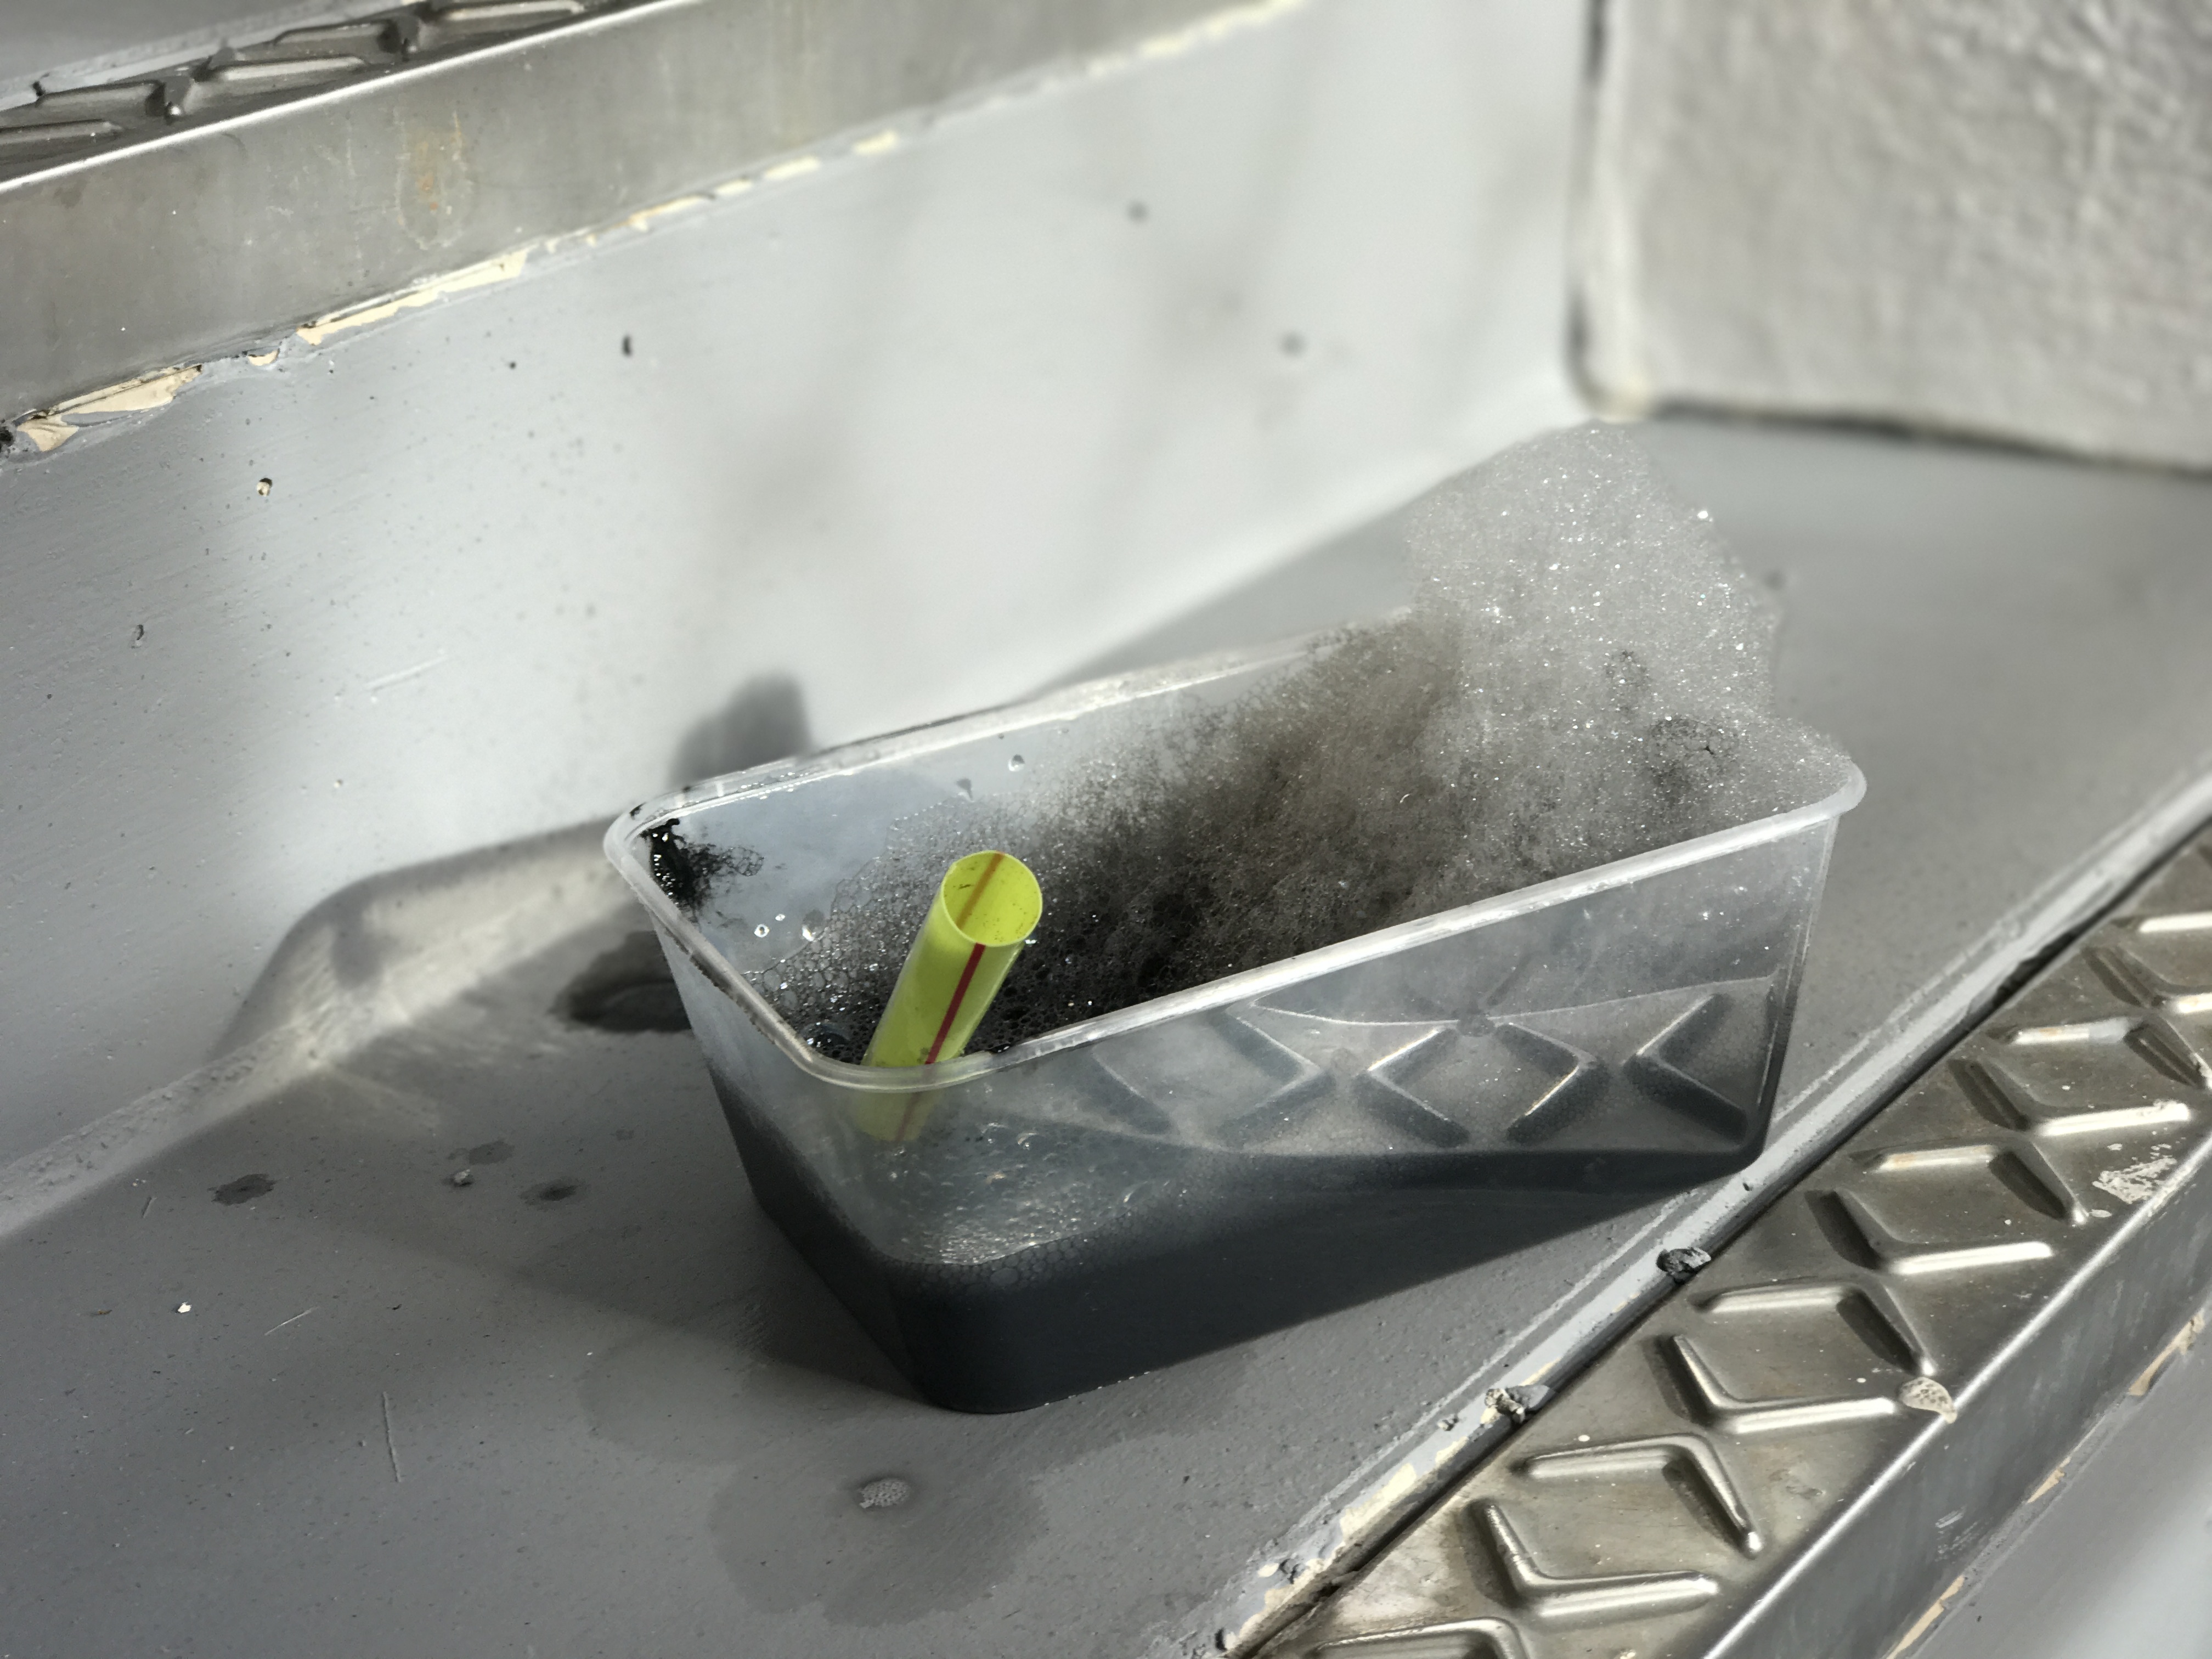
1. Creation of fog juice (mixture of distilled water + glycerin)
2. Other materials: aluminium tray, heat source (candle), bottle ‘cover’
3. Place fog juice onto aluminium tray, and bottle cover over
4. Heat it up, fog should be evaporate from aluminium tray

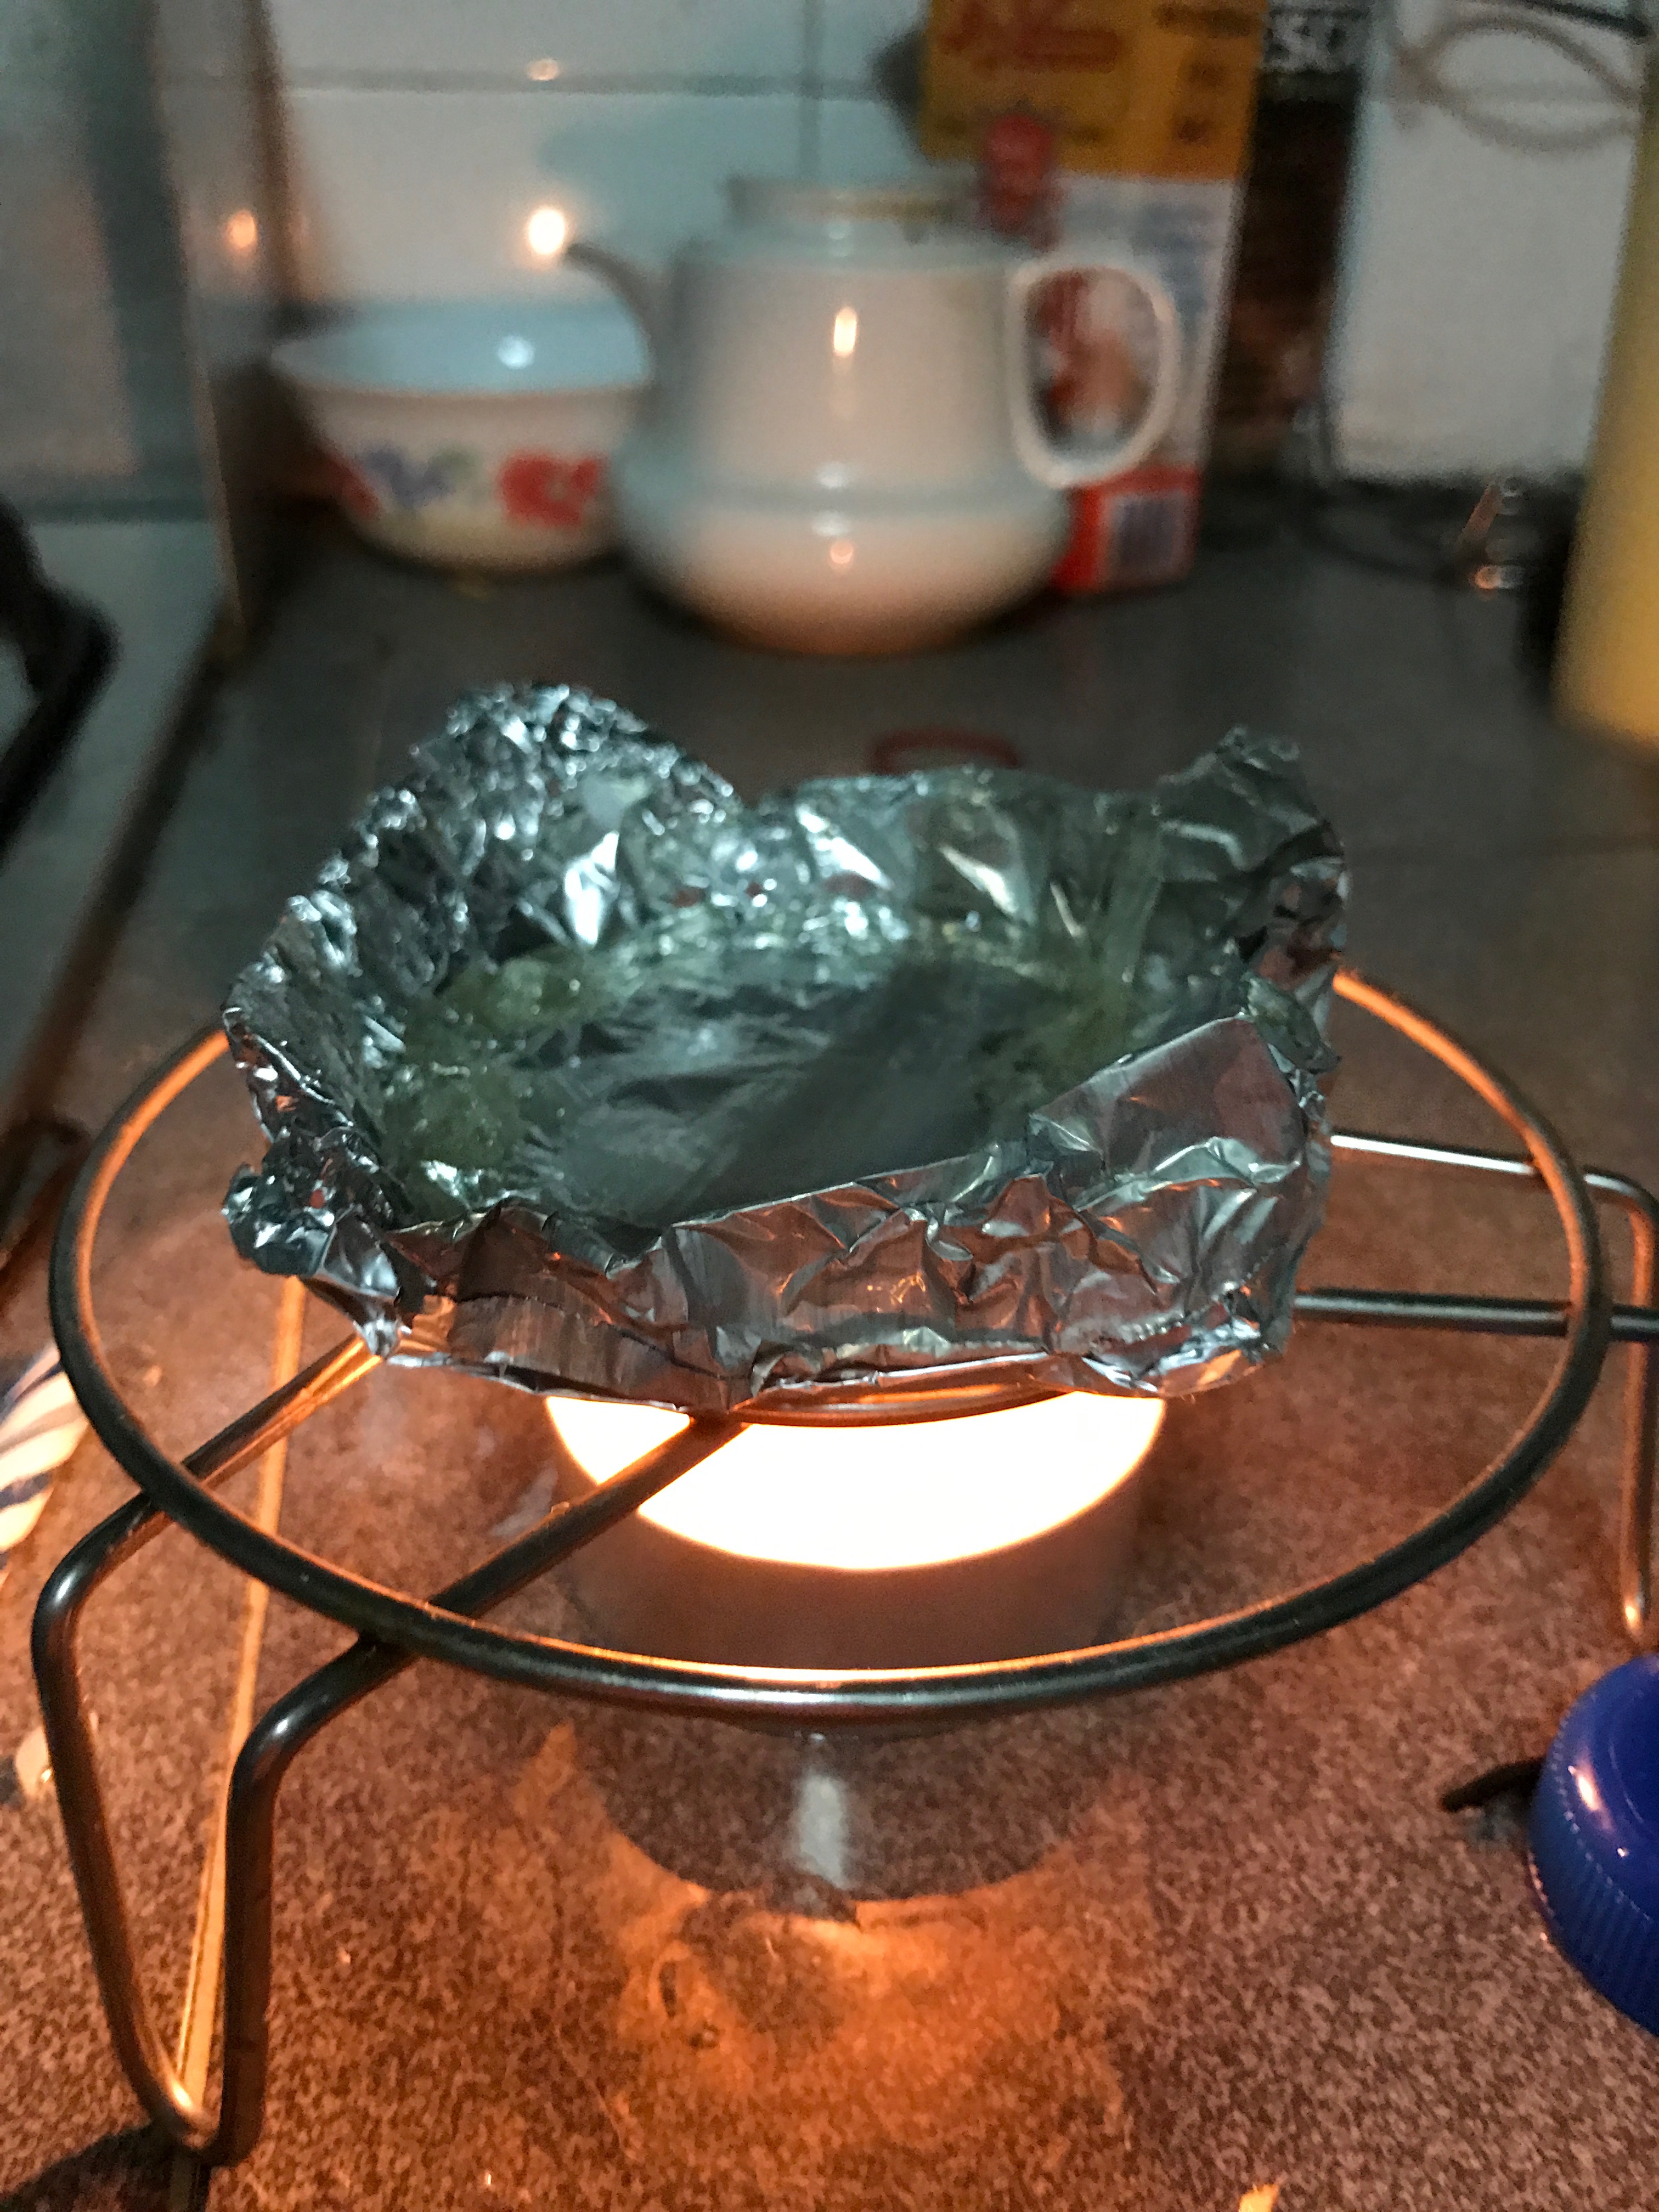
As seen from the video, the resultant fog was near negligible – and in fact, this was the best videos I managed to get. Despite upping the glycerin amount in the fog juice, there were still no fog produced.

The experiment was a certified failure – how now? I would like to scrape the idea of utilising projection onto bubbles directly, and cut out the need for fog bubbles.


Experiment I
Part 2

Rough sketch of experimental set-up
Entire set-up (without heat source supposedly under the aluminium tray)

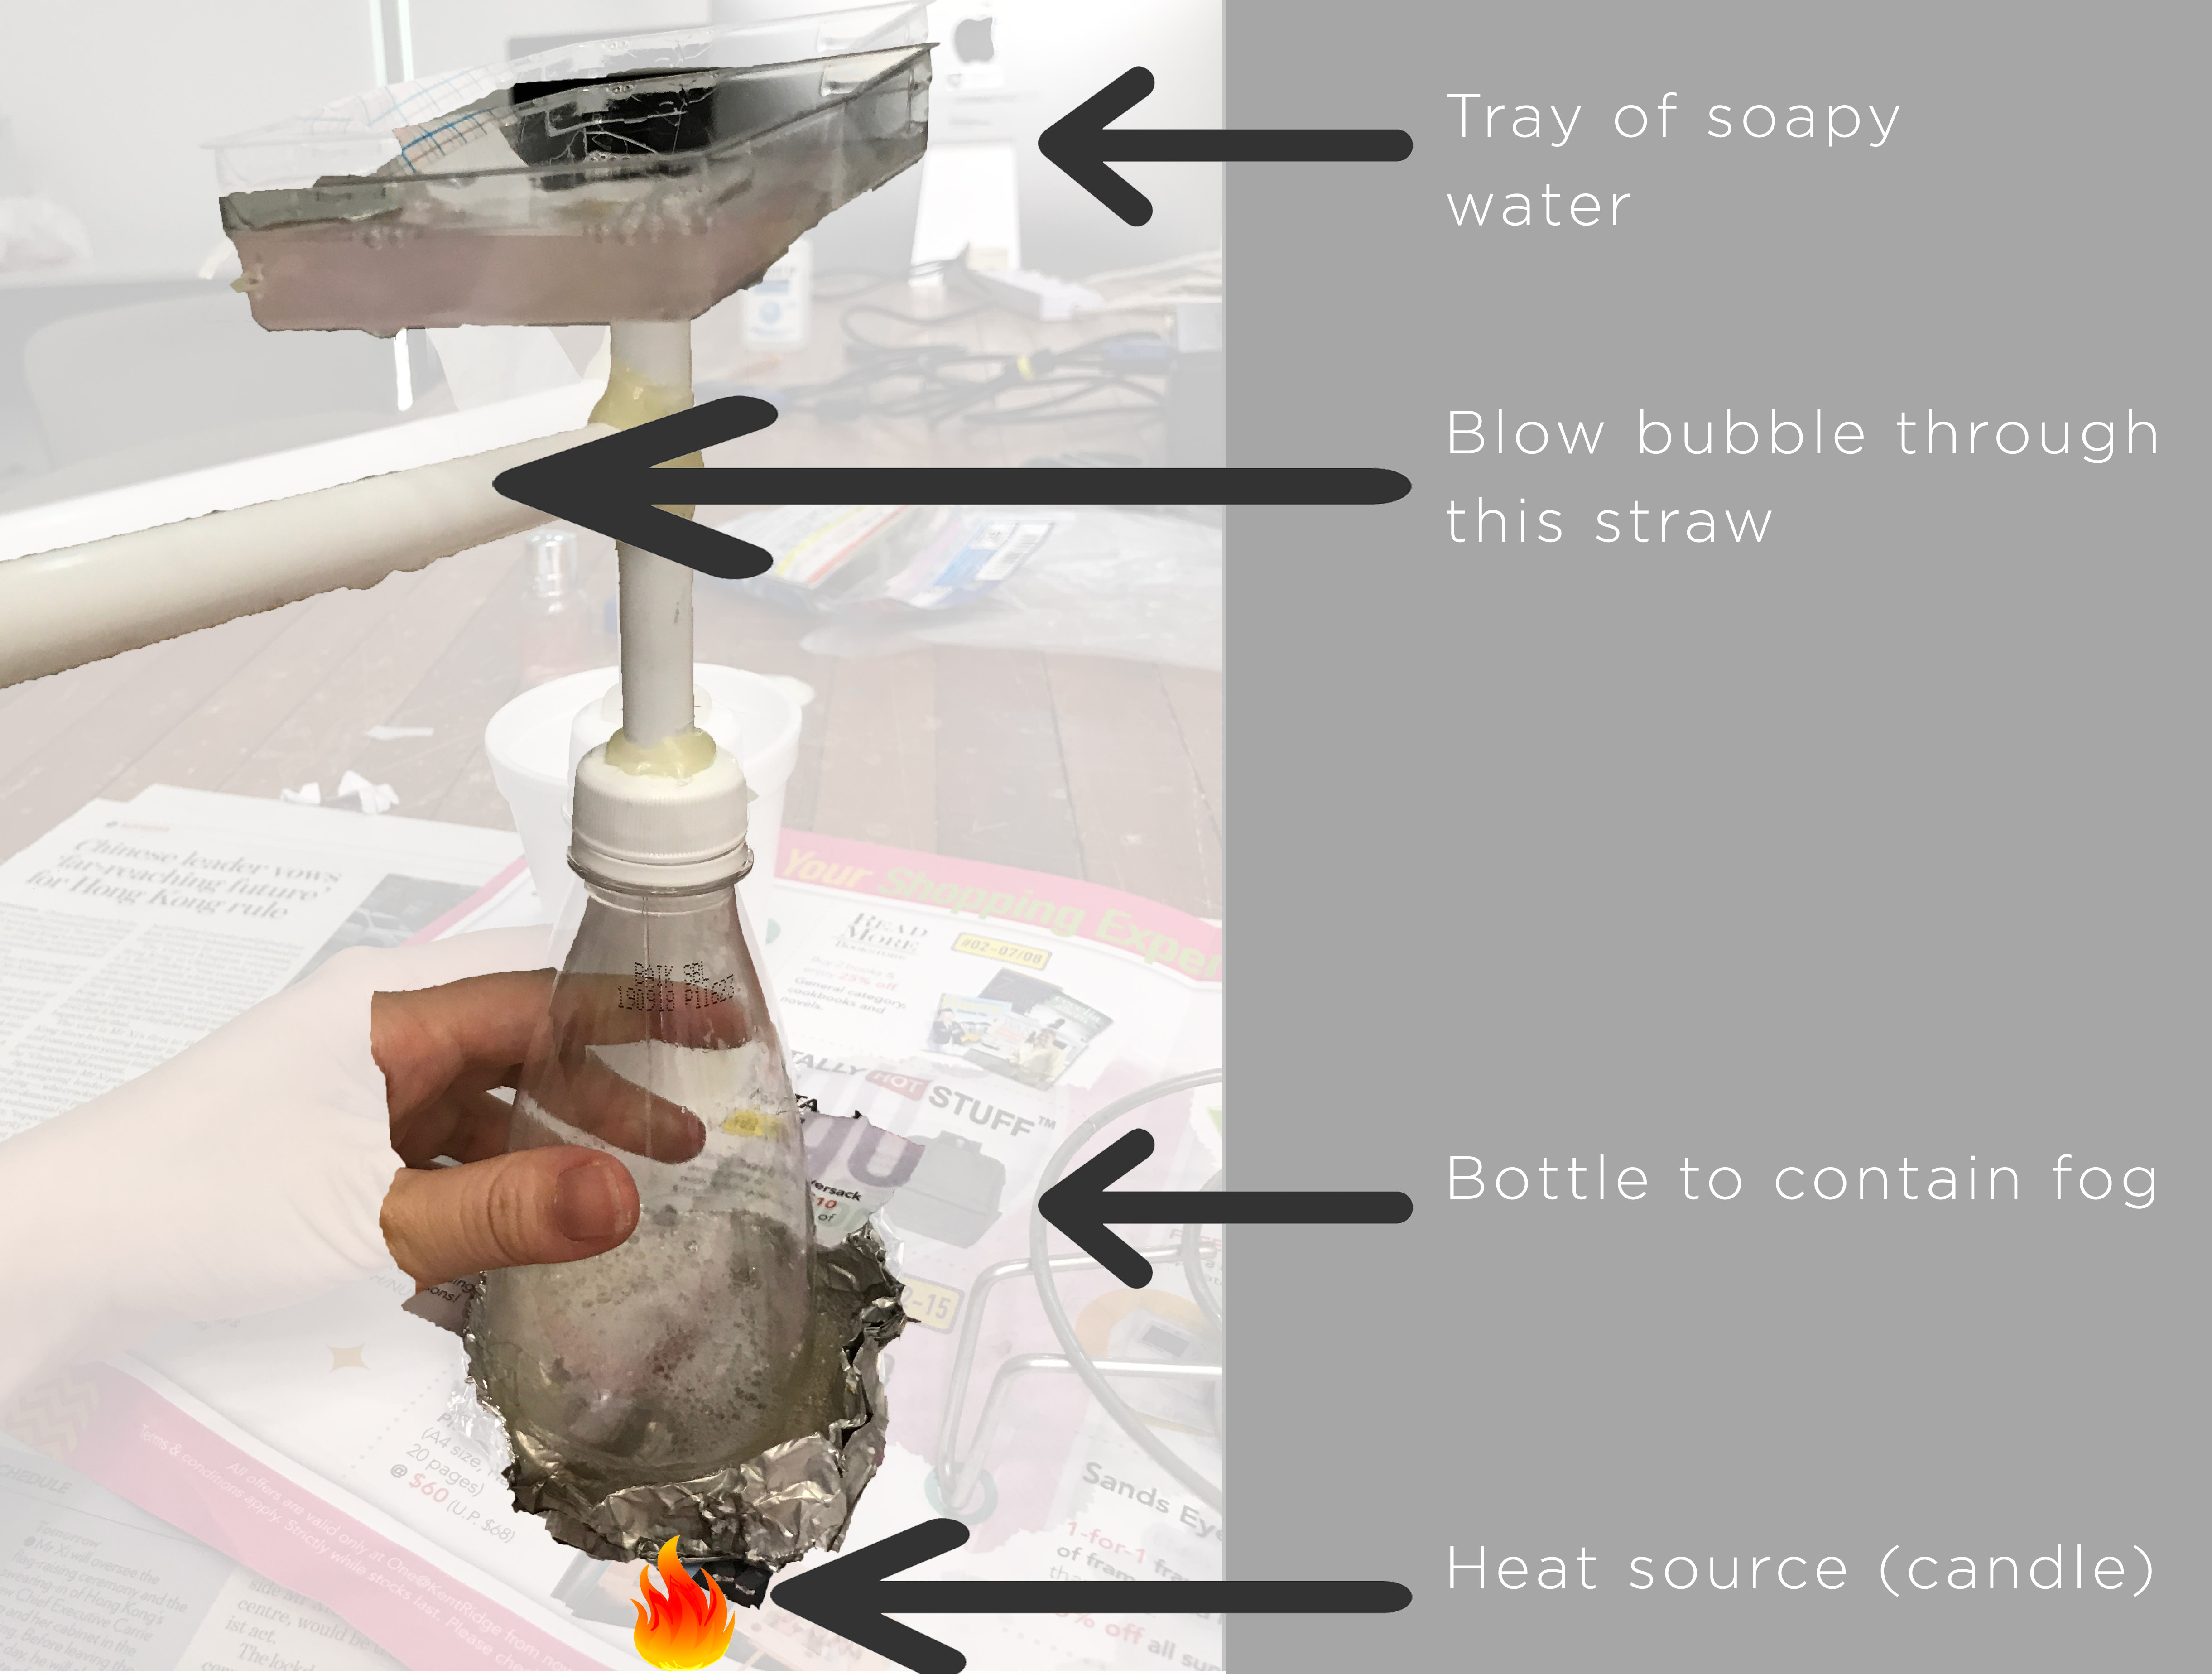
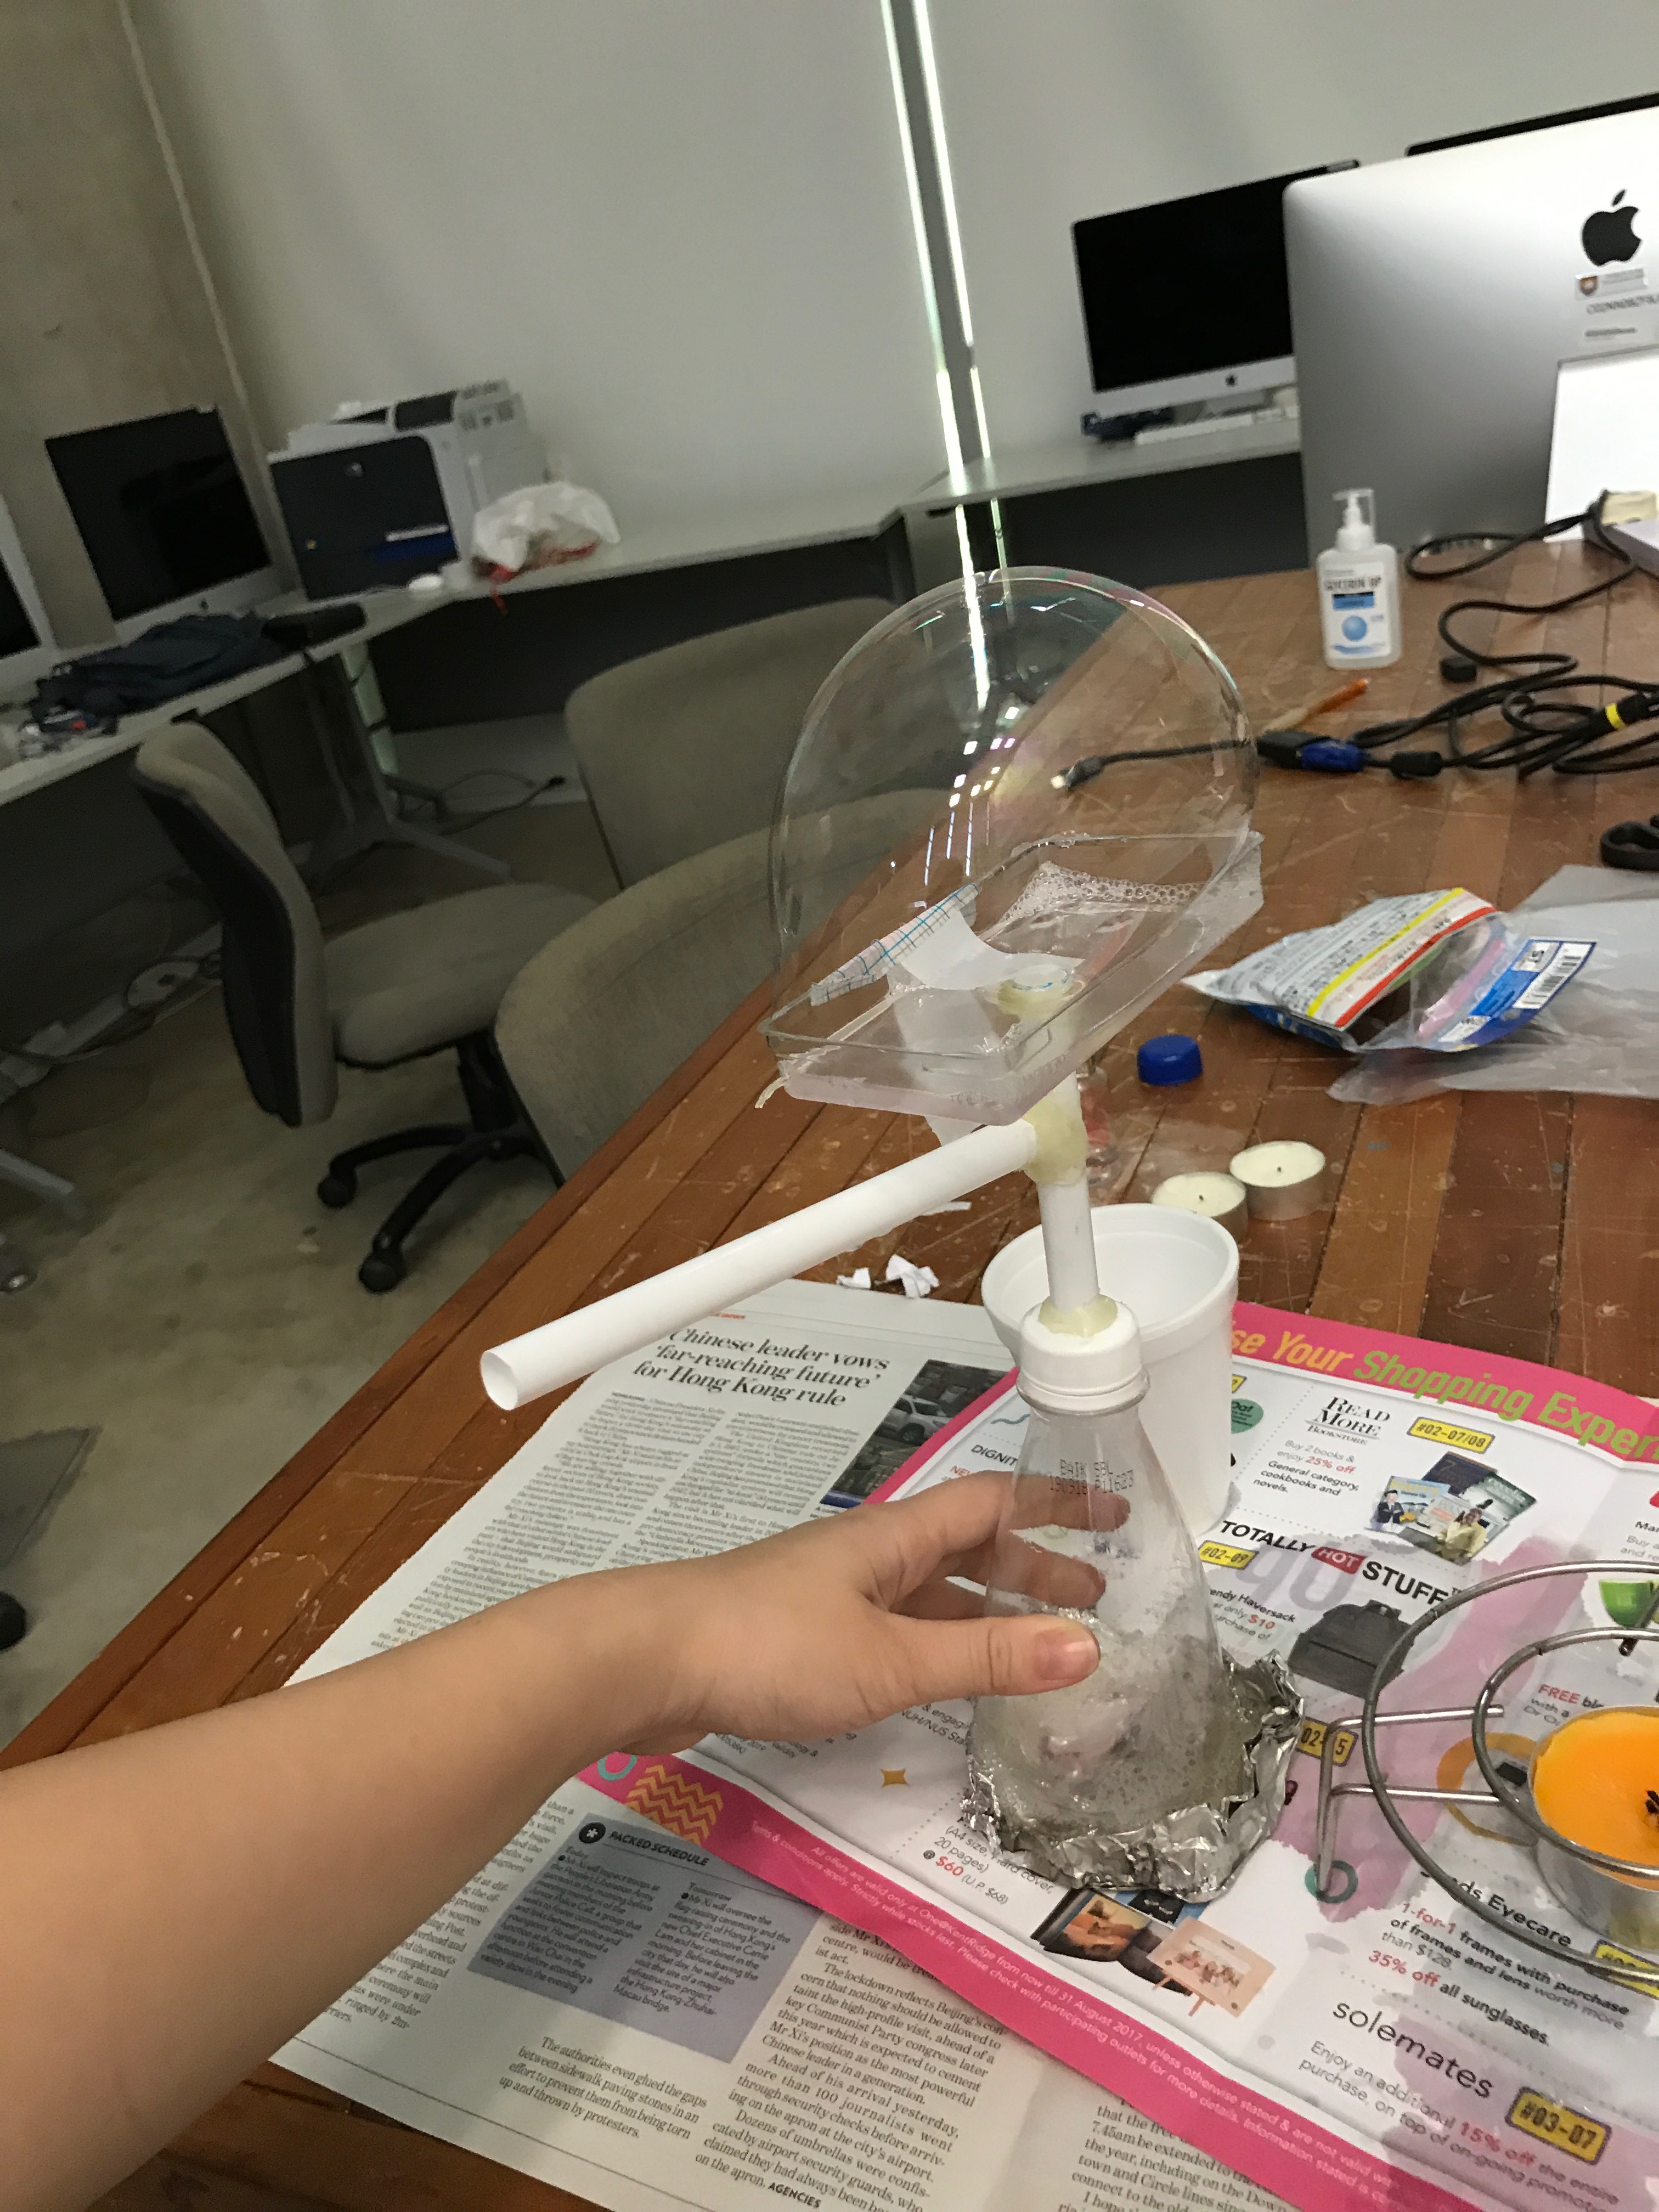
My original intention was just to combine bubble blowing by the user, and create a singular platform for one single bubble to stay on. This bubble ought to be a fog bubble, with fog blown into it.

After creating the fog bubble, projection light would beam images on it and create the effect I required.

Needless to say, this was a situation where the ideal was way better than the physical. The water from the tray kept dripping down the straw onto the fog juice tray, bubble-blowing was an arduous and unhygienic process, and the entire structure as a whole just was not appealing and stable.

Thus, I did entirely scrape this idea as it just was not working, and did not see how it could further develop.


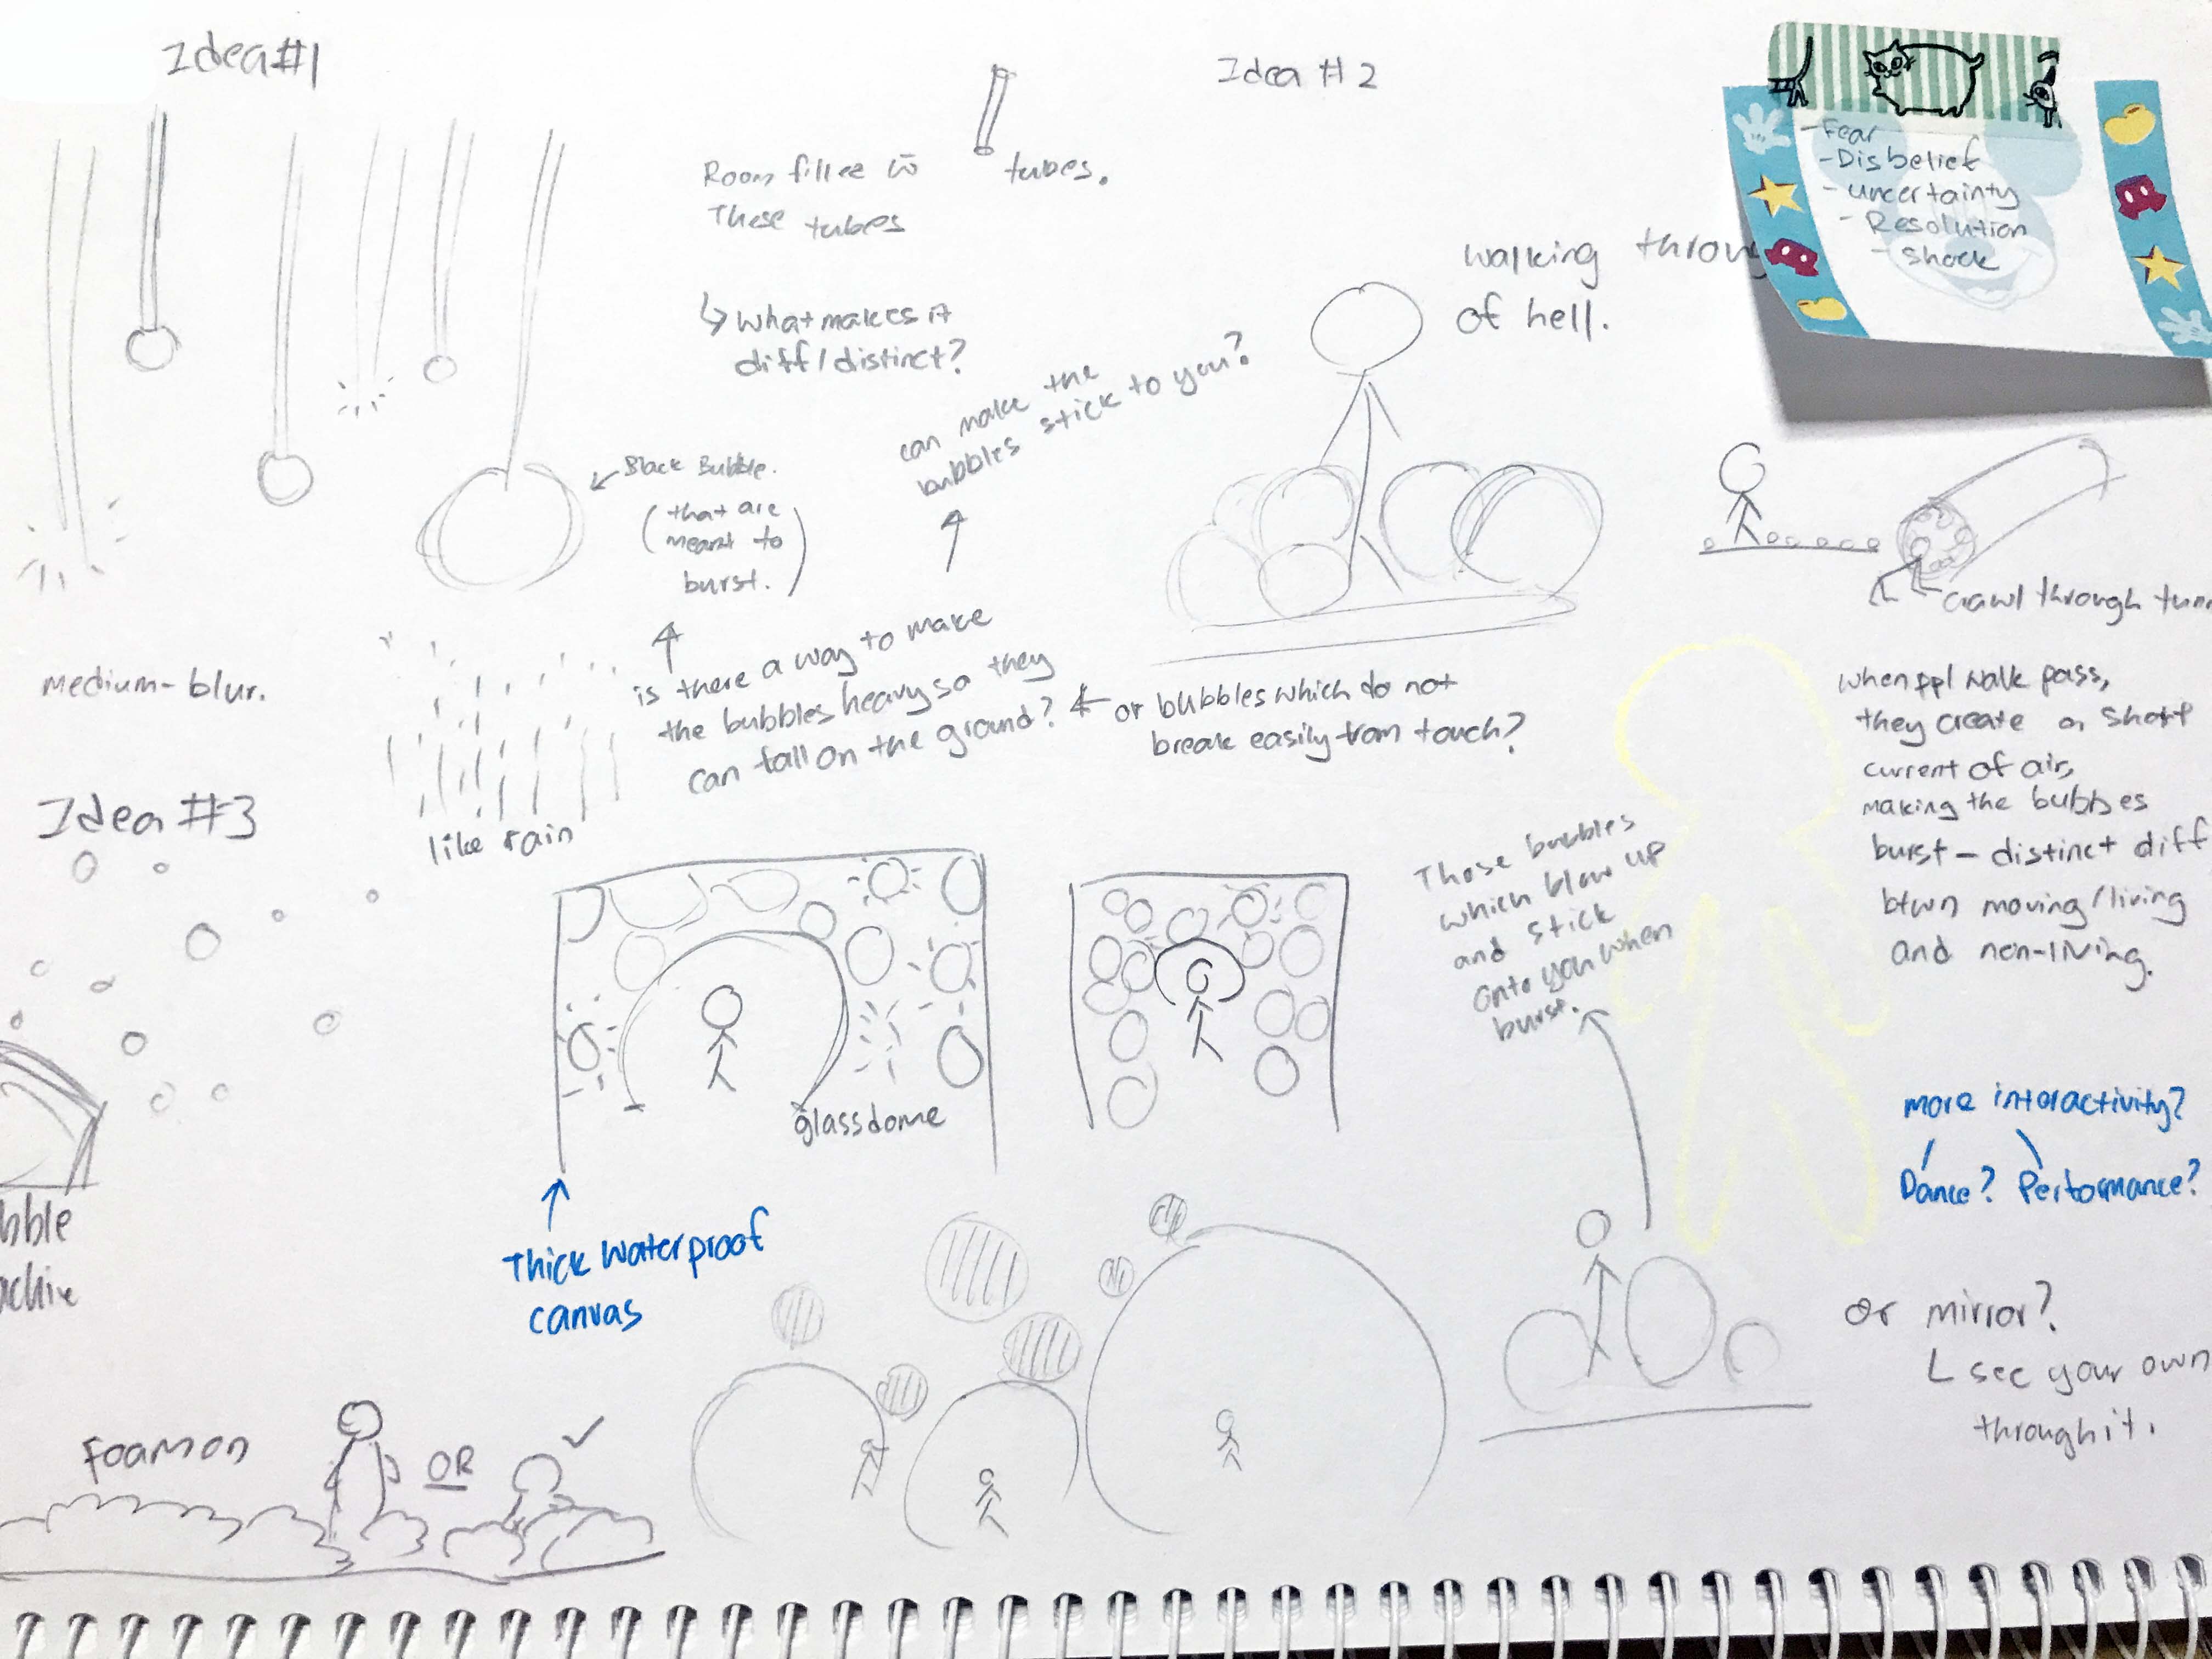
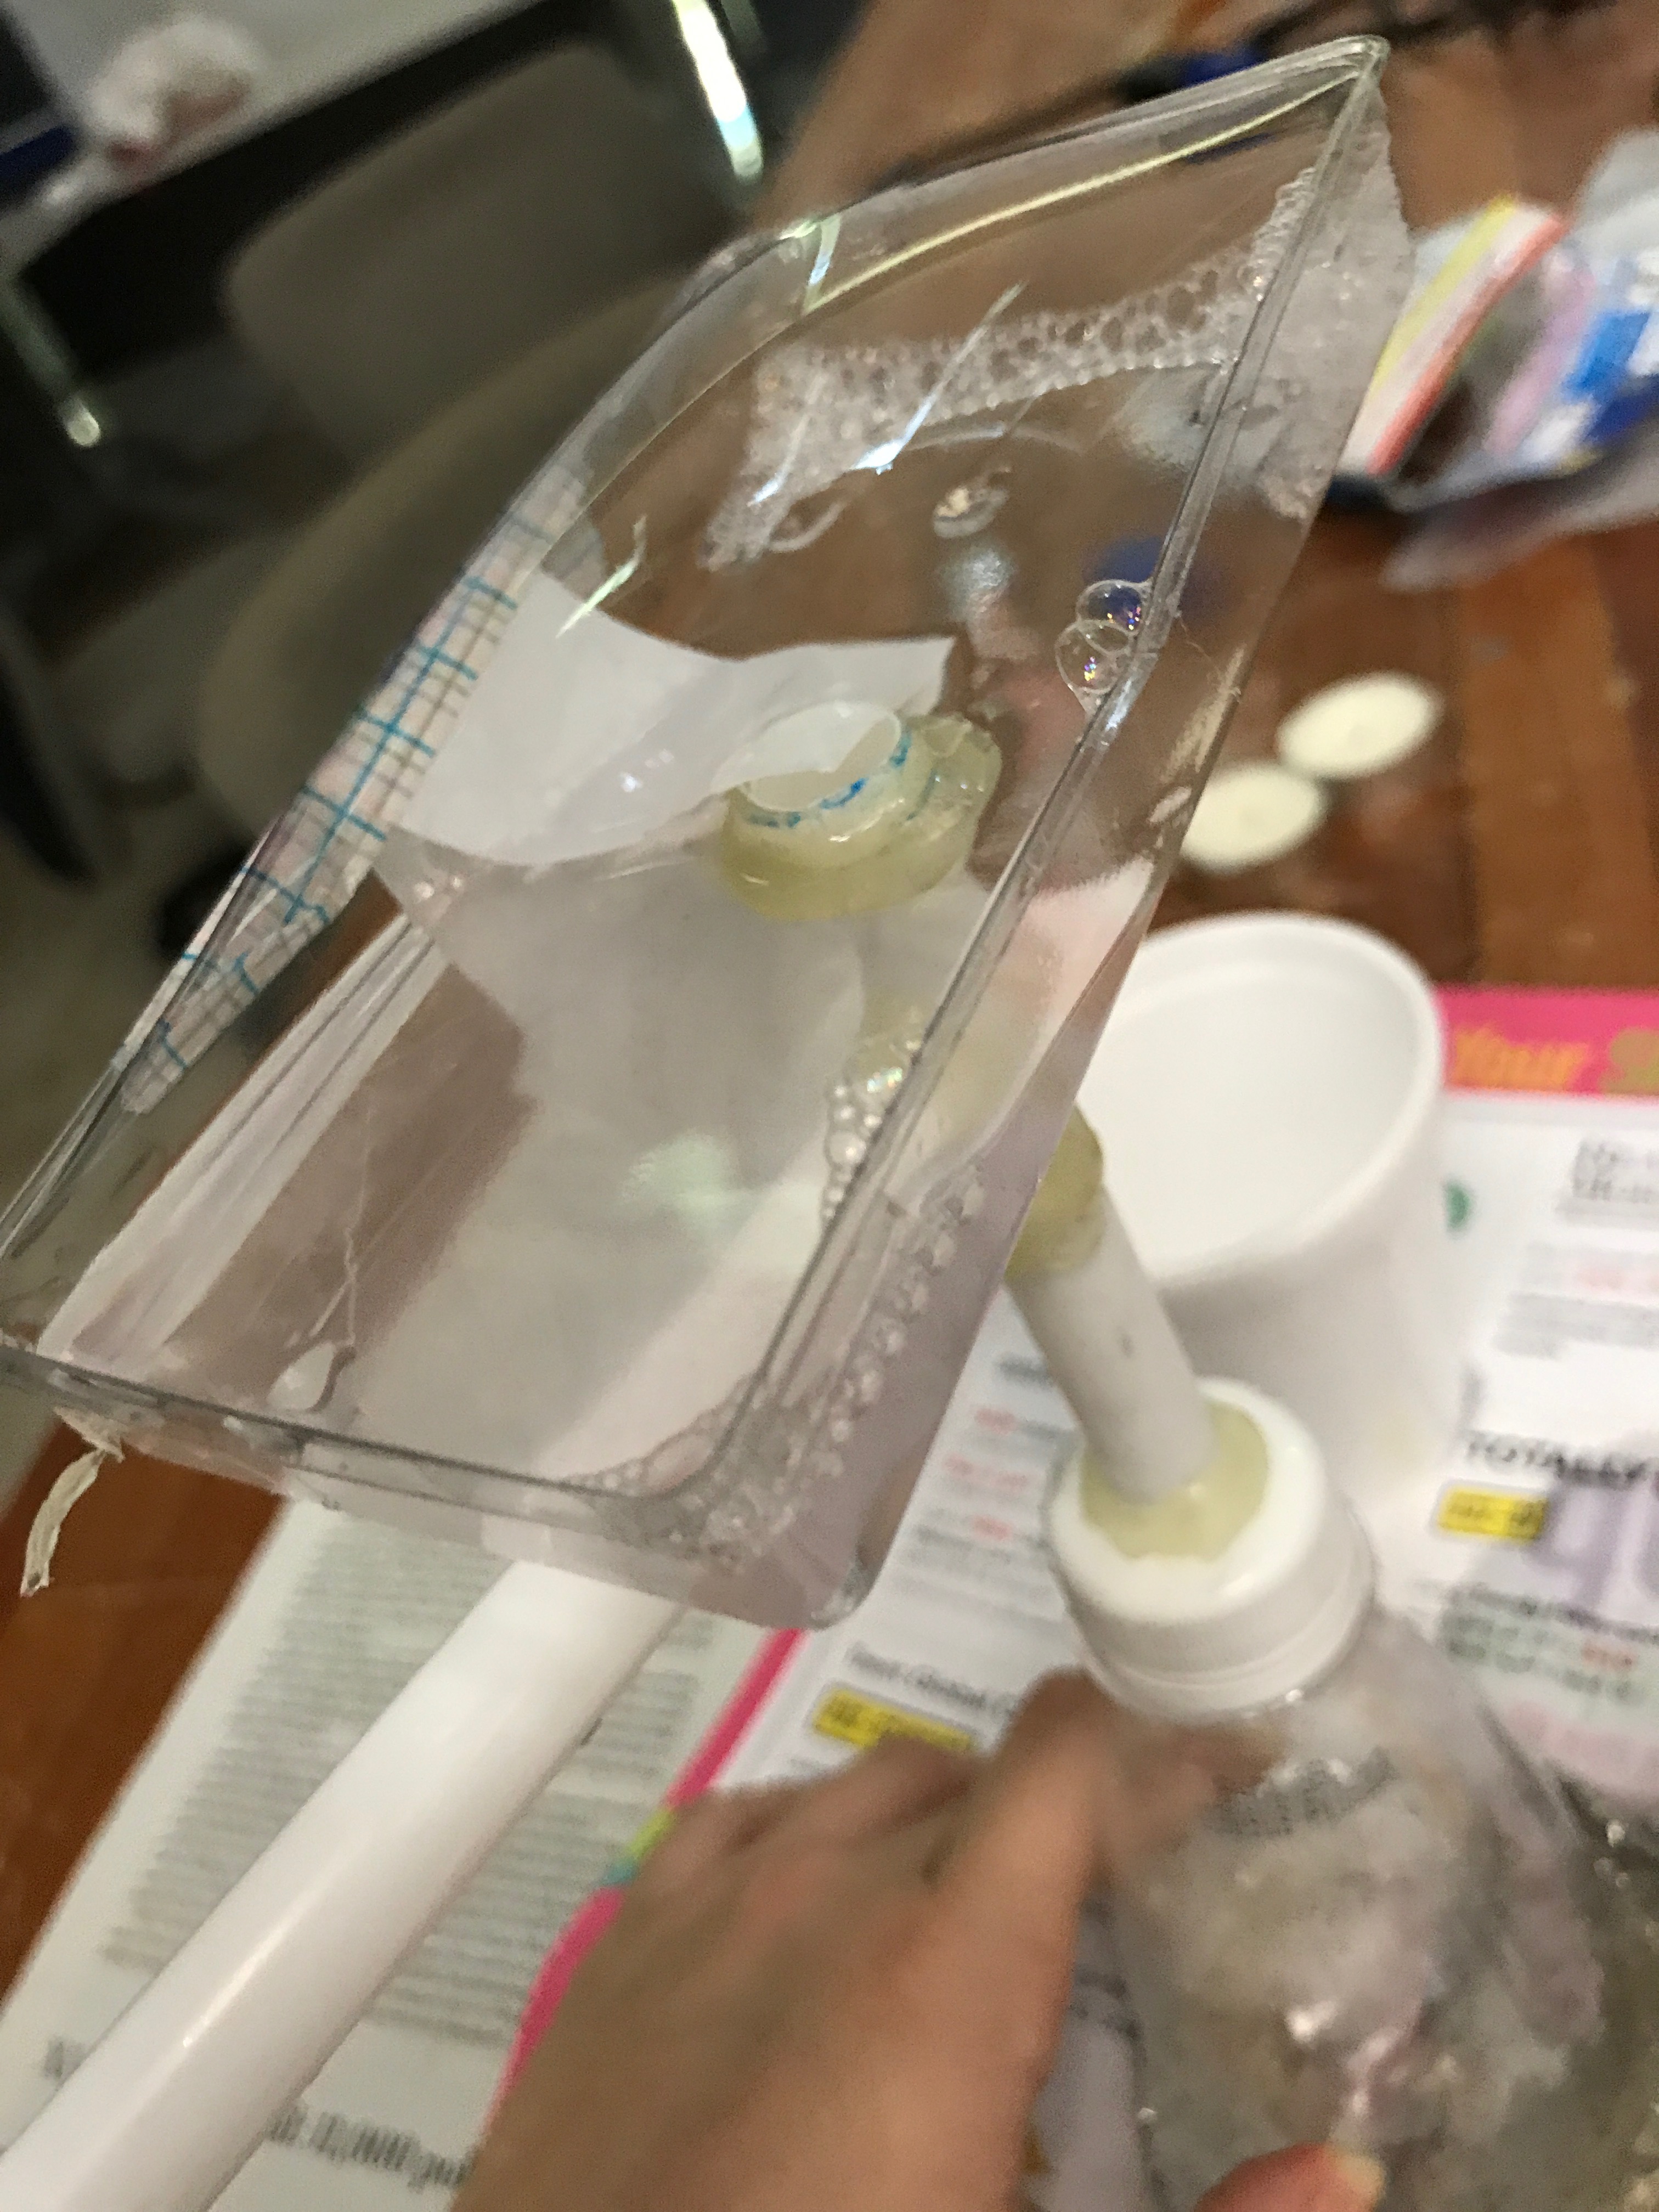
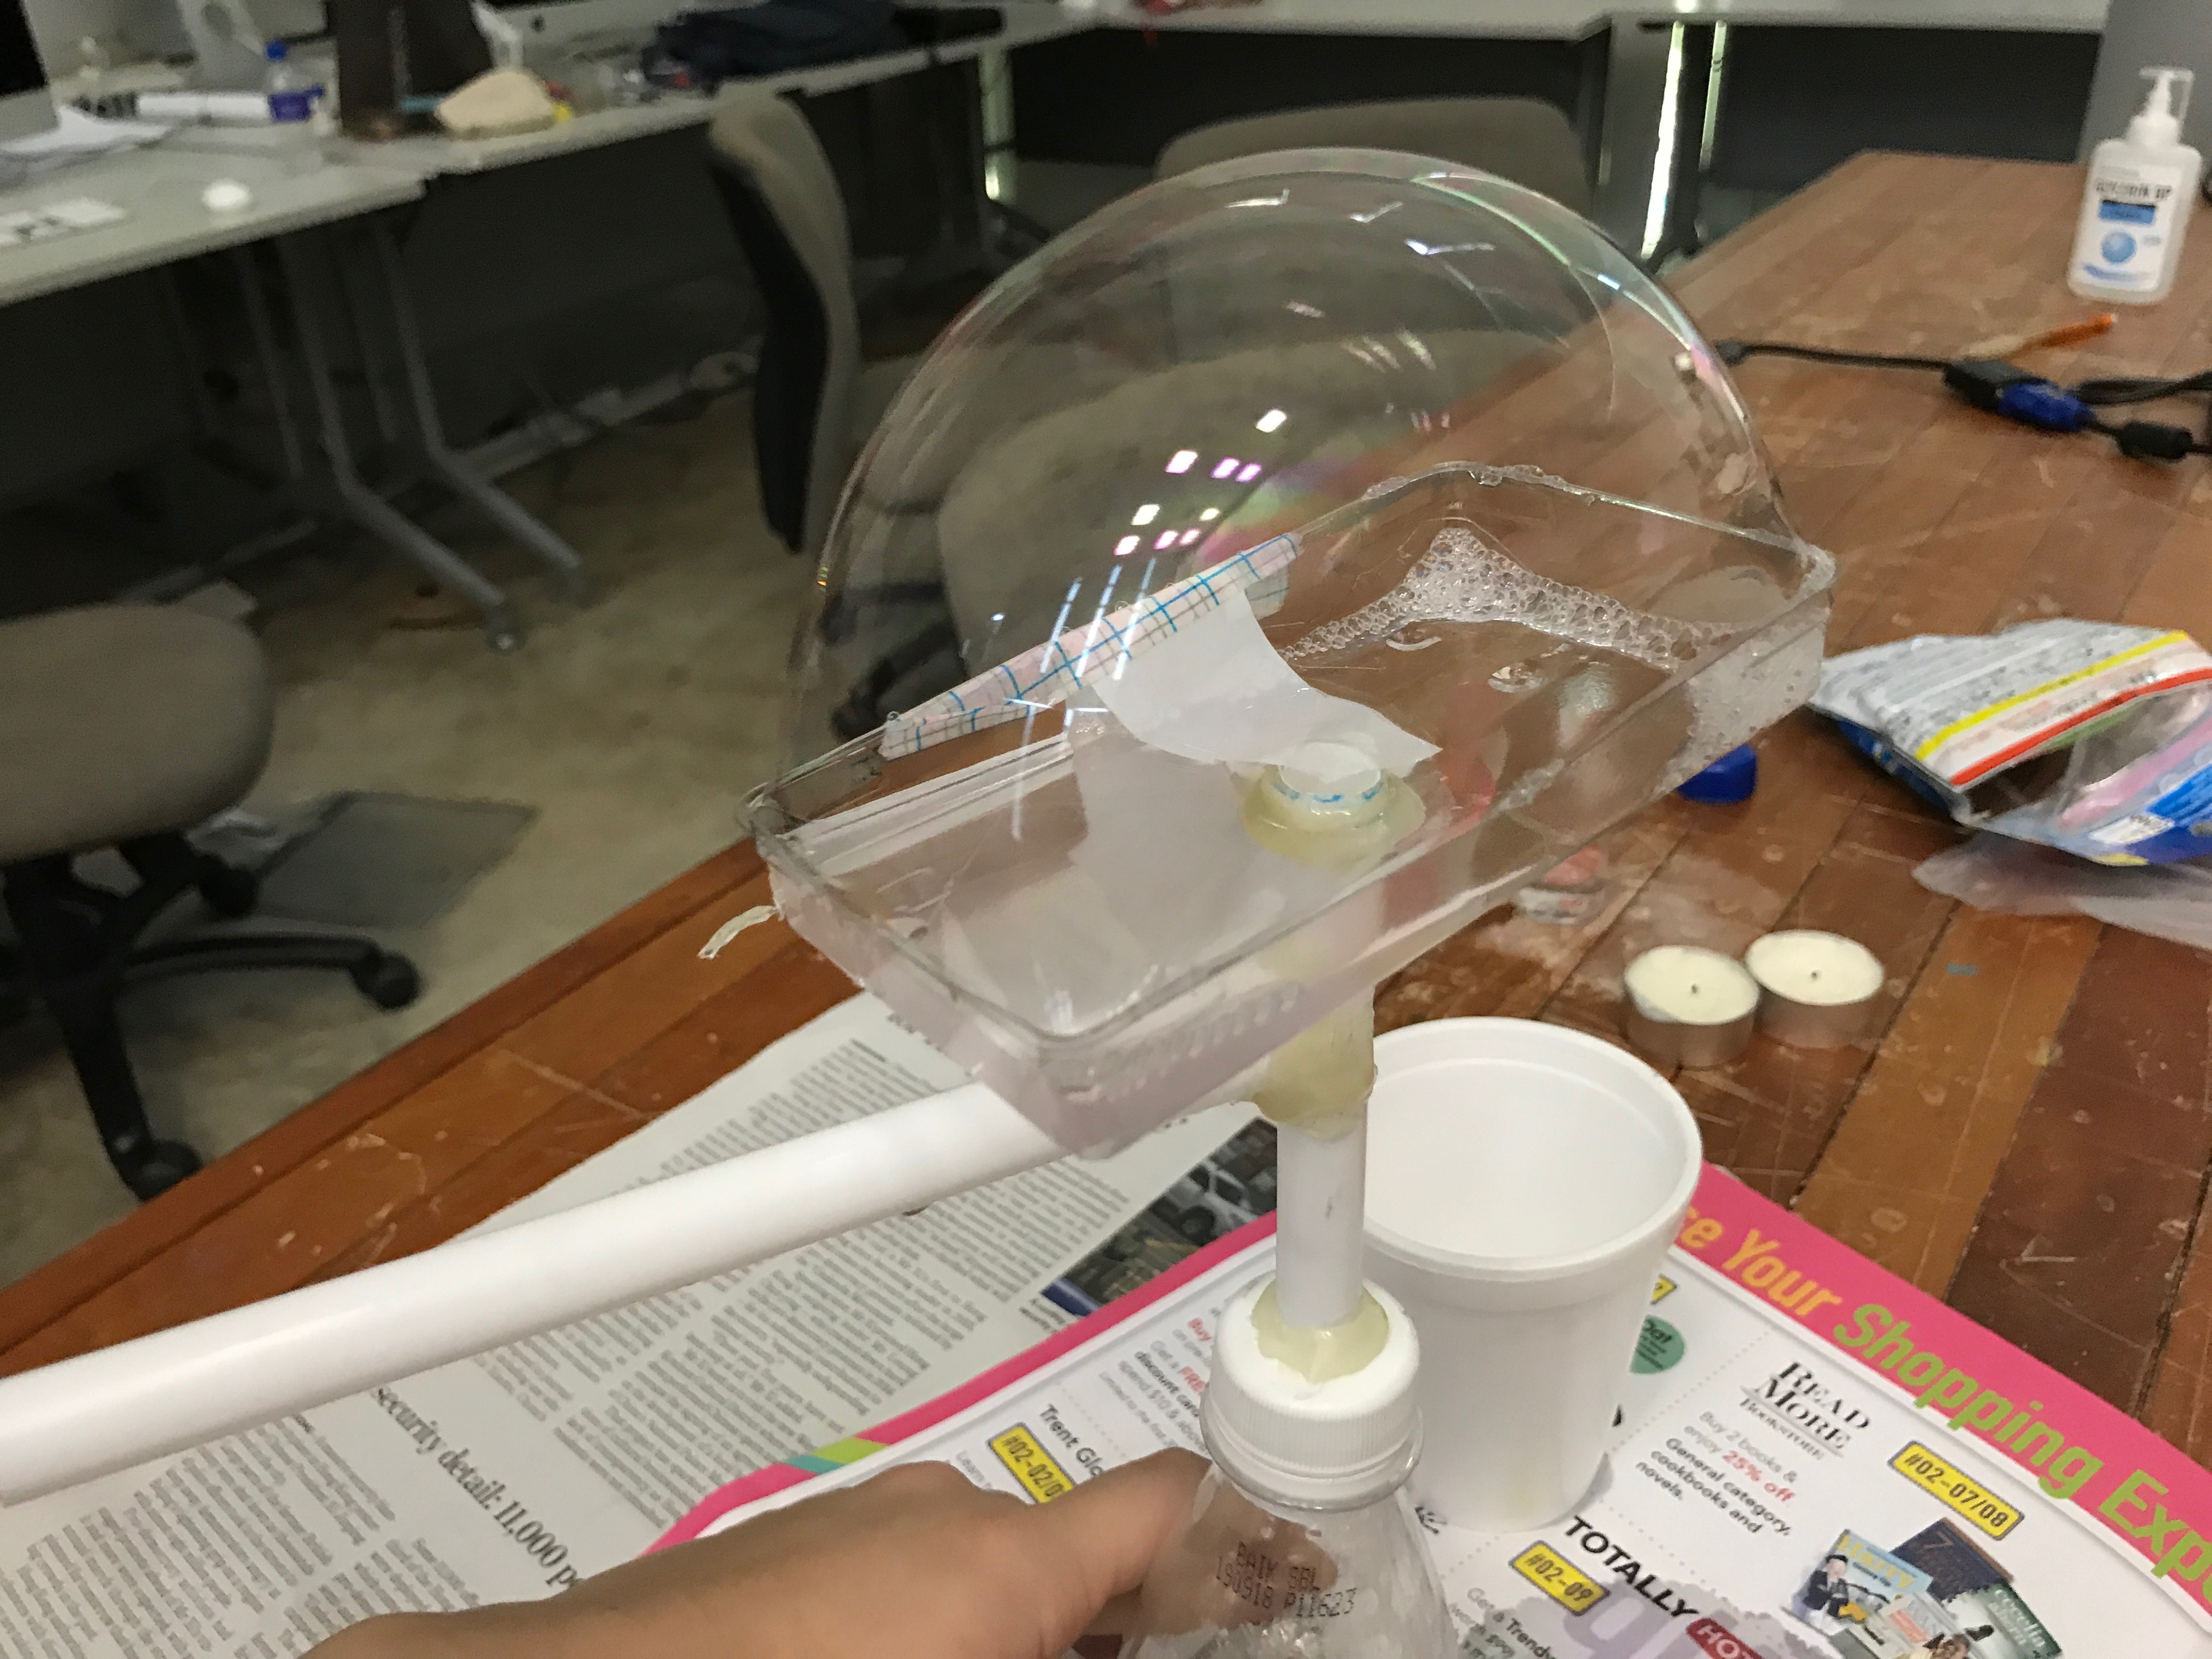
Experiment III (final)

Set-up

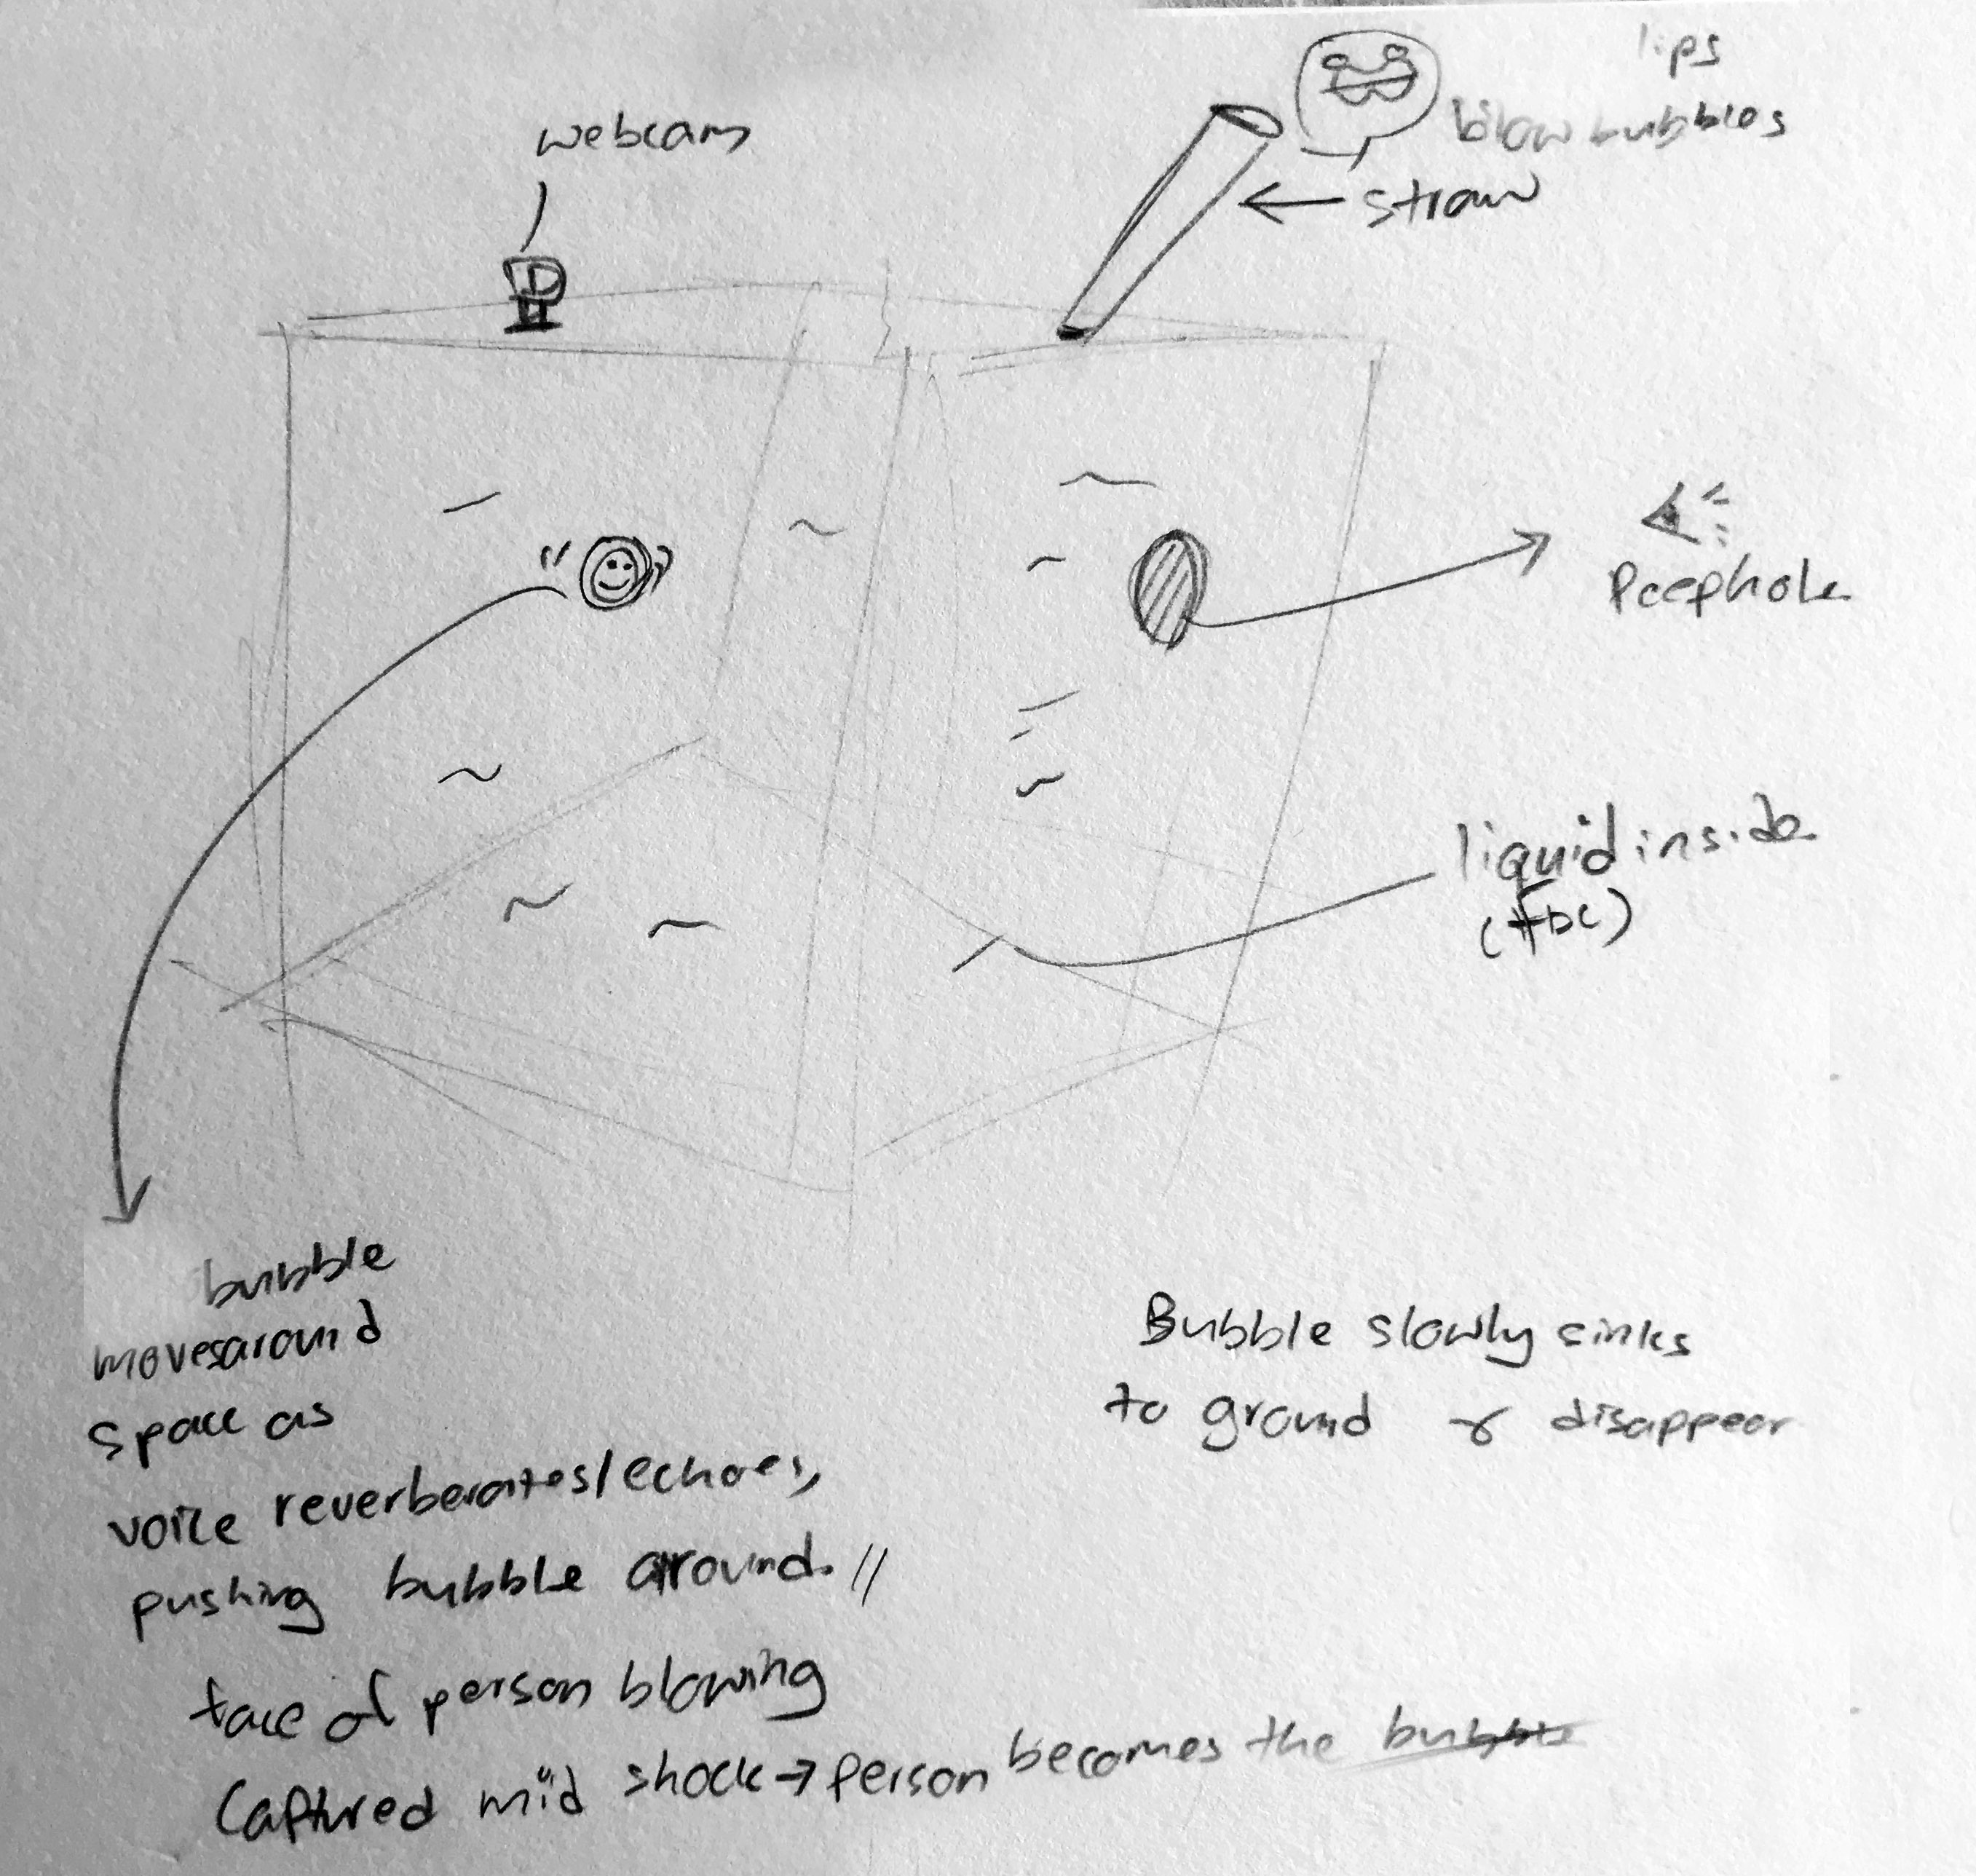
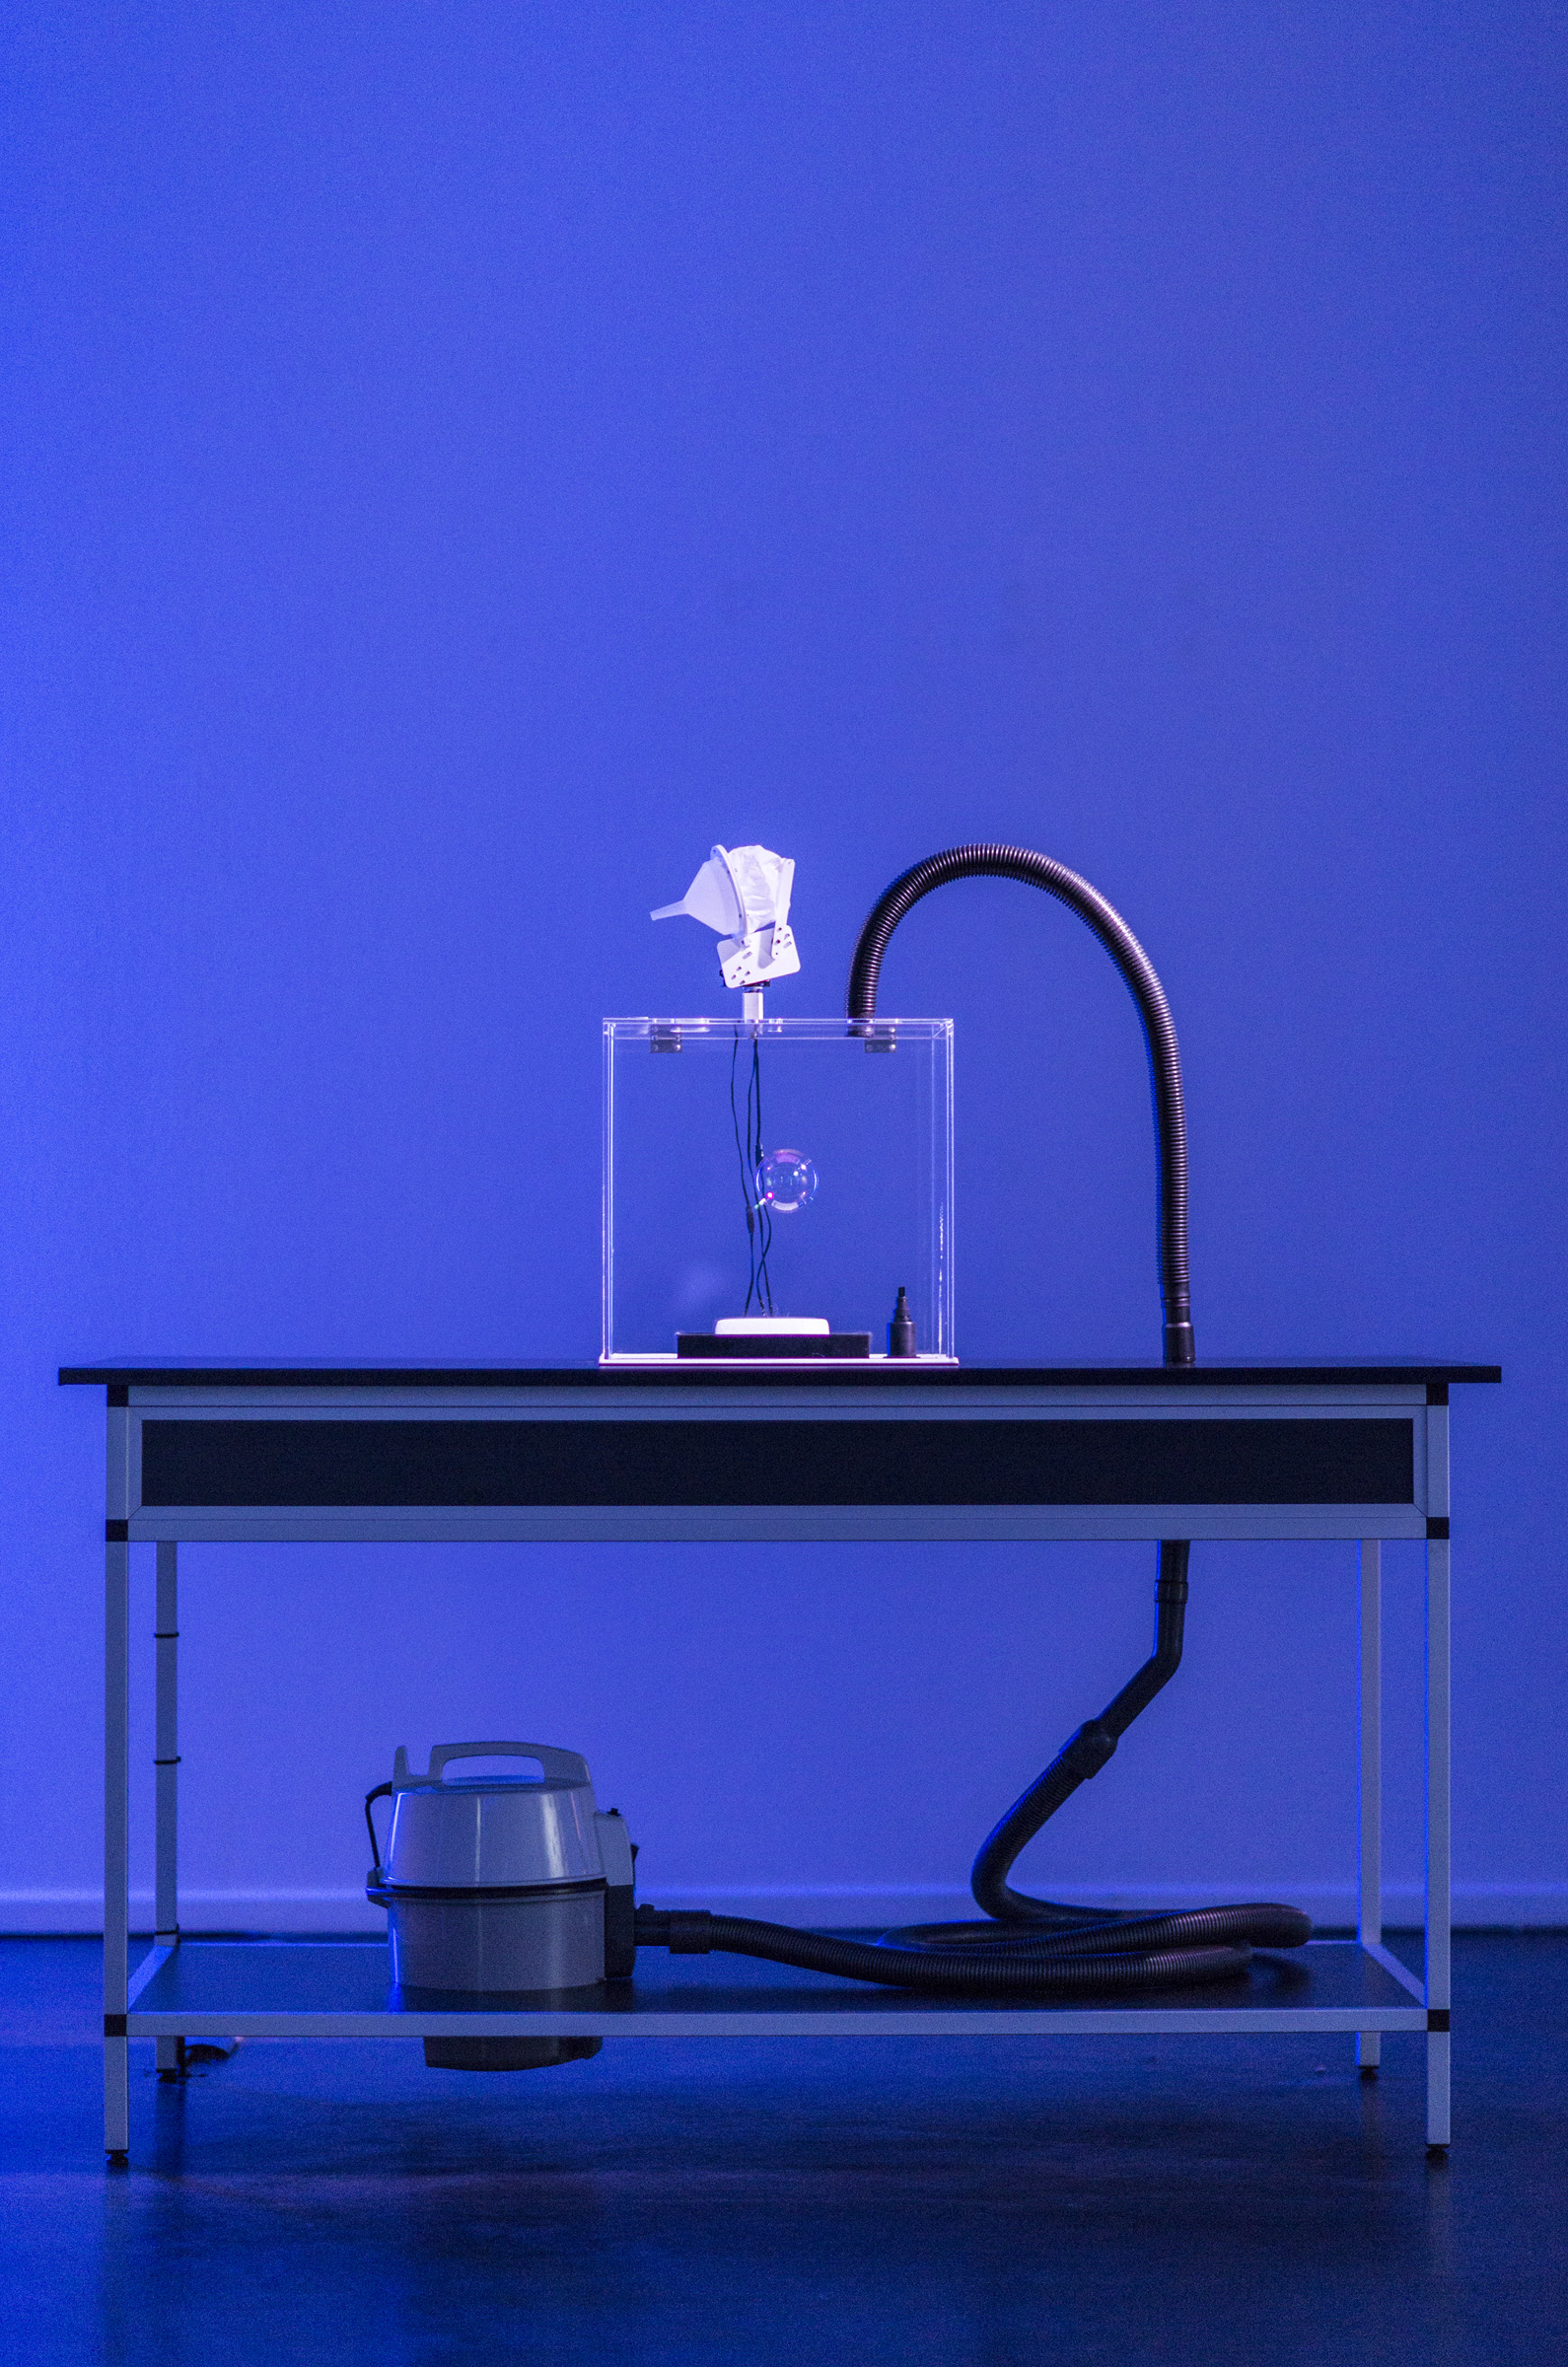
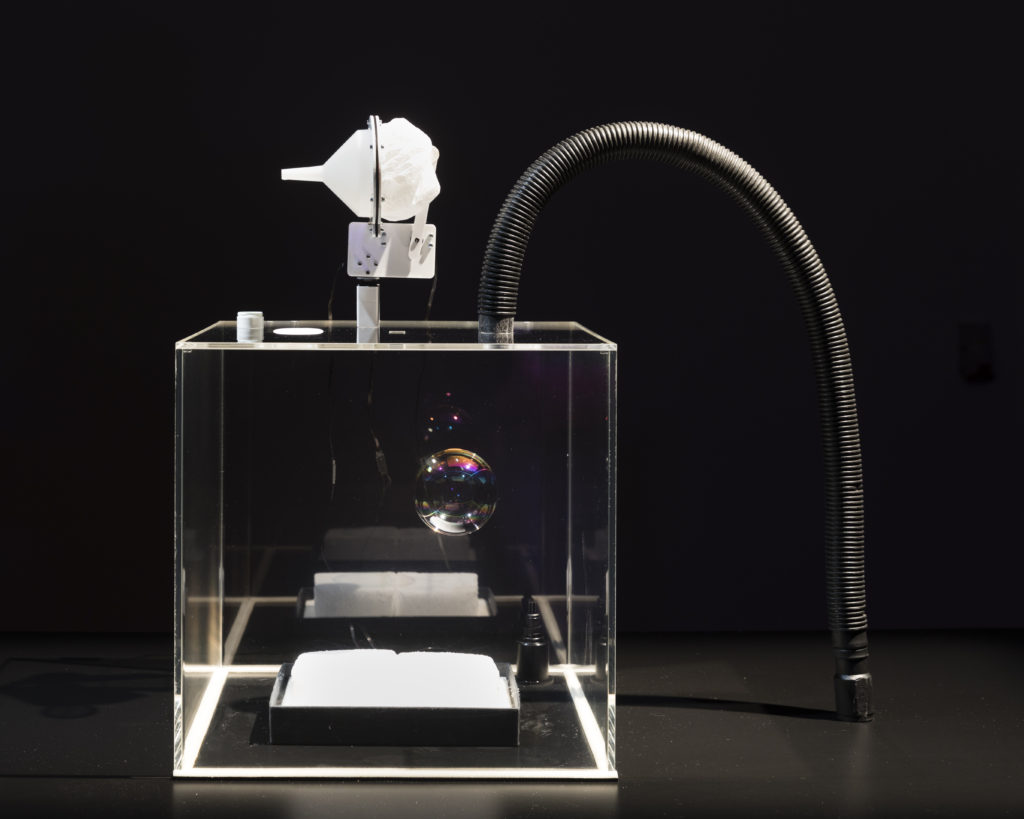
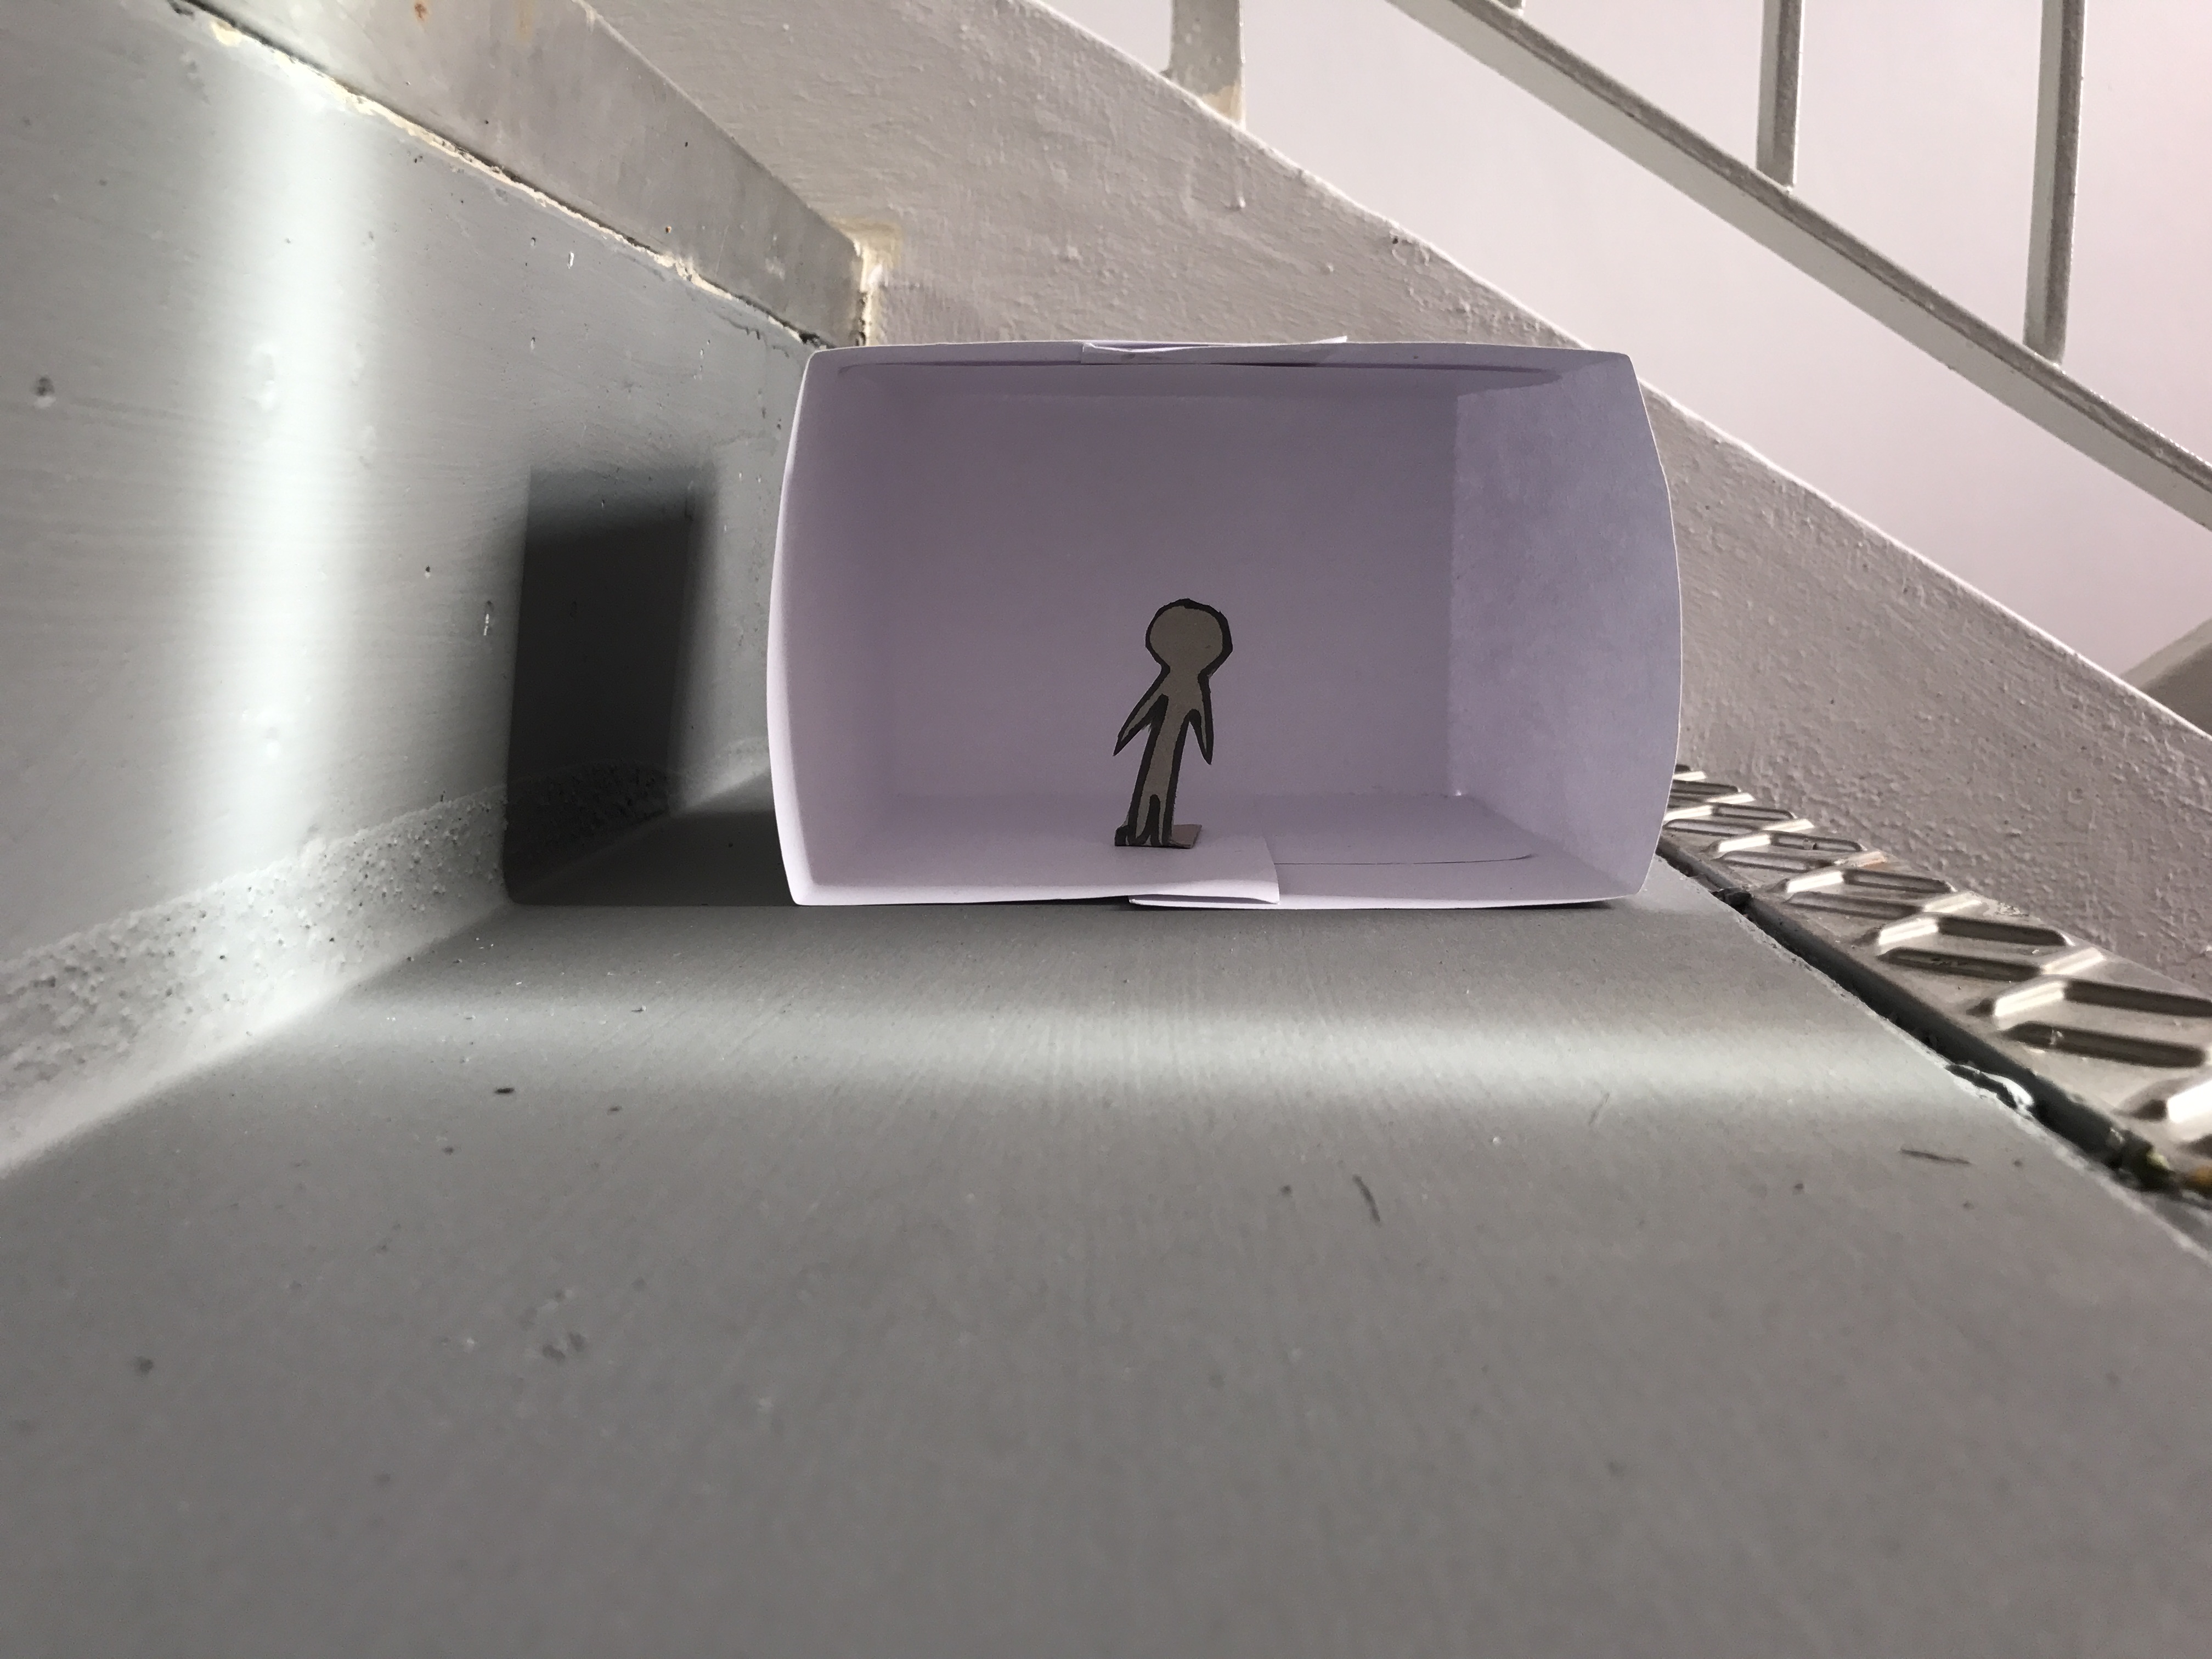
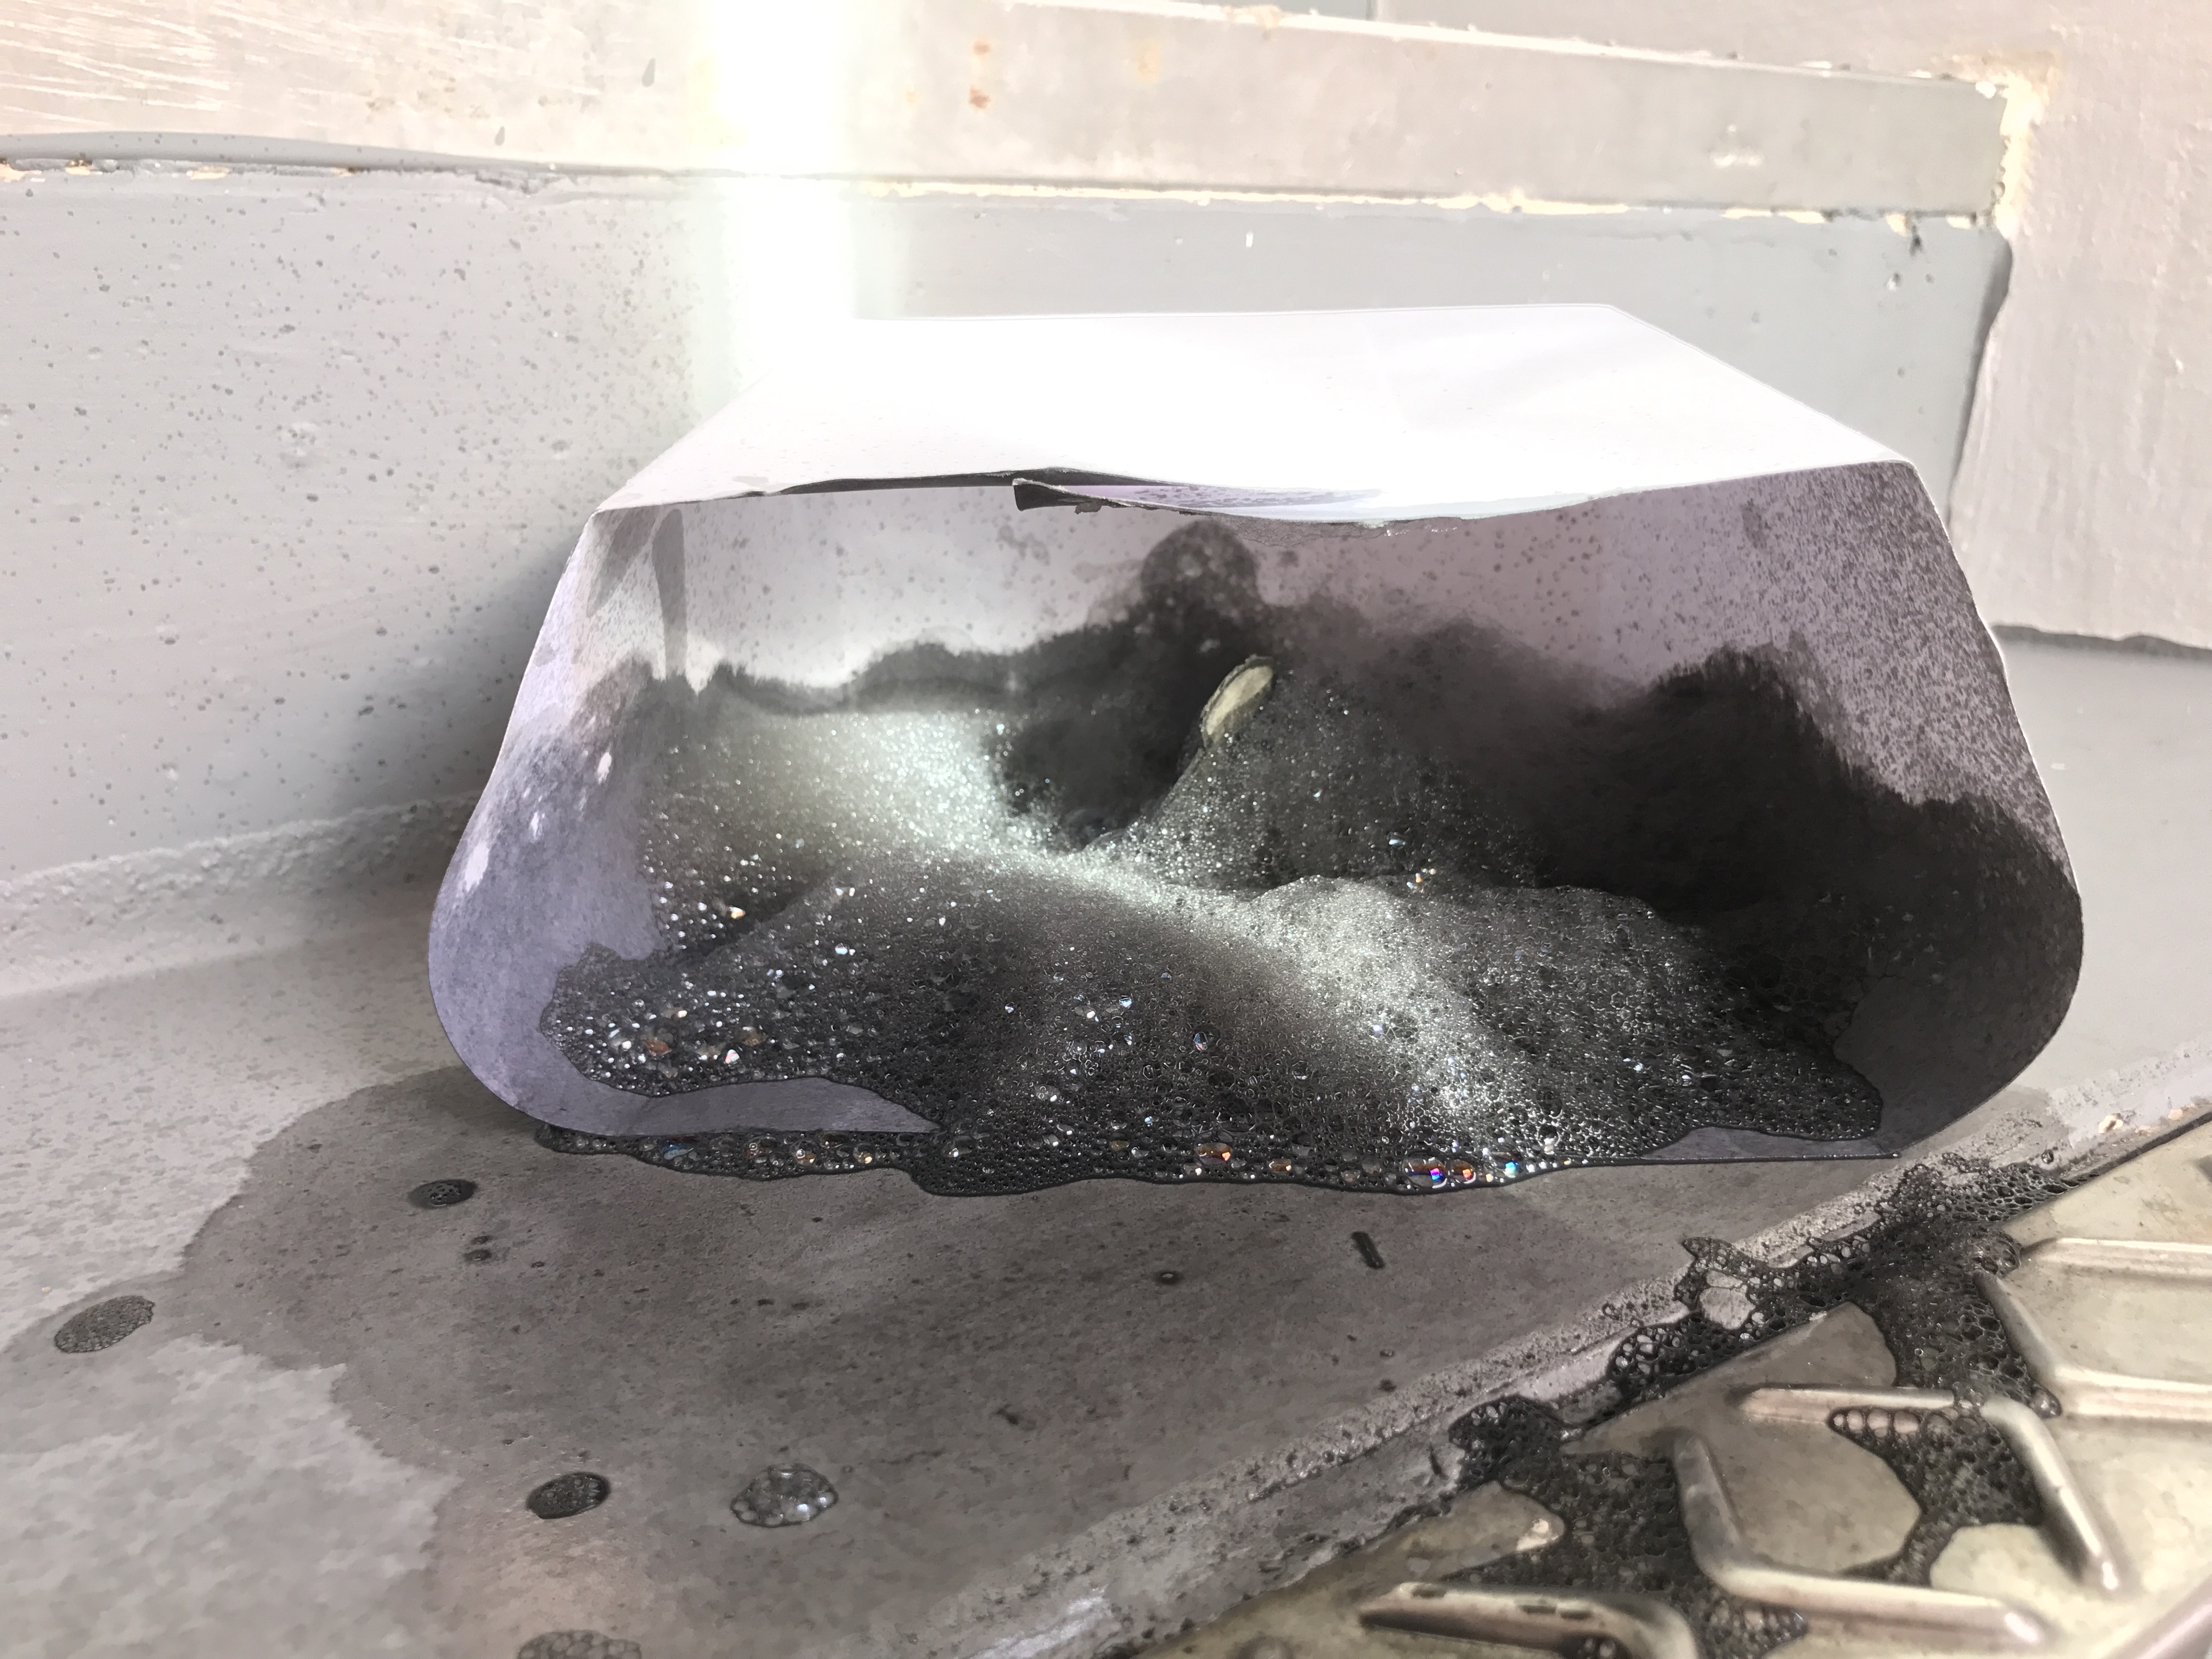
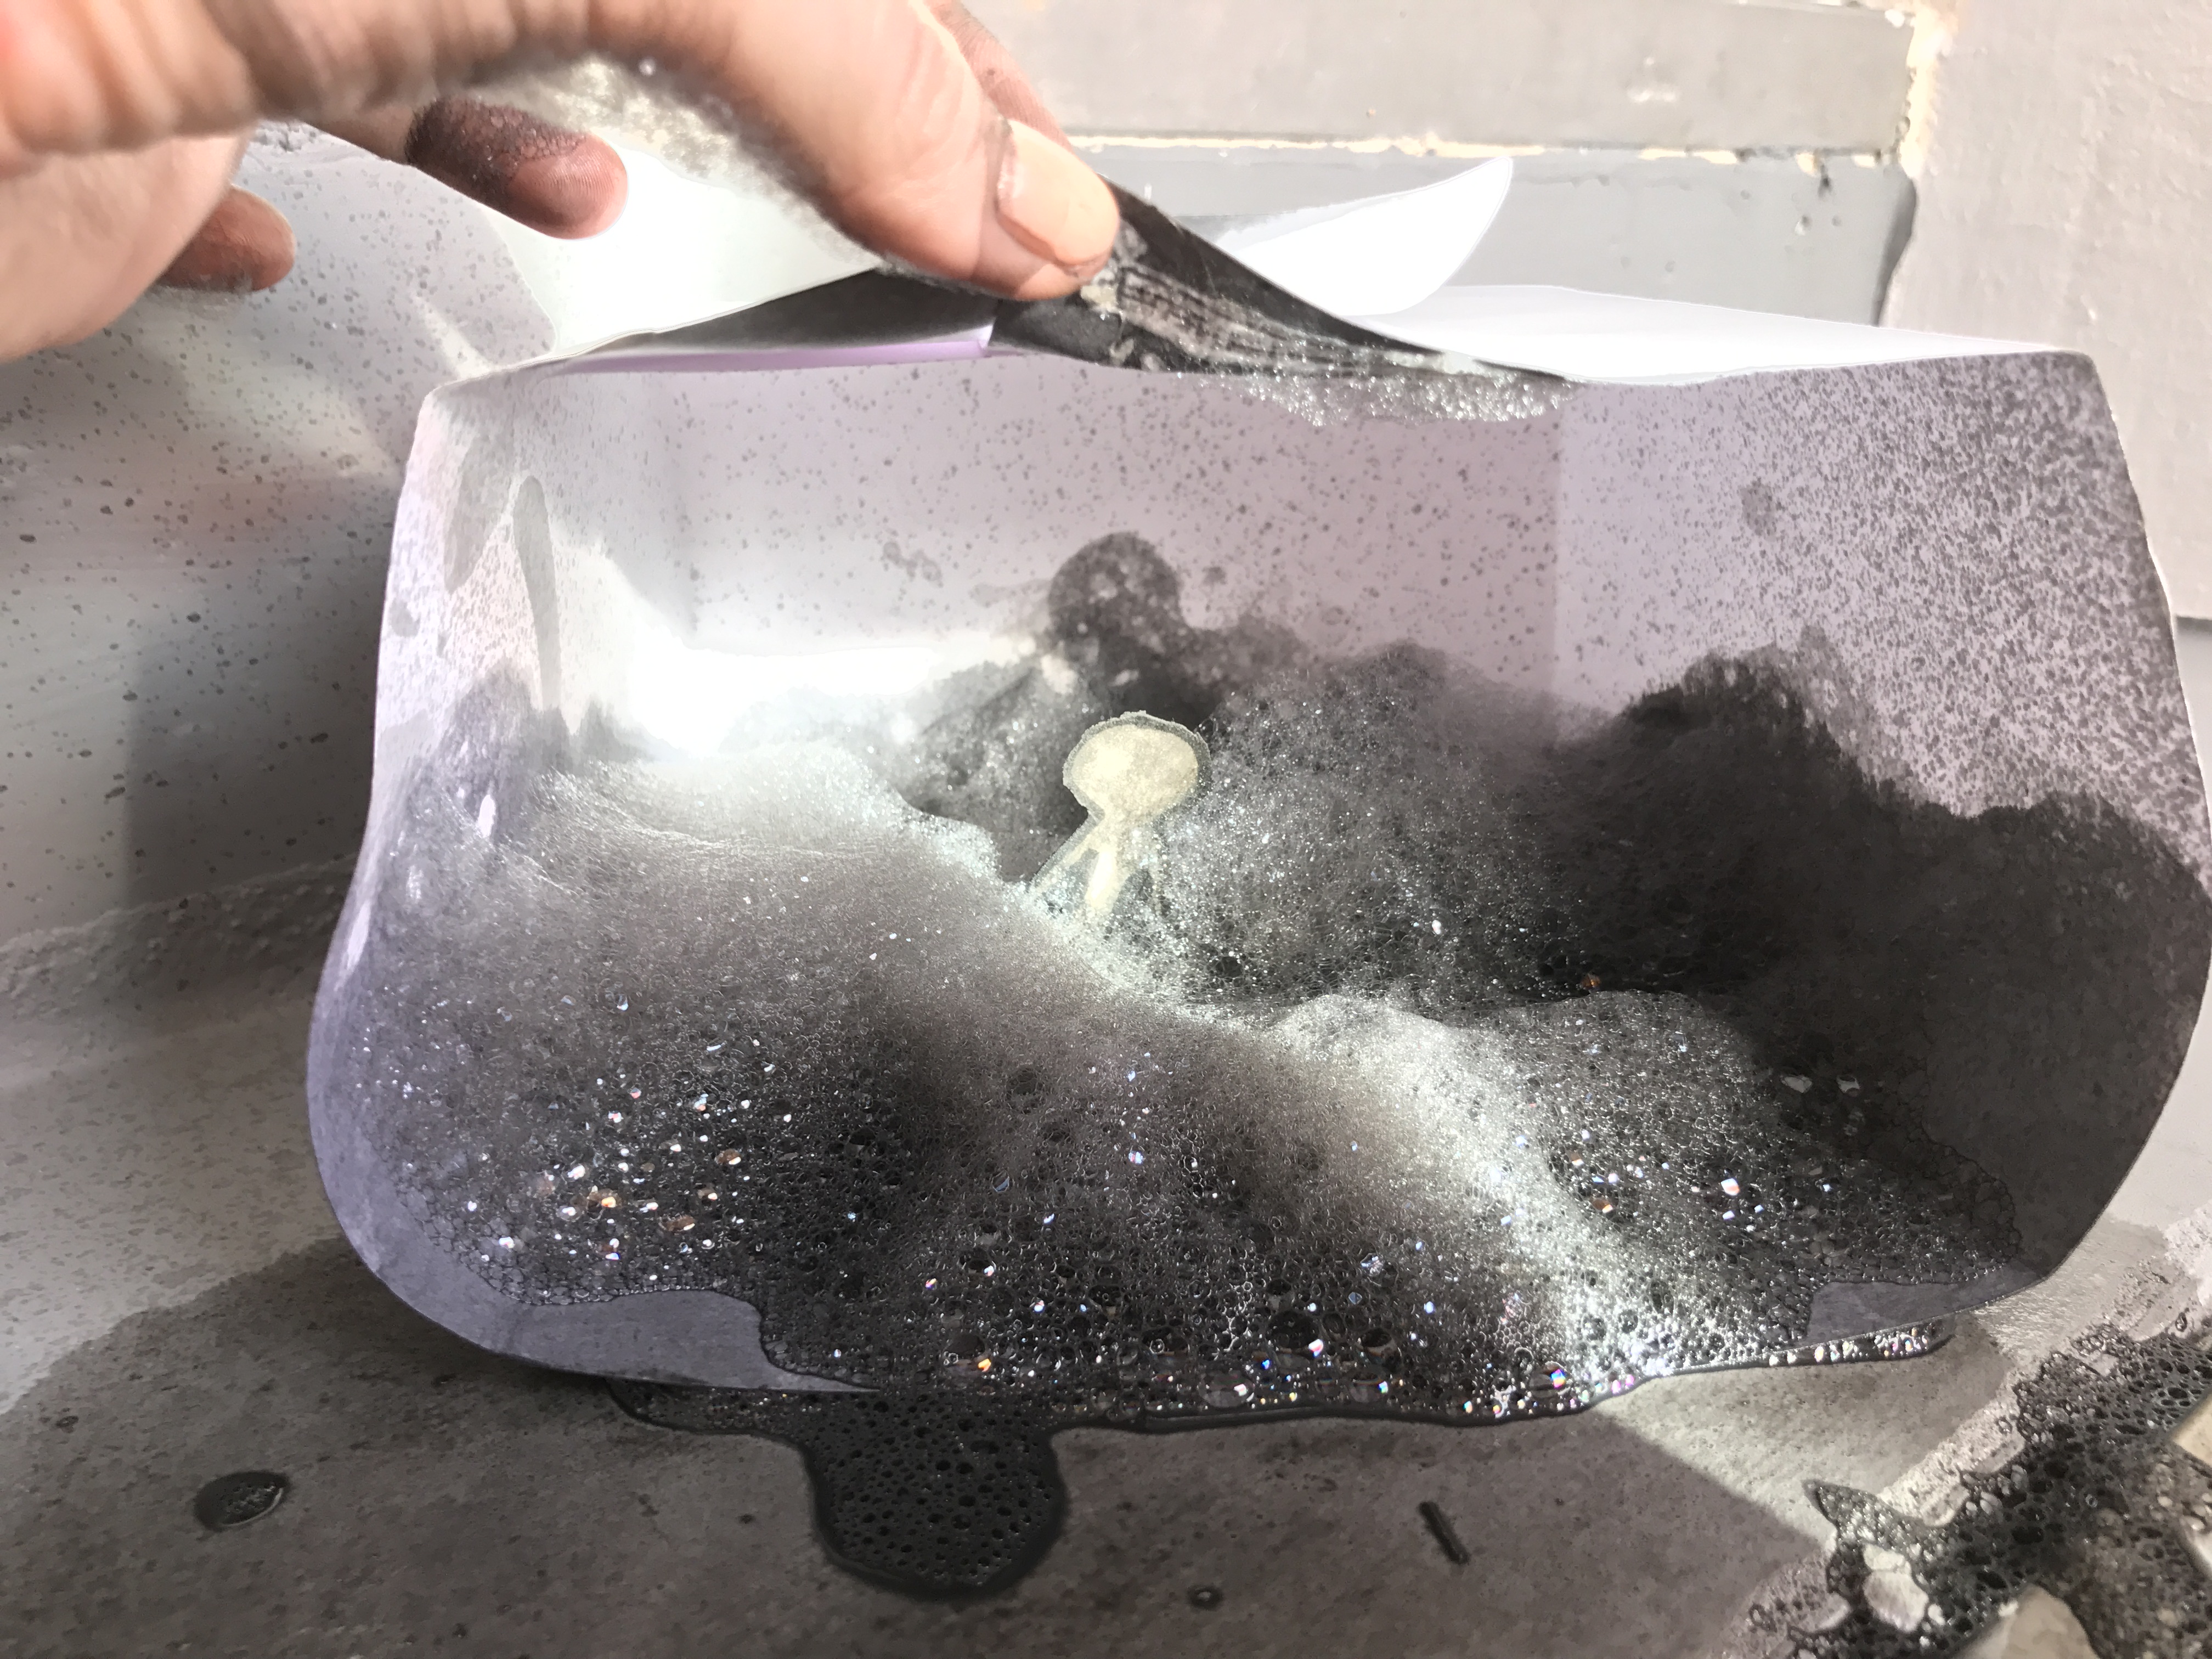
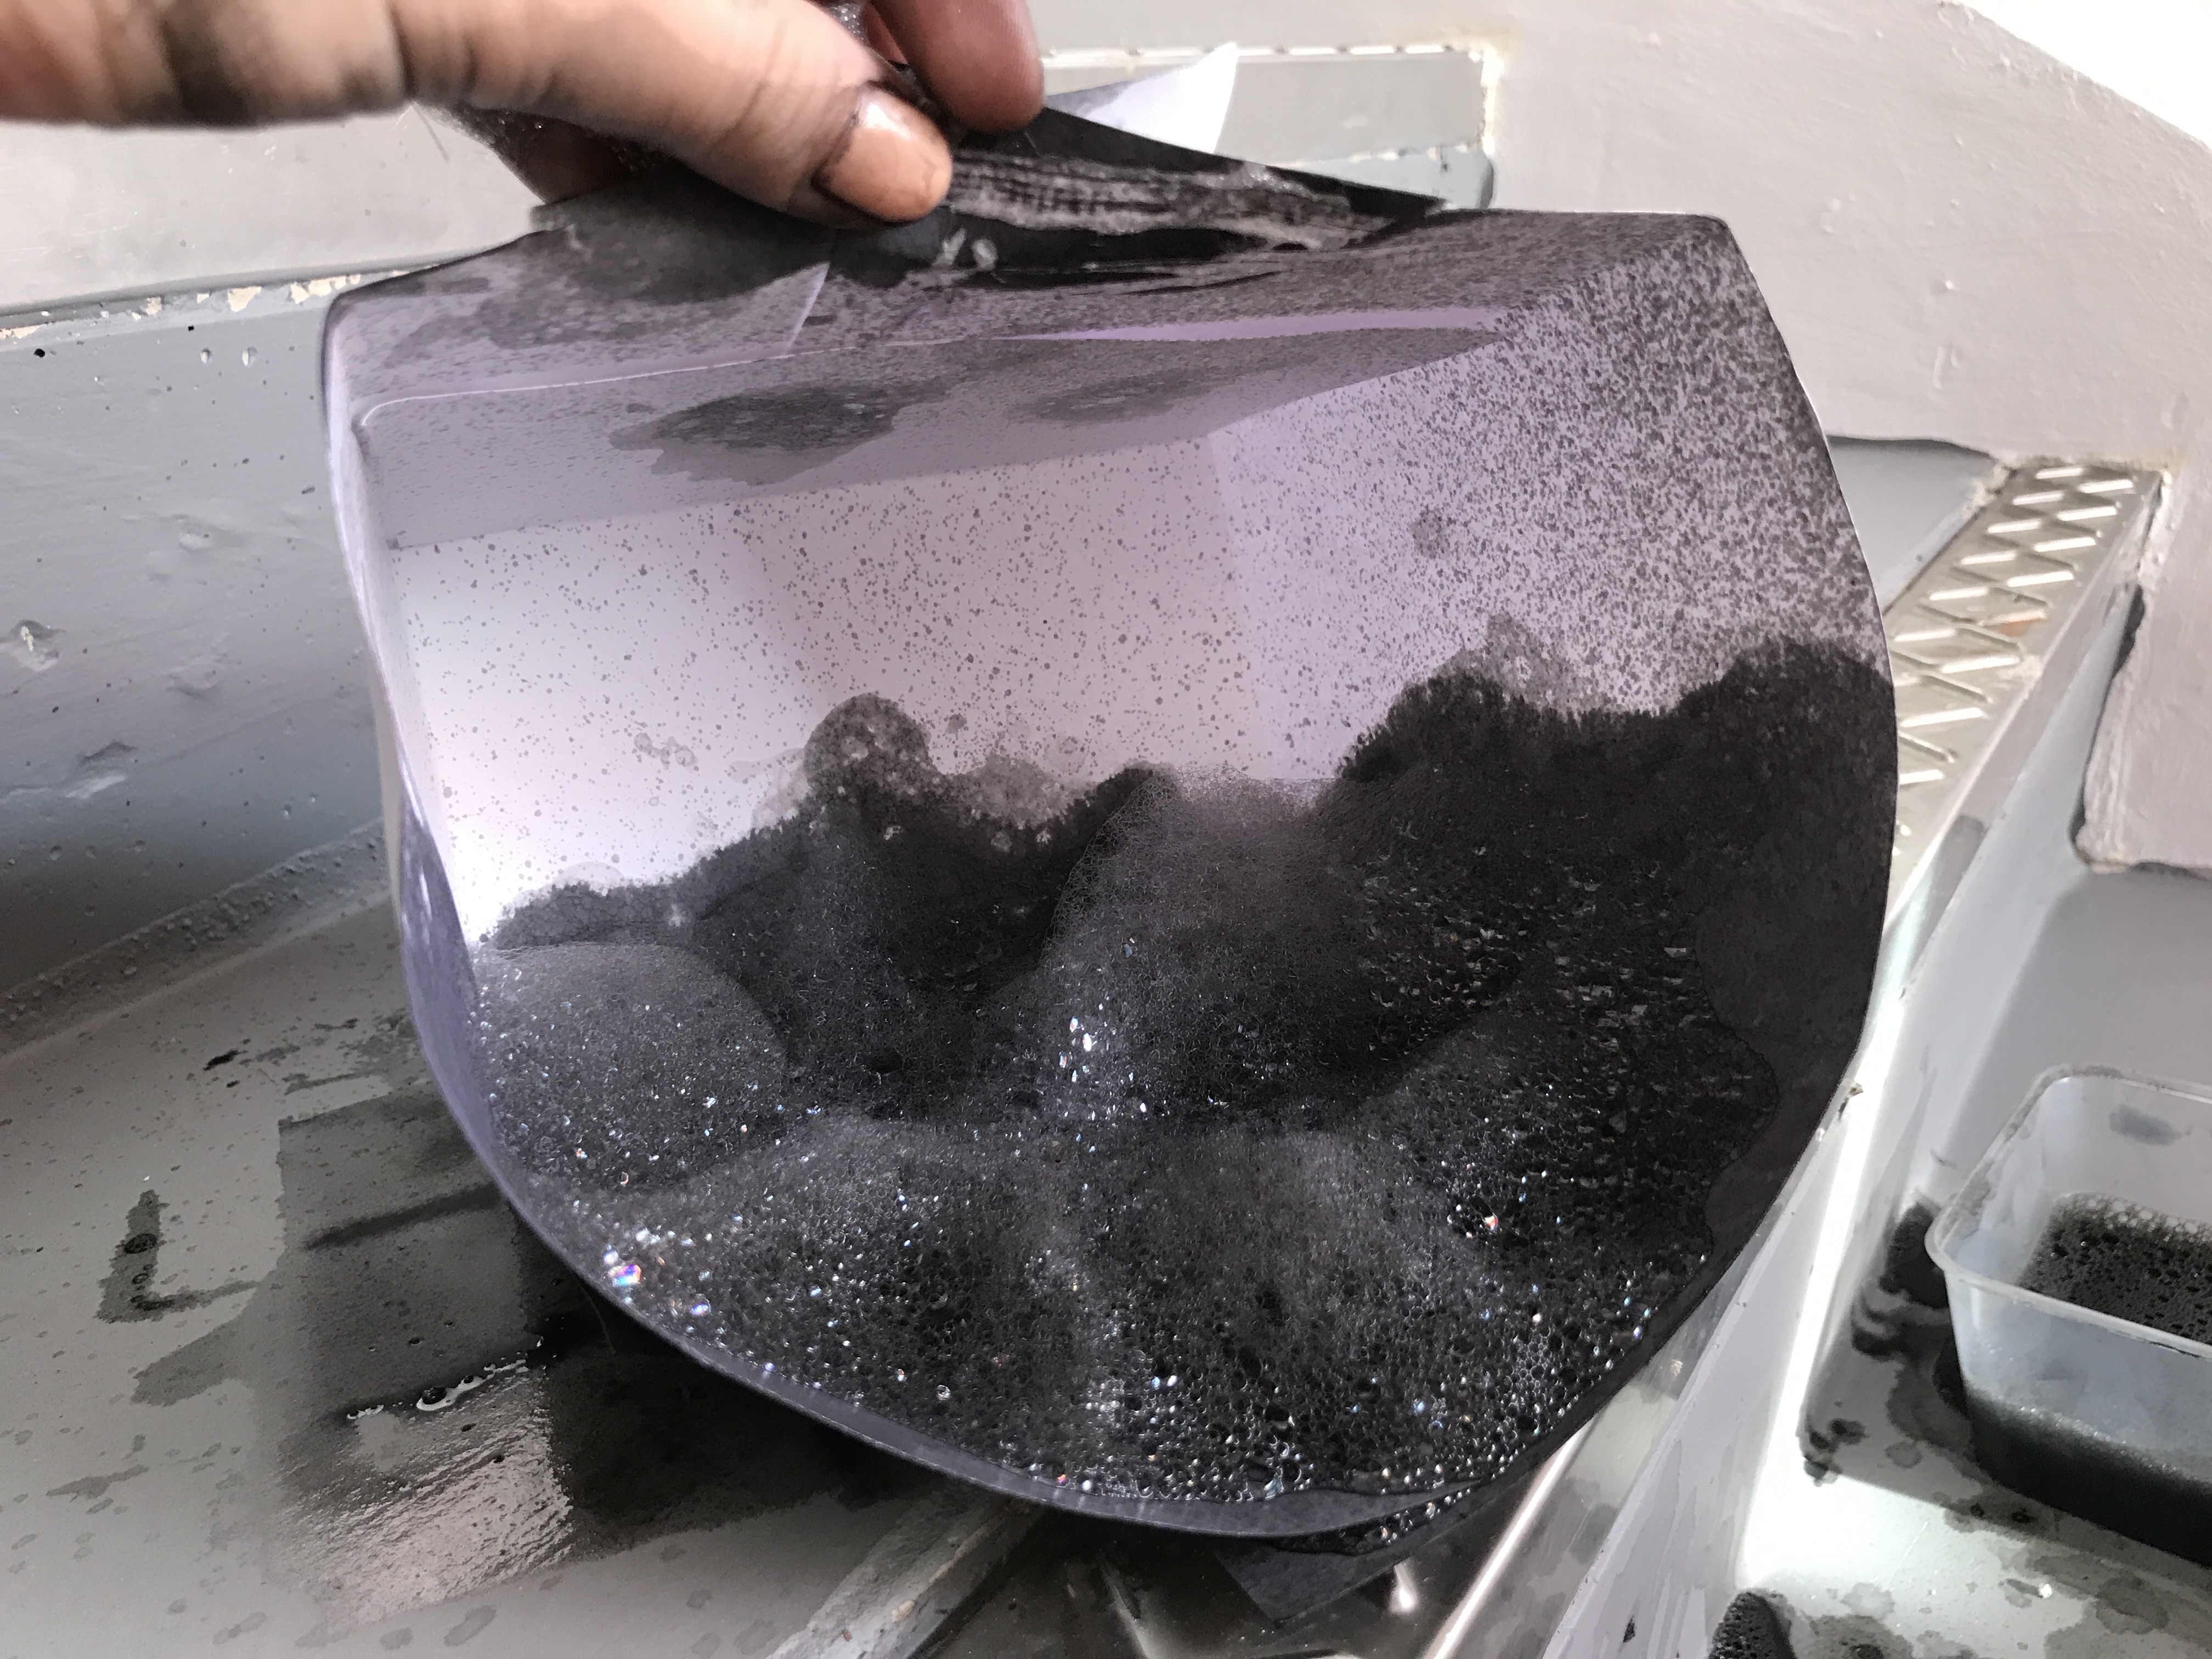
I thought of creating a tinier installation, and contain just one bubble for now as it might be easier to work with. Thus, I decided upon a boxed installation – partly because I started becoming interested in peephole art installations – and also because it was much easier to control the environment within a small, contained space.

The intention was for the user to blow and create one bubble at a time, which float inside the box. An external camera will capture the facial expression of the person blowing the bubble, and project that static image onto the bubble. The bubble was meant to gently float down towards the ground, as I would be placing liquid into the box to greatly reduce the speed the bubble floats down. The user will proceed to look at the bubble through the peephole on the right of the box, as I envisioned that it would greatly magnify the bubble’s size in the eye of the user, and have it easier to contain within a smaller box. The person thus becomes the bubble, and he fitnesses his own death through the bubble.

At the same time, as the bubble floats down and vibrates/moves, a recorder will record the movement and sync it to a sound, which would vibrate according to the bubble’s movement.

Thus, I tried making a box structure to first test out the size.

Set-up: Constructed paper box, blowing tube, plastic sheet at bottom

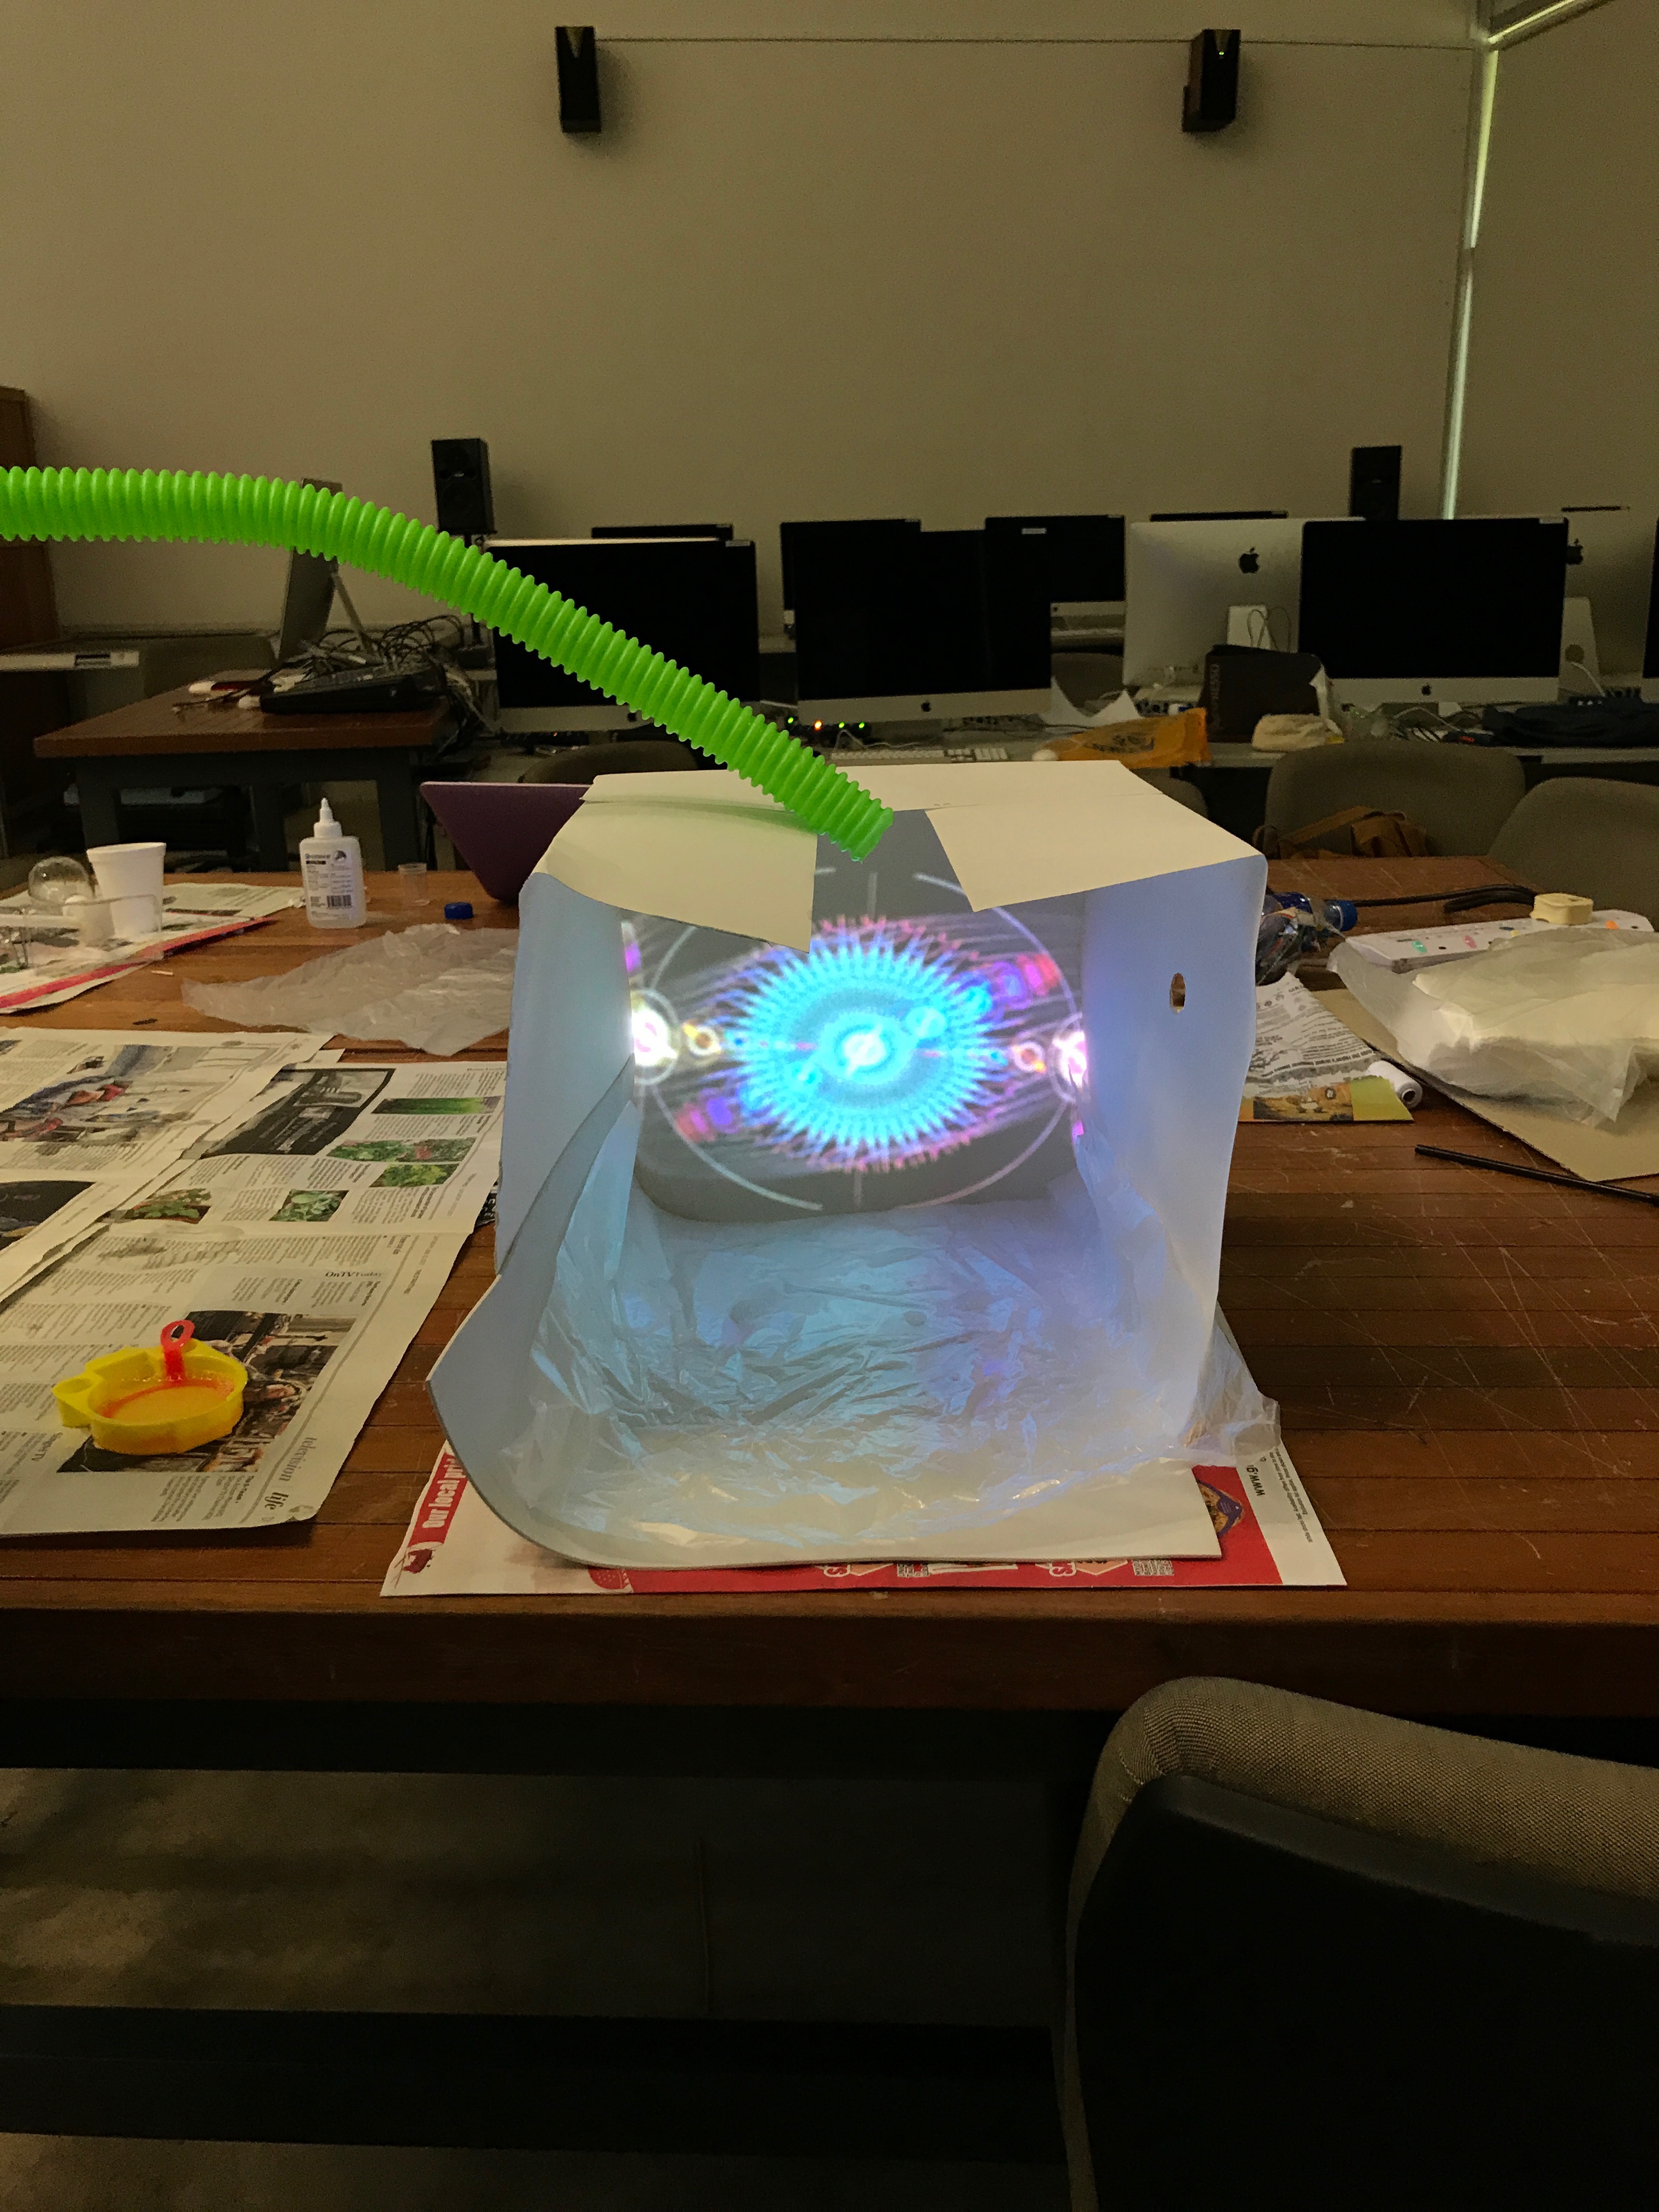
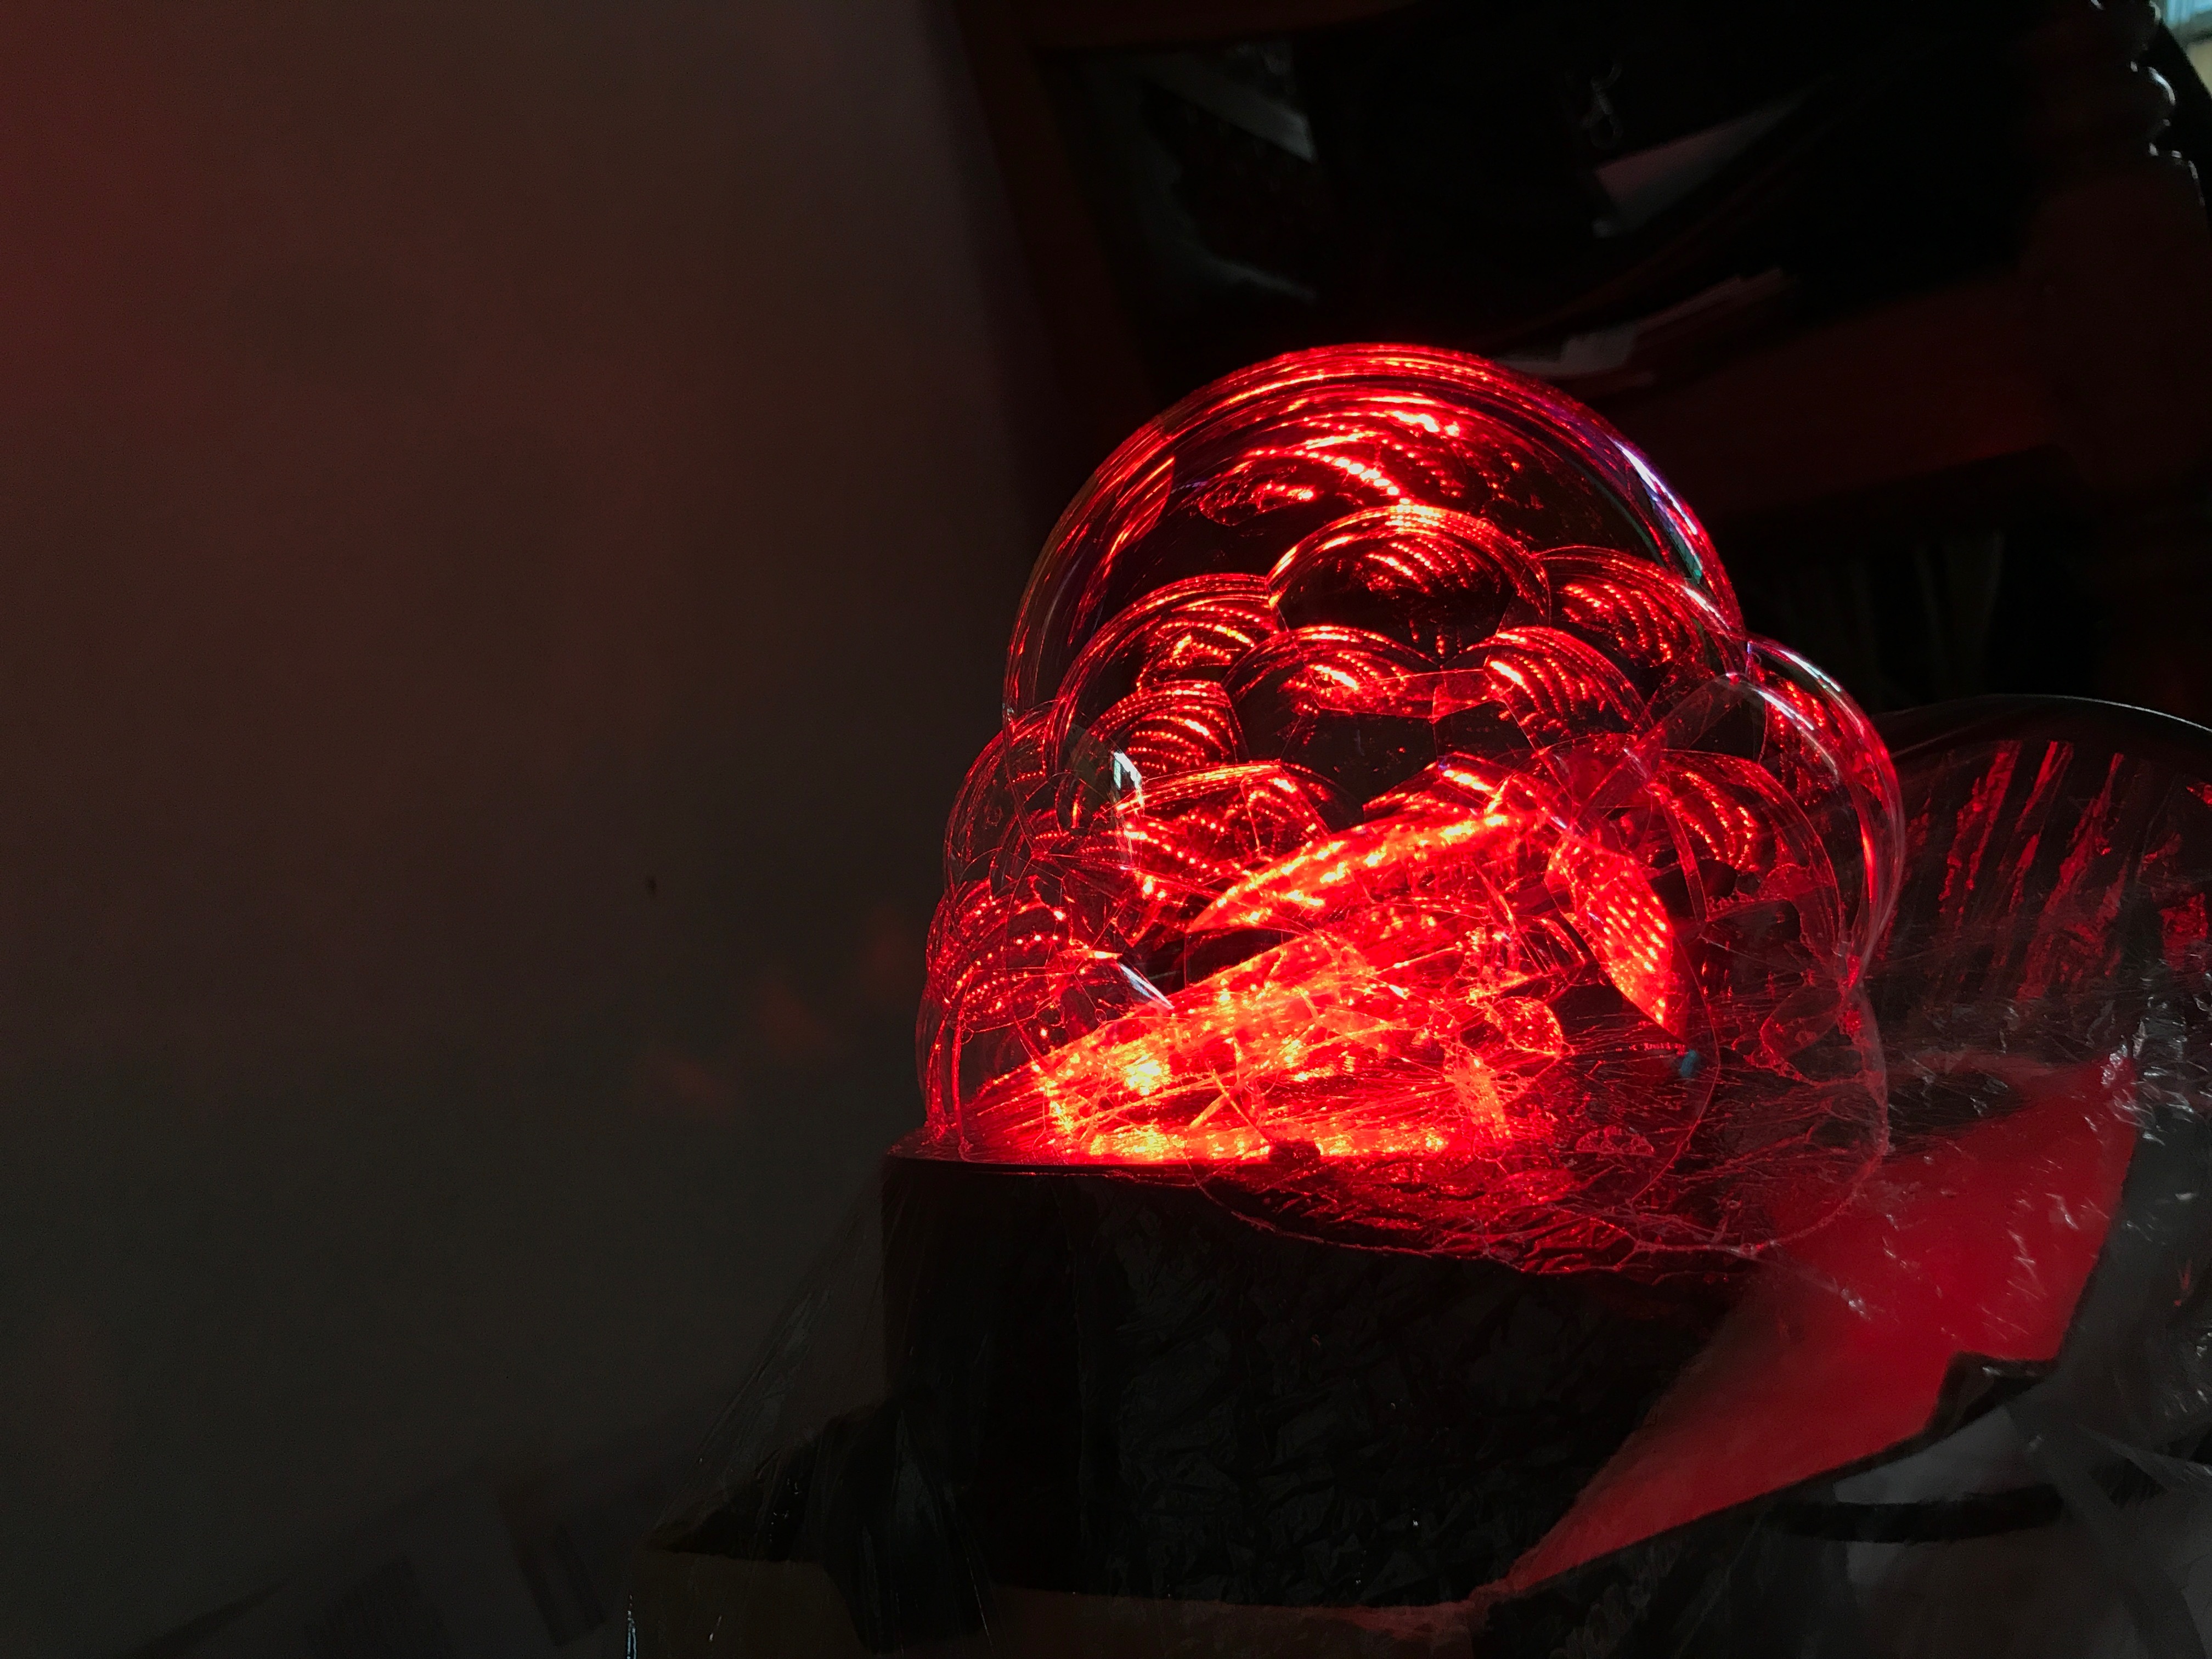
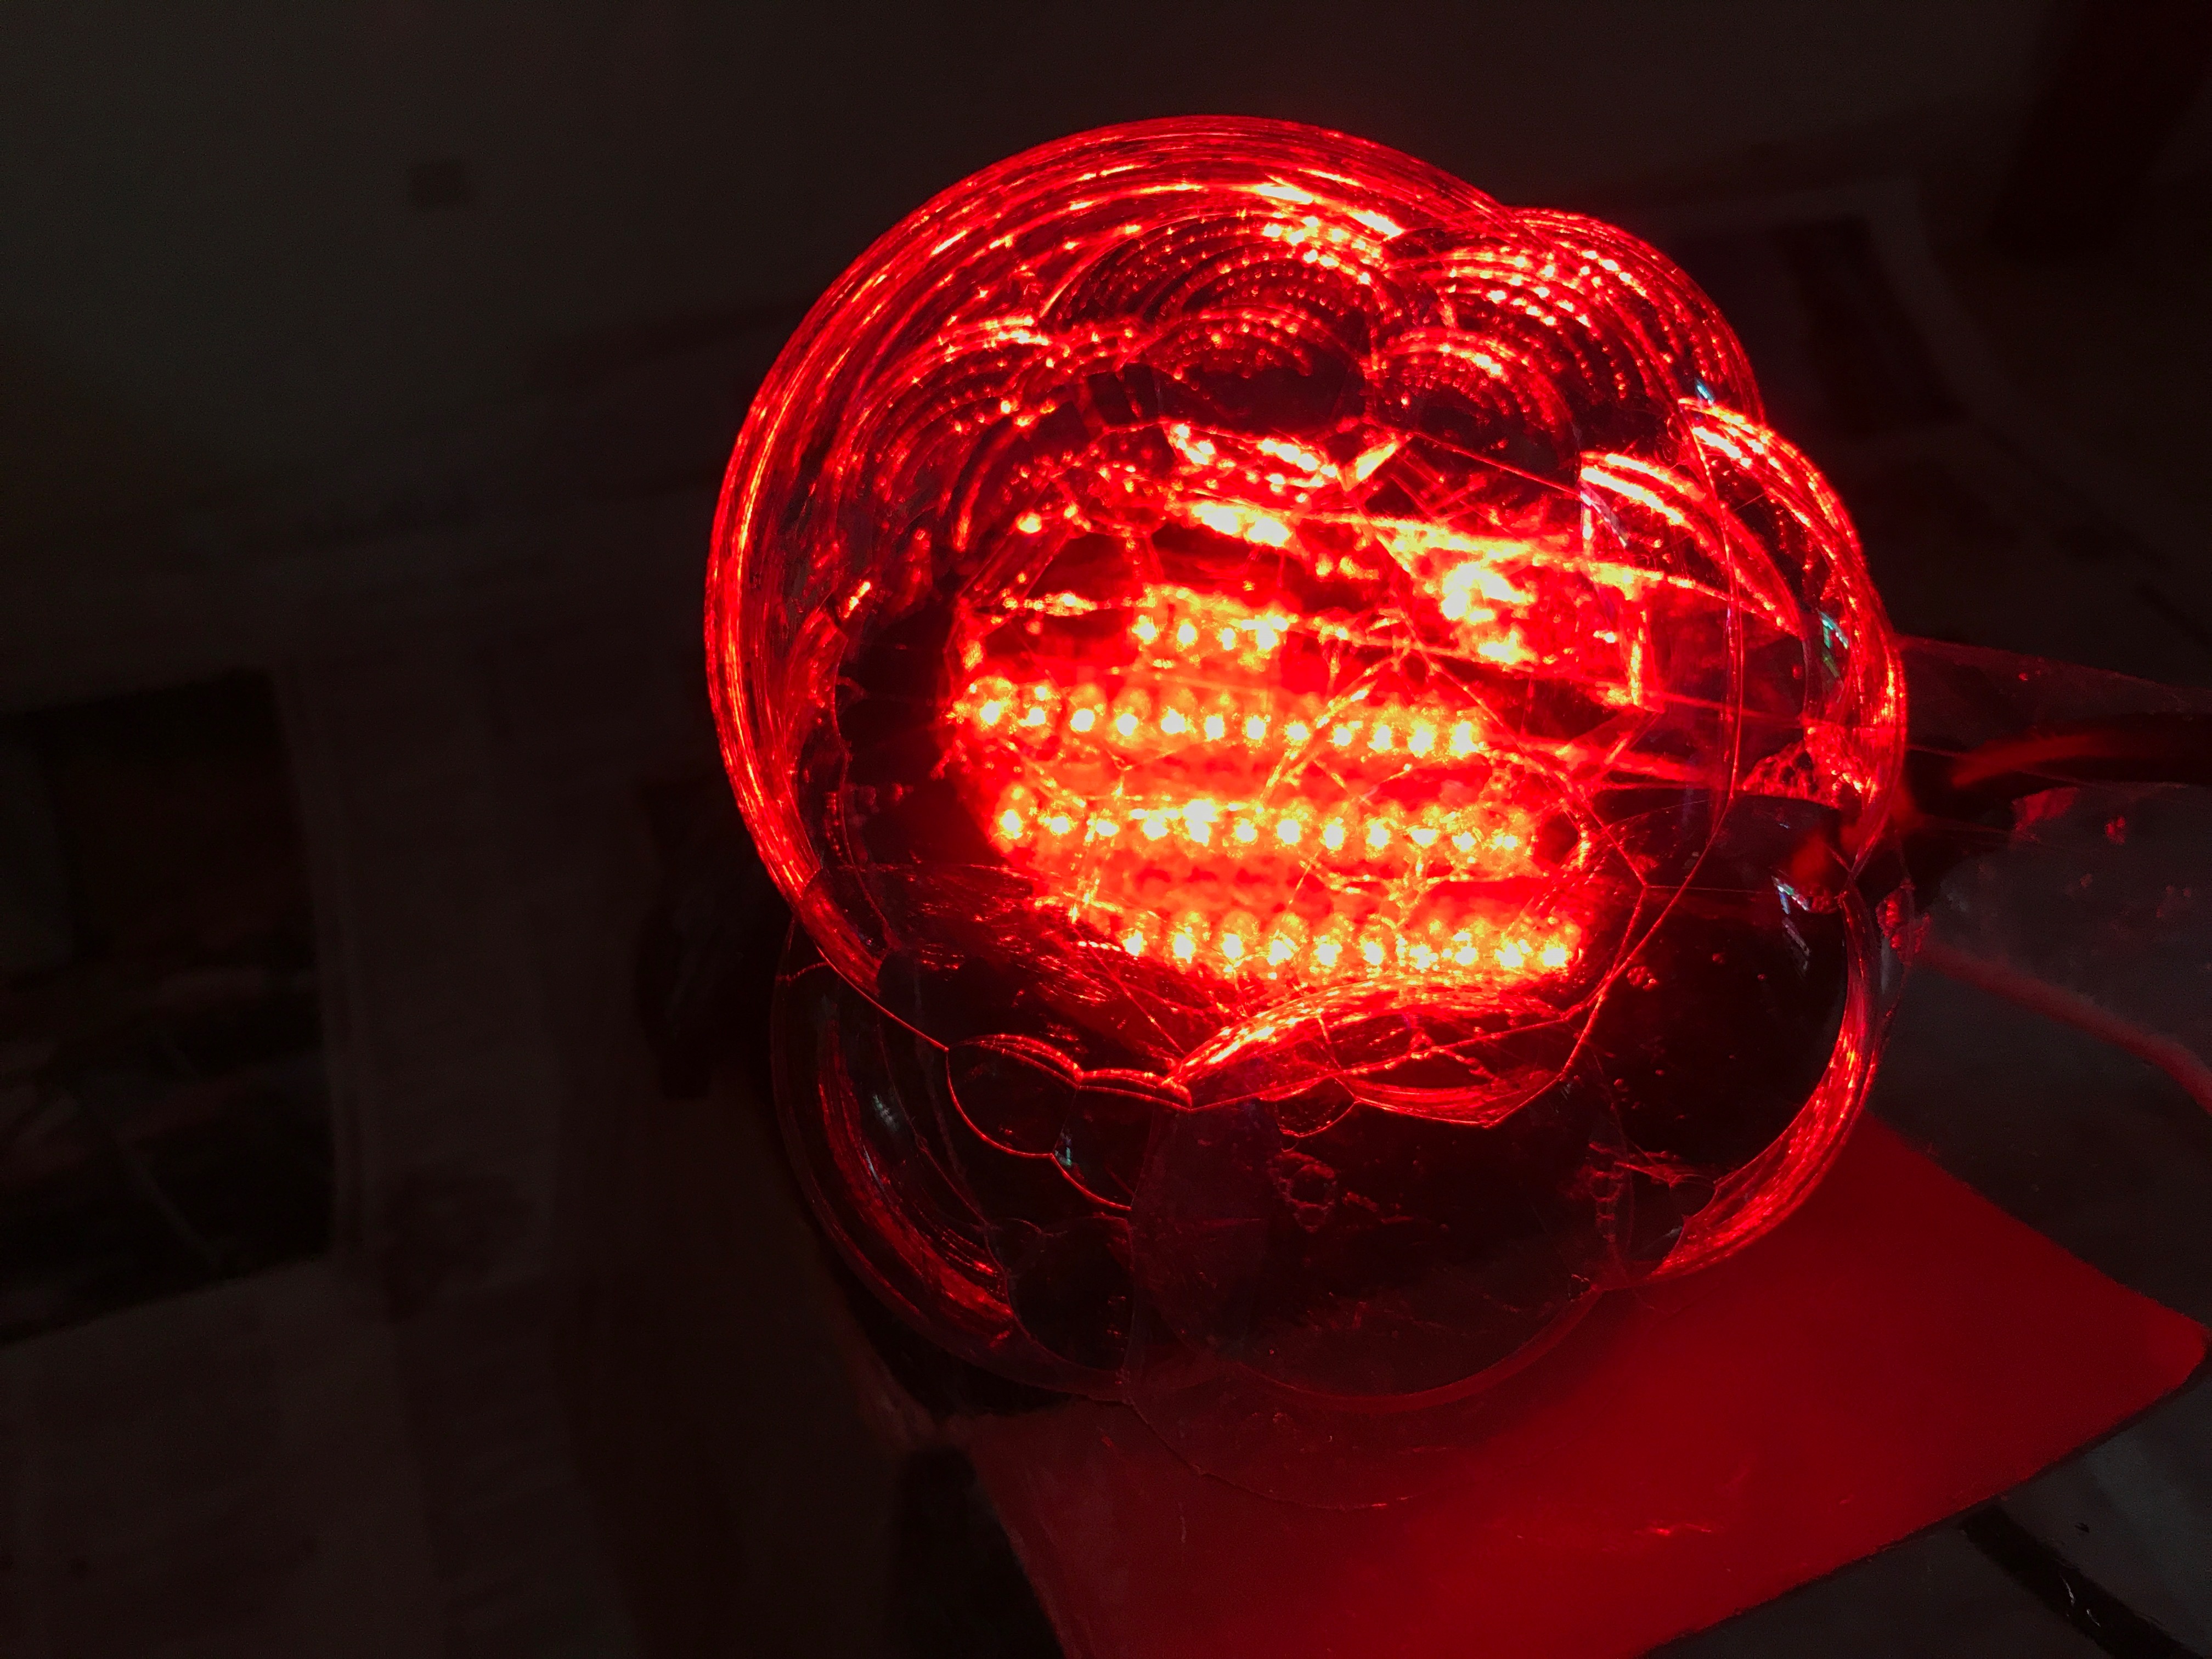
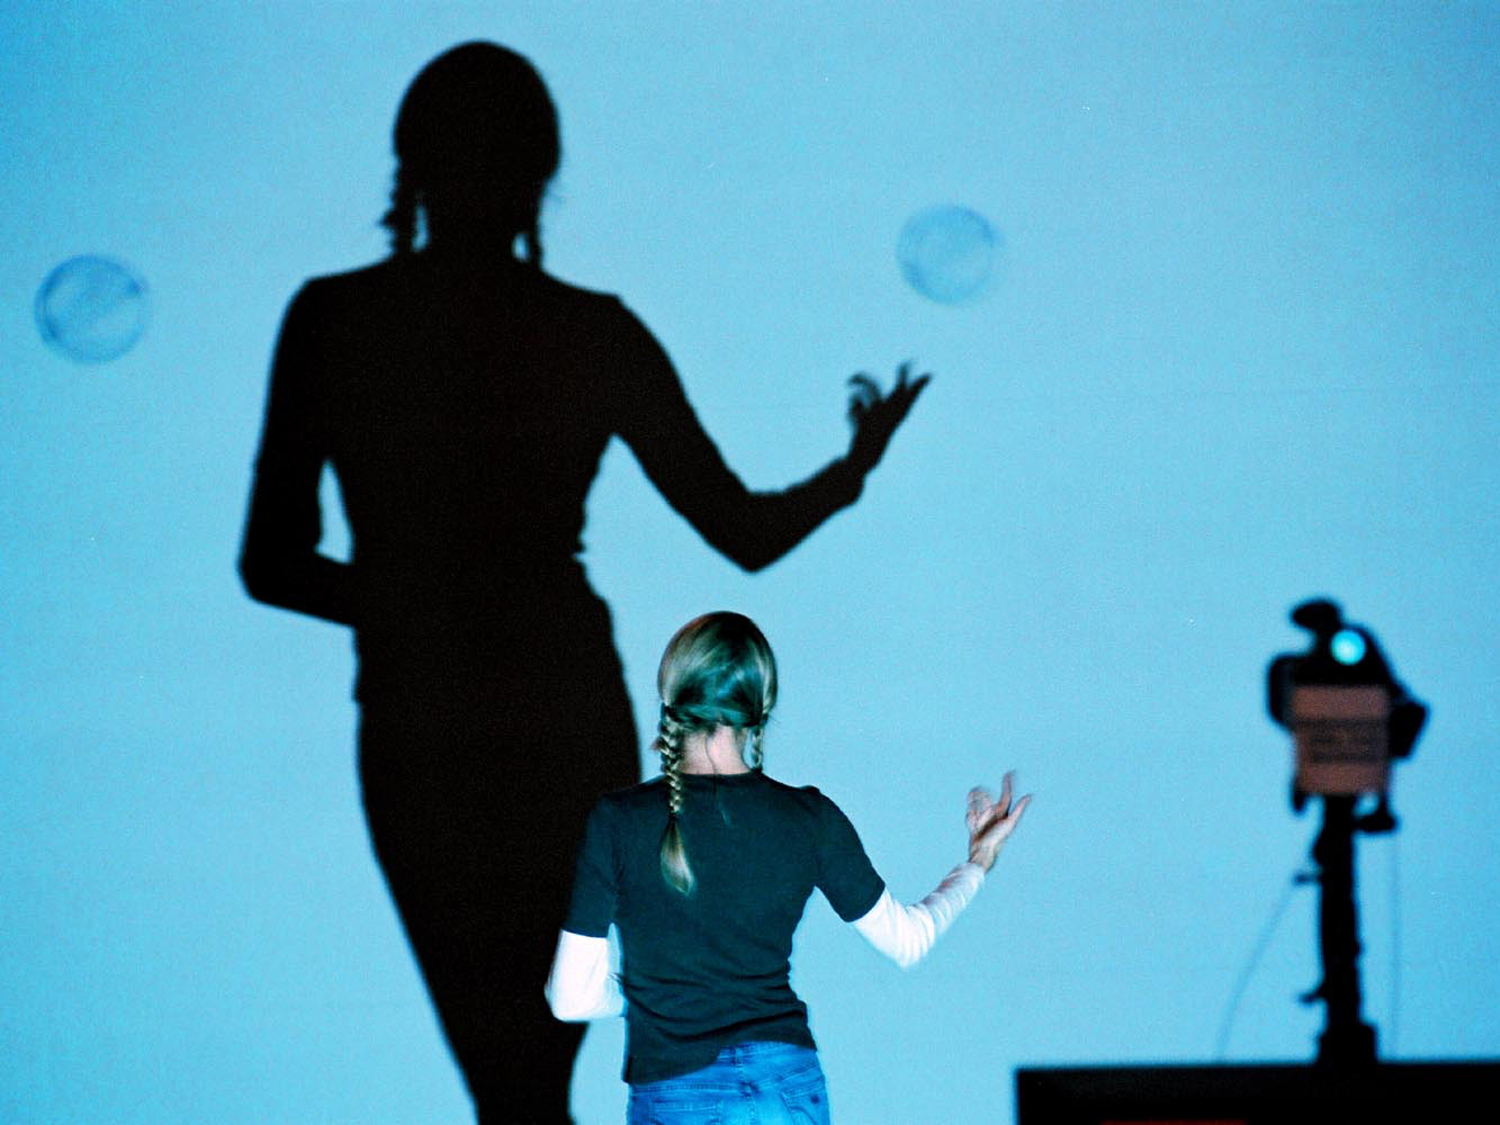
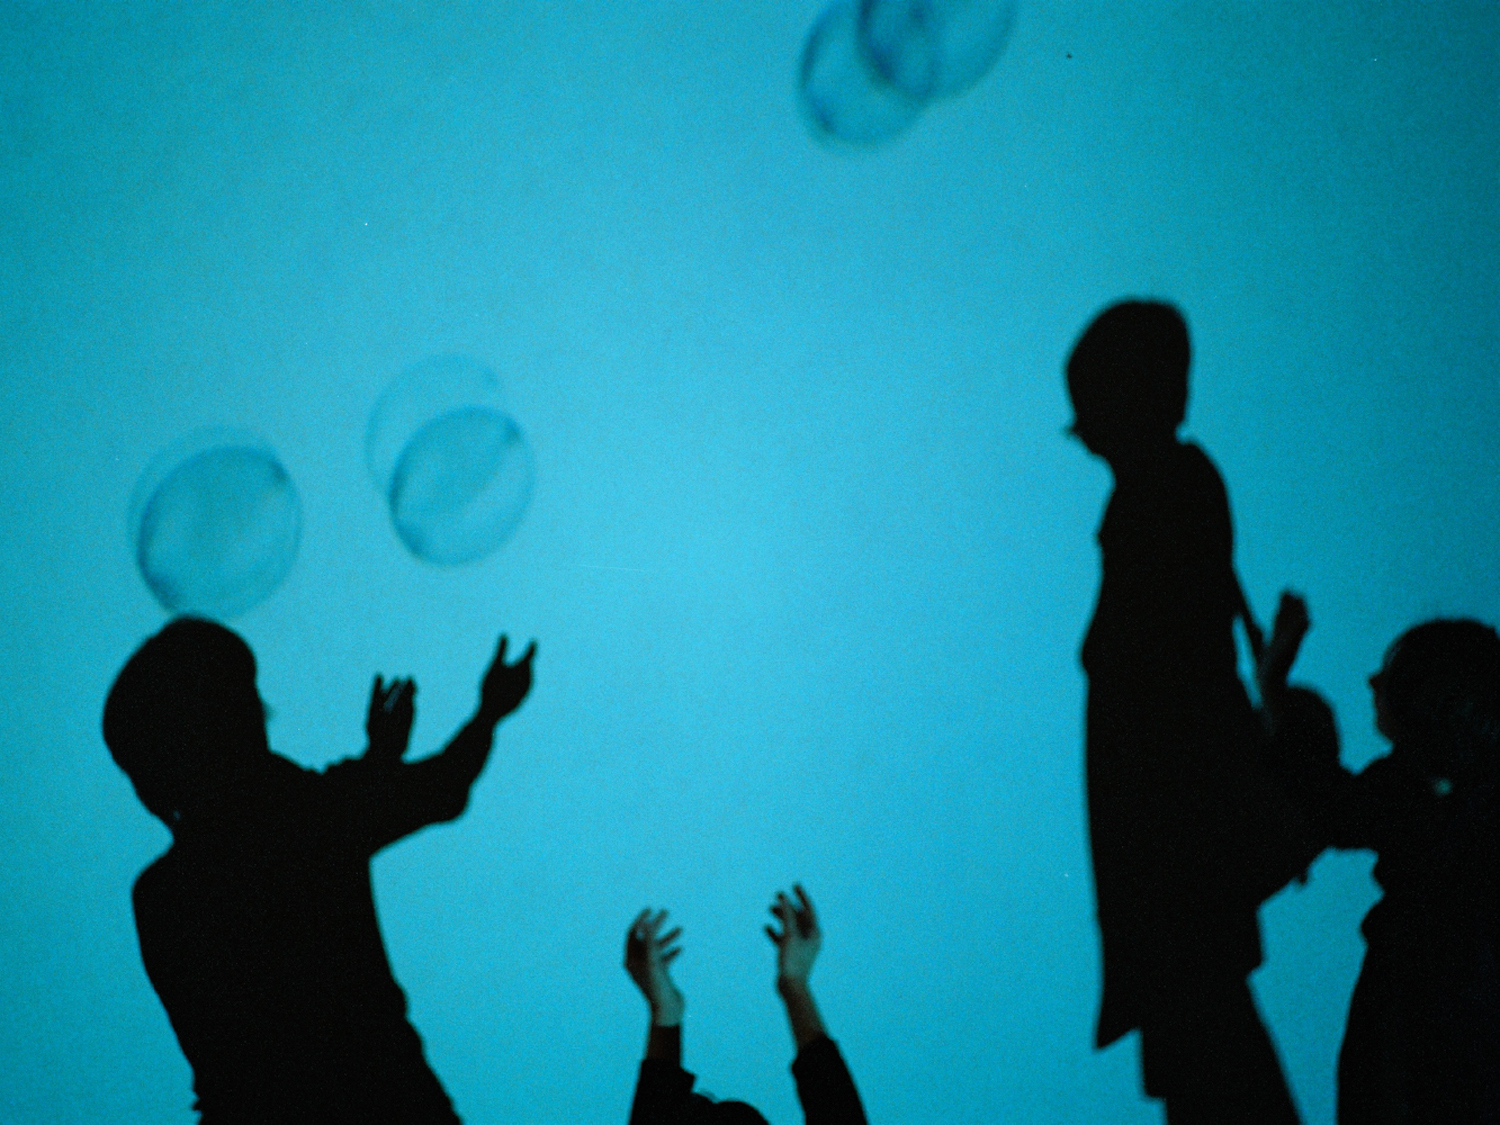
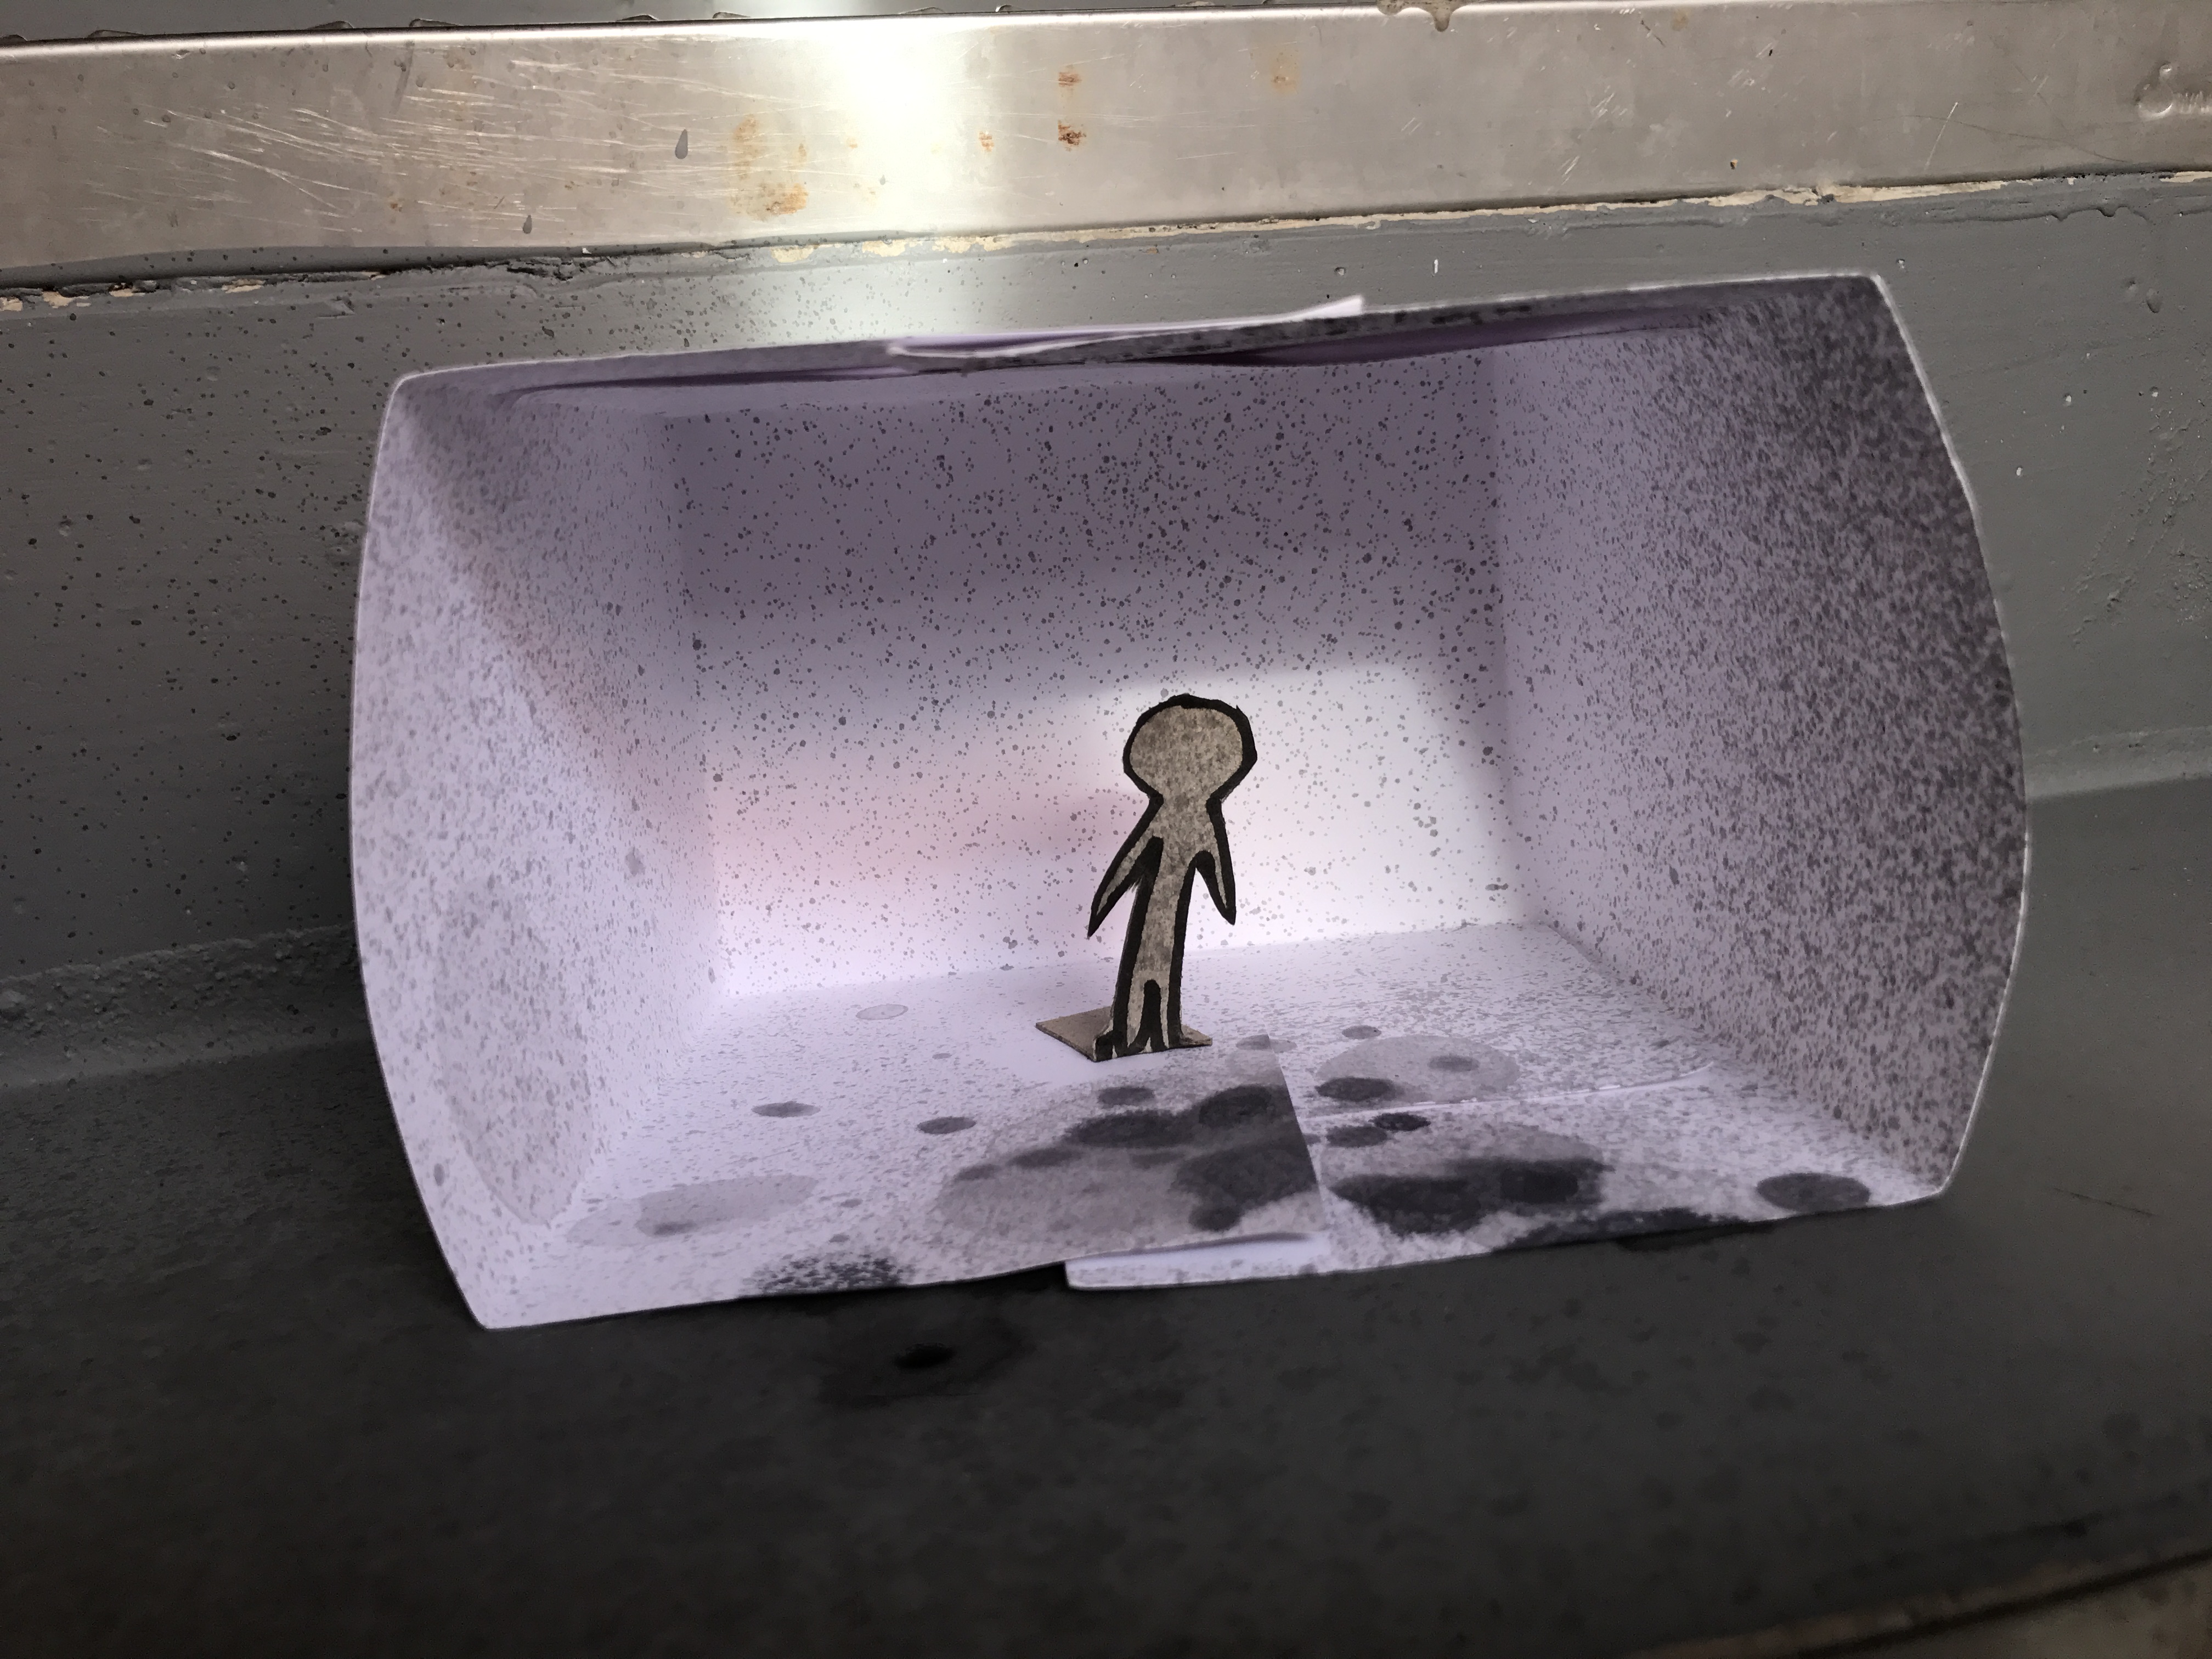
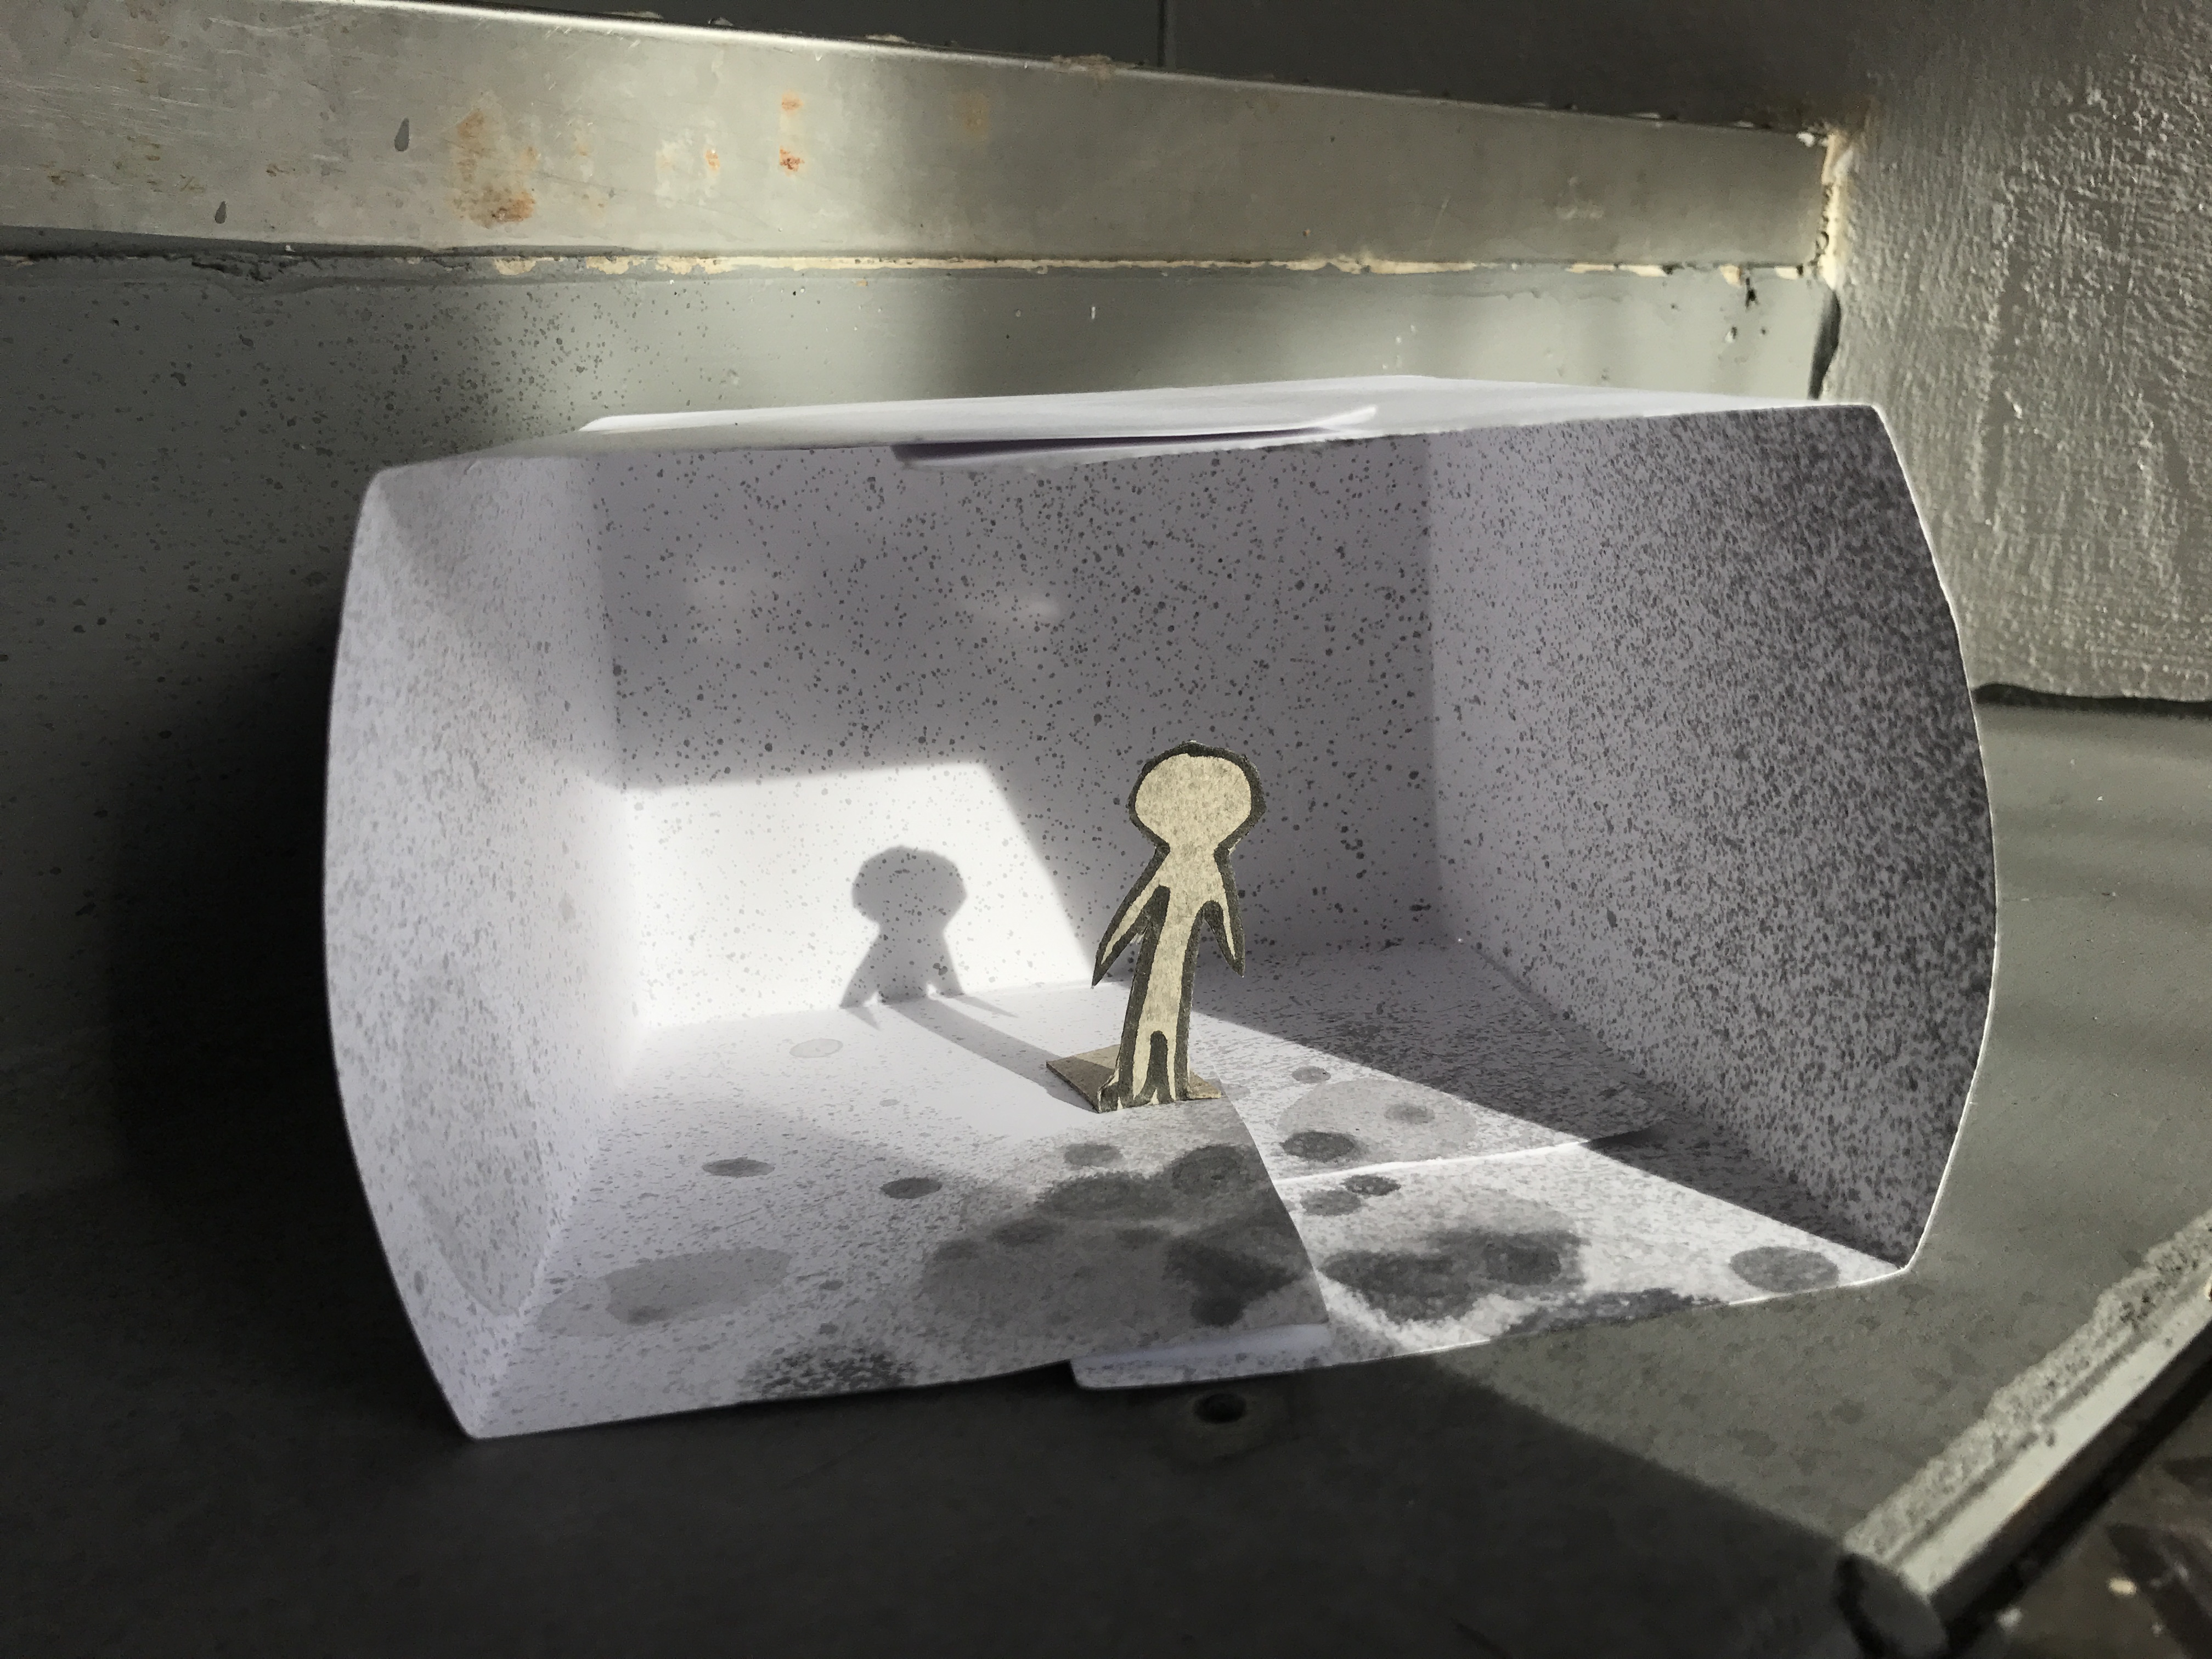
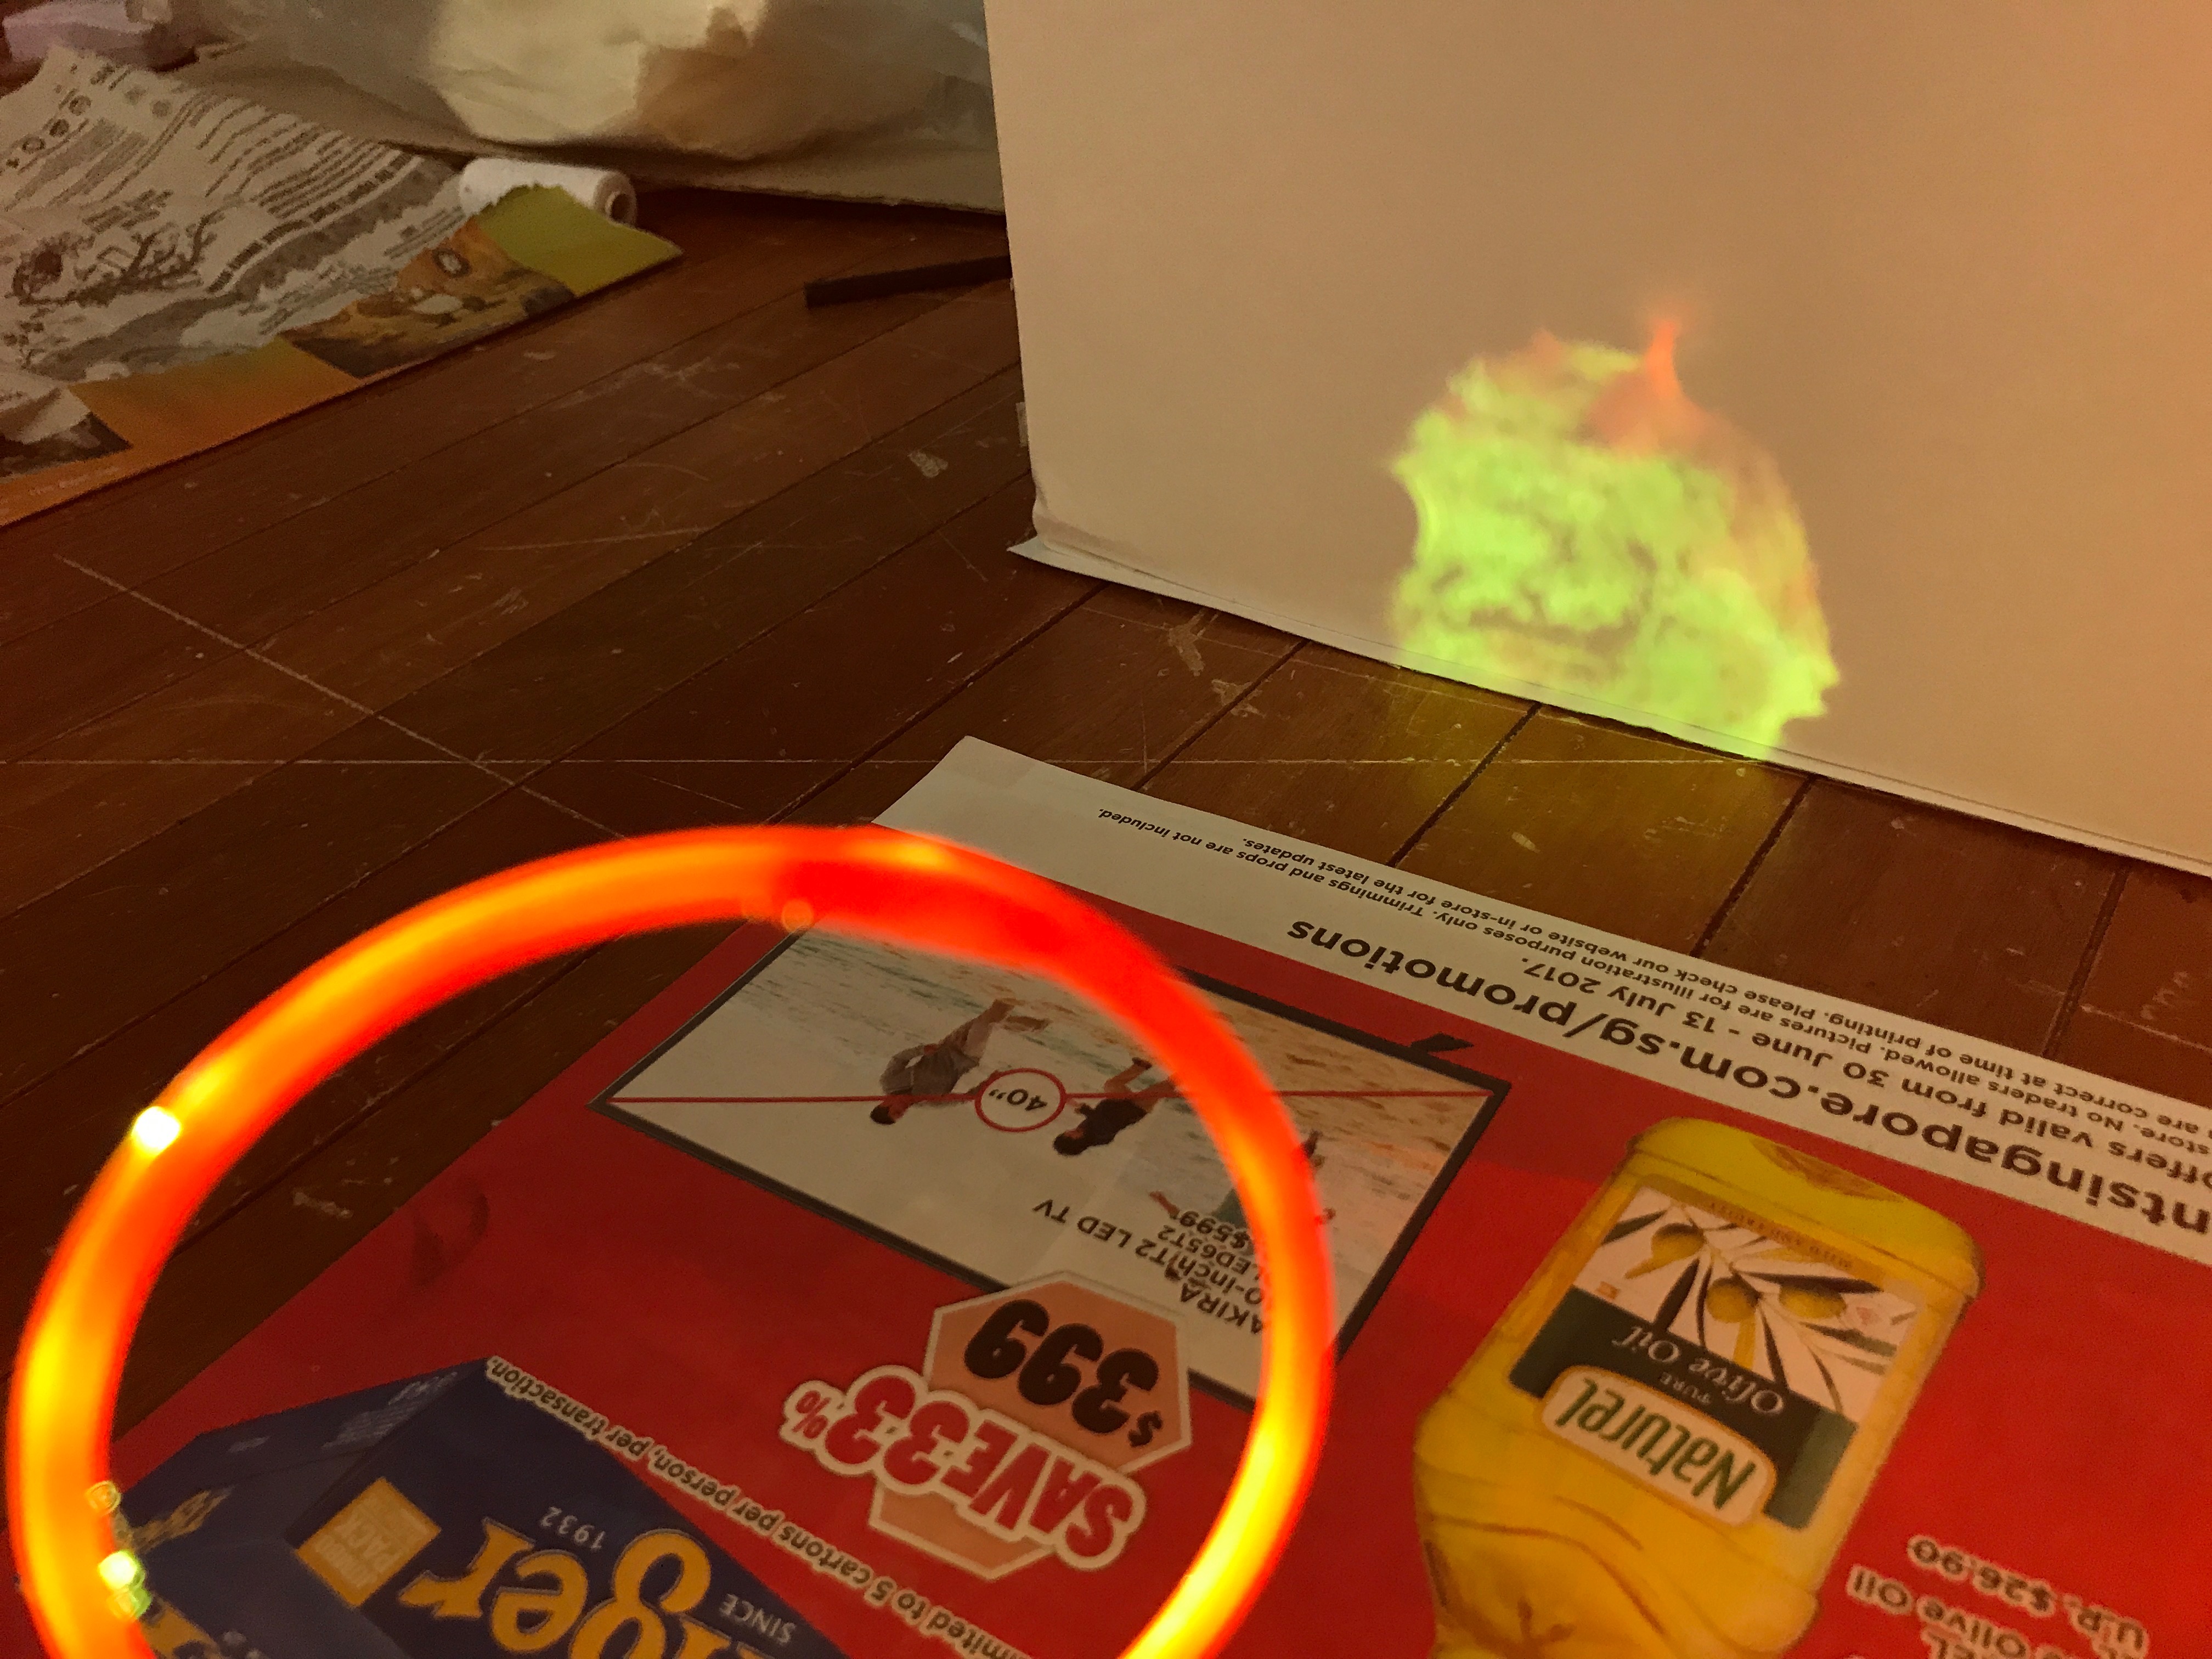
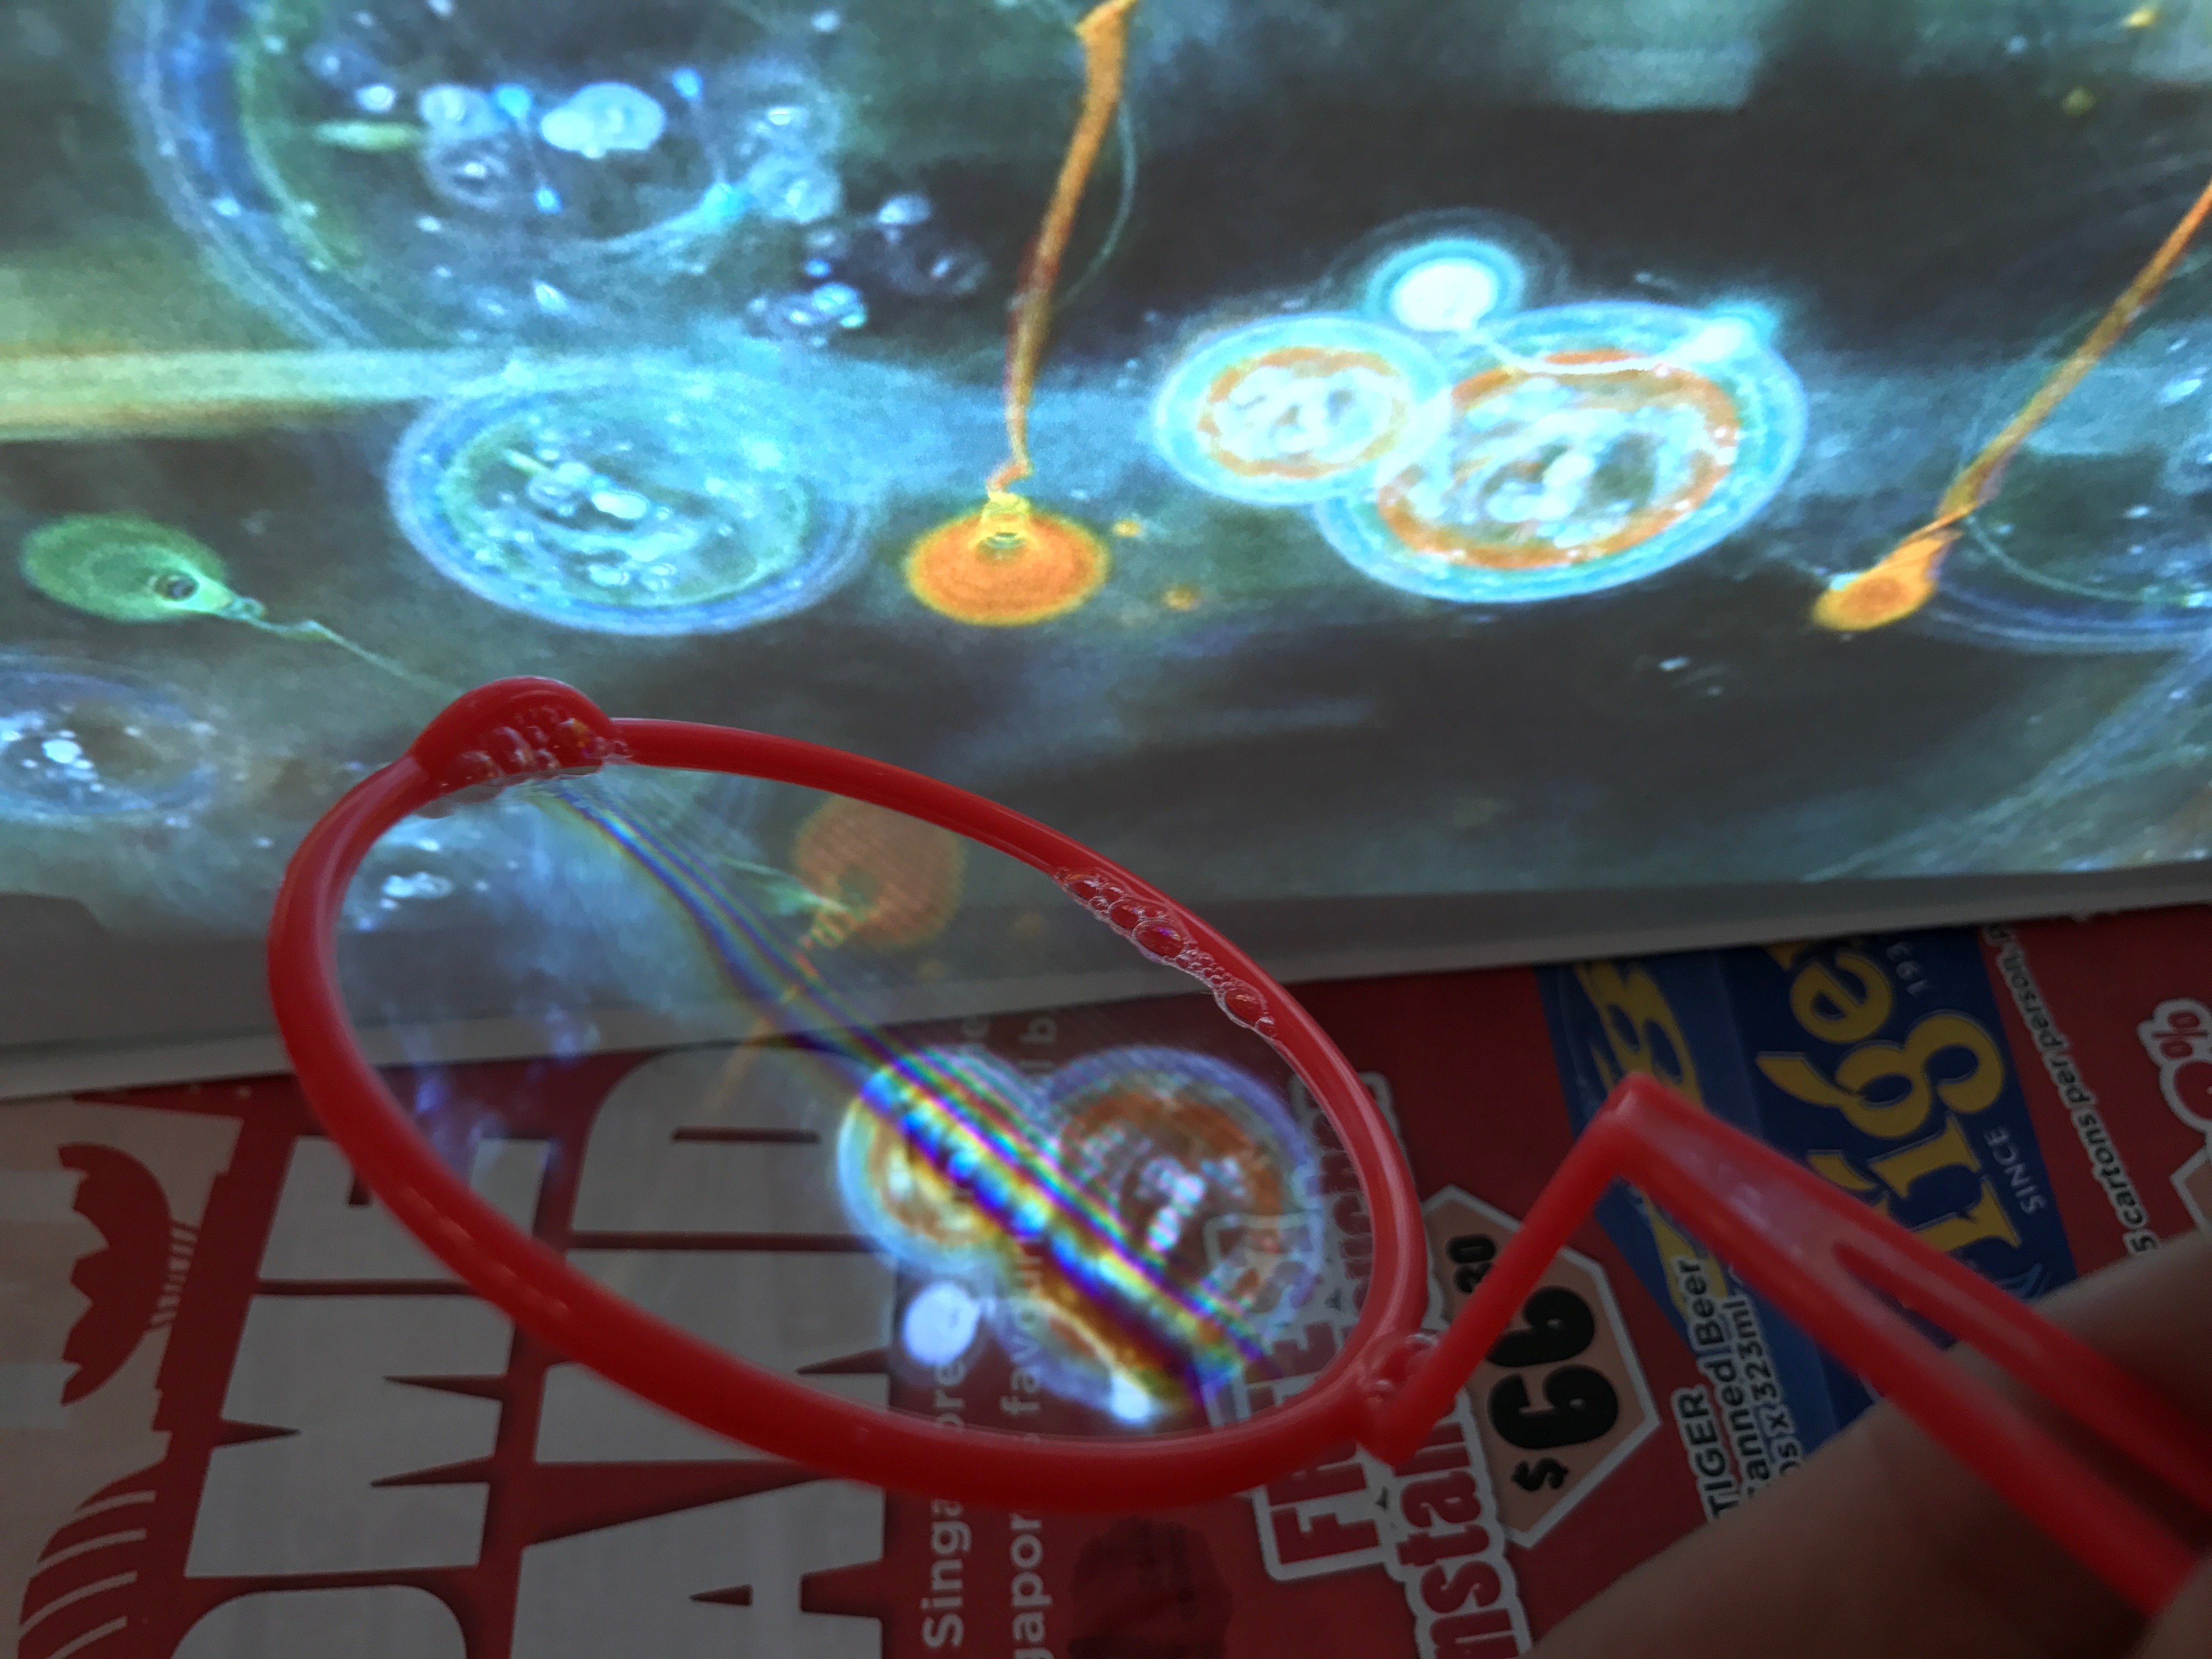
As the programming for the facial recognition, and sounds were not finished yet, I just decided to cast a simple video projection pattern onto the box, and test out the effects on the bubbles.

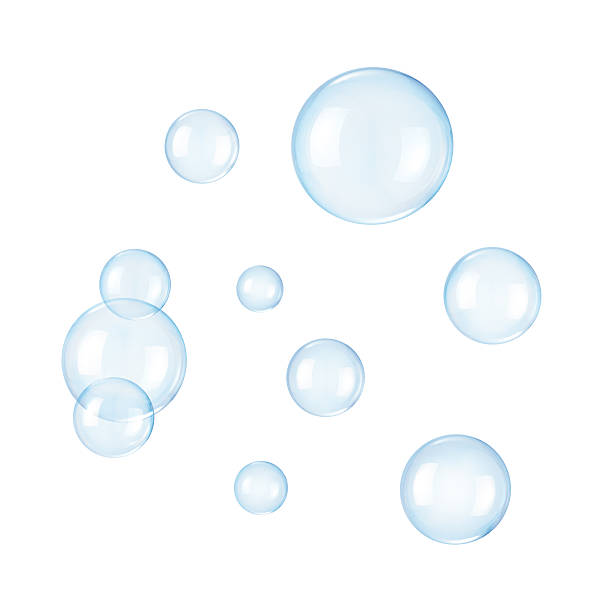
Also, though I intended the bubbles to be like these (see below),

Small bubbles singular form
Singular large bubble

due to the set-up structure, I could at most manage a large bubble or two, like this (see above).


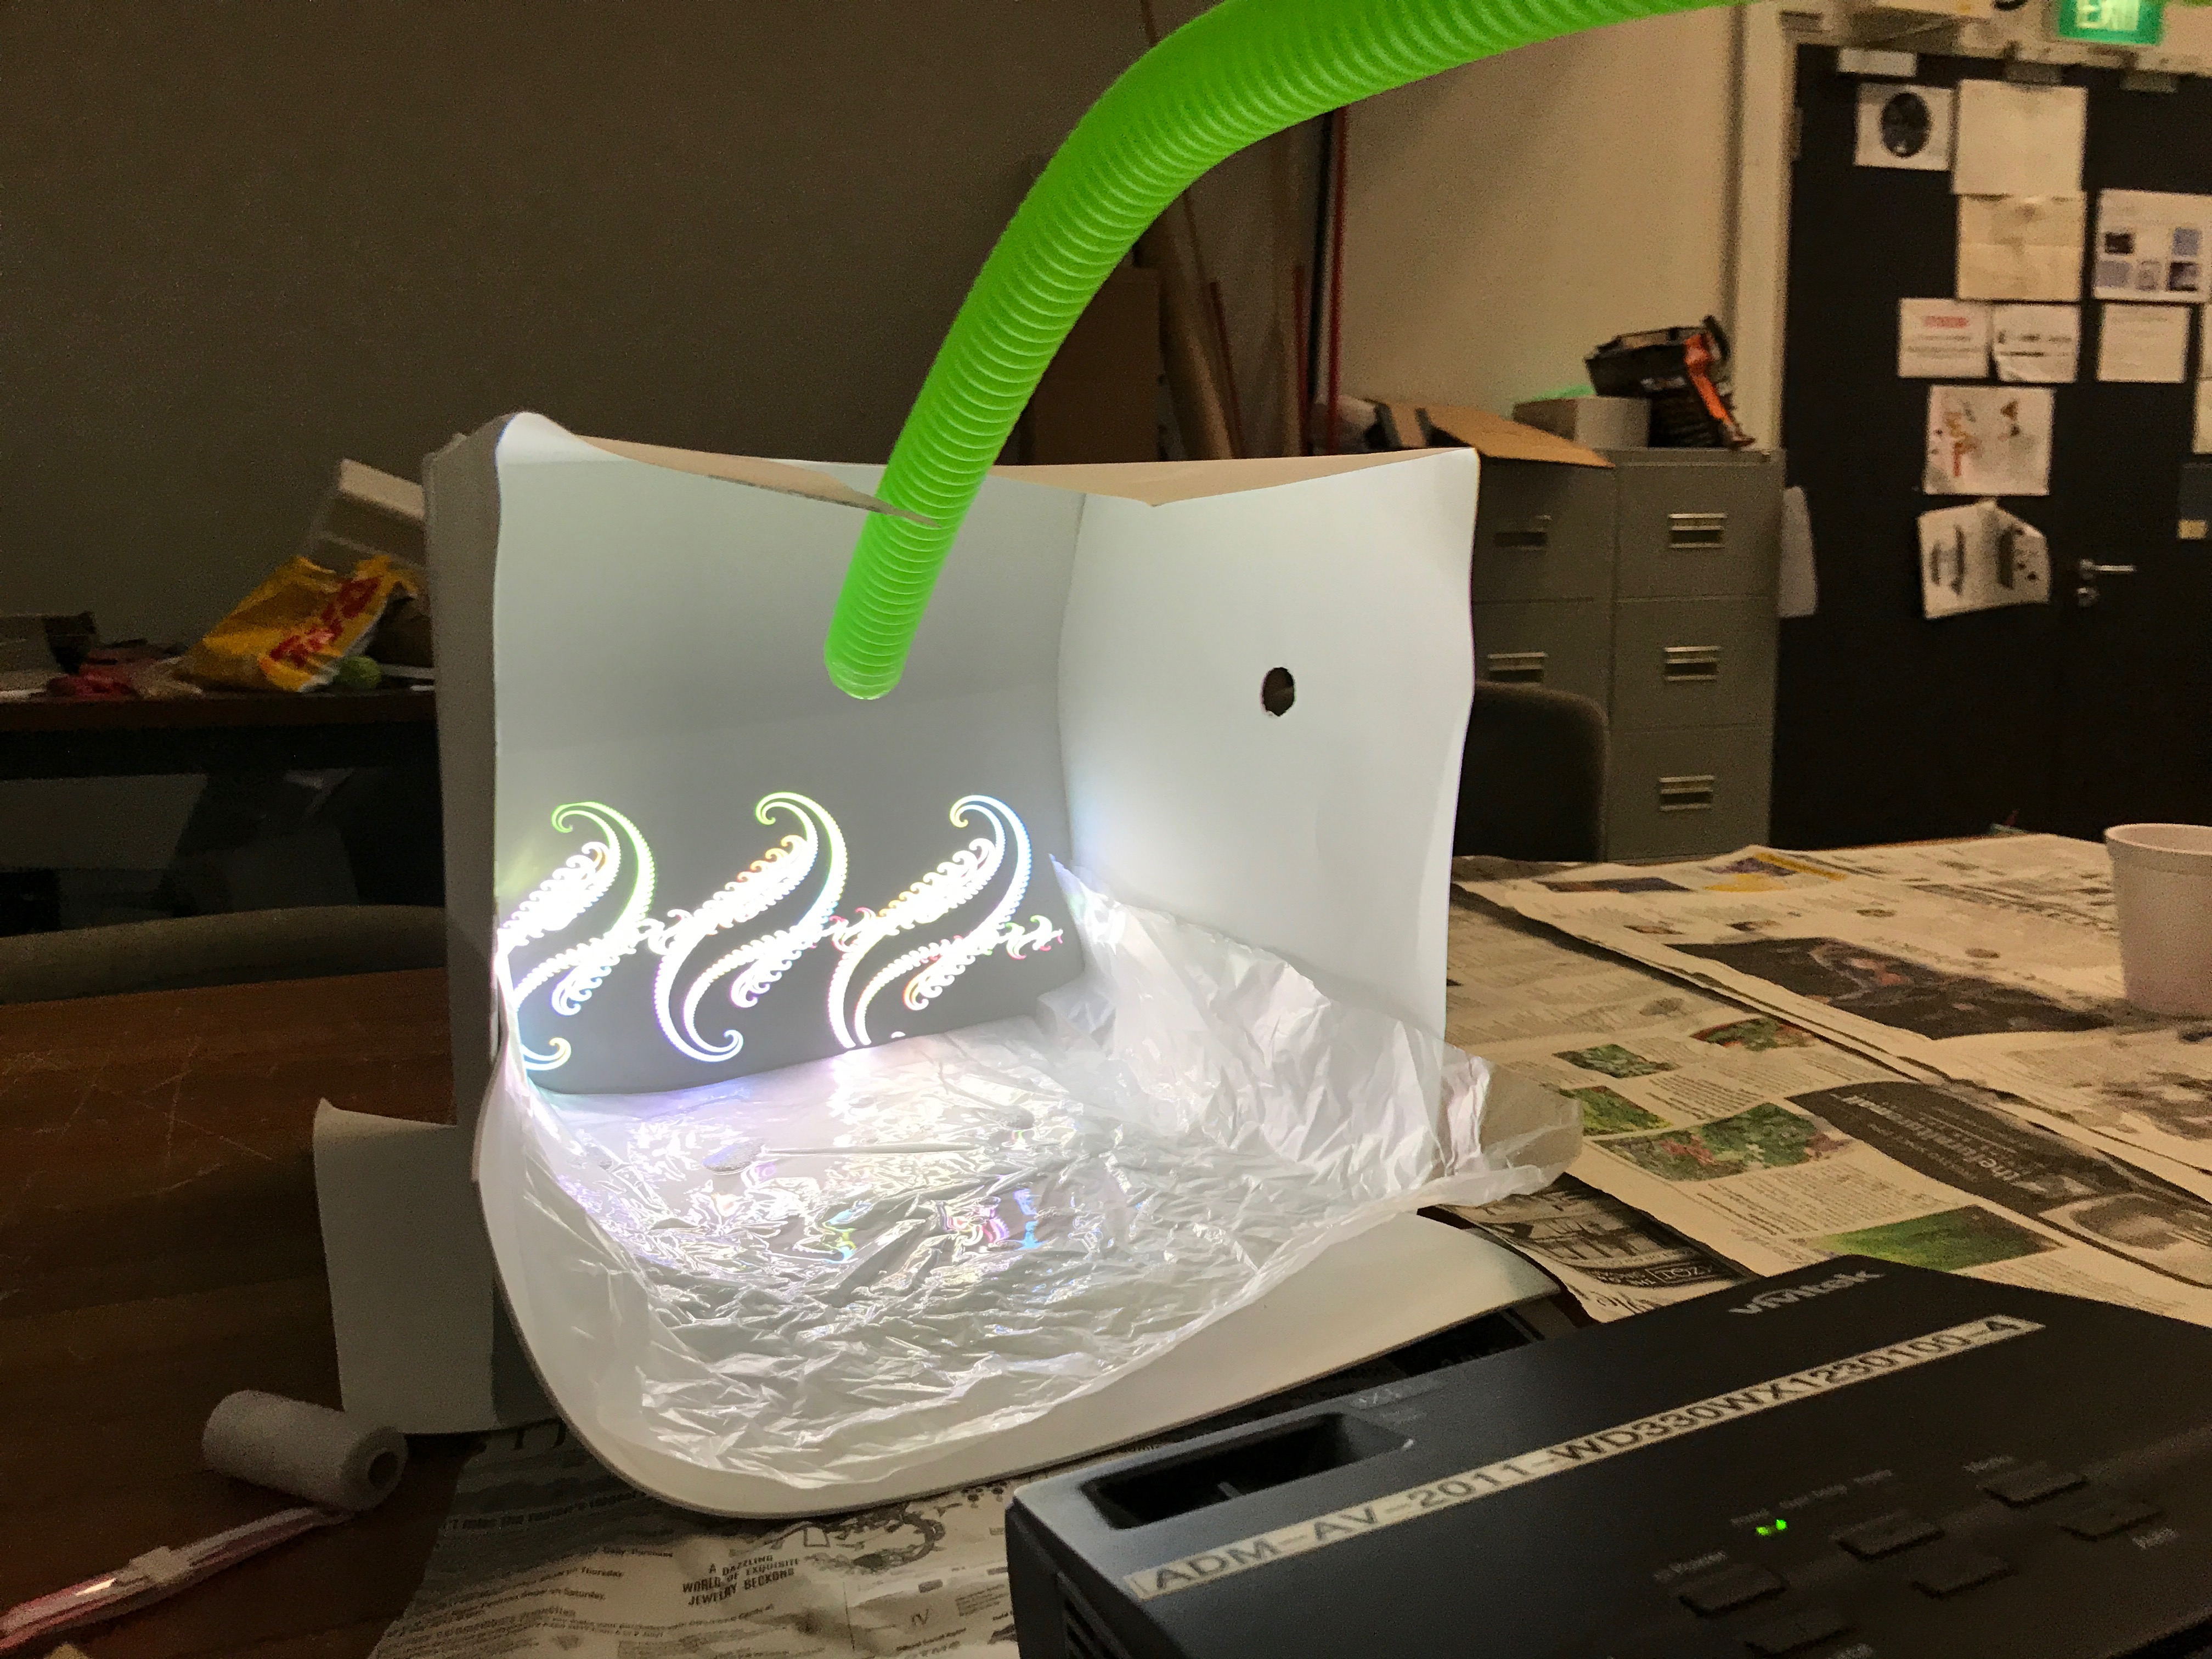
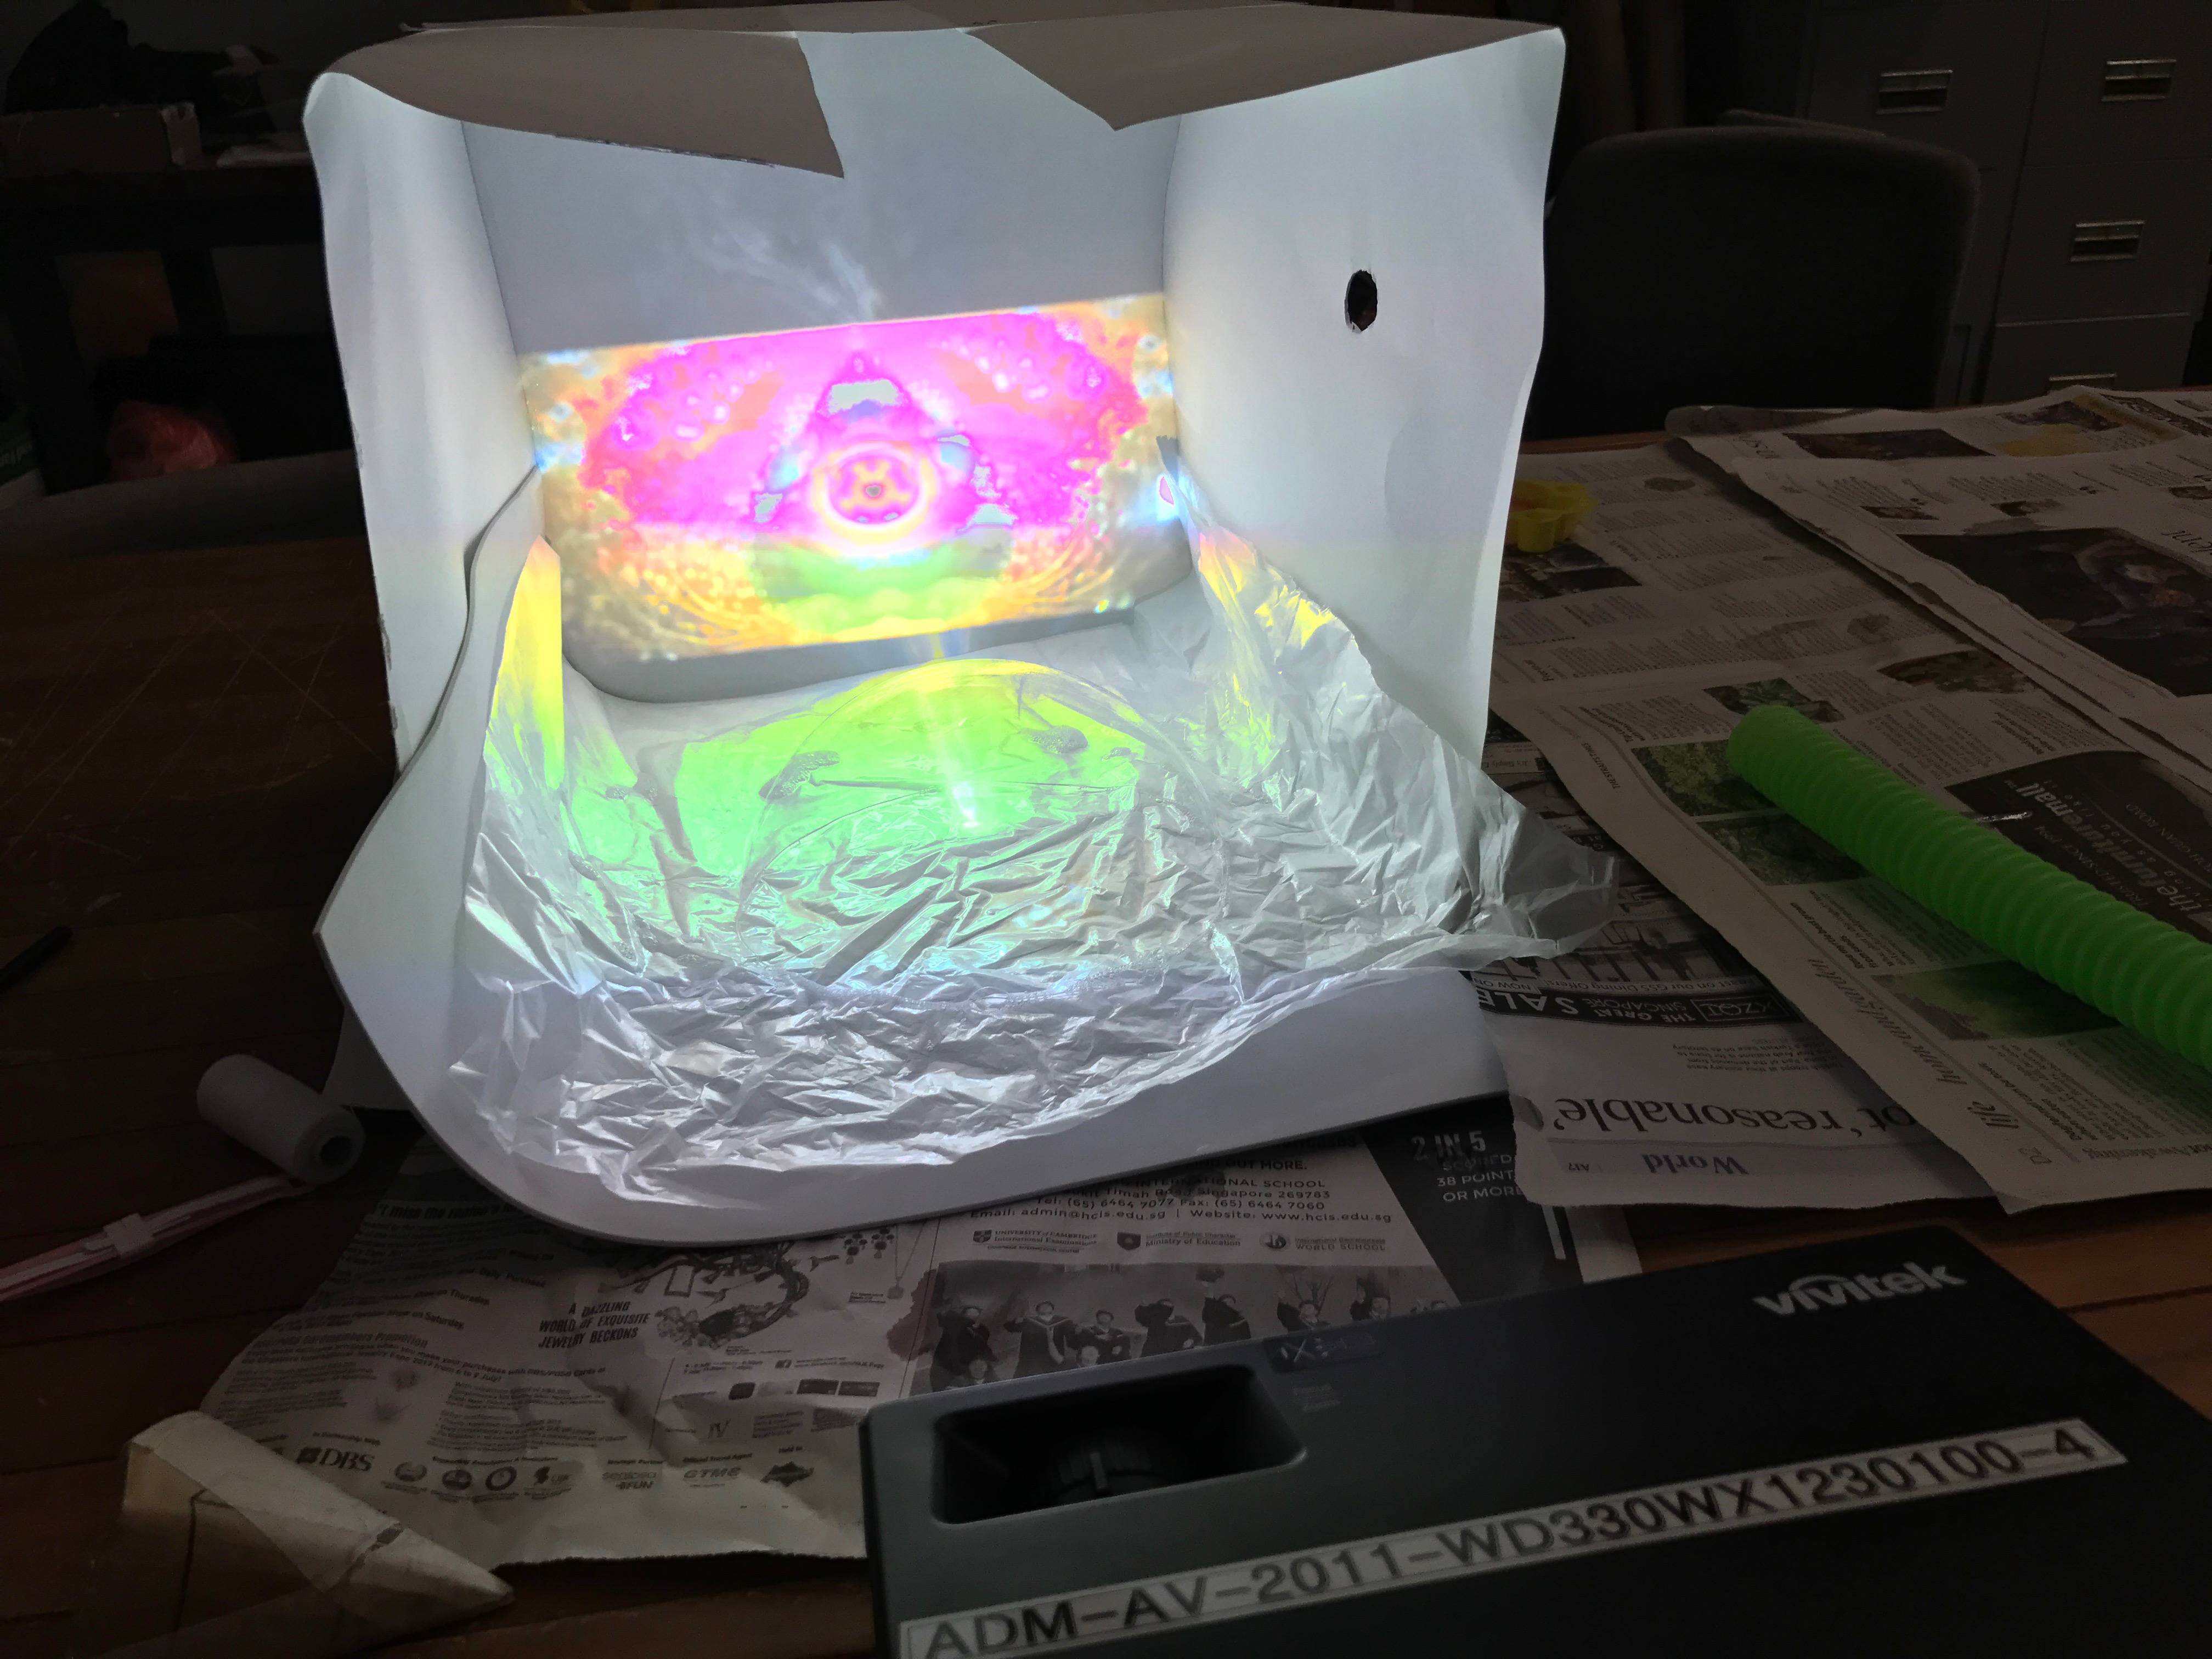
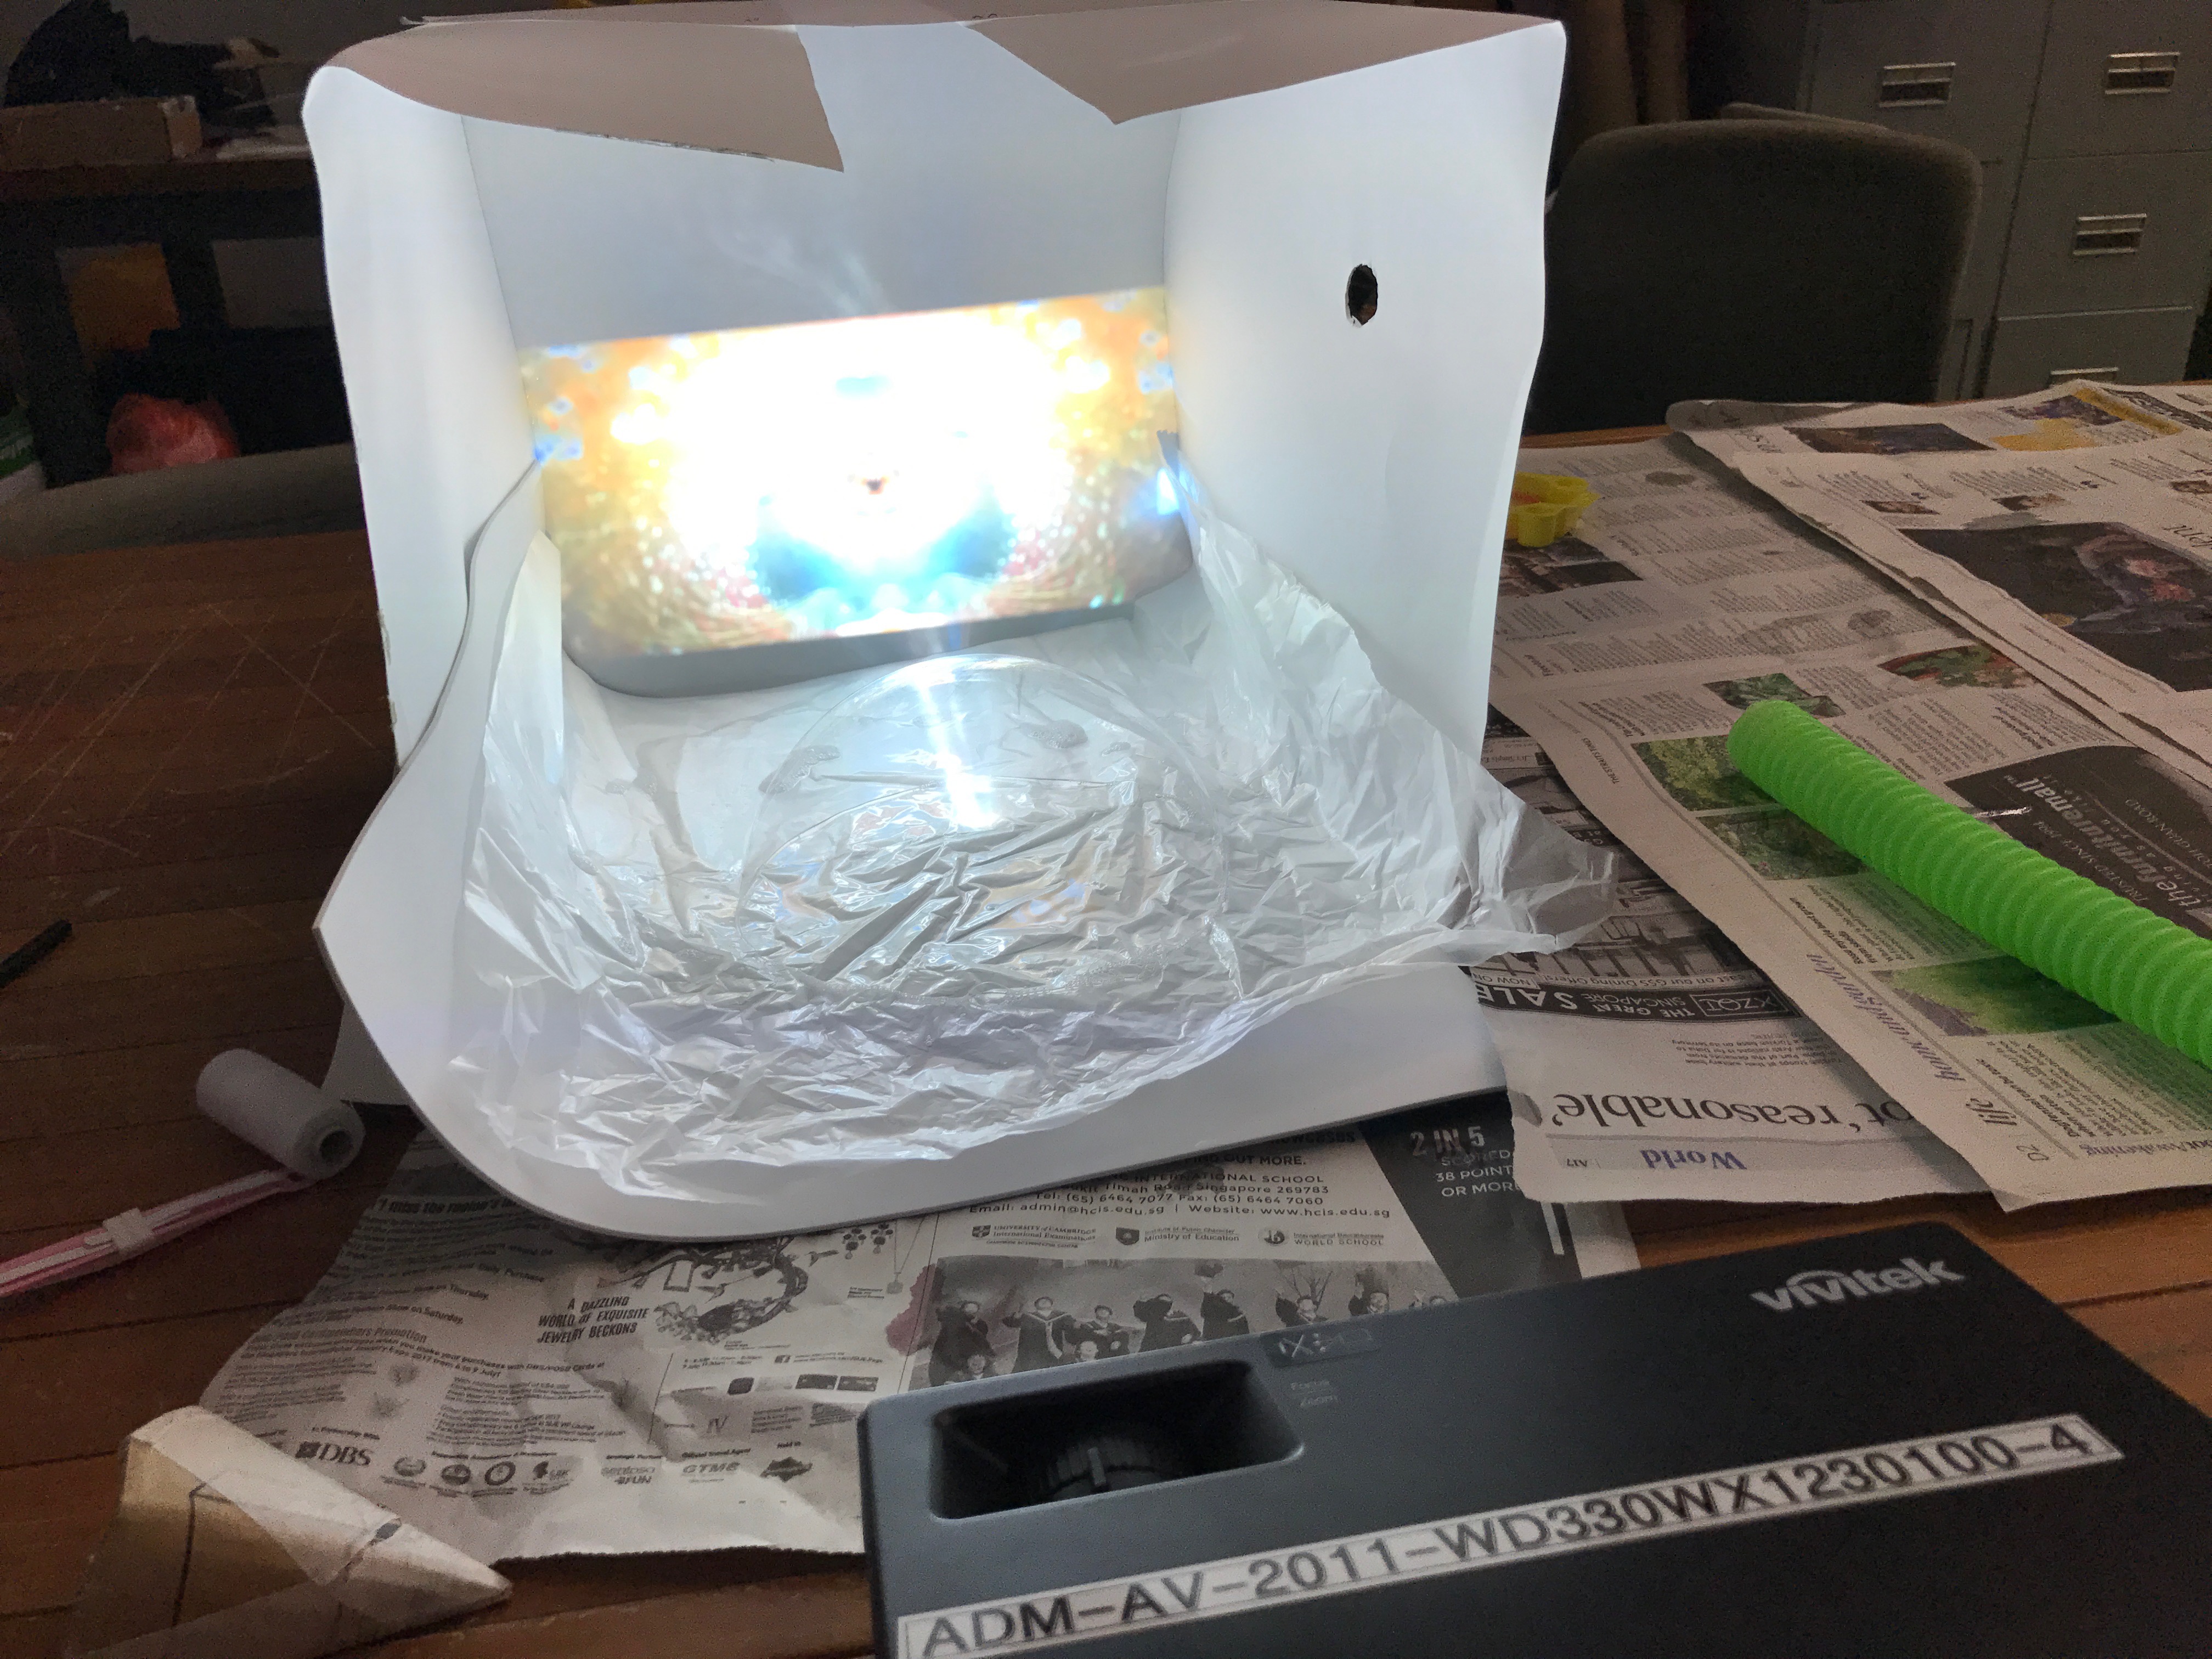
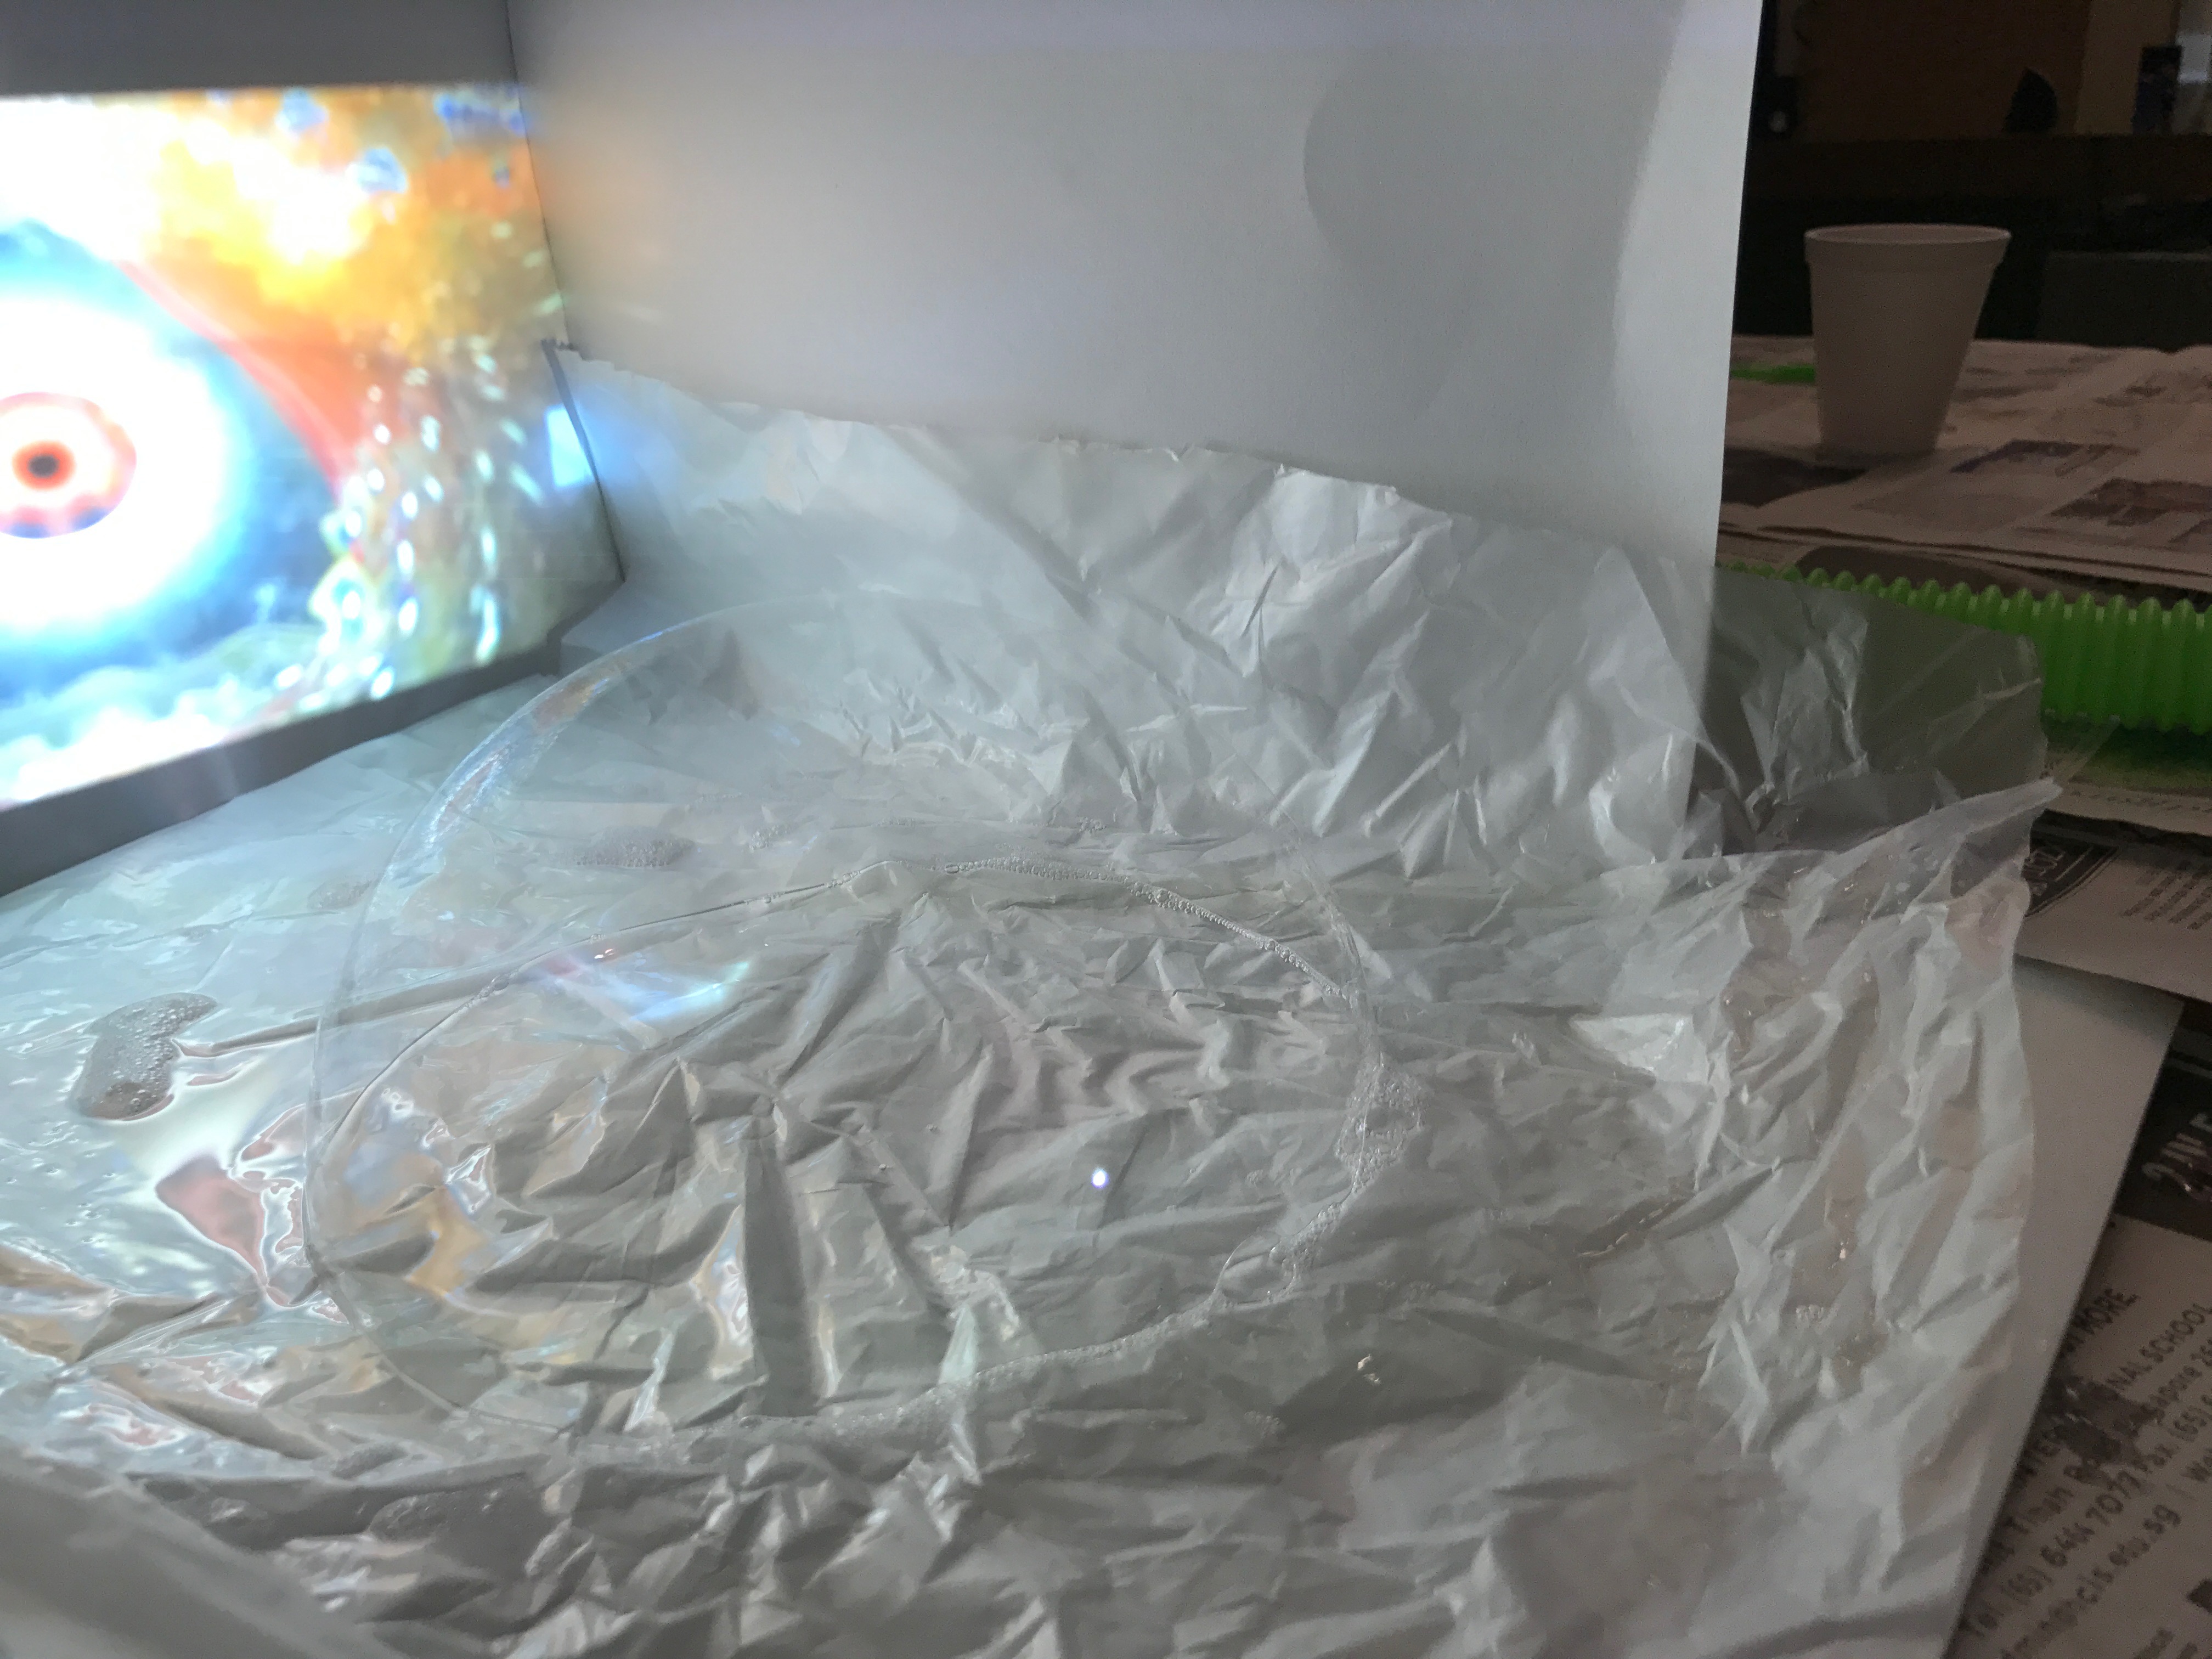
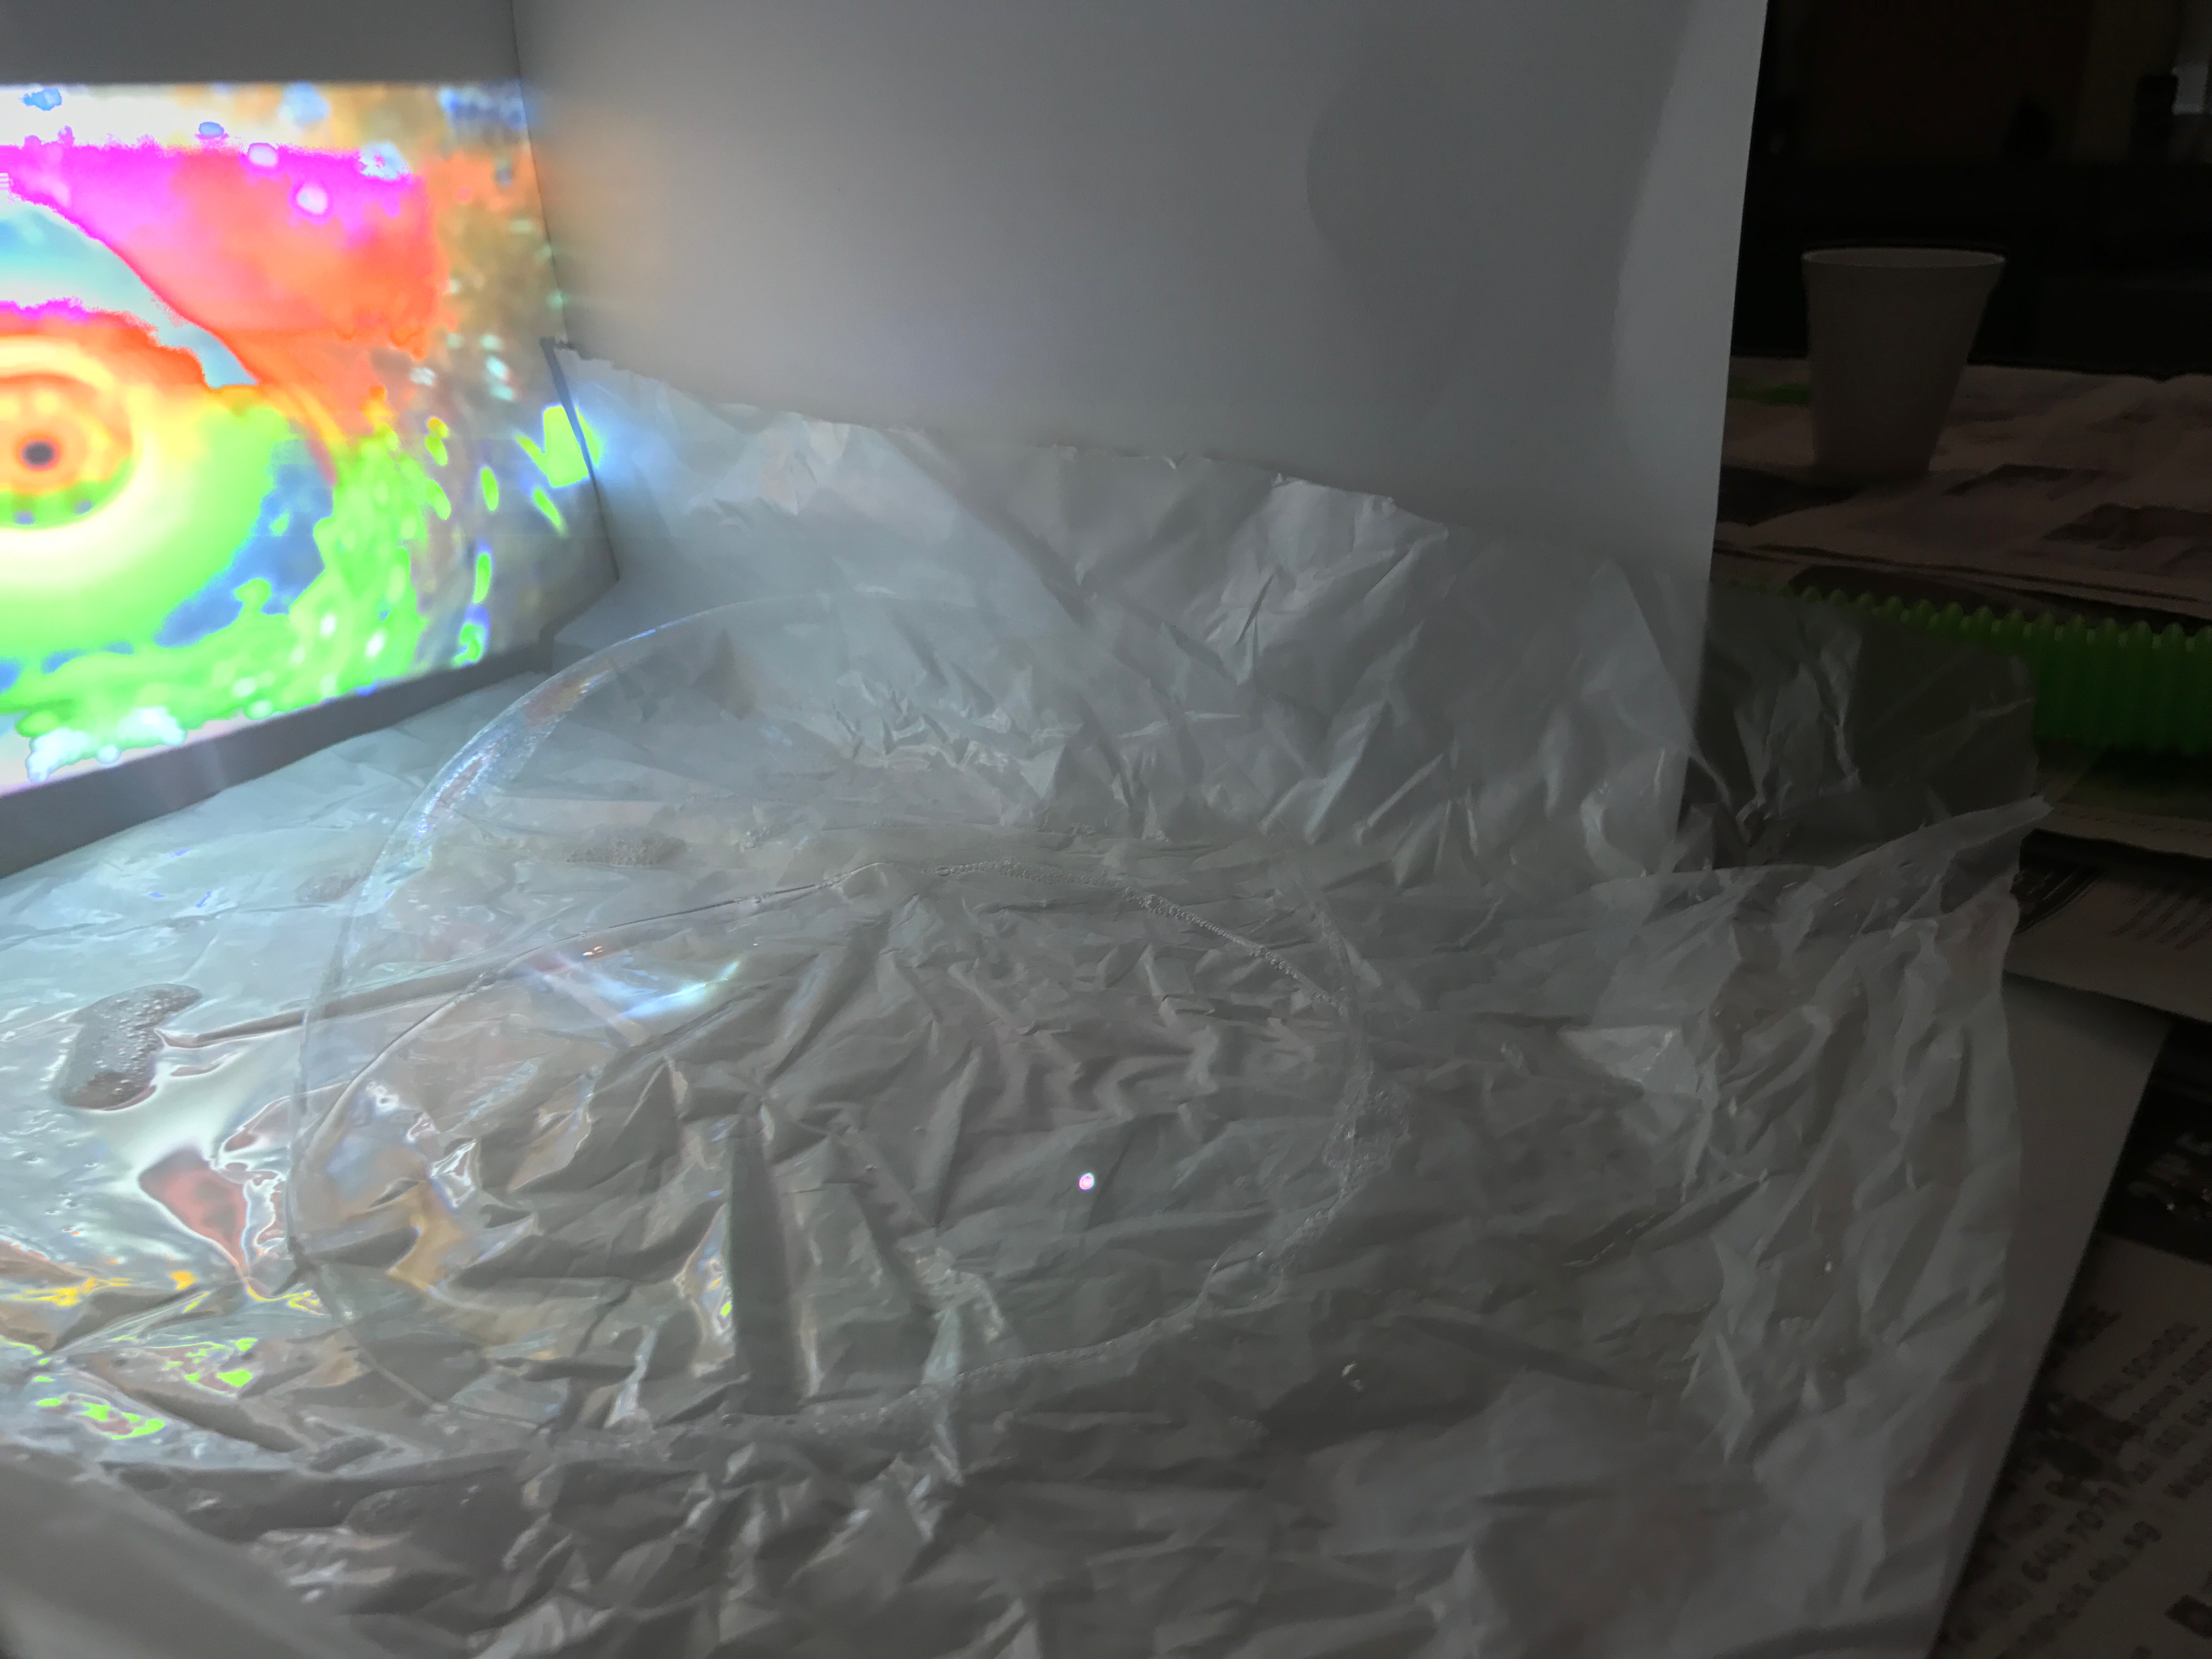
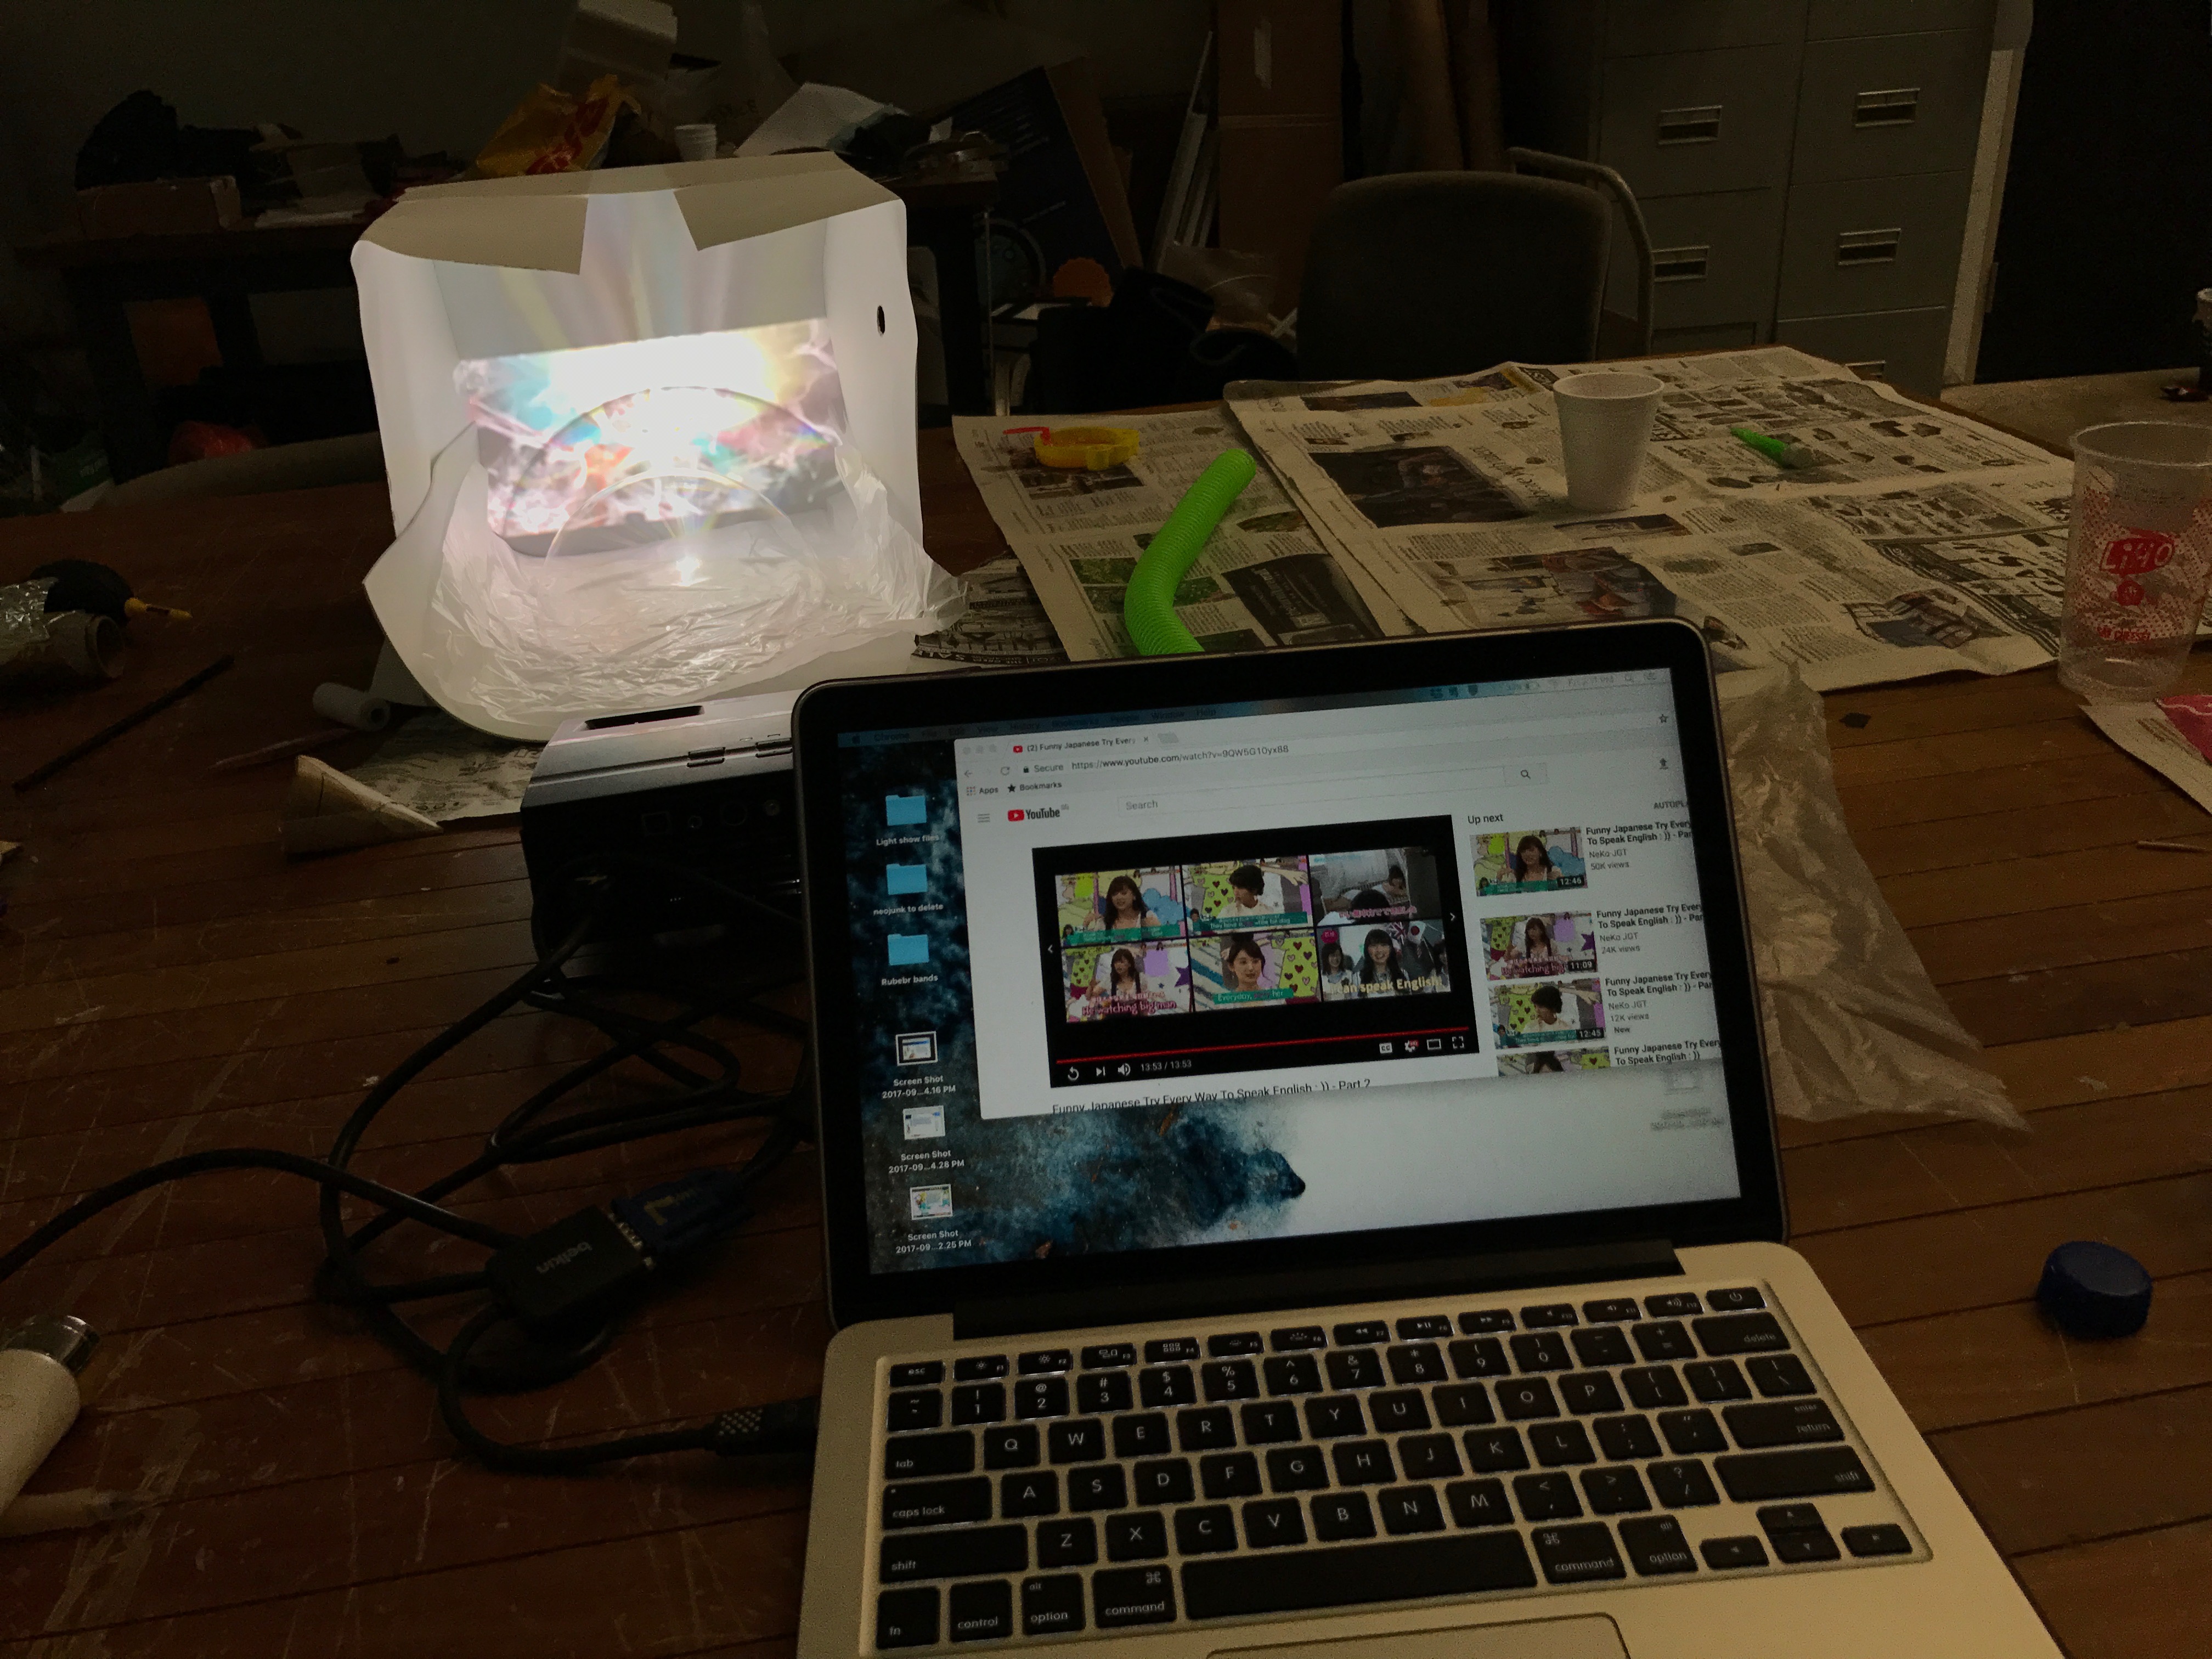
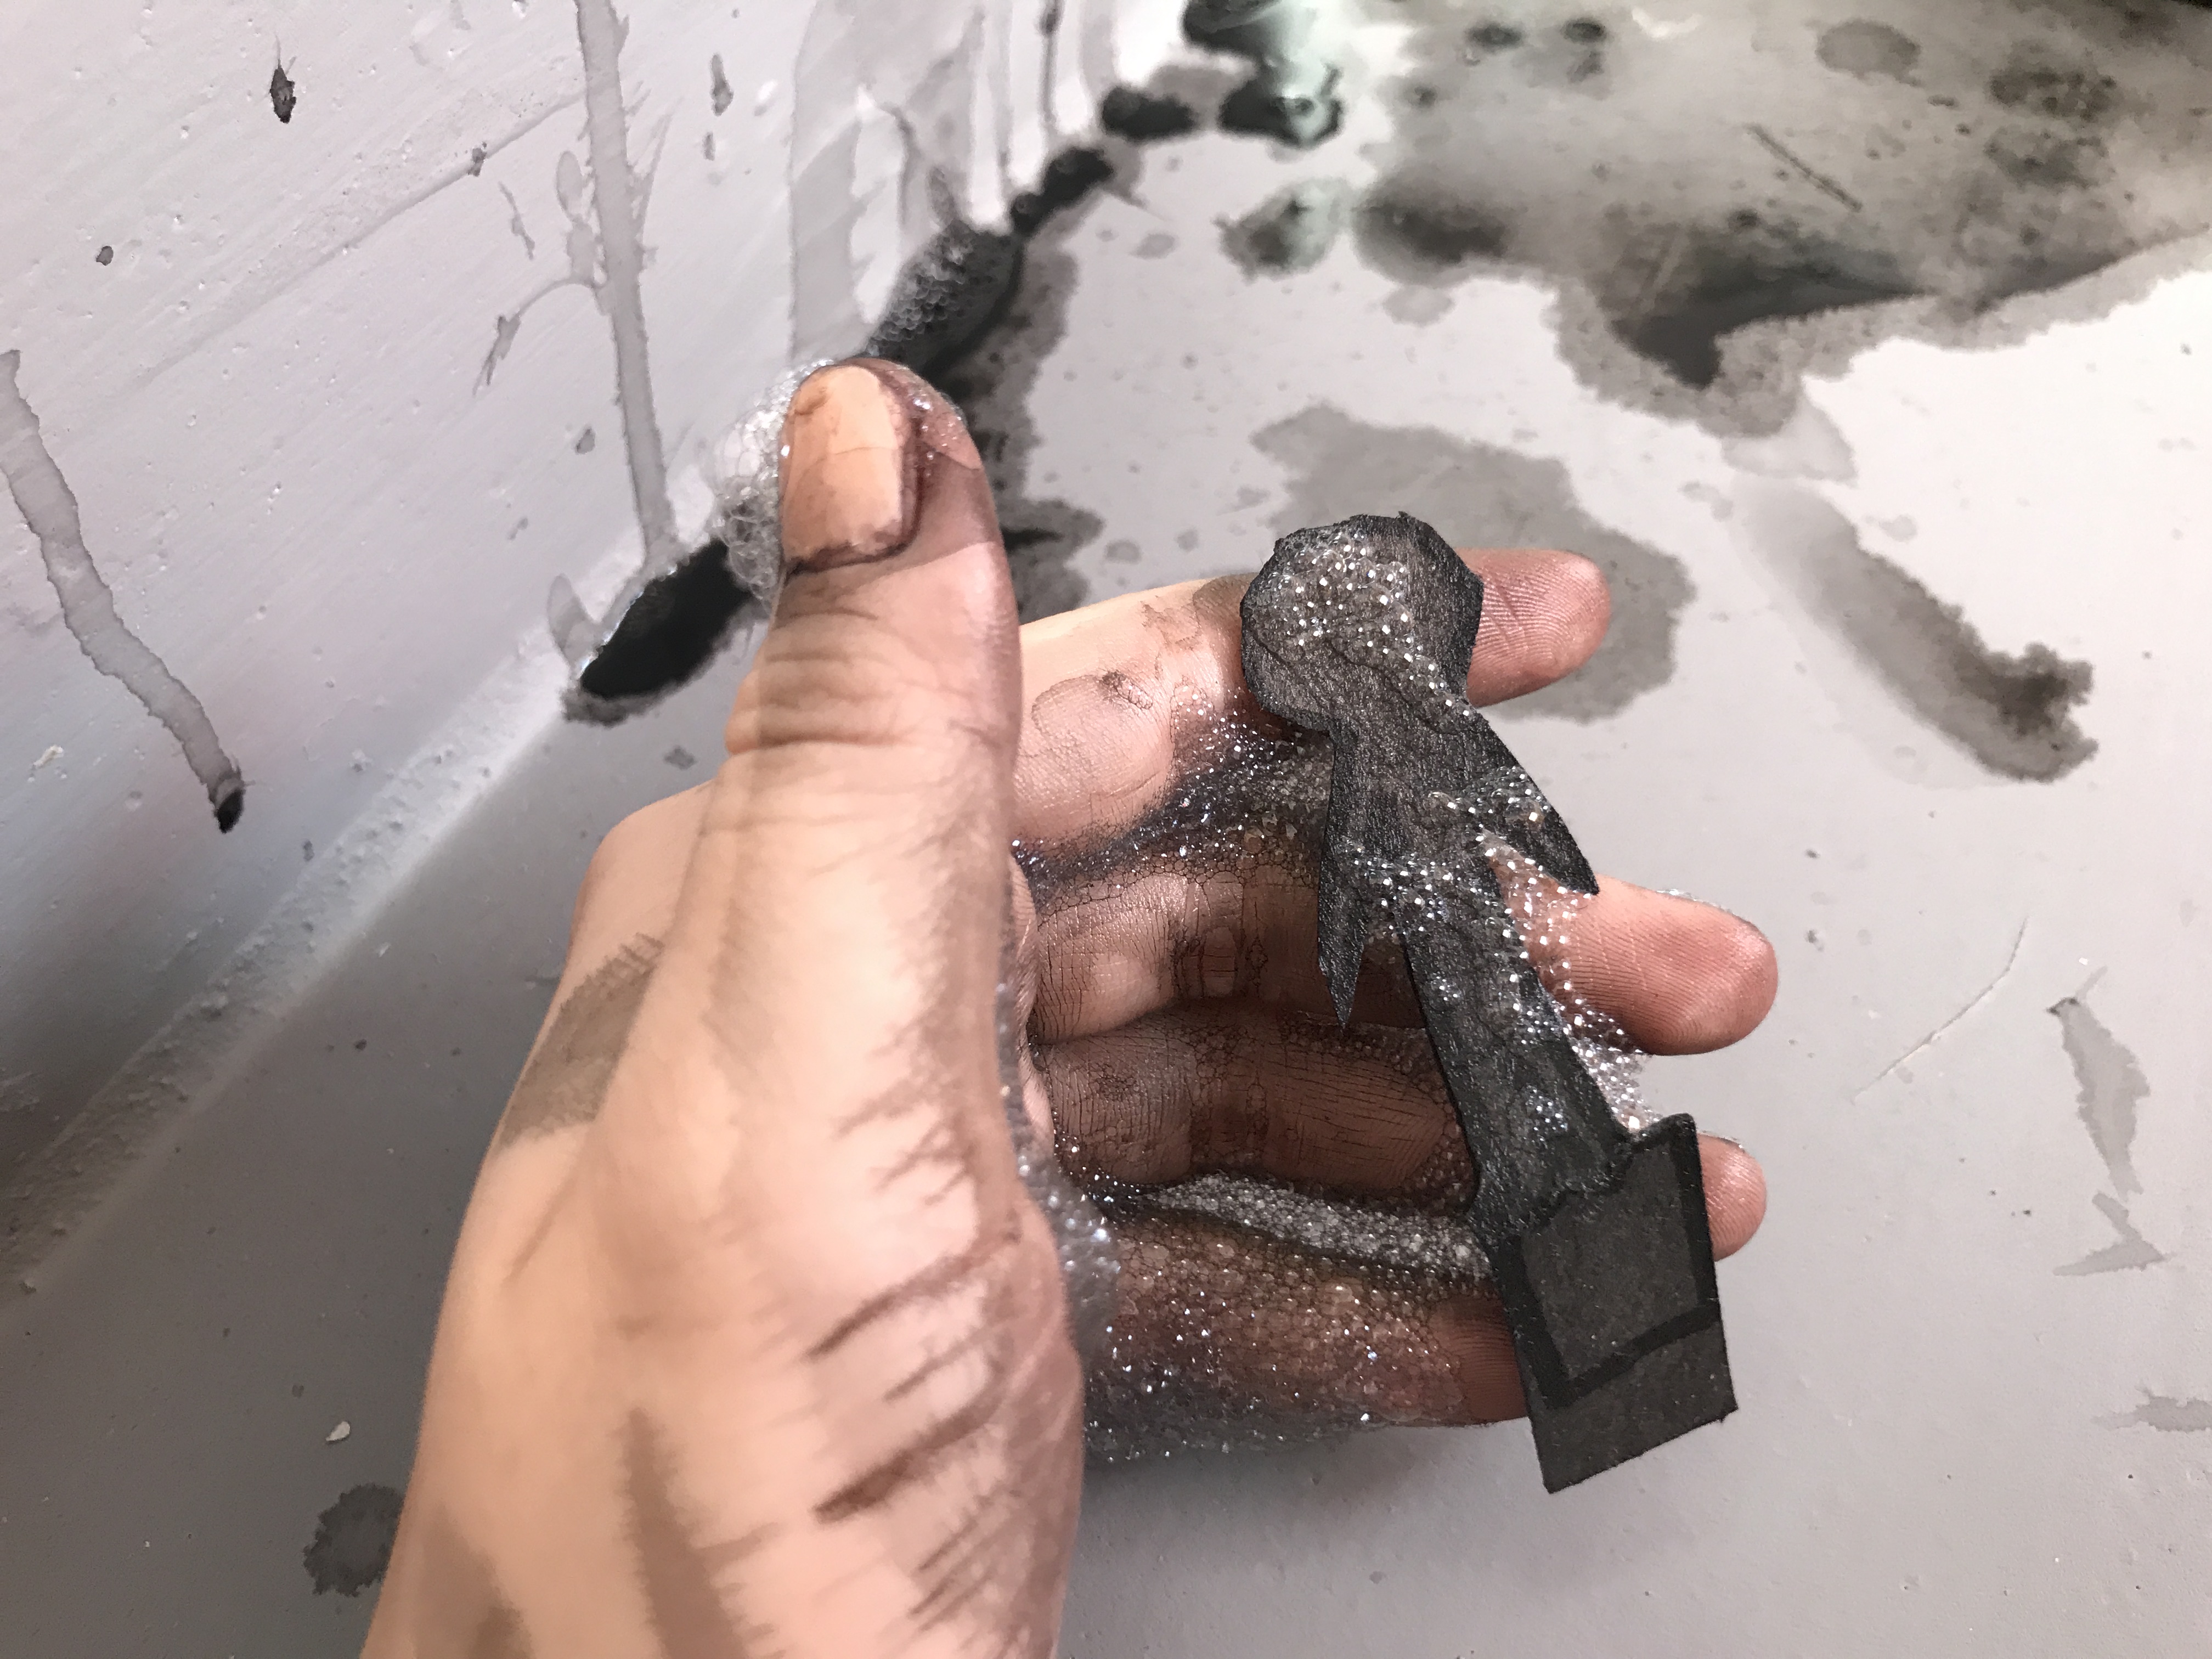
However, I realised that the quantity of light given out by the projector wayyyy overpowered the bubble, and reflected itself at the back of the box. Also, the bubble was exceedingly fragile, and with the small size of the box (and hence short height), there was not enough space for the bubble to poetically flow down as I had wanted it to. The reflection on the bubble, needless to say, was an extremely poorer version out of the many reflections I obtained from my previous experiments.

I received several feedback, that perhaps the peephole was way too small and insignificant to push through the intricacies of the bubble projection, and I could perhaps use a different camera to capture the reflection and re-project it on a larger screen. This way, it would make it easier to look at the projection, and allow a larger group of people to look at it.

Another feedback I got was of hygiene – having visitors to blow through the same tube was unclean, and I did consider providing disposable plastic ‘mouth-guards’ or disposable plastic blowing tubes. However, it was way easier to just alter the bubble blowing structure and make do without this problem.

This idea, though it sounded good theoretically and I was genuinely interested in furthering it, had to be largely tweaked for it to work.


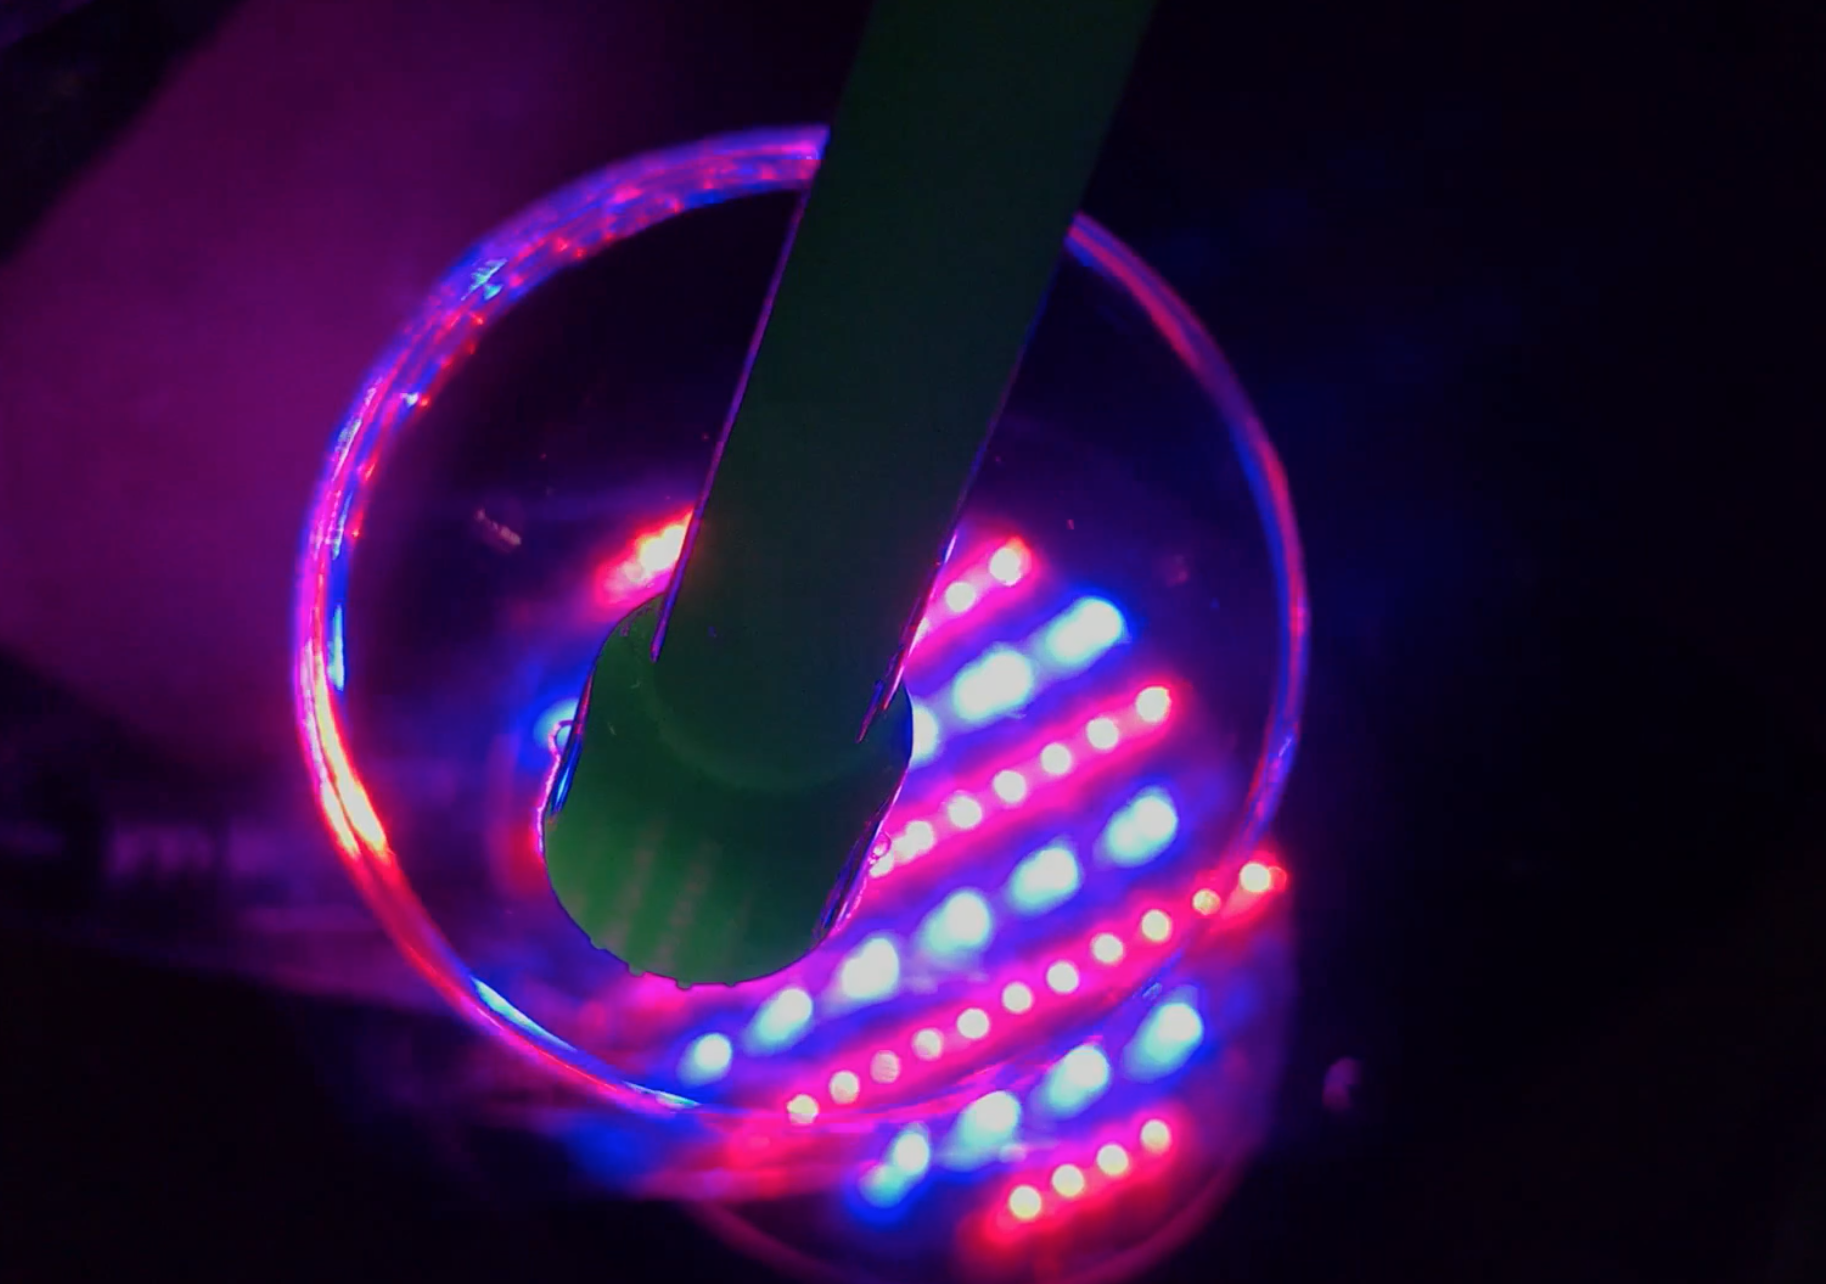
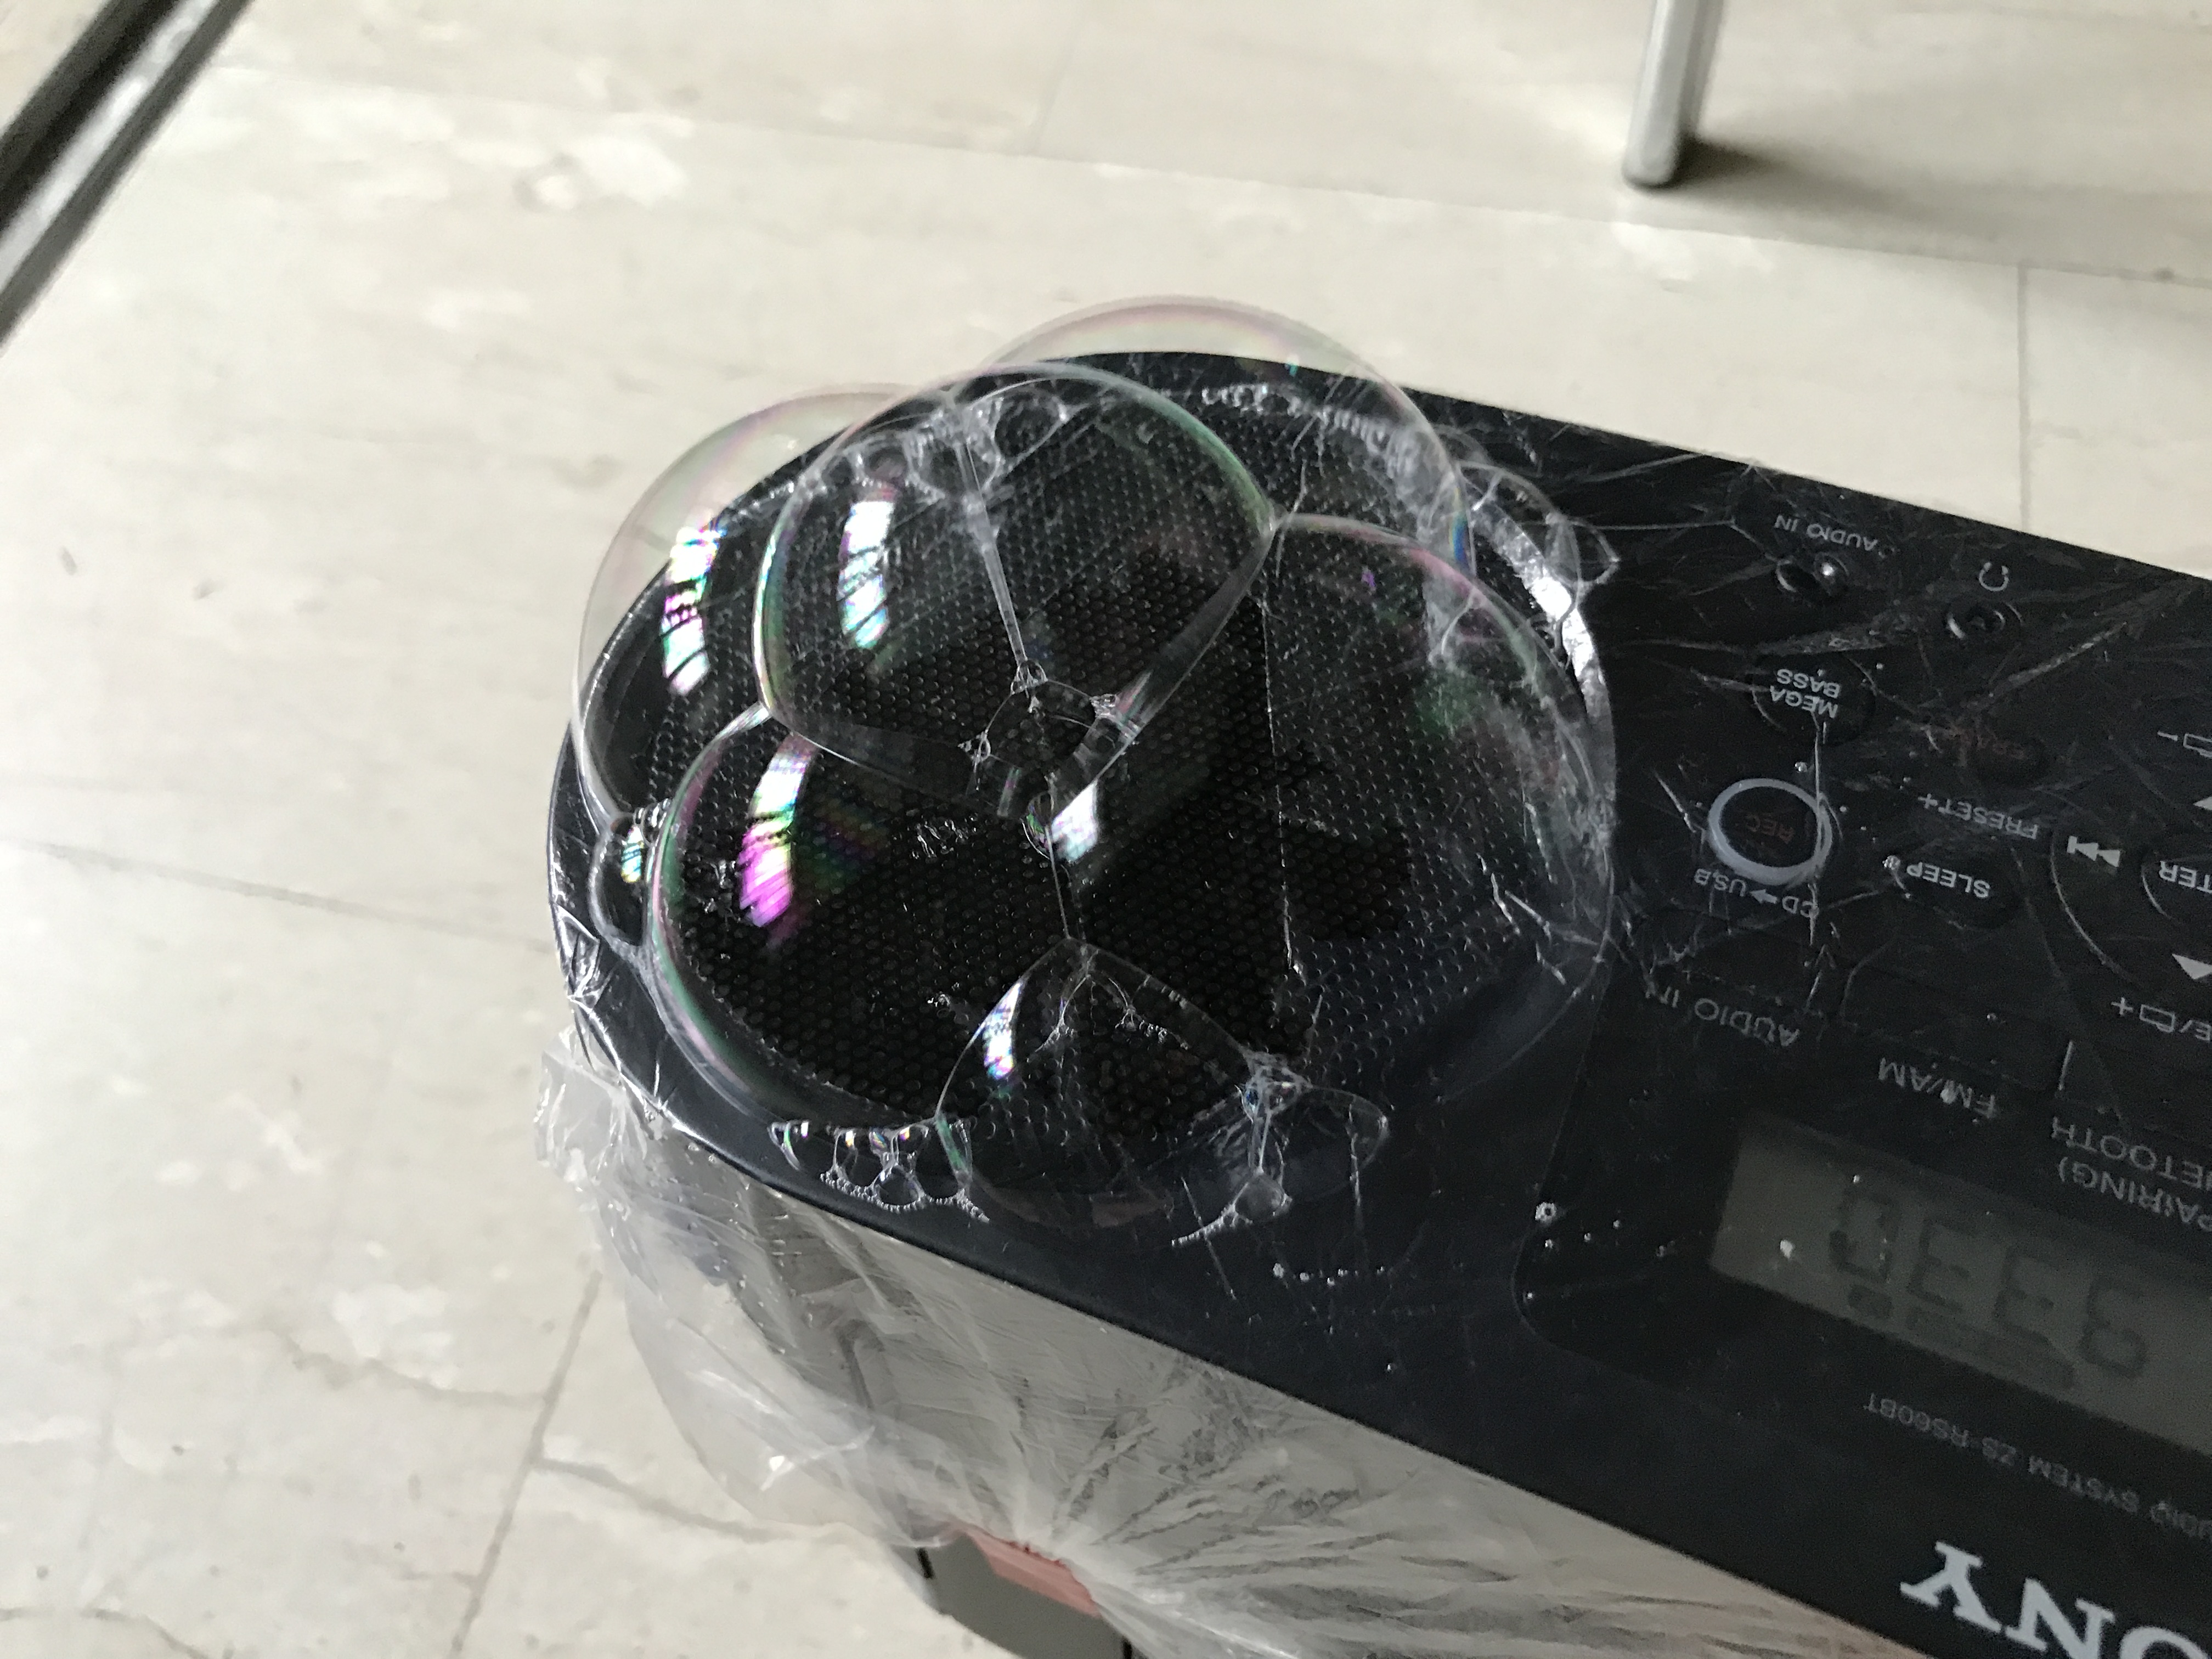
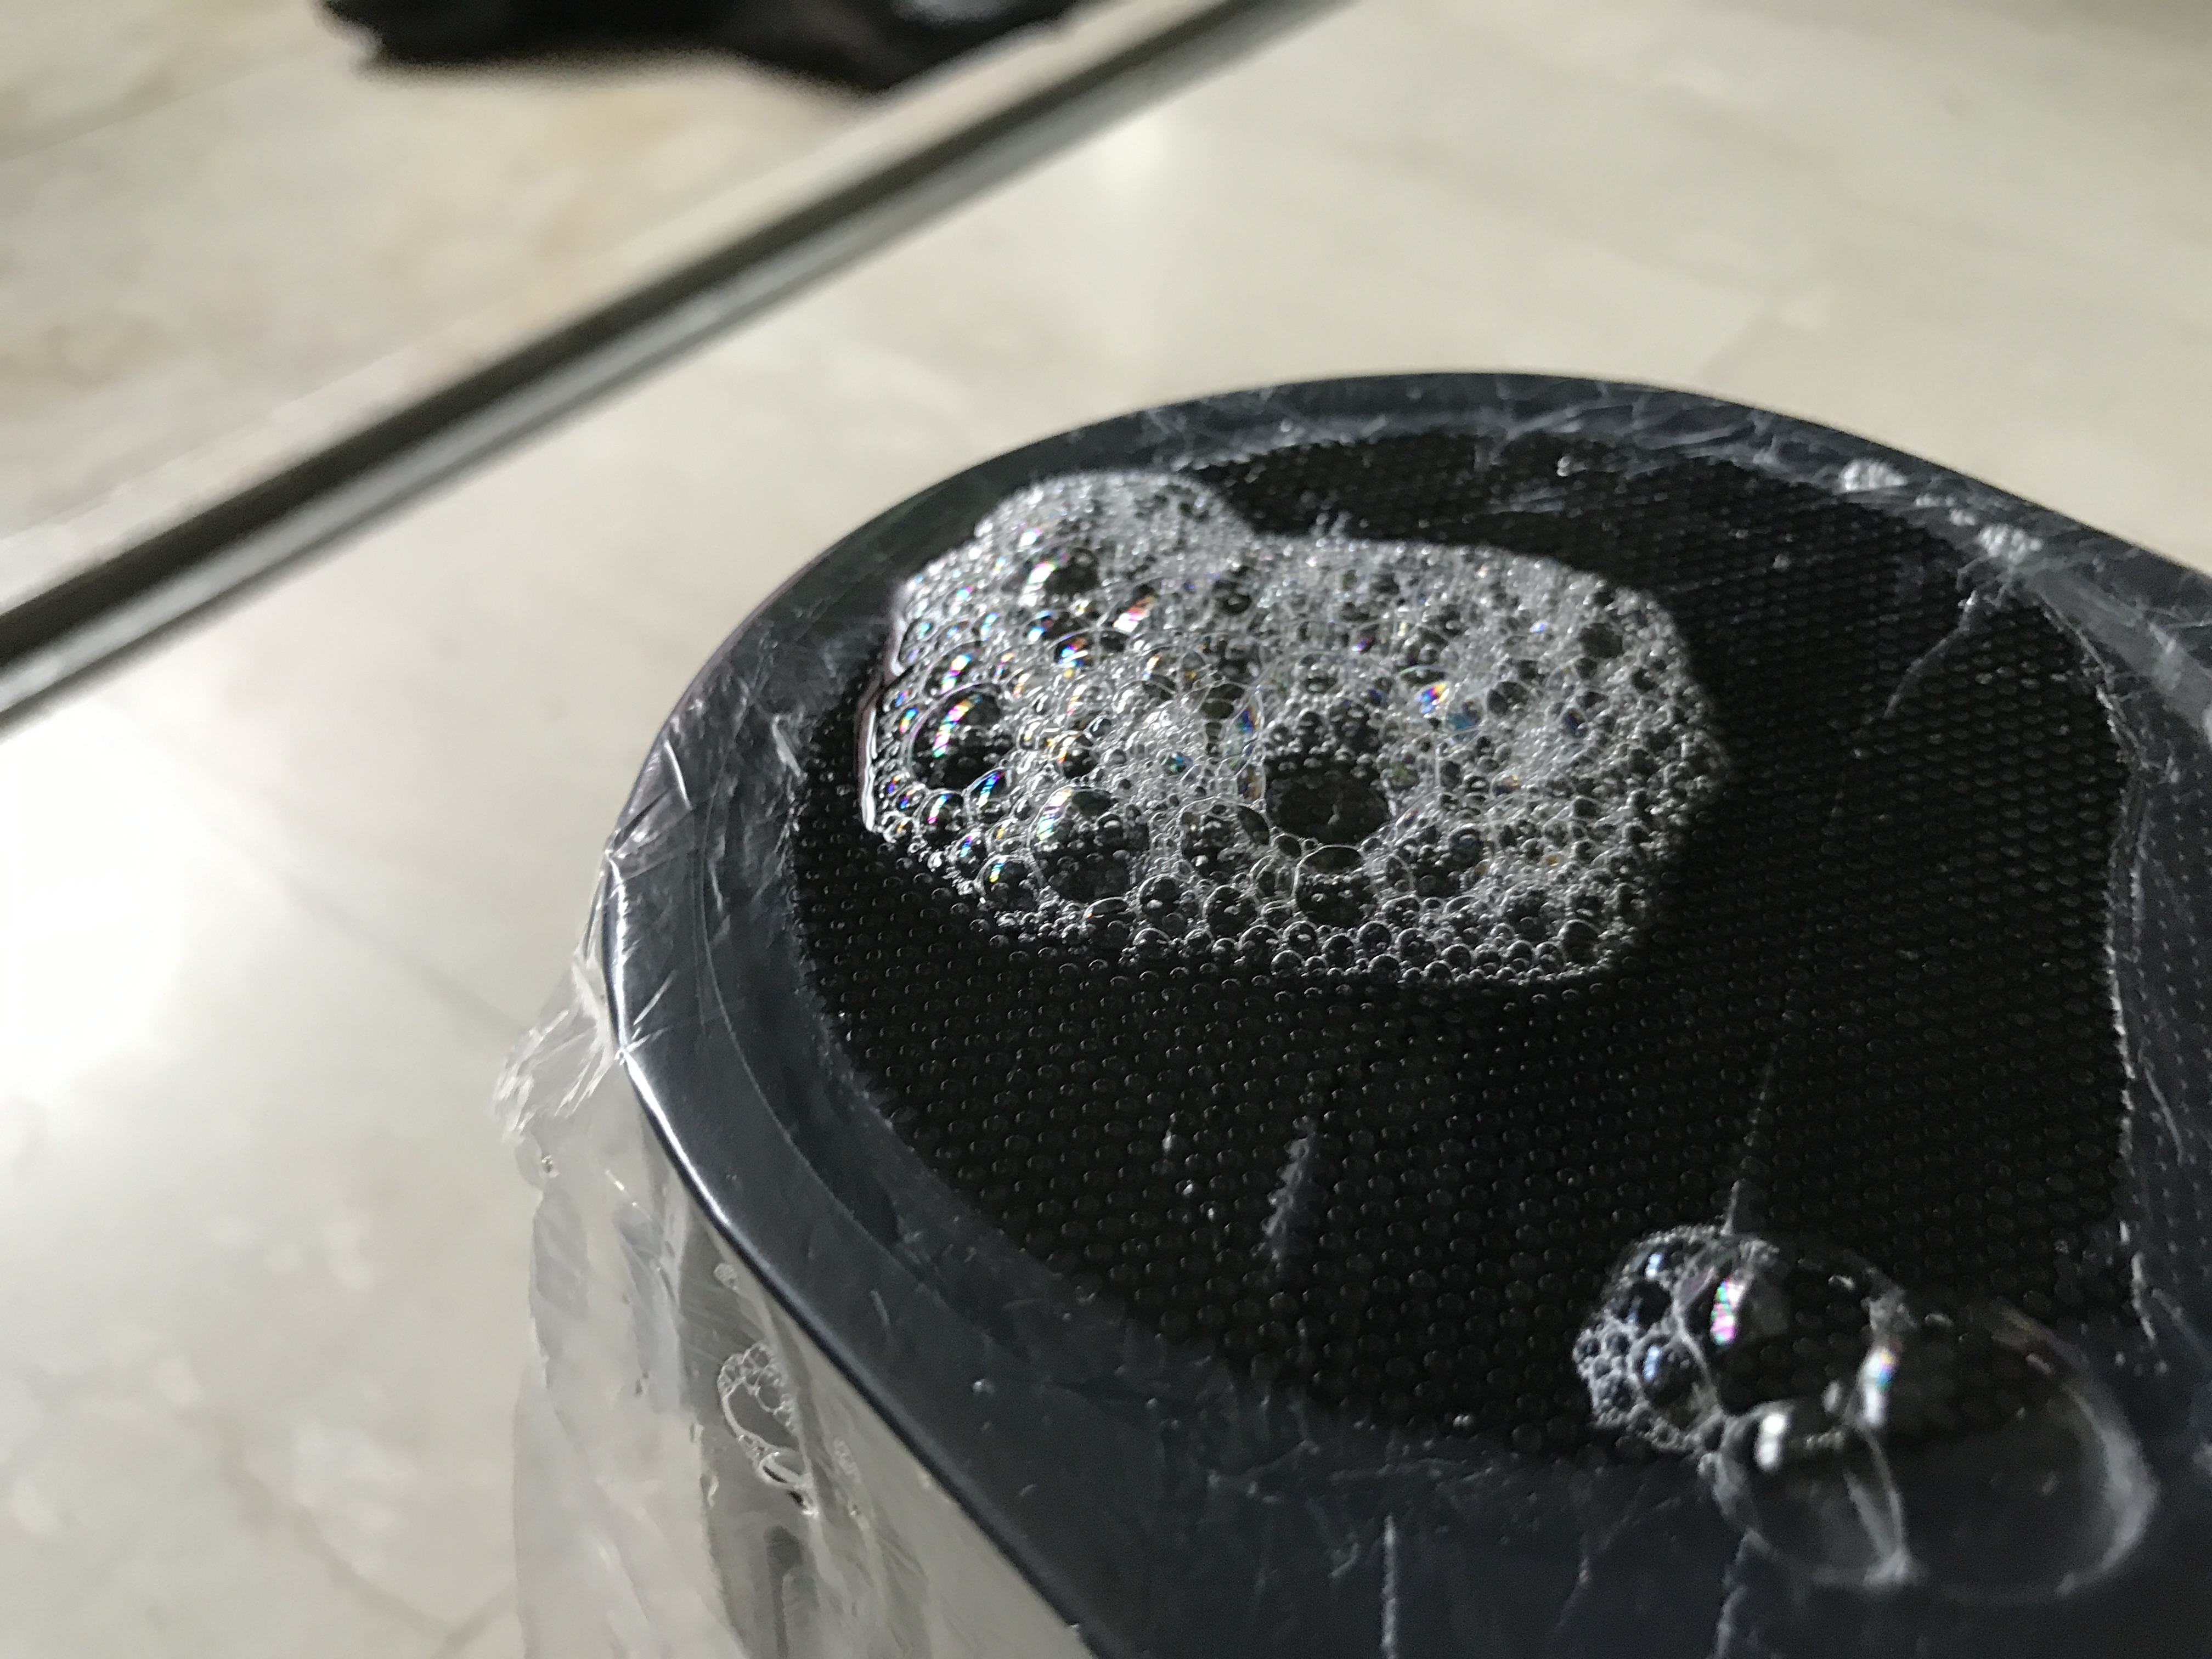
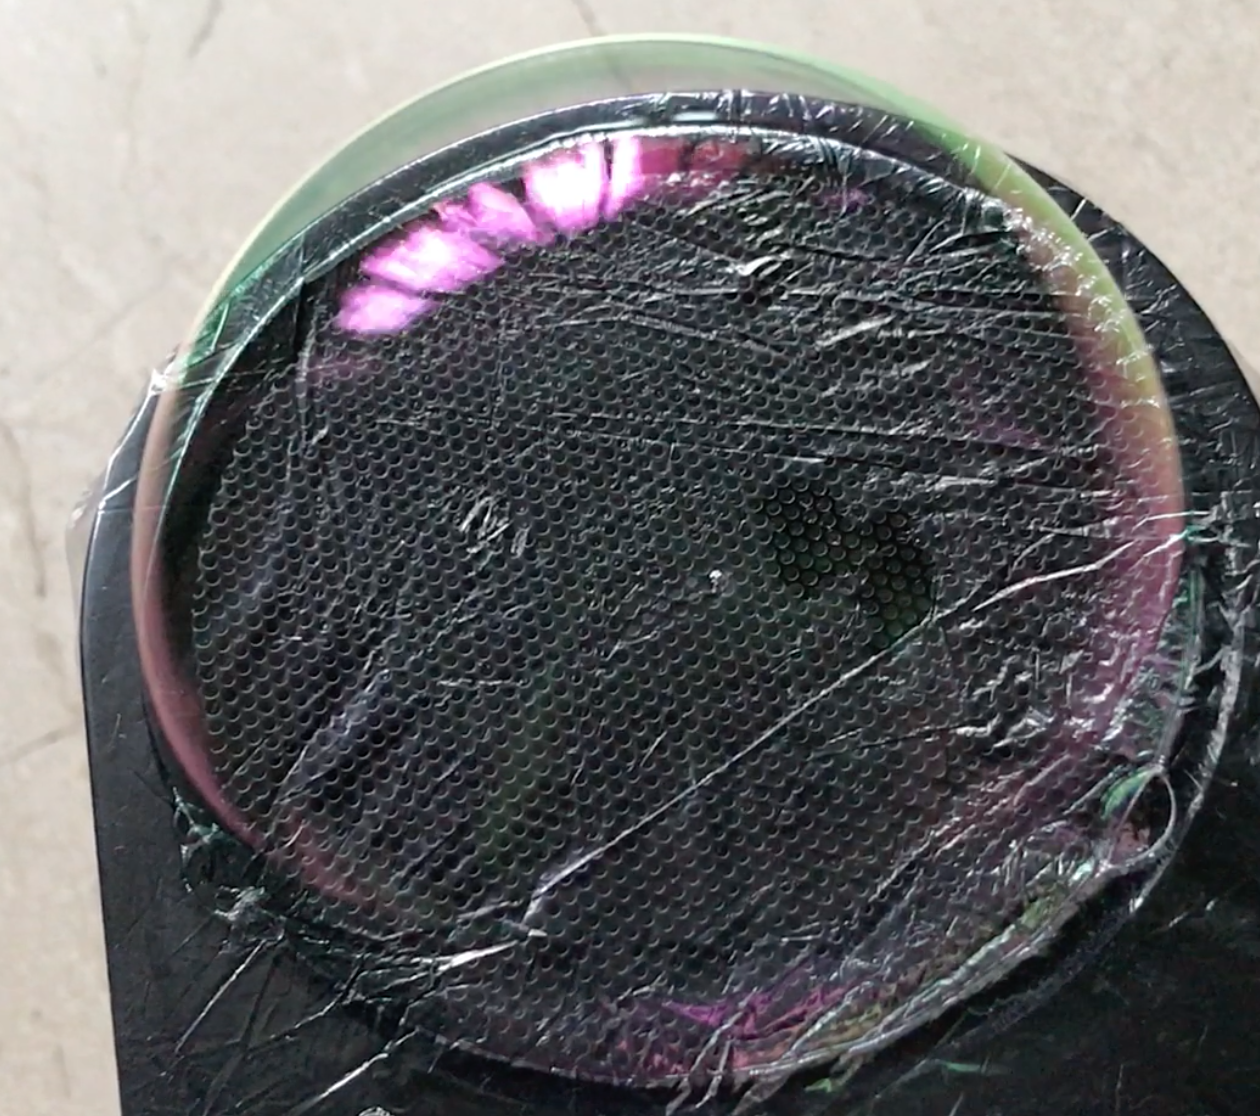
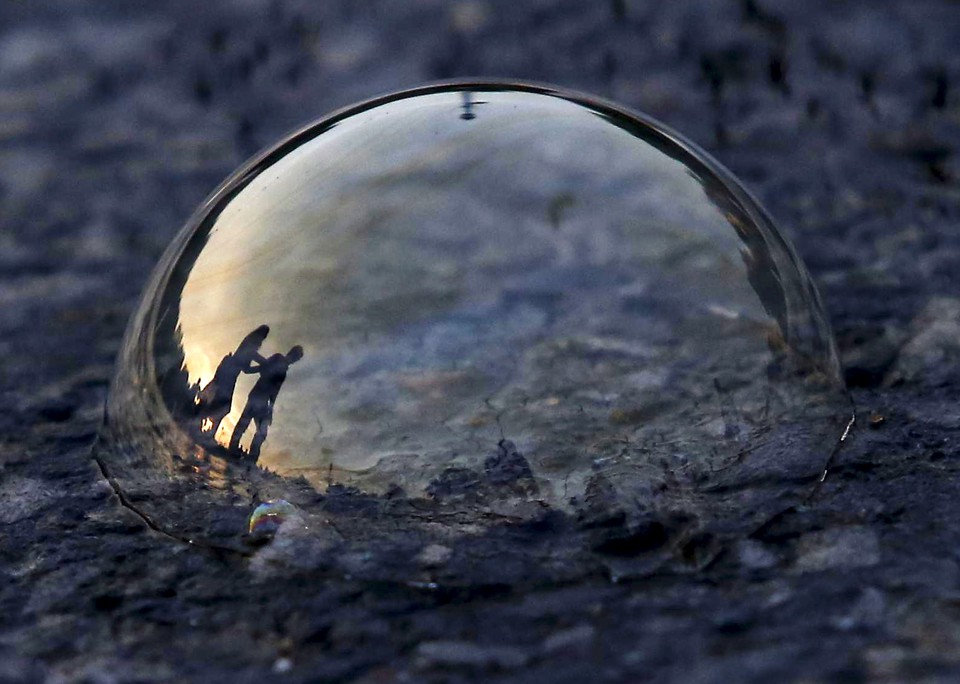
After these experiments, Prof and I found out that the bubble could be used instead as a reflective surface. As seen in the below images, the reflection off the bubbles created a surreal, living image.

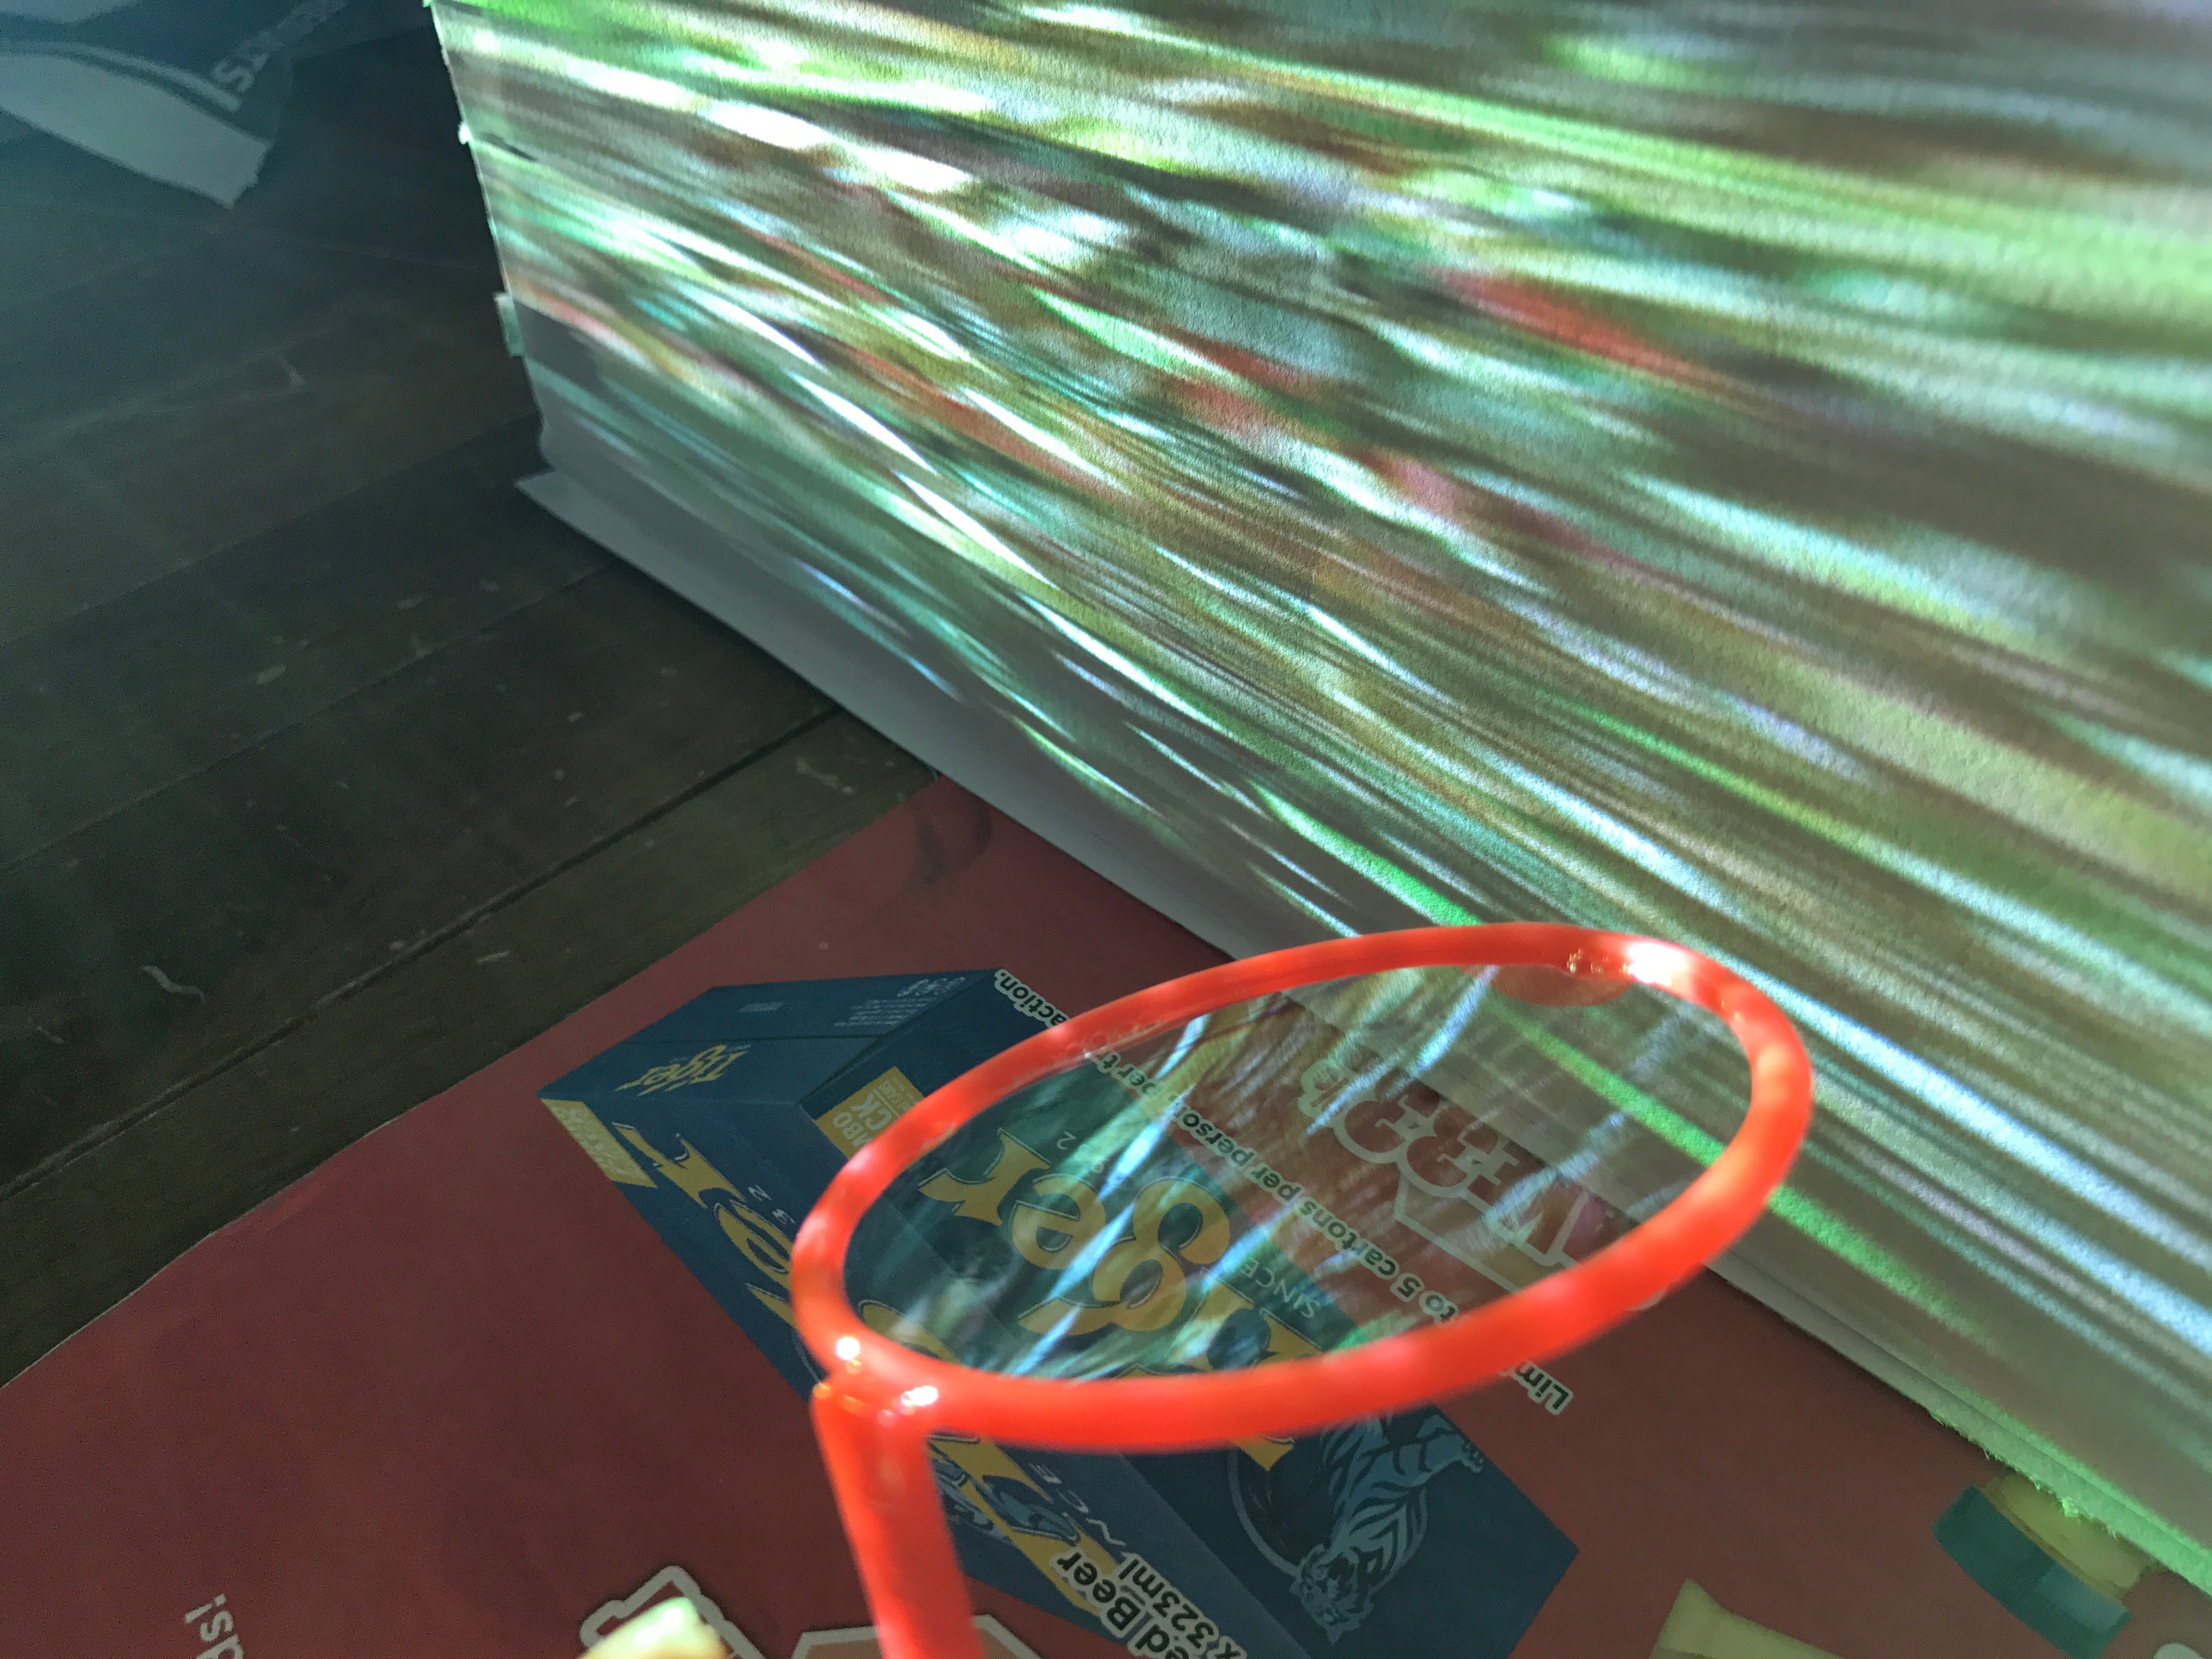
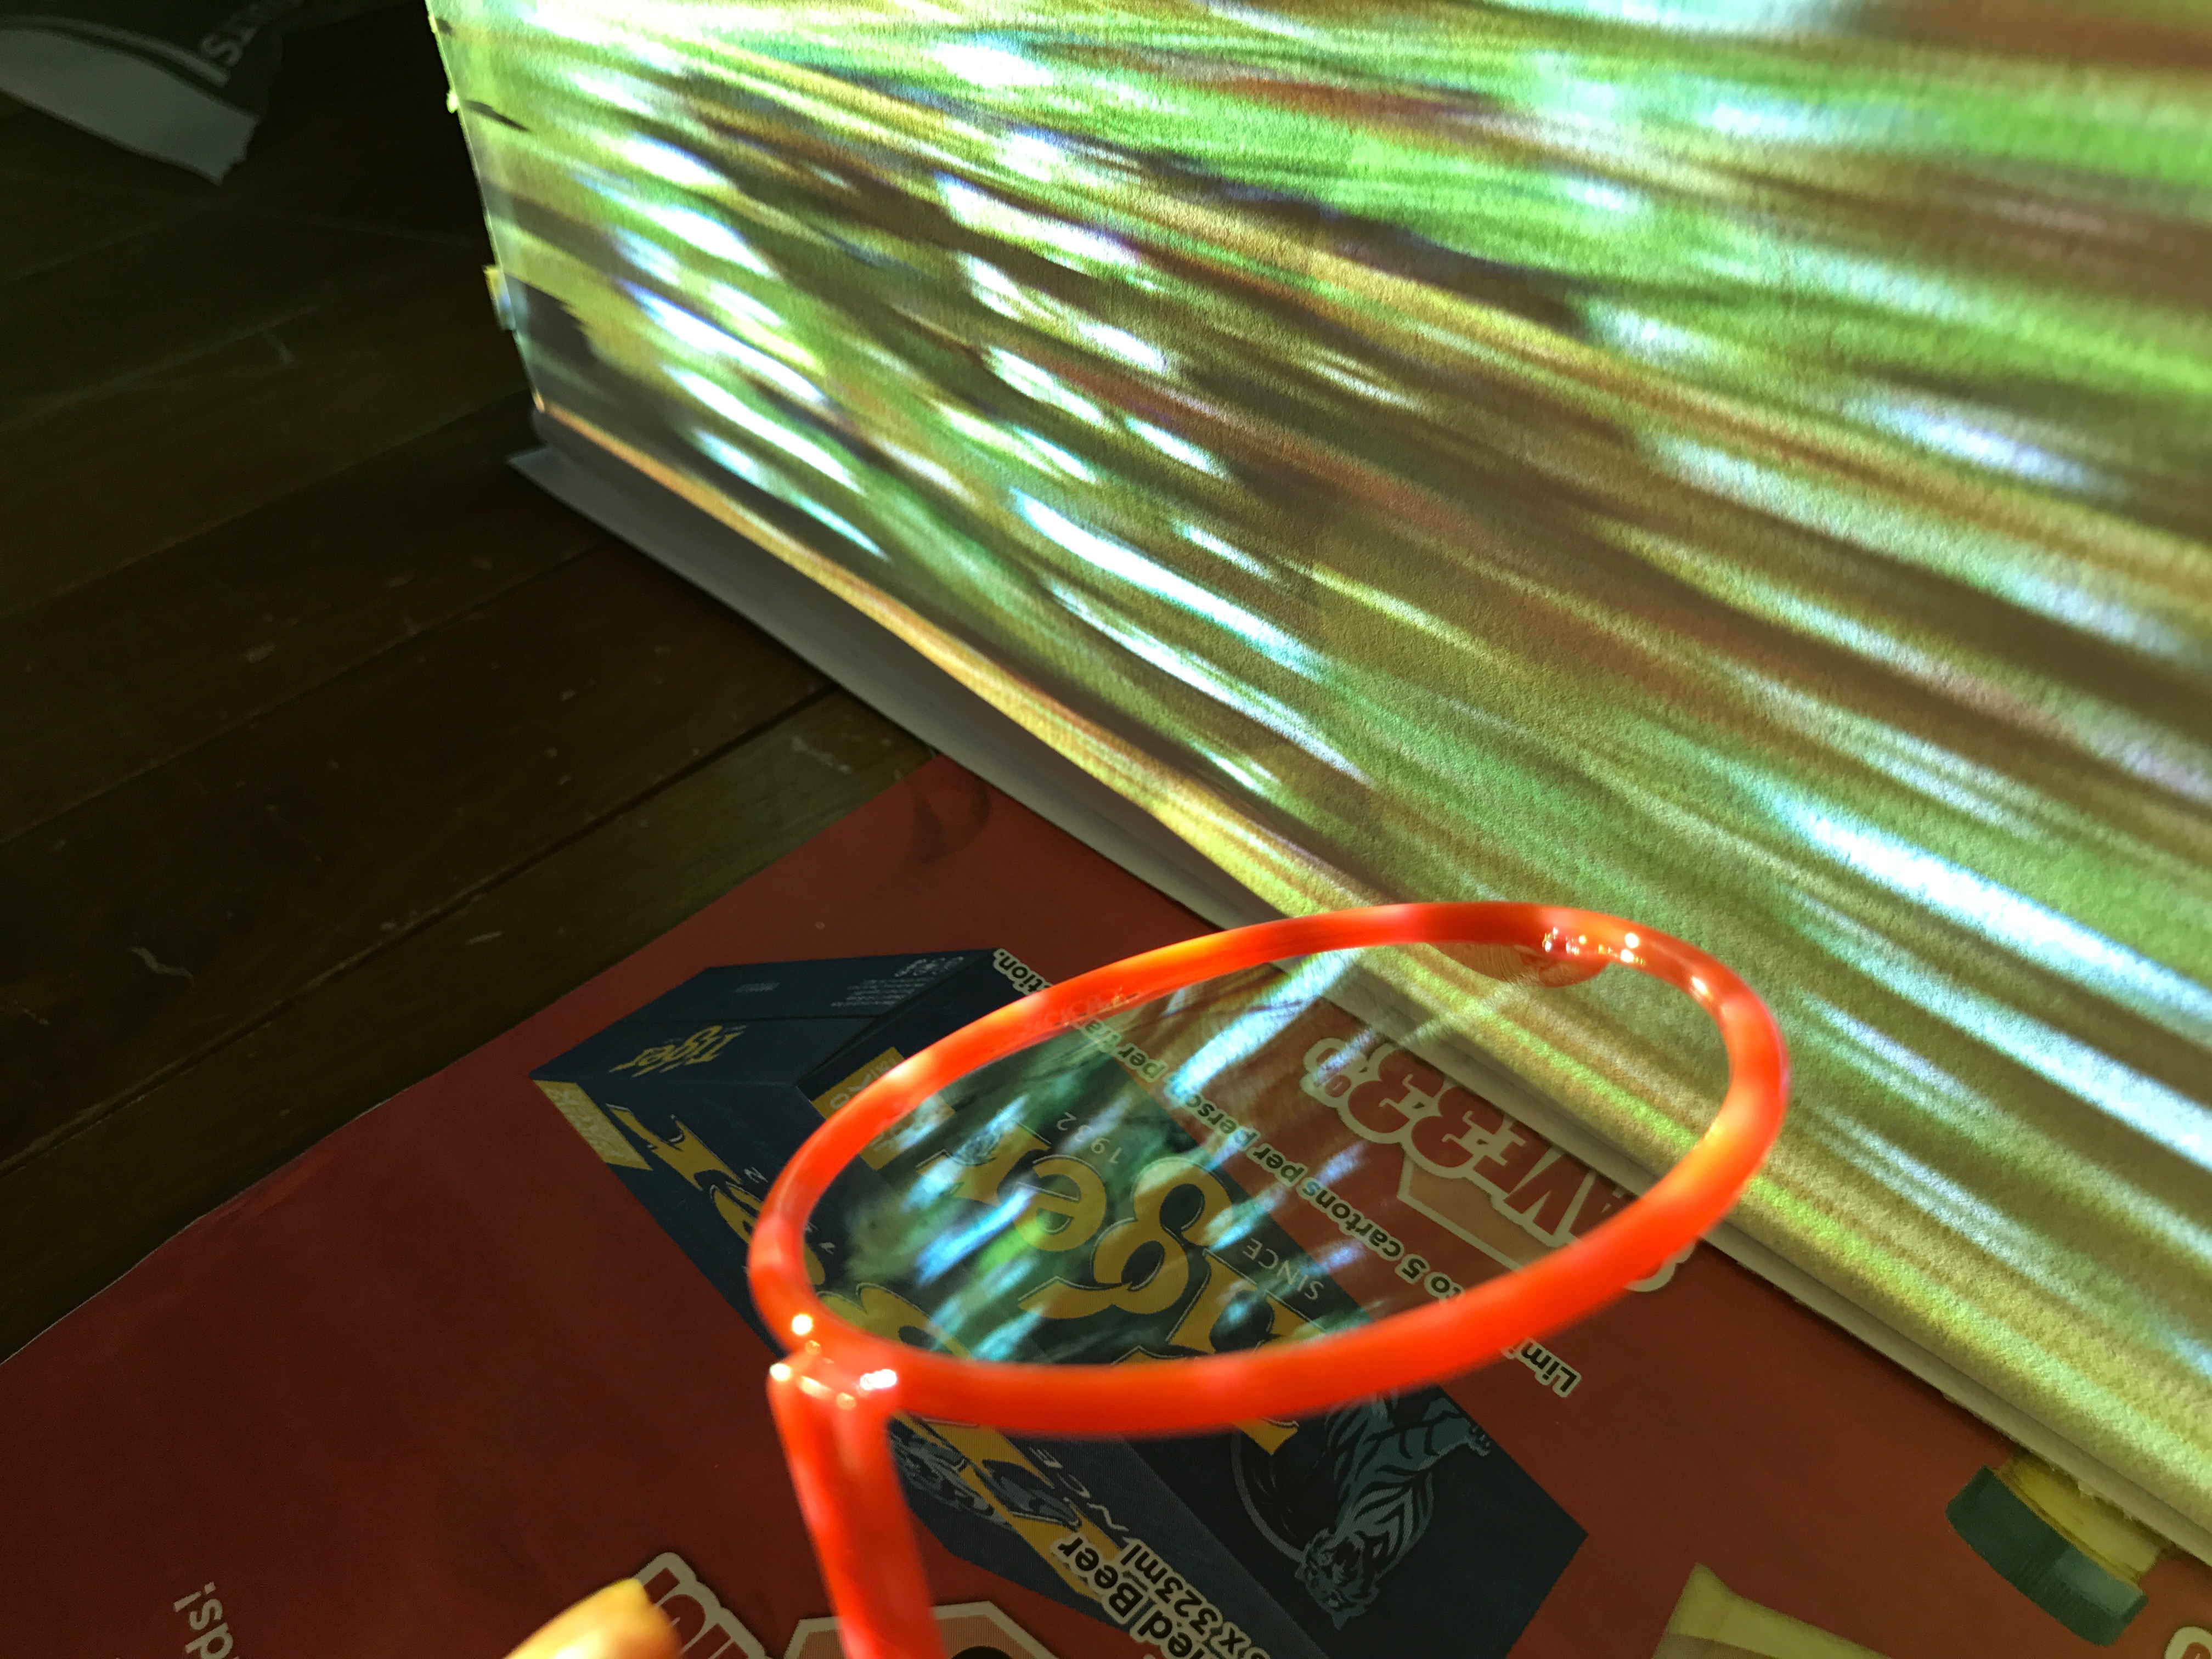
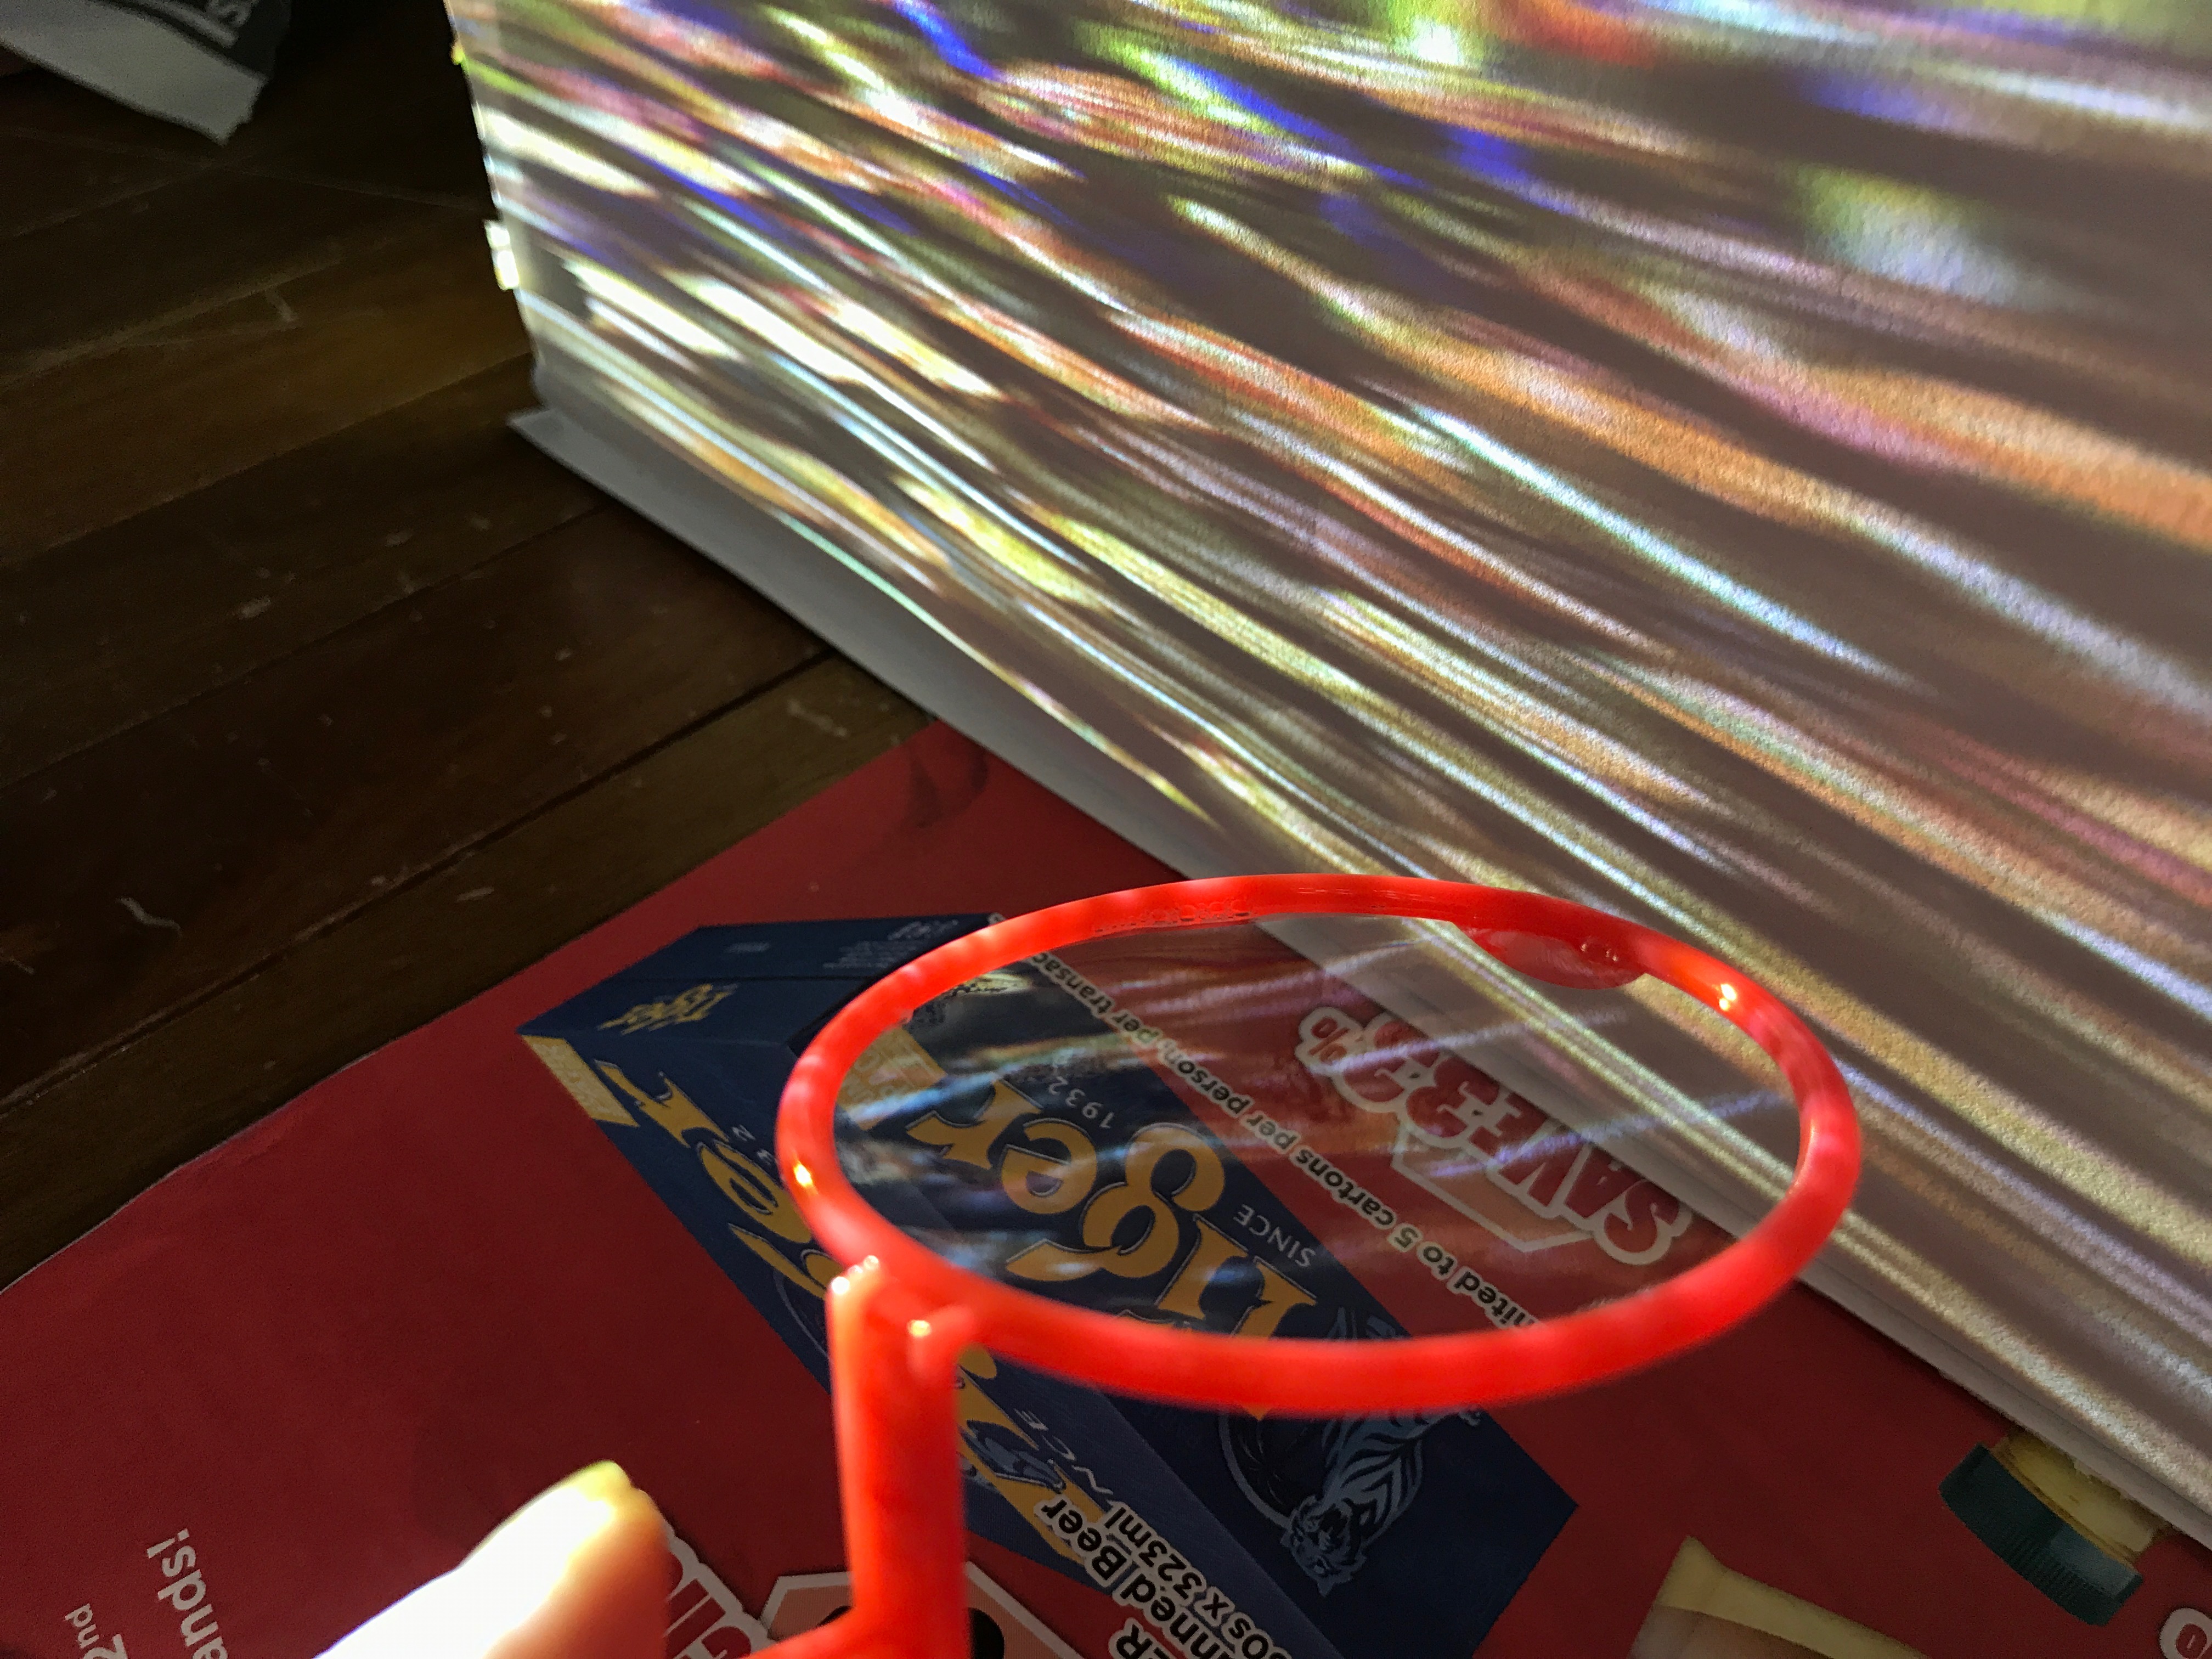
Thus, in my future outcomes, I will be utilising this reflection of the bubble as, 1. it’s much easier to manipulate, and that 2. I love the effect.

The Bubble as the Living Organism + DMX Experiment | #FYP

After doing my research, I decided to start small – making just a single bubble. However, I want the singular bubble to pulsate, as though it’s a living organism. When it later bursts, I wish for the feeling of loss to be more pronounced – by initially thinking of it as a living being, one would feel pity, a sense of loss, and sadness (hopefully), as per what they would feel should a real living being dies.

Honestly speaking, when I start thinking of the idea of a singular bubble, the image of the atomic bomb on Hiroshima during WWII comes immediately into mind (hope this isn’t offensive/it isn’t meant to be offensive):

Hiroshima Peace Museum

Partly due to the fact that it has indeed caused many deaths and destruction, but this symbolic model was very arresting – the bright red contrasting with the vast city landscape.

I did consider putting placing a huge singular bubble into a small room, where people would have to squeeze past it to get to the other side – it seems fun, but there were considerations that they might accidentally touch and make the bubble bursting, making it not-so-practical after a while. At the same time, the bubble will pulsate like a pumping heart, giving it life-like qualities.

Thus, remembering Prof Randall’s words to ‘crawl first before I run’, I decided to start small and create a small bubble before I envision it in the whole space. That being said, small seems okay to start with – in my previous research the artwork The Long Now by Varena Friedrich, she too starts small – yet the product was very effective.

Before I thought of this idea, I did a few experiments with DMX lighting. I did want to try using projection on the bubbles, but decided to postpone it as I haven’t had the fog ready to intensify the projecting (but am loaning the projector again today to test it out this weekend).


DMX Chauvet Lighting and Bubbles

I first wanted to beam the light sideways, but the leftover light shone onto the background wall which was very distracting. In addition, there was too much surrounding light from the chauvet lights – thus it was hard to pick out the lighting of the bubbles itself. So, I pointed the chauvet light upwards instead (and risked the cables getting wet but shower caps are always a lifesafer)

I also did experiment with the flickering lights, as seen below. From my tests, a slow strobe could dramatise the effect of the bubbles, but it really was not what I envisioned for the experiment.

Caution! Strobe lighting in the below video!

(Please mute the above video while watching it; sounds of the video does not correspond with the visuals – I’ll explain why later in the post)

Here, there are two different ways of strobing: fast, and slow. I played with different light colours (purple, white, blue) to test out the effects, and particularly liked the purple colour out of all 3 colours.

One thing to note that while it was resplendently pretty, lighting was a considerable issue – the surroundings had to be STARK black else the surrounding light will wash out the lights of the bubble. Another issue was that the medium simply is hard to capture with the camera – the shimmer of the bubbles, how airy it was, and the glint and floaty-ness that it had. This is truly an experience that one has to feel first hand.

In this experiment, a pure red lighting was chosen as I envisioned that the strong lighting would translate into visually powerful bubbles exuding a single colour.

Side view: Chauvet light directly beneath bubble
Top view: Chauvet light directly beneath bubble

To add on to my previous point, only by directly placing the bubbles at the top of the light itself could really bring out the reflective quality of the bubbles. However, this would mean that the bubble has to be either suspended over the light, or that it would have to sit on a flat surface right above the light – whereby the spherical shape of the bubble would no longer be possible.

I did love the reflections of the bubble, particularly here:

Reflection on singular bubble

However, it was very hard to be able to angle one’s sight successfully to view this reflection, and that the structure of the chauvet lights dictate it that each individual RGB colour is seen, rather than the blend of R, G or B to achieve a new colour. This is especially so in the case of the bubbles were the light has to be very close to the bubble and has no affording distance to blend together. I suppose that this limitation could be overcome by directly wrapping the coloured cellophone paper over the light, hence it will not be an important consideration as of now.

I tried using many small bubbles, and one singular bubble to play with the lights. I concluded that while the small bubbles really gave off an airy feel, I would rather use larger singular bubbles as I could more properly play with the bubble medium. It would also be easier to control, and individualise my project rather than the conventional bubble explosion scene.


Sounds of.. Making Bubbles?

I recorded the sound of bubbling and edited it via Audacity. I will show a few samples.

(Please un-mute the video while watching it)

The edited sounds are included in the video, and there are 3 tracks in total.

Track 1: 00:00 – 00:19
Track 2: 00:20 – 01:05
Track 3: 01:06 – 14:20


Next Steps!

To do: make fog machine

Attempt projection surface tryout with singular large bubble

Make a singular bubble machine

Inspiration:


More Bubble Research | #FYP

Artist references which may give ideas and feedbacks to kickstart my ideation process.


Dream Bubble Machine (Lorenz Potthast and Fabricius Seifert)

Inside a dark room, bubbles filled with fog slowly drift ground-wards. Projected on it are flickering image which are a symbol for dreams which as quickly built as they are destroyed.

How Artwork was created:
1. Bubbles are created:
smoke is blown through a tube moistened with soapy water
2. Camera tracking:
soap bubbles illuminated with infrared light, filmed with an IR camera
Program vvvv recognised position, size and movement of bubbles
3. Projection:
Images projected at calculated positions

The creators were investigating light as a design element, and saw the artwork to symbolise the relationship between dreams and wishes.

Personal Opinion:
The absolute brilliance of their artwork was of how the fragility of the bubbles was highlighted, and transformed with the addition of the projected light. Their artwork becomes a key learning reference for the technicalities of projection – the bubble medium itself is way too thin to be a suitable projection surface; there needs to be a ‘film’ of slightly opaqueness for the light to fall on. Particularly, when the bubble burst, the artwork was arrestingly beautiful – the bubble’s destruction was purposefully amplified and it faded away.

Their artwork also reminds me of the multiple possibilities of using equipment, such as IR light within a dark room to assist with position mapping.


The Long Now (Verena Friedrich)

The Long Now by Varena Friedrich

The mechanical arm squeezes a bubble out, and the predetermined settings in the container attempts to keep the bubble alive for as long as possible. Friedrich mentions that the artwork was her scientific and technological take on the vanitas symbols (momento mori?), where the project looks like a scientific project where the bubbles exist between the states of death and existentialism.

How Artwork was created:

I could not exactly find much information on this, but I assume that Friedrich used a pump manually lubricated with soapy water (the lack of a container for soapy water is obvious). A robotic arm manually squeezes the bubble out. However, Friedrich mentioned that the physical quality of the bubbles had to be altered to increase durability. As for the controlled environment, I suspect it’s to do with temperature, humidity (where colder environment and increased humidity dries the bubble out slower, hence it lasts longer) and wind conditions, to set the bubble at the exact spot where conditions are the most optimal before it slowly floats off route.

Personal Opinion:
I thought this was simply brilliant, and it opened my eyes to the possibility of using only one bubble for the whole experiment vs repeatedly many. At the same time, this project remains very simple and elements are stripped down to the bare minimum – instead of continuously adding in different technologies, perhaps I could focus on the skeleton first? I think this would be very useful to me right now when I have not much ideas on how to create my own project.


Bubbles (Wolfgang Muench, Kiyoshi Furukawa)

Interacting with virtual bubbles using your shadows. Your shadow, reflected on the screen, can move/hit the bubbles, and a corresponding sound will be played. This project attempts to imbue the body – an object usually left out of artworks – into the project as a means of interaction. The combined surface of shadows, projected bubbles and the screen itself closes the distance and spatial relationship between the three discreet objects.

How Artwork was created:
1. Bubbles on screen were created using a simulation algorithm, each bubble was paired with a script object which defined its behaviour according to gravitation, acceleration and air circulation
2. Bubbles’ drifting movements were synced to a midi-synthesizer for sound
3. Shadow’s position was captured if it hit above a certain threshold, and if present, triggers a routine whereby the bubbles bounce back
2. User tracking interface was implemented

Personal Opinion:
Indeed, this could be another method of using bubbles and in fact I did think briefly about this idea. However, I felt that the outcome was way too technology-based/impersonal for my liking. It was nice however, to know that such options are available.


Black Hole Horizon (Thom Kubli)

Huge black horns bellow out compressed air, which collides with soapy water to create big sound bubbles. The concept was to transform sound into three dimensional space with its presence. As the shape of the bubbles are constantly changing, it is also a reflection of how space is repeatedly getting redefined. Visitors are encouraged to place their bodies relative to the bubbles’ position.

How Artwork was created:
1. Need for horn to blow compressed air
2. Fluid circulation required
3. Horns were 3-D designed
Horns’ pitch were also affected by material, due considerations had to be given

Personal Opinion:
I like this artwork, the idea of transforming sound into the physical bubble was evident in the outcome. Since I am considering to input sound into my artwork, are there other ways to go about doing it? Ie. sound affecting the physical bubble


Bubblemania | #FYP

A quick and (very) summarised update on what I’ve been up for the week – bubble experimentation!

Bubble Characteristics
Types of Bubbles
Singular, clump, foam

Bubble Movements
Burst, fuse, repel

Creating Bubbles
Based on my experiments, the outcome of the bubble type will depend on the shape of the wand and can be altered as such.

For a large singular bubble, use a wand with a big single opening. For little bubbles to appear at one go, use a wand with many small openings.


Bubble Experiment #1
Altering Materials

Material List for bubble exp 1

It should be noted that certain materials such as the glitter was hard to mix into the soapy mixture. For future references, only water soluble substances should be used.

Bubble Experiment #2
Inputting Sound

Outcomes:

  1. Singularly large bubble – rainbow reflection was more ‘solid’, and changes in sound beats more obvious in bubble
  2. Clustered bubble – similar outcome to singularly large bubble, but movement/swaying of bubble more negligible
  3. Foam bubble – most obvious outcome in terms of movement (as foam is smaller and lighter to move), water droplets dance around resplendently

My friends recommended that I try bass music instead for more effective ‘bubble dancing’. Perhaps I should try that.

The throw-it-all-in stew of ideas |#FYP

Recapping last week’s episode, I have to combine all the distinct elements into one set installation – as till now I still can’t envision the final outcome. Basically, I tried to combine performance actions with the visuals background in OBS to build up a mockup. But I wonder if blatant combination would be really what I want? The best thing to do is to just work on it and figure how it goes on the side.

Sounds
Understand that sounds are very important, but I am still sourcing for appropriate sounds and have recorded a few but have not started editing them. But at the same time, I am wondering if sounds are really needed in this installation which I am considering of using the physical objects to generate on-site sound rather than a prerecording.


Pioneer Foam Artists //Research

FoamKohei Nawa
Foam in building an environment

Nawa actualised one of the sketches I had in mind, particularly in my foam tryout last week. However, his premise for the installation slightly deferred from mine – through this installation, Nawa investigates the cycle of birth and destruction, whereas mine focuses only on destruction.

Small bubbles (cells) continue to form on the surface of a gently lapsing liquid. They accumulate to form an autonomous structure comprised of foam. Each bubble cannot escape the cycle of birth and destruction, which is not unlike the way our cells operate as they metabolize and circulate. Source: dezeen.com

Cloud Installations, David Medalla
Foam as sculpture and building up forms

Madrid, Cloud-Gates Bubble Machine
Museo Nacional Centro de Arte Reina Sofia, 2013
Cloud Canyons No. 3: An Ensemble of Bubble Machines (Auto Creative Sculptures)
1961, remade 2004
  • kinetic, evolving forms
  • Locally, Medalla’s Cloud Canyons No. 24 installed at National Gallery Singapore requires maintanence in the form of topping up the detergent and water before restarting the installation every five days.Sulaiman’s team had to find a brand of detergent that is odourless, water-based and which emits low levels of volatile organic compounds so as not to affect other artworks. Six different brands were tested – each for a week at a time.

Bouquet Final, Michel Blazy
Foam as an installation

Housed in a Cistercian monastery in Paris that dates back to the 13th century, the unpredictable, free-forming foam “sculptures” drape softly and frothily over unyielding metal scaffolding.

Resembling huge swaths of cotton candy, the fluffy, wet mass of foam is meant to symbolize the fragility of life.

Intermedia by Dick Higgins |#FYP Research Critique

NOTE: this essay requires editing and will be done so at a later date (by the end of this weekend). 

Overview
The Intermedia (1966), a term coined by Dick Higgins, refers what it calls “a myriad of emerging genres that spilled across the boundaries of traditional media”, or in essence, mixed-media forms. Various art forms which we are gradually getting familiarised with – performance art, sculpture and electronic theatre – continue to resist the categorisation of traditional forms of media.

Here is my take on Higgins’ essay: his words are gold, but perhaps not so much in the modern era of 2017. However, underlying the text, there is a persistent cry to push the boundaries for progress, an underlying human societal quality.

Divide and (not) Rule
Higgins’ suggestions tread a fine line whereby he purports that simple combination of different mediums to yield good results, as the sum of its parts make up a better whole. It might correctly mitigate the issues brought about by limited categorisation yes, but at what cost? He fails to highlight that such appropriation should be done carefully, keeping in mind that it risks end up like a ridiculous chimera.

Perhaps, during the 1966, Higgins tried to construct an entirely new artform which might be pioneer of his time. In recent years however, it is gradually being more accepted and conducted, leading us to go back to the basics and question: so what is art? Higgins claims that with the collapsing social classes and tastes, he hints that art is now for the masses. It leads us to think if art is gradually becoming more for the masses, with a one-size-fits-all approach. Is it? We can only know for ourselves.

The Era of the Mixed Media
With lower barriers to entry, without the need to categorise one’s art. As Higgins’ metaphoric story where he suggests that the traditional art ‘is protected by a handful of rude footmen who seem to feel that this is the way Life will always be (29)’. Perhaps, as the Intermedia is a step out of one’s comfort zone, that is precisely why it remains tough to convince others/the audience to adopt it. It marks further proof that the audience and artists are continually intertwined – does that not mean that by utilising MORE mixed, physically made objects with a more visual message (away from abstraction), it becomes easier for the artwork to reach out to the common masses?

Likewise, this ties in with the previous point on the changing needs and outcomes of art, which inevitably lies in the intermedium.

The Art of the Intermedia
Higgins ends his essay on a positive note, suggesting that the ‘use of intermedia as a form of continuity, rather than categorisation’. I agree wholeheartedly with it, for intermedia should not be another category – for that will only further perpetuate the categorisation dilemma – but rather, spark an inclusive world without category, for only if we can achieve that could we finally live in a world as what Higgins envisioned it to be.

Tying up loose ends |#FYP

A Quick Recap
As the title suggests, this update consists of further refinement of the project idea.

Just a recap; I will be doing a project based on the memory of death. The event of death itself is not an end result itself but rather, it kickstarts a series of sequences. In terms of a physical death, the sequences include the pooling of blood to the area of largest gravity, dropping of body temperature etc just to name a few.

I split the process of death into 3 different sections: the Before (~the death), During ~, and After ~. With regards to my own personal memory of my bun, it is as such:

Before – Of choosing the option of death, of enabling it to happen, the signs that lead to it (momento mori)
✓ During – The act of letting go
After – Realising the enormity of the decision and feeling the pain more

I will focus on the During, partly because it has shocked me the most, and is the most impactful of that particular memory of his death.

By clinically examining this particular memory, I wish to indirectly commemorate my bun, by paying tribute to his last moments and also as a form of closure for myself.

The project will take on my viewpoint of the death process, based on my personal experience and what I saw of it.


Branching Out

Of Death.
I tried narrowing down the specific feelings/themes I had during the death, and throwing out certain keywords which might be beneficial in helping me frame my project:

Themes – repetition, disappearance, transient, temporary, abrupt, distant/emotionless.

Characteristics: fragile, brittle, grave, extravagant

Possible mediums: glass, acrylic, paper, cloth, powder, string
*I would prefer the medium to be ‘organic’ and of physical material

Of my Brush with Death
Mentally, my emotions when it happened (During) were as such:
– fear (of what was happening)
– disbelief (of how this could ever happen)
– uncertainty (whether it was the right decision)
– resolution (my brain was convincing my heart that this was the right decision to make)
– shock (I was mentally tired and really could think no longer then)

At the same time, I actually felt a sense of wonder over how fragile life was and how easy death actually turned out to be. More keywords to frame the project:
– floaty
– soothingly eerie
– unbalance
– wonder

I was both wowed, but also traumatised by the experience.


And so, back to the project details!

Honestly, I am still pretty stuck over how to formalise the whole setup structure, but meanwhile will continue experimenting and conceptualising it.

Structure of the Project

I tried extruding common motifs of life/death/interesting shapes and converted them into installation structures

Somehow, I became fixated on the medium of black bubbles, on the basis that bubbles are fragile (much like lives), and they ultimately burst, but are destroyed so prettily.

Experimenting with Bubbles

Sketches on utilising bubbles as a medium

I wanted to create black bubbles – black to imbue the feeling of mystery, and for it to surround each visitor to their waist level. Such that the bubbles veils each person, leaving them uncomfortable, and ultimately bursts to leave a mark. Much like how death will ultimately come to each person, the bubbles as a metaphor of death is a constant reminder of it.

Ultimately, I hoped for the bubbles to be slightly hardier (more unb

I tried to visualise my own installation, and tested it out by creating a dummy mockup in paper.

I tried replicating two of the most structures which I was most interested in creating.

Tentative Installation Structure: surrounded entirely by bubbles/foam in various formats

Experiment 1: The plan was to fill the entire space with bubbles, but it turned out different from expected.

Firstly, I forgot to layer the exteriors with a thin film of soapy water thus the bubbles were not able to stick. The bubbles were also too fragile – but after all I did not specifically alter them to be more hardy.

Effects-wise, it wasn’t to my expectations. In addition, the medium of bubbles was somewhat tough to control, and not an ideal medium to use.

https://www.youtube.com/watch?v=otq3rcvpVKo&feature=youtu.be

Experiment 2: Replacing the bubbles with foam, and fill the entire space with it

https://www.youtube.com/watch?v=7dwTi-bge6k&feature=youtu.be

The 2nd experiment’s outcome was more similar to what I had in mind. I particularly liked how the black stains were imprinted onto the human figure, as though it ‘leaves a stain’. Despite that, it made me realise how troublesome this medium is, and should visitors ultimately come for the installation, they might actively avoid it instead.

Perhaps there exists another medium, with similar physical qualities to black bubbles but less messy? I was considering using cloth, and will continue to consider it the following weeks.

Overall, I’m glad that I experimented with the bubble medium… though it didn’t particularly work out, I wish to continue working with and explore different physical medium for the project.


Performance?
Prof Randall suggested that I investigate performative in the project, after I discussed with him an earlier budding idea (not recorded down on OSS) involving audience interaction.

Performance might be ideal in cases where audience interaction is hard to achieve, or if the artist has an intended narrative to build up.

As such, I video taped a few performative actions that might contribute to my overarching theme. However, it is still not yet integrated with the how-do of my project.

Or, here’s a fast-forwarded version of the above video (lacking action #7):

A short description of the actions are to follow.

#1 – Breaking Down (0:00 – 0:45 min)
What follows death is always decay, aka the breaking down of objects. Here, I break myself physically down, with staggering and exaggerated movements in opposition to the natural decay of bodies.

#2 – Clapping to alert (0.47 – 1.39 min)
A gesture attempting to materialise the memory, by redirecting energy spent on thinking of the memory, and translating it into sound. At the same time, attempts to alert others of the death is ongoing, as though through recognition would it become more real.

#3 – Powder Fiesta (1.39 – 2.48 min)
I am marked; for I have tainted myself. With this memory, I willingly chose death as a route for my bun, and with that, I am going to bear this guilt forever, willingly.

#4 – No Face (2.48 – 4.14)
I am ashamed to face, both my fears and all memories related to the death. I do not want to face the truth, nor recognise that it is the truth.

#5 – Slow Hello (4.14 – 4.55)
My actions have been dulled, just like how the sense of time has been altered for me relative to the neighbouring grasp of time.

#6 – Embracing the Inner Self (4.55 – 5.44)
I find peace with myself, but remain unwilling to bare my emotions to others (hence back is turned against camera). At the same time, I become more and more enthusiastic down this route of self exploration.

#6 – Reach for the Stars (5.44 – 6.17)
In a childish play attempt, I attempt to reach the goal (the aircon) within the camera screen. No matter how happy I might be, this treasured bad memory will always be a part of me.


The pertinent issue is to come up with a game plan for the final project rough guide as soon as possible.. of which I am still exploring.

The bun and me

This post will be a very quick and short summary of what happened.

My favourite and most recent picture of him

This is him, Sharcia the local bunny, but more frequently referred to as small boy.

I first got him as a birthday present when he was barely a month old, back in 2010. He has stayed by my side (whether willingly or not), and saw me through numerous school changes and growth. I liked our feeding hours, seeing his wee little nose bob up and down, up and down, and him going crazy over snacks which I would give him frequently.

One of my favourite memory with him was during his younger days, when I bought a cup of soya milk and sweet, and shared both of them with him.. not sure what I was thinking. But I always do share food with him whenever I eat fruits such as watermelon or mangoes.

Another favourite memory of him was of him escaping his cage, and hopping onto my bed waking me up in the early morning. I awoke to feel a warm and fluffy ball at my feet, and remember kicking it cos it was annoying me. Turns out the ball moved, and I forced myself awake groggily to look at the bun. Mind you, my room and where he stayed in the cage were at opposite ends of the house… this bun really knew his way around.

Him 2 years back at the common staircase

He was practically a little dog, running and hopping around, biting everything in sight. He was friendly, unafraid of strangers, and would lick people’s hands fervently. In return, he would demand head scratches, and loved them to bits.

More than a few months ago, he developed extremely picky and bad eating habits. His pellets would be half finished, hay untouched (or barely touched), but still he looked normal. I tried all ways to mediate it, by changing his food, introducing new variety of food… it worked for a while, but later on it didn’t. I just put it down to him being a picky eater, but was worried on the inside. Gradually, he became thinner, and had bad poop. Every time I wanted to bring him to the vet, he would miraculously improve the next day. I would actually procrastinate, as I was busy working nearly everyday, myself holding down a total of 3 part time jobs.

Until that very day.

I woke up, and he was extremely listless. I clearly remember feeding him a piece of his most treasured snack.. but he ate one, then refused. This was the moment where my darkest and greatest fear came through – I had no moment to waste, and had to bring him to the vet ASAP.

Funnily enough, I found enough strength to calm myself down and google for appropriate vets to bring him to. I brought him there, and the vet had to do emergency care for him, telling me that the prognosis was extremely bad – he had fever, heatstroke, GI stasis (which could be fatal for buns).. and long story short, I decided to put him down that very night and regretting it so so so much. Even till now.

As much as I don’t want to think about it, I feel like I have to recap the memory, and even think of the pain as retribution for choosing such a path to go with.

#FYP | The Rabbit Idea

The Physical Body
Why not show it as it is, literally? I had my ideas, thoughts and possible pathways to explore – problem was translating the ideas onto the physical body, whatever it was. But after seeing Hiromi Tango’s Lizard Tail and Amanda Parer’s Intrude, both of which literally translated ideas into physical form, I thought that perhaps, I wanted to try it.


Lizard Tail (Breaking Cycle) by Hiromi Tango

Lizard Tail (Breaking Cycle)
Part of the Exhibit: Imaginarium: To the Ends of the Earth
Singapore Art Museum, Singapore
6 May 2017 – 27 August 2017

In the artwork, Tango investigates the idea of the lizard’s ability to drop their tails, and how we similarly do it with difficult memories and emotions. The lizard’s tail becomes a symbol for Tango – to nurture, protect and regenerate.

At the same time, she transforms her feelings into the object itself: as she weaves, she considers, and untangles the emotional knots she has.

“I accept that some creature is visiting me, and together we wrap our memory, emotions and trauma. It is quite an aggressive energy and I don’t want to reveal it to others. Other times, a tender energy visits me, and with it, I carefully examine the emotional threads and weave them together. The process is quite simple, but I need to stay focused to see the invisible threads in order to untangle them without feeling overwhelmed.”
– Hiromi Tango (2017). 

Intrude by Amanda Parer

Intrude, Amanda Parer @National Gallery Singapore

The usage of rabbits here contains a slight contradictory message – cute they might look, rabbits are actually considered pests where Parer hails from in Australia. However, Parer attempts to use the cutesy image to entice people to notice the underlying environmental message it (rabbits) brings.

Referencing the ‘elephants in the room’, the large bunnies force us to confront the issue headfirst.


Thus, I thought to look at rabbit-related phrases, and came up with a few:

Horse and rabbit stew referring to unpleasant things being of a larger proportion to beneficial things

Go down the rabbit hole – a situation that is strange, problematic, and becomes increasingly chaotic

✓  Rabbit’s foot – a good luck charm

Of these, I was the most interested in the rabbit’s foot and subsequently did more reading up on it.

Rabbit’s Foot
History
Some history on the foot: considered a good luck charm, the rabbit’s foot has a macabre history behind it. According to an article by Kim Nagy for Webvet, the belief hails from animism which bestows objects with spiritual powers. Obtaining part of the animal would give the holder some of its strengths, such as improved fertility or swiftness in the face of danger.

One interesting point to note that the luckier the rabbit’s foot was to be, the elements involving how it was killed had to be more inauspicious than ever. Firstly, it must be a real rabbit’s left hind foot, the luckiest feet originating from rabbits who are killed or caught in a cemetery. After which, various superstition exists on how to get the luckiest feet – the rabbit must be caught during a new or full moon, or on Friday the 13th. The foot should be cut off the rabbit while its alive, or it be caught by a cross-eyed person.

Folklorist Bill Ellis quotes an earlier advertisement selling the foot, exemplifying this,

“…the left hind foot of a rabbit killed in a country churchyard at midnight, during the dark of the moon, on Friday the 13th of the month, by a cross-eyed, left handed, red-headed, bow-legged Negro riding a white horse.”.

I love how the ironic this is: that by capturing the rabbit through the unluckiest ways, we aim to get good fortune from it.

The Modern-day Rabbit Foot
Based on wisegeek.com’s article, real rabbits’ foot keychains are still easily available on the internet, tourist shops or casino vending machine. However, in my experience, I have not seen an actual rabbit foot being sold, but a furry alternative remains in fashion stores.

Rabbit Fur Keychain

This is the closest keychain I can see inspired by the rabbit’s foot, however it should be noted that these keychains are only for aesthetic purposes, and have no such superstitious value (to my knowledge).

The Rabbit’s Foot and…. FYP?

I did some rough sketches, but somehow feel a lack of direction to go about it. These sketches were mostly for installations, something I think I foresee myself doing. However, the sketches mostly replicated artworks which I’ve seen before, and am unable to express the message I would like to bring across.. all I knew was that I wanted to make something physical. Perhaps I was relying too much on the rabbit metaphor?


After talking to Prof Randall, we thought that it might be better to extract the themes of my bunny, and work with it. With themes, it was easier to both narrow down and explore the concept more accurately.

Key Ideas and Topics
Loss, grief, memory, and fear

Grief
One famous method to categorise grief would be Elisabeth Kübler-Ross’s Kübler-Ross Grief Cycle (aka 5 stages of grief) from her 1969 book On Death and Dying.

The 5 stages of Grief by Elisabeth Kübler-Ross

Without delving too deeply into the cycle, I found my own experience not fully ascribing to the cycle, and sprung onto a new situation. I was in denial yes, but at the same time, I too felt helplessness, was bargaining with myself, frustrated at making the wrong decisions, and in shock. I was everything. It was as though my grief was an emotional replacement for my bun, evident that everything has happened and was not just a figment of my imagination.

An Occupation of Loss, Taryn Simon

Taryn Simon’s An Occupation of Loss tackles grief through acceptance, and she investigates how the living uses rituals and monuments to deal with loss. In her work, performers stay inside large concrete cylinders and grief, forming a cacophony. In a way, she accepts the grief, and moves on, but acknowledges it. I find this aspect very enthralling, or giving sufficient space to this whole new process of grief.

Loss
Definitely, the loss was startling – how can one quickly adapt to a change in routine, a loss of something important in your life? After all, humans thrive on routine. Grief results from this loss.

Memory
While I do understand that the process of my bun leaving is centred on grief and loss, I am more interested in exploring the concept of memory. Memory of my last moment together with him, the previous time spent with him… It feels distant, as though it has never happened before. Rather than focusing on loss/grief, I want to make sure that his PRESENCE is still there.

Perhaps, that will be what I will focus on.

Photographer Jennifer Loeber created a project ‘Left Behind‘, which matches objects her late mother left behind to photographs her father took. In her artist statement, she stated that it was a ‘confrontation’ to her tragedy, and it directly connects the otherwise ordinary objects to the beautiful memorial of her mother.

I like the confrontation, and rediscovered poetic memory of her mother. She acknowledges, and addresses it properly, rather than shy away or disregard it.

Momento Mori

A typical momento mori painting
Vanitas, Still life with books and Manuscript and a Skull (1663)

(Random update: I didn’t realise that I did see this painting before in real life a year ago and even snapped a picture of it!)

Definition
According to Tatemomento mori refers to an artwork ‘designed to remind the viewer of their mortality and of the shortness and fragility of human life’. Translated from latin, it means ‘remember you must die’.

The momento mori and a similar genre vanitas picture became popular in the 17th century, at a time where the majority believed that life on Earth was merely a preparation for the afterlife. In these artworks, symbols of mortality, both directly and indirectly referring to it, are included. In the momento mori, common symbols include skulls, hour glasses, clocks and dying fruits or flowers, whereas the vanitas portrays musical instruments, wines and books, reminding us of the vanity in world pursuits.

Both genres remain a candid reflection of life and death, and a reminder of passing time. It does not trivialise death, but rather prepares one towards it as a final end goal. It is just what it is. It is not positioned as something to avoid, but something we accept.

These genres continue to be explored by artists today.

Life and Death in Art
I particularly liked Beth Lipman‘s One and Others, where she arranges a still life of glass and flowers – items commonly used as tribute for the death – at the top of a coffin which has been customised to fit her.

One or the Other (2011)
Beth Lipman

The clever use of glass, a medium she is quoted saying

“Glass has a perpetuity, or immortality to it. Even though glass is fragile, it mimics the life cycle. It has a duality to it. It’s fragile and perishable, but also perpetual.”

both pushes and reminds one of death. Lipman becomes the symbol of death itself, and imbues herself with the artwork.

Another famous work concerning the reminder of death would be Candy Chang‘s Before I Die.

Momento Mori and my fyp
Facing death directly. Being candid and acknowledging it. Instead of death being a poetic end at the end of one’s life cycle, I want to make a varied version of the momento mori, one which extrudes and glorifies that memory of death (not before it happens).


References
https://www.singaporeartmuseum.sg/downloads/exhibitions/Imaginarium_2017_Lizard_Tail_Catalogue_by_Hiromi_Tango.pdf

http://hiromitango.com/Lizard-Tail-Breaking-Cycle

Intrude – Public Light Art Installation

http://www.webvet.com/main/2008/05/06/lucky-feet-ancient-lore-rabbits-foot

http://www.todayifoundout.com/index.php/2013/12/rabbits-foot-considered-lucky/

Duality: Beth Lipman’s Glass Still Life