Starkey’s Livio AI is not only a hearing aid that provides superior hearing quality, but also a health device that tracks a person’s physical activity. It is a multi-purpose device that helps people with their sense of hearing while also helping them improve on other aspects of their daily lives. Livio AI uses a technology which Starkey calls “Hearable Reality”, and this technology ensures that the user still can hear speech clearly even in noisy environments. The devices suppresses background noises and enhances human speech to ensure ease of communication.
Research has also shown that hearing health is directly related to overall well-being, because a person who is able hear can better engage with their environment. Livio AI is designed to manage both hearing health and physical health. Sensors inside the hearing
aids detect movement, activities and different gestures. This means that on top of amplifying the sense of hearing, the hearing aid is able to assess what is happening in the environment and then act accordingly with the appropriate settings, which improves user experience.
Besides the device itself, there is also an app that pairs up with the device. This provides another way the user can interact with their device. They can link the Thrive app to their hearing aid and then the app will display data that has been received by the hearing aid. For example, the device can hear words from different languages and then translate it into what the user can understand. There is also speech-to-text recognition, and the transcribe will be displayed in the app.
One pro of this device is that it uses AI technology, which means that it is learning from the user’s behaviour and inputs. Each device will increasingly become more personalised to the user and having a device that learns from you and applies what it learnt from you, onto you, will give you the feeling of being involved with device. It increases the interaction the user has with the device itself.
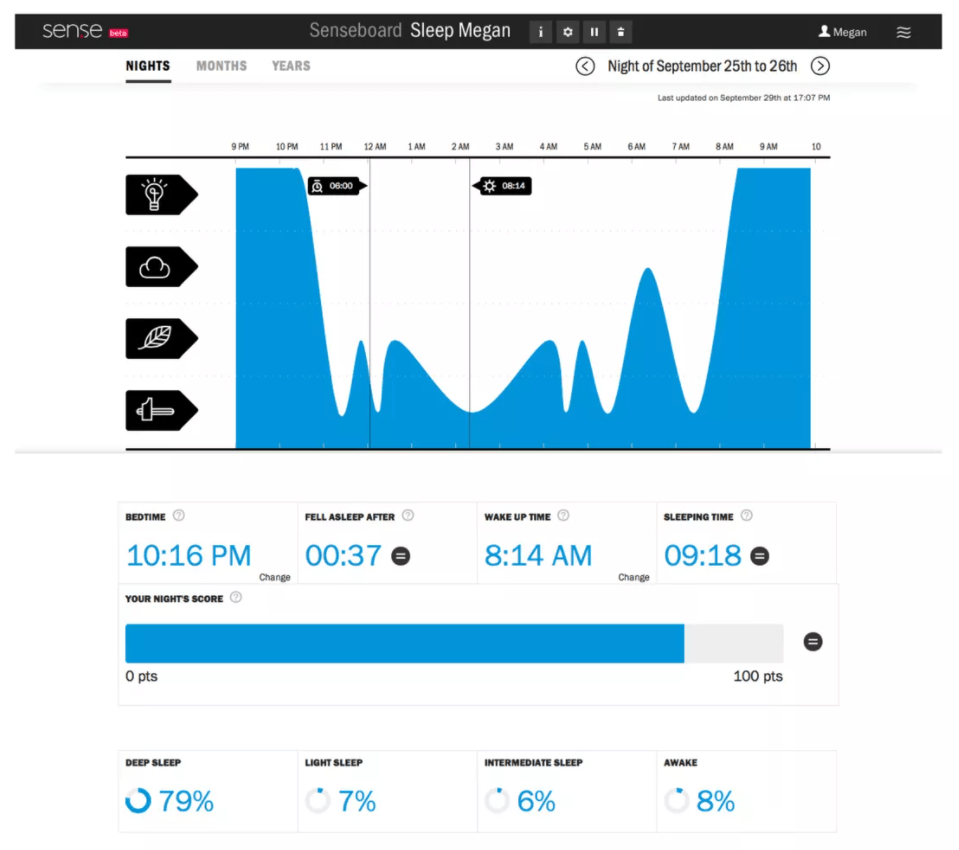
Another pro is that when used together with the Thrive app, there is a lot more interaction involved. The device collects the data and the app displays the data in a fun way of which the user can use to keep track of their data easily. The app doesn’t simple display the raw data as it is. It categorises it into “Body Score” and “Brain Score”, which will then add up to the total “Thrive Wellness Score” and this score, out of 200, will help the user see how healthy they are in both aspects of hearing health and physical health. The app provides insights on how the data is used and then gives the user a more detailed explanation for what each number means. This is a plus to the user experience because the clarity of data makes it easier for the user to understand how the device is helping them in their daily life.
The con of this device would be the cost because I would consider this a more premium product that is not accessible to everyone who needs it. With the amount of features included in the hearing aid, the cost will definitely be an issue because of the number of different sensors needed for the different functions.
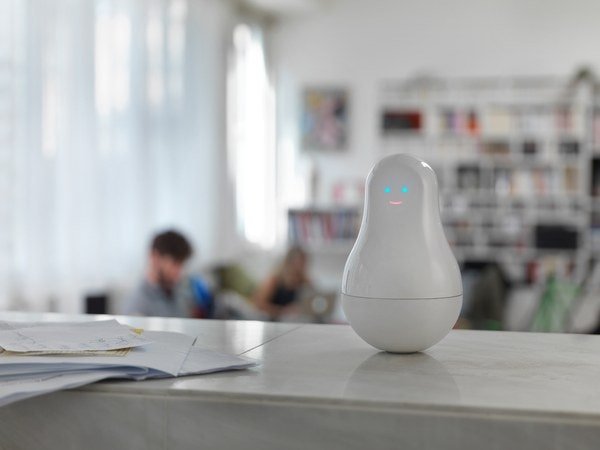
Sen.se Mother, the device that is apparently “like a mum, but better”. Sen.se Mother is a tracker that can keep tabs on many aspects of your life. It helps the user to keep their house organised, while also taking care of the user themselves. And what’s better is that the user can choose what they want their Sen.se Mother to control. Sen.se Mother is essentially a wireless hub that comes with 4 small tracking devices that are colour-coded for the user to attach to the respective appliances. These tracking devices contain motion and temperature sensors which collects data and sends to the user’s phone app where they can control everything. The tracking devices communicate with the main Mother hub and display all sorts of useful information on the related web and mobile applications that are paired with the Mother.
The pro of this device is its high adaptability. The user has the freedom to choose what they want to track, and they can put the sensors wherever they want on their appliances. This means that it can be attached to any kind of appliance so it is highly unlikely that there will be an appliance that the tracker can’t be attached to. The different colours on the tracking device is also very useful in helping the user easily match the tracker to the data displayed in the app because the colour scheme of the data showed in the app will correspond to the colour of the tracker on the appliance (instead of a plain white tracker).
The statistics shown are also pretty in-depth for a sensor so small and compact.
However, a con is that the app can only display the data when the user is within 65 feet of the main Mother hub, though the tracker is still tracking the respective aspects. This means that the user cannot freely access their data and are limited to a small range around the main hub. In addition, Mother has to be hard-wired to your router, which means that is is fixed at one location. For a hefty price of $300, Sen.se Mother is definitely on the pricier side and is only suitable for people who really want to micromanage every aspect of their life.
A sweat sensor that looks similar to a mosquito repellant patch has been developed by John Rogers, Ph.D, an engineering professor and the chairman of the board of directors at Epicore Biosystems, which is a company that specialises in flexible skin devices that monitor fluids. What I find interesting about this sensor is that it makes use of colour change in certain chemical reactions to give a very visual feedback for the user. A lot of times, devices show users information via numbers and statistics, which can get too overwhelming. This sensor helps the user to decipher in a very simple way of colours.
How the device works via chemistry and indicators:
This sweat sensor can help athletes monitor how much fluids they are losing so that they can replenish accordingly and maintain their best performance.
Although there are other variants to measure sweat levels in athletes as they exercise and engage in sports, they were no ways for swimmers to keep track of their sweat levels even though they are also considered athletes. One pro of this particular sweat sensor is that it is waterproof so that swimmers can also keep track of their hydration level and in turn, their overall performance. Sweat loss is related to electrolyte loss and John Rogers says, “Dehydration affects performance and can lead to cramping in the pool, but you don’t have any idea how much water you need.”. However, one con of this device is that there is no way for it to connect to a mobile app per se, so that means there is no long term tracking included with the device, and that users have to keep track on their own if they want to make use of the data collected from the device in the long run. However, research is still ongoing and they are looking into setting up a mobile app to be paired with this device to make long term statistics tracking a lot easier.
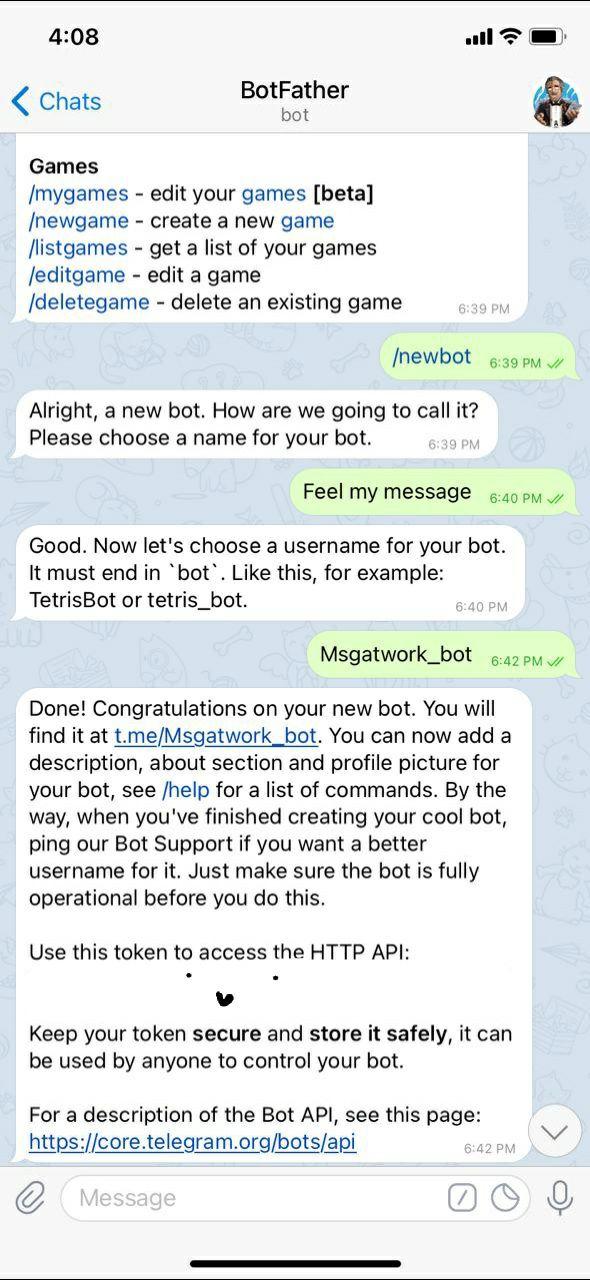
Our multimodal project is called Feel My Message. This project aims to inform a person about the content of a received telegram message without being disruptive to his entourage.
CONTEXT:
Our device is ideally an unobtrusive small box that can be placed on the table or in one’s pocket. We envisioned it to be used when one is unable to check their phones or laptops for messages during a meeting. However, in our prototype, our device is bigger than what we thought due to hardware and financial constraints.
HOW THE DEVICE WORKS:
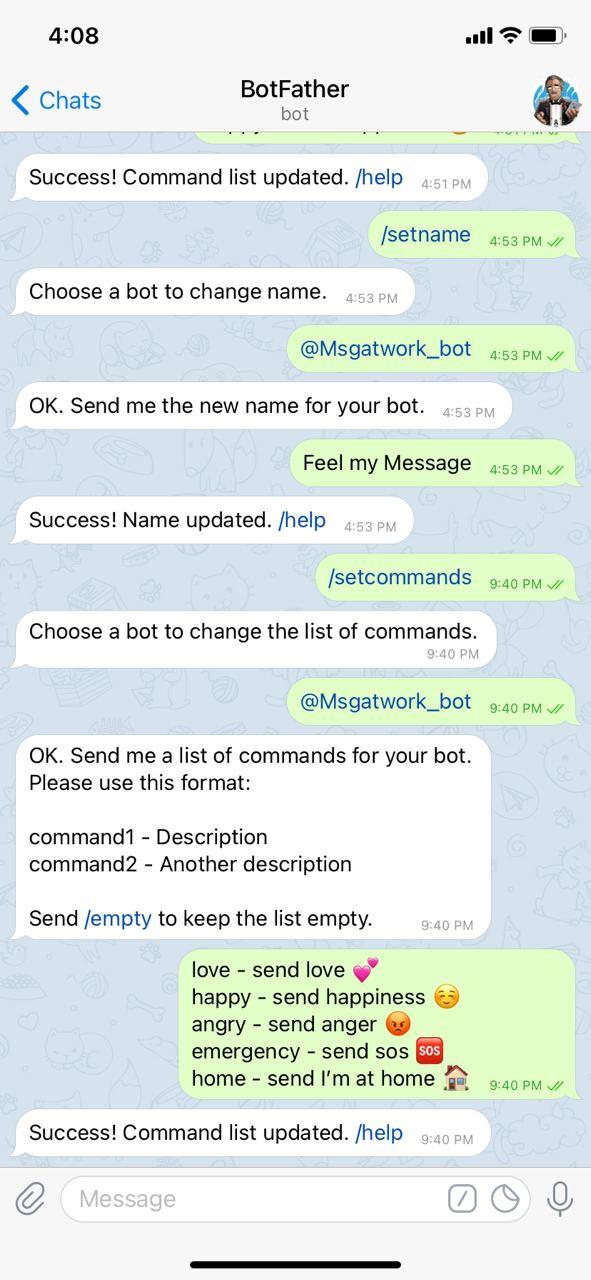
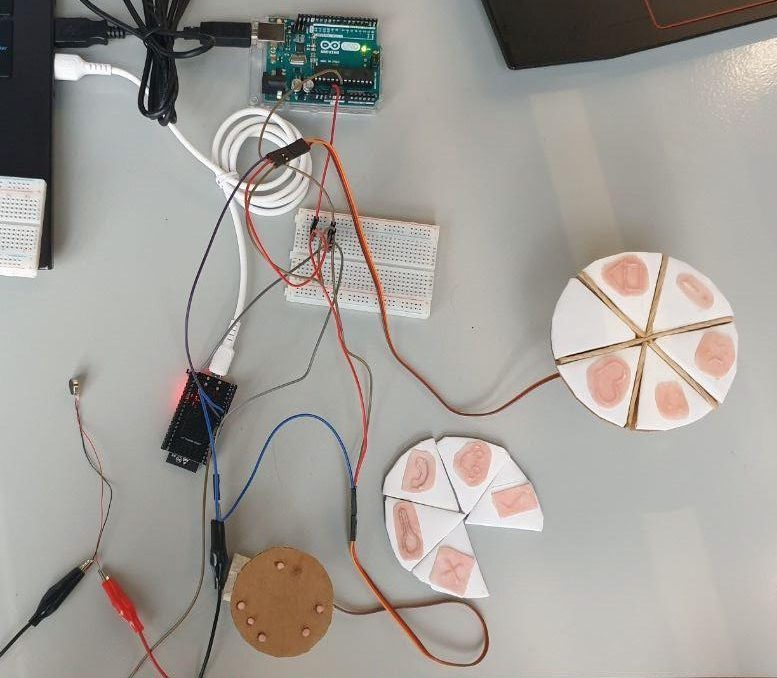
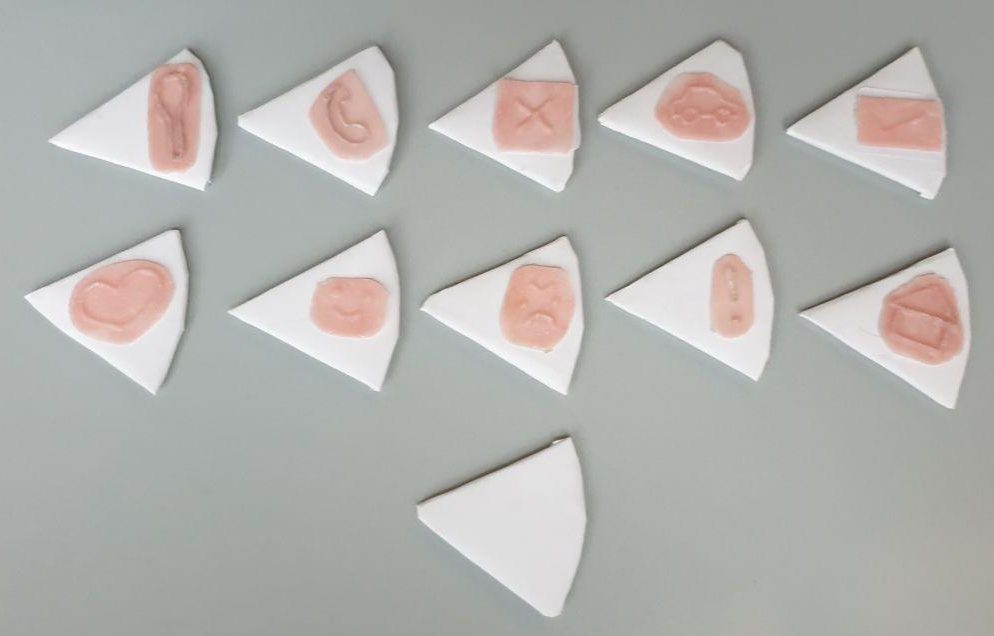
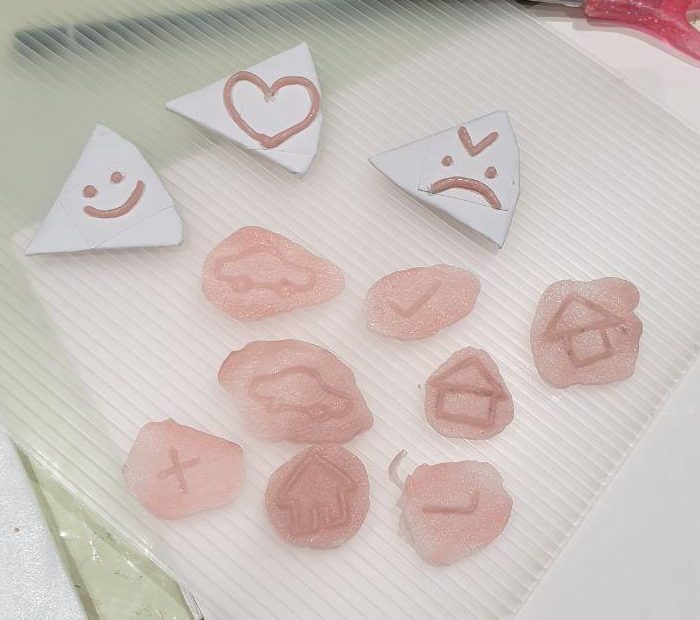
The device will first receive messages sent to the user from someone else via our telegram bot. Then, two separate dials within the device will rotate to indicate who the sender is and the content of their message. This information is depicted through tactile symbols that the user will be able to touch with a finger and recognize upon contact. To make this device universal, the symbols that represent the message content is changeable to better suit the needs of different users. Users can also assign their own contacts to the dial that represents the sender of the message.
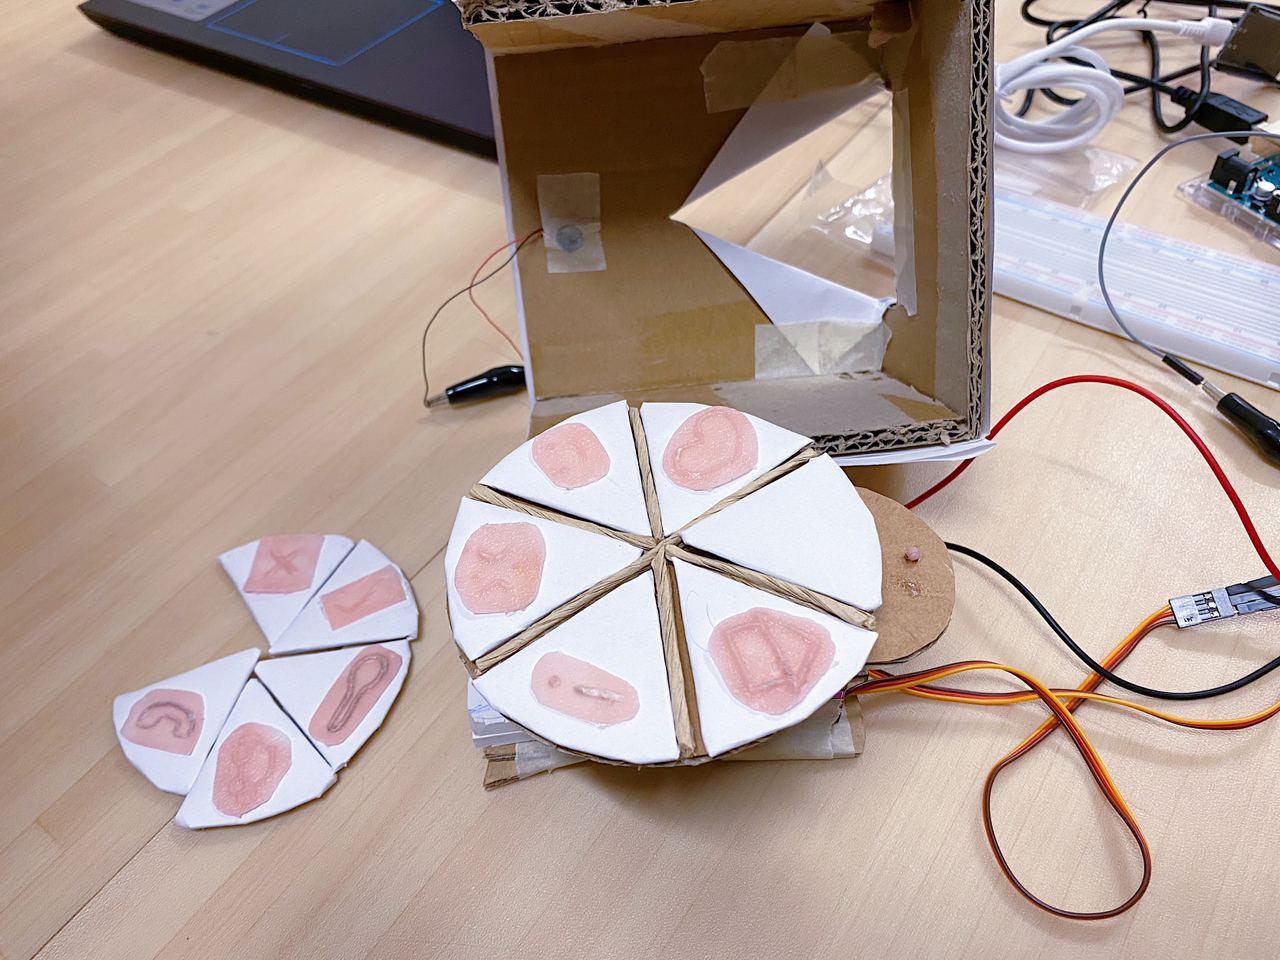
PICTURES OF THE UNCOMBINED PROTOTYPE:
For the symbols, we had prior prototypes before we decided on these symbols. We used plastic poly pellets to make the symbols because it was more forgiving when it came to the experimental stage because we could easily remould it, as we were still trying out which symbols worked best for what kind of message.
Before we settled on using a mould, we tried to shape the poly pellets into the symbol itself, but we realised that the symbols didn’t feel very obvious because it was too smooth to the touch. By using the mould, the finish was rougher and that was more obvious, hence we settled with using a mould.
DEMO:
HARDWARE:
Arduino Uno Microcontroller
ESP32 wifi and bluetooth board
2 x 360° continuous servo motors (MG90S + MG995)
Vibration motor
Breadboard
SOFTWARE:
Arduino IDE
Telegram Bot Maker
SETTING UP THE TELEGRAM BOT:
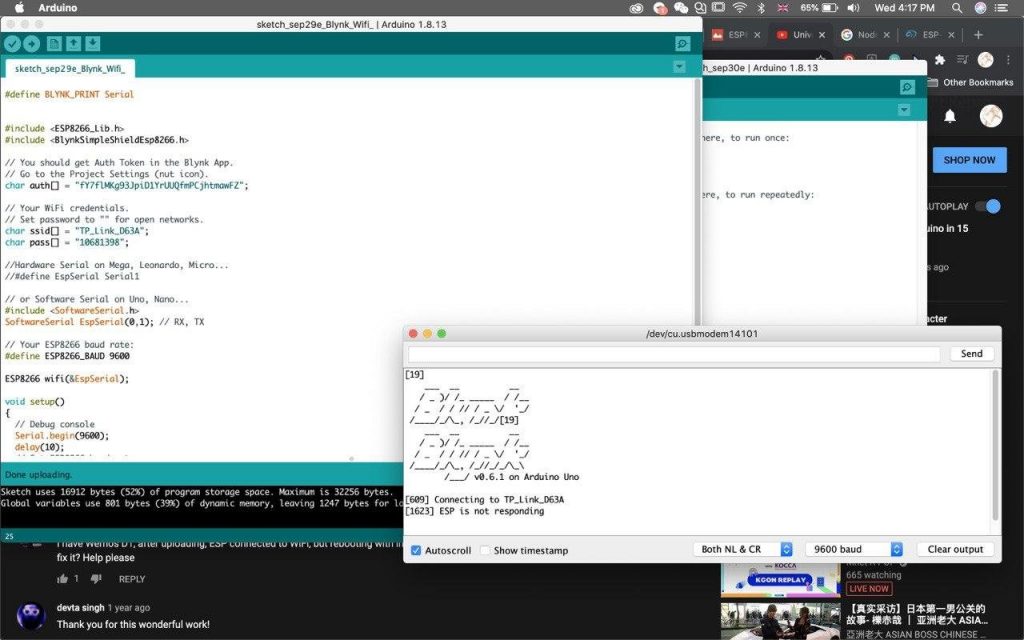
CHALLENGES:
In the beginning, we tried using an ESP8266 wifi module with Arduino Uno, with the software Blynk to Arduino IDE. However we could not get the ESP8266 wifi module to work despite numerous attempts. It would not connect to the wifi or work with Blynk.
Afterwards, we bought an ESP32 wifi and bluetooth board. We tried having two separate codes on the ESP32 and Arduino Uno. We used the Arduino Uno to control the 2 servo motors (5V) and ESP32 to run the main code. We had to do this because the ESP32 runs on 3.3V while the servos run on 5V, so the ESP32 board did not have enough power to run the servos and the vibration motor. But by doing so, we were unable to get the Arduino Uno to communicate with the ESP32 via serial communication, because they were running on different baud rate (9600 vs 115200) and if we uploaded the code via the Arduino Uno, it would be unable to access the ESP32 library.
We attempted to connect the servos to the 5V or 3.3V pin on the ESP32. We were able to receive the messages, but yielded a weird error on the serial port, and the servos were unable to move. We researched that we needed a 5V to 3.3V logic leveler. However, we did not have a logic leveler available to us, so we had to think of an alternative.
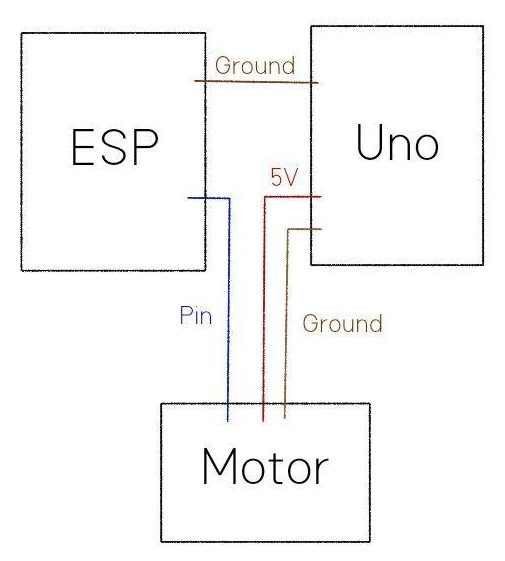
In the end, our solution was to combine both our telegram bot code and servo motor codes into one main code, upload onto the ESP32 and use it as our main micro controller unit, then power the servos with a separate power source. We utilised the Arduino Uno as the 5V power supply through a breadboard. For this to work, the ESP32, as well as our other hardware had to all be grounded on the same line.
(how the wires are connected)
Now, there was sufficient power for the servo motors, we then moved on to combine the codes, making sure that the servos were working properly based on the received messages. Here is our final combined code.
FINAL COMBINED CODE:
#include <ESP32Servo.h>

#include <WiFi.h>
#include <WiFiClientSecure.h>
#include <UniversalTelegramBot.h>

static const int outerservoPin = 16;
static const int innerservoPin = 17;

Servo innerServo;
Servo outerServo;

int vMotorPin = 18;
bool ended = false;
String text, from_name;
int person = 0;
int msgsent = 0;


// Initialize Wifi connection to the router
char ssid[] = "XXXX"; // your network SSID (name)
char password[] = "XXXXXXXXXXXXXXXXXX"; // your network key

// Initialize Telegram BOT
#define BOTtoken "XXXXXXXXXXXXXXXXXXXXXXXXXXXXXXXXXXXXXXXXXXXXXXXXXXXXXXXXXXXX"

WiFiClientSecure client;
UniversalTelegramBot bot(BOTtoken, client);

int Bot_mtbs = 1000; //mean time between scan messages
long Bot_lasttime; //last time messages' scan has been done
bool Start = false;

void handleNewMessages(int numNewMessages) {
// Serial.println("handleNewMessages");
// Serial.println(String(numNewMessages));

for (int i=0; i<numNewMessages; i++) {
String chat_id = String(bot.messages[i].chat_id);
String text = bot.messages[i].text;

String from_name = bot.messages[i].from_name;

if (from_name == "Wan"){
person = 1;
}
if (from_name == "Emma"){
person = 2;
}
if (from_name == "Wei Lin"){
person = 3;
}

if (text == "/love") {
bot.sendChatAction(chat_id, "typing");
delay(100);
bot.sendMessage(chat_id, "Received love!");
Serial.println("lof from " + from_name);
msgsent = 1;
}

if (text == "/happy") {
bot.sendChatAction(chat_id, "typing");
delay(200);
bot.sendMessage(chat_id, "Smile! :D");
Serial.println("happy from " + from_name);
msgsent = 2;
}

if (text == "/angry") {
bot.sendChatAction(chat_id, "typing");
delay(200);
bot.sendMessage(chat_id, "Anger sent!! >:(");
Serial.println("angry from " + from_name);
msgsent = 3;
}

if (text == "/emergency") {
bot.sendChatAction(chat_id, "typing");
delay(200);
bot.sendMessage(chat_id, "Called for help!!");
Serial.println("emergency from " + from_name);
msgsent = 4;
}

if (text == "/home") {
bot.sendChatAction(chat_id, "typing");
delay(200);
bot.sendMessage(chat_id, "Welcome Home!!");
Serial.println("home from " + from_name);
msgsent = 5;
}

if (text == "/start") {
String welcome = "Welcome to Feel My Message, " + from_name + ".\n";
welcome += "Here is a list of commands for you to use :D\n\n";
welcome += "/love - send love 💕 \n/happy - send happiness ☺ \n/angry - send anger 😡 \n/emergency - send sos 🆘 \n/home - send I’m at home 🏠";
bot.sendMessage(chat_id, welcome);
}
}
}


void setup() {
pinMode(vMotorPin, OUTPUT);
innerServo.attach(innerservoPin);
outerServo.attach(outerservoPin);

Serial.begin(115200);

// Attempt to connect to Wifi network:
Serial.print("Connecting Wifi: ");
Serial.println(ssid);

// Set WiFi to station mode and disconnect from an AP if it was Previously
// connected
WiFi.mode(WIFI_STA);
WiFi.begin(ssid, password);

while (WiFi.status() != WL_CONNECTED) {
Serial.print(".");
delay(500);
}

Serial.println("");
Serial.println("WiFi connected");
Serial.print("IP address: ");
Serial.println(WiFi.localIP());

}

void stopturning(){
innerServo.write(93);
}

void vibrate(){
delay(50);
digitalWrite(vMotorPin, HIGH);
delay(500);
digitalWrite(vMotorPin, LOW);
}

void msg1(){
innerServo.write(70);
delay(640);
innerServo.write(93);
vibrate();
delay(5000);
innerServo.write(110);
delay(750);
stopturning();
}

void msg2(){
innerServo.write(70);
delay(1000);
innerServo.write(93);
vibrate();
delay(5000);
innerServo.write(110);
delay(1150);
stopturning();
}

void msg3(){
innerServo.write(70);
delay(1550);
innerServo.write(93);
vibrate();
delay(5000);
innerServo.write(110);
delay(1700);
stopturning();
}

void msg4(){
innerServo.write(110);
delay(1280);
innerServo.write(93);
vibrate();
delay(5000);
innerServo.write(70);
delay(1010);
stopturning();
}

void msg5(){
innerServo.write(110);
delay(750);
innerServo.write(93);
vibrate();
delay(5000);
innerServo.write(70);
delay(620);
stopturning();
}

void sendmsg(){
if(msgsent == 1){
if (ended == false){
Serial.println("msg1");
msg1();
msgsent = 0;
}
}

if(msgsent == 2){
if (ended == false){
Serial.println("msg2");
msg2();
msgsent = 0;
}
}

if(msgsent == 3){
if (ended == false){
Serial.println("msg3");
msg3();
msgsent = 0;
}
}

if(msgsent == 4){
if (ended == false){
Serial.println("msg4");
msg4();
msgsent = 0;
}
}

if(msgsent == 5){
if (ended == false){
Serial.println("msg5");
msg5();
msgsent = 0;
}
}
}

void per1(){
}

void per2(){
outerServo.write(180);
delay(270);
outerServo.write(93);
}

void per2back(){
outerServo.write(0);
delay(270);
outerServo.write(93);
}

void per3(){
outerServo.write(0);
delay(250);
outerServo.write(93);
}

void per3back(){
outerServo.write(180);
delay(260);
outerServo.write(93);
}


void loop() {
if (millis() > Bot_lasttime + Bot_mtbs) {
int numNewMessages = bot.getUpdates(bot.last_message_received + 1);

while(numNewMessages) {
// Serial.println("got response");
handleNewMessages(numNewMessages);
numNewMessages = bot.getUpdates(bot.last_message_received + 1);
}

Bot_lasttime = millis();
}
if(person == 1){
if (ended == false){
Serial.println("per1");
per1();
sendmsg();
person = 99;
}
}

if(person == 2){
if (ended == false){
Serial.println("per2");
per2();
person = 99;
sendmsg();
per2back();
}
}

if(person == 3){
if (ended == false){
Serial.println("per3");
per3();
person = 99;
sendmsg();
per3back();
}
}
}
After coming up with the sketches and putting them in Processing, we were then tasked with connecting it to Arduino. We settled with 4 main functions with different triggers.
We wanted the on/off function to be the most straightforward way, which was for the LED lights to turn on when the phone is faced up (i.e. proximity sensor not covered, giving a value of “false”/”0”), and then for it to off when you place the phone faced down on a surface (i.e. proximity sensor covered, giving a value of “true”/”1”).
Brightness
One interesting feature we found on the iOS version of ZIGSIM was “Mic Level”, so we wanted to experiment with it. We figured volume could work well with brightness because it was quite intuitive for the LED to be more intense as the environment gets louder. Additionally, we tested this feature with music, and the results turned out surprisingly well!
Colour Change
Essentially, we wanted to use the compass to draw a circle, using the gestures to change the colours while “colouring” the circle. We made use of the Gravity, Quaternion and Compass sensors from ZigSim, linking it through Processing to Arduino. From Processing, the data received from ZigSim is communicated to Arduino and translated to colour codes and number patterning for the Adafruit LED Strip.
Preset Colour Patterns
We learnt how to use Wekinator in the previous lesson, so we thought that it would be a good chance for us to apply it in our project. We coded various LED light strip patterns in Arduino, and the trigger for each of the different patterns would be the different touch gestures that we trained in Wekinator. We had 3 gestures to trigger 3 different patterns.
Other variations that we tried and tested
Saturation – Gravity
Colour Wheel – Touch 2D
Pattern Change – Accelerometer (Shake)
Saturation
Saturation defines the brilliance and intensity of a color. White and black (grey) are added to a colour to reduce its saturation. Hence, we worked in greyscale (black to white), with the highest point being white and the lowest point being black.
Colour Wheel
Using the full dimensions of the screen to map to the colours of the RGB colour palette.
Pattern Change
Using accelerometer, if the value reads more than 8, or less than -8, then the device will register the motion as one shake (i.e. “shaketrue”) and the next pattern will play. The shake cycles through the preset patterns.
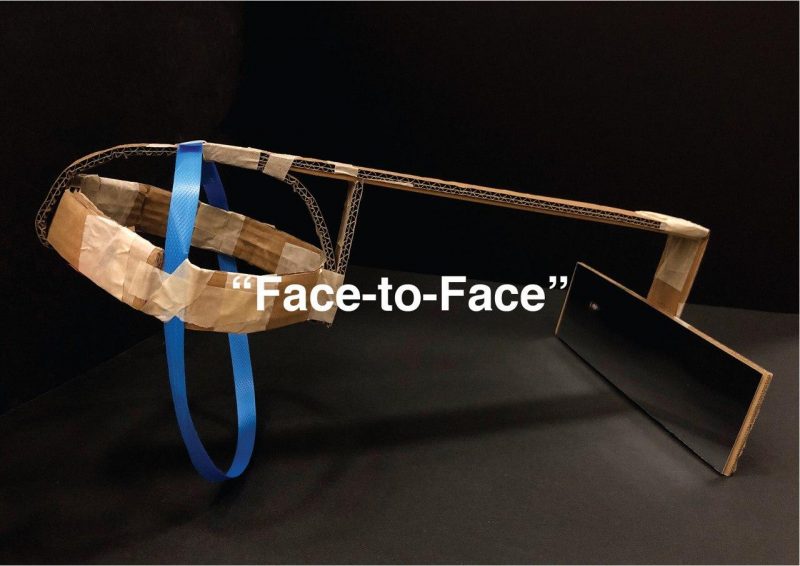
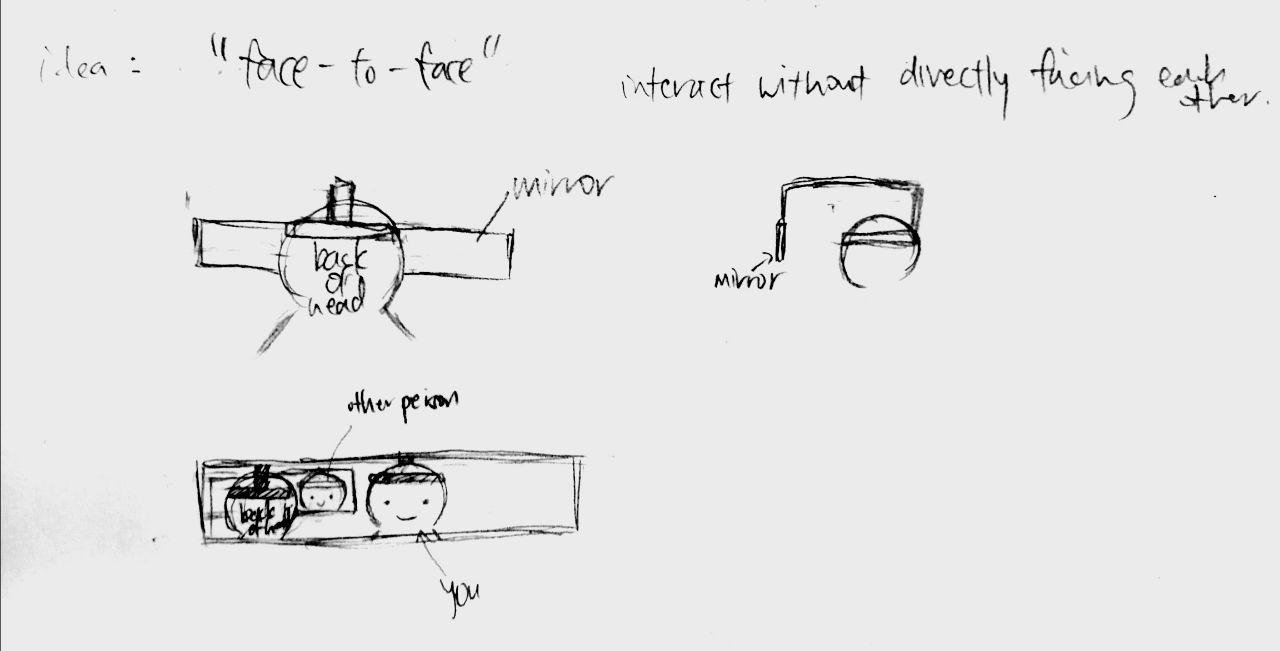
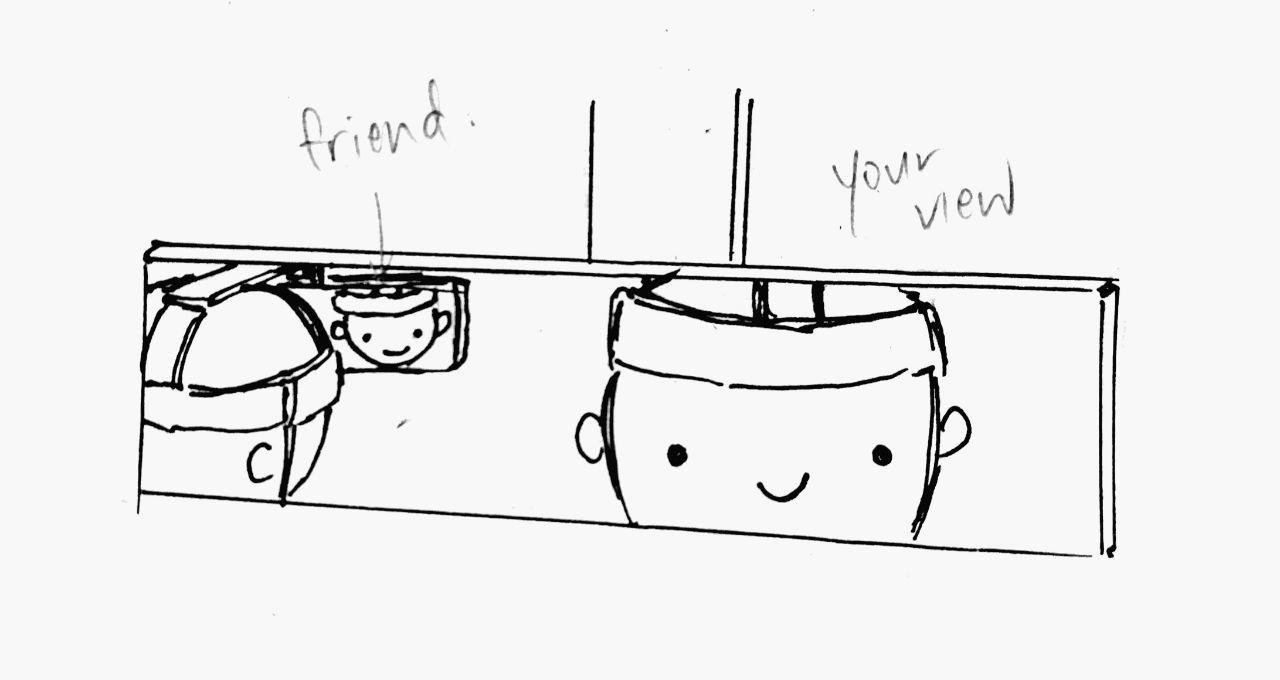
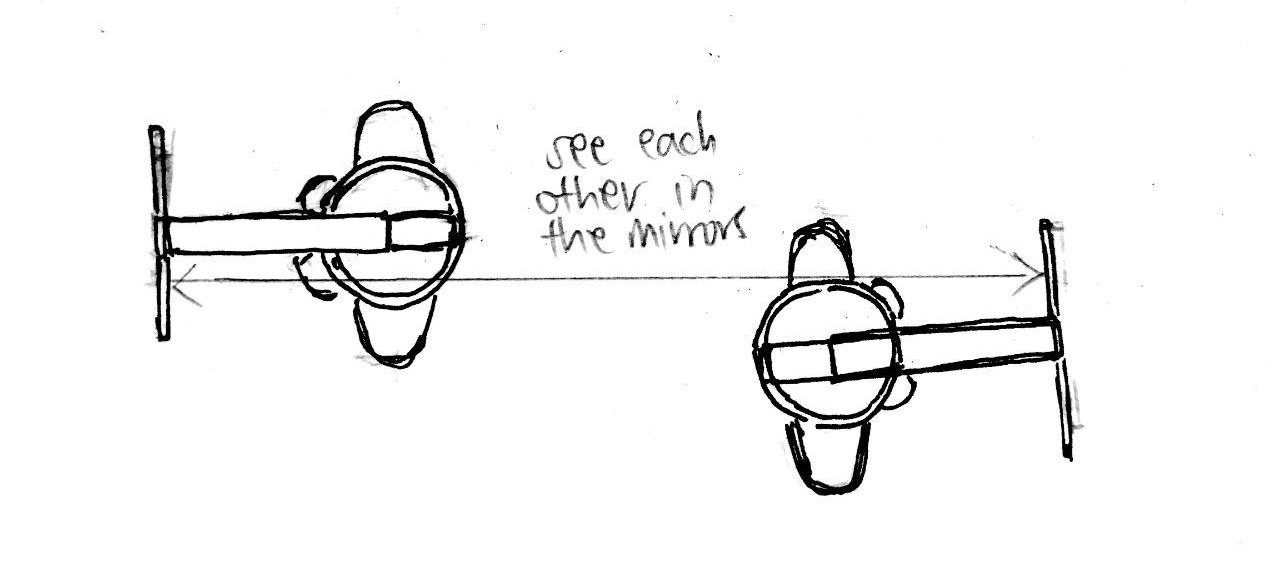
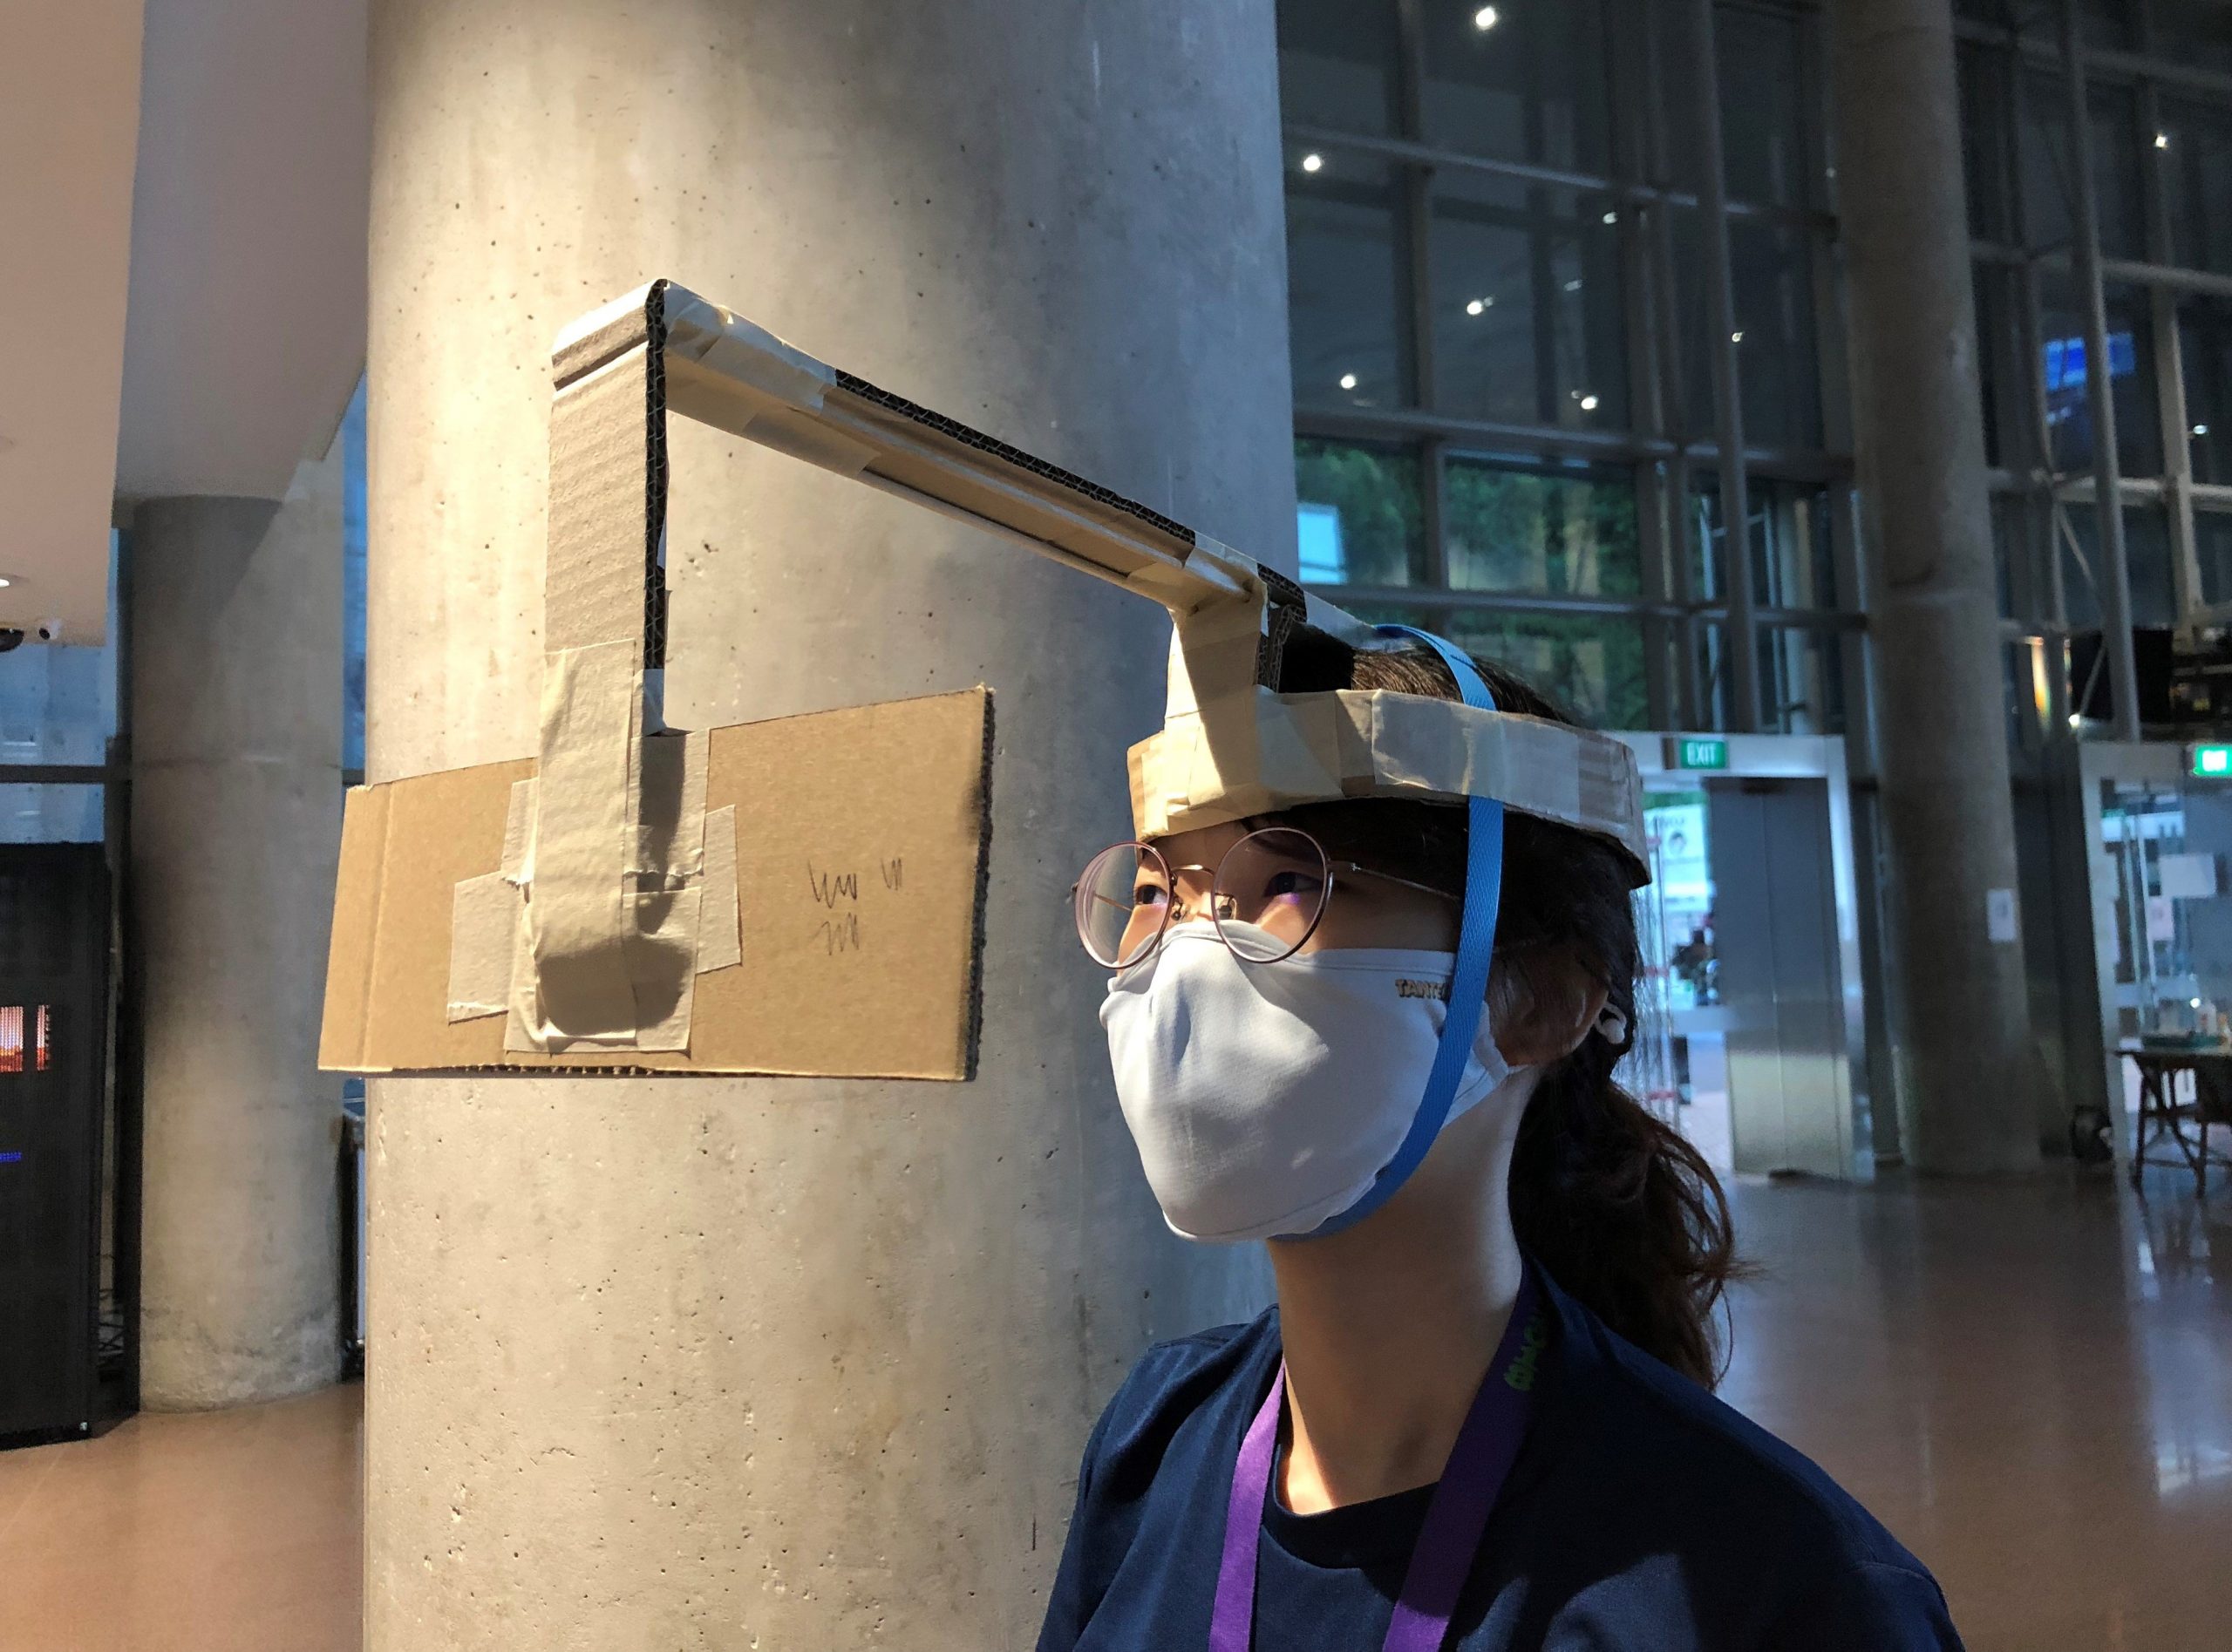
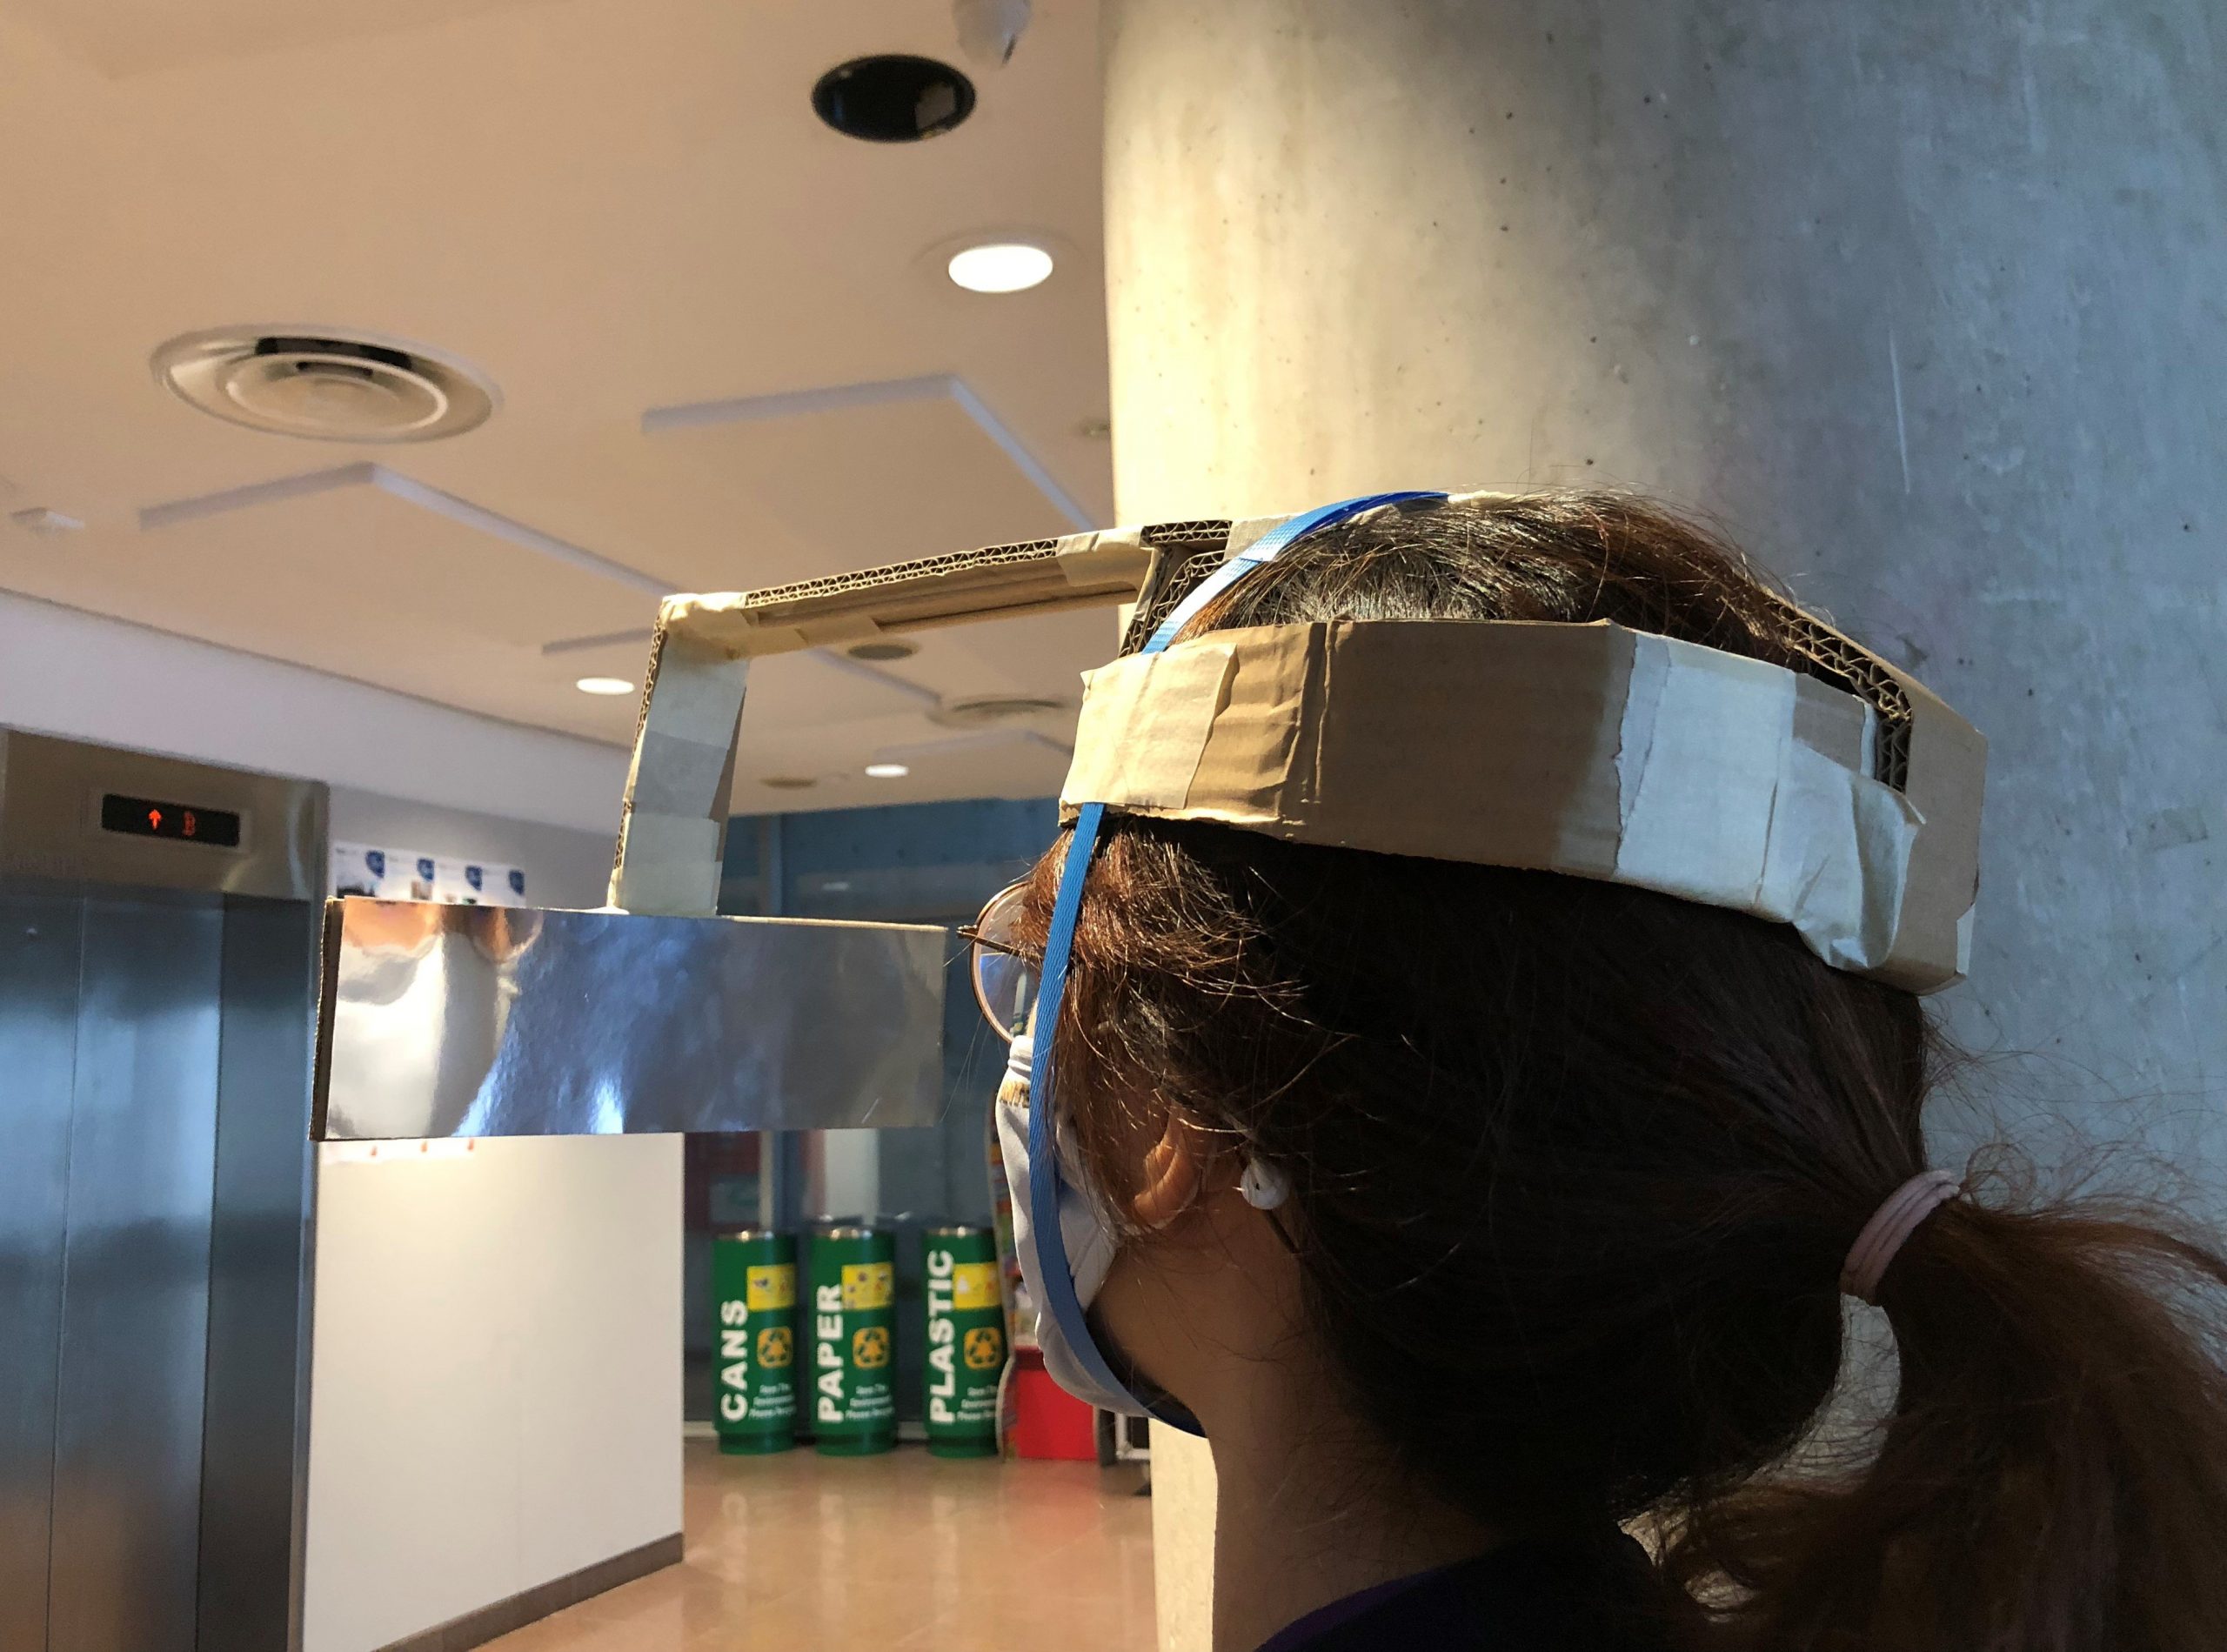
“Face-to-face” is an analog device that allows us to interact in a time of social distancing. Social distancing helps limit opportunities of healthy people coming into close contact with sick people, which reduces opportunities for disease transmission.
With “Face-to-Face”, it forces you and your friend to stay at least 1 metre apart, in order for both of you to be able to fully see each other’s face in the mirror. At the same time, this allows you to still keep the “closeness” of a face to face conversation as you will still be in the same physical space, while also minimising the spread of transmission due to not directly facing each other.
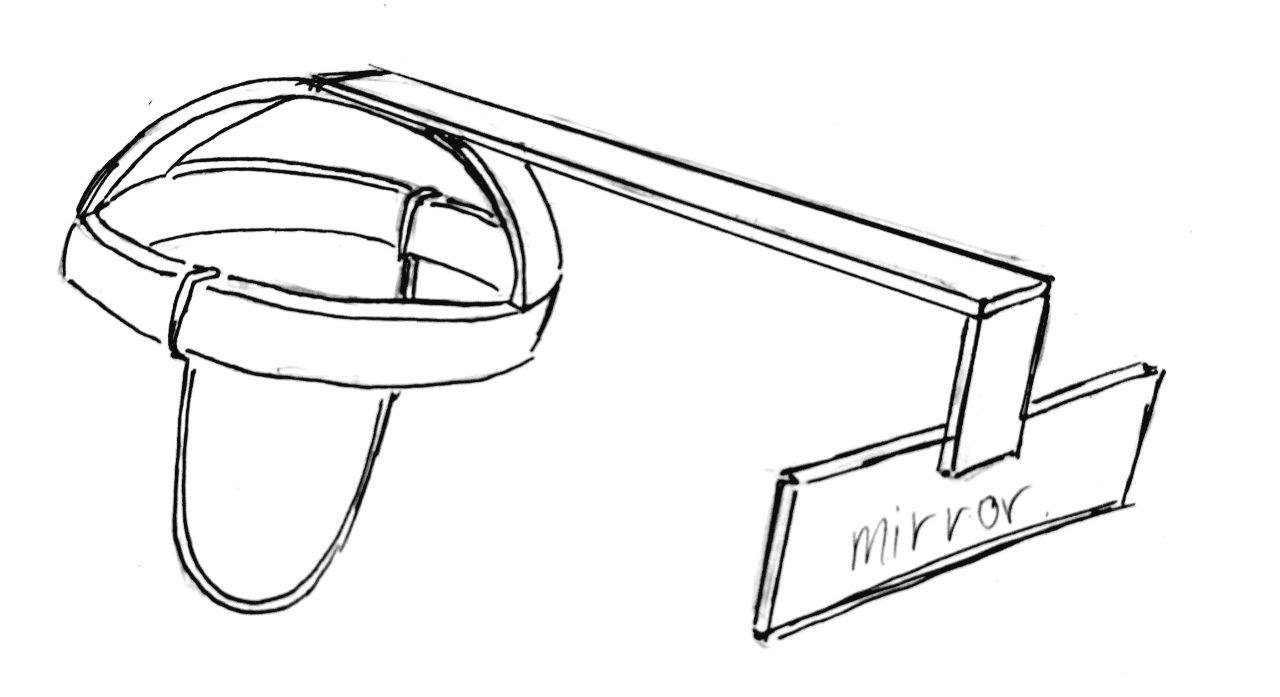
Sketches (Device and how it works):
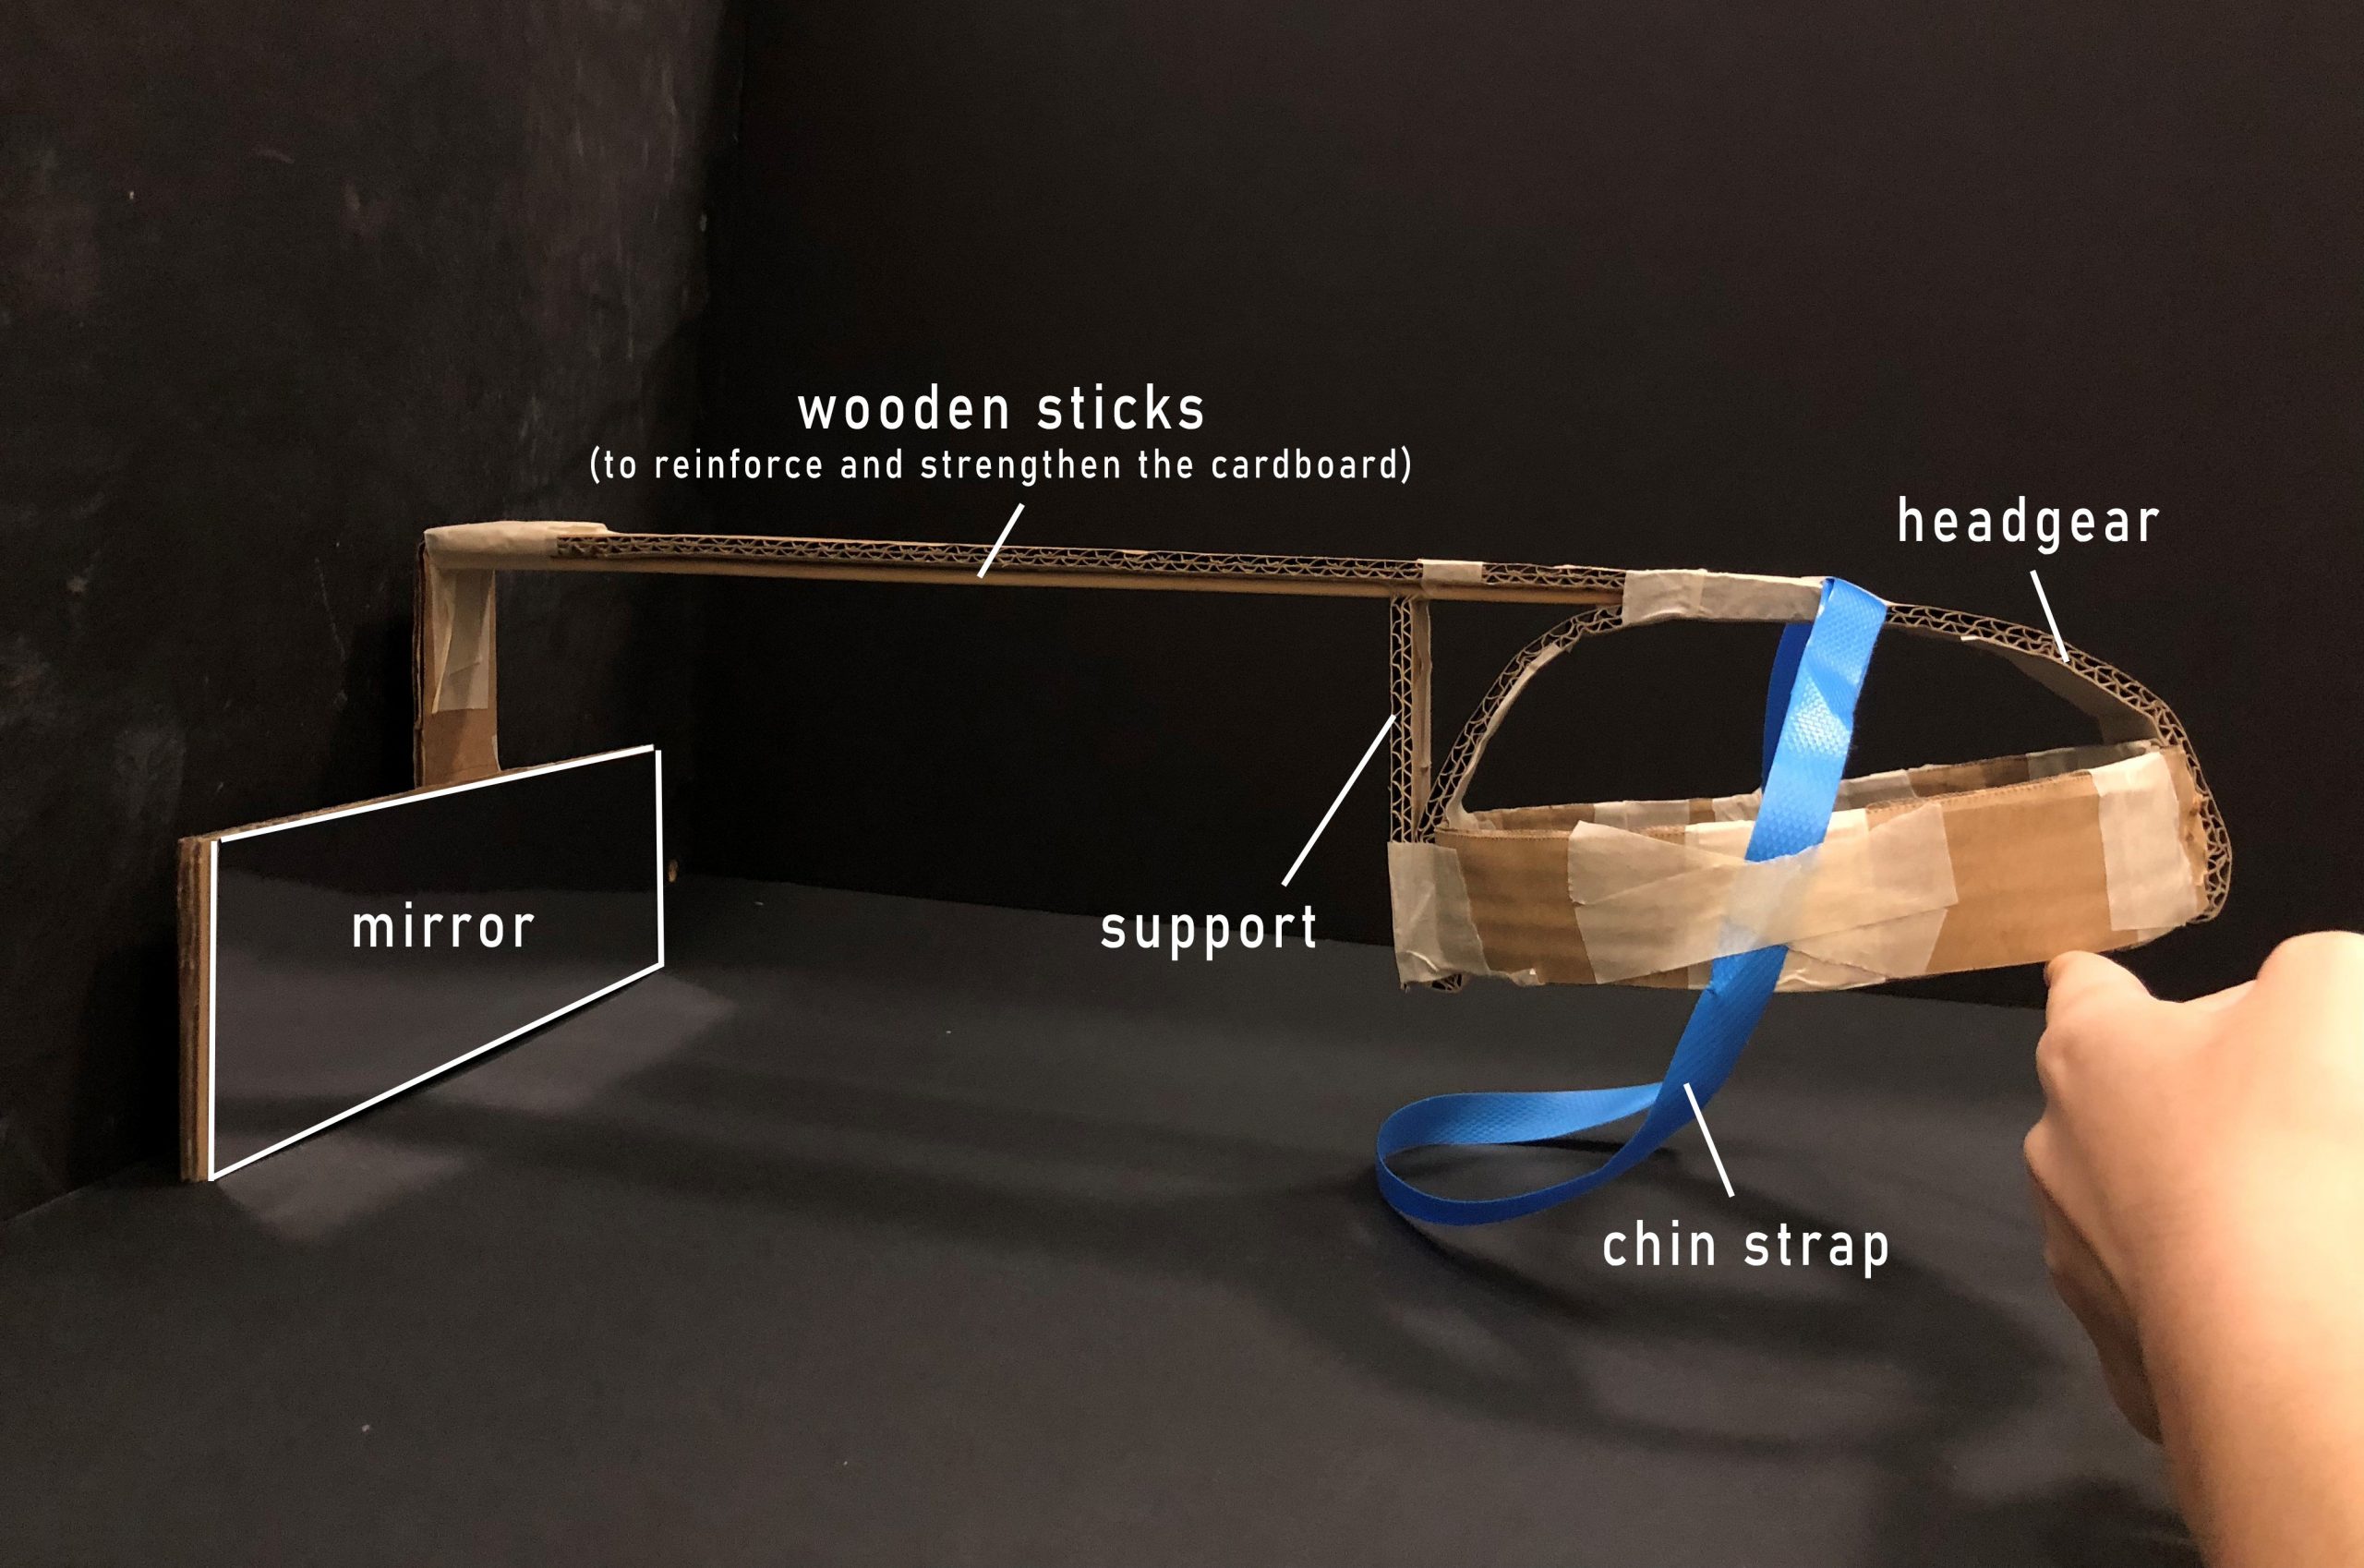
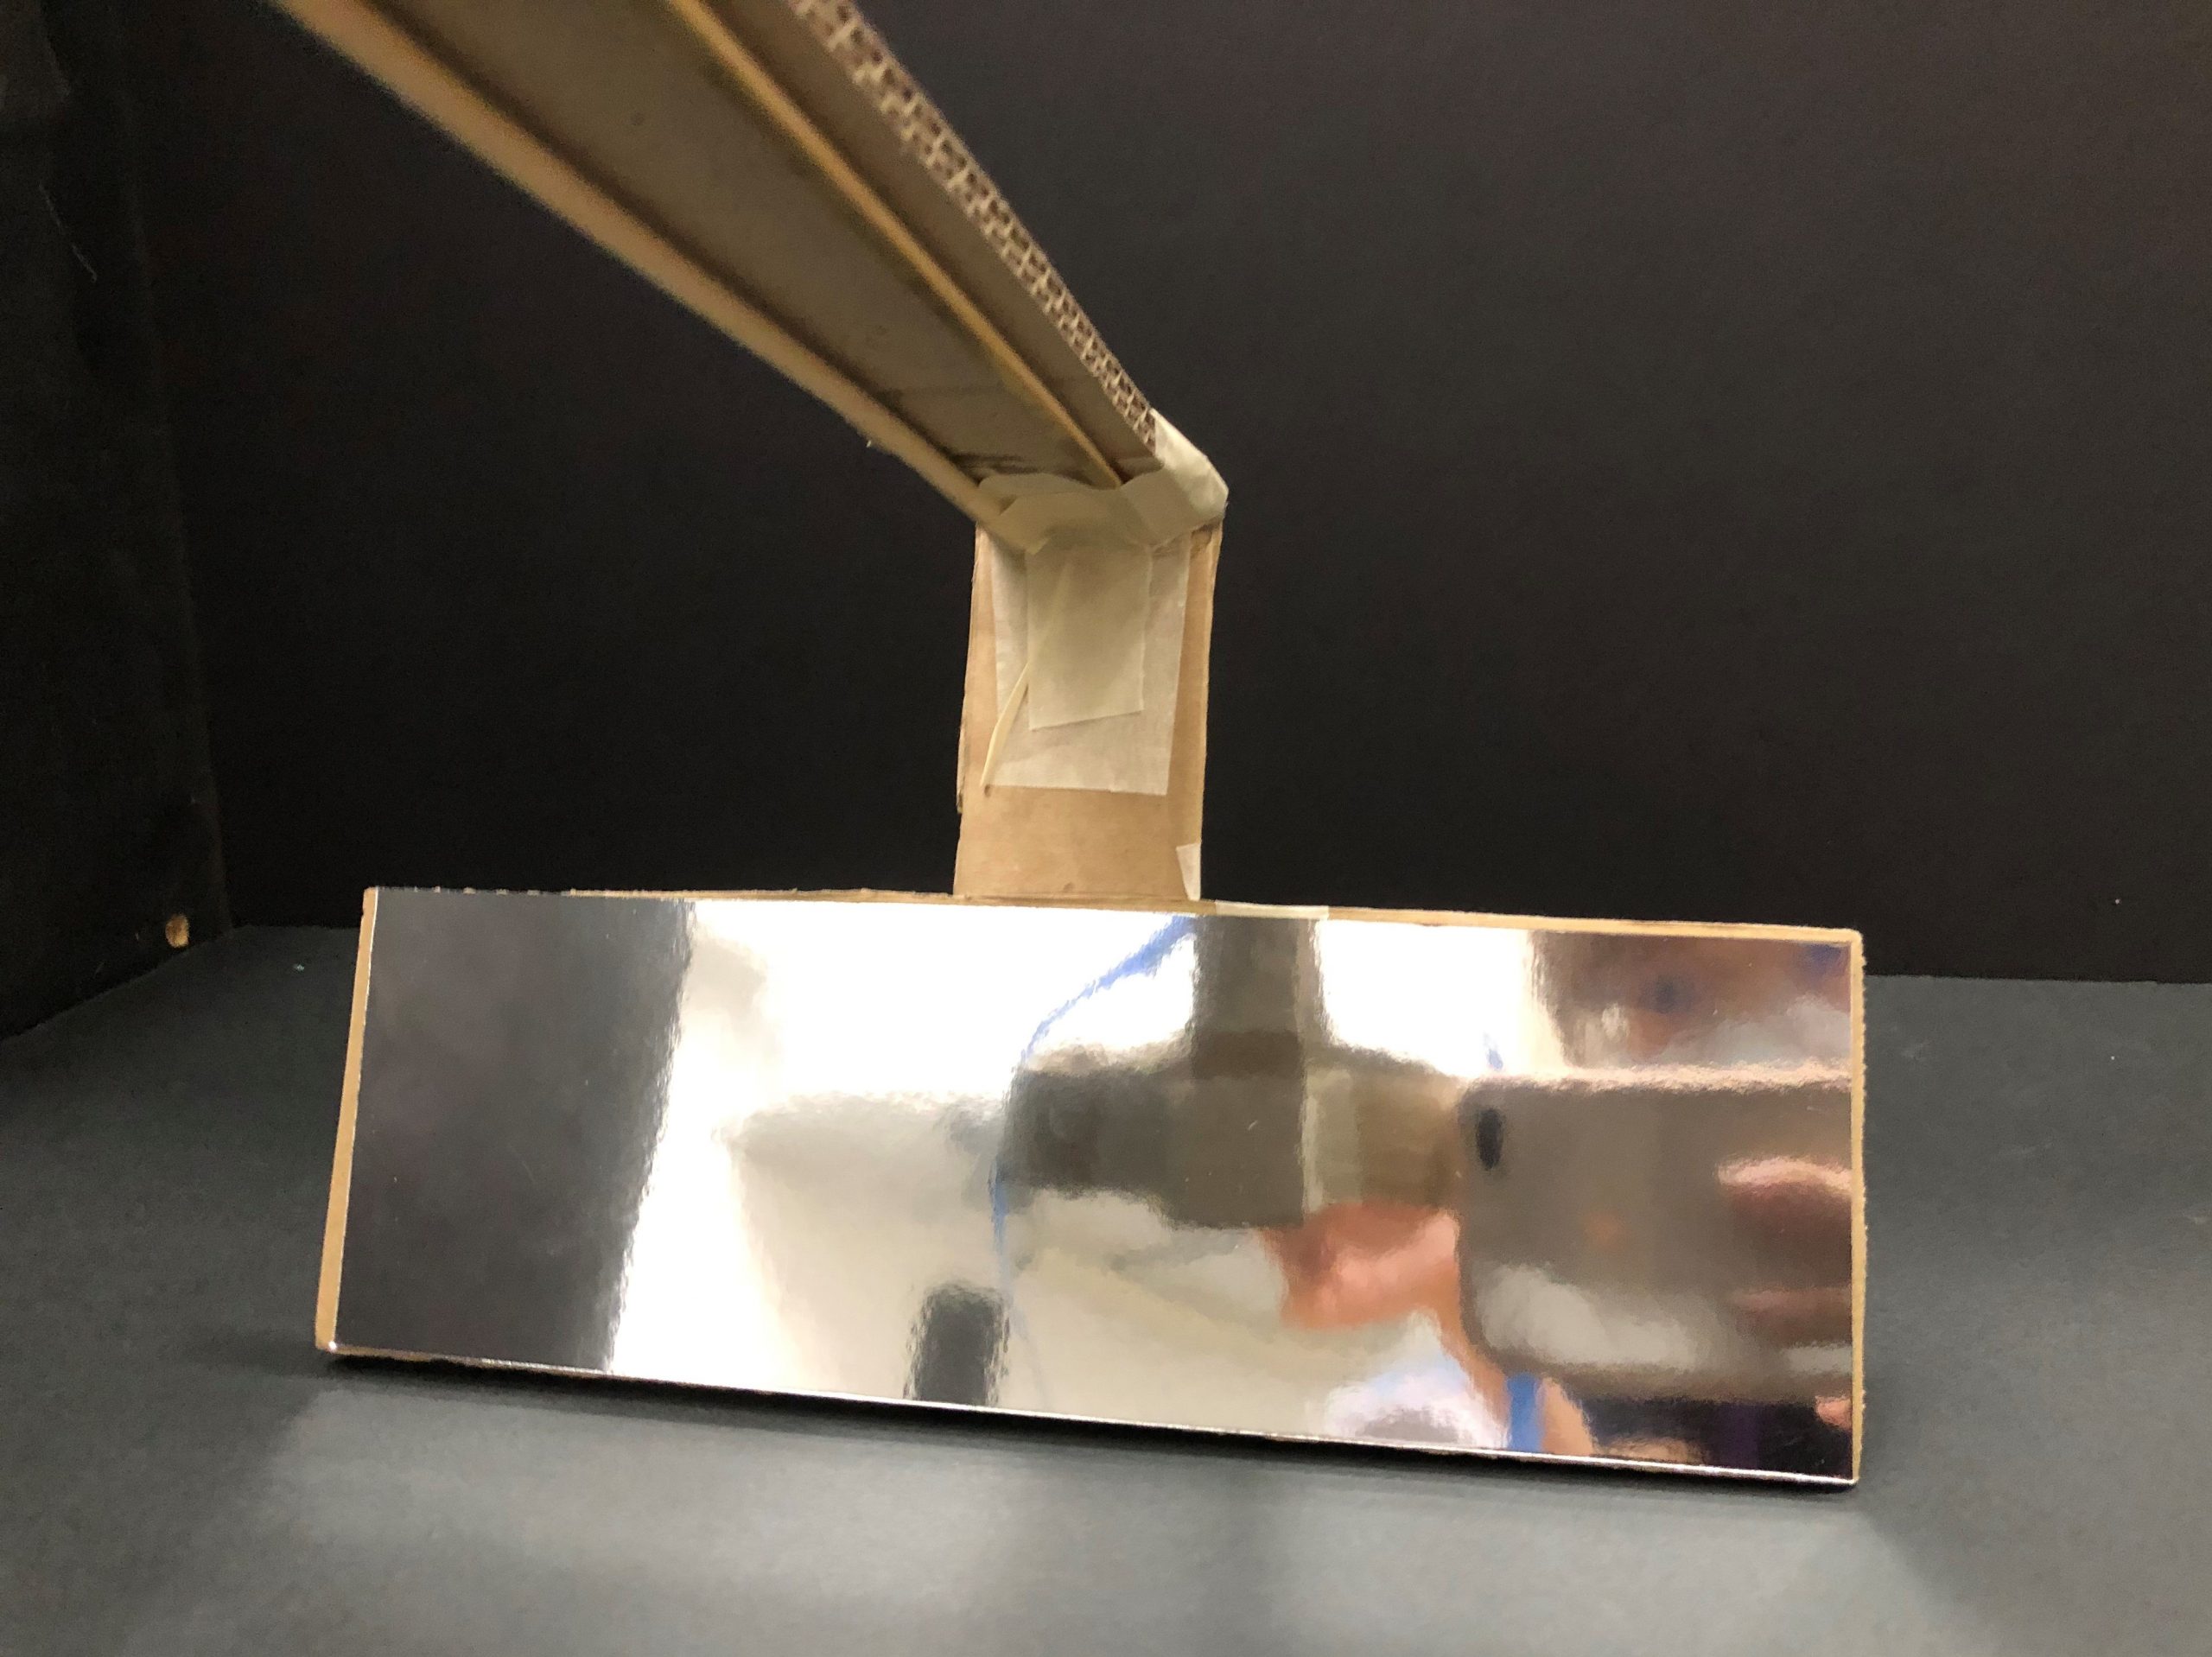
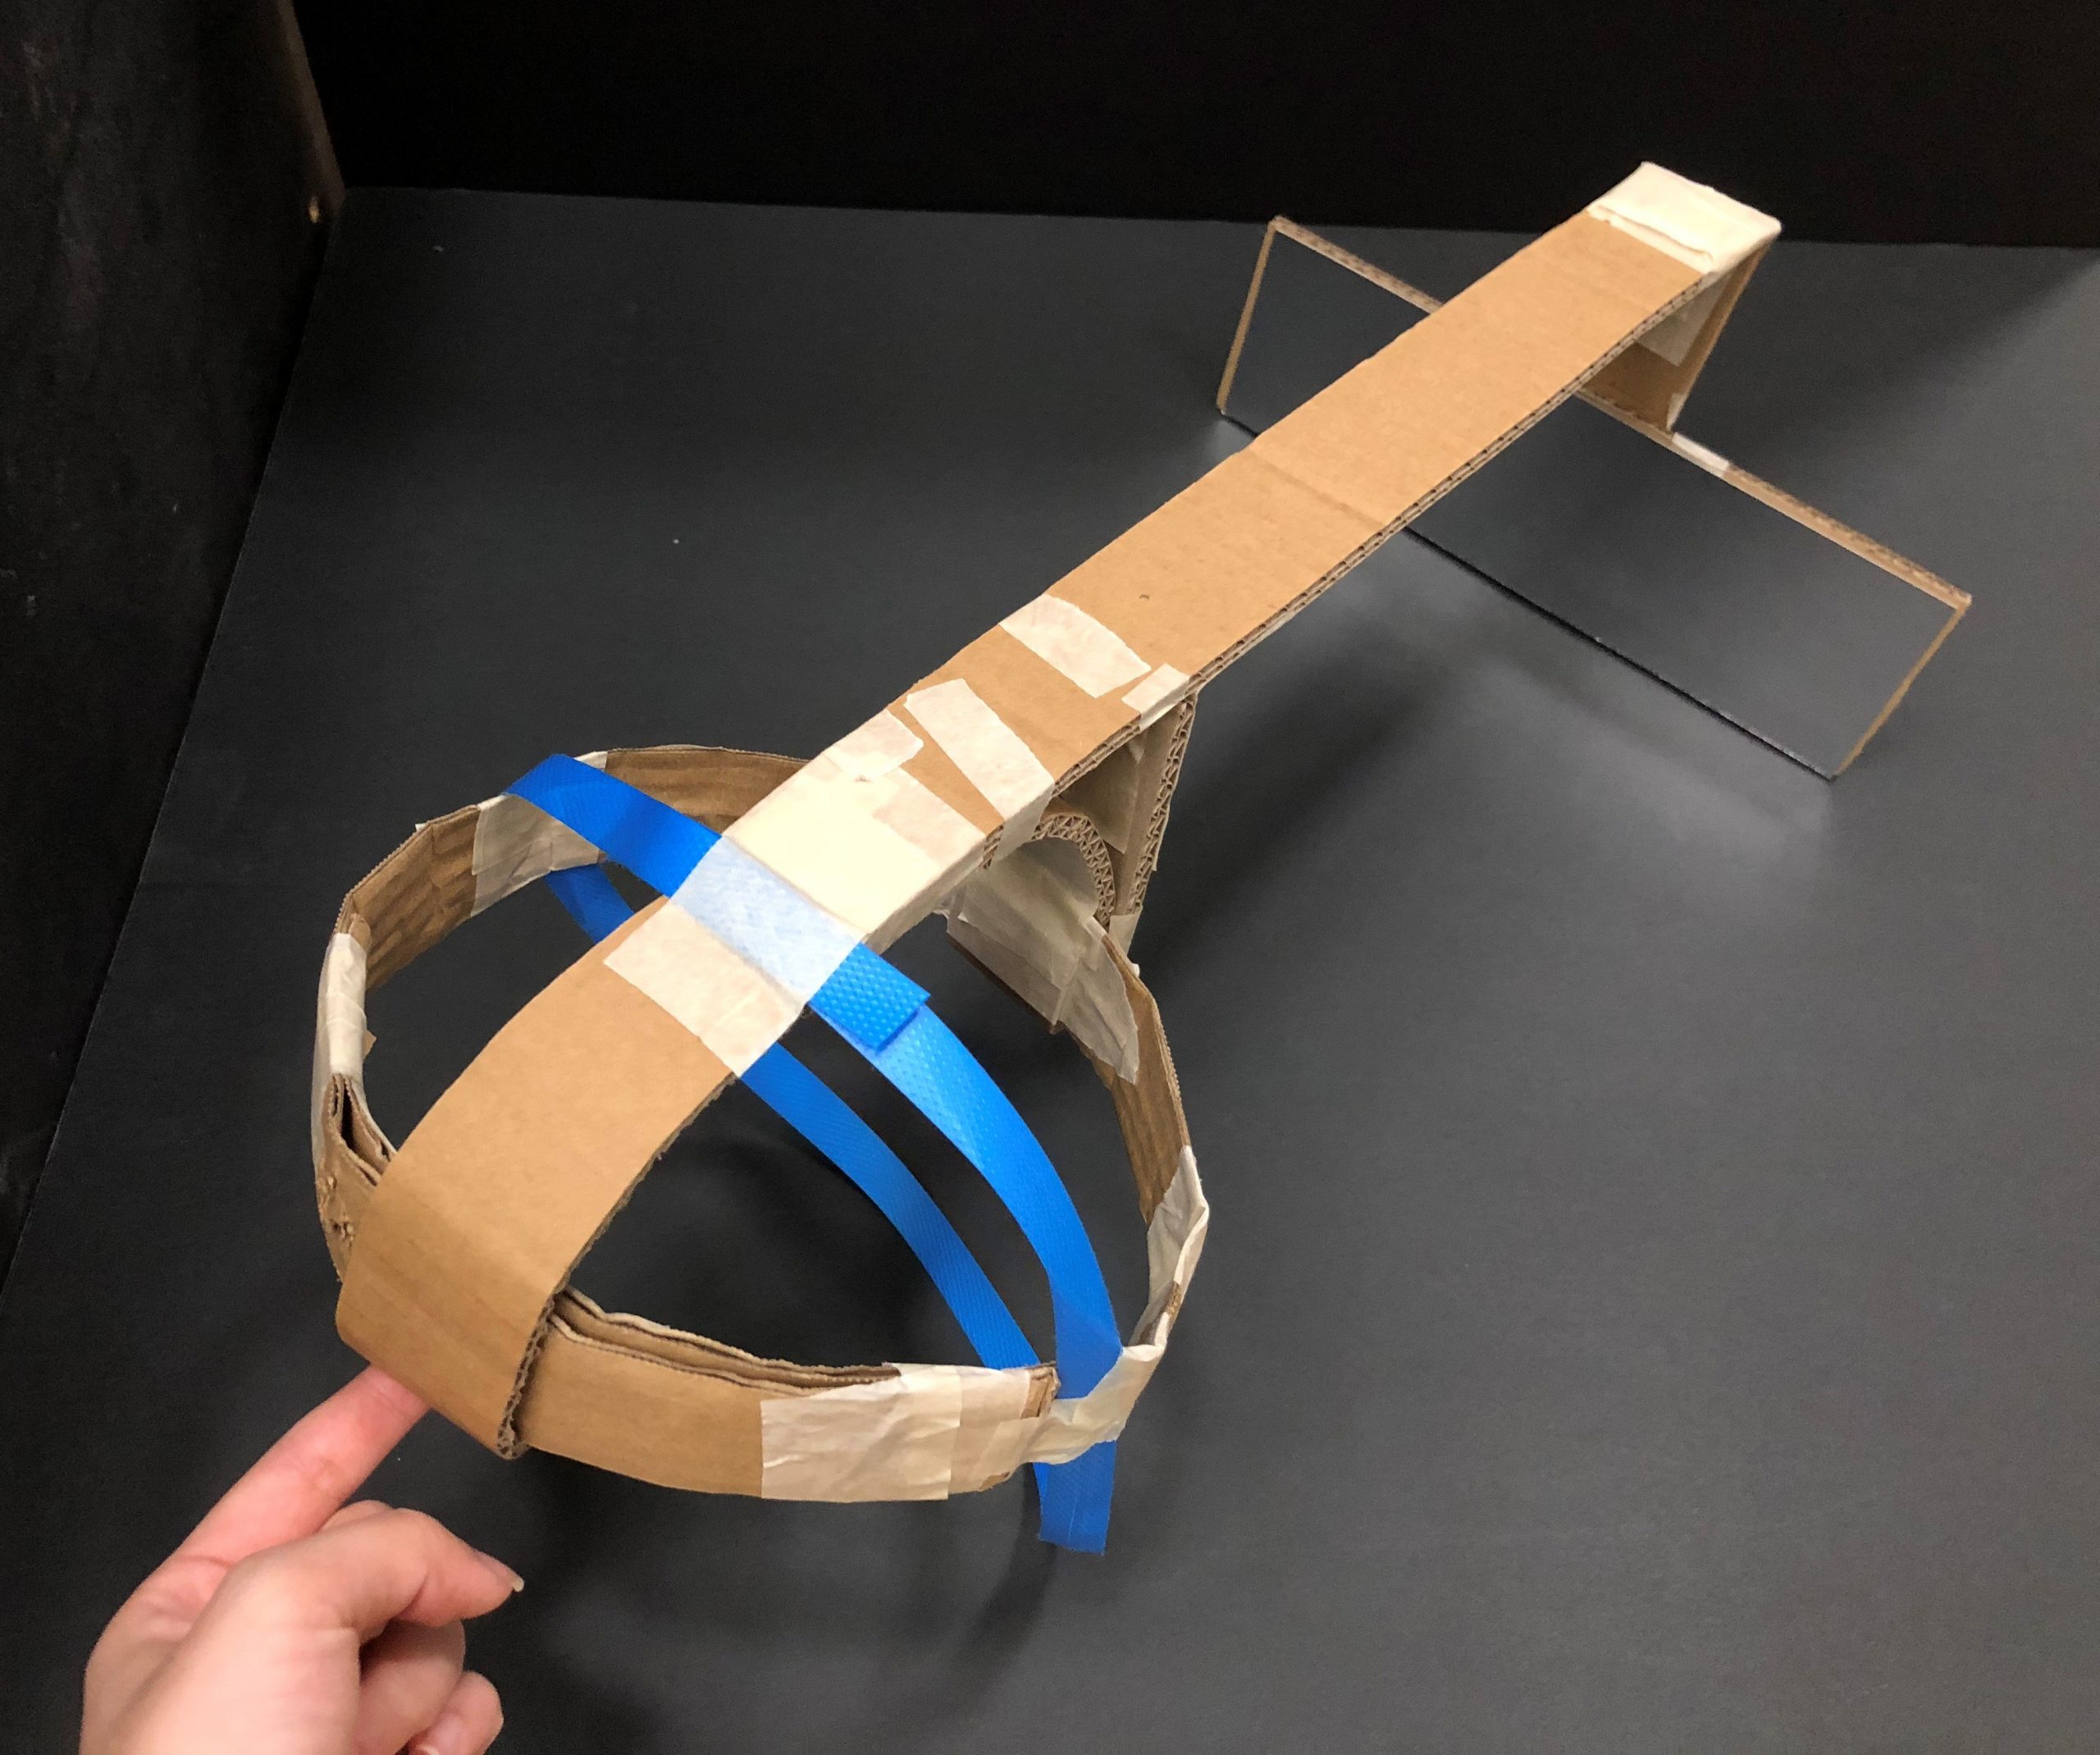
Structure of the device:
Prototype: made with cardboard, masking tape, reflective paper, and wooden sticks


 A sweat sensor that looks similar to a mosquito repellant patch has been developed by John Rogers, Ph.D, an engineering professor and the chairman of the board of directors at Epicore Biosystems, which is a company that specialises in flexible skin devices that monitor fluids. What I find interesting about this sensor is that it makes use of colour change in certain chemical reactions to give a very visual feedback for the user. A lot of times, devices show users information via numbers and statistics, which can get too overwhelming. This sensor helps the user to decipher in a very simple way of colours.
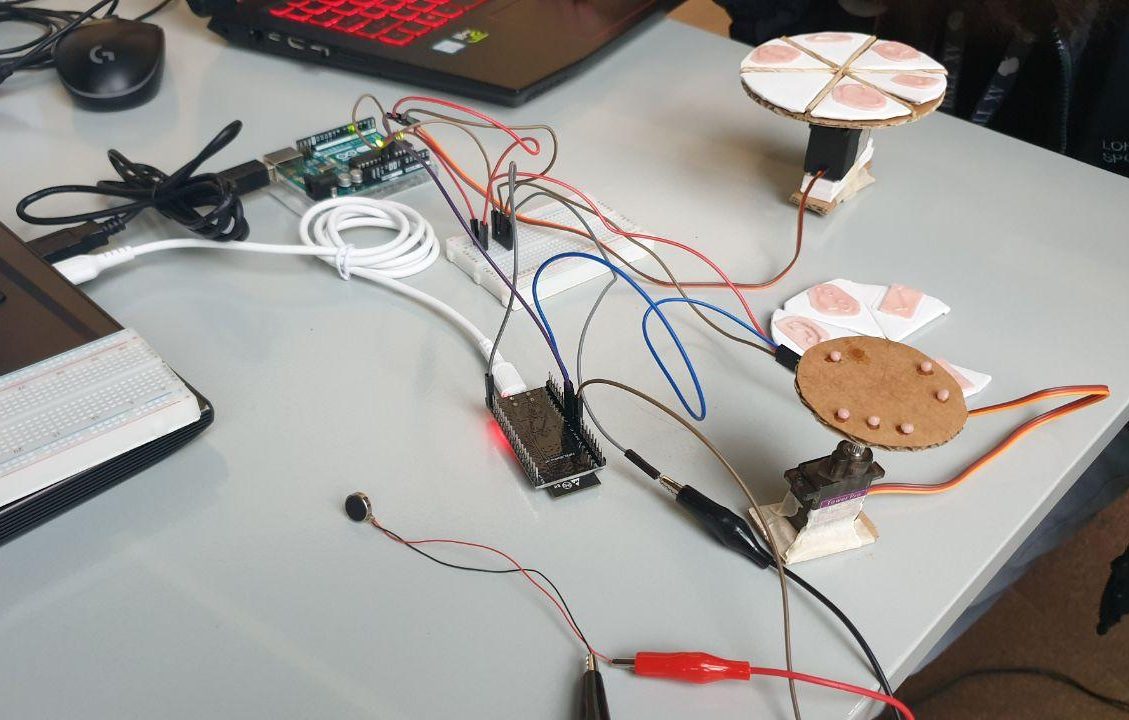
 Before we settled on using a mould, we tried to shape the poly pellets into the symbol itself, but we realised that the symbols didn’t feel very obvious because it was too smooth to the touch. By using the mould, the finish was rougher and that was more obvious, hence we settled with using a mould.