


Tag: 3D
Through the Eyes 03

Through the Eyes 02
My interpretation of a Barnacles’ Range of Movement:

They don’t
Okay, but internally:
 It’s that tiny squiggle! (Movement of their legs to eat)

My barnacle sculpture leeching onto Nasya’s whale sculpture, in the true nature of the commensalism of our animals! (Although I feel more like a parasite)
The cone shape represents the rigid exterior of a barnacle, and the fringed paper represents the legs of the barnacle reaching out to get food. Unlike most animals, a barnacle doesn’t have much movement once it sticks itself onto a whale. Hence I decided to focus on the subtle movement of the legs for this exercise!
How to be a barnacle:
Step 1: Swim around & find a whale.
Step 2: Walk around and find a good spot! (Tip: stay nearer to the head & fins and you’ll get more food!)
Step 3: Do a headstand!
Step 4: Glue yourself to the whale for the rest of your life. (Ain’t too bad for a lazy person like me)
Step 5: Feeling hungry? Raise your legs to get food!
Step 6: Survive.

MY BARNACLE AND I !
Through the Eyes 01

Mutualism – association between organisms of two different species in which each benefits.
Commensalism – association between two organisms, one benefits and the other derives neither benefit nor harm.
Parasitism – relationship between two organisms where one is usually harmed and the other gets benefits from the relationship. Parasites are smaller than their host organism and can reproduce quicker, causing more damage to the host.
Phoresy – an association between two organisms in which one (e.g. a mite) travels on the body of another, without being a parasite.
WHALE + BARNACLE

Obligate commensalism/parasitic
Barnacles do not harm/benefit their host
Only parasitic when whales are harmed due to heavy infestations
Drags and reduces whale’s swimming efficiency
Barnacle infestations can also aid other parasites
Whale barnacles that are forcibly detached will eventually die

Whale vision
(https://www.theatlantic.com/technology/archive/2013/03/youre-eye-to-eye-with-a-whale-in-the-ocean-what-does-it-see/274448/)
Dual monocular vision
Whales eyes are located at side of their heads
They see the world in monochrome, only in shades of grey
Water = black (E.g. people wearing fluorescent clothes under a black light)
Whales do not see refraction, eyes are circular.
Image that they see is “noisy”
Biological mirror at the back of its eye, captures more light than our eyes
Normal human vision = 20/20
Whales = 20/240
Whale senses
(http://www.whalesforever.com/whale-senses.html)
Olfactory structures are reduced in size
Not capable of sensing smell
Have an advanced sense of hearing
Aided by fact that sound waves travel better through water
Good at hearing low-frequency sounds
They emit sounds to communicate to one another
Echolocation – only toothed whales
High-pitched sound travels through water and echoes back to whale
Able to assimilate and interpret the echo to ascertain shape / distance / direction / texture of object
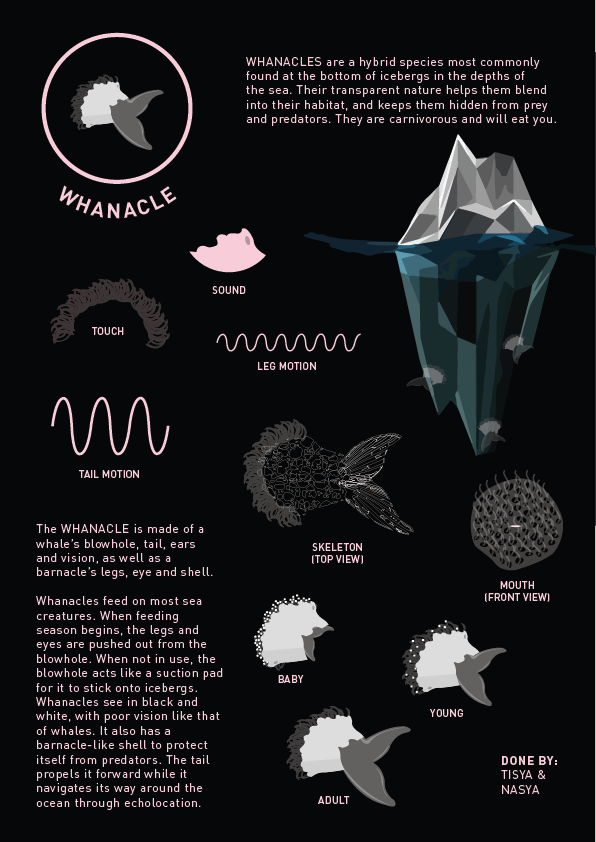
Whale range of motion
Vertical strokes of tail
Flippers aid in changing direction, balancing and stopping

Barnacle vision
Naupliar eye – absent in later developmental stages
Adult barnacles have a single eye that can sense light and dark.
Barnacle senses
Main sense of barnacles is touch
Barnacles stand on their foreheads and eat with their feet
Lies on its back with limbs projecting upwards
Hairs on the limbs being especially sensitive
Barnacle range of motion
Swim around freely as larvae
Attach themselves to something to transition to adult life
Use front antennae to “walk” around whale in search of a good spot where flow of water is consistent (e.g. head/fins)
Lands head first
Spends life stuck to the ground in hand-stand position
Walk for quite a distance
Dialogue in the Dark

This paper model translates how I felt during my Dialogue in the Dark experience. It starts from the centre, where the space felt very dark and cramped, since I kept hitting things/people. Slowly it evolved into a more open space (to the right), because we were told that we were in a park, I felt like I suddenly had more breathing space. Following that, the folded ridges in the paper represent the speed boats that went by us while we were on the river taxi. I imagined the texture to be the texture that the speed boats would create on the surface of the water. The next cone/cave-like space represents the cozy cafe, where I imagine everyone was huddled together in an intimate space. It slowly transitions out towards the small gap at the end of the cone, where we see the “light at the end of the tunnel”.


Throughout the entire tour, I was in constant fear throughout, not knowing what was ahead or behind me (since I was right at the back = extra scary). I was quite lost throughout the duration of the tour and was not too sure about what was going on if not for my friends in front. I was reliant on the wall and the person in front of me to guide me at the start, and I felt a little insecure when I didn’t have a wall to touch or nasya’s shoulder to hold on to. I kept hitting the person that was in front of me with my guide stick and stepping on her slippers (sorry nasya & candy)! Sound was the most prominent sense I used in the tour, especially since I was quite dependent on the guide’s voice for direction. Our guide was calm and caring, hearing his voice was a source of comfort for me, knowing that following the direction of his voice will lead me safely through the darkness and assure that it is nothing to be afraid of. I was scaring myself most of the time, for example at the marketplace, I kept having the impression that I would touch insects when I reached into the bag (since fear factor always like doing stuff like this), I was a bit hesitant at interacting with the space at first, but slowly eased into it and trusted that they wouldn’t make us pay $25 to scare us like that!
I learnt the most in conversations with the guide & the debriefing instructor. I was really impressed with knowing that design can play such an important role in making life easier for the handicapped. I was suddenly more aware of tiny, subtle details in daily objects that had never crossed my mind before. The question on how the visually impaired visualise colours and if they dream in colour actually sparked off a lot of thought in my brain. It makes me curious to find out more, I might embark on some side research about this if I have the time.
Overall, the Dialogue in the Dark experience was very fulfilling, and I’m really grateful to experience it again! It definitely taught me a lot about how we perceive our surroundings, and also to be more sensitive to the visually impaired in our community. I honestly cannot imagine myself surviving without my sense of sight and I really appreciate it a lot more now, though I wish that I can be as sensitive as they are in relation to their other senses. I feel that relying on our other senses other than sight can bring about a whole new experience in the way we perceive and live.
Texturizing Sound 07


Texturising Sound 06
Trying out with different sizes of coins and also increasing the number of coins in the balloon created varied tones of sound produced by the whizzing. However, I faced a major problem:

The balloons kept bursting after a a few rounds of whizzing. I tried slowing down the speed of the coin or avoiding using the 50 cent coin (because its ridges are quite sharp) so that there would be lesser friction. But despite trying with other coins as I did in my first whizzing experimentation, I still couldn’t rectify the situation. Frustrated and at a loss of how to fix this situation, I decided that I needed to change my concept ASAP. However, still barely attempting to stick to my original concept of a rotary motion with the use of friction to produce sound.
I remembered an exhibition I went to and a video I watched before that involved the idea of rotary motion to produce music:
 “If you can dream a better world you can make a better world or perhaps travel between them”, 2016.
I went for the Singapore Biennale nearing the end of last year, and I came across this amazing work by Melissa Tan. Her works “translates the continually expanding urban physical landscape and terrain of Singapore into abstract visual and sonic contemporary expressions”. According to the Bras Basah Bugis website, her work documents the passing of time “through recording – in sound and sculptural form – the physical features that make up Singapore’s ever-changing landscape”. I was amazed by how she managed to translate sound out of the texture of natural objects. I also like how the irregularity of the holes controlled the sound that was produced. I managed to find a very very short sound recording of the sound:
It was a melodious, pleasant sound that echoed around the quiet space and completely changed the way I viewed these objects . I was reminded of a design article that I saw online, about using natural material to produce sound.
An example is Years by Bartholomaus Traubeck, who translated the sound of tree rings into music by playing them on a turntable. The needle doesn’t scratch the surface like normal record players do, they have sensors that gather information about the wood’s colour and texture and use an algorithm that translates variations into piano notes.
Another example of using natural material to produce sound, but through the use of friction, is this wooden vinyl by Amanda Ghassaei. However, I didn’t like that the sound that it produces are “artificial”, since the grooves are laser cut onto the surface and not natural growth rings from the wood material.

Inspired by this concept, I embarked on a mission to create a “muted”, artificial sound to show the unnaturalness of sound in its most basic form. The first thought that came to mind was white noise, as it is a silent form of sound. In terms of sound, white noise is a noise containing many frequencies with equal intensities. It is also sometimes used in non-technical contexts, in the metaphoric sense of “random talk without meaningful contents”.
However, before I started to create my own “vinyl”, I needed to understand how a vinyl record player works. The original vinyl records require a complex process to produce the music that we hear when we play a vinyl on a record player.
http://blog.discmakers.com/2015/02/how-vinyl-records-work/
A vinyl player consists of a stylus, a device that converts electrical energy into mechanical energy. It is cone-shaped and typically made from diamond or other gemstone or hard metal. The stylus fits into the grooves of the record, picking up and sending the etched vibrations through cartridge, which converts the information into an electrical signal, sent to an amplifier that boosts the signal’s power, and then to the speakers, which broadcast the sound. (how am i gonna do this o m g???)
During my research, I managed to find DIY record players that used either real vinyl records or real vinyl players:

The D.I.Y Record Player by Ian Heaney
(http://cargocollective.com/ianheaney/The-D-I-Y-Record-Player)

DIY Wind-Powered Turntable by Bharat
(http://www.damngeeky.com/2016/11/16/45404/diy-wind-powered-turntable-wind-determines-speed-record.html)
I took inspiration from all these amazing DIY vinyl players and tried to combine both in an attempt to produce sound from it. I started off by creating my own vinyl grooves from scratch. I varied the wavelength and frequency at different intervals of the vinyl so that it would produce different pitches of sound depending on the friction of the needle against the vinyl. I tried out various concentric methods to figure out which one would work well with the needle in guiding it across the surface.


It turns out that none of these worked because they were too far apart or weren’t properly connected to one another, so I reworked my design again:
 In the first attempt at laser cutting this design, I decided not to engrave the grooves too deep, and set the lines to be cut as thinly as possible so that the needle wouldn’t derail from it.

However, there was barely any sound produced since the friction was too little and the groove was to thin for the needle to scratch against.

I adjusted and made the line thicker, such that the difference in the sound produced would be more clear when scratched. Here is the laser cutting process of the design above:
I tested out the effectiveness of the spinning with two acrylic pieces, one as the vinyl record, and the other as the base for the vinyl to spin on. I settled on using acrylic as my main material because of its smooth surface. It can spin on its own without an additional spinning mechanism, which might overcomplicate the aesthetic of the model.

I used a pencil as a temporary pole to test the feasibility of the spinning. To see if the sound worked, I used a pin to scratch the surface and realised it produced a static-like sound, with its pitch depending on the frequency of the grooves.

The finalised structure with a supporting stand to hold the needle.

To allow varying tones of static sound produced, I found two other materials that can be used to scratch the acrylic vinyl record – a thin metal pin and a wooden toothpick.
Metal pin

Wooden toothpick

Amplifier

Was playing around with an amplifier because the sound that was produced was barely audible at all and this made it difficult to identify the slight differences in sound of the ridges. I tried using a paper cone to amplify the sound that was produced. It worked only when in contact with the needle, since the vibrations are transferred from the needle to the paper cone.

The amplifier was redesigned with a wider mouth so that it produces a less concentrated sound. My final model! (Yay, finally)
There is actually quite a lot I would rectify with this model! The sound produced was not as smooth as I expected it, because the needle does get caught between the ridges of the groove sometimes. I think the stand holding the needle support needs to be loosened such that the needle can easily bounce along the ridges. I am also personally not yet satisfied with the sound because I feel that there could have been more drastic changes between the frequencies of the ridges such that the difference are more distinct when the vinyl is “played”.
Being so used to translating projects visually for the past semester, this project was honestly rather challenging for me because I had problems deciding where to begin from the wide range of possible outcomes. Sound was a topic that was almost completely foreign! I felt that I could have been a lot more experimental with the materials that I used, where I might have discovered something interesting, lots to improve and work on!
Suggestions for improvement:
– Placing all three needles at the same time to see what sound they produced when the vinyl is spun.
– “Turntable” is not revolving as smoothly as it should because the turning movement of the arm is too great. Need to readjust the fulcrum position & probably add a counterweight on the opposite end so the “pointer” is just floating/ touching the disc but not resting its weight on it.
Texturizing Sound 05
In the last lesson I chose to play with latex gloves as part of my experimentations, but I failed to come up with any solid instrument because I didn’t realise how latex could be used in other ways except by stretching it and pulling it, and hoping it creates some sound (but it didn’t 🙁 )
I did some research on the possible ideas of working with latex and I chanced upon this balloon video which I found really fascinating:
I tried experimenting with various objects in the balloon to see what sort of sound it produced:
10 cent coin in balloon
Balloon Headphones

After I tried out with a few other materials in balloons, such as water, pieces of aluminium foil balls and transferring air between two balloons (like the frog’s air sac, which didn’t work out 🙁 ), I started to question if I was still working on balloon as a medium, or other materials’ interaction with the balloon and the air instead. I realised that a balloon can create many types of sounds on its own, without the use of any other medium.
– tension (strumming)
– control of opening = controlling sound (fart-like sounds)
– rubbing surface of balloon (squeaky sound)
– amount of air affects volume and sharpness of sound produced
– stretchy (as a surface across different hollow materials = drums)
I thought it might be interesting to combine them into a single “instrument”, where the user and the “pinball” can control the sound produced, hence, I came up with the idea of a balloon pinball machine.

And did a a prototype to test out the idea:
Variation 1

Variation 2

Unfortunately, the sound of the cardboard is really distracting and almost overpowers the balloon sounds produced, since it takes up more surface area. It is also because the “pinball” has to roll on the cardboard surface before hitting the balloons, that itself creating another sound. The sound of the wooden paddles also created friction on the cardboard base, creating another distracting sound. I might consider using a smoother material like acrylic for the base instead.
Sudden idea:
I just came up with another idea which is to try out different sizes of coins in the balloon (maybe with different volumes of air) to see if there is a difference in the sound produced, and maybe using a motor or manual rotary energy to power a symphony of coins rotating in balloons.
Texturizing Sound 04 – Croak
Oops totally forgot to update about my frog and human research!!
I was really focused on searching on hearing and googled “similarities between humans and frogs” but got results that were not at all related to what I think we needed to know – about frog and human organs (ugh). Interestingly enough, the research I did slowly led me to finding out more about vocals more than hearing. In the midst of searching about sound, we tend to forget that our vocals are also sound producers!
Before we start the comparison, we first need to gain an understanding of ourselves before we compare ourselves to frogs (unless you’re a frog prince, then that’s a different case). Let’s start off with vocals first!
Humans (and many animals) produce vocal sounds with a larynx, an organ in the neck which is also involved in breathing and stopping food entering the windpipe. Basically we breath in and force this air across our vocal folds, which vibrate; this vibrates the air above the vocal folds producing a compression wave that we can hear. By adjusting the muscles around the vocal folds, as well as the throat and jaw, we are able to change the pitch and timbre of the sound. Our tongue, teeth and lips then conspire to add the consonant sounds that we use for speech.
If you’re a visual learner, maybe this video will help give a better understanding of how our voice works! It also shares how human vocals are similar with other animals (that are not frogs):
So to answer the question, how are frogs and humans similar?
Humans can display an unusual range of vocal sounds, but many other animals also maintain a repertoire of sounds primarily by adjusting the settings in their larynx.
Frogs can augment the sounds produced in their larynx with the use of a vocal air sac. The males of most frog species have air sacs. The frog inflates his vocal sac and makes a sounds using his larynx.
(Source)
The air sac acts like a resonance chamber, which magnifies the sound and makes it louder. The glottis, or opening into and out of the lungs, modulates the net flow of air and the call production. You can think of it sort of like your lips, which can modulate air flow. Frogs can’t pucker and blow, because they don’t have lips per say, just bone covered by skin.
The video below shows just how these air sacs work, but if you are a person who gets disgusted by frogs, maybe this video is not for you. But I think the sound produced, and the way the air moves around the frog’s body is really cute!
Vocals aside, frogs and humans also do have some similarities with hearing!
Both humans and frogs have a tympanic membrane.
For humans, this tympanic membrane is known as the ear drum, an oval shaped structure, and is composed of three layers. The outer layer consists of a thin layer of skin, the middle layer is made of fibrous tissue and the inner layer is mucosa (similar to the tissue in the mouth and nose). The integrity of the tympanic membrane and associated structures is important for proper sound conduction.
This vintage diagram shows how we hear:

Just like us, the frog has an ear drum and inner ear. But, unlike us, he doesn’t have any earlobes hanging off his head which, like dangly lips, would be very unhelpful or hydrodynamic under water. Instead, their eardrum is directly on the side of a frog’s head, acting as a shield and cover for their inner ear. This is called the tympanic membrane or tympanum.
The tympanum acts much like our own eardrum. Internally there is a bone attached to the tympanum. When sound strikes the membrane then the vibrations travel down the bone to the inner ear where the semicircular canals, cochlea, and papilla are located. The tympanum works both under and above water to detect sound.
(Source)
After all these research, I definitely gained a better understanding on how my hearing and vocals function (as well as that of frogs)! I would have never expected that we would have similarities to animals, and I’m not sure what to make of it yet. But at this moment I’m just starting to wonder if it would be a good idea to work on vocals or to modify or replicate the way vocals work instead of working on hearing (or maybe both?) for my project, hmm.
Fun fact: If you would like to hear a symphony of frogs/toads, the Sunken Plaza at ADM is the best place, especially in the silence of the night!
croak croak croak croak croak
Texturizing Sound 03
We went around school to record sounds that we felt were pleasant and unpleasant to us and to later translate them into texture. I became hyper aware of my surroundings, listening intently to sounds around me or thinking of objects that created sounds which I knew were appealing/unappealing to me.

An observation one of my friends made after I “consulted” her about my sound texturizer, was that the texture and material I choose to use as a representation of the sound doesn’t have to be a direct reflection of the actual object. This made me broaden my material options instead of restricting myself to the materials that I knew were part of the original object. (thank you friend)
Hence, I shall not reveal the actual sound in this post because I would like you to try to relate the sound to the texture, I feel its more effective 🙂

The feeling I got from this sound was one that was sharp and yet consistent, and that there were different intervals inbetween each period of “high energy” that I could identify. I decided to translate it by slicing the paper in almost-consistent strips, and folding them in sharp angles to mimic the sharp sound that I was hearing. I also imagined the sound possibly cutting through something very intensely, hence the use of voids to show this.

The feeling I got from this sound was one that was fluid, since the sound that was produced follows the movement. I tried to create a texture that could form to the touch of the user, to mimic the object that I was hearing in the sound. The transition of the crumples to the untextured part of the paper could be interpreted as the pause of the sound when the movement itself is stopped.
We had to translate the textures into actual materials and I changed my concepts quite a bit!
PLEASANT

To be honest, I didn’t go out to specially get materials for this partly because I thought it wouldn’t be a bad idea to restrict myself with the use of materials. I went to the first aid box in the 3D room and found this gauze material which I thought was quite interesting to experiment with. I sliced the gauze multiple times, stretched and tore it to create holes in the texture to mimic my previous sound texture.

While scouting for materials, I chanced upon this plastic bag and decided to experiment with it. I started by using my fingers and tearing random holes in the material to “weaken” it, like what I did for the first sound texture. To recreate the idea of fluidity, I crumpled the plastic bag, giving it a very organic texture. I loved how it turned out to look like a sculpture 😀 I also like how the sound produced by crushing the plastic bag actually sounds and visually sounds like the pleasant sound that I recorded.

Tried combining both textures together but I didn’t feel like they complemented one another as well, and feels like two contradicting sounds overlaying one another.

The unpleasant sound feels metallic, hence I decided to use aluminium foil to represent it. I started by slicing the aluminium foil, to show the consistent motion of the sound that I was hearing. However, I felt that this was too simple and does not express the full effect of the recorded sound that I heard.

I decided to redo the effect and started experimenting with the crumpling of aluminium. I finally settled on this because it expresses how I felt inside when I heard the sound. The three “islands” also shows the intervals of the recorded sound.
COMMENTS:
– Volume of sound affects the model
– Plastic bag more dynamic & tumultuous
– Colour of plastic bag causes confusion
– Temperature of material (warm & cool)
– Sawing: shiny + ridges reflects sharp sound
After everyone’s presentation, I observed that different people have different ways of interpreting the same sound, or using the same texture for different sounds, which I felt was really interesting!