Surface Design 11 – Thermoplastics (Fabrics)

Thermoplastic is the forming of a fabric material by embedding objects. The material used is polyester organza, a synthetic fabric that can become fluid at a certain temperature, allowing for reshaping through pleating, moulding or crushing. It can be used to make accessories, clothing and has also been used to mimic corals in art.


Materials Required: 
Organza Polyester Fabric, Objects to embed (Marbles, bottle baps, etc.), Rubber Bands, Aluminium foil, Pot, Water, Chopsticks.

Steps:
01 Cut a piece of organza fabric.
02 Place chosen objects in the material & secure with rubber bands.
03 Wrap fabric and objects in aluminium foil.
04 Boil or steam in pot for 1 hour.
05 Use chopsticks to remove the aluminium package.
06 Unpack package, remove rubber band and objects from fabric.

Reflections:
This was one of the methods that I was the most excited to try because of the different textures that could be produced with it! I was actually quite inspired when I saw Nora Fok’s & Mariko Kusumoto’s work, in using the technique to create beautiful organic forms. However, I realised that it’s actually quite challenging to achieve because of the limitations of objects that can be contained in the fabric material and yet still be able to withstand the heat during boiling.

For my samples, I used marbles, bottle caps and eyelets. I was quite happy with how they turned out, but I felt that the form was not as obvious as I expected it to be. I wished I used a more iridescent & shiny material (and a bigger piece of material!!), so that the nature of the fabric could better display the forms that were embedded. I will definitely work on this again, experimenting with more forms and materials that could be done with this method!

Edible Textiles

Just wanted to share something which I saw and thought was really interesting: Edible Textiles! These fabrics were designed by the owners of De Culinare Werkplaats, a food exploration studio. These textiles were made out of dehydrated fruits and gelatin coloured with the juice itself. They used fruits and vegetables such as watermelon, red cabbage, spinach, strawberry and beetroot – just to name a few! Seeing this reminds me of the limitless possibilities of textile exploration, who knows what else we can wear in the future when we can already wear what we eat?


You can find out more here:
http://www.bitrebels.com/design/eat-your-clothes-edible-fabric-made-from-fruits-vegetables/
https://www.deculinairewerkplaats.nl/

Surface Design 10 – Etching

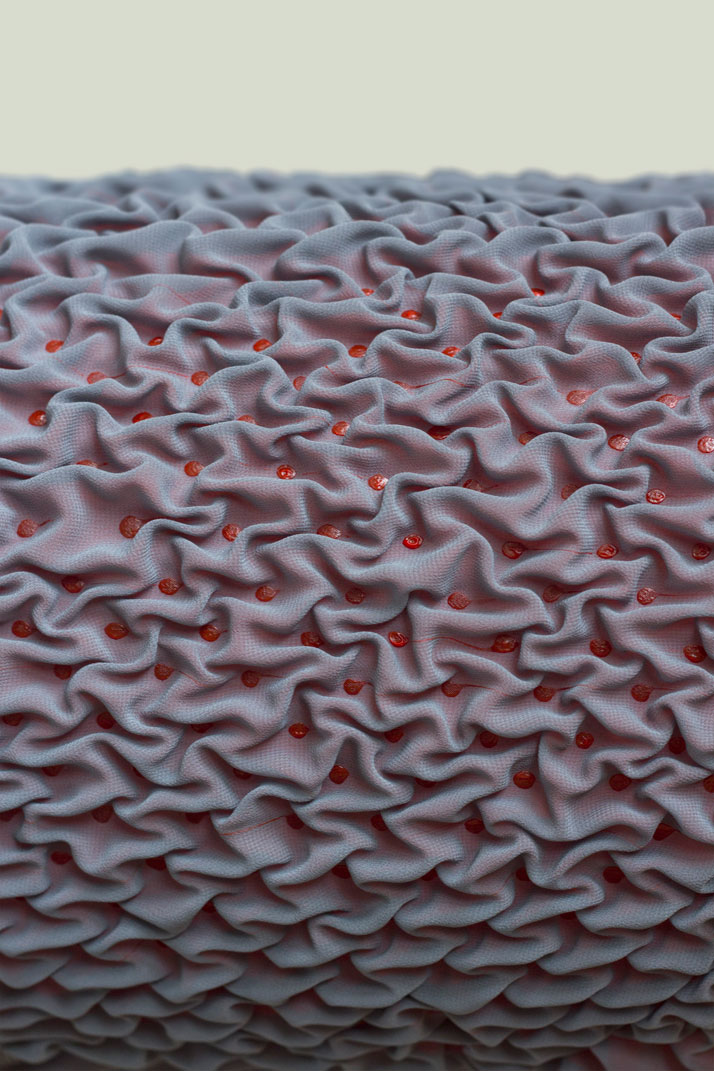
Etching or Devoré, is a method that uses an etching liquid on a mixed-fibre material, especially for velvet. The etching liquid dissolves the cellulose, leaving the protein part behind, creating a semi-transparent pattern on the material. While looking for existing works using this technique, I chanced upon an amazing artist by the name of Lesley Richmond, who has been working with this method to create intricate Devoré pieces that resemble forested environments. You can find out more about her work here!! : https://www.textileartist.org/lesley-richmond-interview. Etching has been used to in fashion, home furnishing,  material experimentations and to create artworks. A similar method (though not with the same processes) can be applied to decorating eggs too!


Materials Required:
Velvet, Silkscreen board with template, Squeegee, Fibre Etching Liquid.

Steps:
01 Cover table with a fabric/plastic sheet.
02 Lay a piece of velvet fabric on the table.
03 Align and place the silkscreen board over the velvet piece.
04 Pour a good amount of fibre etching liquid at the top of the silkscreen board.
05 Use the squeegee to pull the liquid across the board.
06 Repeat the above step 2-3 times.
07 Leave the material to dry for 24 hours.
08 Use a brush to scrub off all the excess cellulose fibres.

Reflections:
I find it really interesting that etching is one of the few methods that plays with reduction of the material itself instead of adding on other ingredients to create patterns. I was really intrigued by the science behind the process, whereby the designer/artist has to be clear about the specific type of fabric they are using in order to achieve the intended effect. I also wonder if it is possible to silkscreen in reverse, whereby majority of the material is eaten away instead of it being left behind.

I really love the translucency and transparency that can be achieved with this technique. I would like to see if it would be possible to control how much of the material gets eaten up so that I can create varying translucencies on the velvet material, and perhaps not leave not much of the actual material at all.


Bleaching is a technique that is rather similar to etching, but the process dissolves the dyes instead of the material itself. It works most effectively on materials that contain cellulose, such as cotton and linen. The technique can be used in kitchen towels, clothing and upholstery. Leaves have also been used as part of the bleaching process, much like the transfer printing method that we have seen in the first lesson!

Materials Required:
Coloured cotton/Linen fabric, Rubber bands, Household bleach, Face mask, Water, Spray bottle, Plastic Sheet.

(P.S. Please do wear a mask while doing this project, I did accidentally poison myself while I was working on this!!)

Steps:
01 Cut a piece of cotton/linen to desired size.
02 Fold/roll the fabric & hold in place with rubber bands.
03 Mix bleach & water in the spray bottle (1:2).
04 Lay a plastic sheet on the floor.
05 Place rolled up fabric on the sheet.
06 Spray with the bleach mix.
07 Let it dry for about 5 mins.
08 Wash the fabric.
09 Leave it to dry.

Reflections:

The bleaching technique is rather similar to tie dye and Shibori methods, but in reverse. It is another technique that creates patterns through removal, but not of the material. I love the unique patterns that can be created through simply rolling and folding the fabric, which ensures that every design is unique and cannot be replicated.

In my initial tests of this method, my fabric did not change its colour at all. I thought that the reason might have been because I didn’t spray enough bleach, so I tried it again, only to receive the same result. I realised this was probably due to the mix of threads in the fabric material, which was neither cotton nor linen.  I borrowed some material and tried again, which did create some bleaching effects, but not too much. It could have been the way that I folded the cloth, which might have worked well in a tie-dyeing process, but not for bleaching. I would like to try other methods of folding and bleaching methods which can create more obvious designs.


Rastering, otherwise known as laser engraving, is a technique that uses a laser cutter to cut just the top part of the material, and can be used to create patterns and textures. There are limitations to the materials that can be used however, as there is the possibility of certain materials starting a fire. The best materials for rastering are wood and acrylic. Rastering has been used to create products such as rolling pins, earrings and shelves, to design wall & floor tiles, as well as to create intricate artworks!


Materials Required:
Wood/Acrylic piece (3mm), Illustration to be cut (in EPS format).

Steps:
01 Create an artwork on Illustrator.
02 Save it in EPS format.
03 Transfer file into Corel Draw.
04 Apply a different colour to the raster and cutting lines.
05 Place material in laser cutter.
06 Align the artwork to the size of the material.

Reflections:
This method makes it easier to cut complex shapes and patterns as the machine is able to do it more accurately than by hand. Hence, I decided to exploit the machine to create more intricate shapes. For my samples, I made use of images of the ocean that I found online. I thought it might be interesting to be able to feel the texture of water through that can be seen through the images by rastering it onto the surface. I feel that I should have rastered it inversely instead, as the areas which are supposed to be textures of the water are now rougher. I should also have tried varying the depth of the raster to create a more textural surface!

Surface Design 09 – Thermochromic Ink

Thermochromic Ink  is a special type of ink that reveals itself depending on heat. The temperature of its surroundings or contact by a heat source will make the print appear or disappear. It shows in considerably warmer temperatures (including body temperatures), but disappears in room temperature or when it cools down. Thermochromic inks have been printed on books, furniture, packaging and even wall tiles!


Materials required:
Cotton/Polyester Fabric, White thermochromic base, Coloured thermochromic powdered pigment, Cup, Spoon, Silkscreen board with template, Silkscreen Squeegee, Face mask.

Steps:
01 Lay the table with plastic sheet/paper towels.
02 Wear a face mask.
03 Put 8 scoops of the white thermochromic base and 2 scoops of powdered pigment in a cup.
04 Mix it well.
05 Lay fabric on the table.
06 Align the silkscreen board as desired & place it on top of the fabric.
07 Scoop some thermochromic mixture and put it at the top of the silkscreen board.
08 Use a squeegee to pull the ink across the board.
09 Repeat the above step 2-3 times.
10 Carefully lift up the silkscreen board and place it in a slightly elevated position.
11 Leave fabric to dry.
12 Iron over the fabric and see the amazing results!

Reflections:
I think that thermochromic printing is a really magical process, but the best thing about this technique is that it can also be used for practical reasons! It can be used to hide secret messages/images, indicate the temperature of food and drinks, suggest the presence of someone due to the imprints left behind, etc. It is a medium that doesn’t seem to require a lot in the execution, but definitely has a lot of areas that we can expand on in experimentation. Some questions I had were: What other kinds of material can it be printed on? What kinds of colours can be produced? What other applications can this be used in that can be beneficial to our daily lives? Would it be possible to have different colours appear at different temperatures? There are a lot of things that I was wondering with regards to this method and I would love to play around more with it!

Surface Design 08 – Knitting

Knitting is a method where thread or yarn where consecutive rows of loops are used to create a fabric material. Knitting can also be done with other materials such as plastic and wire. The technique has been used widely to make clothing, lamp shades, tree huggers and chairs. Someone has even knitted noodles!


Materials Required: 
Yarn, Plastic, Wire, Knitting Needles.

Steps:
01 Refer to the link below (might do a step by step later):
https://www.thesprucecrafts.com/learn-to-knit-2116465

Reflections:
Knitting is the most addictive method out of all the techniques that we have learnt so far. It is quite therapeutic too!

For my knitting experimentations I used the same method across various kinds of materials as I wanted to compare and see the difference between them. I used materials such as yarn, kitchen twine, raffia string, plastic bags, nylon string. Unfortunately, none of the pieces are completely perfect as I tend to make a lot of mistakes during the process of knitting. I will definitely work on improving this as I work on more pieces using other knitting methods and materials.

I did want to try knitting noodles too, but the cooked noodles were too wet and sticky, so it broke very easily. I will definitely try it again, perhaps with another kind of noodle or even pasta, as I am really curious to know it will turn out!

I also combined different materials by alternating them in rows to create some pretty interesting compositions. I tried knitting nylon string and really loved that it curved naturally in the process. I wondered what it would be like to have the nylon string merged with another material and if that would affect the rigidity of the material. I also knitted plastic bags and yarn, as I thought the plastic embedded in the yarn piece could produce a plastic ocean waves sounding piece.

I would like to work more on perfecting this and also on joining the materials during knitting more seamlessly so that I can create more patterns and textures.

Surface Design 07 – Sewing With Elastics

Sewing with elastics, or shirring, is a technique whereby an elastic thread is sewn onto a fabric material to create a stretchable material that takes the form of the wearer’s body. The technique creates gathers in the fabric to manipulate its form, and is used mostly in fashion.


Materials Required:
Any fabric material, Elastic thread, Sewing Machine.

Steps:
01 Ensure either the top or bottom bobbin of the sewing machine is rolled with the elastic thread.
02 Cut a small piece of fabric material.
03 Place fabric under stepper of the sewing machine.
04 Sew in any consistent direction (vertical/horizontal/circular).
05 Ensure that the fabric is pulled/held back so that scrunches of fabric will be created.


Materials Required:
Any fabric material, Elastic Band, Sewing Machine.

Steps:
01 Cut a small piece of fabric.
02 Cut a short piece of elastic band.
03 Position it on the fabric.
04 Place both the elastic band and fabric under the stepper of the sewing machine.
05 Don’t forget to sew while pulling the elastic to ensure that the fabric gathers!

Experimental Steps:
Try turning the fabric and band while sewing to create some curvy shapes!

Reflections:
I was experiencing some difficulties with ensuring that the elastic thread/band was sewn/pulled enough such that it will create gathers on the fabric. In many of my initial experiments, I forgot to pull the elastic/fabric and ended up sewing a normal line or appliquéd the elastic band onto the fabric material (sorry for wasting material!). I initially couldn’t appreciate the existence of the elastic as it looks like something that was meant to be hidden. However, I decided to embrace it as part of the design and used it as a form of “decoration” on the fabric instead.

Anyway, I just wanted to share more cool things that I’ve chanced upon while looking for examples! The photo on the bottom right of the examples above was from a dress designed by Thomas Vailly & Laura Lynn, but is not directly done with elastics. The details of the dress were actually done using glue, which creates folds in the form of the fabric and provides a similar effect to shirring! I love how they also decided to embrace the glue as part of the design, and I especially love how nicely and uniquely the fabric was manipulated.

photo © Thomas Vailly and Laura Lynn

It also reminds me of a project I saw during the Dutch Design Week in Eindhoven, where the fabric takes the form of the material 3D printed onto it! These examples only demonstrate the endless possibilities of fabric manipulation, which does not necessarily include the use of fabric or threads!


Surface Design 06 – Fabric Manipulation

Fabric Manipulation is a technique that sews parts of the fabric together in ways that create different patterns and textures on the surface. It can be used in sculptures, clothing, bags and jewellery.


Materials Required:
Fabric Material, Thread, Sewing Needle, Pencil, Ruler, Smocking Template (Optional).

Steps:
01 Find a template to follow.
02 Mark out the design on fabric using a pencil and ruler.
03 Sew alternate lines together on the fabric and create the pattern.

Experimental Steps:
Try using templates that are not designed for fabric manipulation to achieve different outcomes!


Steps:
01 Mark out an evenly spaced grid on the fabric with a pencil.
02 Sew in a line onto alternate grids & repeat across the fabric.
03 Pull the thread to create folds in the fabric.
04 Sew on every alternate fold, following the lines of the grid.
05 Repeat the above step to create a diamond-shaped lattice.


Reflections:
For my first smocking piece, I tried using a template from a paper folding book by Paul Jackson. I was wondering if there are specific methods that makes a good template for fabric manipulation, or if any template would work the same. As the template I used was not meant for fabric manipulation, it was quite challenging to figure out which areas I would have to sew to create the intended effect. Unfortunately, the result did not turn out as well as expected, probably due to the nature of the fabric material that was used. The pattern did not seem to be secure and looked like it could be pulled apart.

For the second smocking piece, I decided to follow the “correct” method of fabric manipulation instead. I was quite intrigued by a diamond-shaped lattice that I saw in the examples above and decided to try it. Initially, I was having issues with the instructions as the website I was referring to did not give clear instructions. I also learnt how to make the thread less obvious by hiding it on the inner parts of the piece. I was quite happy with what I managed to achieve, but have yet to figure out how to properly finish it!

Surface Design 04 – Felting

Felting consists of two non-woven techniques to merge fibres together to create felt material through matting, condensing and pressing fibres together.


Wet Felting is a process where the fibre material is combined through moisture and friction. It can be used to produce varying thicknesses of felt. The technique has been used to make clothing, vessels and vases.


Materials Required –
Felting Fibre, Hot Water, Soap, Plastic Sheet.

Steps –
01 Take small piece(s) of felting fibre & place it on plastic sheet in desired position.
02 Pour some soap and hot water on the fibre.
03 Use hands to spread the soap water mix around the fibre while ensuring that the fibres are bonded.
04 Leave to dry.
*Experiment with different thickness!


Needle Felting is a process where the fibre material is combined through poking and bonding the fibres together with a needle. The technique can be used to create felt sculptures, floor mats, containers and lamp shades.


Materials Required –
Felting Fibre, Felting Needle.

Steps –
01 Take small piece(s) of felting fibre & form it to desired shape.
02 Poke it furiously until fibres become tight.

Experimental Steps – 
Try braiding the fibres before poking for a different texture.


Reflections –

Between the two felting methods, I personally prefer wet felting because of the seemingly limitless possibilities that can be done with the technique, especially with regards to the thickness and texture. During my experimentation, I tried to create some parts which were as thin as possible with only a few fibres, and they managed to stay in position! I also like that it is possible to mix various colours to create interesting compositions. It is somewhat similar to the fabric of threads method, but less rigid and durable if it is too thin.

Needle felting is more tedious as it requires a lot of poking energy, but it a lot easier to ensure that the fibres are joined together properly. I tried braiding the fibres before felting them as I thought that they might be easier to bond and can also create a spot-blended pattern. Unfortunately (or not), it only created a bumpy texture. The only issue that I experienced with needle felting is in determining the “doneness” of it.

Anyway, I was quite inspired by the light shade example and tried creating a piece that plays with the translucency of the felting material. It’s a mini cloud! I will document photos of it with light & blinking light (like a thunderstorm), stay tuned!

Surface Design 03 – Fusing of Plastics

Fusing of Plastics is a method that makes use of the natural properties of plastic to create different textures and to combine different kinds of plastics together. Plastics tend to melt and warp under hot temperatures, resulting in a variety of interesting compositions. This technique has been used to make pouches, create textures on dresses, reused as waterproof pots for plants and rain boots!


Materials required –
Plastic bags or any kind of thin plastic material, Scissors, Cloth, Iron or Heat Gun.

From Top Row: Bubble Wrap, Cling Wrap & Plastic Bag.

Steps –
01 Cut plastic material to desired size.
02 Fold them in repeated halves such that the top layer is the thinnest, and the bottom is the thickest.
03 Place a cloth over the material.
04 Iron over until satisfied with outcome. (May burn holes and shrink plastic even smaller!)


Steps –
01 Cut off handles from plastic bag.
02 Arrange them in a random manner.
03 Lay a piece of baking paper over.
04 Hover iron over the baking paper to heat the plastic lightly.


Steps –
01 Cut a sheet of plastic from a plastic bag.
02 Lay a piece of baking paper over.
03 Hover iron over the baking paper to heat the plastic lightly.


Steps –
01 Cut a sheet of plastic from a plastic bag.
02 Lay a piece of baking paper over.
03 Iron directly onto baking paper.
04 Fold plastic and repeat.
*Plastic may become too sticky and cause it to be stretchy (as shown in last photo)


Steps –
01 Cut a sheet of plastic from a plastic bag.
02 Crumple plastic piece.
03 Cut plastic chopstick wrappers into pieces and place it randomly on the plastic.
04 Lay a piece of baking paper over.
05 Hover iron over baking paper before ironing onto it.
*Plastic may become too sticky and cause it to be stretchy, plastic straw wrapper pieces may fall off.


Steps –
01 Recycle a plastic straw wrapper.
02 Hover iron over the piece.


Steps –
01 Cut a sheet of plastic from a plastic bag.
02 Cut pieces of bubble wrap and place it randomly on the plastic.
03 Lay a piece of baking paper over.
04 Iron directly onto baking paper.


Steps –
01 Cut a sheet of plastic from a plastic bag.
02 Lay a piece of baking paper over.
03 Iron directly onto baking paper.
*Plastic becomes very FRAGILE!!


Steps –
01
Reuse all recycled plastic from previous experimentations.
02 Arrange in a random manner.
03 Lay a piece of baking paper over.
04 Hover iron over baking paper.
05 Repeat on the other side.


Reflections –

For the plastic fusing method, I tried experimenting with the nature of the plastic material itself to create varying textures. I realised that every little amount of heat applied to the plastic material will cause it to warp and melt depending on where the source of heat was coming from. Hence, most of my experimentations were attempting to control the amount of contact that the iron has with the plastic, as well as a combination of the effects that are created when the heat source is near and far. What I find very interesting about the plastic material is that even when it is overheated and forms holes, the material still has its own character.

Surface Design 02 – Fabric of Threads

Fabric of Threads, as the name suggests, is the formation of a fabric material with the use of threads. The technique requires a water soluble stabiliser, which dissolves and forms the glue that holds the thread material together. This method has been used to create dresses, bowls, vases and even portraits!


Materials required –
Water Soluble Stabiliser, Threads, Ribbons, Fabric Strips, Pins, Sewing Machine, Water, Cup, Mould.

Steps –
01 Cut two pieces of water soluble fabric to desired size.
02 Find some threads / ribbons / fabric pieces.
03 Arrange the materials on the water soluble fabric and pin them down to secure their positions.
04 Lay the other piece of water soluble fabric over.
05 Pin the sides of both pieces of fabric together.
06 Begin the sewing process by sewing along the edges of the water soluble fabric to ensure the materials inside do not fall out. (Do not forget to remove pins while sewing!)
07 Sew across the materials to embed them onto the piece.
08 Continue sewing across the piece either in:
– an orderly grid,
– circular,
– or random manner.
(Ensure that the threads are crossing each other to form a lattice!)
09 Fill a cup with water and leave the piece to soak inside for a while. (Do not leave it for too long or the piece might not harden!)
10 Place the wet thread piece over a mould and leave to dry.

Experimental Steps –
Combine other materials such as plastic strips, nylon string or raffia string for varying strengths and texture of fabric!


Reflections – 
I initially thought that it would be possible to sew directly onto the water soluble fabric without embedding materials. However, all I managed to do was to puncture my fabric with a lot of holes from the needle of the sewing machine. This also led to the sewing machine getting stuck a few times.

For the embedding, I thought it would be interesting to add nylon string inside as I was curious to find out if non-fabric materials would work in creating unique textures and possibly a new type of fabric material. During the sewing process, I realised that the stiffness of the nylon string added some rigidity to the thread material and also gave the fabric a slight sheen.

I would like to experiment with other non-fabric materials to take a look at the various textures that different combinations can produce!