Upon receiving the brief, the very first thing i did for this project was actually to research on Emiko herself, as well as the world of “Wind Up Girl”. I wanted to really make sure that my design had fit the world and also was able to carry out the functions that it was supposed to, in other words, be a cooling bio-radiator.

Upon research, I found out a couple of things about the premise of this world that Emiko lived in and herself:

  1. She is a modified human, made for the sake of pleasure
  2. Emiko works in a sex club
  3. The mechanisms used in the world consists of kink springs and generally older technology infused with new ideas involving animals or something along those lines (there was no clear statement of how the technology worked)
  4. The name “Wind Up Girl” further suggests the technology is more from the past than the white minimalistic clean look we think of when thinking of something futuristic.

With this, I decided to jump right into the project. With the basic knowledge on cooling and heat reduction that i had from my secondary and junior college days, along with certain common knowledge, i knew that the nape was the section whereby upon cooling, would result in the whole body cooling as well.

Thus, i decided from the beginning that i would create a design that involved the neck. Other options such as garters and arm guards, as well as head pieces did cross my mind, however, i felt for the purpose and functionality, the nape was still the best option.

Now, further looking at the premise of the assignment, with Emiko as a sex android and working in a sex club, i wanted to create something that was not obstructive to her activities and also tied in with her job. While it is true that she resents her job, i felt that she most probably had no choice and for something such as a cooling device, she would most probably have been gifted by a customer or provided by her workplace.

Taking into consideration the basic cooling mechanism and the fact that the world was using rather old technology, i was glad that my first section was using black nails, as i felt it fit the aesthetics and the functionality.

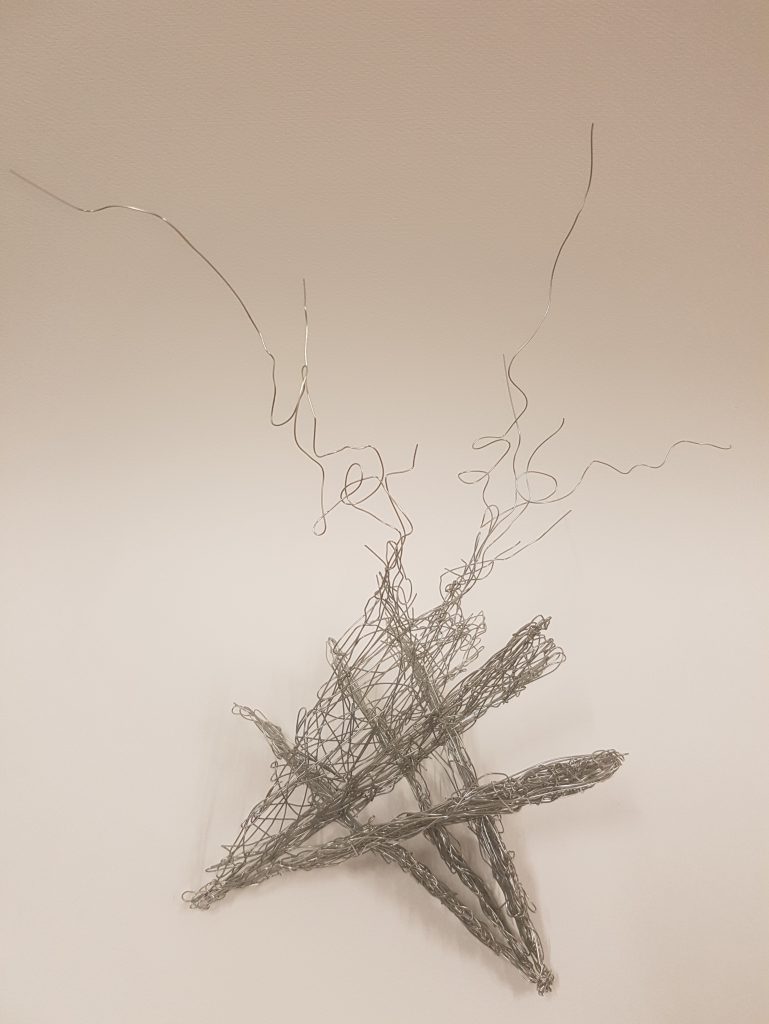
As shown above, my first part involved nails and it was held together with blue thread. We were tasked to find an SEM image and recreate it, however, i personally was intrigued by interlocking mechanisms and thus wanted to use nails and bolts. Upon further thinking, i decided to use thread and nails instead. I hence worked backwards, with me finding a picture to match a possible design that i wanted to create.

I managed to find an image of Silicalite-1-Octahedron, that is synthesized by repetitive branching. I think i managed to recreate the image well and was rather delighted with my result.

Following this, i decided to do more research to ensure my facts were right. A few things i looked up were cooling based on colour, increase surface area and how it results in increase cooling and also which area cools the body the best. Fortunately, my knowledge on cooling were not proven wrong and i carried on with creating a design.

i initially planned to a neck piece, but upon doing research, i chanced upon a spinal harness as shown in the bottom left of the above picture. It was very interesting and captivating. I felt that the usage of the nails were very suitable for this spinal design. This also made me realize that a harness had actually fit what i was looking for in a design.

Hence, i decided to made a harness.

The above is a process model broken down to its separate parts and functionality.

The main gist of the whole device was such that the metal piece that was situated in the nape would absorb all the heat from the body and then transfer it down to the spinal nail back piece, where through the increase in exposed surface area, the heat is cooled down using the second law of thermodynamics. This is of course with the assumption that the surrounding air is cooling than the device when it is heated.

The nape area was also made using leather, imitation leather in this case, real leather if it was actually in Wind Up Girl. The use of leather was due to leather being a cooling material compared to any other material. It was also important for the device to have comfort and thus it was used for the neck area where the wearer would not be pricked by the nails or metal parts.

Being a modified android human, I believe that with the chest having the most area and space, most of the parts of the android would be at the chest area. Hence, a chain piece was also added to the chest area as it would most likely have to be cooled down greatly as well.

All in all, i feel the harness is useful in its functionality and aesthetics with regards to the premise of “Wind Up Girl” and Emiko. I really liked how the spine turned out. Through feedback, it was mentioned that the nape area could have also been nails and rather than a single line, i could have played with the design as a skin.  i do concede that the nape could have been nails but i wanted it to have a large surface area where it conducted heat away from the body easily as nails would have resulted in too much free space and hence compromise the function. As for the nails as a skin, it is most definitely something i would look into given the chance again.

For this project, i chose the very first video, which was AMA by Julie Gautier.

I chose this video as it caught my attention the most. I felt it was the most captivating and it made me think of waves and the ocean, with swirls. I really loved how the water made it seem as though there was little gravity and thus she was floating around.

The three words i thought about for this dance was Grace, Flow and Empowerment.

Research

I actually did not have much research or references for this project, and it was more of a very experimental experience. I had an idea that involved waves and swirls and went along sketching and trying out different ideas.

I went to search a few sculptures that involved swirls and ended up finding this particular sculpture which i thought was elegant, which fit the idea of Grace.

The ball paired with the swirls made a nice piece, and thus i wanted to incorporate that into my design.

Process


The above are a few sketches i made before searching online and finding references pictures. As shown, all the designs involve flow and swirls. I actually was very interested in the second design from the top. However, i had to think of the material to be used and was hesitant in going for that design.

I also initially wanted to use magnets in my design, allowing it to have a revolving mechanism and thus adding to the idea of flow. I wanted to use magnets also due to the fact that it was gravity defying, which was point i took from the dance video. However, magnets were restricted against for this project and i thus decided to look into other methods such as using balance to hold a whole sculpture on a point, allowing it to spin.


Before my research, these are a few trial designs i did. I made them using paper as i thought paper was the easiest to bend to make delicate curves, due to its soft and thin nature. I also knew i wanted my sculpture to be black and white, and thus the use of white paper also enabled me to envision how it would turn out in the final product. 

After trying out with paper, i attempted to recreate the swirls using transparency sheets.  However, i soon realised that the transparency was unable to retain its shape and thus was hard to work with. Below are a few pictures of my mock ups with the transparency. This time, i included the ball into the design. I really liked the idea of the swirls surrounding the ball and decided to roll with it.

I then decided to work with a new material, bought from Daiso, which was an air dry clay that was extremely light and hand wooden powder.

I played around with the shapes, making strands to curl around a ball. However, i realised this design looked rather fragile (though i later received feedback that this was an interesting composition).

I ended up making more sketches and then drawing the design below. In which it consists of two swirls joined at the top, with a tip coming from one of the swirls to stand on a ball purely with balance on that single needle tip.

The ball was meant to symbolise the dancer’s pain, and her power enveloping it in the form of white swirls. This was the section for empowerment. As for flow, it is evidently the curves of the structure. And the grace was the minimalistic design along with the fact it sat elegantly on a single pivot.

That said, i went along working with the clay, and to my dismay, i realised it was hard to mold the clay to the shape i wanted without it breaking.


And thus, i started to think of a way to ensure the shape of the curves could be retained.

I ended up using wire mesh to cut the shape of the swirls. I really liked the look of the wire mesh (and i was also given feedback that the wire mesh was more beautiful than the final product), but it was not the mood i was going for, as i wanted an elegant white and black sculpture.

I then covered the wire mesh strips with the material i bought, the airdry clay and then joined the pieces together, and painted it white.

This was a learning experience as i had never worked with clay or air dry clay before. Thus, it was rather unfortunate when i realised that the air dry clay would not have a smooth finish, and the one i bought it particular was unable to sand. However, it was light and that was what i required. Using the balancing technique required my structure to be light in general, with weights at the bottom. Thus, i was unable to opt for the normal clay as it would have been too heavy despite being able to have a beautiful smooth finish. My end piece ended up with many bumps and rough edges and it left me greatly dissatisfied.

Nevertheless, due to a time constrain, i had to work with it and continued pushing through.

The above is the ball piece for my design. I realised that the wooden ball i had bought was 1) too heavy and 2) too big. Thus, i opted to make a ball out of wire and truth be told, it is the part of my final piece which i liked the most.


Balancing the swirls on the ball, i then added the normal clay onto the ends such that the swirls would end up upright and not slanting to a side. This took much time and effort as the placement of the clay and the amount had to be specific.

I then paper mache the whole swirl structure but purposely using thicker strips of paper to create a texture, in attempt to guide the eye away from the uneven surface of the swirls.

Below is the final outcome, here supported with a stick, but in reality, it is able to stand on its own.

Final


Reflection:

I personally really liked the design of my final piece, but i feel my execution was greatly lacking, which i felt was very unfortunate. This project in general was a great learning experience for me as i was able to try using clay and other materials like transparency. I think learning about the different types of clay was fun. Despite the rather upsetting final product, i think it was a fulfilling project as i learned much from it, but given the chance, i would most definitely re-create this piece to produce a better piece.


Model 1

I decided  to use the tetrahedron for my linear model, a simple yet interesting shape.

Model 2

I initially wanted to use organic shapes to form the tetrahedron, contrasting with the sharp edges of the tetrahedron. I wanted to try to use only 3 planes to form the shape, hence deciding on intersecting the pieces in the middle such that they fit together nicely.

However,  i realised the task wanted basic geometric shapes that looked interesting at all angles, and hence decided to scrap the idea, as it was rather boring when looked at from top and bottom.

I had a few ideas, and had to decide between a more random structure with circles, rectangles and triangles, or a more organised structure. As i thought about the second design among the three above, i decided to change it up such that 3 planes intersected another 3 planes that had the exact same form. It was an organised and simple design, but yet looked interesting at all angles.

I made a mock model using drawing block, ensuring the model was unique at all angles, before using cardboard.

  • Two exact set of 3 planes decreasing in size.

  • When intersected, forms an interesting shape
  • Slits have to be cut with angles and depth in mind – a lot of calculations and trial-and-error
  • Final model for model 2

Model 3

I initially wanted to use wires and strings, and hence made the outline of the model out of thin wire. It is actually one full strip rather than different pieces of wire cut and connected to form the shape.

However, i realised that the thin wire was too weak to hold the shape and hence had to change the material or the thickness.

I opted for the thicker wire, once again using only long piece of wire to make the whole outline. Then used string to wrap around the outline over and over, randomly. I wanted to make certain sections more condensed and the opposite end more spaced out to give the idea of an disintegration occurring.

However, this was not what i had envisioned and decided to look into other mediums.

Using Tomohiro Inaba’s sculpture as a reference, i decided coil wires and form the planes, rather than using string and wire. This made me switch back to the thin wires, which were more flexible and easier to manipulate than thicker wires.