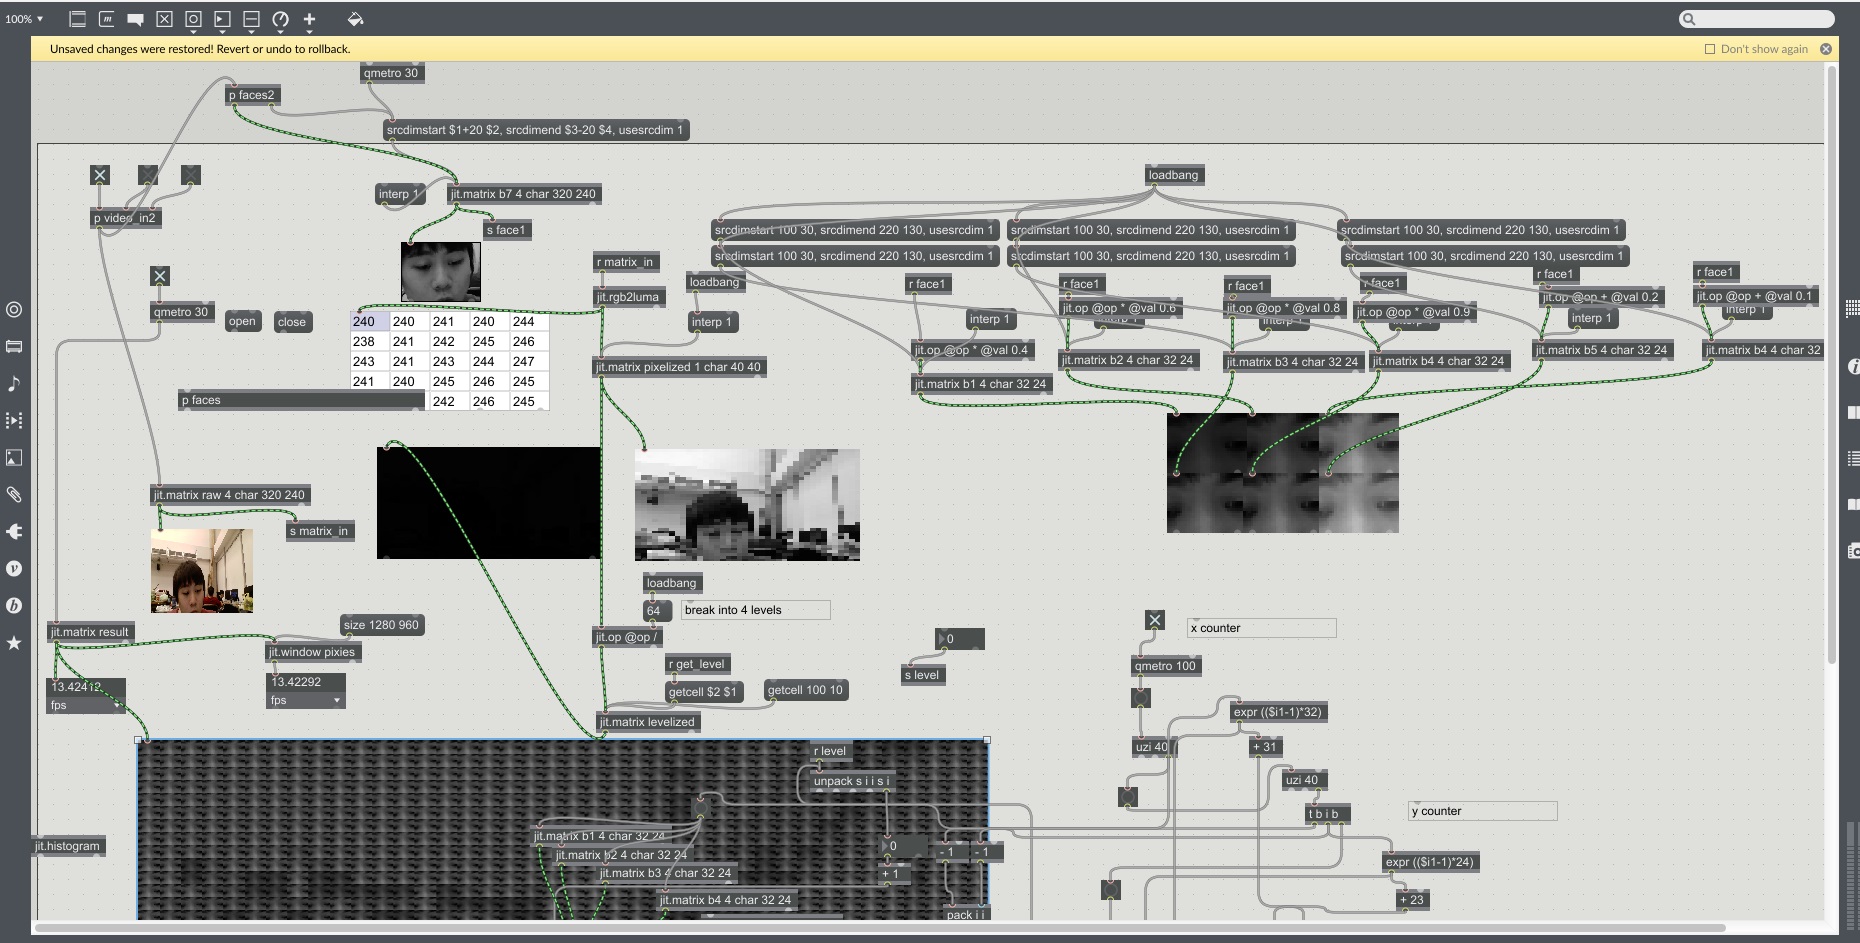
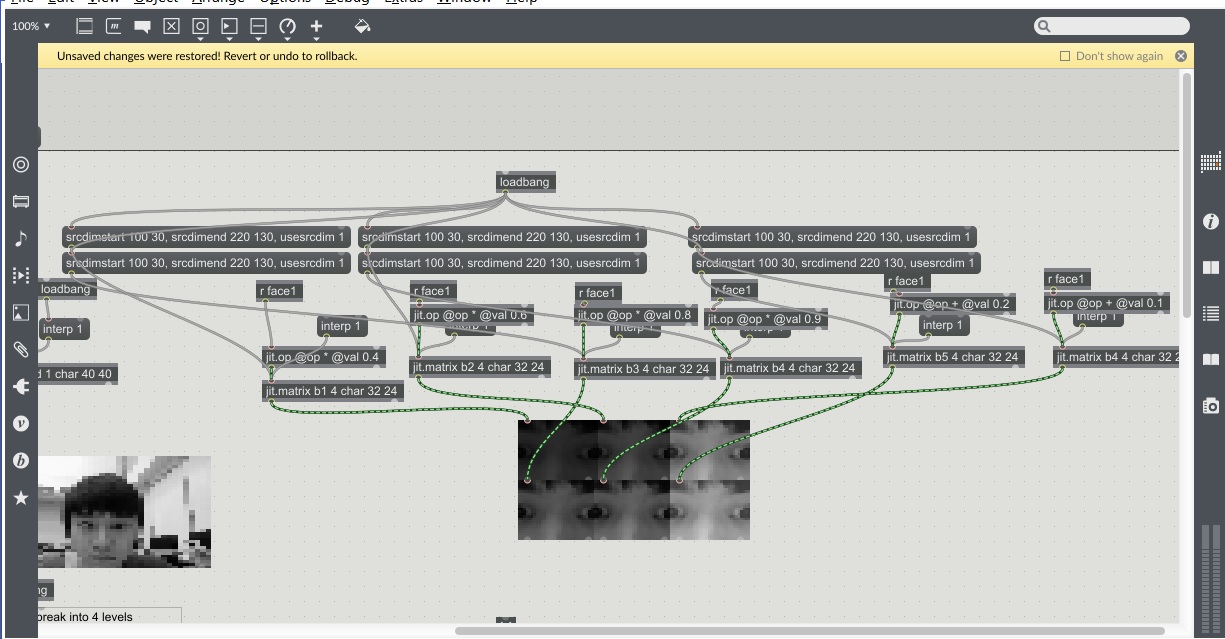
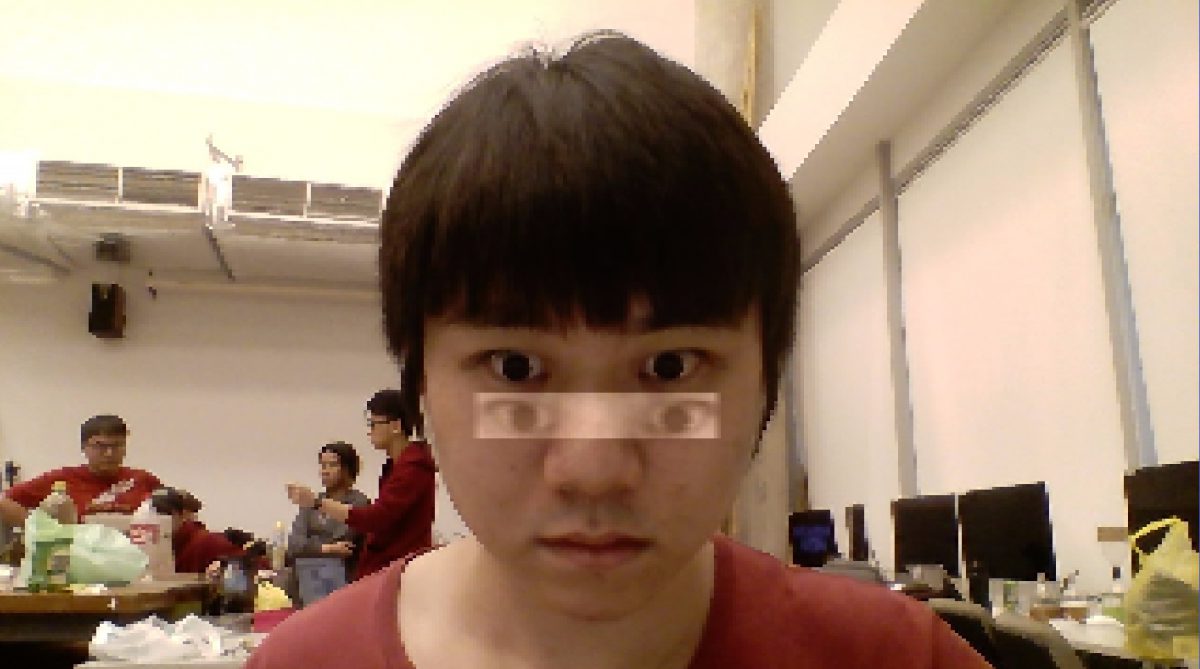
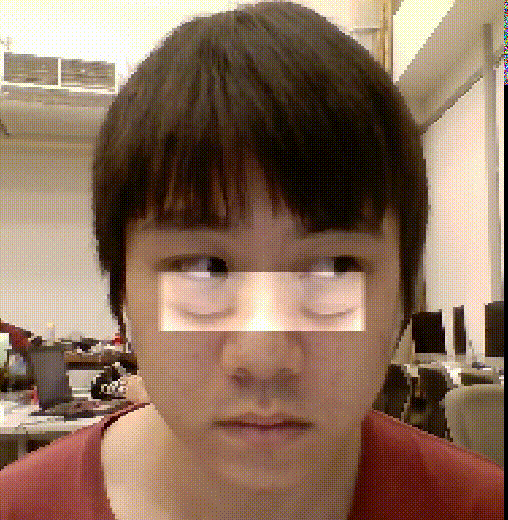
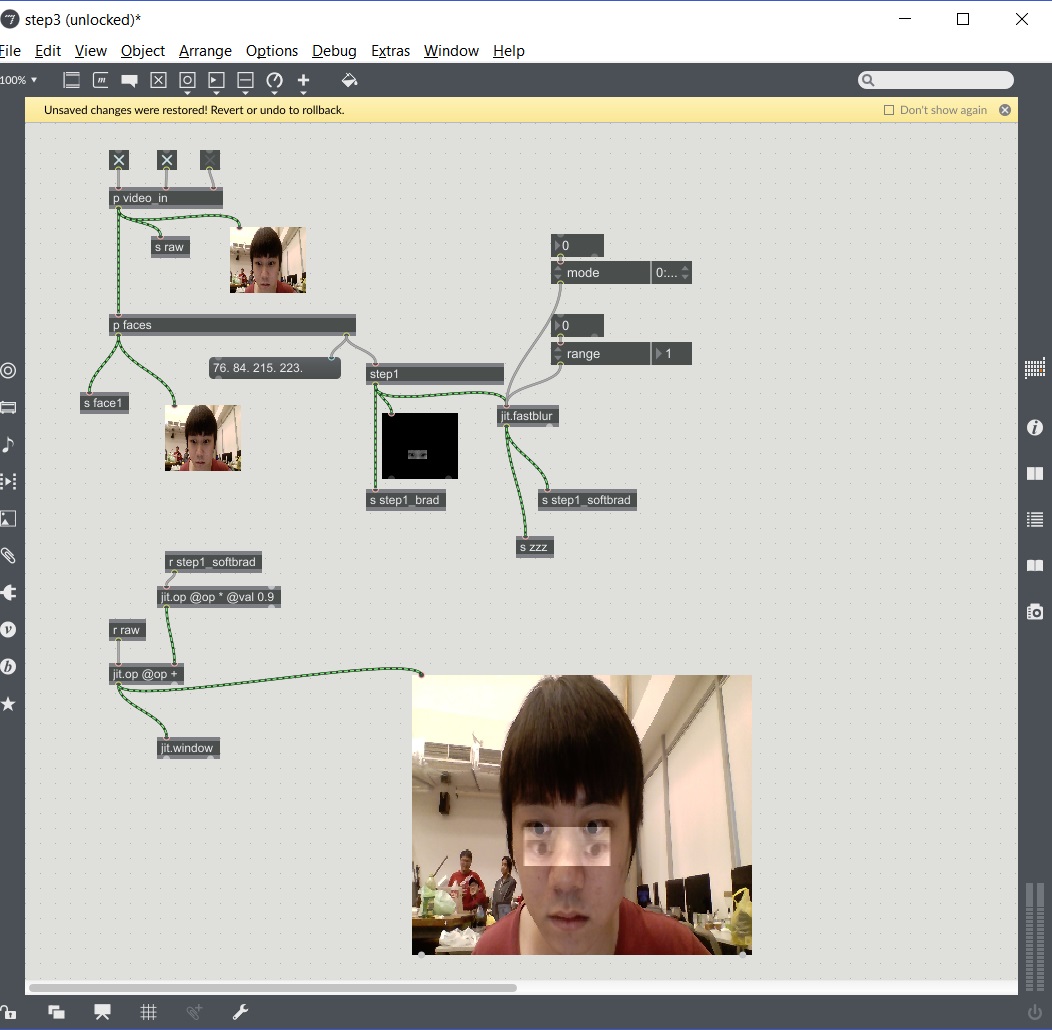
To be frank, I am not sure what to do with this patch to make it unique, so I added my previous patch that track my eye and did a minor adjustment so that the repetitive pattern in this patch will make the eye to look like a wall of continuous eye, since they are happening at real time, it feels like it is the nightmare of those trypophobic.
this still work with parts of the previous patch, by zooming more into the eye and changing the darkness of the clip to make it work.
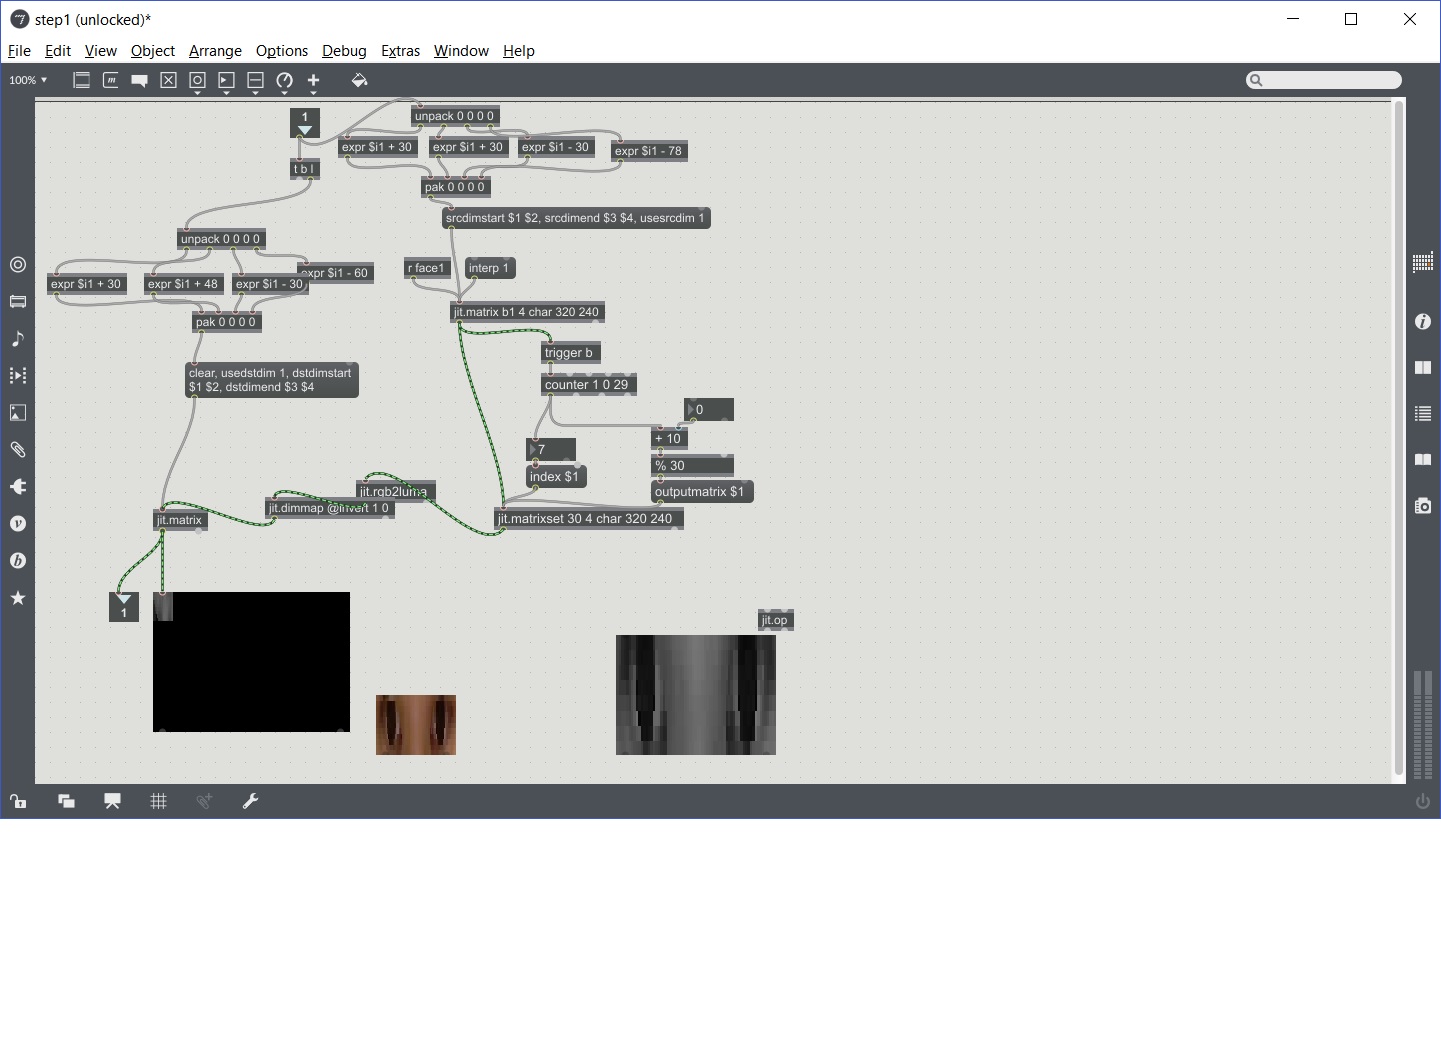
In this Exercise, I’ve used the location of the face tracker and cropped to only the eye area, scale it accordingly and delay video of the eye by using jit.matrixset, after that, I mapped it onto the original location of the face, creating a trippy effect of a four eye monster.
There are a few things that I’m unable to solve.
1 – the alphamask will give a rectangular box and im unable to remove it even with blur.
2-the additional eye is too sensitive and it look like its vibrating, maybe i could line it afterwards.so I added the eye tracker from the value of the jit.face box, while doing it, i realise it looks really cool on this effect for just using only the jit.face and scrdimstart and scrdimend it. it feel like a really old way of fliming drunken scene.
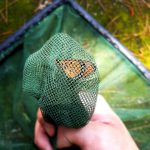
Through this disastrous week, we focused on getting the the final batch of butterflies for the presentation, writing the max patch, Arduino code and also purchased a 19 inch monitor which got ruined by a single drop of raindrop and also, setting up the “habitat” for the butterflies in the acrylic case we made.
the two Leopard Lacewing Chrysalis Sarah Gave us
The extended net we brought to catch butterfly
Tawny Coster caught
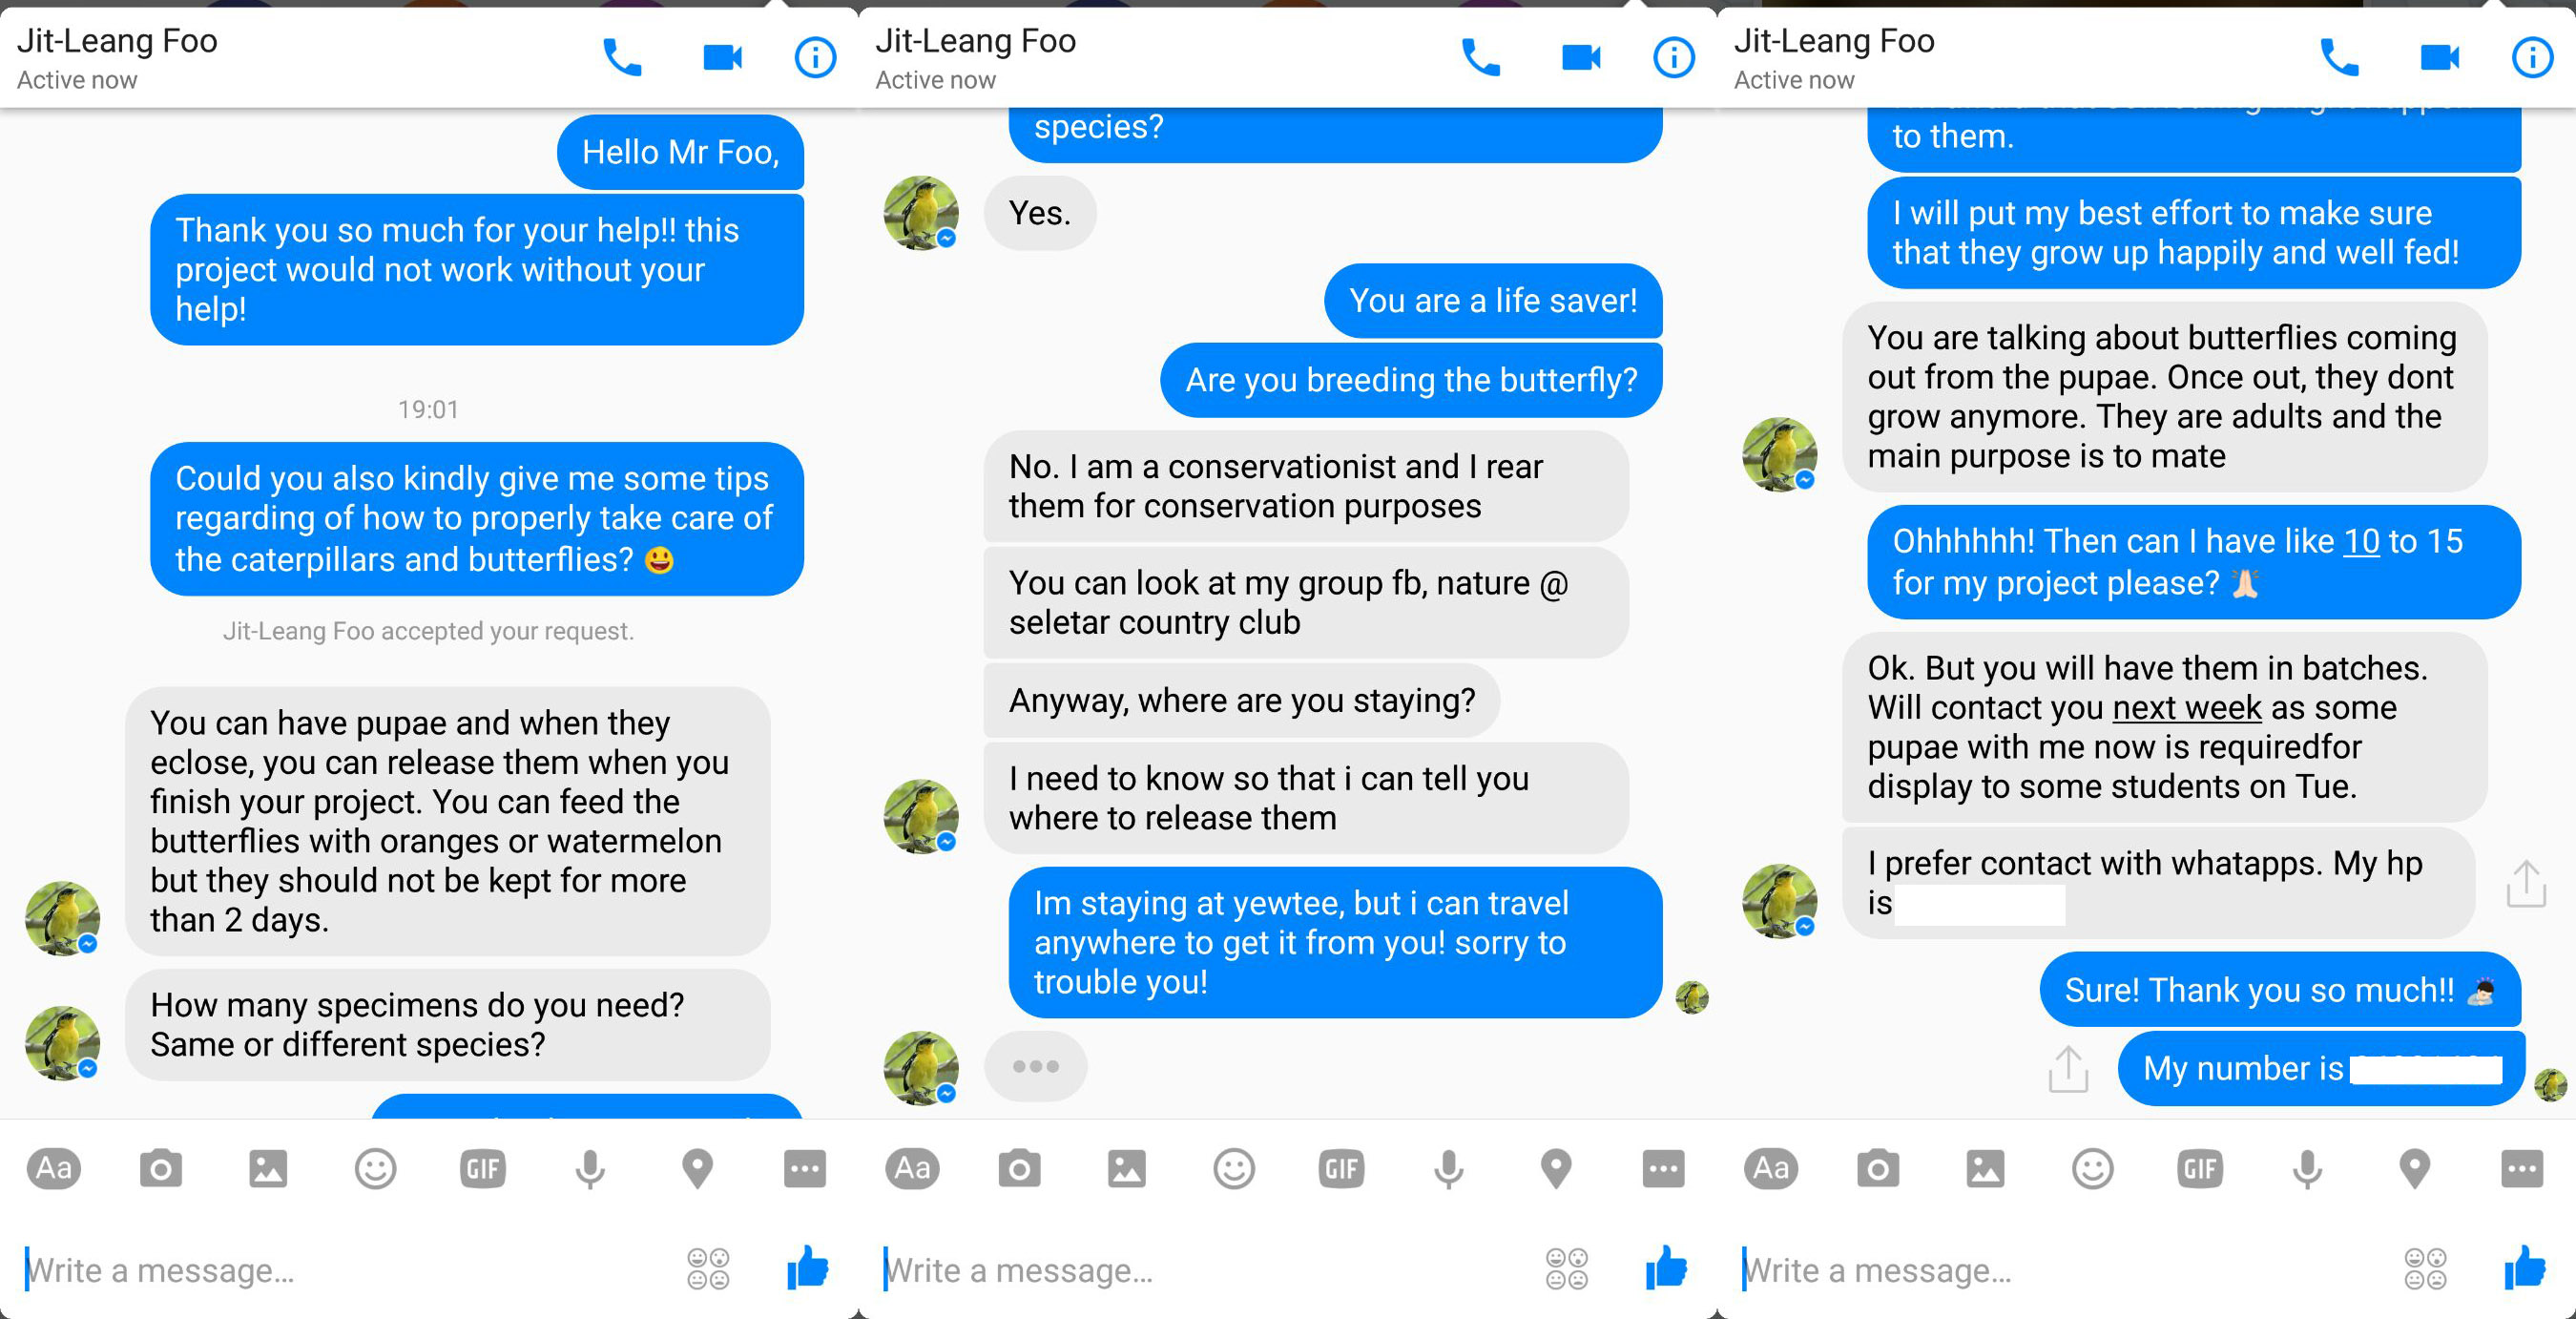
As for the butterflies, since we released all of our 8 butterflies last week due to the agreement with Mr Foo, the conservationist, we have 0 butterflies on hand for our project and as he agreed with us previously, he would give us in batches, and this week he direct me to a school teacher Sarah, who gave me two of the Leopard Lacewing Chrysalis. Since we know two is not enough, we decided to try our luck to catch some more butterflies a few days before the presentation just make sure they will be at least visually attractive for the final submission.
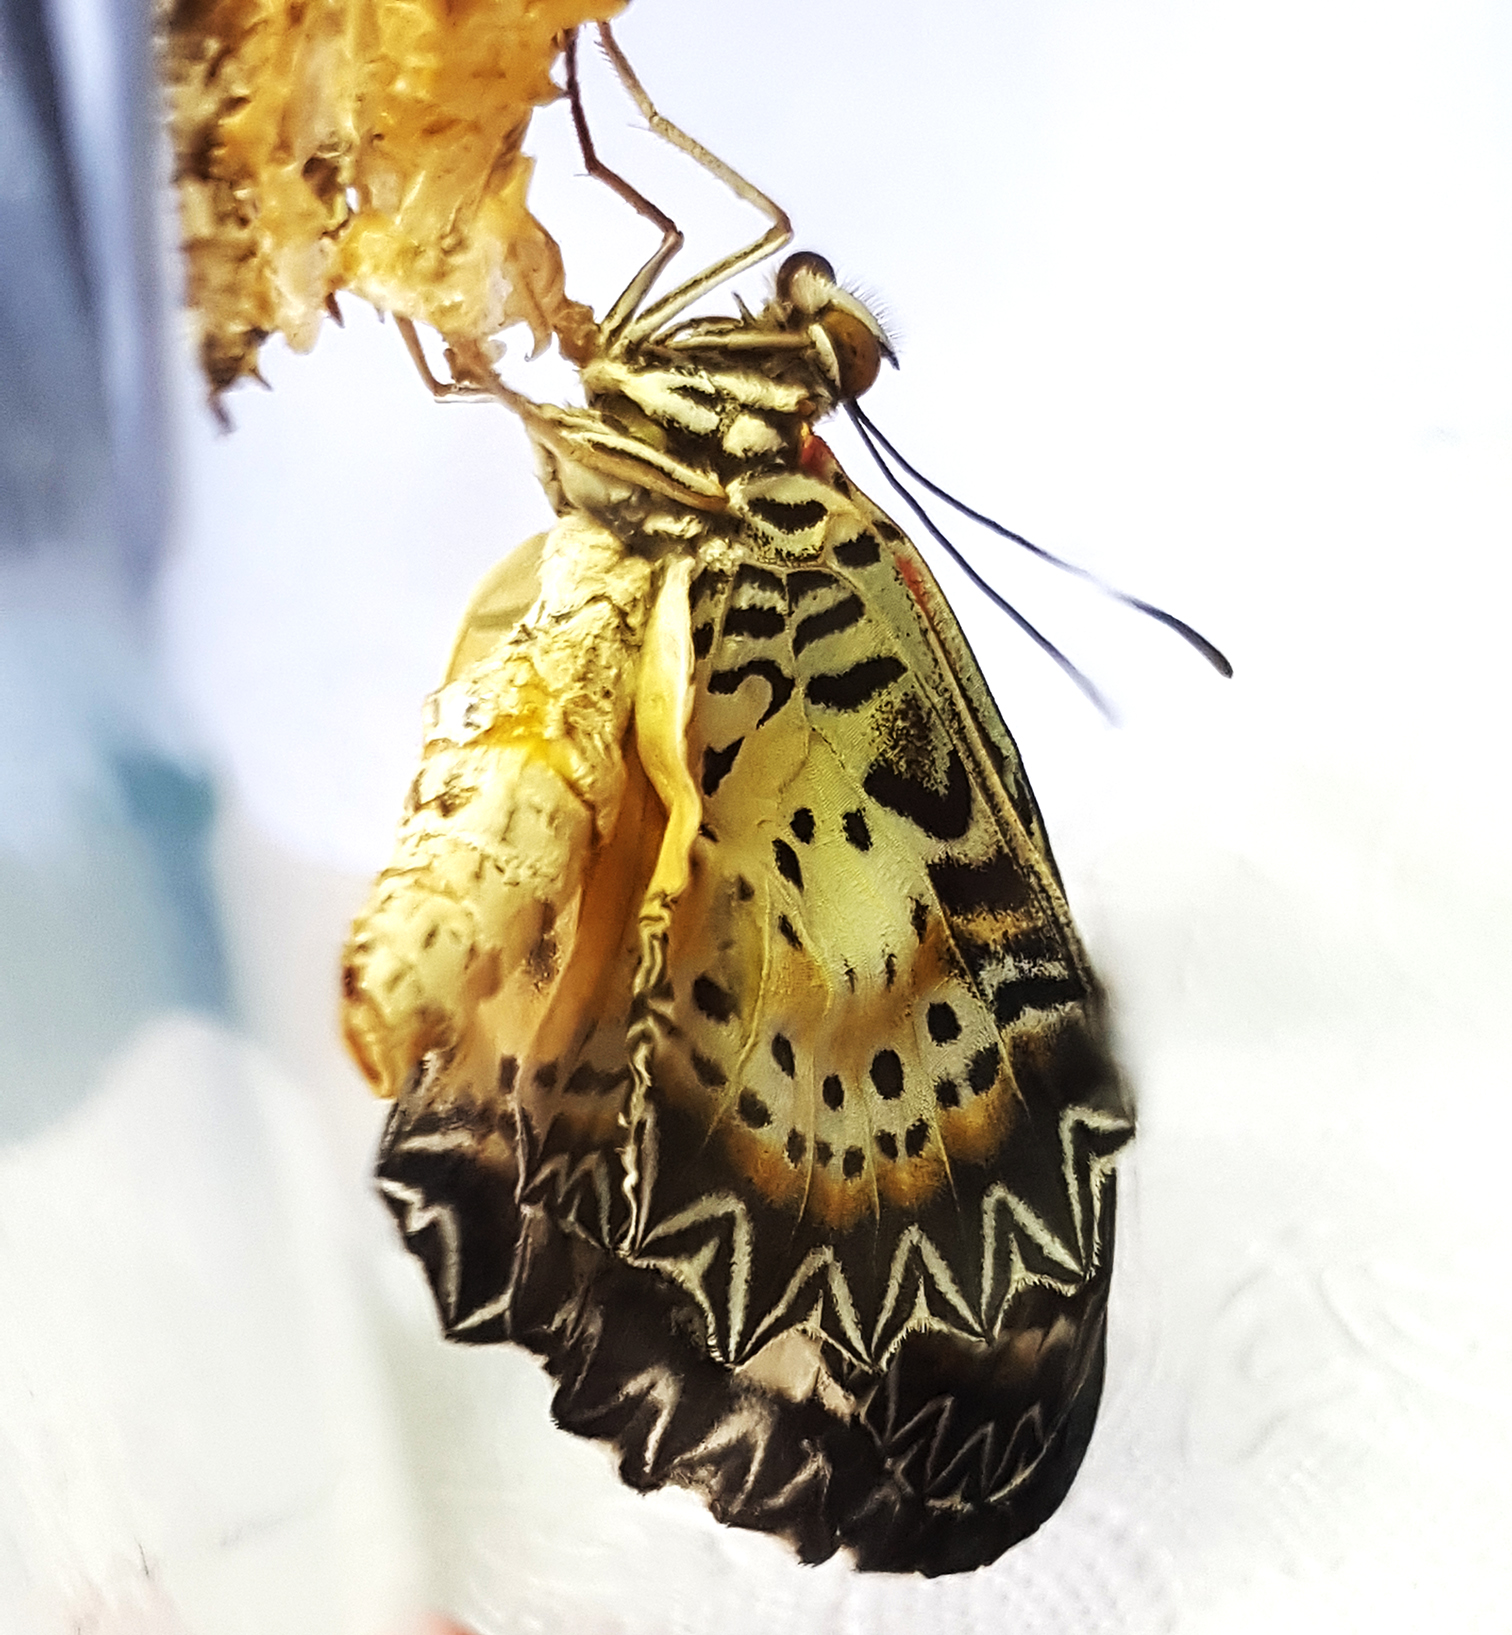
The Deformed Leopard Lacewing with one wing much smaller than the other.
Both of the butterfly is female although we hope for them to be male which are more visually appealing. however, one of the two butterflies which Sarah gave us have deformed wings and is not able to fly very well. it is still relatively healthy other than that.
And we went to Yewtee park on 3 separate occasion, on the first occasion, we bought a short net which was unable to reach the butterfly and therefore we bought a long extension for the net the following day.
Problem: Not enough butterfly.
Solution: Catch them
During this week, we also use code that allows to use jit.blob and jit.op @absdiff to prepend in the colour in the frame and enable us to locate the center of the blob, the problem here is that we can only unpack the multiple blobs into one XYZ value. Therefore we looked online and tried many different patches and finally came to using [jit.spill @plane(number)] -> [unpack 0. 0. 0.] to unpack many blobs into many XYZ coordinate. hence enable us to track multiple blob’s location at once.
using those cordinate, we also followed a tutorial that taught us how to use jit.lcd, we use the cordinate from the blob centroid to draw the lines in the lcd, we also use timer function to change the RGB value of the lines created in the lcd
Jit.blob with jit.spill, message to jit.lcd to draw
usiing timer to change RGB value
up till here, we found out from Prof LPD that we we cant or it is very hard to map many point that attract the particle system as they only “move to destination” but not really is “attracted to” the point. so we decided to find another patch to learn and build our patch on.
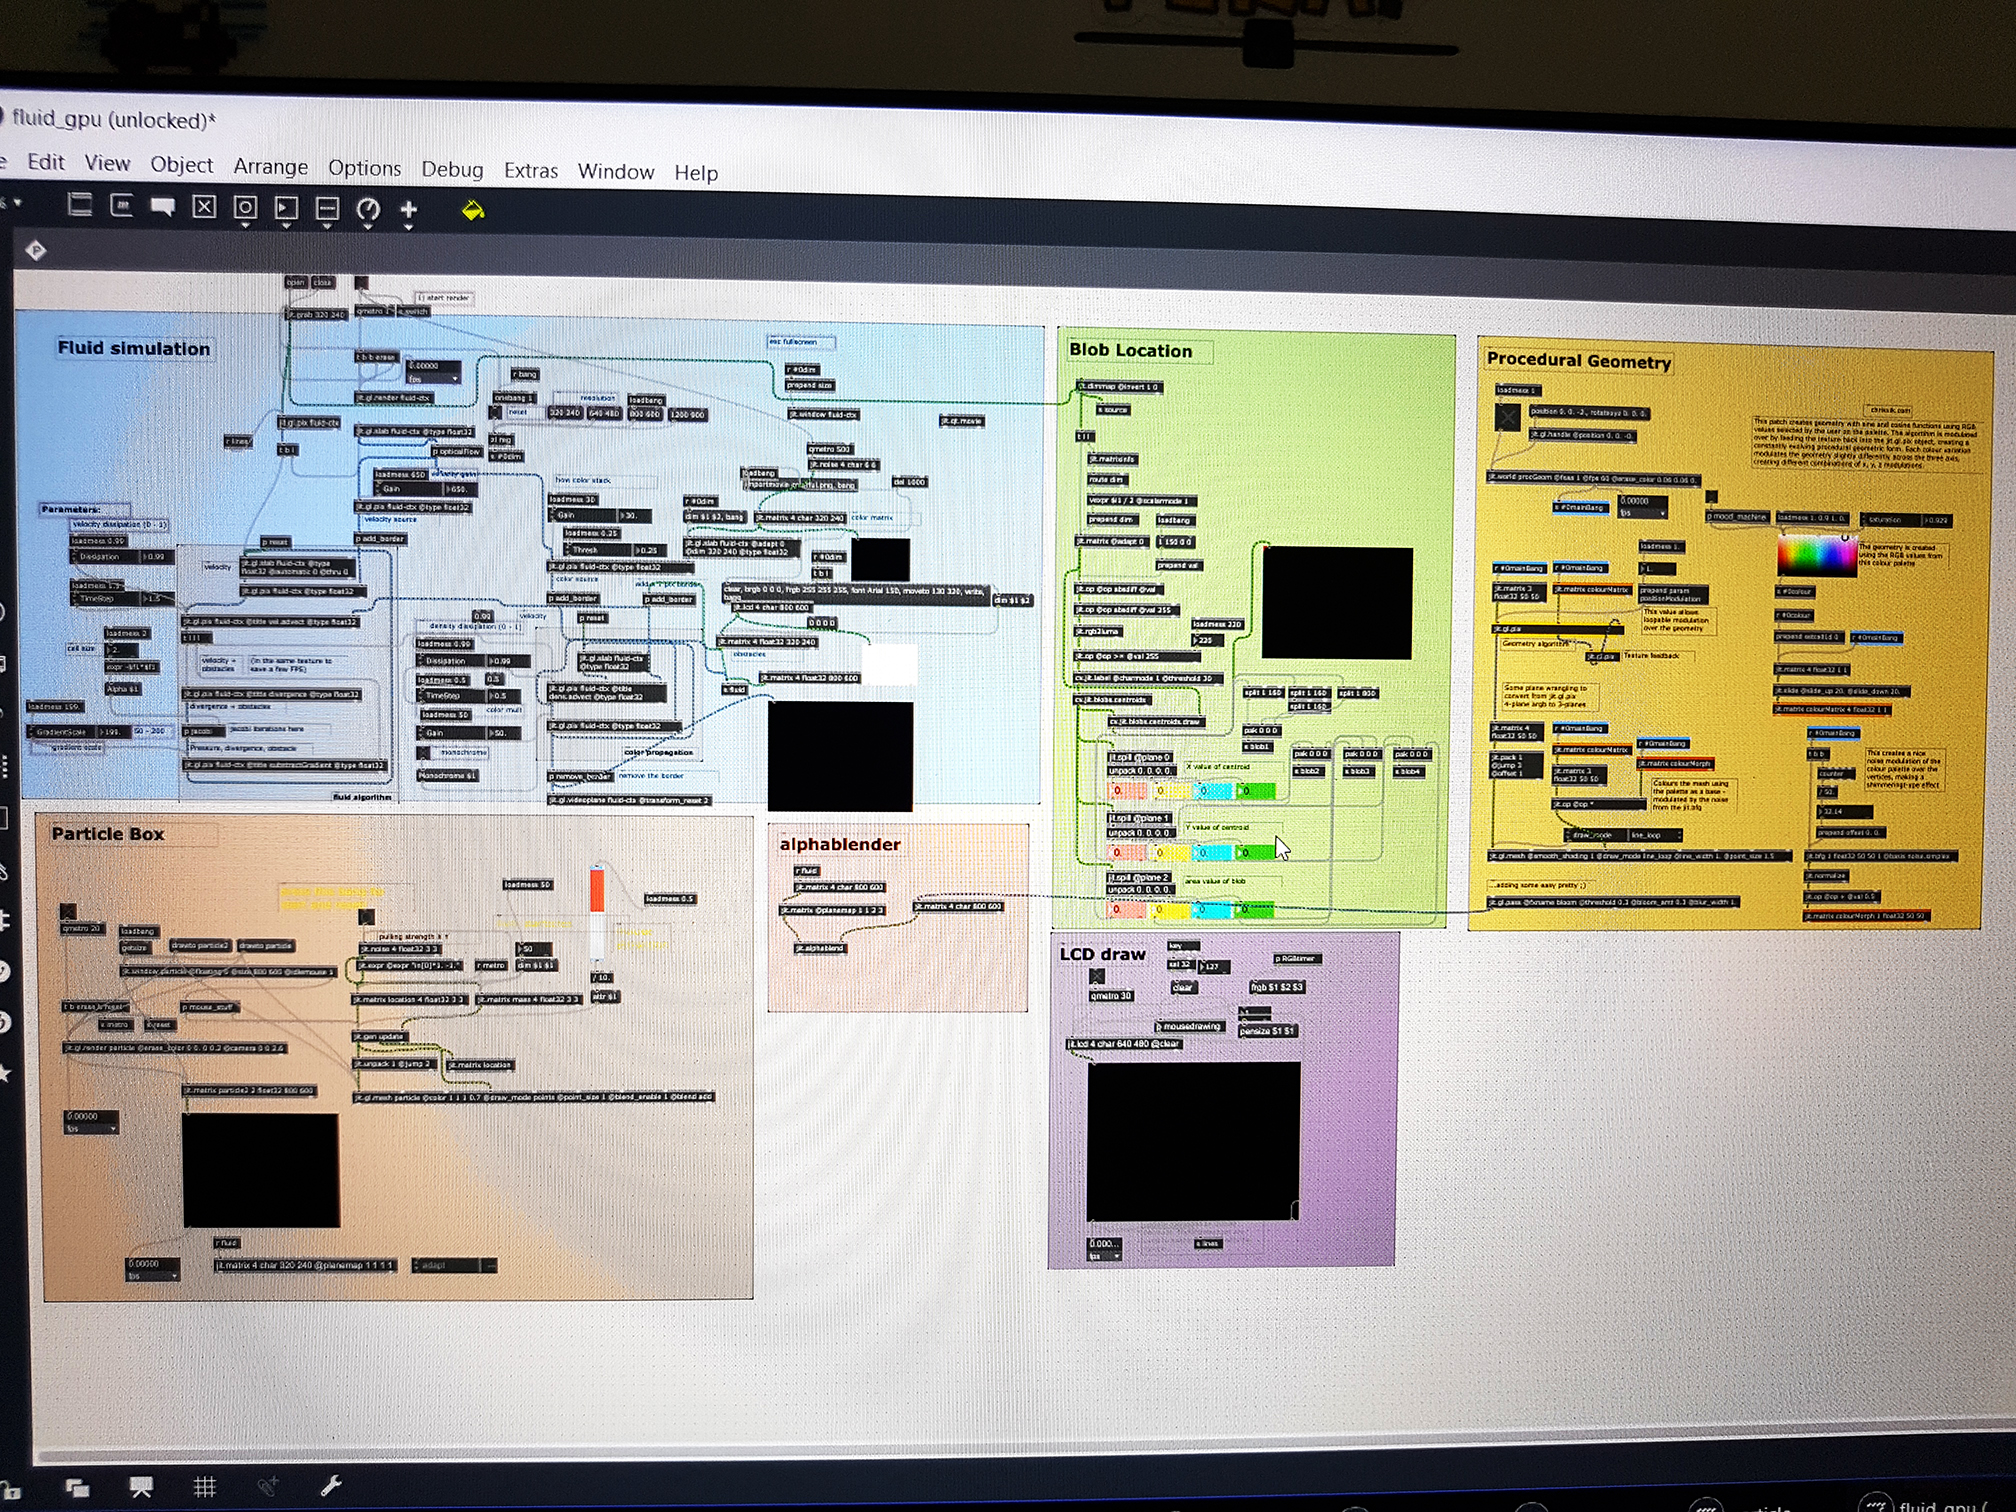
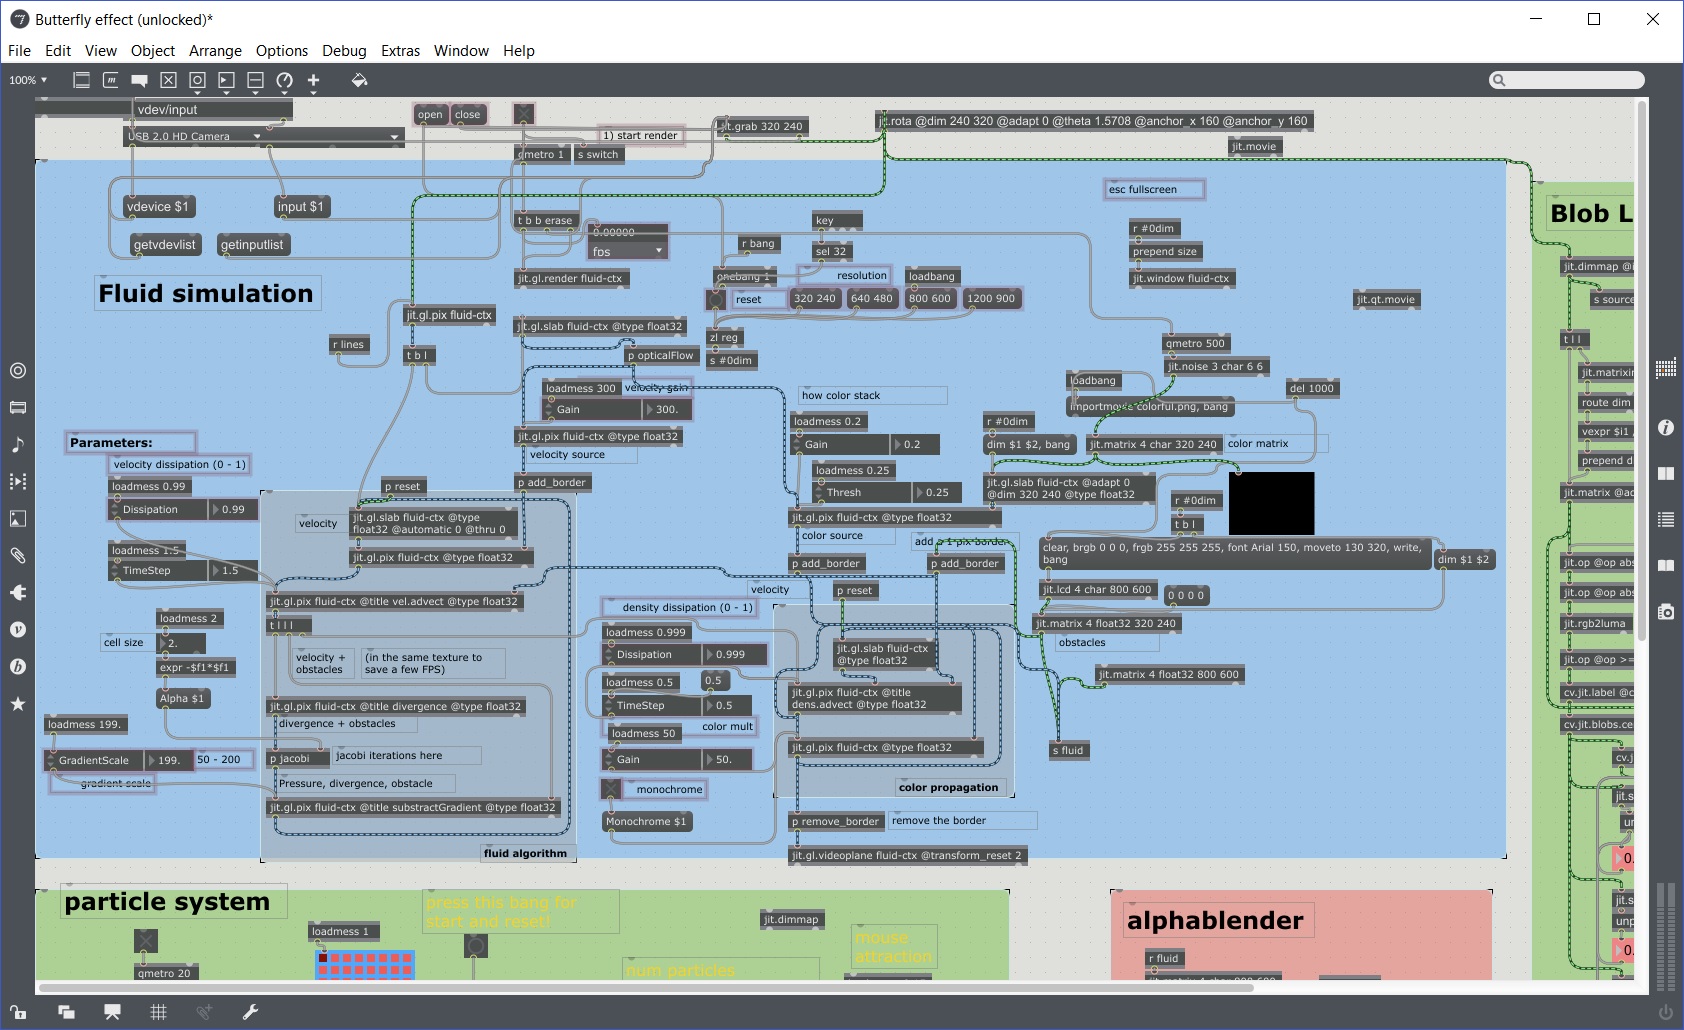
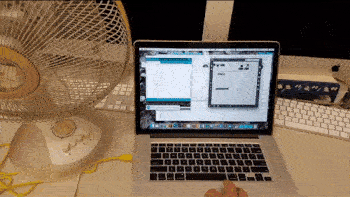
This is a screen shot of the final patch we used for the presentation.
just a day before the presentation, we decided not to use the particle system as we think it is not that more is better, it is the effect that we wanted that is important. basically, we found a way to change the camera to using external camera that we have(vdev/input), since the external web-camera is longer in the width, we decide to let it lie by the side and rotate the orientation and scale it accordingly to the screen size we have. (jit.rota) and also changed the original patch from a standard (importmovie colorswatch.png bang) to (qmetro 500 -> jit.noise 3 char 6 6) which produce a new 6 by 6 random RGB boxes every half a second and thus changing the effect of the fluid effect.
Next after we solved the fluid effect, we build the very simple code that uses (serial c 9600) to send a integer over to Arduino which is linked to a relay that controls the 220v table fan which turns off after 8000 ms
And that is roughly it for the codes that we wrote this week, we also settled the logistic part like the screen with a self made stand for the visual generated to be place under the butterfly casing, the flower for the butterfly to stay onto while adding to the overall visual appeal for the whole project, lastly we searched online for the species of butterflies we have and made a information about our project for the butterflies.
Dell 19 inch monitor we purchased for this project
a drip of rain water went into the system on the way to school
just a drip killed the monitor
We purchased the second hand monitor on carousell and it was working, WAS. and then on the way to school while raining, a drip of rain water goes into the system and killing it once we turn it on. talk about unluckyness. so now, we’ve got a spoilt monitor screen, and we still need one so we searched online for more monitor, in the end we borrowed a 22inch monitor from the IT department which is slightly oversize but great nonetheless.
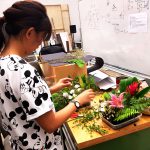
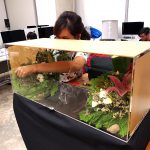
While I was doing this, SuHwee was arranging the flower carefully, although it may look easy to do so, having the balance and the need to consider the size and the butterfly is quite hard.
sticking the flowers and plants + cut some from the sunken plaza into the special sponge for flower arrangements,
once the flower is placed in, everything looks lively and vibrant
we put the screen and the butterfly box together, did up the information board to it and transferred the butterflies in, tore off the paper protecting the acrylic and we’re done!
We will update/upload the video for our project soon!
These 3 different species were given by the conservationist Mr.Foo, there were a total of 7 Chrysalis, 5 Leopard Lacewing, 1 Plain Tiger and 1 Lemon Emigrant. All 5 Leopard Lacewing had emerged this week and the other 2 will be coming out tonight or tomorrow morning.
Leopard Lacewing (Cethosia cyane) Female Pumping fluid into wings to extend them.
Leopard Lacewing (Cethosia cyane) Male – underside
Did a lot of butterfly related task this week which includes getting the chrysalis from Mr.Foo, setting the chrysalis up for documentation, waking up way too early to get the video of the eclosing process. laser cutting and build the final casing for the butterfly and presentation, Researched on what butterfly eats and how to feed them. buying Curry leaves from supermarket with vegetables for the butterfly to live with. And tried to get a second hand monitor screen from an online seller, the seller did not turn up and did not reply. Our 160 degree wide angle web camera had arrived from china and we will test it out really soon with Max.
While I was writing this post, The Lemon Emigrant eclosed! (and I diden see it nor video it!) now that the Lemon Emigrant came out, the last one that will be coming out will be the Plain Tiger.
Also for coding, we further researched about our max patch and spend most of our time studying and trying to merge/tweak the standard patch as well as what other people did for their project, some of the patch were too hard to understand until today’s lesson when LPD explained most of what the patch does then we understands(slightly) what the patch does.
From this week to next week we will focus mainly on the max patch and get something that could roughly work in terms of butterfly/motion tracking, visual generation and output to control a real life appliance using UDP or the wireless I-Cube X.
Write up a rough Max Patch for Motion tracking using camera and particle/visual generation from the point/blob that was tracked by the motion tracking.
Catch more caterpillar/cocoon from different area and see how long they need to become butterfly + research more about butterfly.
Actual Milestone Done in Week 10 -11
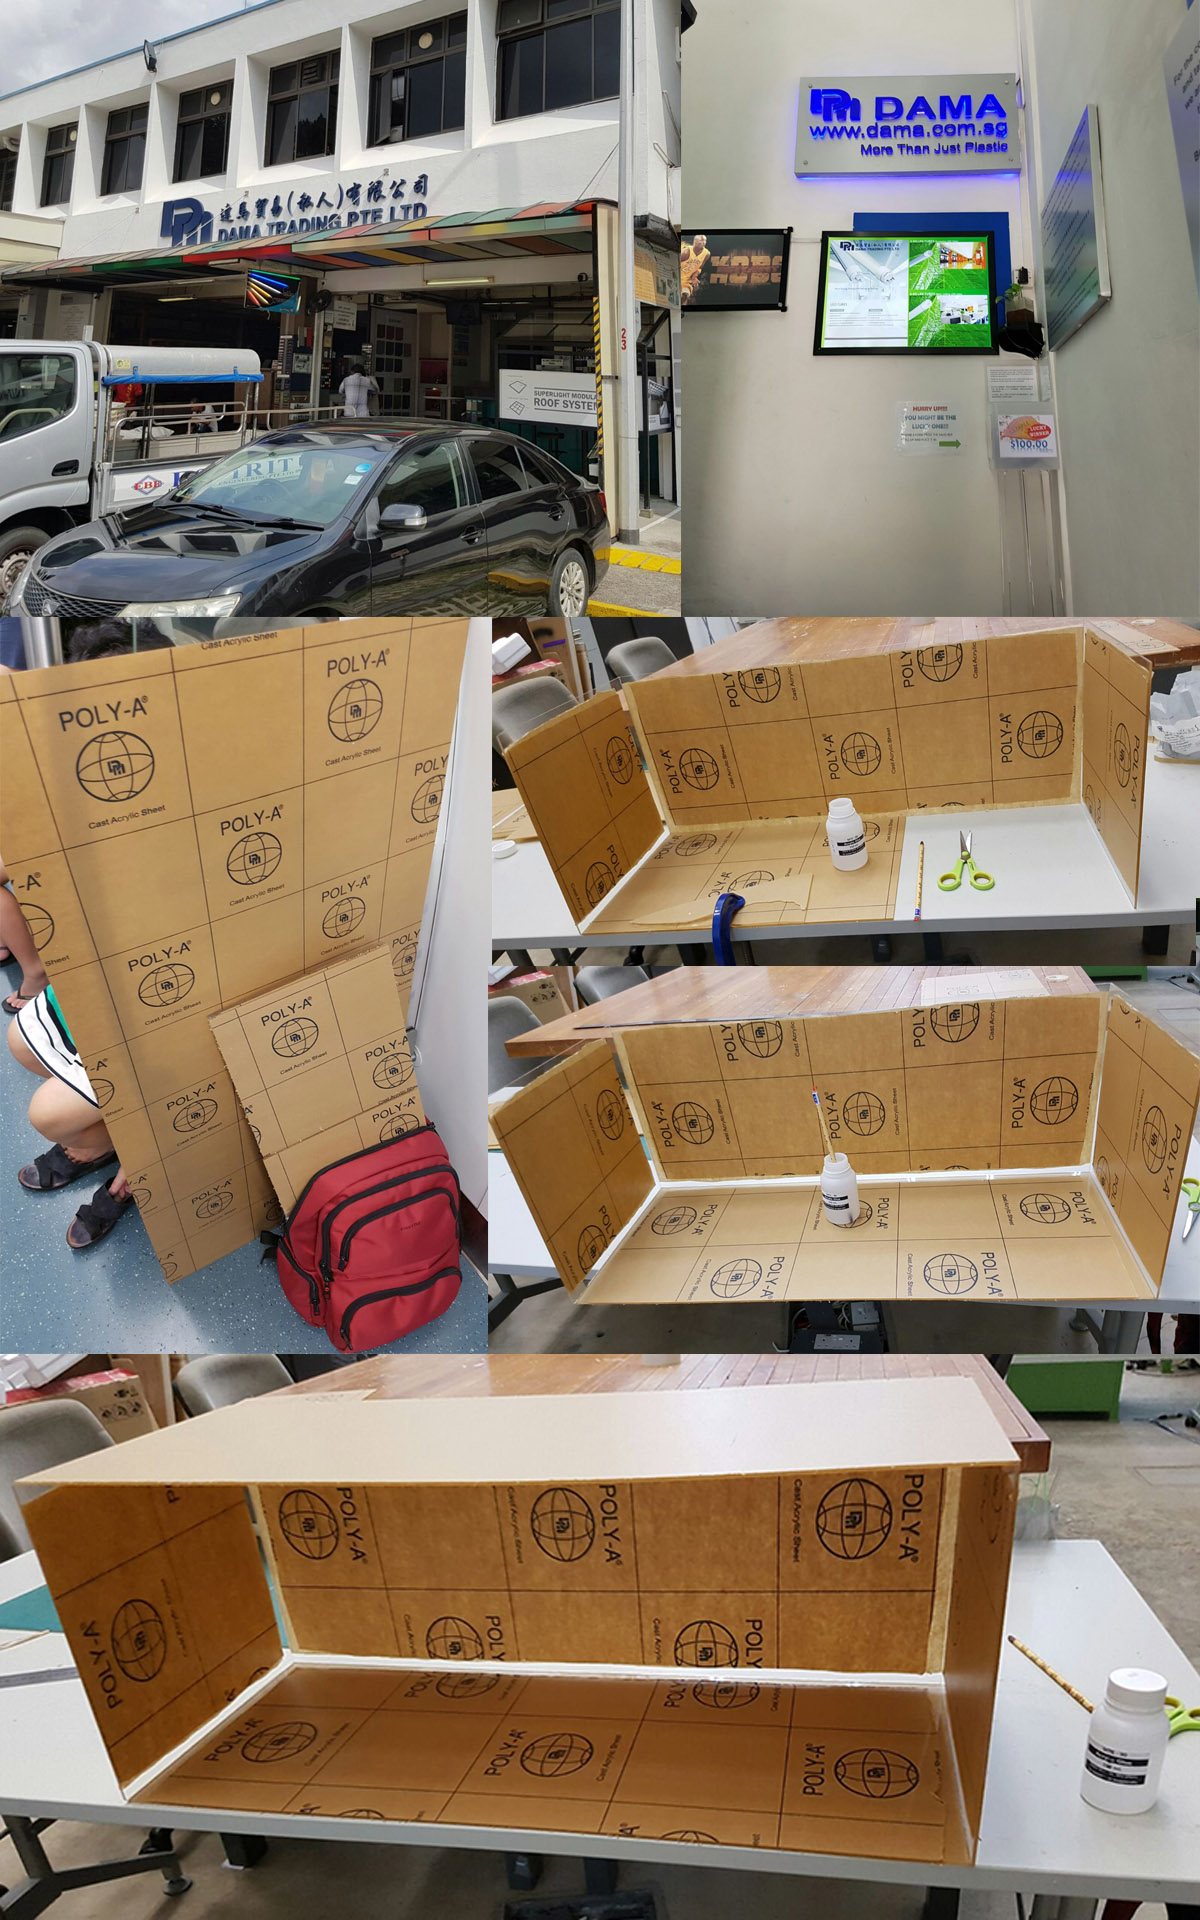
Purchased the materials and built box for the project using acrylic.
Purchased a mini webcam and tested it with Max, the viewing angle is
Tried to find caterpillar off the wild and also met two community gardener in different location who said there wasn’t any caterpillar seen recently.
Managed to get two chrysalis of butterfly from friend.
Managed to talk to a conservationist in Singapore and he agreed to give us some chrysalis of butterfly of different species for our project.
searched for particle system and tutorials for Max and had been trying to make them work.
We went to Dama in Ubi to purchase our acrylic to build the box for this project, the box have the length of 2.5ft by 1ft by 1( 76 x 30 x 30 cm ) and net will be attached to one side of the box for ventilation.
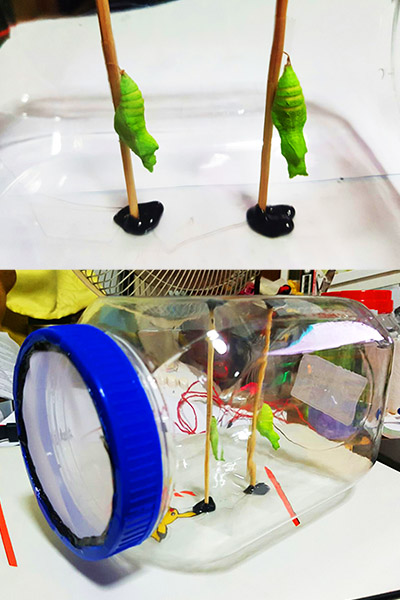
Helping the Chrysalis to shift the house from the insect container to a proper container for better documentation process and prepare for the timelapse during the emerging process.
The lid of the container was replaced with a net hotglued in place for proper ventilation for the Crysalis.
Also, I’ve joint a butterfly community in singapore and tried to ask for people to help me to get caterpillars of chrysalis of butterfly, and Mr Foo, a conservationist in Singapore agreed to give us some chrysalis for the project!
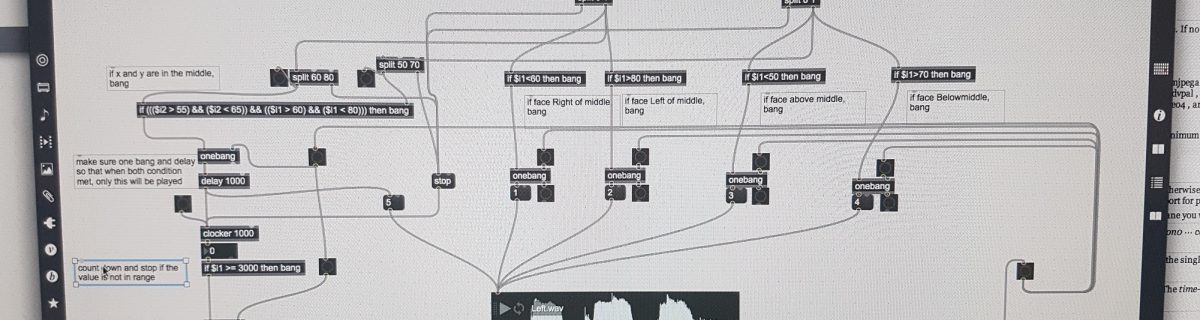
This was the hardest Max patch we wrote up till now as it is logic base and after LPD taught us about the function of different commands –
Clocker(used in the patch to count down the 3,2,1,)
Timer
Speedlim (use in this patch to prevent sound from looping endlessly)
Pipe
Select
Split (used in this patch to split zeros with all other number hence when there is no value = 0 = do nothing)
Route
Trigger
Gate (I tried to use this, but diden fully understand this so i used IF statement)
Onebang(my favourite) (make sure there is only one bang until it is reset)
Counter
Line
LoadBang
Loadmess
Scale
Expr (to put mathemathical expression (x1 + x2)/2 )
Pack and Pak
all of these are basic tools and if one can use them to their fullest by chaining up different object, alot of cool stuffs could be done in just these objects.
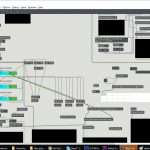
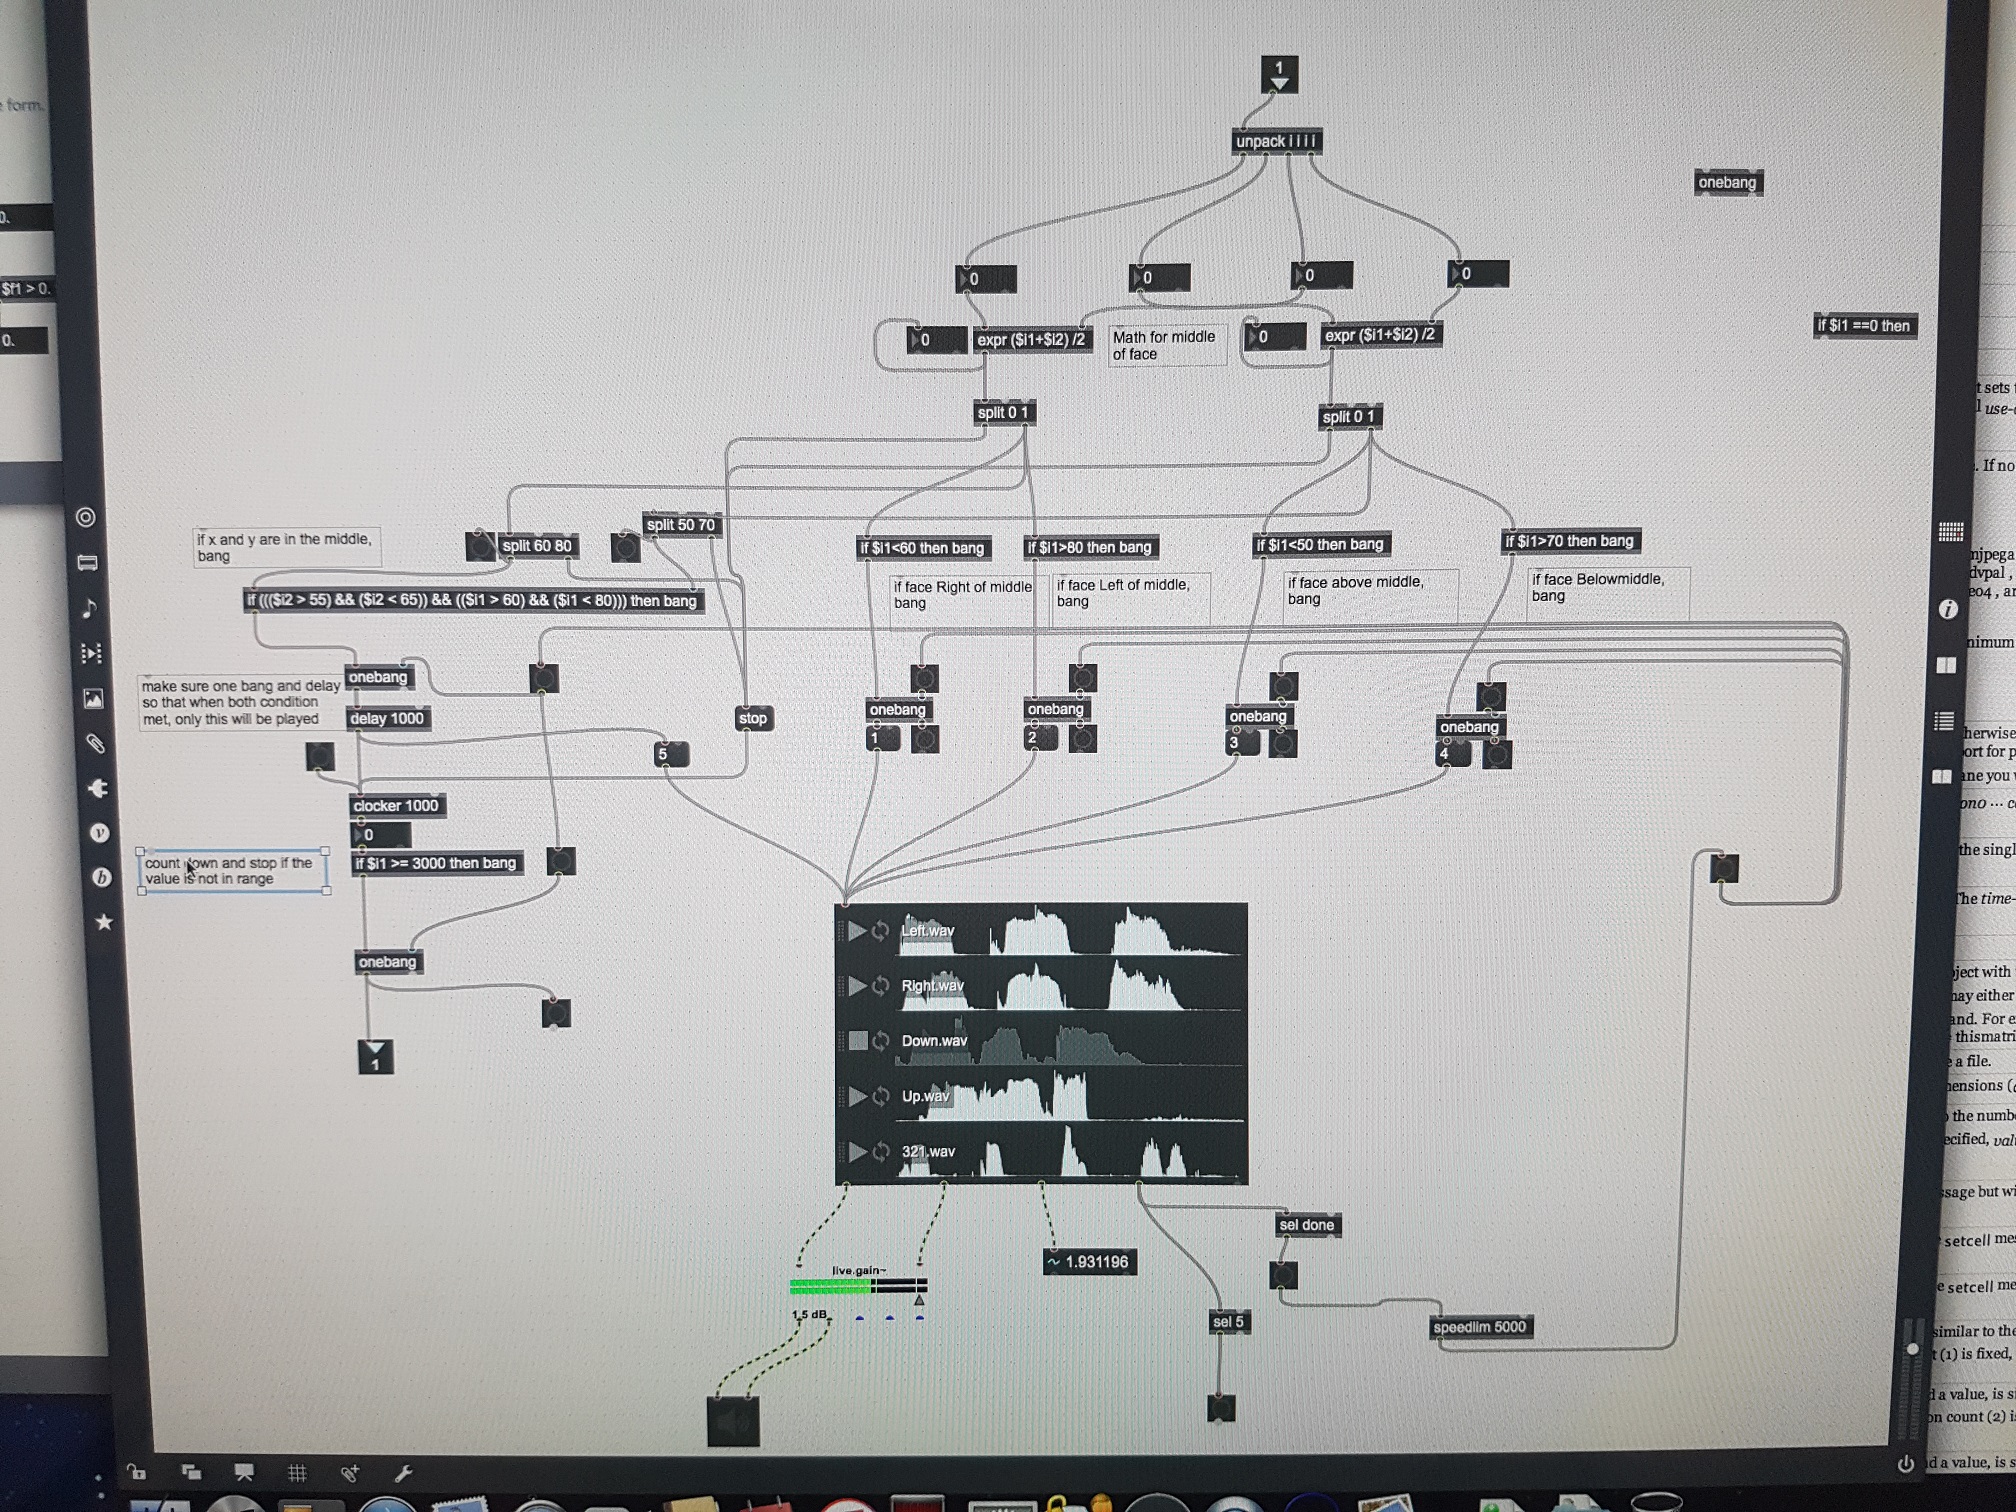
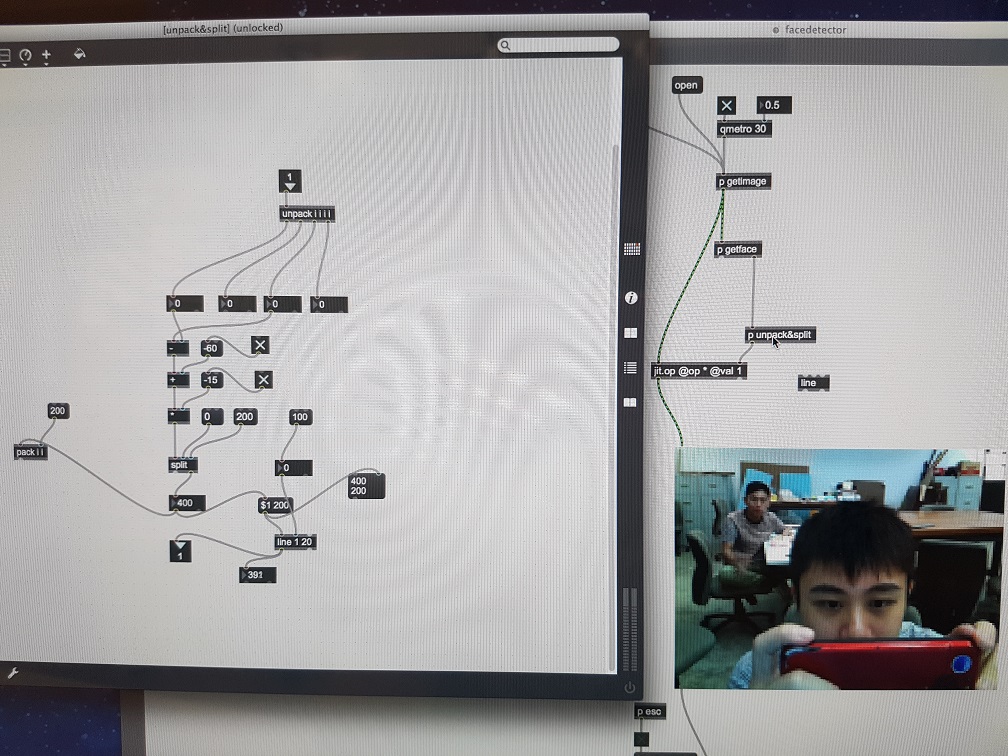
This is the main piece of patcher in my patch, the rest of the patch are very similar to the previous exercise, so in summary, the flow of this patcher
get the square value from face & unpack it
find the middle of the square in terms of X value and Y value
split into 5 zone
1) Middle Zone (MZ) (the zone where X and y value are around the center, for my patch it is 60 < X < 80 and 50 < Y < 70),
2) X higher than MZ
3) X Lower than MZ
4) Y Higher than MZ
5) Y Lower than MZ
For 2 to 5, send the number straight to the audio player
And for 1,send the number to audio player while if the value stays in the zone without X or Y going out of the zone for 3 seconds(using counter and if $i1 >= 3000), then take a photo, else stop the timer(and when the timer resumed, it will auto start from 0
lastly, I used a single playlist of audio player just because i dont want the patch to play more than one sound clip at any given moment, the only way for different soundclip to play is either
1) when one clip finish playing and the condition is still the same, it will playback the same soundclip after 2000ms or
2) when condition changed when a soundclip is playing, it will then stop the current playing soundclip and play another sound clip instantly.
I hope this is relative clear of the flow, through this exercise, I learnt mainly about logic flow, which i think is the most important in every kind of coding.
Featured image warning: “sorry I retard I laughed at myself LOLLLOLL”
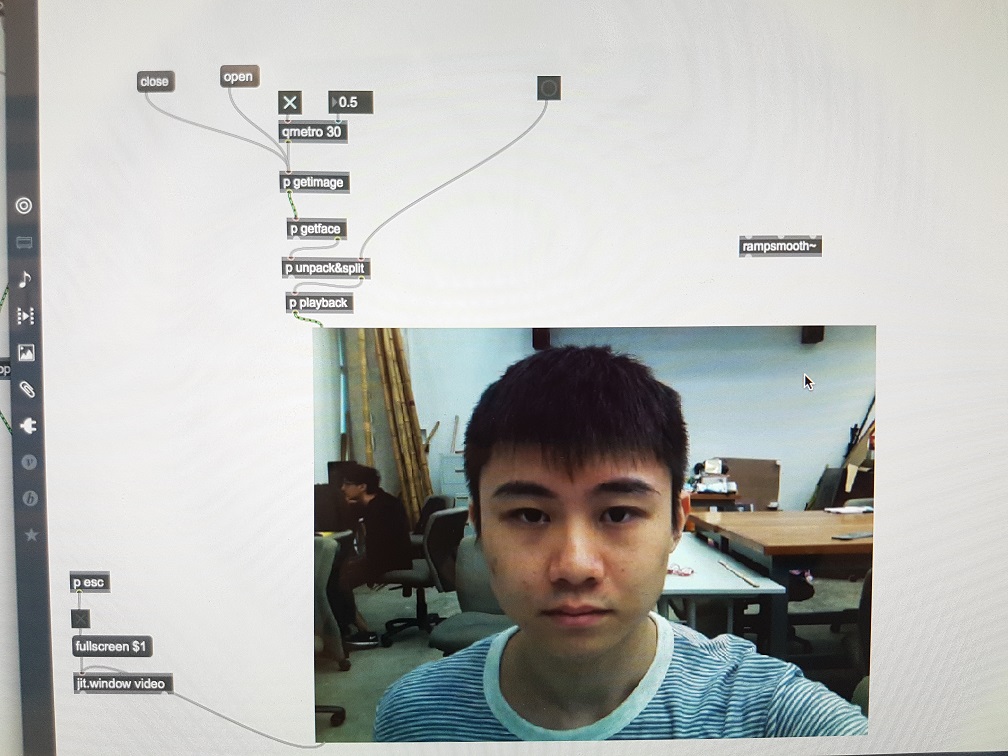
This Exercise was built on top of the previous one where we can use the majority of the exercise 1’s code and add on the playback of another video to it, playing the frame corresponding to the x position of the face detected.
I’ve also added the “if” statement which made the video to “look” at the middle when no face is detected and “line” it so that the face will turn gradually(only somewhat as i do not have enough framecount in my clip to make it really smooth)
in this exercise, I’ve learnt how to:
playback a certain part of video
use the “if”, “then” and “else” statement properly in max
This is the first exercise of max and we are all new to this program(we were kind of used to the script coding and this is really new! YAY TO NO MORE SCRIPT WRITING!! hopefully)
“your face is so ugly where the mirror got blackout if you are too near”
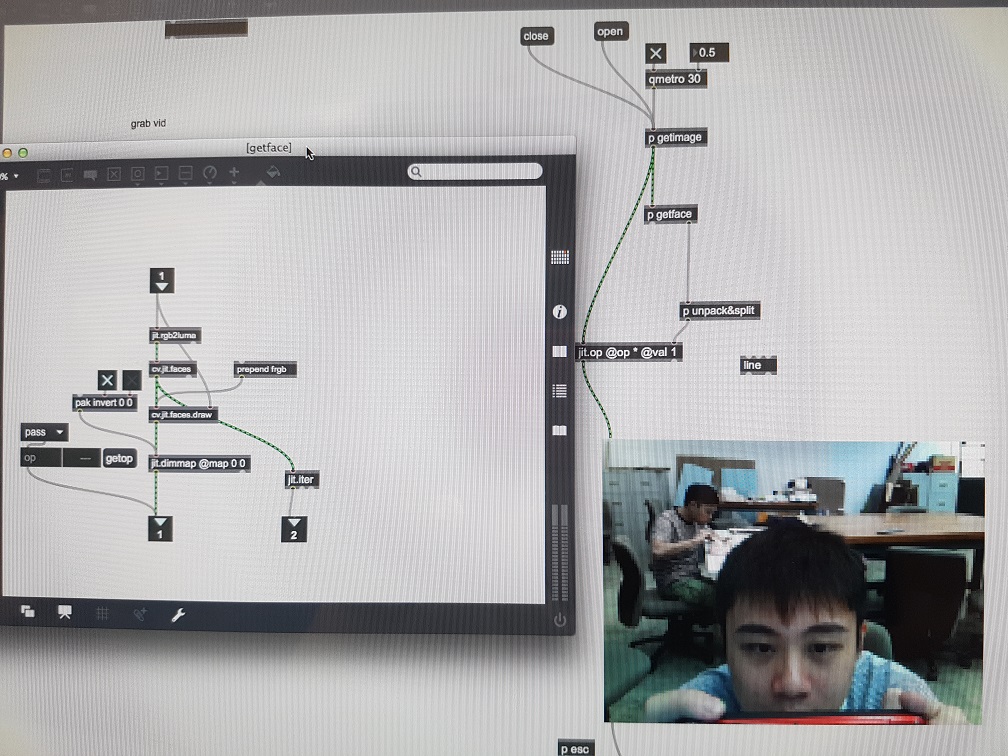
Principals behind this project:
1 – turn camera on
2 – detect face using the camera
3 – know how big(near) the face is in correlation to the image
4 – dim the image the bigger(nearer) the face is in correlation to the image
5 – when there are no face, set to normal value i.e. 1
6 – in the event of rapid transition between jumping numbers(face and no face) gradually dim or brighten the image.
I personally think max is relative easy to pick up but hard to master as it is a logic base(atleast i think it is for now) and the biggest problem of max is that 1- the documentation is hard to find comparing to other coding language. 2 – you have to know the syntax of the object before you can do anything and *read number 1 again*
there are a few difference between max and processing, i love that max is a multi thread processor which means it can do many different task at a single moment which is visually making sense (like things happening at the same time can be put side by side)
some really useful stuffs I’ve learnt in this exercise:
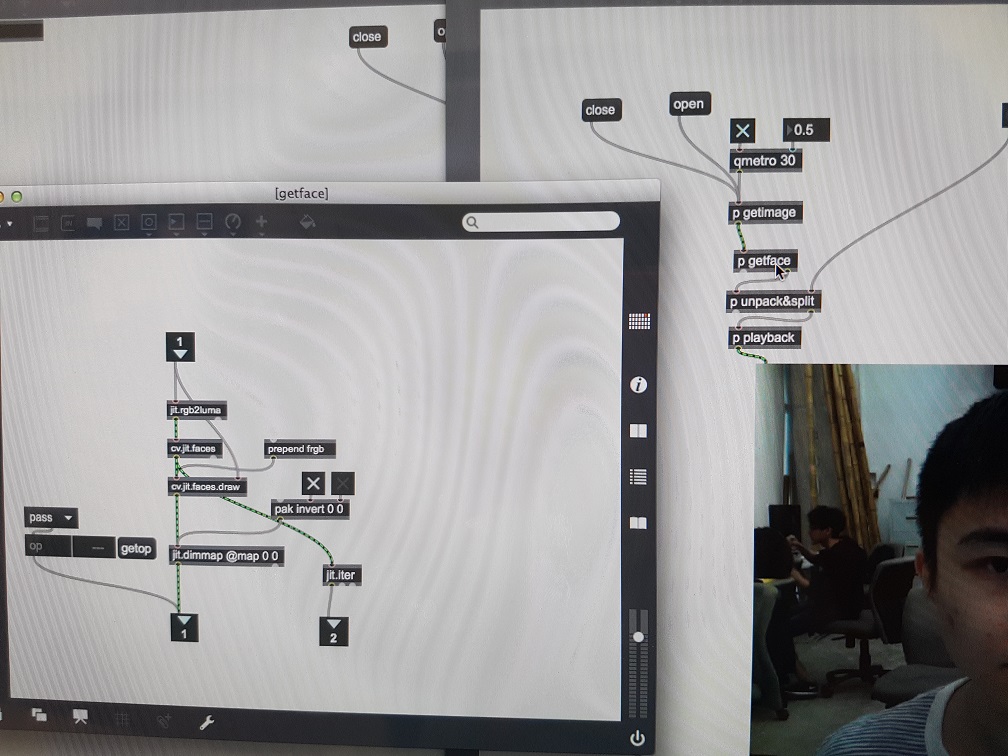
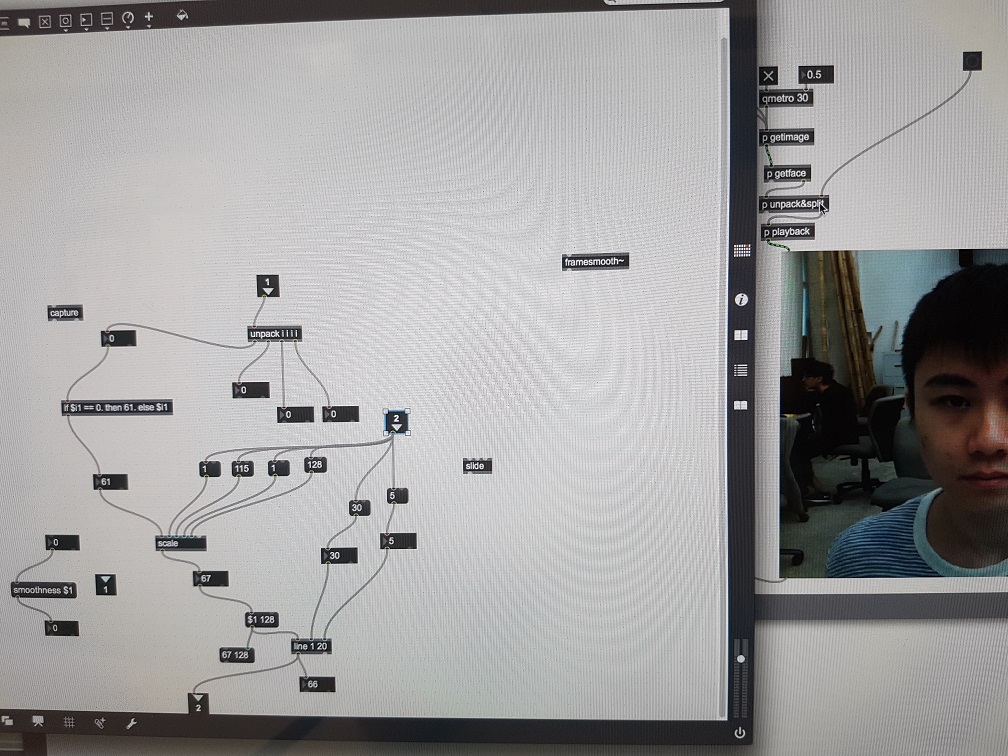
jit. – a useful library
cv.jit. – a library that need to download
unpack – take a package of many sets of number and split them into different number
Split – to be honest, i dont really know how this came about in my patch, i copied from somewhere and put it in which works(shall find out next time)
scale – to map the input and scale it to the range of output
line – to “smoothen” the transition of one number to anotherBelow is the system i used, the patch”p unpack&split” is math which i used to calculate where the face is and the best and smoothest transition between face.


