
Bleaching and Laser Cut
Week 10
What is the technique?
Fabric Bleaching
Fabric is one of the stages in the manufacture of textiles. All raw textile materials, when they are in natural form, are known as ‘greige’ material (pronounced grey-sh). This greige material will have its natural color, odor and impurities that are not suitable for clothing materials. Not only the natural impurities will remain on the greige material but also the add-ons that were made during its cultivation, growth and manufacture in the form of pesticides, fungicides, worm killers, sizes, lubricants, etc. The removal of these natural coloring matters and add-ons during the previous state of manufacturing is called scouring and bleaching.
Laser Cut
Laser cutting is a technology that uses a laser to cut materials, and is typically used for industrial manufacturing applications, but is also starting to be used by schools, small businesses, and hobbyists.. The focused laser beam is directed at the material, which then either melts, burns, vaporizes away, or is blown away by a jet of gas, leaving an edge with a high-quality surface finish.
What are the relevant materials needed for the technique?
Fabric Bleaching
- Plastic tablecloth
- Rubber gloves
- Safety goggles
- Chlorine bleach
- Detergent
- Spray bottle
Laser cut
- Wood (3mm Plywood)
- Acrylic
- Sandpaper
How to achieve the technique?
Fabric Bleaching
- Choose a day when the weather outside is above 65 degrees Fahrenheit and the sun is shining brightly. Place a plastic tablecloth on a flat surface in direct sunlight.
- Drench the fabric with water, then wring it out. Place the fabric on top of the tablecloth with the right side up. Stretch the fabric across the tablecloth until it is wrinkle-free.
- Put on a pair of rubber gloves and safety goggles. Pour bleach in a spray bottle, until it is one-quarter full. Fill the rest of the bottle with water, then shake it to thoroughly mix the bleach and water.
- Mist the fabric with the bleach mixture. Let the fabric dry in the shade for mild fading, or let the fabric dry in the sun for more fading. Check the fabric after an hour to see how much it has faded.
- Wash and dry the fabric immediately after it has faded to the color you like.
Laser Cut
- Obtain a laser cutter.
- Create an image that you wish to cut.
- Choose the material you are going to cut your image onto.
- Turn on the machine and wait for it to warm up before starting.
- Go to your computer and in your software program go to “File” and then “Print.” A Preferences menu should pop up allowing you to choose the cutting method. Most machines will have 2 cutting methods: “raster” and “vector.” “Raster” is used when you wish to engrave something, and “vector” is used when you want to cut out pieces.
- Set your laser cutter’s line width and cutting speed and then cut out your image.
- If necessary, sand away the burn marks.
What are the uses and applications of the technique?
Bleaching
- Clothes
- Textile
- Decorations
Laser Cut
- Piping materials
- Structural materials
- Book cover
- Badges
- Fence
![]()


![]()
Photo
Spraying the bleach

Leaving the bleach under the sun to take effect

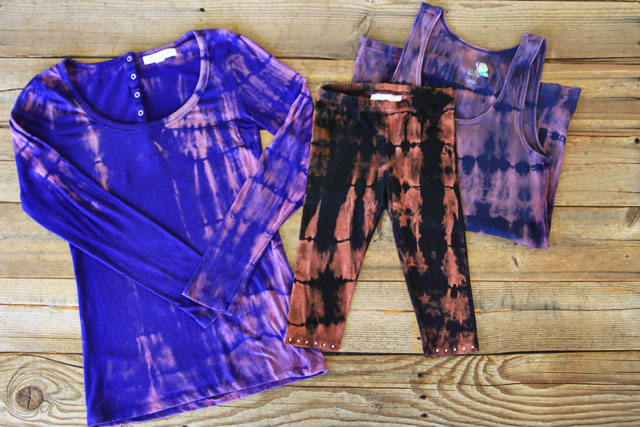
Final result from bleaching

My attempt to bleach

Another attempt

Laser cutting example

Laser cutting badge

Badges


Laser cutting labels for final


Reflection
I really love how bleaching develops such random results and like the tie dye effect. I am interested to explore the colours that I can add upon the bleached parts to see how it will contrast with the dark base material. For my final, I will be attempting to bleach a knitted cotton piece and splattering acrylic colours over it once it is dried to achieve this galaxy look. I am excited to see the results of this experiment.
I think laser cutting is a very useful technique to use as it can produce very accurate and professional looking results. I used this method for my Visual Communications final project to create badges and I am very happy with the results. For my final showcase in Surface Design, I decided to make labels from laser cut since it can be mass produced in accurate measurements.