Artist’s Statement: This series of 10 photos captures two individuals who are discontent with life and are trying to envision what could be through VR. As they try to visualize their self curated reality, they realize that they don’t actually know what they truly desire. They just want something else. || What compelled me to go with this theme is my love for anything tech related, thus when I found out NTU has VR sets I really wanted to incorporate it in somehow. Not to mention, prior to this class I didn’t know how to use Photoshop so I wanted to test my limits by adding in special effects into some photos.

Link to Before and Afters &  High Res photos: https://drive.google.com/drive/folders/1qtvq4hZ6jEkeCJPd0G2SQZcGQvXWgxVH

There was an error every time I tried to upload so I had to put everything on google drive.


Artist’s Statement: People from all walks of life want to change the reality they are in. This desire stems from the realization that they are not fulfilling the life they envisoned for themselves. This series of photos captures people visualizing a self-curated reality. These individuals will essentially escape the “now” through virtual reality.

Every shot hand held, in manual focus, using the Nikon D7500 with a 35mm lens. To get the desired shots that I wanted I would say something to my subject to capture the right emotions. For instance, in the first photo I said “think back to when you were a kid, what did you want to become?” and for the last I said “quick! imagine there’s quick sand under you”.  In terms of editing, I have never worked with special effects and lights before so I wanted to try something new. I took away a lot of things in the background that seemed out of place in the second picture (ex. blue dust pan) and also clone stamped green leaves to hide the brown ones. I really like the lesson we had on how to enhance shine of jewelry so I took my own approach on it and tried to colour dodge and paint the ‘shine’ directly on her necklace.

Major fixes:
– Removed my face from the VR screen glass by clone stamping and applying a gaussian blur.
– Necklace Shine
– Lights on eyes
– Hair Colour (paint brush and a few advanced blending options)
– Smoothed skin
– Made lips more visible
– Removed scratches and words on walls
Style and Inspo:
https://www.instagram.com/anojon/
https://www.instagram.com/bin.cloud/
https://www.instagram.com/monaris_/
FIRST PHOTO

F number: f/2.8

Shutter Speed: 1/320

– Masked area that she is sitting on to make it grey and blend in better, it was brown and patchy before.
SECOND PHOTO

F number: f/1.8

Shutter Speed: 1/640

 
THIRD PHOTO

F number: f/2.8

Shutter Speed: 1/320

By: YILMA REBECCA SEDEY [N1902209F]

Google Drive Link: https://drive.google.com/file/d/1BJGUbs8od3gP2r7QYKtXGlgZeS1dEQw1/view?usp=sharing

You may click here to see the before and after vid.

Artists statement: I am a Canadian expat currently residing in NTU Hall  of Residence 9. For the most part, I would say I’m not a morning person but one day I decided to wake up early to be more productive. To my surprise I found out that H9 had a rooftop deck, so I went up on it and had my breakfast overlooking the view captured in the images above. The thing that compelled me to take this image is because of my love for accent colours (especially orange and lime green). I liked how the building wasn’t too modern but had a modern aesthetic appeal through its paint accent. In terms of the mood/theme, my aim was to depict what Toronto  looks like during this time of year, because I sometimes miss the cold weather back home.

Technical decisions:

—> Camera Process: I signed out the Nikon D7500 with the original lens kit. Firstly, I took a series of shots from the rooftop, all handheld shots, varying from medium  shots to extreme long shots. I also racked the focus a bit to make sure the building was the main focus. After looking through the photos I selected this one because of the exposure and it was the least slanted one.

—> Digital Process

step 1 – Colour balance using the paint bucket and inverting colour

step 2 – New non-destructive layer, then extracted a colour in the sky and lightly painted on top, I added some pink tones to the clouds to give it more of a give it a feel that there is a sun somewhere behind all those clouds.

step 3 – Added a red and green gradient at 27% set at Luminosity to make the building stand out more

step 4 – Extracted colour from the tree leaves, increased saturation and painted over then with the paint brush tool then set it to Soft Light, opacity 37%

step 5 – I thought the picture was still too bright and didn’t resemble a cold Toronto morning so I used the Curves to make it darker.

step 6 – Using the Hues/Saturation I selected the orange parts of the image and made them look more “burnt” (commonly known as burnt orange)

step 7 – Lastly using command+alt +sift e I made a monochromatic noise layer over the whole image to add a grain/vintage effect.

AFTER

BEFORE

You may also watch these two videos to see before and afters:

Face_VId

Body_Vid

Google Drive Link: https://drive.google.com/file/d/17tKik34NfrDUhXQ6F7HQZjbyjfXPg6tM/view?usp=sharing


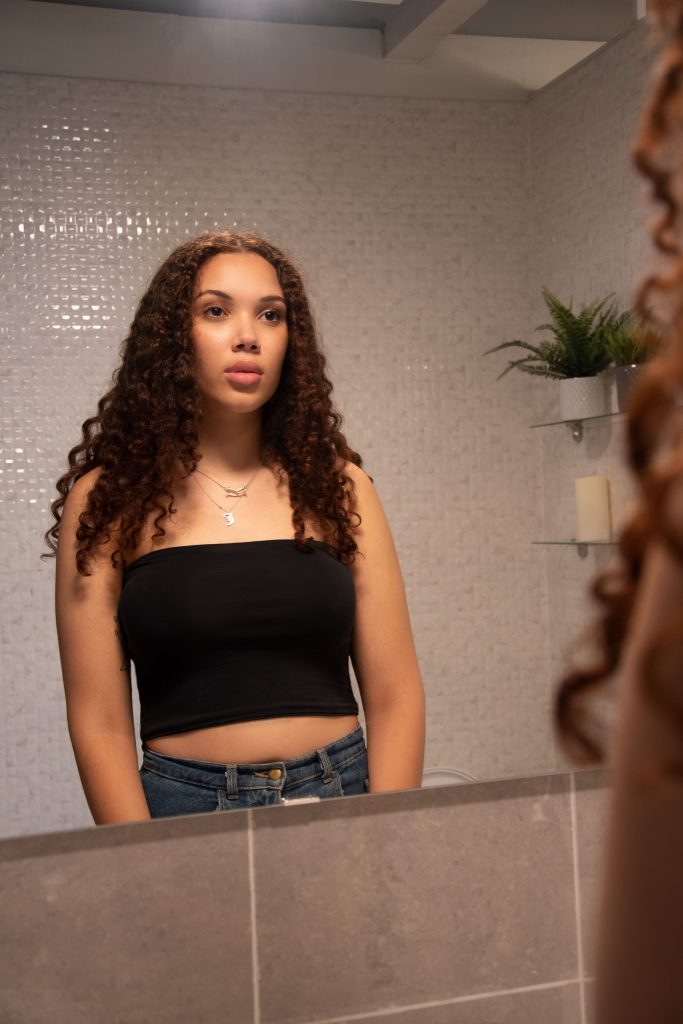
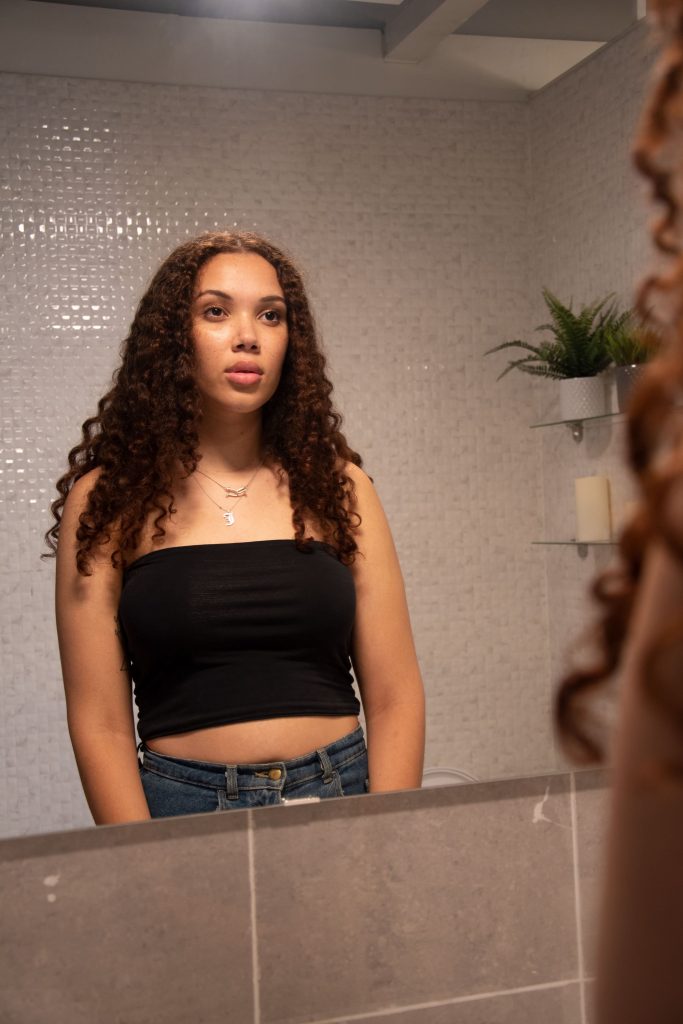
Artist Statement 

The individual photographed in the images above is Jessica Lewis, a UX/UI designer born and raised in the heart of Toronto, Canada. Jessica also happens to be my best friend and we both came to Singapore together wanting to experience something out of our comfort zones. What compelled me to take this image is so that I can capture and manifest a struggle in her life that she is currently facing. That being identity — as a 6th generation Canadian Jessica has no idea what her ethnic makeup is and this sometimes makes her feel like she doesn’t belong. Jessica looking at her reflection in the mirror is a symbolic representation identity and knowing who you are as a person. In terms of location, one of our favourite places to go to in Toronto is IKEA (we love home decor) so I took her there so she can feel in her element during the shoot.

Technical Decisions 

  • Camera : I used the Nikon D7500 with a 50mm lens. I stood behind her with the camera to portray the sense that we (the audience/viewer) are looking through the mirror with Jessica. I made sure to rack the focus on her face and blur out her arm and hair on the right side so that all the attention is not drawn there, but yet it is still noticeable.
  • Digital: First I used the healing brush tool to even out skin tone starting off with the nose and remove most but not all the blemishes on her face/neck/chest to give a natural air-brushed look. I also removed the mascara and eyelash shadows around her eye using the same method. Not to mention there was two white patches on the tile under the mirror that i faded out to make it more subtle. After this I used the dodging and burning to lighten up her dark circles under her eyes. I used the gaussian blur filter to smooth out areas such as her stomach and arms. Then over processed the blur on her forehead to contour it. In addition I made the shiny parts of her face more dull and removed wrinkles on her shirt. The clone stamp tool came in hand to straighten the folds in her shirt. I used “liquify” to make Jessica’s lazy eye on the left side match her right eye in size. Last but not least but not least, because the fabric in her shirt was stretched out I smoothed it out to even out the darkness and remove elastics.