Tag Archives: visual analysis

4D Project 2 – Process Update

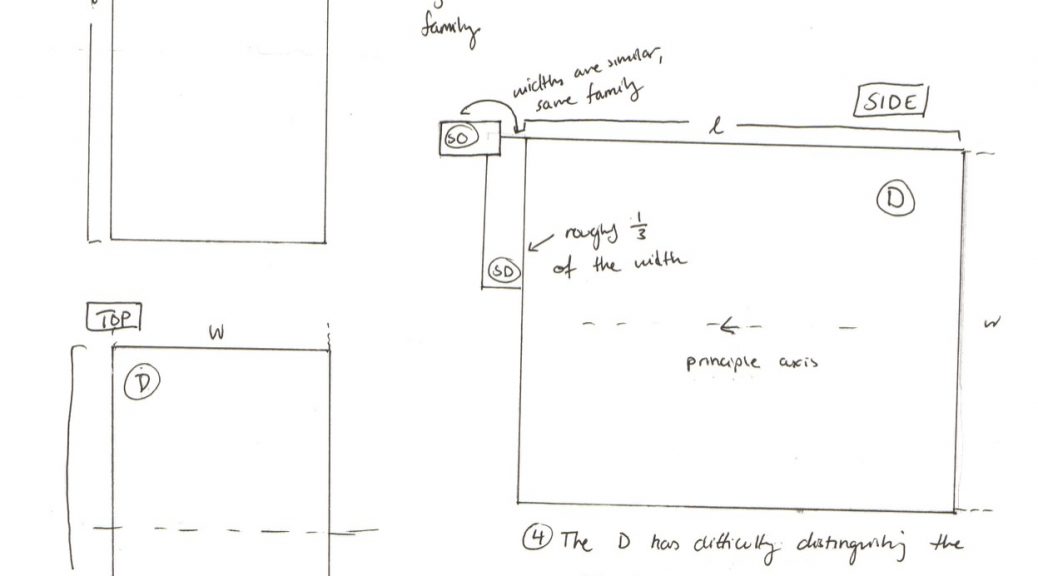
To pursue the notion of rot and moulding in food (as symbols), I decided to make my own food grow mould and rot. At first, I wanted to try moulding fruit (more specifically, an apple) by cutting into it a design so that the mould would grow through the skin, like so: screen-shot-2016-10-12-at-8-03-34-pm screen-shot-2016-10-12-at-8-03-38-pm

However, I read online later on that apples, out of all the fruit that mould, would form mould the slowest – this would not give me enough time to take good photos before the project’s 30+ images were due. So, I decided to throw away the apple and then use another food item that would mould quickly: bread.

screen-shot-2016-10-12-at-8-05-06-pm

The conditions for growing mould on bread are:

  1. Moisten the bread
  2. Let it catch the spores from the air (that will start moulding eventually)
  3. Put it inside a plastic bag so the spores do not cause illness (to me) and the mould can grow and be observed easily.
  4. Put it inside a dark area, as most mould doesn’t grow in sunlight.

Disappointingly, even though I had read online that mould would take 2-3 days to grow, by the 4th day I had seen no signs of any growth and I was about ready to give up and use online images of mould. But then, on the 5th day, the first sign of growth was spotted on the bread and I just carried on from there.


The problem still though, was that I didn’t want to just have a sequence of pictures of a singular slice of bread moulding; I wanted it to have a connection to my idea of food as human nature, as a memory.

So, Robert gave me the idea of showing the beginning, that is, right before one is about to consume the food, where the excitement and the energy is highest and where the thought of what happens to the food afterwards is far, far away from one’s mind. And then, showing the end. Which would be the bread as it becomes mouldier and mouldier. I decided there and then that I would pair up the photos – pictures of a meal about to be eaten with scans of the mould on the bread.

The older the picture, the more mouldy the bread would be.

Foundation 3D – Project 2: Curvilinear (3D Models + 2D Sketch Analysis)

This time round, the project we were assigned to didn’t require rectilinear shapes, but rather, curvilinear. In all honesty, I found making these shapes significantly harder as sanding and measuring had to be taken into account to form shapes such as cylinders, spheres, and cones.

Nevertheless, I came up with 3 models that demonstrated the use of previously-taught things such as dominant, sub-dominant, and subordinate pieces and then also tried to incorporate precarious, dependent, and independent balance. Below are the models that I have developed. Model 1 is the model that I will be focusing on to make into my final exhibit-quality model; the last two are part of the process I went through to understand curvilinear models better.

Model 1 – “Decapitation”

IMG_2940 IMG_2941

This model is what I plan to make for my final piece. I like the void that exists between all three pieces, as well as the dependent balance between the dominant and the subordinate piece. However, I think the presence between all three needs to be exaggerated (as in, the dominant needs to be bigger or the subordinate needs to be finer). The improvements are displayed below in the 2D sketch analysis:

model 1

Model 2 – “Overfed Traveller”

IMG_2945 IMG_2947

This model had no disparity between the dominant and the sub-dominant piece; especially from the photo on the left, one cannot tell which is the dominant piece. However, I felt this demonstrated precarious balance as I planned to make the model rest on the edge of the cone only, supporting both the subordinate and the dominant pieces. The improvements for this model are in the 2D sketch analysis featured below:

Model 3 – “New-Age Drumkit”

IMG_2943IMG_2944

This model uses dependant balance between the cylinder and the sphere (will be resting on both pieces) while the cone sticks out as the subordinate piece. However, there are a few improvements to be made to this model as outlined in the 2D sketch analysis:


Foundation 3D – Project 1 – Least Favourite Sketch Models & Visual Analysis

For my 3D sketch models, I created 3 that I felt could show the properties of dominant, subdominant, and subordinate pieces. However, not all of the were able to portray these properties in an interesting and engaging way and so I picked out one favourite amongst the 3 that I wanted to be my final model. The two least favourite are discussed below.

01. Sketch Model 1

IMG_2719IMG_2720IMG_2721

For this sketch model, I conducted a 2D analysis that highlighted areas of improvement. For example, the length of the subdominant and the dominant pieces are quite similar; they look as though they are from the same family.

In my 2D sketch analysis, I have added small notes and measurements of the model to comment on some of the improvements and the properties of the model with regards to the dominant, subdominant, and subordinate pieces.

Sketch Model 3

02. Sketch Model 2

IMG_2716 IMG_2715 IMG_2714

This sketch model makes use of voids and of levitating pieces to add aesthetic properties and to make the model more interesting overall. However, the placement of the subordinate (SO) did not make use of all the axis of x, y, and z, as from the back the SO was not visible. Additionally, the widths of the SO and SD are similar and look as though they’re from the same family. To improve this model, I would shorten the width of the SO to be 2/3rds of the SD  and also possibly move up the SD to sit on the 1/3rd line of the dominant piece.

Sketch Model 2

These two models were the models that I decided were not ‘exhibition-worthy’ enough, per se, and so I decided to just show how they could be further improved.