Product Design IV // Week 3

Initial Brainstorm
Fiona x Shanelle

Slowing down the pace of life in NTU.
In a fast-paced society like Singapore, the
stress level of University students can be very high. We noticed that the walking pace around NTU is as fast as it can go, there is no space/chance for students to relax.
Our aim is to create a calming experience for students in NTU.

CONCEPT:
Adapting the movement of humans in the surrounding and translating that into a playful interaction. With a sculpture that mimics the movement of one’s footsteps, one would slow down their pace to interact with it.

INSPIRATION:
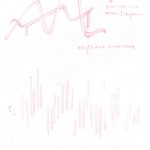
Pacing translates into
rhythm or rhythmic patterns. Rhythms comes in many different forms. Sound, lighting, kinetic movement. Rhythms can also be repetitive in different frequency.

Our idea is to use sensors to detect one’s walking pace, that will then be translated into rhythmic patterns and extracted visually or auditorily onto the sculpture.

LINK:

FEEDBACK & QUESTIONS:
Too idealistic.
Is there any existing installation that works the same way? There is a certain level of difficulty when it comes to integrating technology in a sculpture. What will happen when there are too many students on the path? How will the result of the interaction overlap? Are you certain that this will work? Research more into the practicality and feasibility of this concept.

The NTU cycle.
How many times have you encountered the same event in NTU? Take for example the number of times you see bus 179 or the campus rider loops around NTU. There are many cycles and repetition happening around us in NTU. Cycles are so common that we take them for granted as much as we do the air we breathe. Our aim is to produce an abstract art piece based on the theme “the NTU cycle”.

CONCEPT:
Create an abstract representation of cyclic recurrence in a sculpture. One should be able to interact it with over and over again/the sculpture should reflect the idea of cyclic recurrence.

INSPIRATION:
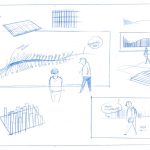
A cycle can be represented by a never-ending loop/phenomenon. The cycle of NTU could be thought of as students entering and leaving school day by day, over and over again. 
Based on that as a starting point, we want to depict and repeat that “in and out” movement in a sculpture.

Using a proximity sensor, the sculpture will detect one’s distance from the sculpture. When one is close to it, the colored fluid/sand (could be anything) would be attracted to you. Much like how a magnet attracts magnetized metal dust.  

FEEDBACK & QUESTION:
Too idealistic, too much technology involved. Do more feasibility research. A cycle is not a specific phenomenon to NTU’s student. It happens everywhere, to everyone. Find the data that is significant only to NTU. The theme “cycle” itself is too broad as it is relevant to everyone.

Enhance human-nature interaction in NTU.
There are many trees in NTU yet interaction between us and nature is minimal. Our aim is to build on to the value of existing physical features of nature in NTU.

CONCEPT:
Create an idea of human’s presence in nature. With the thought that a person was once present in a particular spot, it invites one to interact as the familiarity would make one feel emotionally secure.

INSPIRATION:
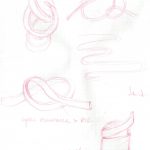
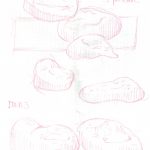
Wrinkles are a symbol of presence. When a three-dimensional figure gets crushed after being used, naturally it gets wrinkled. Plastic bag, tissue papers, can drinks, clothes. When a three-dimensional figure gets dented as it supports the weight of a person, naturally it gets wrinkled. Beanbags, pillows, blankets, couch.
So our idea for the sculpture is to recreate wrinkles in natural objects (such as stones) to facilitate interaction between us and nature.

FEEDBACK & QUESTION:
Somewhat interesting topic. Other factors as to why people do not go to nature is because of insects or the weather. Be practical. Instead of bringing us to nature, look into bringing nature to us. There are many ways to increase the interaction between us and nature. Think more, look deeper, question yourself, research more.

Sketches

Product Design IV // Week 2

Initial Brainstorm
Fiona x Shanelle

Analysis of Day by Day DataGeorge Perec

Some of the points we got from the essay

How we only noticed something that stands out or is unknown to us, disregarding things that are known. How can we start unknowing the knowns and start questioning each of them?

How do we bring attention to things that we overlooked in our daily lives?

Design opportunities are always presented everywhere. Yet, as humans, problems are only important when it is identified as a lingering issue to the majority while we swept the rest under a carpet.

Infrastructure and urban space around us were created with an intent behind them. They mold our behaviors in spaces and reflects a particular culture to visitors that are new to the city.

  • How can we instill the culture of NTU into our infrastructure such that individuals new to our school can relate to them as well? – Inclusiveness
  • What’s the intention behind our design? What’s the experience and behavior we would like to mold?

Inspiration

We asked ourselves “What is something that we may not see, but is crucial to our survival?”
From there one of the things we thought of is the process of pollination, a task that is vital to the survival of agriculture. ¾ of our staple crops and ⅓ of all food in the world requires pollination, yet it is a process that people often overlooked. Using the idea of pollination as a foundation, we started to think about the intention behind our sculpture.

How it works

Like the ecosystem of pollination, our idea aims to promote exchange and reuse of plastics such as plastic bottles/plastic bags between every being in school as we noticed several disposed wastes around the school compound (Plastic bags floating in the lake, empty bottles by the drain).

The overarching intention behind our idea, is simply to better utilise our daily resources and maximize each of its lifetime. One could recycle their plastic bags, or even get a plastic bag off the sculpture when in need. This form of engagement contributes to the entire artwork of the sculpture as well, giving each individual a part to play.

Making of Mock-up

Feedback

  1. There’s a certain difficulty when it comes to balancing aesthetics and recycling. Because there’s this danger presented in such idea, it may backfire, ending up being trashed with waste, looking like a trash bin even though it wasn’t meant to be.
  2. What’s the motivation for people to want to leave their bottles/plastic bags?
  3. Suggest looking at how waste is treated in NTU currently. They do have existing regulations that forbid plastic bottles in school.
  4. The idea doesn’t necessarily have to be a solution, it could be something that brings attention to the public to start a conversation.
  5. Perhaps looking up on how much waste NTU have accumulated and treat the waste and make it into something?
  6. Risk on factors such as of health & environment.

Week 11./ Thermoplastics

“A thermoplastic fiber has the property of softening or fusing when heated and of hardering again when cooled. With the application of heat and pressure, it can be molded and remolded.”

Process photos


Challenges, learning points and application

Thermoplastic, although time consuming, is another interesting technique that produce a very beautiful result. With the application of heat and pressure, it can be moulded and remoulded. This can be both an advantage and a disadvantage. lt is advantageous because in fabrics made of thermoplastic fibers, certain features like pleats can be made permanent through heat-setting. However, because of their sensitivity to heat plenty of care must be taken in drying und ironing fabrics made of thermoplastic fibers.

Week 9./ Fiber etching and Bleaching

Fiber etching
Removing fibers from fabric

“Devore is the removal of fibers from the surface of a fabric using a chemical called sodium bisulfate. This chemical eats away the cellulose fibers in that fabric, leaving the synthetic and protein fibers untouched”

Fiber etch

Material needed:
– Blended fabric
– Dust Mask
– Fiber etch
– Brushes or Silkscreen printing set
– Iron

Steps:
– Secure fabric to workspace
– Apply Fiber etch to fabric using silkscreen or brush
– Allow fiber etch to dry thoroughly
– When dried, sandwich the fabric between 2 baking paper before Ironing ( Fiber Etch can stick to the iron and ruin the iron surface)

Sample

Process photos

Challenges, learning points and application

I feel that Fiber etching is the more difficult to control technique out of all, most of my fiber etching sample end result either have holes because I put in too much fiber etch at some part or some parts the fiber doesn’t even come off. I guess Fiber etching is not a technique that I’ll explore further as I have the least interest in it.

Bleaching
Removing colors from fabric

Process photos


Week 8./ Thermochromic ink transfer

Thermochromic ink transfer
Thermochromic ink can change from colourless to colourful or colourful to colourless very quickly with temperature

” Thermochromic inks or dyes are temperature sensitive compounds, developed in the 1970s, that temporarily change color with exposure to heat. They come in two forms, liquid crystals and leuco dyes.”

Material needed:
Thermochromic Pigment Powder
– Container
– Paintbrush
– Acrylic Paint
Acrylic transparent gloss medium
– Fabric (Light coloured)
– Silkscreen set

Steps:
– Mix equal amount of acrylic transparent gloss medium and thermochromic pigment powder in a container
– Apply the mixture onto the fabric with silkscreen or brush
– Wait for the paint to naturally dry
– Apply heat on fabric to see results

Process photos

Challenges, learning points and application

I find thermochromic ink transfer one of the most cool and fascinating technique. It is also one of the simpler techniques. If there were one thing difficult, that would be applying the paint evenly with the silkscreen set. Overall, thermochromatic ink transfer can produce captivating results and I am glad that I am able to try it out in class!

Week 7./ Knitting and Crochet

Knitting
Manipulating yarn to create a textile or fabric

“Knitting creates multiple loops of yarn, called stitches, in a line or tube. Knitting has multiple active stitches on the needle at one time. Knitted fabric consists of a number of consecutive rows of interlocking loops. As each row progresses, a newly created loop is pulled through one or more loops from the prior row, placed on the gaining needle, and the loops from the prior row are then pulled off the other needle.”

The first tutorial video I watched to learn how to knit! 

Process photos

Thinner yarn

Crocheting Metal

Challenges, learning points and application

One learning point from knitting and crocheting is patience. I feel that knitting and crocheting is quite a therapeutic activities. I would definitely do them during my free time and make pretty things to keep! One interesting thing that I want to master at is crocheting metal. Hopefully, with more practices in the future, the result will look nicer!

Week 6. /Smocking and Shirring

Smocking
Securing finely pleated or folded fabric with a decorative stitch

“Smocking was prominent in the 18th and 19th centuries because of its ability to stretch. Prior to the advent of elastic, this was the only way to secure large amounts of fabric while still allowing for movement for the body.”

Direct Smocking

Material needed:
– Smocking pattern paper
– Fabric
– Needles
– Scissors
– Thread

Steps:
– Select a grid pattern
– Mark the dotted pattern on the back side of the fabric (Try not to use permanent ink pen)
– Following the stitching path shown in the pattern, draw the needle and thread through.
– Stitch the points together and secure them with a small stitch.
– Cut the thread and continue until the pattern is complete

Reference: http://kaliwan.tistory.com/entry/How-to-do-Canadian-Smocking 

Process photos

Challenges, learning points and application

 In modern days, smocking has become a decorative statement rather than a functional one. Indeed, I also find smocking a technique which produces very stunningly beautiful result if you do it well. One challenge for me is to sew at the right spot, as I sew more and more and the fabric becomes more crumpled, it is quite difficult for me to determine where to sew and often I end up with a messy pattern. I guess with more practices, I should become more meticulous and precise in sewing in order not to end up with disastrous work.

Final outcome


Shirring
Creating fabric that is contracted into a smaller size when gathered along multiple rows of stitching 

“Shirring was first developed to gather large pieces of fabric to fit snuggly against the body. It is especially useful around necklines and cuffs because it stretched over the body and then fits snuggly against it with sliding or pulling.” 

Basic/Elastic Shirring

Materials needed:
– Fabric 
– Elastic Thread
– Sewing Machine
– Elastic Bands

Steps:
– Determine how long you want the final piece to be and add seam allowances to all edges if possible.
– Plan a pattern of lines (or you can skip this step)
– Stitch along the lines with the sewing machine and elastic thread, straight stitches or zigzag stitch
– When done, hold the threads on one end of the fabric, using the other hand, draw the fabric towards the secure threads.
(For elastic shirring, insert the elastic band between 2 pieces of fabric before stitching)

Process photos


Challenges, learning points and application

Shirring is one of the easiest and least time-consuming technique so far. Just like smocking, shirring also produces beautiful results. If there has to be one thing hard about this technique, I would say that is to determine the amount of fabric needed in the first place such that when the fabric is shirred, it does not become too small in size.

Final outcome

Trends in products; Trip to Harvey

Trends In Products

Minimal

I would say one of the difficult things for a designer is to make a product look coherent, even the details like buttons should echo with the overall form. (One of the difficulties I face when designing the toy for the major project is also blending the crank into the overall form.)

Some of the more attractive product designs I saw:
From a hair dryer to electric fan, all of them have a very simple and minimal form. Nowadays, people wants to see as much functions in a minimal structure as possible. Minimalism is the ultimate sophistication. Minimalism is beauty.

Less edges, more curves

To add on, many of the products also have an organic form with more curvatures and less edgy sides. Their clean and smooth surface attracts customers to touch it.

Read more about Minimalism in Design here

Old is new.

The idea of creating new products with a style similar to a style from the past is quite an irony and it apparently has become an in-thing right now. The use of softer pastel colors captures the attention of customers, and by using nostalgia appeals to them through emotions and sentimentality. In a sense, these products focus more on the emotional factors.

Read more about Nostalgia in Design here


Acting for film: Character Development (2)

Backstory: A singer, Shannon, found out from the doctor that she is slowly losing her sense of hearing. However, she has a very important performance coming up soon. That performance marks her debut as a singer. She waited very long for it and wants to do it very badly and so she tries to hide her condition from others. The scenario starts in the studio where Shannon is practicing for the performance as usual and her vocal coach, Dave, slowly starts to notice something unusual about her voice and tune.

Props: Mic for Shannon, Laptop to play background music, Printed Lyrics

Outfit: Smart casual

Shannon: Positive, independent, high self-esteem, perfectionist. 

Dave: Harsh on the outside, soft on the inside. 

The script: Script for DF2010