Project 2: The Subverted Object

Component 1: Denotation

Since Denotation means the literal meaning of things, I decided to focus on mostly the characteristics of the measuring tape and also the function of the tape.
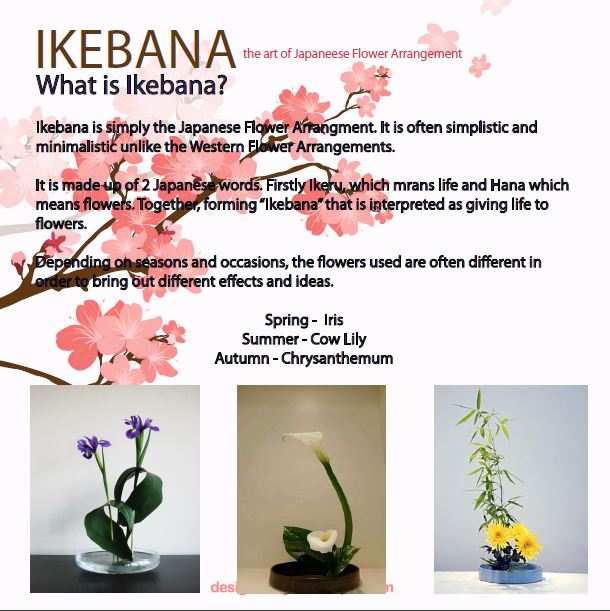
Image 1

Showcasing the flexibility and texture of the object

There are 2 kinds of measuring tapes, one is a Mathematical tool and the other is usually meant for the measurement of the body. I wanted to showcase the difference between the 2 types of tape and capture the unique property of this measuring tape, its flexibility, compared to the more rigid tape measure that is often used as a Mathematical tool.

Furthermore, the texture of the measuring tape can also be seen here with a slight reflective feature at the 42 to 43 and 12 area suggesting that the tape is smooth.


Image 2

Showcasing the numbers and order of the object

Numbers are a key feature of a measuring tape regardless of inches or centimeters. A reason why I choose to focus on inches for this image instead of centimeters due to the fact that such flexible tape measures are generally used for the body measurements.

Why didn’t I want to focus solely on one number?

I felt that the order of the numbers from small to large is also a key characteristic of a measuring tape and this feature should also be included.


Image 3

Showcasing the function of the object

This picture depicts the general function and association of a measuring tape. As these tapes generally measure the body, I have placed it on my waist, which is one of the areas I am more concerned with in terms of my body image.


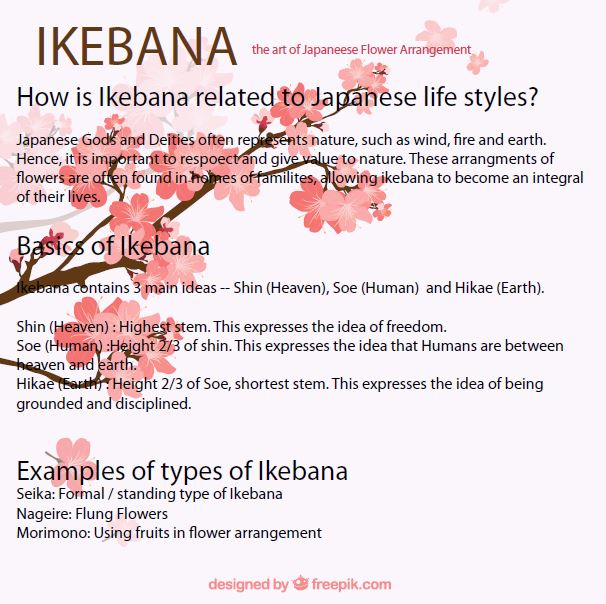
Component 2: Connotaion

By subverting the object, it allowed me to add new layers and meanings to the object.

Image 4

Blindfold – Criticizing the social standards in body imaging

For this image, I wanted to subvert the measuring tape into a Blindfold. The numbers 33 inches and 13 inches are placed on my eye itself. This is because 33 inches is often seen as the perfect bust size and 26 inches the perfect waist size. In this case, 13 inches was used instead of 26 inches as 13 inches is a more common representation of 26 inches especially on clothing.

Why the inclusion of my hand?

I wanted to include my hand to showcase that I blind myself to these standards. There is also a certain degree of tightness and tension, as seen from the fats on my under eyelids, because I wanted to suggest that like even though my body is not at the “perfect sizes” I still try to forcefully bind myself to them.

Comments and Improvements:

Unfortunately, the this photograph was not well executed. It provided a very minimalist feel and did not truly seem to represent a blindfold.

A possible idea to improve would be to totally cover my head with several measuring tapes, and tie a knot at the back of my head. The shooting from the back of my head, making it seem more mysterious and similar to the idea of a blindfold.

There could still be the focus on the numbers on each side of the head through techniques such as blurring out the other irrelevant numbers. Furthermore, the repeat and focus of the specific numbers (33 inches, 13 inches) could be more defined and obvious using several measuring tapes.


Image 5

Ballet Ribbons – Criticizing the mandatory body images required for performers

I have been dancing since I was in Kindergarten and it is an activity that I truly like and enjoy. However, as performers, we often don’t have a choice but to have a certain specific type of body, shape and size in order for us to perform.

Although I was doing something that I truly liked, the constant contact with these ribbons every lesson forces me to remember that my abilities and talent are not the only ones I’m measured against.


Image 6

Handcuff – Criticizing on other aspects of how numbers define us

On the Right hand, it generally focuses on inches, which is a common unit of measure for our body. While the left hand generally focuses on centimeters, that is used in this case to represent our IQ level, with numbers ranging from 114 to 148 .

The general public usually has an average IQ of 85 to 110. However, the numbers shown are all above the average IQ level, suggesting how we bind ourselves to standards above average and sometimes forcing ourselves to work beyond our capabilities so that we can excel and impress.

Comments and Improvements:

Unfortunately, the this photograph was not well executed. It failed to give the representation of a handcuff.

Perhaps a solution would be to wrap several of the measuring tapes onto a toy handcuff in order to attain a defined shape of a handcuff. Furthermore, the image can also be taken from the back with my "hands behind my back" to give the feeling of being arrested if the social norms and higher standards are not kept up to.

Each ring of the handcuff should also be coated with specific number ranges to further highlight and re-emphasize the significance of the numbers.


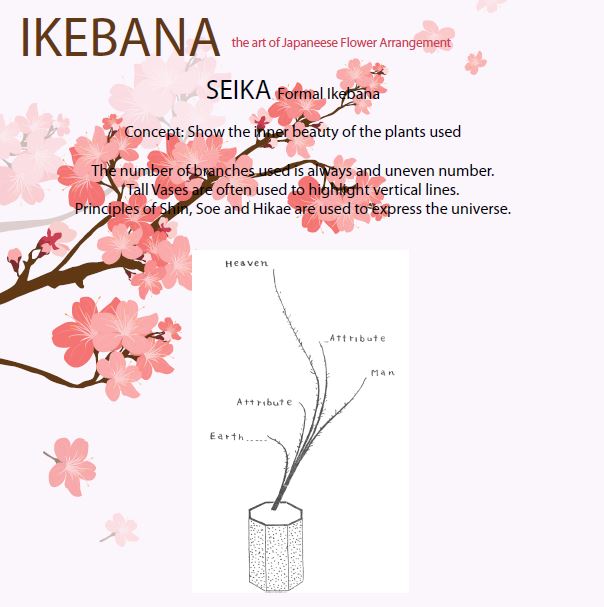
Component 3: Text and Image

This image is taken from component 1, picture 2.


Image 7

Analysis

Numbers to letters As mentioned in component 1, the order of the numbers are a key feature of measuring tape.

–          Despite being used to measure the size of the body, the measuring tape is often only related to numbers and not the letters that also indicate the size of our bodies.

–          Hence, I changed the numbers to letters as they still represented the same thing.

Why does the letters decrease in size gradually? So usually XXS represents “extreme extreme small”

If its suppose to be small why such a big text size? (vice versa for XXL)

–          Generally, the bigger text often means something of more attention and importance. Hence, in society, XXS has become something of much importance to us as it becomes something that we desire and want, the smaller the better especially for sizes of clothes. This suggest that slim bodies that are “desirable”.

–          Whereas for XXL, since it is the least “desirable”, it has the smallest text size suggesting the insignificance in society.

–          Hence, the gradually decreasing size of the text in despite the increasing body size.

“Size doesn’t matter, they are only letters” Relays

Used to expand on or explain the significance of the image.

Font of “Size” For “Size”, I literally used different sizes and fonts to create this effect of different body sizes. Eg. I even though its usually v skinny, I used a small and bold text font to showcase short and stout.

I felt that it gave more effect on how size is in real life, especially if you imagine each letter as a single person, instead of just the size of our bodies dictated by S,M,L.

Font of letters For Letters, the different fonts and sizes suggests that we are all of different sizes just like how each character in the word “letters”.

If only society was as simple as these letters with different fonts and sizes, accepting of each other to form a bigger meaning and picture.


Comments and Improvements:
  • The decreasing sizes of the fronts are not obvious enough. Hence, does not really showcase the effect of importance or hierarchy within a society.
  • Certain contradiction, even though the poster says "Size doesn't matter, they are just letters", the decreasing font size of the sizes had an importance in showing the attention given to each different body size in society.
  • Perhaps it would be better if I played with the unrolled areas of the measuring tape
  • Or include other sizes such as 5XL and not just the mediocre sizes. There is no need to list all the sizes out as well.
  • Not very good and still can be further improved.


Personal Reflection

Compared to project 1, this project was definitely more in depth and I felt that I had a certain degree of growth as compared to before. Although it may still be a little tough for me to grasp the concept fully, it was definitely a brain wracking project as I had to think of several ideas and ways of executing the plan out. Most of the time, the images in my head did not match what I wanted to portray or the potential image that I imaged. Even so, I think there was a certain degree of improvement for me and I picked up more new skills in this area. I will do my best to improve and do better.


In-Class Assignments on Project 2: The Subverted Object

Class Exercise

I really found this activity very interesting because it helped me to create more ideas and better concepts. This exercise was particularly useful for me due to the introduction of the techniques of Removal, Replacement and Redefinition.


Some of the stronger concepts and ideas were actually developed through this process and I decided to use them in my Project 2.


GAIA IKEBANA FINAL FOOD MODEL Autumn Falling

Final Model, Autumn Falling, I had to incorporate the idea of Ikebana, Autumn, food as well as Model 1 in Phase 2 together. Using the main concept of autumn, I came up with the dessert.

Concept

In Autumn, the leaves of deciduous trees begin to fall after turning orange. 

Cone (dominant): acts as the main bark of the tree and covered in orange due to association of autumn and falling leaves.

Sphere (sub-ordinate): SO acts as the "head" of a tree while the cereal on the SO acts as shedding leaves, hence the many crumbs and branches fallen on the plating.

Cylinder (sub- dominant): acts as the logs and fallen tree trunks in a forest.


Despite the autumn season, the presence of the autumn yellow flower, Sternbergia, is still present. This gives a sense of warmth as well.

Hence, the dessert, Autumn Falling, because Autumn is often referred to as Fall and also because of the image of falling orange leaves during autumn.


Final Food Model Analysis

Analysis of Autumn, Ikebana and Food usage

Autumn

Concept Comparison to final model
Falling trees and branches Cone: Tree

Cylinder: Logs of trees

Sphere: Leaves

In autumn, Deciduous Trees lose their leaves. Similarly, I wanted to portray a similar effect. Hence, on the base plate, there are many branches and crumbs of cereal.

Brown and Orange and Yellow flower (Sternbergia) These are the key colours in the season of autumn. Hence, my group decided to use these colours as the main anchor for our group. We all used different types of food to showcase the season of autumn while still having the same theme and colour.

Sternbergia, yellow flower, is also an autumn flower that blooms while the season changes. This is also a group item that all the autumn final models have. We wanted to showcase that even in the mists of change from summer to winter, during the dull autumn, flowers still bloom.

Season of Harvest Autumn is often known as the season of harvest and some of the common harvested foods are pumpkin and pomegranate. (refer to research)

Hence, for the food within the cone, I made pumpkin egg pudding to represent the relation to autumn instead of simply using colours to reference to the idea of autumn.

Ikebana

Concept Comparison to Final Model
Shin, Soe, Hikae Shin (Heaven), Soe (Human), Hikae (Earth) is a key concept in Ikebana. (Refer to research slides) I wanted to include this idea as it was interesting to me.

Shin (Heaven): Flower branch (tallest branch) — Heaven is the highest and most holy place, respected and people earn to go there.

Soe (Human): Thinner and shorter brunch that curls around the cone — The curling of the branch suggests a sense of vulnerability to showcase how we may be weak.

Hikae (Earth): Fallen branches — Showcases the earth and ground in which we walk.

Sternbergia (Yellow flower) Sternbergia, is an autumn flower and this was key because ikebana is often related to seasons and the types of flowers used changes according to the different seasons to showcase different atmospheres. (refer to research)

Food

Type of Food used Reason for use
Pumpkin egg Pudding Autumn is the season of harvest especially for food like pumpkin.

Furthermore, pumpkin is an important ingredient for the festivals in autumn such as Halloween (Jack-o’-lantern) and Thanksgiving (Pumpkin Pie).

Cone – Large Ice cream Cone

Cylinder – Chocolate Biscuit rolls

The large cone is required in order to hold the pumpkin egg pudding.

Since my final model is a dessert, I felt that it was important to use some typical sweet food items.

Sphere – Chocolate with cereal The cereal, acted as leaves, had the colour of light brown with sugar coated on them. Hence, it created the shimmery feeling similar to how it is magical when the autumn leaves fall creating a scene of red and orange.

The chocolate is used as it is able to be molded to certain shapes and allows the cereals to be embedded within.


Final Amendments to create Autumn Falling


Improvements made:

  • Increased the height and curvature of the branch and the flowers in order to create a more vulnerable feeling as well as a possible new SO which is the void encompassed by the branch and the flower.
  • The SD, that was originally too bulky, is now reduced in numbers and size. 1/3 of the Cylinders now pierce through the 1/3 mark of the cones.

Other comments:

  • The usage of the Aluminum foil was to secure the cone as it was difficult to balance the cone with the pudding inside.
  • Whereas the orange wrap was to cushion the cone in case of any fall of the cone. At the same time, orange is also associated with the change in season from summer to winter. Hence, I felt that it was important to use this concept in my final model.


Group Performances:


Reflection:

I think it was very interesting for us to experiment with the food and also find out how D, SD, SO and curvy linear is applied to our daily lives even though we may not observe it. Through this project, I also learnt about the independent, dependent and precarious orientation to bring about different effects. The project also allowed me to use my creativity to gather knowledge on autumn and ikebana. Eventually placing them both together and applying it to my final food model. Overall, it was a very fun project and I truly enjoyed it!


GAIA IKEBANA PHASE 2 – 2D Analysis

For Phase 2, I involved wedging and piercing to 2 of the 3 models I created in Phase 1.

The chosen models for Phase 2 was Model 1 and Model 3. They were chosen as both the models could incorporate both piercing and wedging instead of simply wedging for Model 2.

Model 1:

Cone - Dominant

Sphere - Sub- Ordinate

Cylinder- Sub-dominant


Model 3:

Cone - Sub-dominant

Sphere - Dominant

Cylinder - Sub-ordinate

For the final model, I have decided to use Model 1 instead. I felt that Model 1 would be more of a challenge as it also required me to find the right balance such that the model would not topple. At the same time, I wanted to make use of the tip of the cone, which is unique to the cone, as a point of contact to the base.

For the next post, I would be combining autumn together with ikebana as well as Model 1 in Phase to create a new food.


GAIA IKEBANA PHASE 1 – 2D Anaylsis

In Phase 1, I generally focused on getting the concept and formed different structures in diagonals using Spheres, Cones and Cylinders.

Model 1:

Cone - Dominant

Sphere - Sub-ordinate

Cylinder - Sub-dominant

I made use of the “Zig-Zag” idea to create model 1. At the same time, learning from project 1, the use of thirds was also extremely useful in this project as well.


Model 2:

Cone - Sub-ordinate

Sphere - Sub-dominant

Cylinder - Dominant


For this model, I wanted to create a more unbalanced look. It is important that I made use of the diagonals. I also made used of a large dominant on a smaller sub-dominant to show a tilted feeling.

Model 3:

Cone - Sub-ordinate

Sphere - Dominant

Cylinder - Sub-dominant

For the final model, I wanted to create a leaning on, “domino” effect feeling. Hence, the sphere leans on the cylinder and the cylinder leans on the cone.


These are my 2D analysis of my models in Phase 1.

Autumn Research

Autumn is generally known as the season of harvest. There are many festivals and food related to Autumn such as Halloween and Pumpkin. In this research, it will focus on festivals as well as the food used in each festival.

In my final work, I have decided to you biscuit rolls, large ice cream cone as well as pumpkin pudding to express the idea of autumn.


IKEBANA Research

For our 2nd 3D Project, I decided to first research on Ikebana in order to fully analyse and ensure that I understand the concept.


The idea of Shin, Soe and Hikae is the most interesting concept to me. Hence, I would like to input the idea into my final work.

Final Product Analysis

Word: Asymmetry

The Final Product

Front

Side

Top

Material used Reason for choice of material
Clear transparent acrylic (Dominant)


Clear Blue acrylic (Dominant)

Since the coins will be separated into different categories, it would be more interesting and fascinating for the separation of the coins to be seen despite all the coins entering the piggy bank from the same entrance.

One side of the dominant has a blue acrylic used instead of a transparent one. The purpose of this is so to blend the SD together with the D. Also the SO is blue in colour, so it blends all of them together.

Clear Blue acrylic (Sub- Dominant) In the previous post, it is mentioned that from certain angles, the SO cannot be seen as it is blocked by the SD. In order to make all the SO, SD and D to be seen from all angles, the clear blue acrylic is used.

Blue is used because it is not too dark or too bright to take the attention away from the SO.

Blue Beads (Sub-Ordinate) Blue because I wanted it to seem to blend into the blue acrylic. The beads are also slightly shiny and reflective, giving it a texture and also ensuring that it is pretty eye catching.

Application 1: Piggy Bank

Basically the Piggy Bank would be able to separate the coins such as $1, $0.50 as well as $0.20 and $0.10 together.

Image Projection of Piggy Bank:

In addition to the above table,

Wooden Plank (for rolling coins and compartments) Wooden cause its stable and strong, and will be easier to carve out the size of the holes more accurately if not the coins will fall to the wrong places.

Allows the compartments to distinctly separated.

Rubber (cover up the holes at the base) Rubber is easy to remove and replace. It is also small and will not cause instability to the base of the object.


Possible improvements:

  • Make the SO movable such that it can remove part of the acrylic in case any coins were stuck at the slide
  • Make the wedge greater to prevent the coins from getting stuck


Application 2: Infinity Embedded Pool

The pool can be an infinity pool while being embedded within the ceilings or walls in a shopping mall or hotel and the transparent areas allows interaction between the people at different places.

Image Projection of the Infinity Embedded Pool:

Glass for panels of the pool Pool will be glass such that the ceiling of the mall and the base of the pool can coincide and people can interact as they swim. Also allows the swimmers to see the sky while the tanners can see both the swimmers and the sky.
Floats (SO) area and steps made of stainless steel Strong material that ensures that the floats will not be moving everywhere disrupting swimmers. Also cause Stainless steel is does not rush in the water.
Locker Room Area (SD) Enables people to be able to see the skies at the infinity pool despite being in the locker room. Also allows parents to see their children from the locker room to the pool area/entrance to ensure safety.


Improvements:

  • Diving area could be made more distinct and separated from the tanning area to ensure that the different groups of people can enjoy in case some people prefer peace and quiet
  • Tanning area needs to made safer.
  • May need another life guard nearer to the entrance of the pool to ensure safety and react more quickly to the swimmers.


This concludes my application for my Pandora Box Project 1 for 3D Foundation. 🙂

Short Reflection:

It was very interesting and fun because I got to make use of different materials and thought in a very real life context and scenario of materials required and used to built surrounding items. Hope you will like my idea and application!


Phase 1 and 2 (2D Analysis of Objects)

Phase 1 – assembling boxes to form objects
Word: Asymmetry

Object 1

Despite having the word Asymmetry, I tried to include counterbalance as well. Hence, both sides of the Dominant (D) has either a Sub-dominant (SD) or a Sub-Ordinate (SO).

Front

  • The shaded area at the SO will be added on
  • Whereas the SD will be shifted down to match the 1/3 mark of the D

Side

  • Similarly, the SD is shifted down to hit the 1/3 mark of the D

Top

  • SD will be shifted up to hit the 1/3 mark of D
  • SO will be added such that it hits the 1/3 mark if D


Object 2

For this object, it has 2 SD as there was no box small enough to create an SO. Instead, during phase 2, a lot of changes would be made to this Object in order to create an SO.

Front

  • SD 1 (smaller) is shifted outwards to the 1/3 mark of D
  • SD 2 (bigger) is shifted slightly more outwards to hit the 1/3 mark of SD1

Side

  • Shifting of SD 2 to 1/3 of SD 1

Top

  • Similarly, the SD 2 is moved such that it is at 1/3 of SD 1
  • SD 1 is already at the 1/3 mark of D

Object 3

For this object, the SO is very small and insignificant. Hence it will be made bigger and placed at a more strategic location for better observation.

Front

  • SO is very insignificant
  • SD is shifted from 1/3 of the

Side

Top

  • SD cannot be seen from the top view
Phase 2 – Using techniques (wedging, piercing and cradling)

I decided to choose objects 2 and 3 as they were the more challenging ones that required much more attention in changing the structure and hence I could possibly play with more of the techniques as well.

Object 2

I made changes using foam to allow Object 2 to have an SO. Then I used the technique of Wedging to incorporate the SD to the D using the SO.

Front

  • The SO is placed at the 1/3 mark of the D
  • Similarly, the SD is placed strategically at 2/3 mark of the D
  • Wedging technique is used

Side

  • The SO is placed at the 1/3 mark of the D

Top

1/3 mark of the D is used as a marking point for the SO

Object 3

For object 3, the SO has been placed at a new location to ensure that it can be seen easily. Furthermore, the object has been rotated as well in order to ensure that it does not topple over. The techniques used here are Cradling and Wedging.

Front 

  • SD uses the wedging technique while SO uses cradling technique

Side

  • However, if seen from the other side, the SO cannot be seen. Hence this requires some changes in the specific material used in order to allow all the D, SD and SO to be seen.

Top

  • Now all the D, SD and SO can be seen clearly.


With that I present to you the final model,

Front

Side

Top

(Applications and material usage of the final product, refer to the next post :))


Project 1: Picture Story – Curating Self

Introduction:

This Picture Story generally tells of my character, a quirky child in me that will never grow up no matter what my age is. Maybe even something more…

Component 1: Me

The inspiration for this photograph was from Sally Mann, Eyeless (1995, Immediate Family). She played with the shadows in her photograph and similarly I wanted to use the same technique to portray the quirkiness in me.

Also, the shadow on the right side of my face seems to show another “side view of a face” suggesting that despite its supposedly being a formal shot, there is some mischief.

When I was younger, I tend to look very awkward in formal shots and ended up making weird or quirky faces. So I wanted to re-enact the scene in order to showcase this peculiar side of me.

An improvement could be to crop only the area of my mouth to better show the mischievous and unique image of me.


This photograph showcases me looking through the water bottle to zoom into my eyes. When I was young, people always say I have super small eyes and I still do. Hence, I used the water bottle filled with water and took a photo through it. Another reason why I did it, is because when I was young, I often did this action to scare my friends and pretended to be a detective using it. By re-enacting this action, it felt like I was back to my childhood and could be playful, quirky and mischievous.

The light was purposefully shined from the other side to create a contrast using shadows and to bring out and highlight my eyes.


To me, when I’m truly free of judgement to be mischievous is when I was younger as a child. Hence, I wore white shoes and high white socks to showcase the primary school times and the playful state that I was in and wish to be in still.

One of the references I made was Wolfgang Tillmans to create a more “Instagram” feel.

Furthermore, I took it from a low angle to make it seem like I have fatter and wider legs just like when I was in primary school. A flash was also used to brighten up the area in contrast to my shins as I used to be slightly tanner.

Another reason why I took this photograph is also because I often make an association of my name, “Shin Yi”, to the shin bone which my friends call this idea pretty peculiar, bringing out my odd and weird character once again.

Componet 2: Object and representation of self

Object chosen was a blanket that had been with me since I was young. It has “watched” me grow up and is an important object to me. It continues to represent me due to my quirky character that still reminds me of the child I am.

The story behind this photograph is how when I was young, people often said that I had a big head and a small body. Hence, I made use of the picture on the blanket to combine both the past (small body) and present me. I also showed my face in this manner to showcase my quirky nature despite my age.

An improvement that could have been made was perhaps to showcase my expression when people told me I have a “big head and small body” instead of the quirky face as it was similar to the 1st photograph for component 1.


When I was younger, I used to want to be superman due to his super power to fly and my blanket often became my cape. Despite being older now, I wanted to re-enact the same scene and make my dreams come true using Adobe Photoshop. Although with my current knowledge, I know that it is not possible to really fly like superman, I still wanted to portray the bubbly and frisky image as a child would have.


A weird habit of mine is that I sleep beside my blanket rather than use it to cover myself. This is because when I was young, I was highly sensitive to fur and hence could not have many toys. Hence, I slept next to the teddy bear on my blanket instead as a form of company instead.

I tried to make the photograph more interesting by wearing similar vertical stripped shirt as well as imitating the bear by placing my hands upwards and showcase my playful nature even in my sleep.

Component 3: My World

The chosen location for me is East Coast Park because it was a place where I spent most time with my family as a child every Sunday where we would cycle together. Although I no longer go there as often as I use to, it still holds many memories of my childhood were I displayed my playful character and quirky ideas.

This image is a low angled image where I placed my camera into the ocean itself and let the waves submerge the camera. The canted angle was used to make the photograph seem more unusual like my odd nature. The waves also created little splashes on the lens of the camera that emphasizes the playful nature of a child to bring chaos to order as all of us know that the typical camera should be protected from water to prevent damage.


This is a small drain at East Coast Park. I took the photograph from a low angle in hopes of making one feel like they are in an enlarged drain. The back story was that when I was young, I cycled into a drain despite cycling with supporting wheels. I vividly remembered the drain that I fell into but unfortunately, the current drain was under construction and had to find another drain to replicate the actual drain I fell into.

The reason why I fell in was because I tried to cycle so fast, so I could remove my legs from the pedals. Only to realise when it was too late that I lost control of the bicycle and fell into the drain. Perhaps my playfulness went slightly over board and I got myself hurt.

The low angled photograph is generally inspired by Richard Billingham takes several low angled photographs such as Arrow, 2000 and Untitled RAL 36, 1995.


I enjoy burying my legs in the sand as the waves of the oceans gently wash and sweep across my feet. In order not to get washed away by the waves, I remember there was one time when I buried my legs in the sand to prevent myself from falling. Thinking that my plan would work, I arrogantly boasted to my sister about my brilliant plan. Only to realise that it was not all that great. As I got out of the sand, I lost balance and combined with the washing waves that gave me a slight push forward, I landed flat on my face.

I guess my quirky nature that helped my come up with this odd idea backfired at me.

This photograph was taken from a high angle down. However, the area I was standing on did not seem to be high enough to help me create a better high angle shot. This was one area I needed to improve on and this image may be similar to the previous photograph.


I used to enjoy placing my arms through the bars at the jetty at East Coast Park. The bars are now changed to fences and I can no fit my arms through. Hence, I could only look through the fences with my camera lens.

In each hole created by the fence, there is a ship respectively. As a conclusion to my quirky nature, I wanted to use this picture to say that although it is a part of me, it is not my only character. Just like how a faraway ship my look small, it is definitely not the case if you take a step closer. Therefore, if you get to know me, you will know that I’m not just girl with a childlike playful character, but something more.

An improvement could be me using framing and cropping to improve and highlight on the areas I wanted people to focus on. In this case the 3 ships through the holes of the fence.

The End of Project 1: Picture Story - Curating Self

I'm very thankful for this opportunity to try out a new project like this that incorporates many different aspects of not just myself but learning and exploration of techniques as well as more artists.

The learning of picture making and meaning making has made my photographs more meaningful and look beyond just simple facial expressions. The use of strategically placed items to re-enforce or complement an object or idea was also one key point that I took away through my fellow classmates' images.

Although I am still unable to execute this technique well, I have gained more in depth knowledge and intend to put them in practice through my future photographs and images created.

The critique session with my fellow peers has also allowed me to better myself as I set higher standards and explore more possibilities to improve.