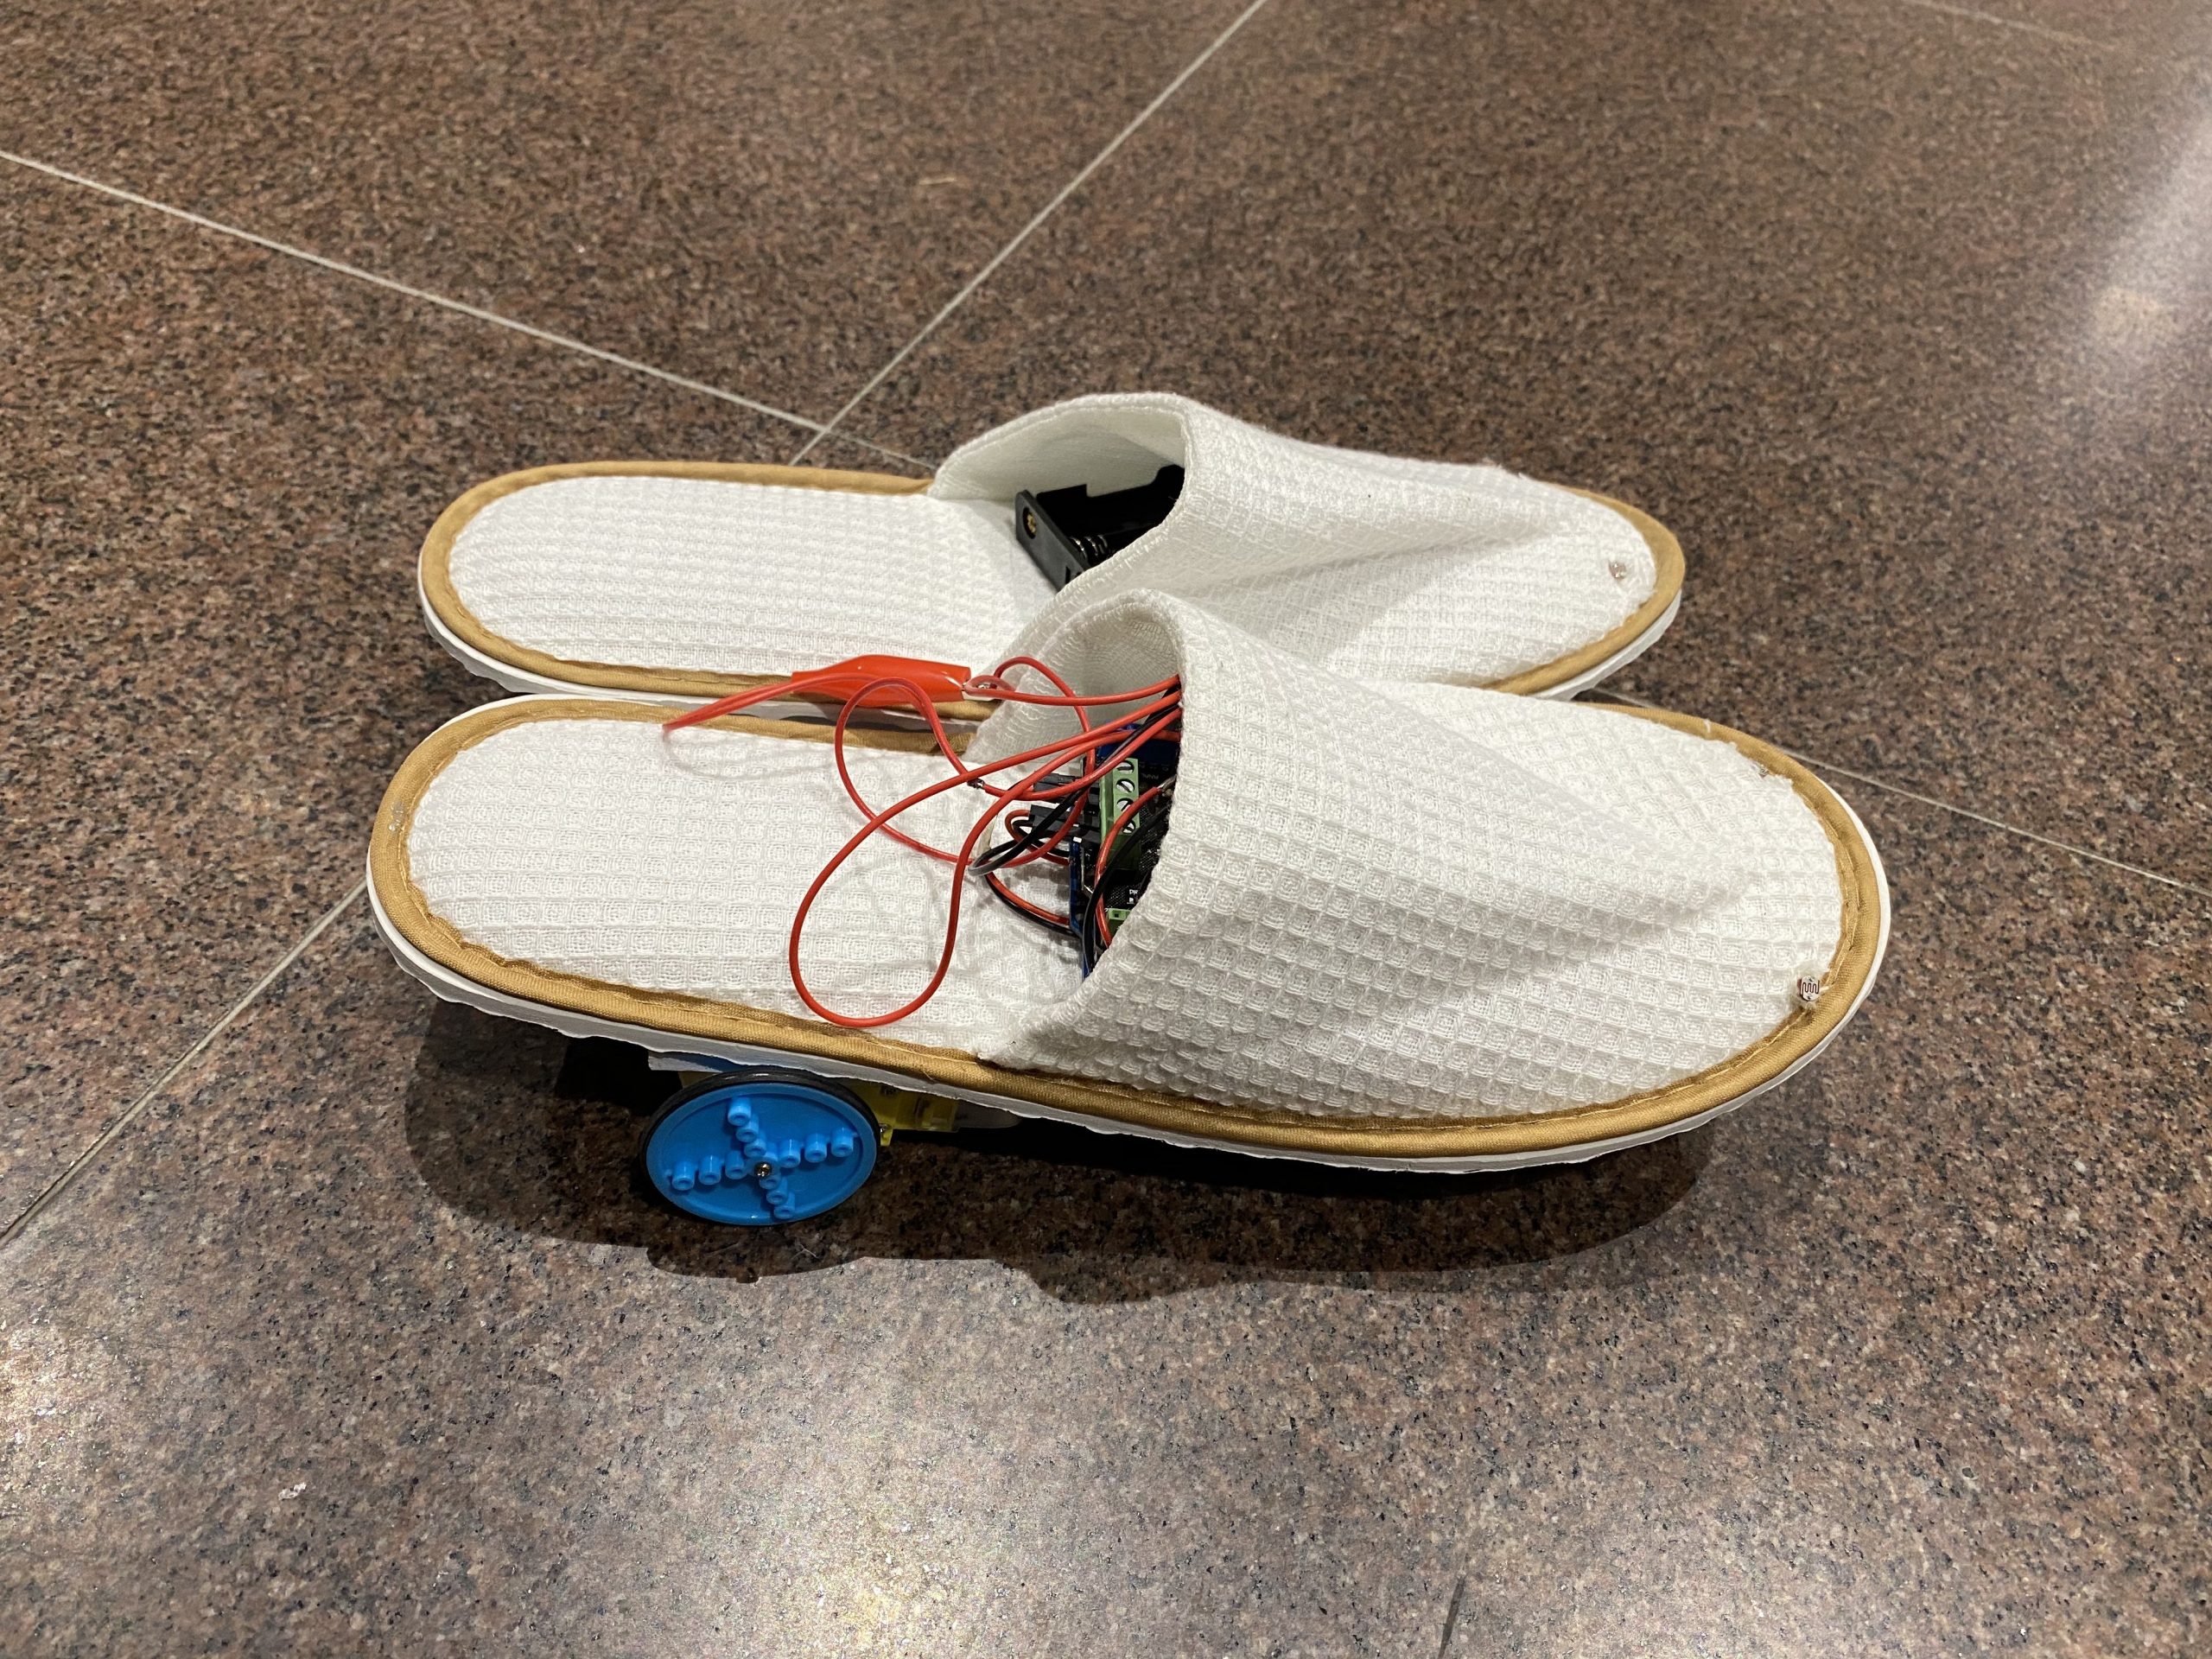
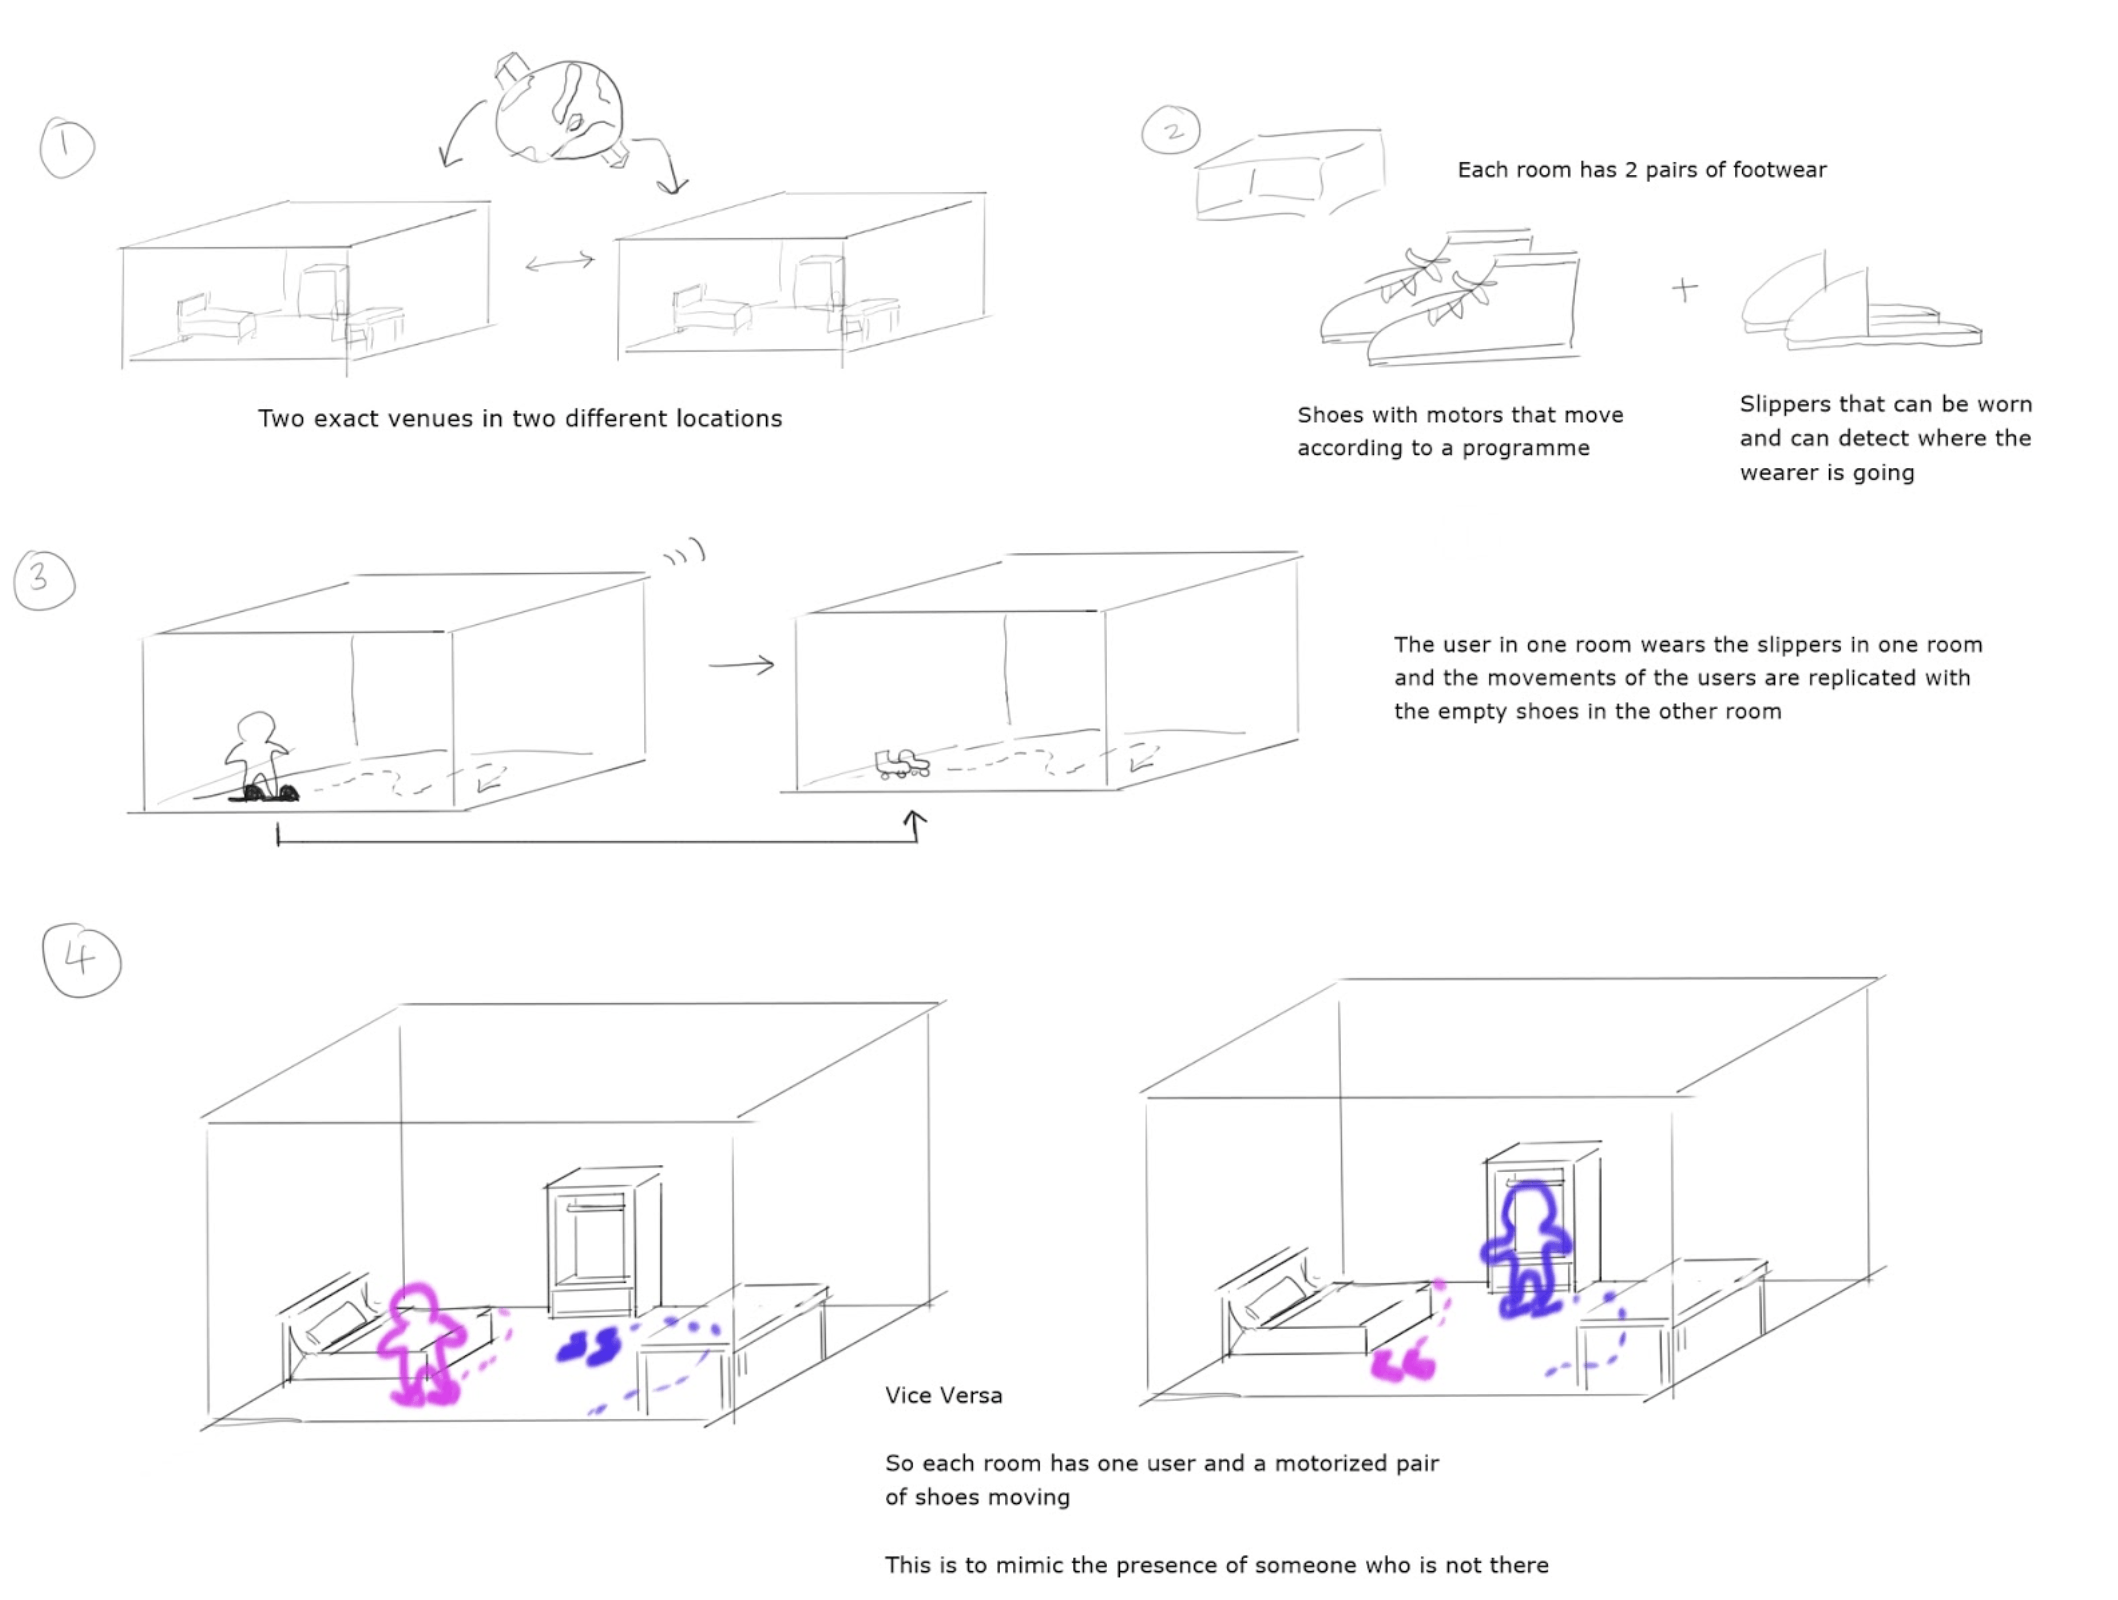
In our current pandemic situation where loved ones cannot easily be with each other physically, our device (and setup) aims to stimulate your loved one’s walking movements in your room. It seeks to highlight distant bodies through the absence of the body.
How the device works
Walking around the space, one’s footsteps are translated into a path of light in a distant room. In both rooms, a path generated by your loved one begins to form and a pair of shoes follow suit. Watching the shoes move, the distant movement is transported by light to the room one is currently present in. The presence of another body either haunts or comforts us through its absence represented by the shoes. The physical distance between is shortened to a lighted path as both distant bodies now move together in their respective rooms.
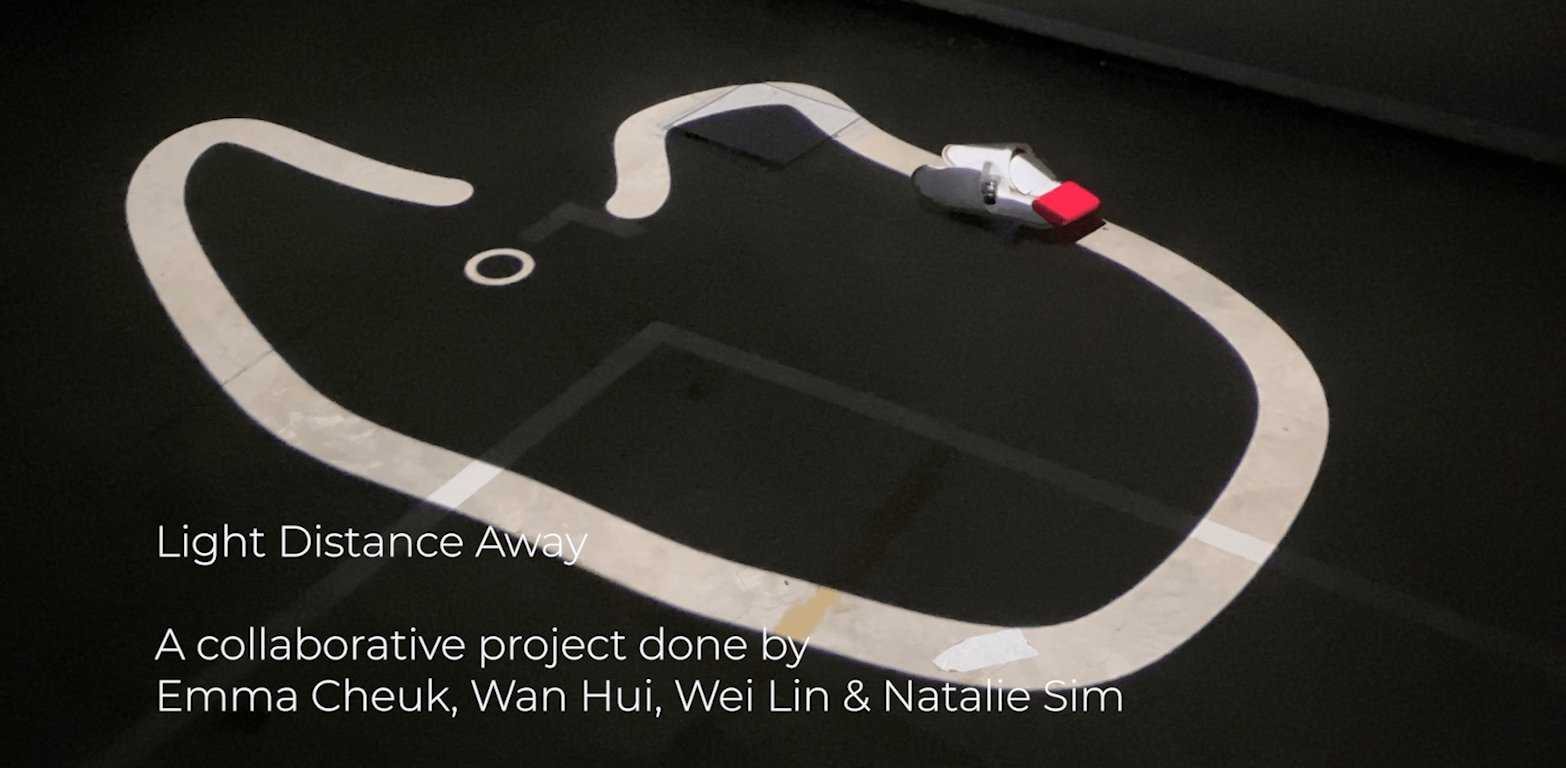
This is our progress for our Semester Project, Light Distance Away.
Concept SketchLight Distance Away (footwear)
Our goals for mid-fidelity stage
Prototype
Track light and draw lines and curve on processing
Project the line on the floor
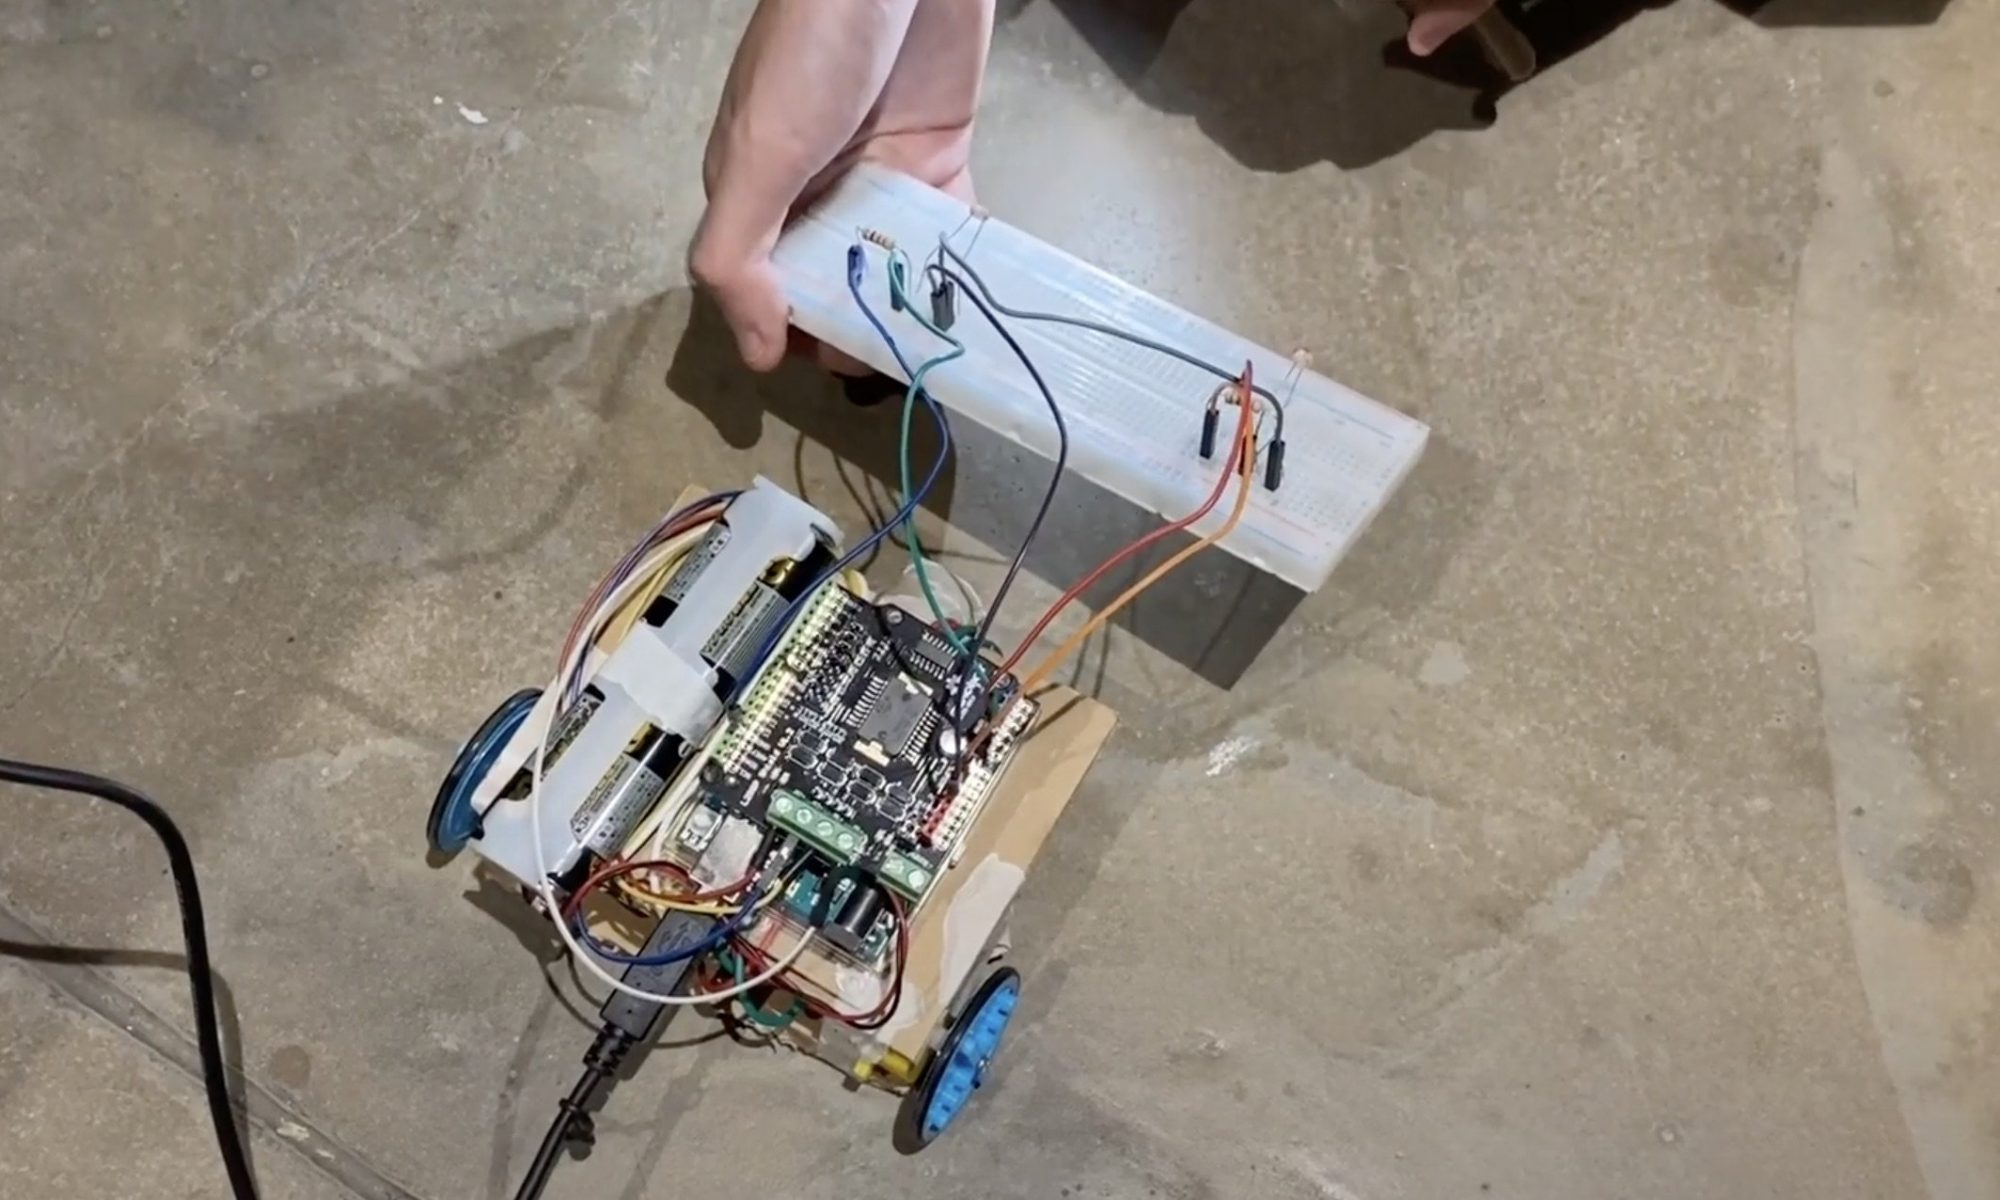
Stable LDR tracking system on motors that follows the lines projected
Setting up the area with pixy camera, arduino & projected at the ceiling
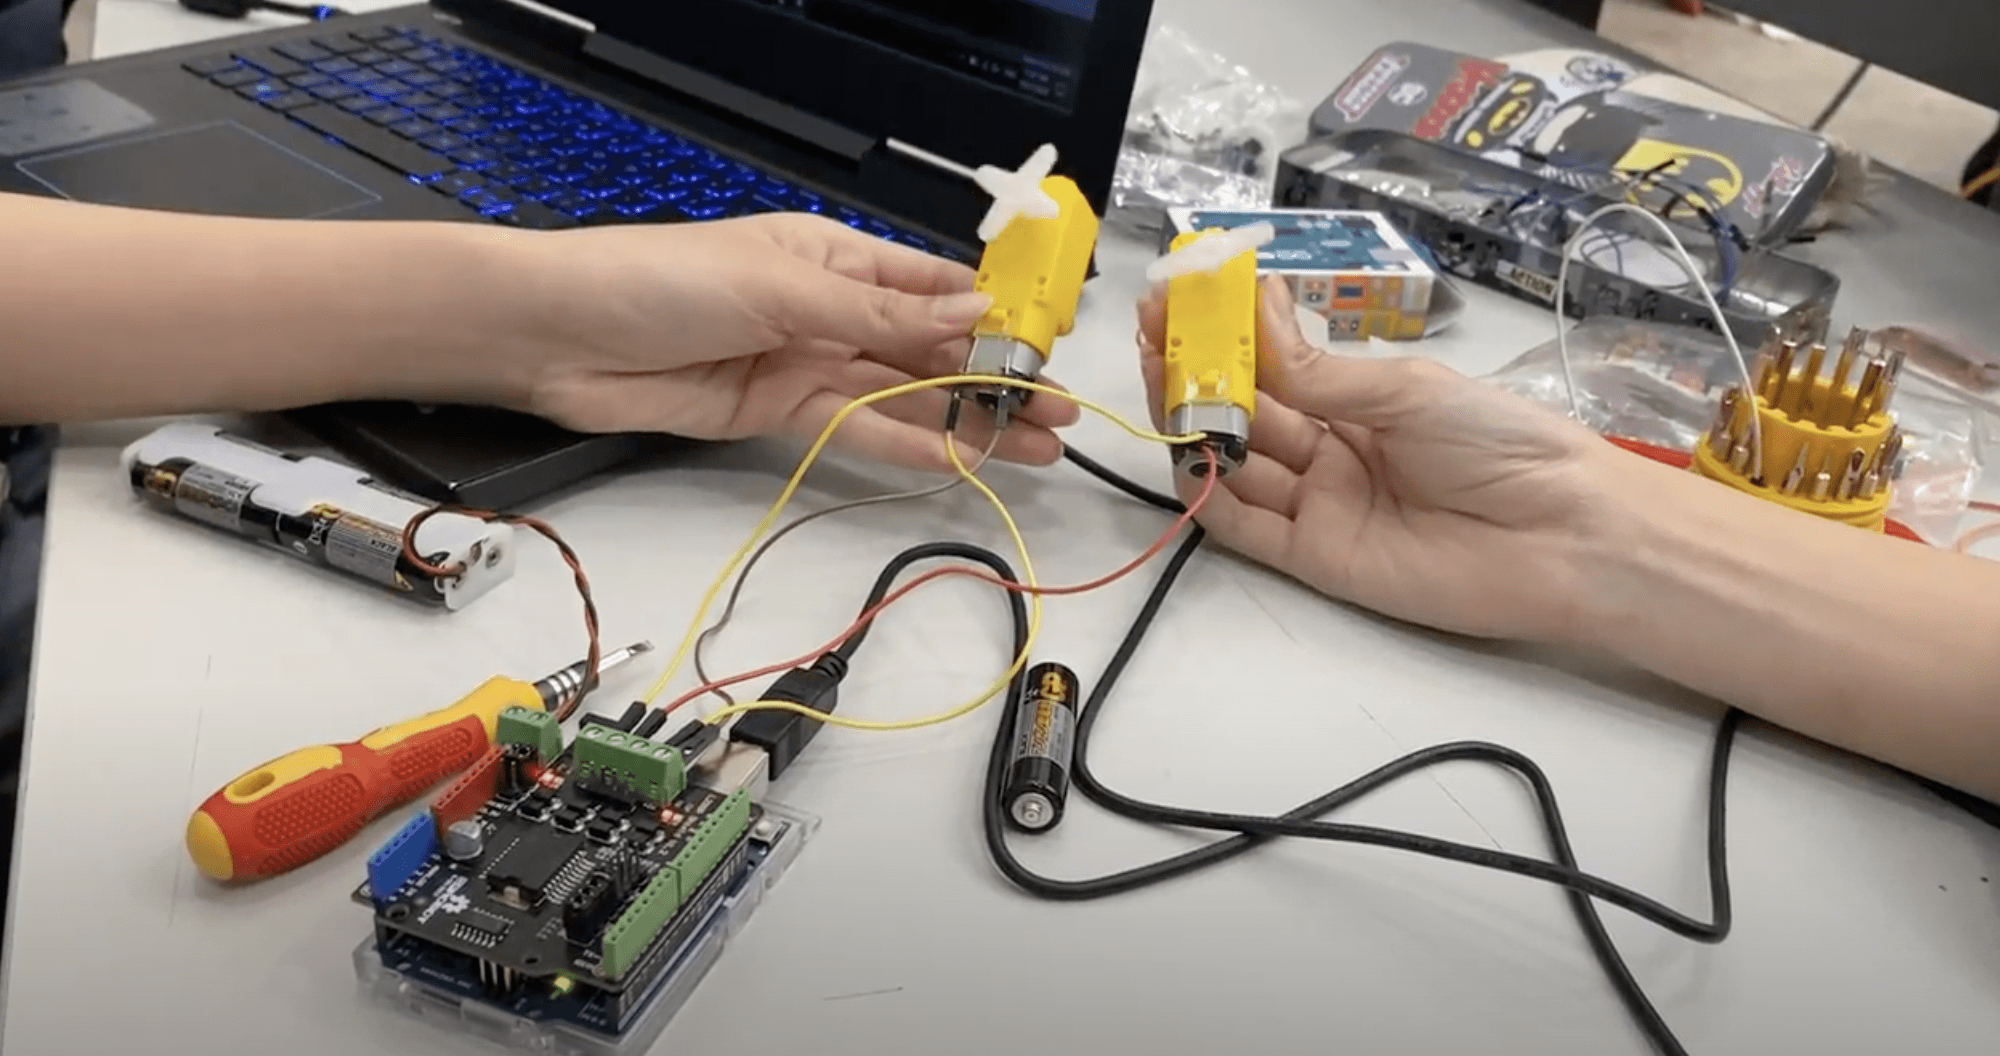
Following our low fidelity prototype, we needed to research on how our motor could follow the XY coordinates received. After some consideration, we thought about using light as our method of moving the motors of the automated footwear.
Luckily for us, we already had spent time creating a line in processing which had initially only been there for us to ensure our pathway was tracked. Yet, knowing light could be a viable option, we began to borrow top down projectors and then flipped our code’s background and line colour to display a light line that would draw as one walked around under the pixy camera.
Thus, we began our prototypes and trials, but not before ensuring our pixy cameras were improved.
Our semester project is called Light Distance Away. It aims to send comfort by the hint of another person’s presence despite them being absent through the use of our setup and device. A camera will track User 1’s movements when they are within the display area and a white line will be projected into User 2’s room based on User 1’s movements. User 2 will then be able to see the personless footwear moving based on the projected line in realtime, ironically creating a rather haunting feeling of an absent presence, while comforting the user with the reminder of this presence. The physical distance between is shortened to a lighted path as both distant bodies now move together in their respective rooms.
We started with 2 separate development paths after researching in depth of possible tracking methods:
Creating an interactive work that involves communication between ZigSim on mobile, Arduino and Processing on desktop. Making gestures with the phone that will be translated to the room lighting. This is an individual work by Emma 🙂
Developing from the previous sketches (link below), I have developed two different set of programs to show ways to change the LED strip color.
How do you feel now? Are you feeling happy? Draw a happy smile to brighten up your room in RED light! Most of the time, people tend to hide their feelings. Instead of showing your sad face, you could draw a sad face(a curved line facing downwards) to represent “I am feeling blue” with blue lighting . To express surprise, you could draw a O to u light up the room in Yellow!
Instruction:
Draw a smile to change to red- happy 😊
Draw a sad face to change to blue- I am feeling blue 🙁
Developing something other than the wearable devices
Due to the Covid-19 situation, people are required to maintain a safe social distancing of at least 1 meter. Moving into post-circuit breaker phrase 2, most activities resumed, yet there is group size and capacity limits in place. People are not allowed to eat out at restaurant together(with capacity limits) to prevent saliva spreading.
Yet, in real life, most people will just ignore safety measures. To practice the social distancing in a fun way, I am suggesting the game of “Distancing Chair”.
The Distancing Chairs Demo video
Distancing Chairs – Play it everywhere/anywhere
RECAP OF THE CONCEPT
A rope is tied at two chairs which is placed at 2 opposite sides of a table.
When a person wants to sit on the chair, and pull the chair back, the chair on the other side will be pulled by the rope towards the table. No space will be left for the other person to sit on that chair.
This is to suggest the idea of “One Table One Seat”. No more than 1 person is allowed to sit at a table.
We want to show people’s obsession with winning when there is an incentive to win (in this case, the money). However, our machine is wired in a way such that it isn’t easy to win, so this would spur people to play continuously, to emphasise on the part of “obsession”.
The Freebie is a provocative object that aims to bring the awareness of free stuff. Everyone loves free stuff however without people realising, free stuff is not technically free because people somehow have to pay for a price to receive them. As the word “free” is the best way to capture people’s attention, we decide to use it in our product.
“Nothing in life is free”
“kiss is”
This product gives away free unlimited kisses but the people who are receiving these kisses have to pay by embarrassing themselves in public, sharing their kiss experience with others.
Concept: A kissing sticker from WeChat, Copyright: suano
How does your hacked object behaves in a way you least expect it to?
What are some reactions you observed from your participants when they interacted with the object?
What are the challenges involved and how did you overcome them? What problems still exist? How might you overcome them eventually?
EMMA
Expectation
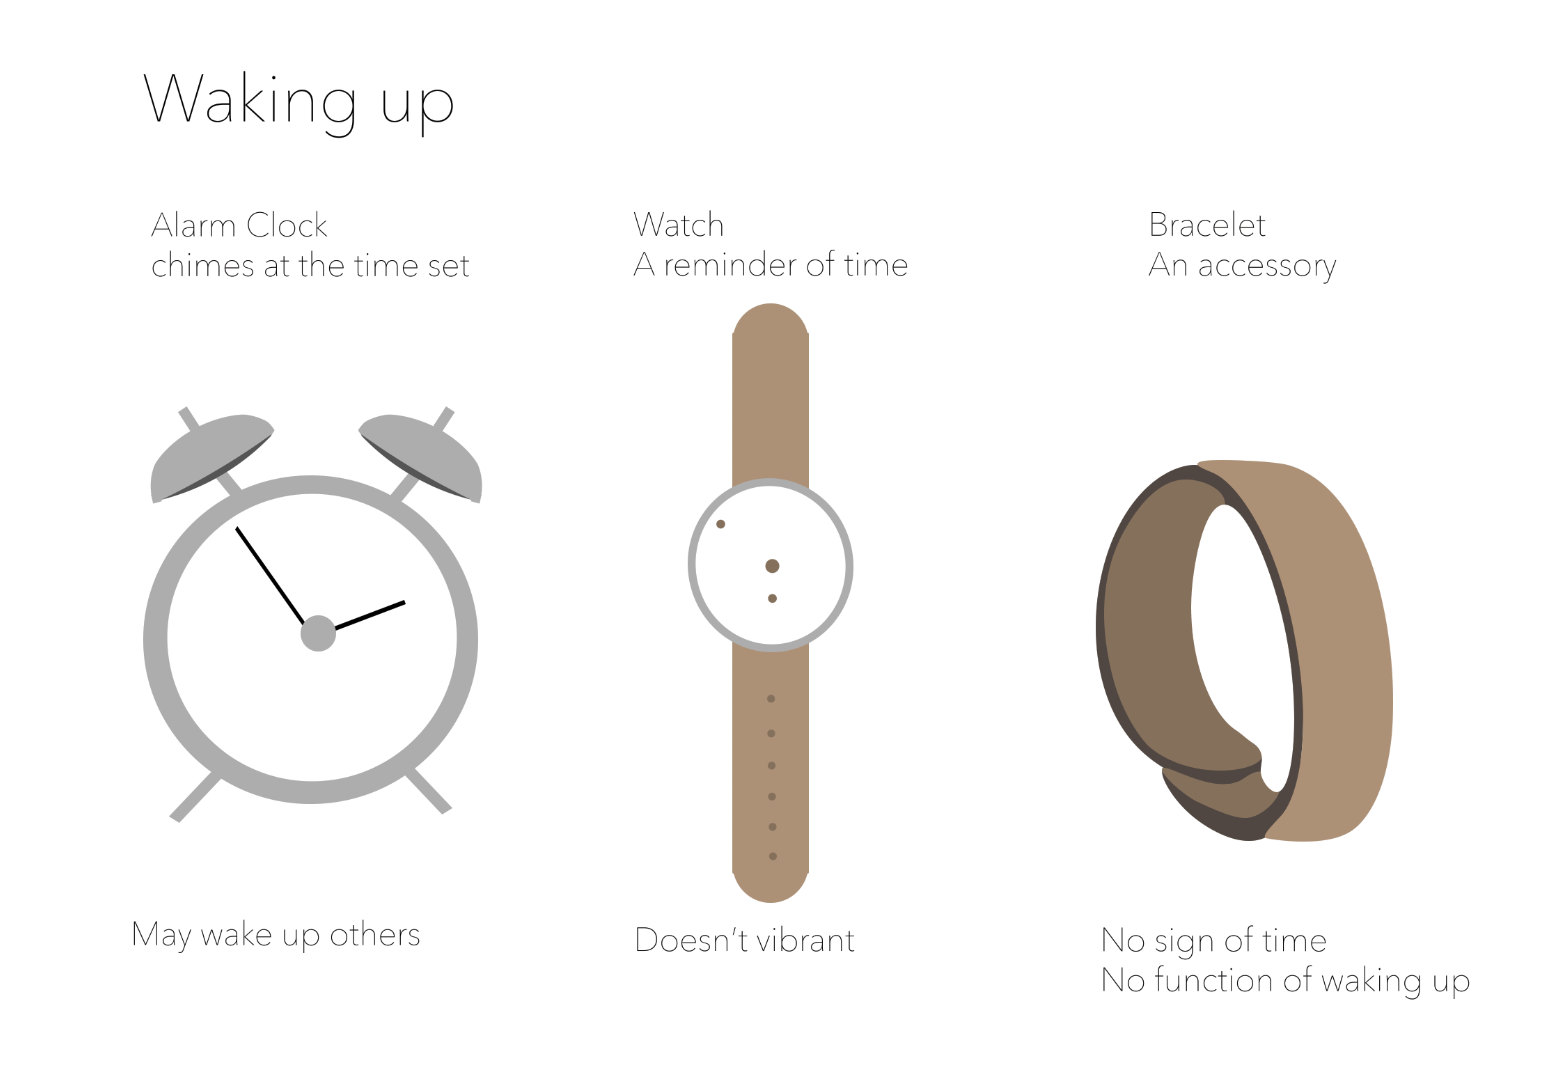
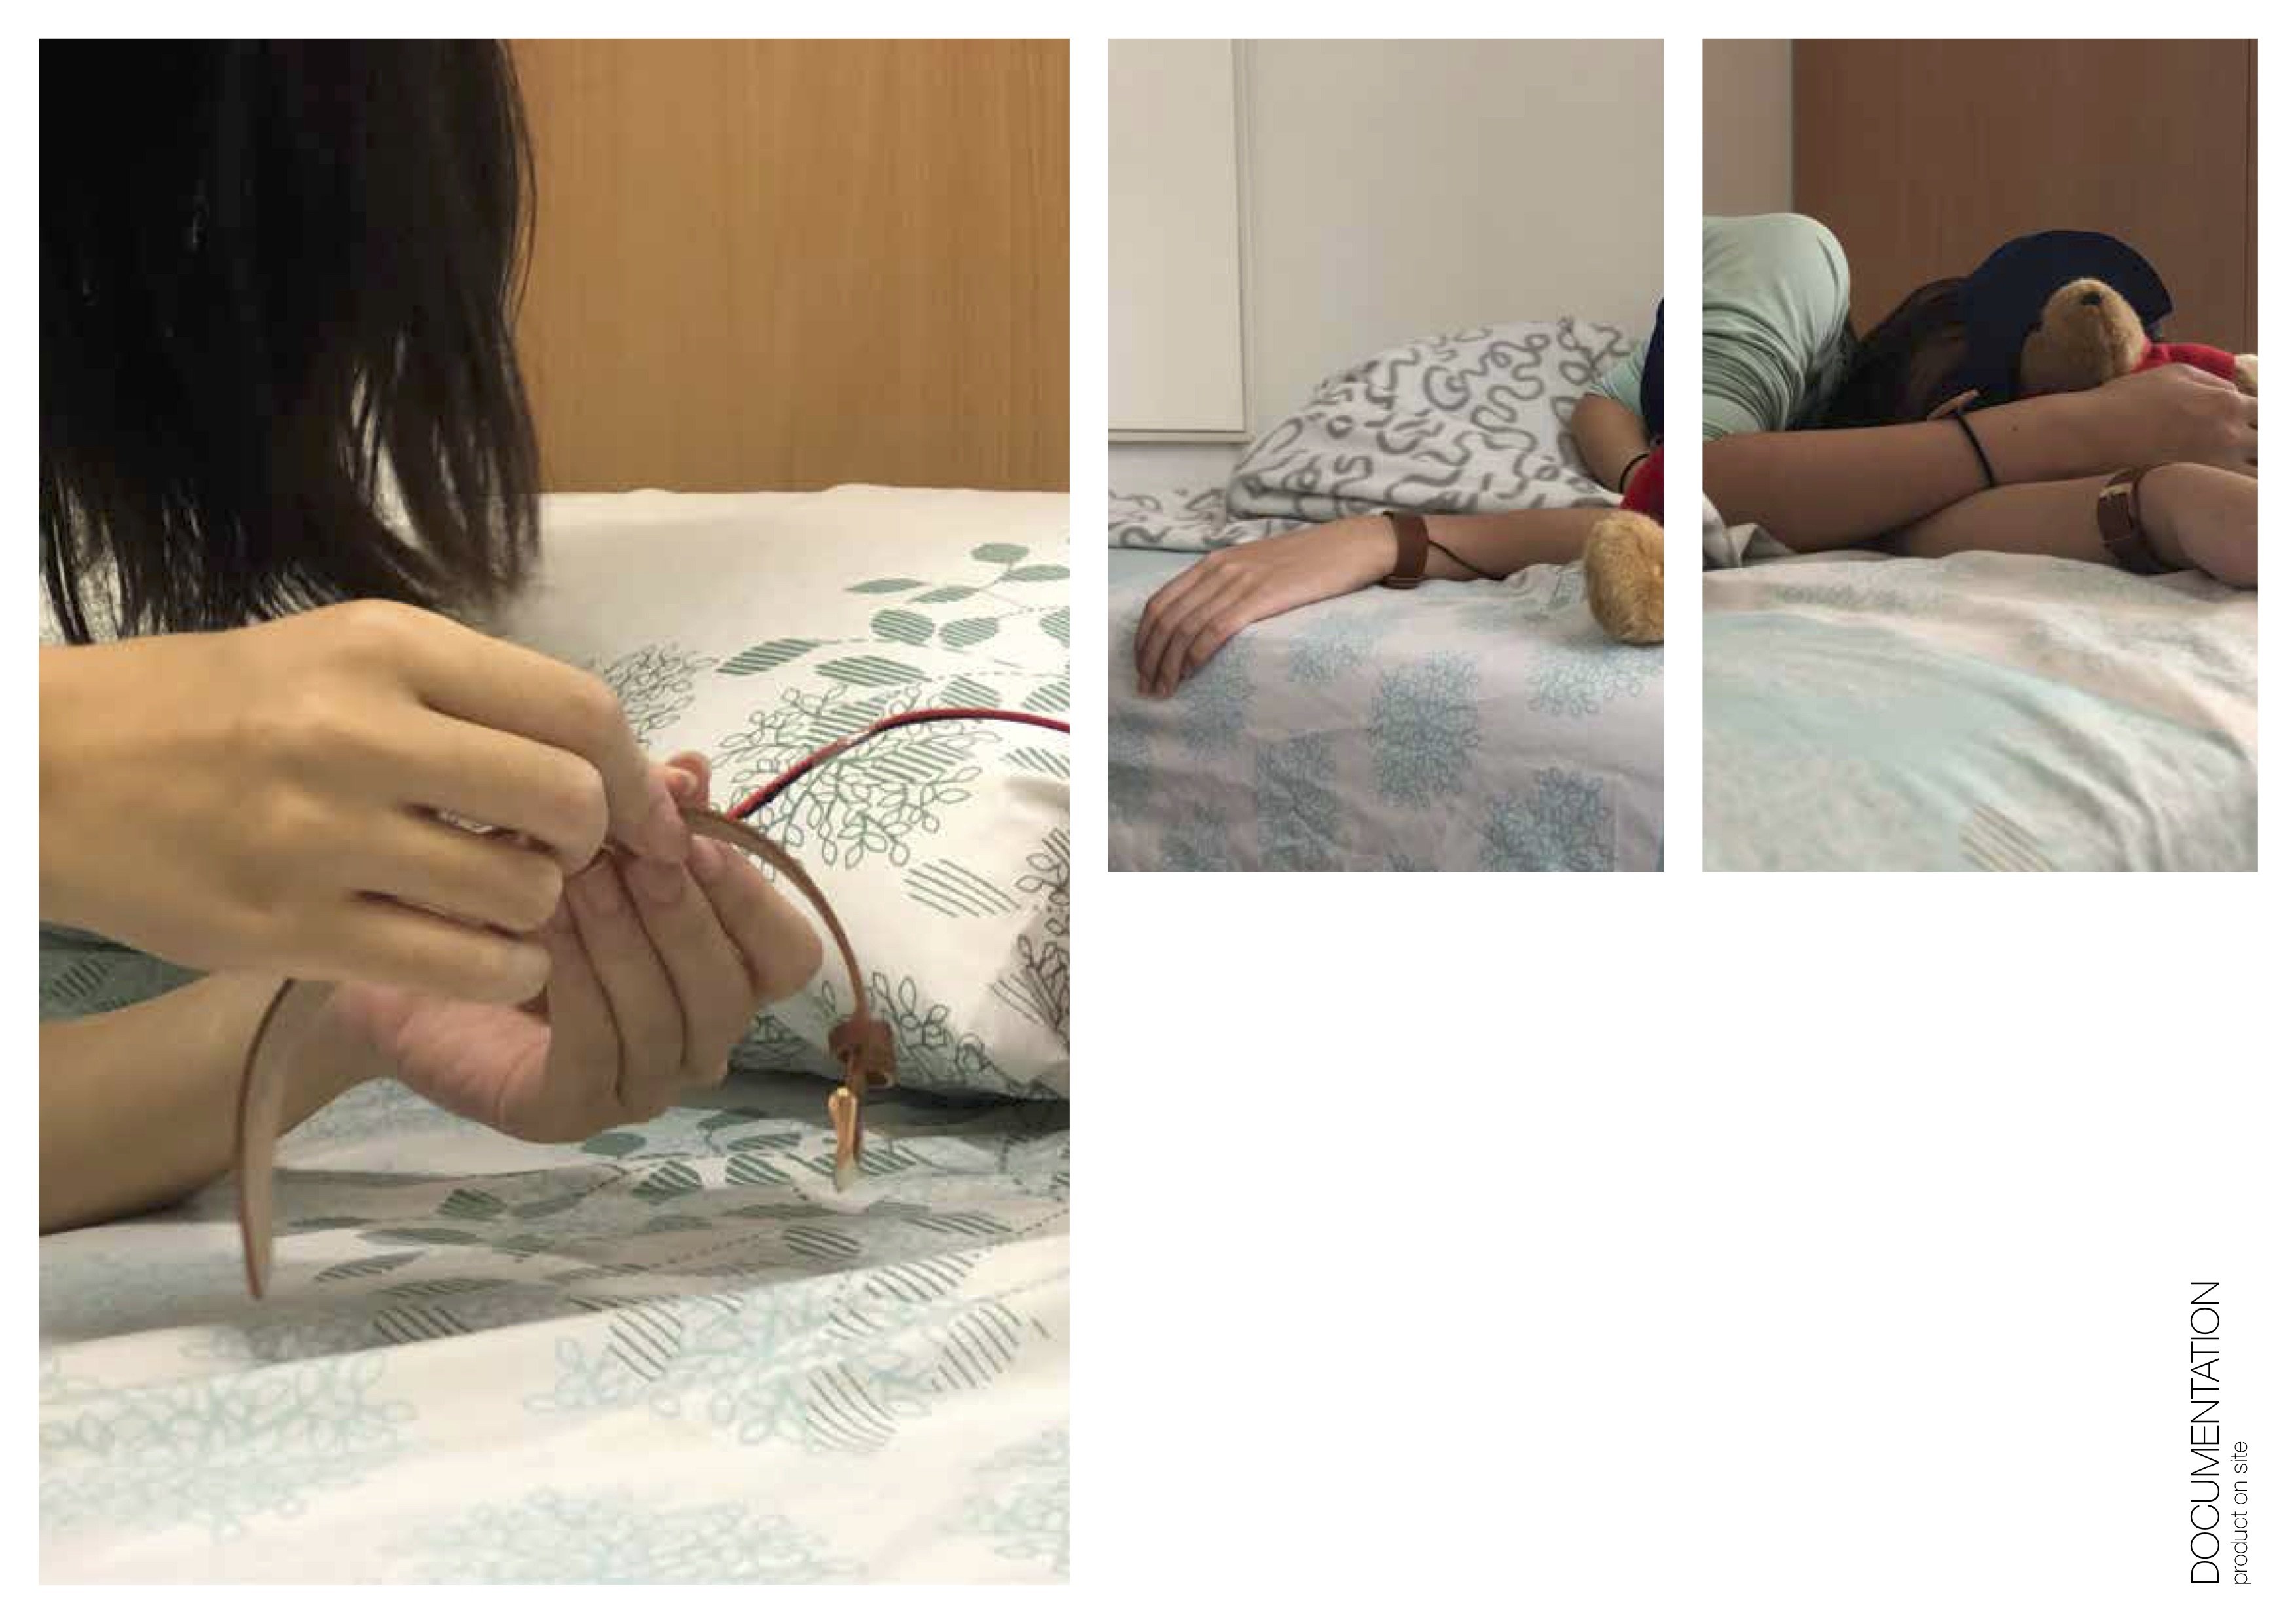
Our hacked object, the “vibrating bracelet” works exactly like I expect it to behave, vibrates after a certain period of time. At first, my partner Hamimah and I were thinking whether we should add a time display, just like this. After discussing, we decided not to because it would distract the audiences. If we had added the time display, our product would look like a normal watch, with a vibrating function. Therefore, we sticked on the idea of just having a vibration motor.
During class, my classmates had further expanded the discussion: to have a watch surface or not. Somebody said yes, so they can know the time. I personally think that not having the watch surface makes the product works better. I will go back to nap for a while if I know the timing. The strong vibrating is enough to “shake” me up.
Reactions
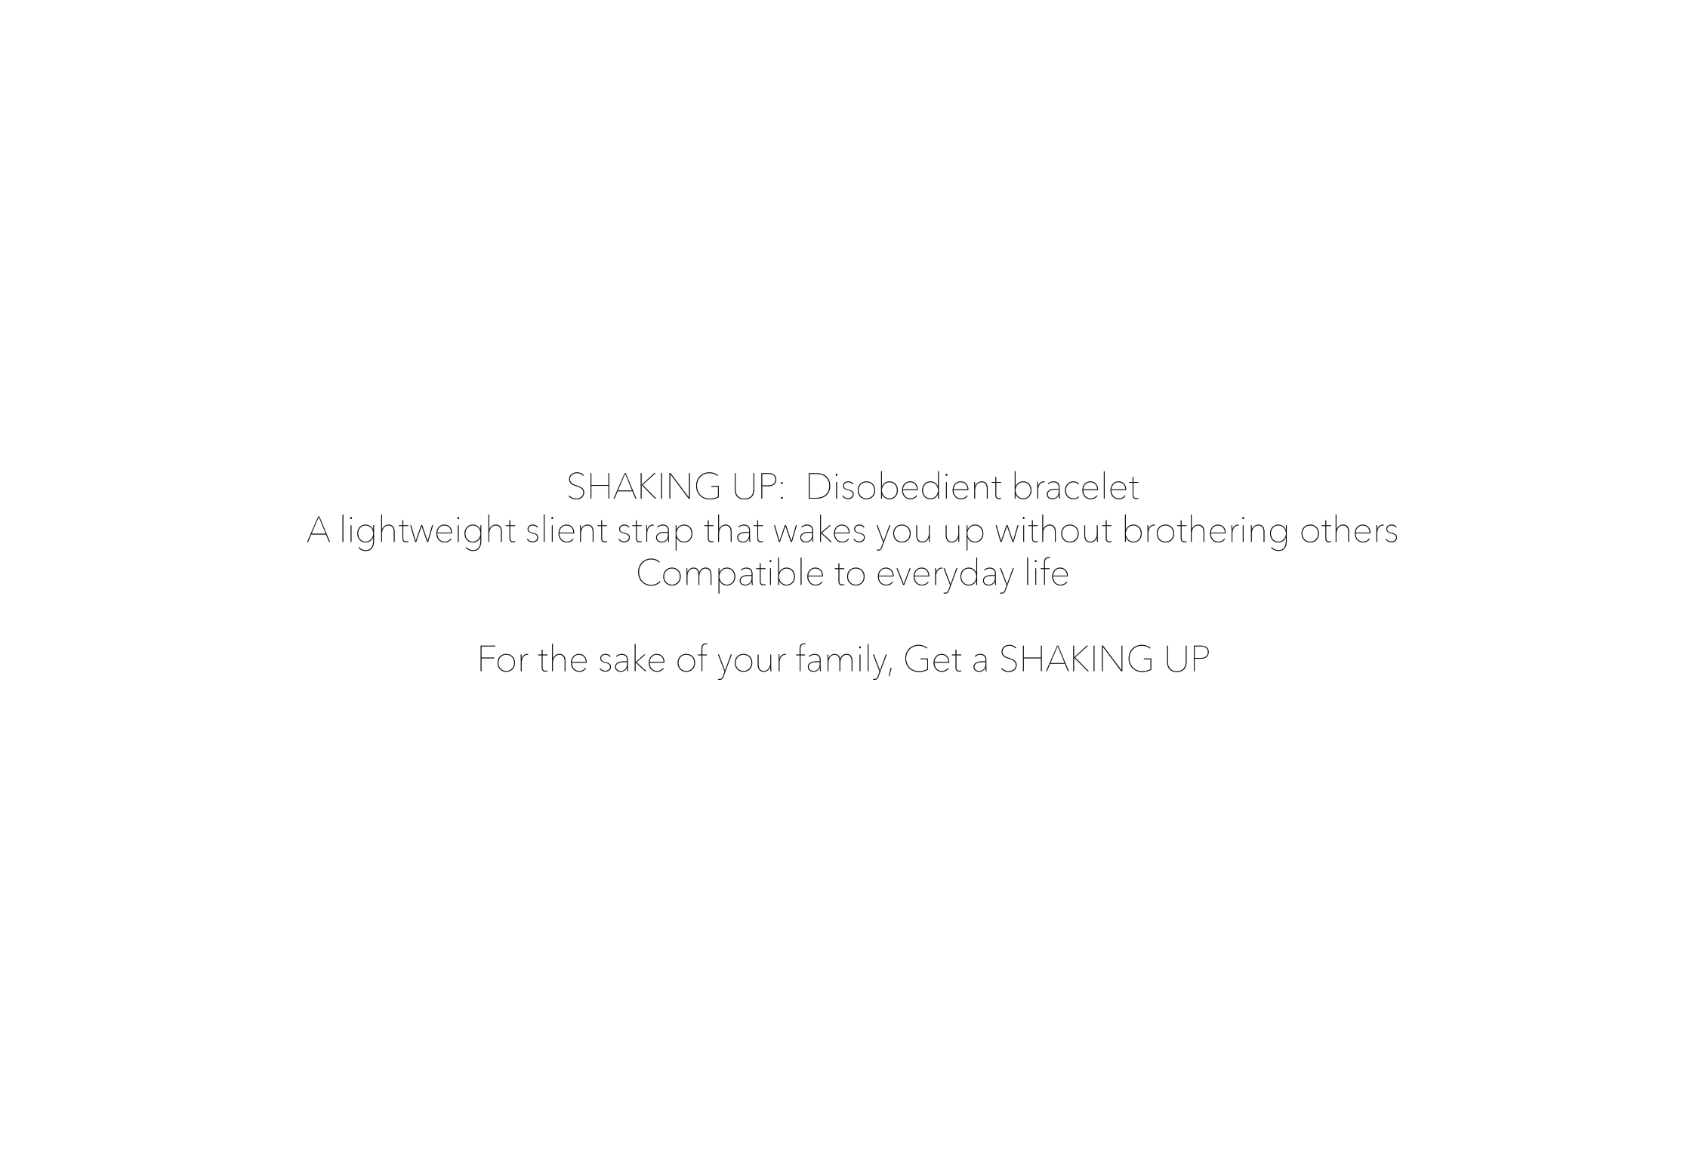
Our 1st participant was confused about how to interact with our object. She tried on and noticed the object is vibrating. The 2nd and 3d participants observed the 1st participant and got the idea of the function of our object(vibrates then stops, vibrates and stops). Overall, participants didn’t get the meaning of our object after experiencing. Nevertheless, after explaining and presenting our object, people gave positive feedbacks saying that it really works as a “Shaking Up” object. People became even more interested in our object when they were told the strength of vibration can be adjusted.
Challenges
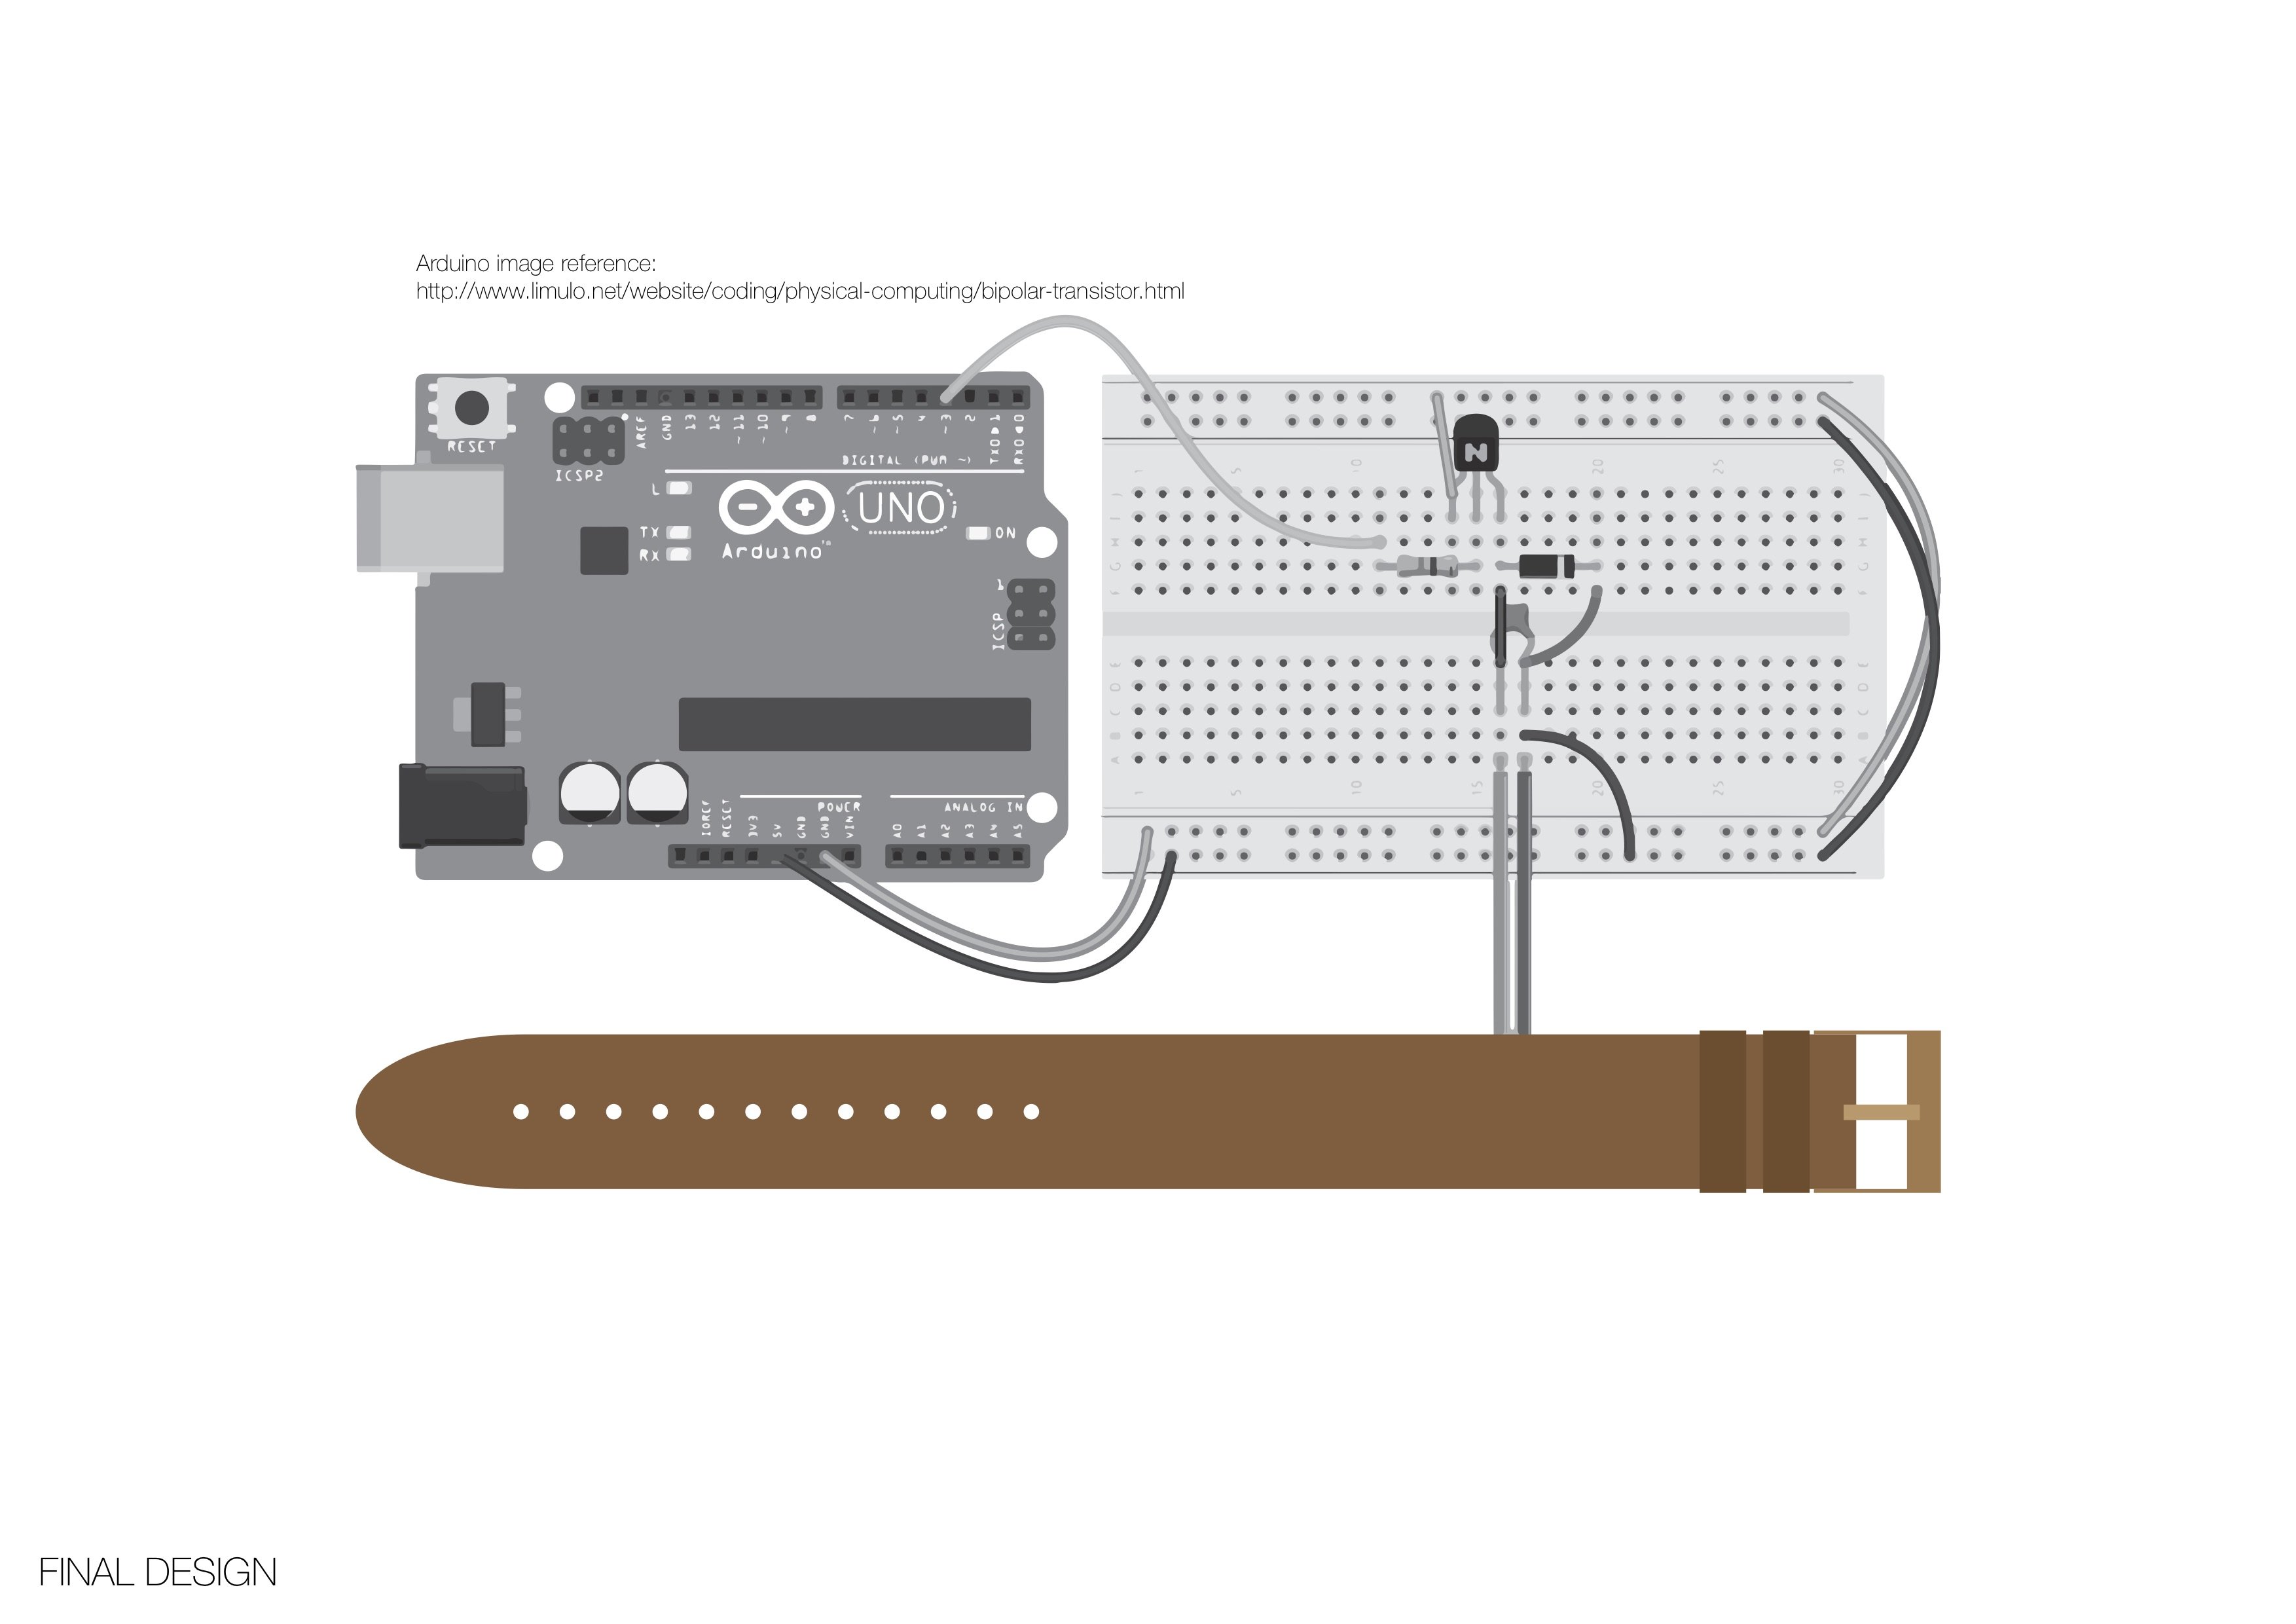
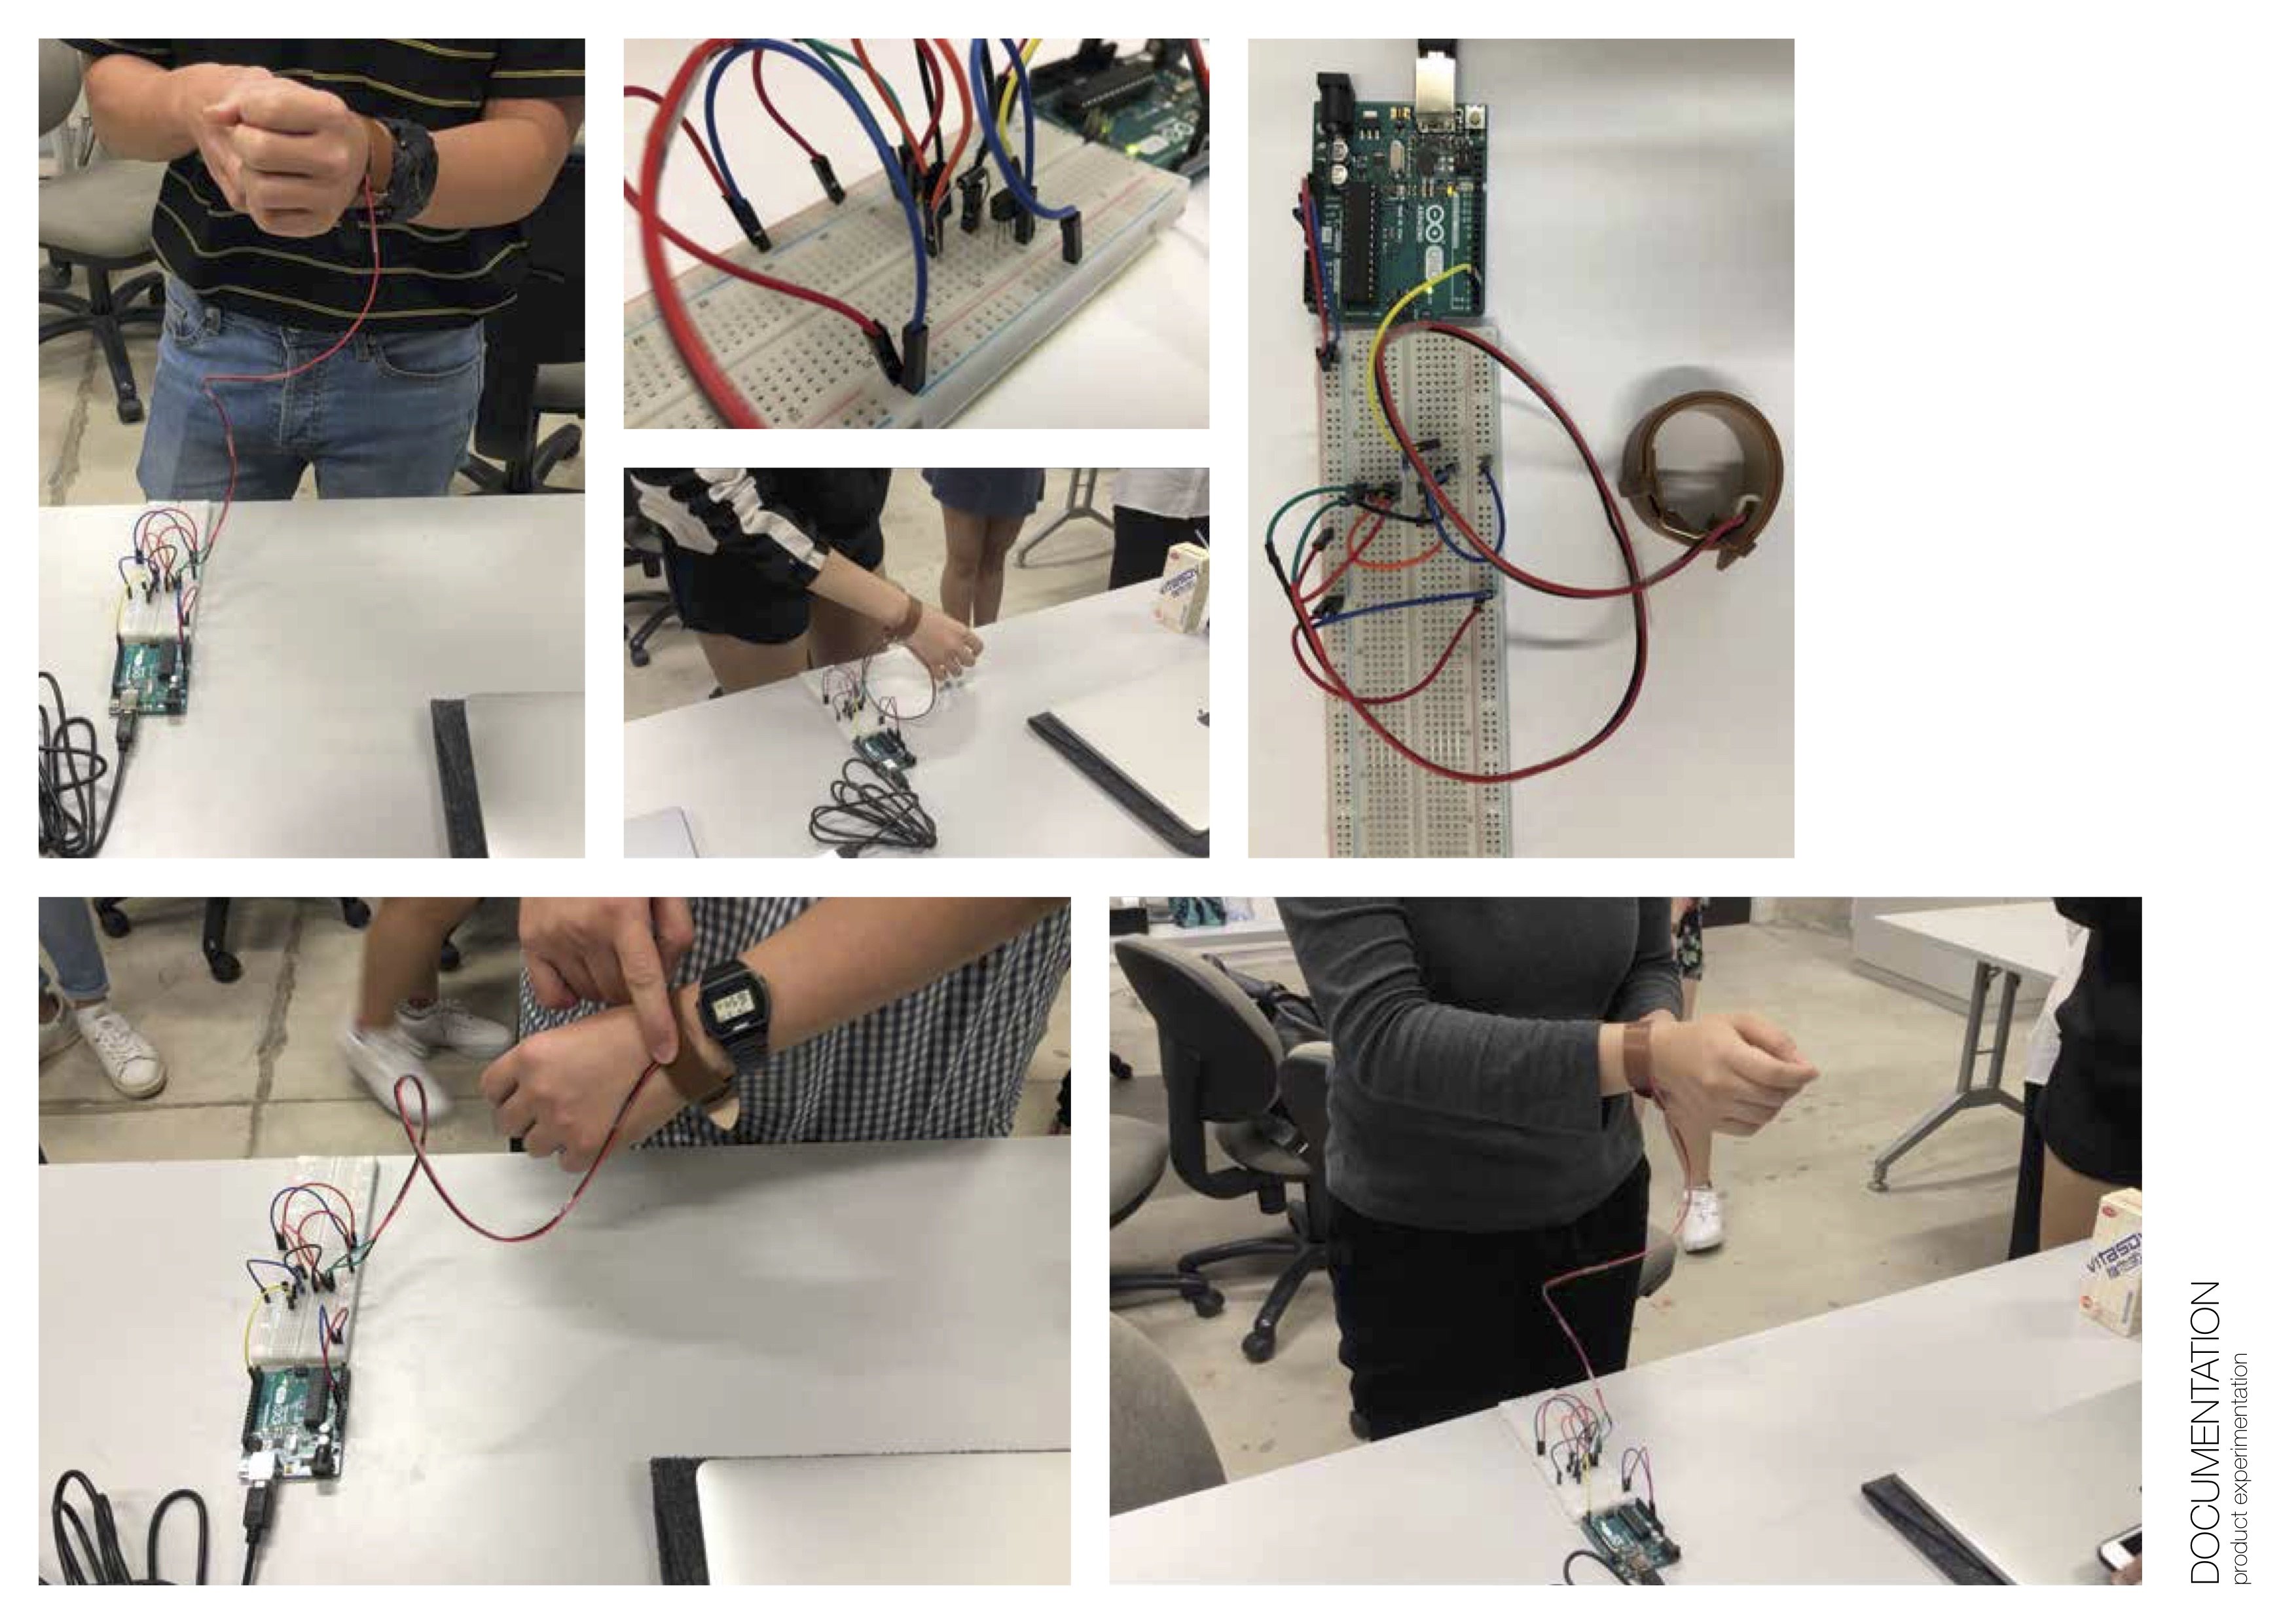
When we first came out with this idea, we were very lost as we haven’t learnt how to use a motor. We struggled a lot of from what electronics and electrical needed to how to type for the coding nor how to setup the arduino with the motherboard. Choosing Material for attaching the vibrating motor: a bracelet, an elastic band, etc. We chose a watch strap as it is lightweight and comfortable to wear on, perfect for wearing when sleeping. We thought of placing the vibrating motor on top of the bracelet but instead we placed it at the back so the vibration to user was stronger.
The questions for consulting:
How to connect the timer with the vibration motor?
What is const int motorPin? motorPin=3? (we are confuse)
What does it mean for the speed of motor to be 0 to 255?
How do we control the strength of the vibration?
The problems were mostly solved during the consultation. I am pleasant to have a slot for consulting our lecturer. The ‘sewing department’ helped us to lengthen the wire of the vibrating motor and Lei helped us to find a sample together showing how to place the electronics. We learnt that a 1 Ωresistor isn’t same as the 5 Ω one and how to control the strength of the vibrating motor (value 0-255, the larger the value, the higher of strength). Also, learning that Arduino Pin3 is used for motors.
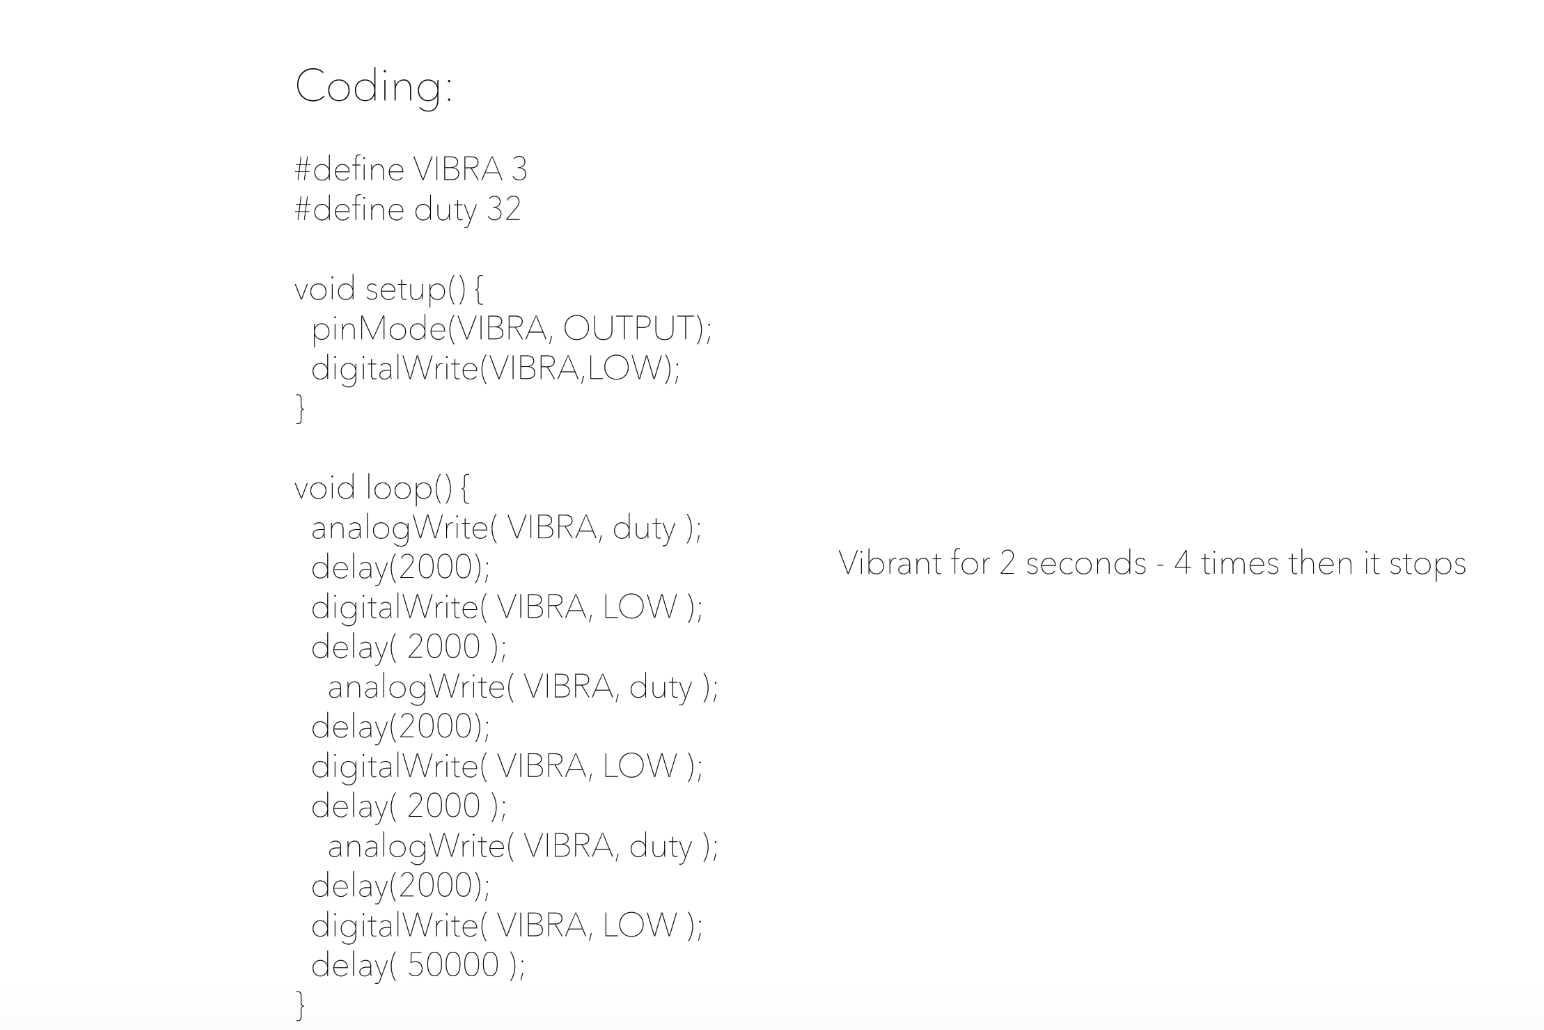
1 hour before the Trying On lesson begins, we still couldn’t solve the coding problem. We wanted it to vibrate for a few times then stops, just like how an alarm clock functions. We thought of doing a countdown code but it was too hard for us to construct a workable coding. We ended up using the original researched coding sample.(changing the delay time) We copied and placed some codes but there were errors of the codes. Finally, we solved it by double-checking the connection to the right port and decreasing the times that we wanted it to vibrates(from 5 times to 3 times).
Reflection
The experiencing could be bettered by including a sensor or more output devices, for example, a LED light, pressure sensor, a buzzor. They can create a more ‘interactive’ experience to the participants. I will say we both learn a lot from this Micro-project, about collaborating with a partner, constructing a interactive product, knowing the materials and electronics needed for creating an Arduino working object. I hope one day I can actually write and put the electronics in the right place without coping codes and following the sample.
HAMI
Both of us understood the brief differently and because of that there wasn’t any unexpected behaviour. The whole layout was set to achieve the expected results. Since our final outcome was a little different from the rest, our first participant was extremely clueless on how to interact with our object. She keep on asking questions on how to approach the object which ended up with one of us have to step in to help her. The other two participants was quite alright since they have the basic knowledge from the first participant. The overall feedbacks we get was that everyone was at loss with our object. However, after our explanation, everyone seems to be aware of what we are trying to approach. There was also a moment of chaos when they learn that they are able to control the strength of the vibration. Overall, the reaction we get was that a few of the class thinks this vibrating bracelet was a cool idea however, there was a handful who thought that this was a useless idea which is quite sad. The whole process was a challenge me and Emma since both of us was completely loss throughout the whole making process. We were lucky that we get a slot for the consultation. The consultation helps a lot. Like seriously a lot. The challenges we faces is 1. Controlling the strength of the vibrating motor . 2. The parts we need for the vibrating motor to work . 3. Getting the right coding for the alarm. The first and second challenges we overcome with Lei helps. The discovery of controlling the strength of the vibrating motor helps most the confusion. But sadly, we still haven’t solve the alarm coding. Our lack of understanding with the code ( with / for ) make it impossible for the alarm to work. We decided to play around with the timer coding (it is the easier way to deal with time) by creating longer delay. The existing problem is perhaps that we are making an alarm object without using the alarm coding. I guess the only way to overcome this situation is when we learn how to make interactions with time.
Comparing Micro Project 4 with 1, 2 and 3, Micro Project 4 is way beyond difficult but I think mostly it’s our fault that we were quite ambitious to try something that wasn’t taught before. Perhaps we should try dealing with LED light and sound sensor. Vibrating sensor was quite a challenge to deal with firstly the different parts that we never heard off before and secondly it deals with time. We learn a lot of things in this project but the main takeaway is that interactions that deals with time is … let’s just say difficult is an understatement. Till today we are still confuse about the whole coding.


 1. ColorEmo
 Project Brief