Interactive telecommunications force a re-evaluation of what we have learned from television

Lovejoy talks about the juxtaposition of cyberspace, technology and humans, and how the formal has changed the way we interact. This reflections summarizes my notion of individualism that emerges from the creation of cyberspace, critically analyzing how the disappearance between private and public boundaries disrupts culture, social structure to create a blend of identity that is transcends categorization.

Erosion of social structure and culture

The emergence of cyberspace in the year 1982 by author William Gibson, which he coined in a fictional book and now become reality. Much so, the cyberspace, which largely consist of online networks and the internet had altered its position from being an escape from reality in the early 2000s, to reality being an escape from cyberspace in our current modern era. We were fascinated with what the internet had to offer, its possibilities were never-ending and our curiosity led us deeper into the world of cyberspace that we had unknowingly caged ourselves in a space we do not fully comprehend. Yet, we are so comfortable in this virtual space that we are blinded by its dangers; or choose to turn a blind eye on it.

The spying; the breaking down of barriers between private and public space for an individual was identified by Lovejoy as she denounces the cyberspace for this erosion. We tune in to our social domains and internet so often that we become ‘social’ by being ‘anti-social’, which is so ironic as we lose our sense of genuine, face to face communication and we rely and depend on the internet to hold our social interactions instead. We are unknowingly data-mined on a daily basis through our web browsers (cookies and service providers), spied on with our webcams and even voiced recorded and analyzed through machine learning to ‘personalize’ our user experience on Google, to receive advertisements on products we seem to voice out through our computers. Imagine having google ‘read our thoughts’, that is how the internet space is becoming.

We break the traditional perspective of hierarchy, as we are able to communicate to just about anyone with different statuses, different backgrounds and social standings.To further emphasize on this change, our culture has been eroded in a matter of years due to globalization and cyberspace interactions. Some cultures that took centuries to create are often neglected as they become obsolete in the cyberspace, as the internet becomes a borderless space that embraces every individual. People on the internet do not bond their traditional cultures per se, instead the main stream media has repudiated the idea of culture by promoting pop culture. A new, widely accepted culture that becomes a norm for everyone, regardless of nationality and race. The idea of promoting self was created by pop culture as a way to liberate ourselves from the stresses of having to conform to society.

Cyberspace as a venue for validation

We have created a persona, an impression that we wish to convey, a front made to convince others that this is actually the real us. Many seek validation online, through platforms such as Youtube and Instagram, as they constantly monitor their likes and shares on these social media platforms to validate their self-worth. It has become such a big issue that Instagram change its policies recently to remove the number of likes being displayed.

Social Media Influencers often provide the opportunity for people to live vicariously, to experience the crazy experiences such as travelling and living in luxury. ‘Followers’ tend to support these influencers in their lifestyles by ‘donating’ to them, and feel the satisfaction of seeing their influencers have the opportunity to live a lifestyle ‘funded’ by them. Unbeknownst to many living in such manner, we are guilty of doing so as we indulge in hours of drama on netflix, youtube surfing sports cars and house tours of mansions, amongst many other forms of entertainment. The availability of entertainment may cause some to stop short of living their own experiences as they are able to do so through others.

Individualism

We do see the social commentary on proprietary models that emerged from the 20th century through the form of WikipediaArt. WikipediaArt is a performance artwork that critically analyses the nature of art, knowledge and Wikipedia, a collaborative project by Nathaniel Stern and Scott Kildall.

Wikipedia Art

Although I appreciate and support the challenge against ownership and champion the idea of an open source thinking, it provokes me to think about individualism that arises from participation of WikiArt. Specifically, the fact that individuals are able to contribute to an artwork in an open source setting such as Wikipedia, and subsequently seeing it being taken down just 15 hours after its creation confirms that a sort of proprietary model still governs the open source platform. The backlash by the online community made me question: was the commotion really about criticizing ownership, or because expression by individuals were subdued? This expression makes me ponder about the people’s perception of contribution and ability to impact the cyberspace which they are actually concerned with, rather than simply denouncing Wikipedia’s ethics. The problem of individualism arises again as I believe people may be genuinely obsessed with their ability to create and impact on the cyberspace. The open source space of peer to peer interaction may be a mirage of peer to peer validation.

Conclusion

We live in an era where it is difficult to identify the long term benefits and consequences of engaging in the cyberspace. The disconnect from reality by communicating through the cyberspace and erosion of culture leads us to validate and identify ourselves in ways that we may not notice, and thus communicates our growth of individualism as we are reorganized through globalization. We will continue to find ways to belong and exist on the cyberspace as we inculcate in the young the need for technology.

Sources:

https://wikipediaart.org/

Vaidhyanathan, S. (2005). Open Source . In Open Source (p. 25).


Plakatstil, also known as Sachplakat, is German for Poster style, originating from Germany in 1900s. It was started by Lucien Bernhard, who was also the director of Das Plakat, a monthly German art magazine. Plakatstil turned away from the complexities of Art Nouveau, into a more modern outlook on poster design.  Since it was a style, there were certain distinct characteristics found in all Plakatstil posters, such shapes and objects being simplified as plenty of negative space to guide the viewer to focus solely on the subject matter. The posters were usually accompanied by bold lettering that grabs the attention of the viewers. Lucien Bernhard believed in minimalism, in the ‘less is more’ approach. Plakatstil became universal style that did not have any association to any specific school or art movement.

The colours used were usually reductive flat and distinctive, eye catching colours. Bernhard was 15 when he attended the exhibit in Munich of work and walked away ‘drunk with colours’. He attention was caught by the flat, eye catching colours he had seen, which jumped at him. This was when he came to the revelation that design could be minimalistic and clear; clutter and intricacies of design was not necessarily vital to bring forth a message. In Bernhard’s poster for Priester’s matches of 1905, his original idea consists of cigar, dancing girls and a table; which he felt reflected Victorian style, something he did not want to achieve. After reduction and compositional tests, he removed the elements one by one and was left with a the matchbox and matchsticks. This gave the poster a minimalistic approach and the message was straight to the point. In this new era, shapes and objects were used, rather than full-on illustrations.

Poster for Priester matches, Lucien Bernhard, 1905.

Typography was usually created by hand as part of the illustrations. Although Bernhard preferred using classic book typefaces for setting text, he designed a number of display typefaces, including Bernhard Gothic, Bernhard Fashion, Lucian, Bernhard Tango, and Bernhard Brushscript. There was no limitations to what kind of typefaces could be used in Plakatstil.

Poster for Stiller shoes, Lucien Bernhard, 1912

Plakatstil was a style that was not art for art sake, rather it had a function, a purpose. The purpose was to capture the audience and entice them to desire, and therefore purchase what was reflected in the posters.

Poster for men’s ready made clothing, Ludwig Hohlwein, 1908

Minimalism, less is more concept of Plakatstil was unfortunately derailed in 1914 by WWI.

As artists, we are constantly being in the loop of trial and error, finding the best way to communicate our messages on advertisements to the viewer without distracting or distortion from the original message. The Eureka moment struck Bernhard as he developed the idea of using a minimalistic approach to his design, influencing many others such as Ludwig Hohlwein and Hans Rudi Erdt. Although there wasn’t a definitive style that followed in Plakatstil’s footsteps, artists such as Nancy Stahl, who designed the 37-cent Snowy Egret definite stamp in 2003 drew inspiration from the style and evolved it to integrate into her own art style. The bold and graphic stamp was made in a reductive, flat-colour style, drawing resemblence in colour to that of Hans Rudi Erdt’s ‘Opel poster’.

FUTURE WORLD

is an interactive space consisting of numerous exhibitions where visitors can interact and immerse themselves in a ‘magical’ environment. High-tech interactive artworks in Future World are created in collaboration with teamLab, a renowned interdisciplinary art collective. It is here where we see a fusion and removal of boundaries between art and science. How appropriate it is to be held at the Art Science Museum!

INTERACTION.

It is defined as a reciprocal action or influence, involving two or more objections or persons.

As we previously learnt, interaction come can in many forms, namely:

Man-man interaction

Man-machine interaction

Machine-machine interaction

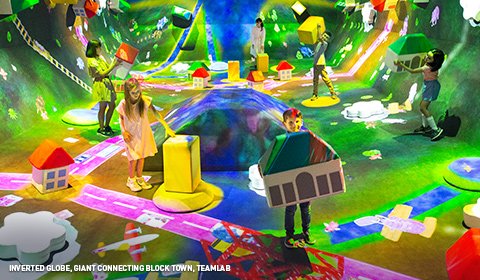
In future world, we are able to see all of these types of interaction happening. Man-man interaction is displayed through the observation and reaction to other people’s input onto the interactive screens, which I will discuss further. Man-machine interaction occurs when the visitors are required to sketch a drawing, move closer to the installation or follow an instruction to receive a reaction from the machine, in this case the installations. Machine-machine interaction is displayed when we move an object, for example in the City In a Garden – Giant Connecting Block Town, when a block is moved to a different location, the map recalibrates and reflects the current location of the block in the virtual map.

Real time change in location of objects, synchronized with the physical location of representation objects placed.

An interactive artwork should invite visitors/participants to think, take a step back and observe. It creates a personalized experience and opinion towards that particular artwork. We deviate from the typical need to critique and evaluate each artwork based on how ‘good’ it is, how it is able to accurately depict or evoke a certain emotion or get that certain reaction from its audience. Instead, we as the audience break down and digest the artwork empirically.

Certain level of understanding is needed before a viewer chooses to interact with the object. We as humans have the tendency to fear what we do not know and reject it. As much as we tend to give the audience the freedom to interact, we insert controls to guide the viewer, which does so much for us. These controls can help preserve our artwork, tailor user experience (albeit to a small degree), and most importantly ensure that the interaction becomes a positive experience. These ‘controls’ usually come in the form of instructions, or guides and hints that lead us to a certain action(that is usually unrestricted) that kick starts the entire experiential process. Without these controls, there will be little to no understanding from the viewer and thus restrict or compromise the experience. Let me provide you a few examples.

*170314_Sliding through the Fruit Field_nontelop

As seen in the Sliding through the Fruit Field installation, there is a set of staircase that leads people up the top of the slide, where they can slide down and observe the interaction beneath them. They ‘become a beam of life-giving sunlight, and as they glide down the slope, their energy is transferred to the fruit field, causing flowers and fruit to blossom and grow’. Even though the interactivity is the most important aspect of this installation, without the control(staircase), users may not be aware on how they should properly interact with the Fruit Field installation. Users may end up trying to climb up the slide via the interactive screen, which increases the chance for injuries etc, or end up not interacting with it at all because they don’t know how to.

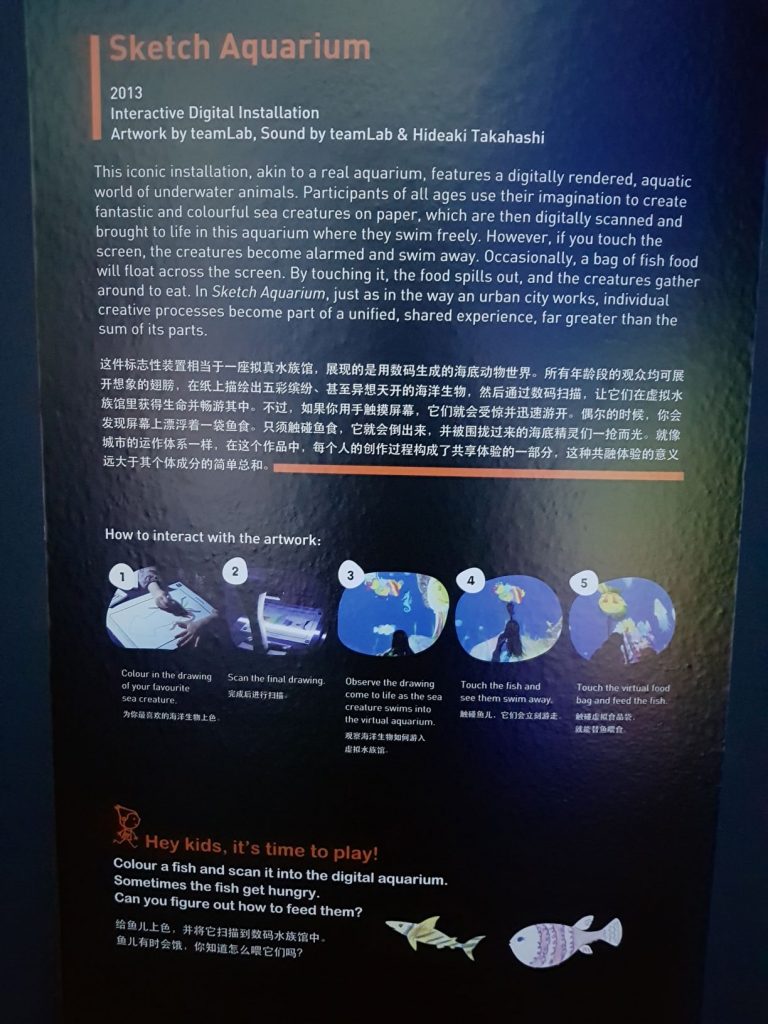
At another installation, called the Sketch Aquarium, viewers see a set of tables and chairs, with a giant screen that displays the Aquarium. There is a set of instructions like this:

These set of instructions and description helps contextualize the artwork, and in my opinion, although done as an afterthought(so I would assume), it is a vital asset of the artwork.

As previously mentioned, the control acts as a guide and thereafter, the freedom of what to draw, where to touch etc. belongs to the participants.

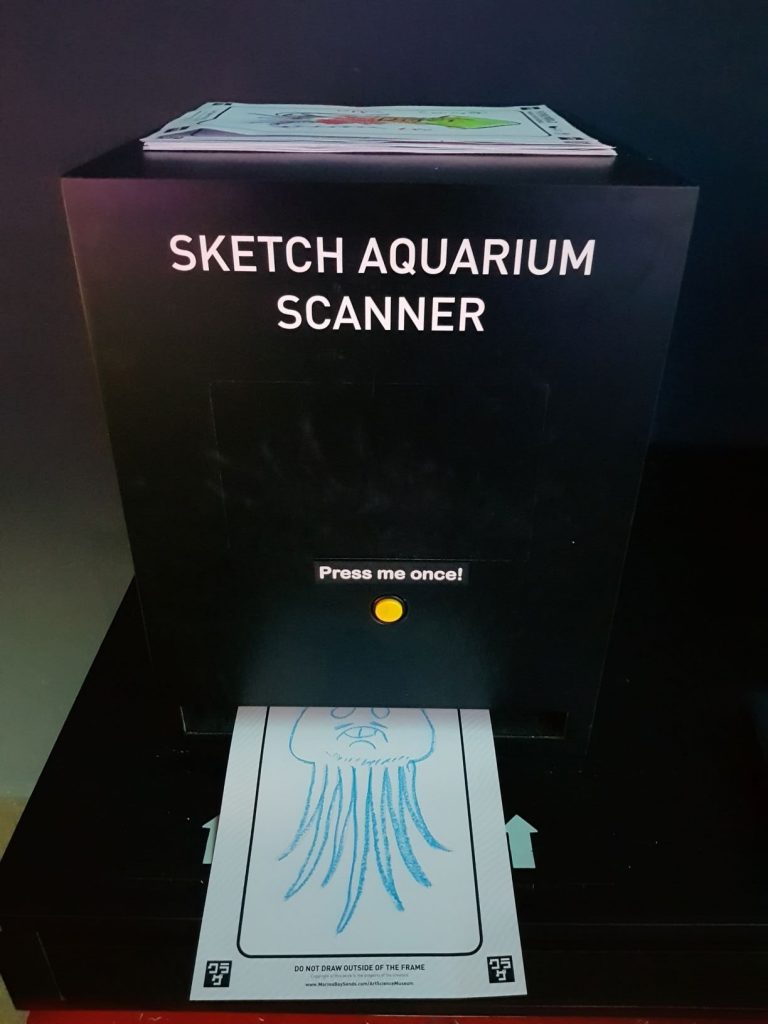
I drew a gentlemen jellyfish and scanned it, adding it to the collection of fishes appearing in the Sketch Aquarium.

Video of my jellyfish

It was also natural for viewers to read and observe other viewers’ creations as well. One viewer had written on his fish ‘Free HK’, which reminded me that the content scanned and uploaded were unfiltered. This allowed the viewer to actively voice his opinion on the Aquarium, as part of the ‘freedom’ he was entitled in this interactivity. Could this be then considered a limitation of the artwork? After all, any viewer could exploit the use of the Aquarium.

SPACE – Crystal Universe

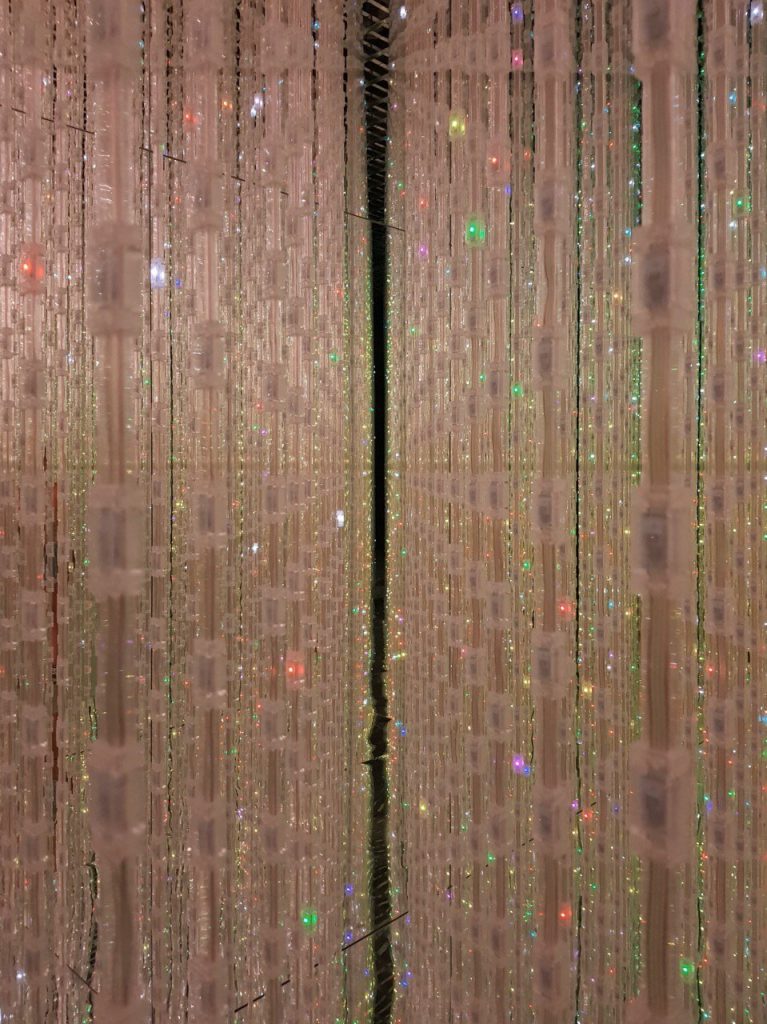
SPACE – Crystal Universe was strategically placed as the last artwork before the viewers finish up their tour of the FUTURE WORLD exhibition. The artwork consists of over 170,000 LED lights and a panel to walk through before reaching an open space that viewers can capture the entirety of SPACE. I believe that mirrors were placed on the sides, top and bottom of the lights to multiply the illusion of the countless LED lights that resembled stars. The concept of space and the unknown will forever be intriguing. The beauty of the galaxy and its vastness is reflected in pop culture, where movies are based in Outer Space. Although I did not linger in the art space, the interaction encouraged me to step back and think about the interactivity that it involved – the swiping on our mobile devices to change the light effects on the installation. The physical element of simply touching the artwork is removed, since we send our response through the internet. Will that, then, change the experience of the users when the element of touch, thus interactivity, is changed? The medium, in which we are able to interact, therefore affects greatly how we receive the experience.


PTSD Vest

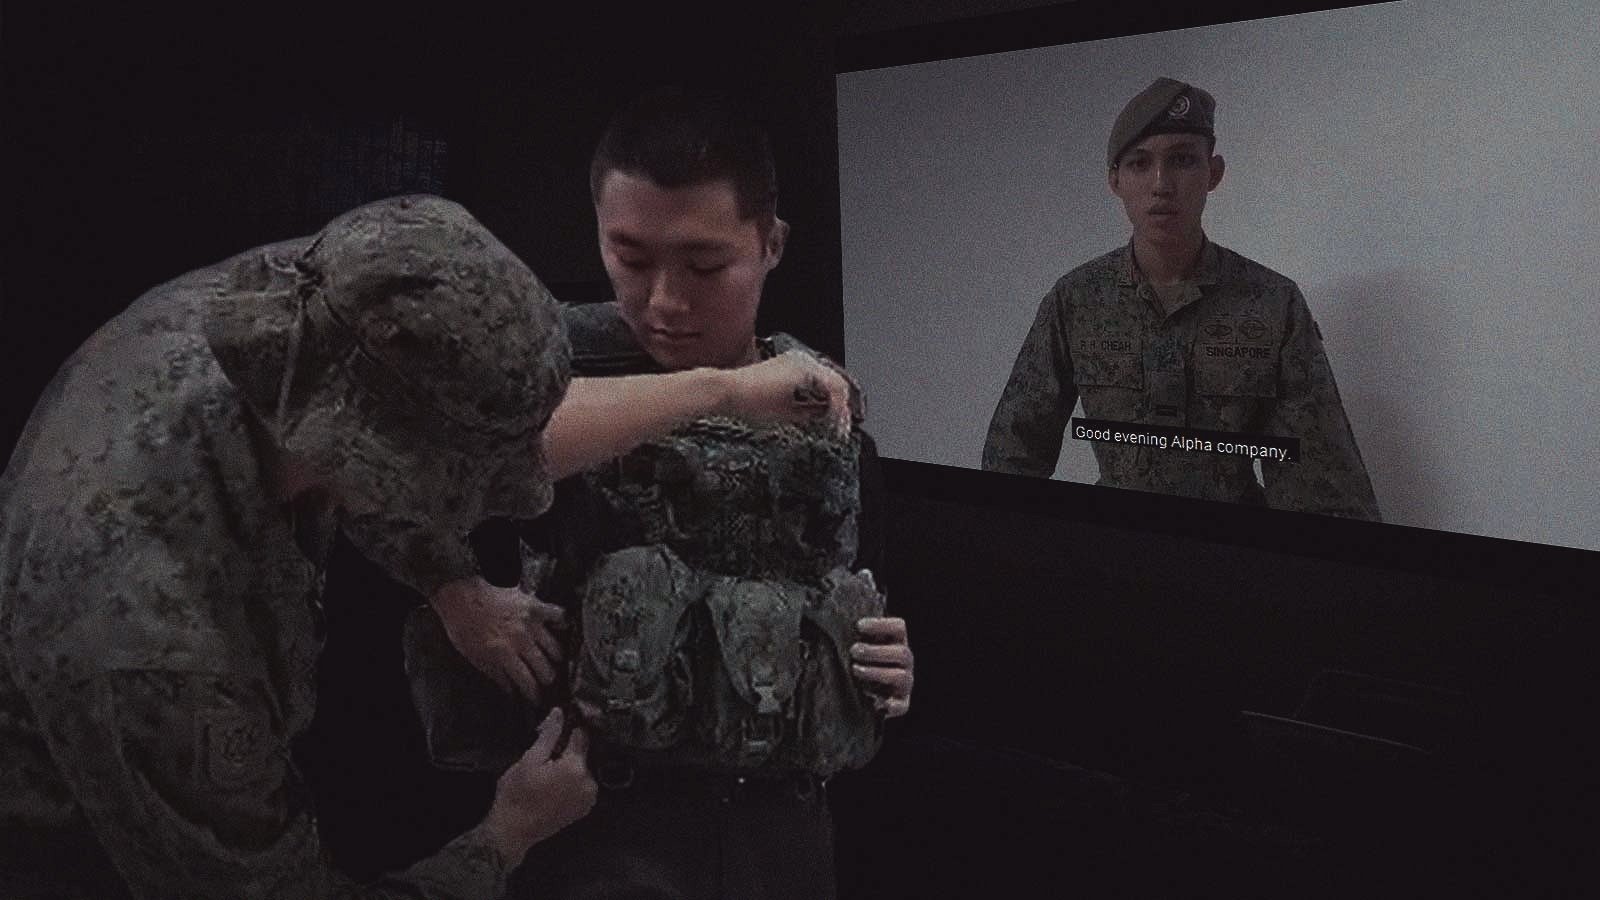
We set out to design a vest that simulates an episode of PTSD experienced by a war veteran. This is a dark object that forces the user to distance himself from others in society due to his seemingly irrational behaviour. We recreated a scenario that encompasses how the veteran: came to develop this disorder, how he acts in a public situation and how people react to him. Scenario: Person A has PTSD, which he had developed from narrowly escaping death from a live grenade explosion. He is being pulled aside by his commander at the point of time, making touch a trigger for his PTSD. He crouches down/ prones to react to the ‘situation’, which triggers different sensors to sound/vibrate. In designing this vest, we are creating an understanding of how one might come about to develop PTSD and hopefully create room for sympathy.


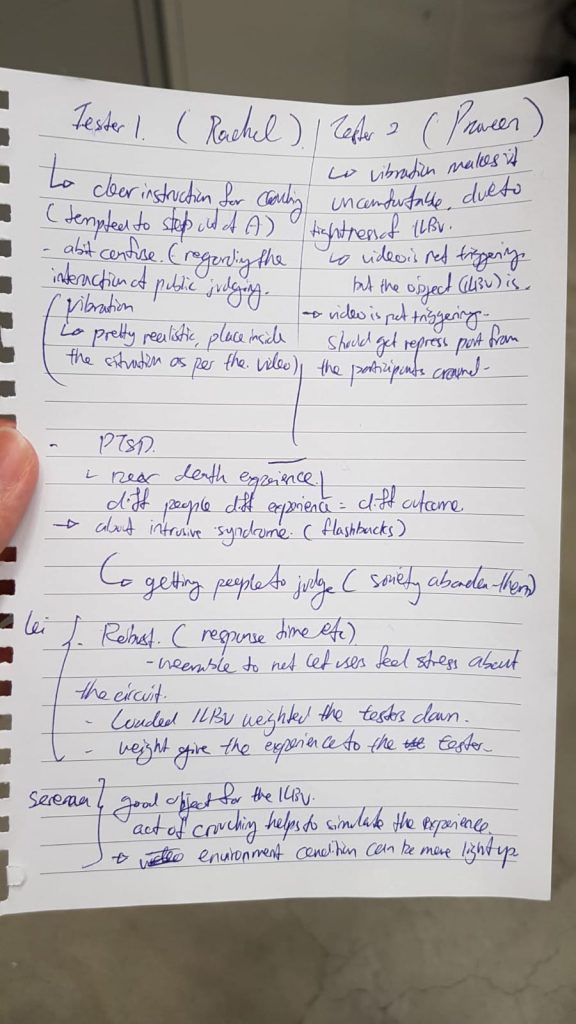
Observational documentation for user tests

3 user tests

Tester A: She was able to get into the vest, albeit the tightness. We gave her verbal instructions to crouch as we didn’t play the video for her.

The circuit ran as intended, the photocell sensor triggered the sound “Grenade!” from processing and she crouched down. In sync with the explosion, the vibration went off as well. We did not tell her about the vibrations beforehand; this will make it a more genuine test to see whether the circuit was able to work properly (and well). She said she could feel vibrations on her chest, but they were subtle. Using this feedback, we decided to put in paddings in the front zipper pouch so that the vibration motor will be closer to the tester’s chest when s/he crouches down.
Tester B: It was a guy, who was rather big sized. He was able to fit into the vest as well as we did not pull the strap too tight. We gave him verbal instructions as per tester A, and this time round he was able to feel the vibration. As he wasn’t taking EI, he didn’t know what the circuit was for and was genuinely intrigued by the PTSD vest. At this point, we knew the circuit was working properly and was satisfied with our testings.

Tester C: Last guy, he is an exchange student and didn’t go through national service. We helped him put on the vest and gave verbal instructions. The test went smoothly; the vibration and sound came out as queued. Tester C said it sounded like “Renade” but we felt that it wasn’t much of an issue because he tested the object in an open environment and wasn’t able to hear clearly. He also mentions that the vest felt light, and didn’t feel like an operational vest. He suggested that we add some weight to it.

Notes:

  1. The grenade sfx and explosion sfx was too far apart, there wouldn’t be a sense of urgency to crouch down.
  2. We also took note of the timing for the entire experiment so that it would not become repetitive.

Improvements

As mentioned, we added the front paddings with stuffings for the rest of the grenade and magazine pouches. This would provide more chest contact. We didn’t use hard material as it would not follow the tester’s bend and would instead make it more difficult for him/her to feel the vibrations.

We added a water canteen(1l water bottle) on the right side, and 1kg dumbbell at the back. These, coupled with the weight of the ipad is similar to the actual weight of an operational vest with hard plates inserted(ours was way more comfortable than the actual).

We cut the videos (introduction brief and day-to-day scenario) to around 2mins. This would consist of about 5-6 triggers, which we felt was just right. On the day itself, Daryl was in charge of guiding the audience around the installation, and I was to help with the participant put on the vest and guide him/her through the scenarios.

Here is the context video for our PTSD Vest.

Here is our final installation.

Feedback from final installation and user test experience:

  1. We can look into using surround sound to make it more realistic and immersive.
  2. The lighting could have been adjusted to see the video better and yet create a realistic environment for the tester.


Design Process documentation

It is important to note that we have chosen the ILBV not only for its representation of an object used it war, but also for its robustness and ability to store and conceal multiple objects. During our initial phase, we had planned where we would place our individual sensors and power source (Daryl’s ipad).

We created a google slide file for our initial research and presentation purposes:

Dark object – PTSD Vest Research and Presentation

For more information on design process, you can refer to: Project Development – Ideation Sketches and Context planning

Step-by-step construction of our PTSD vest

Materials:
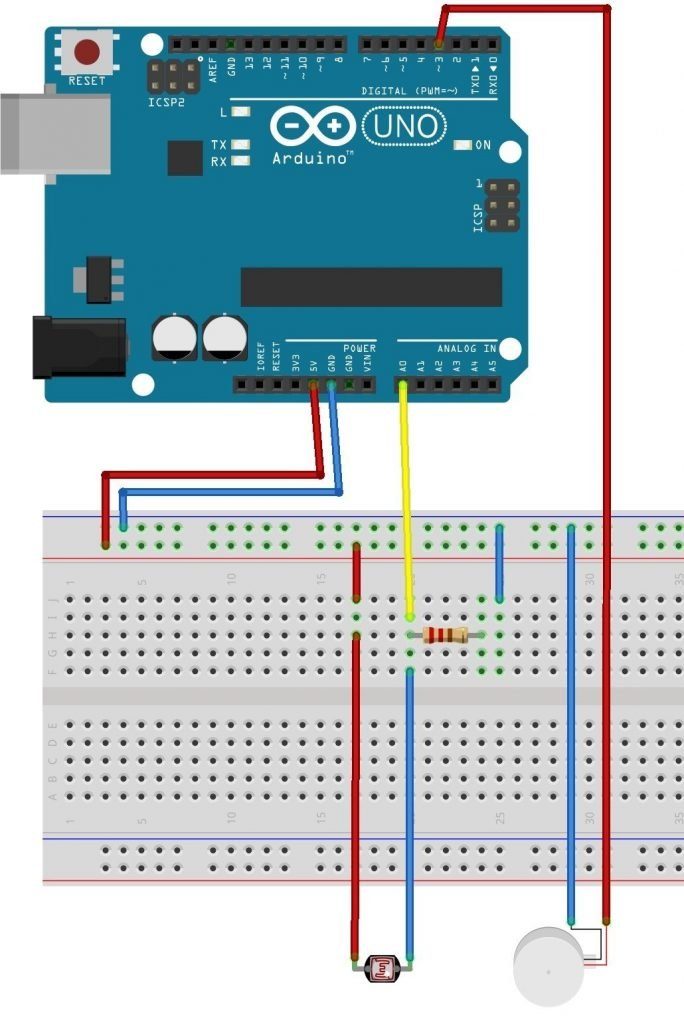
1. Arduino Uno
2. Photocell
3. Coin Vibration Motor
4. 220k Resistor
5. Cables
6. Vest
7. Grenade Explosion SFX Files
8. Tablet (that can run processing)

Programmes used: Arduino and Processing

Step 1: We started setting up the circuit. We bought the vibration motor and tested it with the arduino. We used a code from online and used different resistors to test the sensitivity of the vibration motor. It was slightly too strong (which shouldn’t be an issue) but that broke our first vibration motor. We were lucky to have bought a spare, and we taped it to whatever surface we were testing on so that it wouldn’t break apart.

Step 2: We uploaded the Arduino code; the photocell sensor would measure the light exposure in our environment. We set a threshold ”int threshold” so that when the amount of light exposure falls below the threshold, it would active the vibration motor and sending ”1” to Processing.

Step 3: Upload the ”Grenade” and explosion sfx into Processing. When ”1” is read, the ”Grenade sound” will go off. After a delay of a few seconds, the explosion sfx will play.

This was our initial voice recording: it wasn’t clear and created unnecessary ‘chaos’.

This was our final voice recording for ”Grenade”

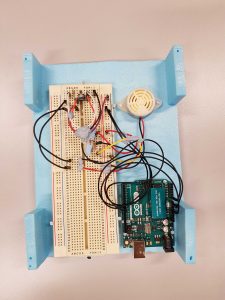
Step 4: Setting up the arduino/ breadboard to the vest. This required us to construct a simple box to hold and protect the breadboard and arduino, and also 2x 1m wires to allow the photocell to be placed on the shoulder pad, and the vibration motor to place in the inner paddings of the vest. This is how we installed it:


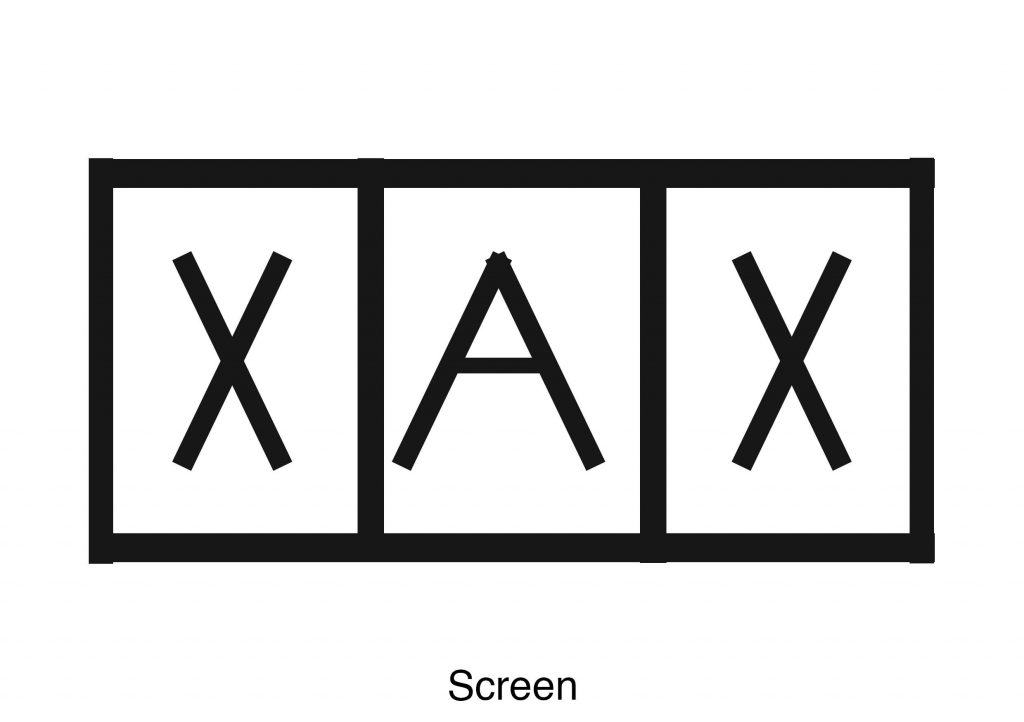
Step 5: Setting up the physical space.

A: represents locality A.

X: Supposedly where the viewers would stand.

This would give us control for our experiment and prevent deviations.

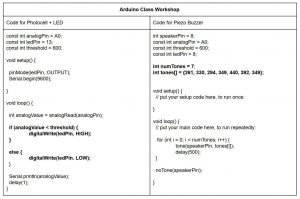
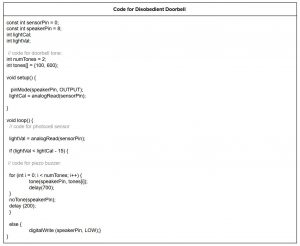
Codes:

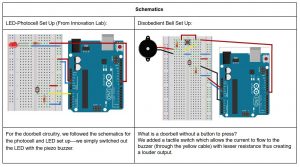
Schematics:

Micro-Project 4: Disobedient Object
ALL by Rui Hong & Daryl

Assignment Brief:
Using Arduino and its sensors and actuators, we were tasked to hack an everyday household object and make it behave in an unexpected/disobedient way.

Ideation:
The object of our choice was a doorbell, or rather the concept of a doorbell (We didn’t want to destroy and pluck out our actual doorbell). We chose the doorbell as it is an object with an obvious purpose and a predictable outcome when interacted with. Placed beside a door, the object, being a button, is easily recognized and participants would immediately know how to use it. The call to action for the interaction is straightforward and participants will assume to know what is the outcome–only when you press the button, the bell will ring once-Ding Dong. Here, we have an opportunity to use that assumption to create a new and unexpected experience.

Hence, the disobedient doorbell was meant to play on that preconceived knowledge of the doorbell mechanism. So instead of a doorbell that activates when you press it, it will activate before the participants presses or even attempts to press the button.

There are 2 stages of this interaction:
1. The participant approaches or comes into close proximity to the door and the doorbell will unexpectedly ring. The doorbell will continue ringing as long as the participant remains in close distance. (We estimated the distance for the bell to sound to be around 15-30cm.) When participants walk away or retract their hand, the ringing will then stop.
2. With the bell already ringing, when the participant chooses to press the doorbell button (we anticipate that participants will assume pressing the button will stop the ringing), the ringing gets louder to an uncomfortable volume with some distortion. Holding onto the button will keep the ringing at the louder volume while releasing the button will bring the ringing back to its original volume. Again, when the participants choose to walk away or retract their hand, then the ringing will stop.

The disobedient doorbell is meant to make the participant feel alarmed, confused and panicky like the participant is not supposed to be there, encouraging the participants to leave the site of interaction.

Realisation & Delivery:
So we started on our building process.

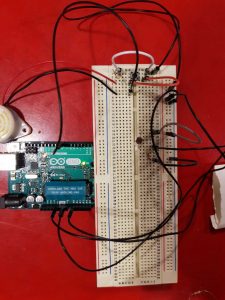
Inspired by the class workshops on the photocell with LED light and piezo buzzer, we combined the codes and modified the circuitry. Instead of the LED lighting up when the threshold of the light reading is low enough, the buzzer will sound. We then coded the buzzer to sound like the average 2-tone doorbell.

Progress & Final:

Video:
In Situ Video here. https://youtu.be/eVCgNR0CAl0


DARYL

What are some reactions you observed from your participants when they interacted with the object?
Participant #1: When #1 approached the bell, she didn’t realise that the bell had already rung when she approached it. She proceeds to press the button, which made the ringing louder, but she remains confused from the interaction. In the feedback session, she mentions that she is intrigued by the bell but wasn’t aware of the bell ringing in advance.

Participant #2: Given that #2 has observed the interaction of #1 with the bell, her interaction with the disobedient bell was closer to what we intended. As she approached the bell, she waves her hand in front of her, trying to test the bells sensitivity. However, the bell only reacted when she tries to press the bell. On multiple tries to press the button, when the bell rang prior to her touching the button, she retracts her hand as if the bell were a buzzer, telling her not to press the bell. She gives up trying to press the button and leaves.

Participant #3: The last participant, having observed the 2 interactions before her, reacted and had the thought process we intended. As she approaches the bell, it sets off even before she lifts her hands to press it. She jumps from the unexpected alarm. She continues to try and press the button. Because the button broke, we simulated the effect of the louder ringing as she pretends to press the bell. In the feedback, she mentions how when the ringing starts, she assumes that the button will stop the continuous ringing, hence she attempts to press the button.

Challenges & Problem Solving:
What are the challenges involved and how did you overcome them? What problems still exist? How might you overcome them eventually?

[Daryl: For the first few classes on Arduino, we were taught to use the arduino board and breadboard, learning how to use specific inputs such as the piezo buzzer, LDR sensor, LED and switch amongst other things. Given our inexperience, we took a while to figure out how the circuits would work, and through errors on writing the sketches we understood coding better.

The first challenge we encountered was starting on the coding. A blank screen can be quite intimidating and we did not know where or how to start. We then decided to work off existing codes we practiced in class. We started with the codes from the photocell workshop then incorporated the codes from the piezo buzzer workshop. We also used the IF & ELSE code from the LED workshop. After a few tries, we manage to get the piezo buzzer to sound.

The second challenges was finding the right sensitivity for the bell. We were not sure how close we wanted the participant to be. On multiple occasions, the bell became unpredictable and started sounding off whenever or did not sound at all to any interaction. We figured it was the angle of the photocell which affected its sensitivity.

Lastly, we had some difficulty fitting everything into a compact object and creating a button to extend from the breadboard to the cover of the case we built. We took a while to get the correct measurements and finish up the case for the doorbell. (After the in-class test run, we realise that the material of the object can also affect the way people interact with it and how they approach the object. We will consider the effects of materials for the next project.)]

RUI HONG

What are some reactions you observed from your participants when they interacted with the object?

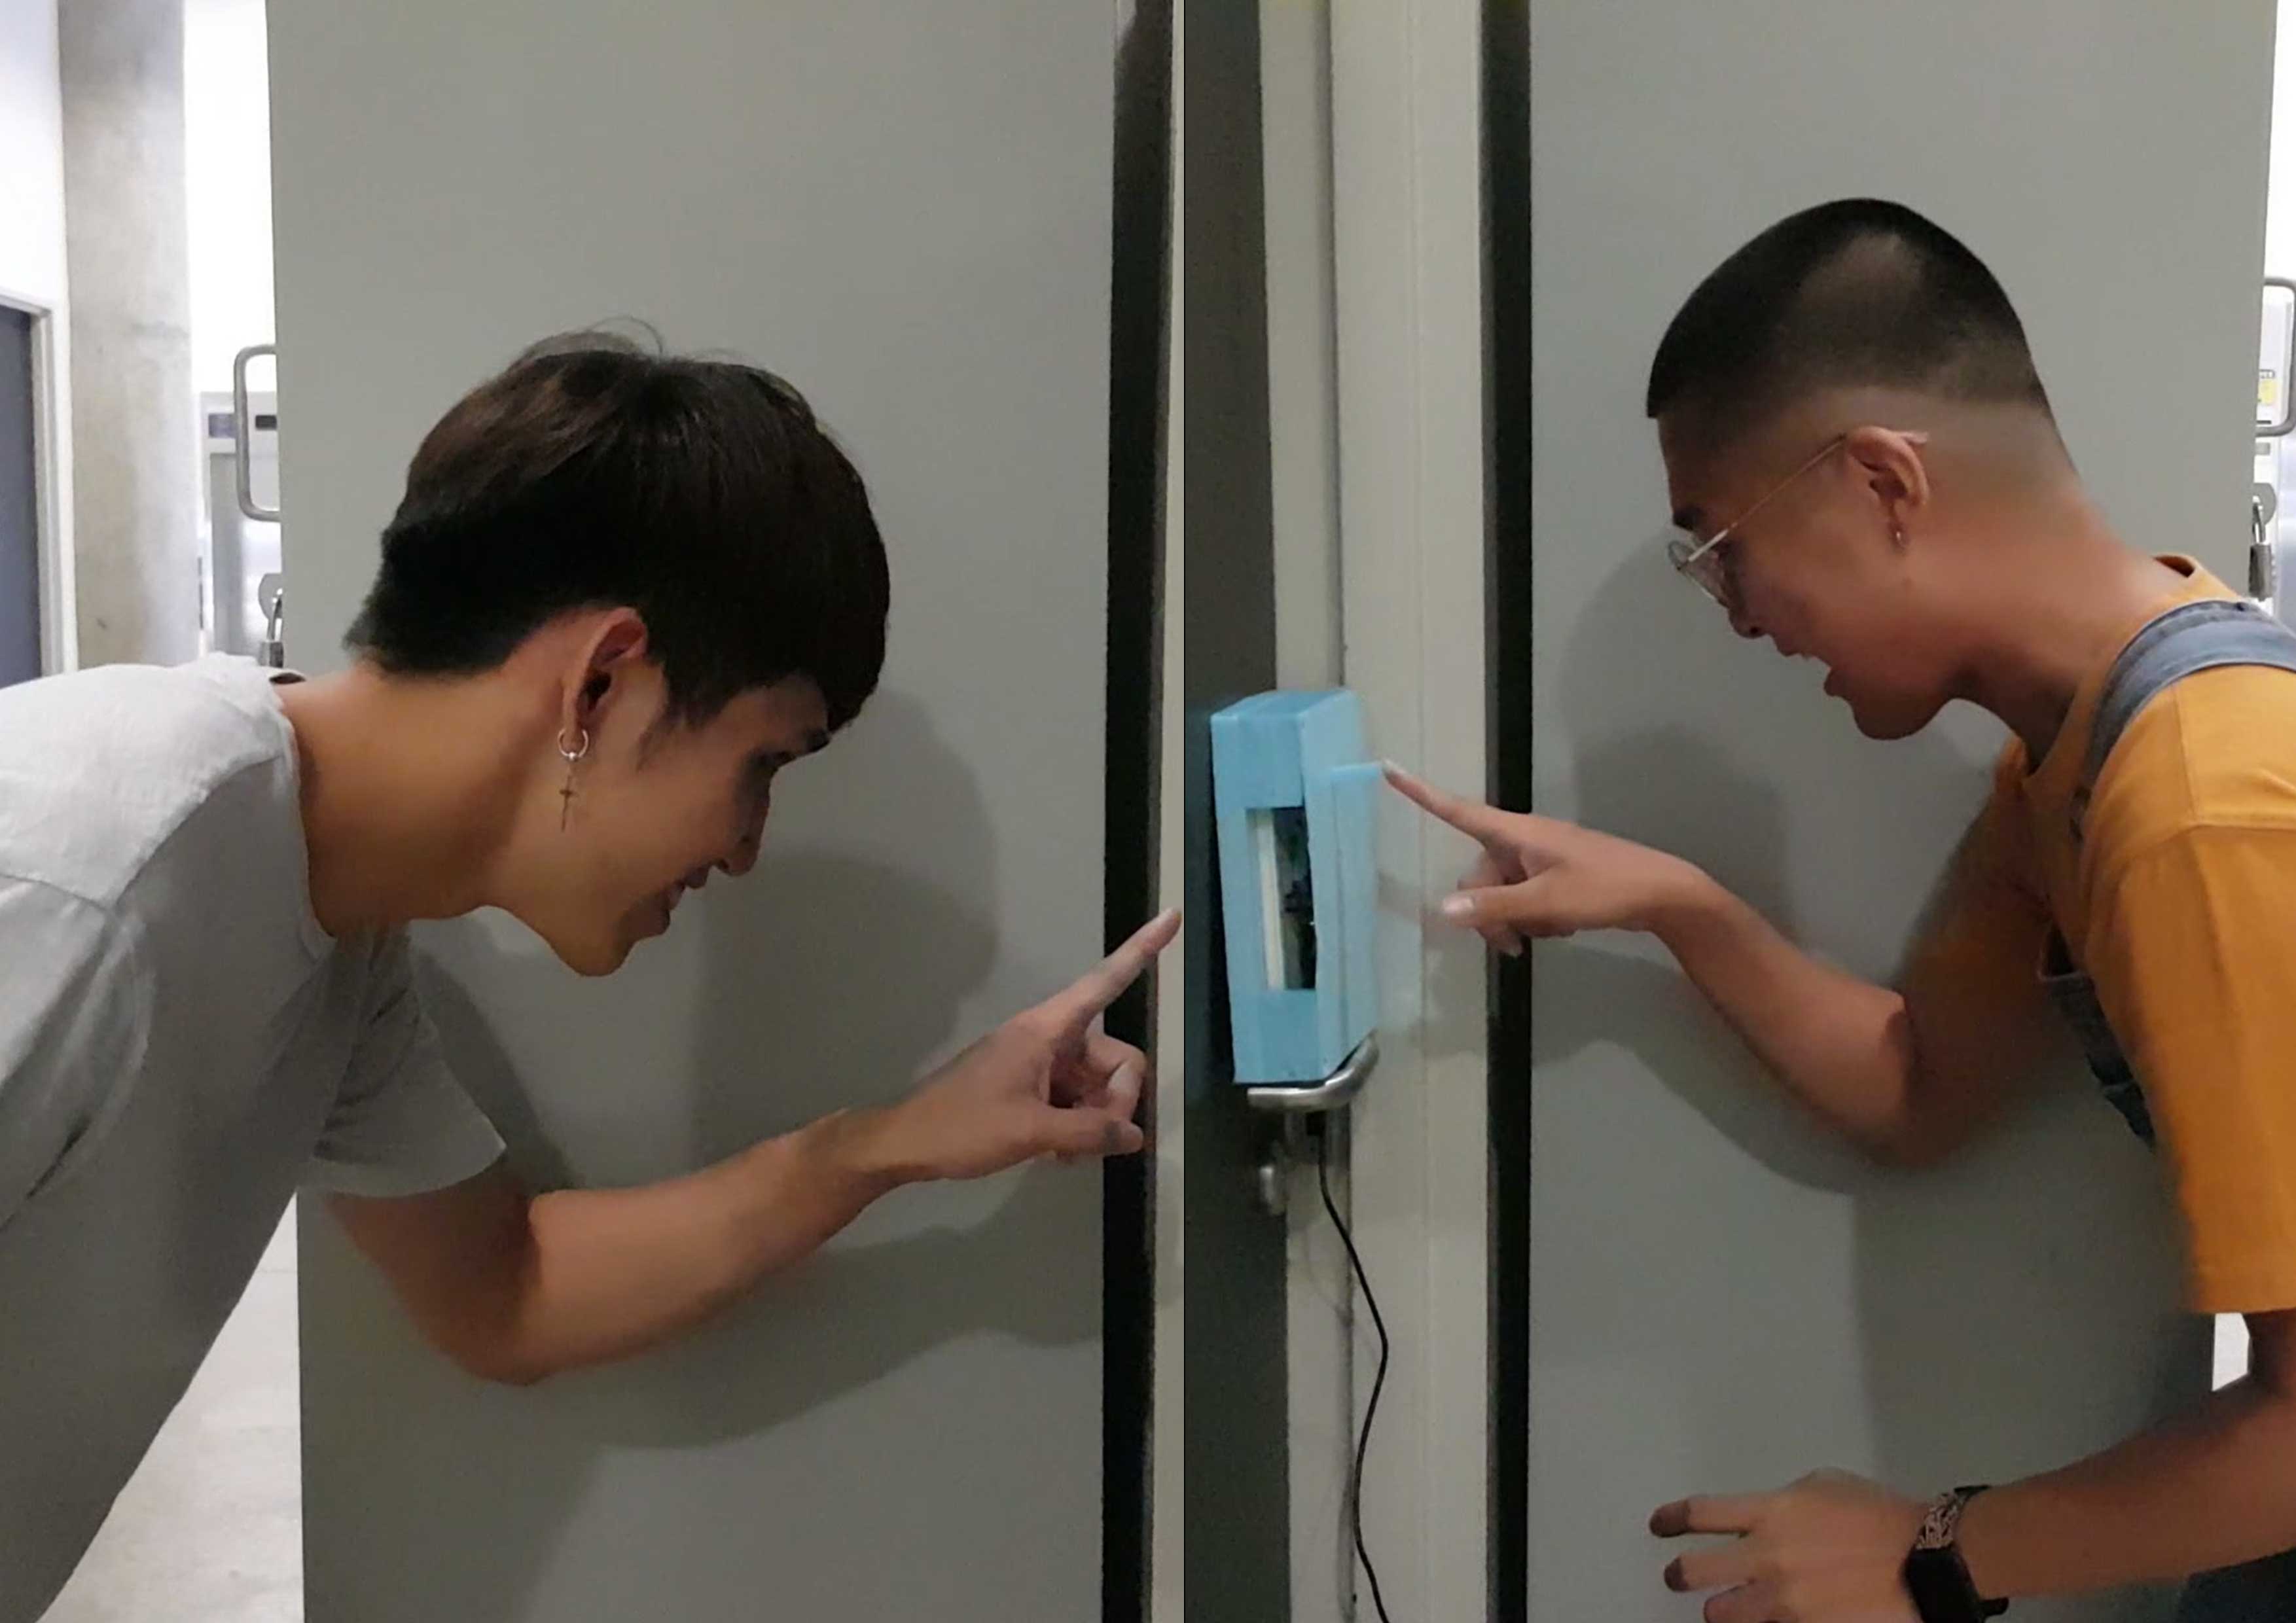
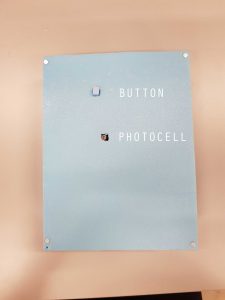
Participant #1: Participant 1, being the real guinea pig in this situation, approached the doorbell with confidence to test out the doorbell. It rang on queue and as there is only 1 button on the foamboard (which was intentional as to lead the participant to try it out on instinct), she pressed it and it gave a secondary beep. She didn’t seem surprised by the louder secondary beep. As we are used to having a ‘click feedback’ when we press a button, the foam button made it hard to feel the ‘click’ and that prompted her to press harder onto the button. What happens afterwards can be seen in the button. Besides the click feedback she was looking for, I felt like she may have expected a different result (such as a louder beep or a different sound) from subsequent presses and that may have prompted her to try again.

Participant #2: Participant 2, having observed participant 1 gained some insight on how the button may work. Approaching the doorbell, she tested out the sensitivity of the photocell by waving her hands in front of it. After that, she attempted to press the doorbell but was prompted by the initial beep of the doorbell to refrain from doing so. She ended up not pressing the doorbell, which I felt may have caused her to be uncomfortable and leave the interaction space (which was one of the intended outcomes).

Participant #3: Our last participant, having observed two interactions, had a similar thought process as us. She startled at the initial beep as she approached the doorbell. Thinking that the doorbell might stop ringing as soon as she presses the button, she is ‘pleasantly’ surprised at how it didn’t stop ringing, but got even louder. The doorbell then obediently invites the participant to leave with the annoying beeping.

What are the challenges involved and how did you overcome them? What problems still exist? How might you overcome them eventually?

For the first few classes on Arduino, we were taught to use the arduino board and breadboard, learning how to use specific inputs such as the piezo buzzer, LDR sensor, LED and switch amongst other things. Given my inexperience, I took awhile to understand how it worked and had to refer back to slides more than just a couple of times. We bumped into a few incompatible sketches which helped us understanding the coding process better.

We started from scratch as we didn’t want to confuse ourselves. The way we revised the arduino coding was to wire the circuit according to the slides and then stare at it until we understood how and why the circuit works. We then read the code and change certain values in the sketches to test out the coding to give ourselves a better understanding. We knew what components we wanted to use, the problem was combining the existing codes to form the correct sketch that would work. We stuck to what we learnt from the workshops, coupled with a few references from existing codes from the google search bar.

The second issue we faced was the ever-changing sensitivity of the photoresistor. Due to the different environments we were in when we worked on the arduino board, we had to tweak the sensitivity according to our classroom to make it workable. This was one we were able to work out easily as we had had a few goes at changing the sensitivity before going to class, so it didn’t seem like much of a hassle.

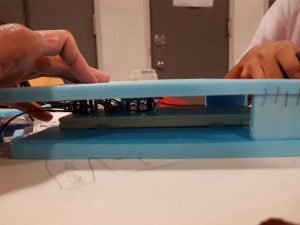
The third issue was the design of the board; the measurements had to be exact so that the photoresistor could stick out just enough for it appear on the foamboard we made. We took a few tries (shaving down the board) before the photoresistor would stay obediently in place. In hindsight, we could have used crocodile clips and other materials to extend the flexibility of our foamboard. We had decided to keep the design of the foam board as not to confuse our participants. In our test-runs, we realised that we have always tested it while the foam board lies flat on the table. We should have tested it in an upright position for more accurate results.

Area of improvements:

  1. Test runs can include more situations, different angles of testing to ensure an accurate experiment.
  2. Prototype board can be more sturdy and should not obstruct our participants from trying out the doorbell as they are afraid of damaging it.

Thank you for reading!

My process to break apart the lint roller.

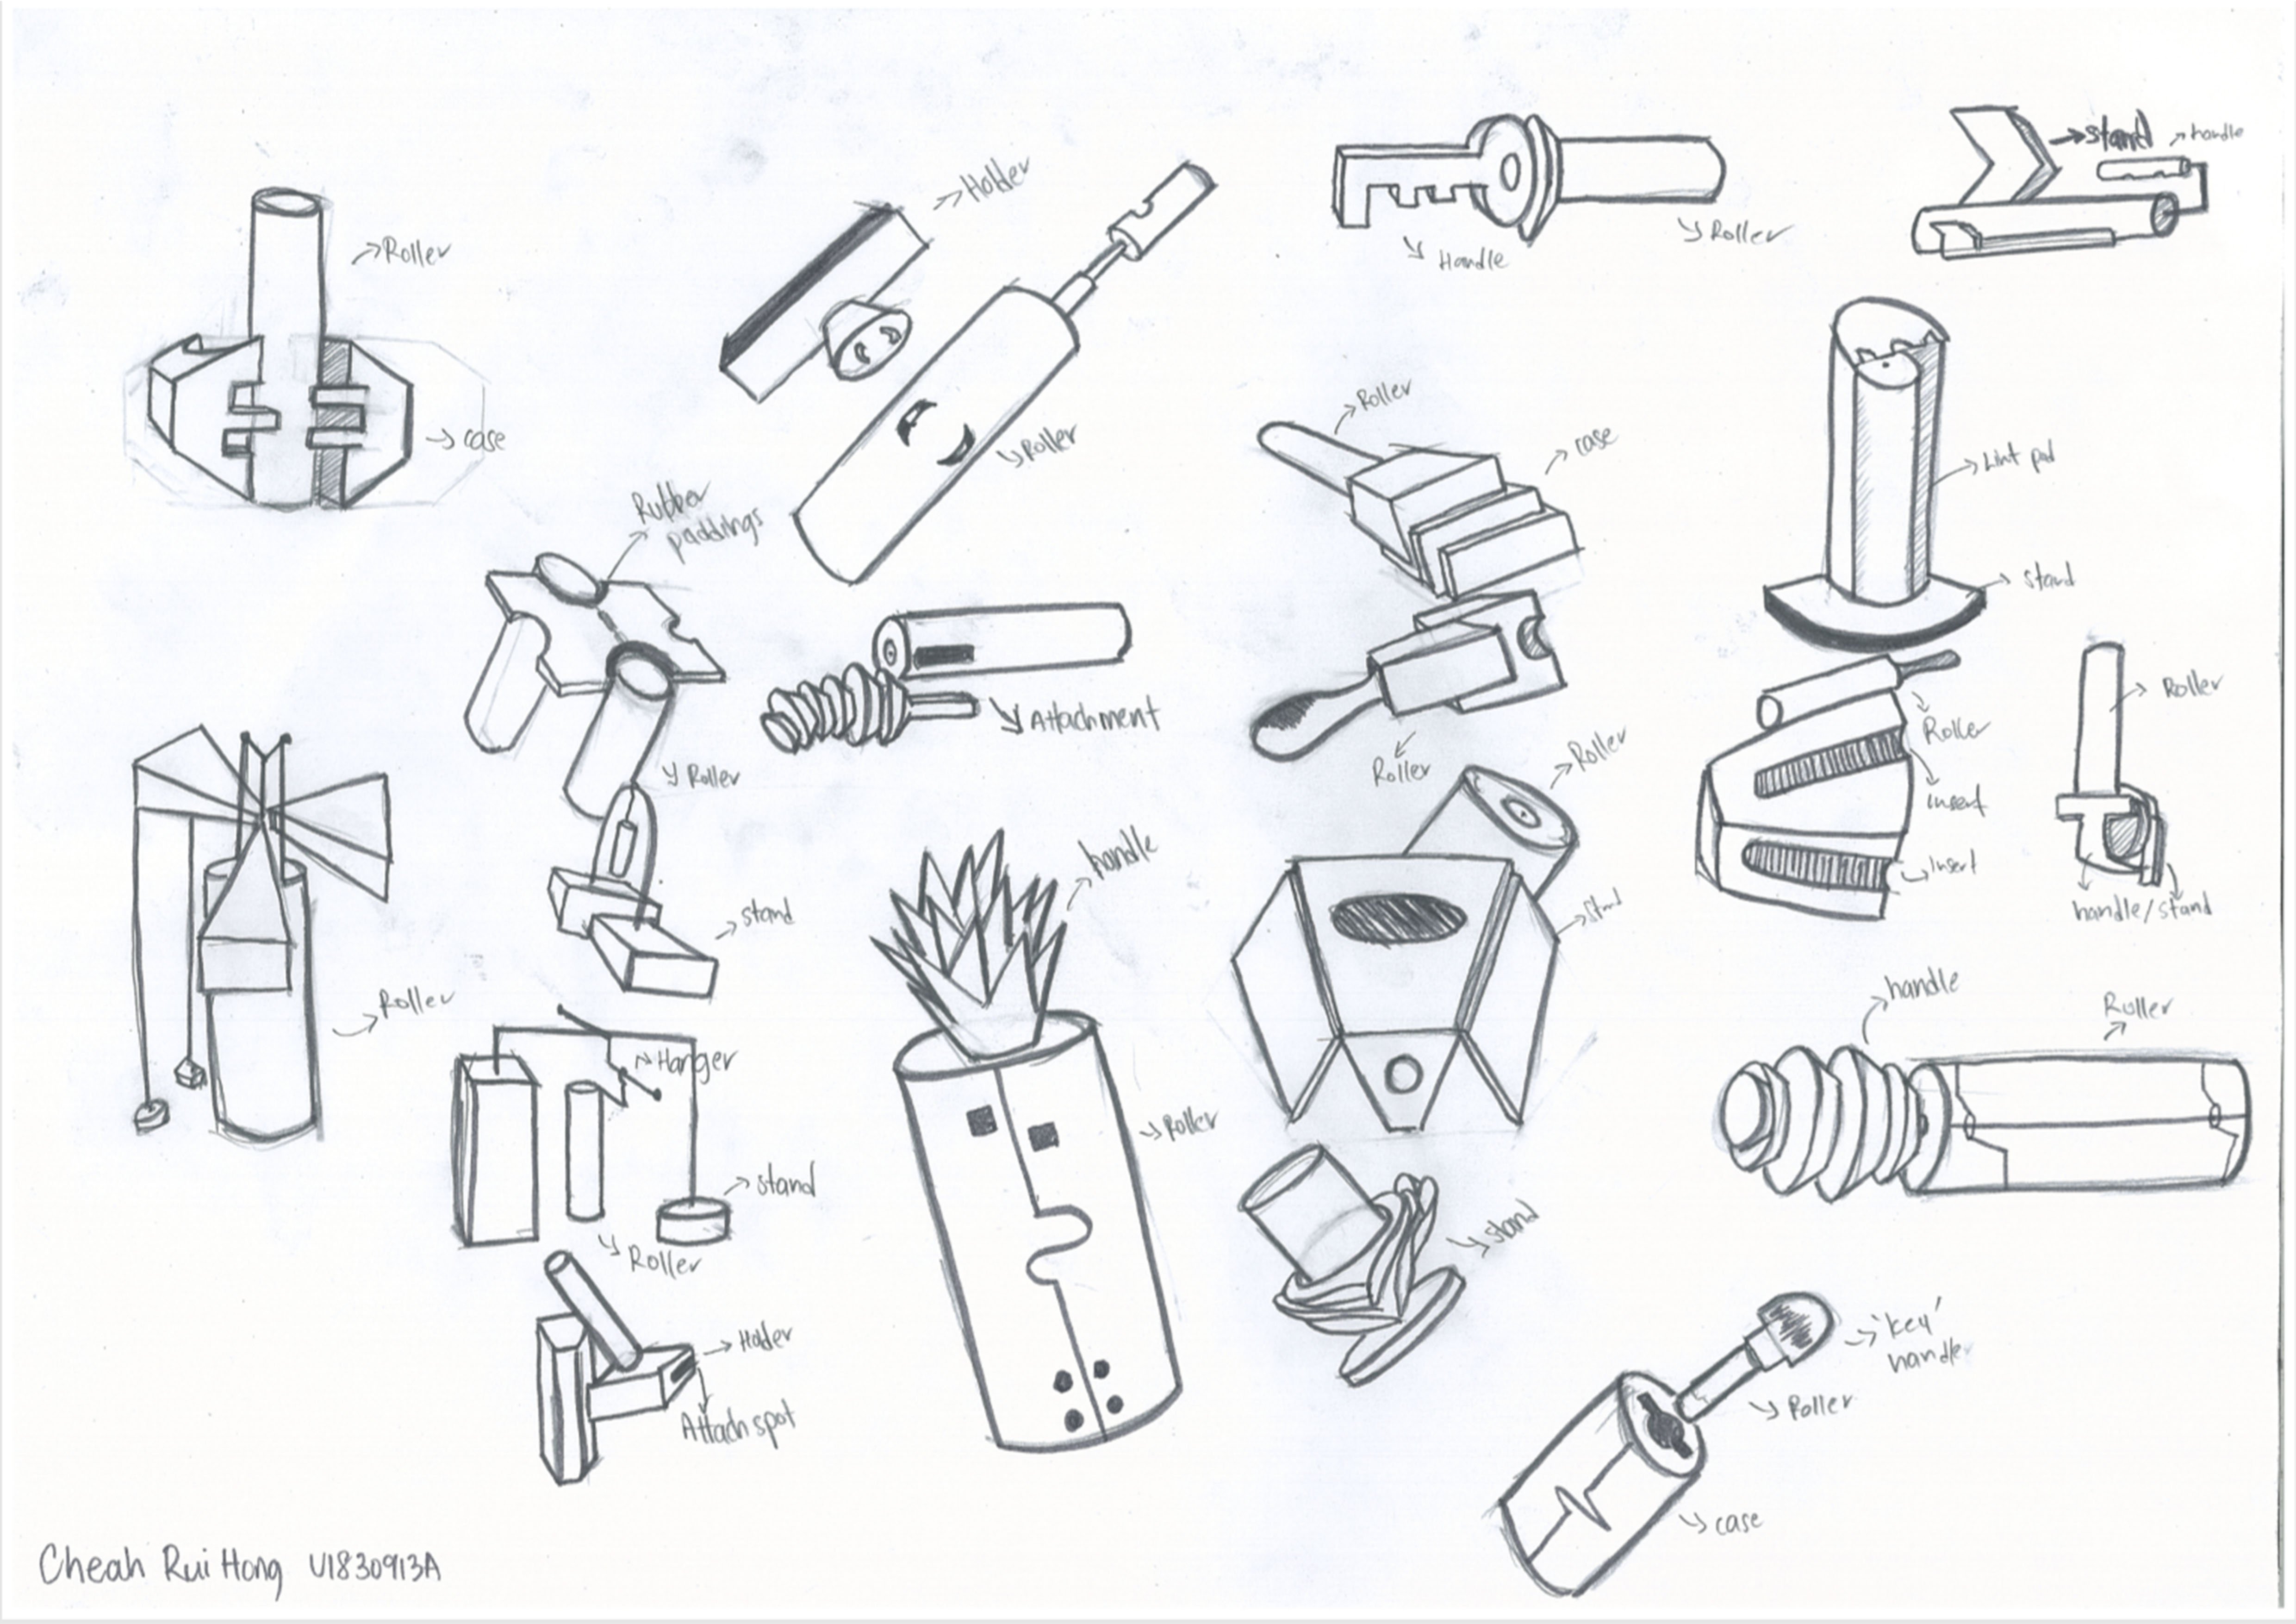
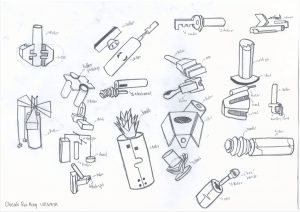
We were tasked to create 40 individual thumbnail sketches from our Assignment 1 item;

which happened to be a lint roller for me. On hindsight, I did regret choosing lint roller as

my object of choice as it was too simplistic in design and lacked the intricacies of other

objects such as hair dryer or vacuum cleaner, or even a drill. Thus, starting on Assignment

2 felt like a mounting task as I really struggled to come up with new ideas and kept referring

to existing objects to help me come up with my ideas. I really disliked THAT process and I

felt no sense of ownership of my drawings as they fell way below my expectations. Why

would anybody find my idea interesting if it was simply based on another invention?


Thus, after 26 painful sketches… I decided to redo the entire draft. This time round, I looked

long and hard at my previous sketches and used elimination to the sketches I felt were OK

over to my new sketches. After a few youtube videos for inspiration and listening to talk about

how ‘limitless’ and interesting it is to come up with ideation sketching, I picked up my pencil and

marker and just kept going at the paper, erasing from time to time to make sense of my sketches.

What I felt was really intriguing was that I would lean back and try to connect the dots after sketching out.

This kept the process very fascinating and to be honest the hours spent drawing the sketches didn’t

feel as long.


I was really glad to have thrown the old sketches out and start over, instead of ‘salvaging’ it. Breaking

apart the archetypal components of the lint roller allowed for much more creative space.