Getting the scene layout is one thing, but lighting the scene is another; and on top of that working the camera for the scene, its focal length and movement all are another aspect. Here’s an example of how Scene 4 has progressed over time.

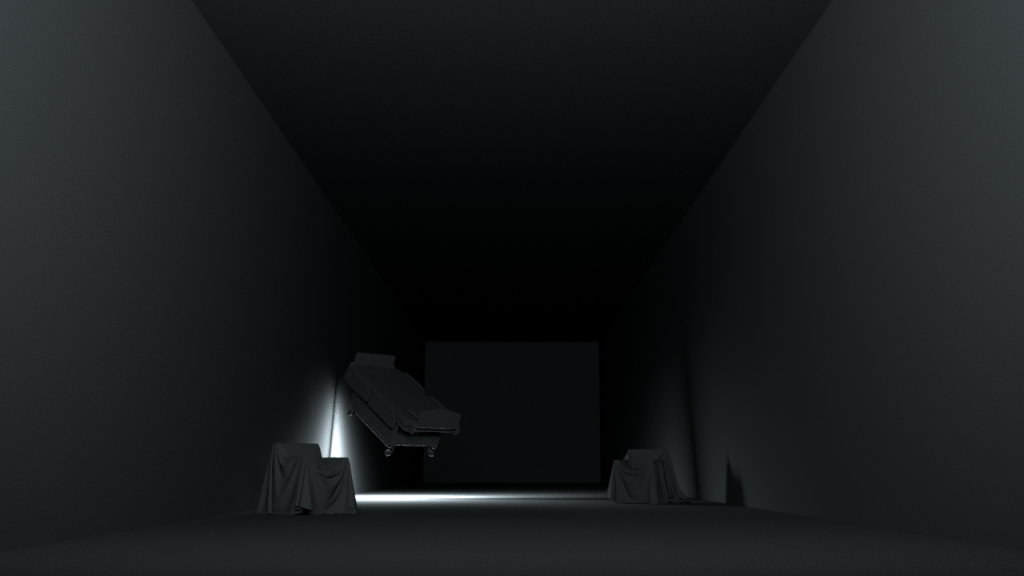
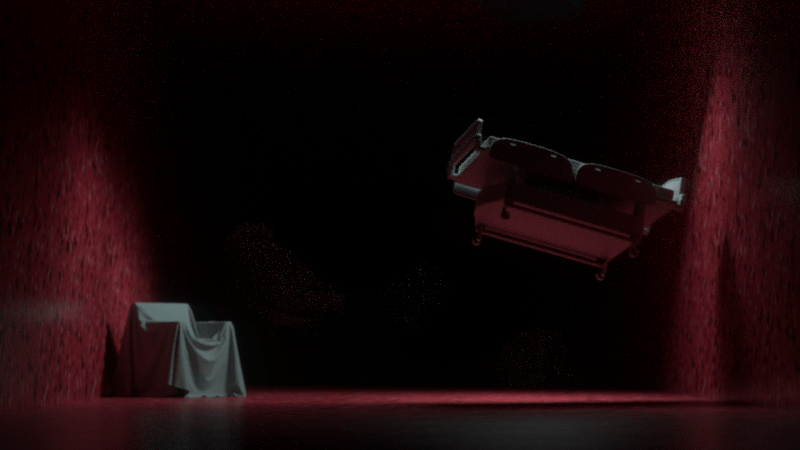
Before any real work has been done, but a concept was there in where the light will propagate through the room.

My initial idea was that the light would be from the back of the room, shining into the audiences face. Shafts of light/God rays will stream past the objects and through fog to create this grand image.

However, that did not work out the way i planned. For one, the lights kept leaving these hard dark lines wherever they intersected with geometry, mainly the room. You can even see it in the image above. This made me venture into IES lights, which really removed that problem (surprisingly) but still I could not achieve the look i wanted. Also IES lights from this point on were my go to methods for lighting. In short IES lights use real world bulb/light falloffs to replicate specific lamps or bulbs. Mainly used in architectural renders for bulb specific accuracy, they’ve really gone on to help other CG artists achieve better realism in their images, plainly because the light falloff wasn’t as linear as default CG lights.

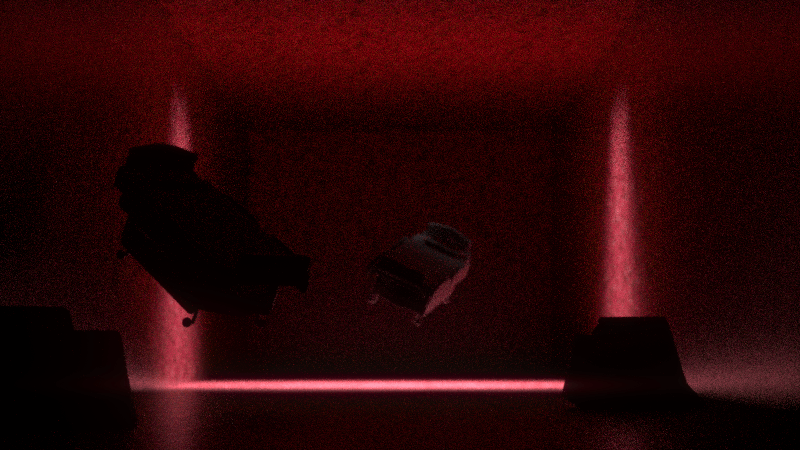
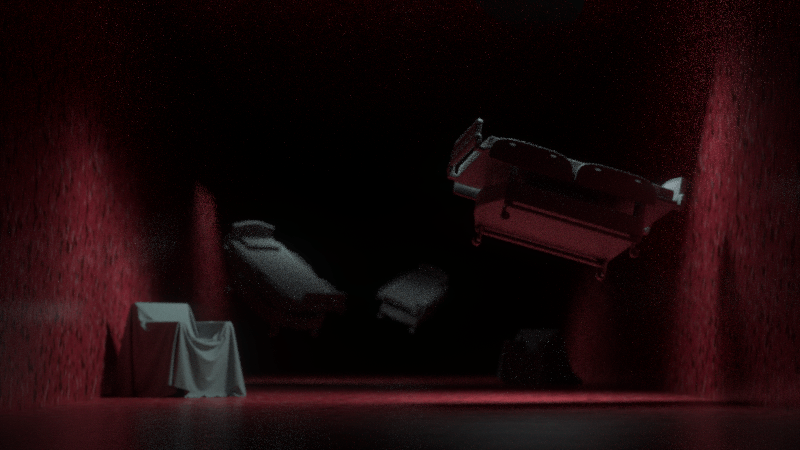
This lovely scene i tried to work for some time, camera angles weren’t exactly working, lighting wasn’t where i wish it were. Even the way the objects in the scene laid out I did not like. (especially those damn chairs). But this still had parts that i liked; for example the light that counces off the walls onto the middle bed looked good. Image composition was still rather poor however, it was sorely lacking a foreground element. Hence my next move was to slap another bed into the scene. I also had to relight the new portion of the room, but this time, i knew that i wanted a sort of rim light to catch the foot end of the bed frame; and by miracles of miracles, the scene just started to look better.

Additionally I started to explore other techniques such as focal drift. I wouldn’t set the focus exactly on the object, I’d push it a bit back or forward; trying to achieve that organic look. Though I’m still wondering how I’d do that with enough control in more static shots.

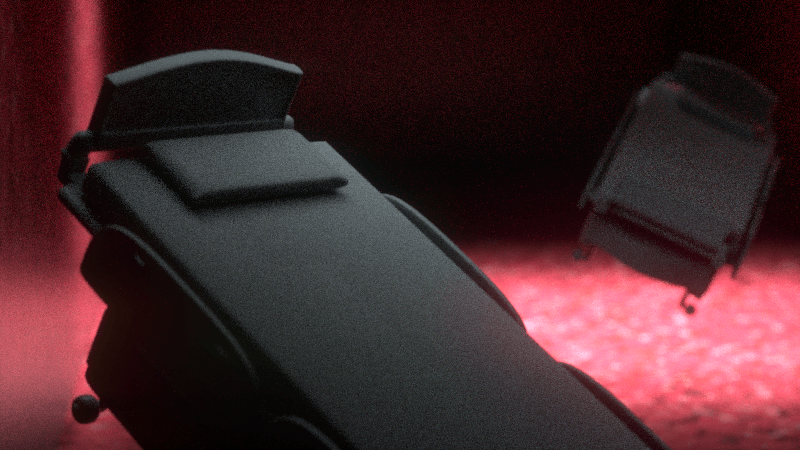
I also improved the lighting for a closeup shot for the beds behind. Going from this style below.

To this~ Which I’d say is a pretty good improvement. I’m also pretty proud of the visible material difference between the bed frame and the mattress fabric. Hopefully these material details are still textually noticeable after the post-processing of Red and Blue. Additionally, I sculpted better pillows using the cloth simulator in C4D and then smoothing it out with a brush.

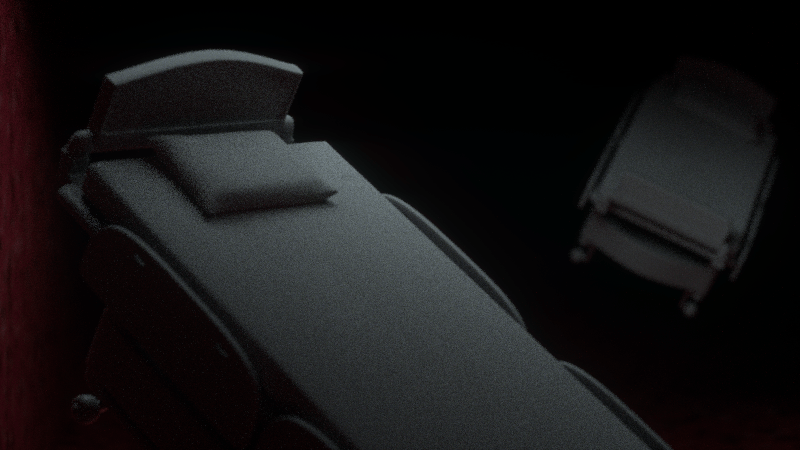
Sometimes I worry that I’m spending too much time on superfluous details like these, but I do think they’re noticeable even if not completely conscious on the sort of quick viewing that happens during an FYP show.

Next up I’ll talk about the other dynamic simulations.

Metachaos by Alessandro Bavari from 2010 has always been loitering in my mind since I first saw it way back many years ago. Visually it was very peculiar and odd, with its writhing bodies, shaky camera and mix of dark and light environments. While I had seen a number of odd videos before such Aphex Twin music videos, works by Chris Cunningham, Michel Gondry and other directors; something about Metachaos felt even more surreal. I think the fact that it was fully CG (or largely CG) helped push what was possible to “film” into this expanse of possible visuals without a concern for real world viability or even a large film budget to make it happen. Additionally, considering the year it was made, even now, I think the textures, lighting and camerawork (though low res) were and still are exceptional. Which brings me to what I intend to do. 8 years on, with technology advancing, I do strongly feel that it’s possible for me to recreate a fraction of what I saw in Metachaos. Not to say I’m attempting a recreation of its mood and visual style, but on a technical level.

Throwing back to the works of the aforementioned artists/directors, thinking about it now I’d say it was not that it was odd that really kept me around, but in the world building that making these fantastical scenarios brings about; likewise with Metachaos. Upfront these might just seem like kooky videos that last a couple of minutes but they appeal to me because they feel like they’re creating alternate worlds, akin to those of Tolkien’s Lord of the Rings universe though not as fleshed out in the same way.

Ultimately what I personally trying to do, is to bring that same kind of intensity and atmosphere of a world through to the viewer. I want the viewer to get a sense of the world, even from erratic snippets that are fleeting; which is why I gravitate strongly to the idea of having strong aesthetics and visuals for my shots. Thought this might be subjective, I personally feel that strong visuals give the viewer a mental branching off point for a variety of thoughts.

TESTING

I start out my foray into the project by jumping back in 3D software. Having done CG from 2010 – 2014 in my 3 year Digital Visual Effects course in Polytechnic, I figured it’s time to jump back in. This time though, I started with Cinema 4D rather than Maya, both of which I’ve used before in varying degrees. These next few shots are the visual tests I’ve attempted as a refresher into the software.

As a start I tried to recreate a decent rocky textured terrain as per a tutorial. The aim being to get realistic surfaces and decent lighting.

Surface Deformers and Lighting Tests

Also I wanted to try lighting with objects and get reflections of said objects on surfaces such as water. But I haven’t been able to figure out that last portion with the reflections yet.

Testing Lighting with Objects

Testing Lighting with Objects

Lastly I tried smaller scale surface tests. I could get decent render times utilizing sub-poly displacement but not on a larger scale on the size of landscapes without dramatic increases in render time.

Sub-poly Displacement (1 second per frame)

Render Time – 7 mins 28 Seconds (Subpoly Displacement)

Render Time – 15 seconds

These were tests into lighting, displacement and bump maps, and additionally optimizing renders, which is my main concern, the downtime induced by rendering; which is why I’ve also started contemplating using software such as Unity for this project.

Unity allows for real time interaction as well as lighting and rendering, which is very appealing, though, the downside for Unity at the moment is unfamiliarity, I’m definitely not as proficient at Unity as I am in 3D software. However, I’ve seen very stunning examples of visuals to come out of Unity, outside of game development such as the example below.

View this post on Instagram

Excuse my breathing lol

A post shared by Stephen S Gibson (@ssgibsonart) on

View this post on Instagram

Testing particle effects for my secret project!

A post shared by Stephen S Gibson (@ssgibsonart) on

In doing these tests, I’ve stumbled upon a realization that, I’m not limited to one software for my final outcome, that is to say, I can utilize and draw on the even larger field of experience I have with other software, namely After Effects.

Slit-Scan

The gif above is the result of taking a render of the sphere rotation and utilizing a slit-scan technique through After Effects. The technique is essentially visual time displacement. Having tried this with live footage before, one of the shortcomings was that I didn’t have a smooth enough frame rate and caused banding (you’d see thick slices moving instead of a smooth displacement).

The benefit is that in 3D software I can increase the number of frames per second and render at a high frame rate (120 in this case). The downside being I’m rendering more frames = more render time and also additional rendering in After Effects.

Still finding my way though the software, optimizing the renders really feels like the make or break of this at the moment, being able to get fast feedback being the key at this iterative stage.

I’ll spend some time after this week looking into Unity as an option for both render and interactive reasons.

Additionally, I need to work on crafting good looking compositions or essentially the cinematography of the shots. Upon that I should also build a short storyboard for a sequence to test out camera movements and cuts.

In short + subsequent steps

  • Crafting strong shots
  • Creating a good sequence
  • Exploring further technical aspects (motion blur, depth of field) both of which I’m currently doing tests for
  • Sound Design
  • Trying out Unity
  • Final Execution look (multi-screen or other output)


This video essay was given with the premise of making a video about something that you like.

I really wasn’t sure what to do, especially with the stipulation of using footage I had already shot.

Thus I was left with the footage I had recently shot either at Hong Kong or from Japan from when I had visited my grandparents.

I was quite hesitant to be honest dealing with quite a personal space. But I did it anyway.

I intended for it to be spoken word simultaneous to the footage mainly because it would save me having to listen to my own voice for hours.

But this came out with an unintended effect of having a lot of ambient sound on the video, something I really enjoyed when I watch the edit back.

It makes the video able to stand on it’s own without the words, while maybe even giving a sense of what I was trying to say with words. Although that might just be because I know what the words and mood I intended for was.

As such, I think it’d be better to leave the footage and words as separate entities. Thought I was thinking of perhaps translating or subtitling in the future, but I really feel that the text at the bottom detracts a little from the whole image by cutting out the lower portion visually while also commanding the strongest presence.


https://drive.google.com/open?id=1CxFbc8Z15JOOzc2A5sv8PKXKI8eUOGVz


Text below, Video Above


At the end of May last year, I went to Kagoshima, Japan to visit my Grandparents.

Kagoshima is in the south of Japan and to get to my Grandparents house, we had to take a long ride into the mountains where the average age seems to be in the late 60s

I generally thought of myself to be more of a city boy, but the two weeks I spent there seemed to say otherwise.

A lot of the places are in the middle of nowhere but seem like the typical anime tropes

Train crossing, grassy fields, typical Japanese houses, crows

But I digress

This was the same house my mother and her sisters grew up in

This is the same river that they played in as kids

And it brings to mind how peculiar the passage of time is

Something change while other things stay the same

There’s a strange disconnect between the two

My grandfather doesn’t remember much and doesn’t even recognize some of the people in the photos of family.

My Grandmother doesn’t remember much at all

As my two weeks drew to an end, I really didn’t want to leave

Because I worried that that would be the last time I have a reason to be there

I don’t know if that’s true or not

We wanted to explore the connections between each live stream and the fun possibility that we can create! Since our final project will be presented on the grid wall, we decided to build our whole concept revolving the idea of the grid wall and the potential of viewing all four live streams at the same time to create a piece much greater than each individual stream. Exploring the idea of third space and synchronising one and other. It involves interaction, cross streams, planning, coordination and a lot of teamwork in this project.

We start off at different location and moving to meet each other at the same pace where we play with the visual effects of filming. From synchronised games, face connection to various streaming ideas are thoughtfully planned, hope to explore different ways of live streaming.

It was quite interesting and fun to see how this project has grown from it’s initial idea up to our current idea. Bulk of the process in this project was very collaborative, especially in the conceptualising and planning phases. Ideas were bounced off each other and we really helped each other refine the nitty-gritty details and what we want to explore in the project.

Even on an individual basis, everyone had their part to play in their own special way. I helped out in scouting the location and keeping everyone up to date on the weather – the groups very own weather boy – which proved to be quite a tricky task considering how unpredictable the weather has been of late. Along with that, that weekend was slated to have a high chance of precipitation which led to a lot of ‘calling it at a minutes notice’ when taking action. Scouting the location was also part of my repertoire, which considering the location, was quite a pleasant task, especially with the maps provided, it really helped to figure out a good location for us to go on our own winding paths away from each other.

and oddly enough, in our divergent paths, reunite again

The process it itself was a little daunting especially with how coordinated we needed to be for our final result to appear as we’d like. Fortunately, even when putting the video together roughly, by placing our phones side by side, we were all quite wow’d by the final result even in that form. Even happy coincidences like the crossing seen in the gif above were a nice touch on the abilities of our project.

My personal takeaway from this project is once again this idea that even when apart from each other, our lives have a level of synchronicity that we are unaware of. I say “once again” as I had similar sentiments when doing the co-broadcast with Su Hwee; showing the parallels that everyday people have to a degree that even I didn’t expect going into the assignment.

With all the works, reading and meetings we’ve had through the semester, one work that does stand out to me, that reminds me of my aforementioned sentiment is Douglas Davis’ “Worlds Longest Collaborative Sentence”.

Firstly, because I’m sure that page after page of keyboard musings, there definitely are common themes, similarities and identical words and phrases keyed in but additionally so in the sense that people have felt like they’ve been closer and more connected to people despite distance.

“I DID NOT FEEL SEPARATED I FELT VERY CLOSE EVEN THOUGH WE WERE THOUSANDS OF MILES APART AND I WAS SURROUNDED BY PEOPLE HERE I FELT CLOSE…”

Straight from the ‘Sentence‘ itself; and much like the past projects, I genuinely do feel this thread of connectivity, allowed by this advent of social broadcasting in being able to connect people and see just how much everyone is and can be a community in their similarities despite their differences and the amazing parallels that we all have in our lives.

Seeing the humans behind any work always comes with an air about the whole scenario, ‘These are the people behind what I’ve been seeing’.

Despite being new to their work, seeing the people behind Second Front was no different.

And it’s made even more tantalizing by the fact that there’s the opportunity that I’ll be able to hear from the artists themselves, especially so when there are parts of the works that I don’t fully understand.

While I didn’t personally ask any questions, though I had a few in mind, I find that hearing from the artists themselves helps give a good look into how they function, how their thought patterns go about arranging themselves and in turn, their everyday gives an understanding into their artworks.

Something that didn’t occur to me, was the idea that they’d have backlash. Jeremy Turner/FIimflam (a name that got stuck in my head for a bit) even bringing up a case where a guy was said to be able to “see his IP address” and in turn knows where he lives and is gonna come and kill him. In retrospect, considering cyber-bullying is a thing, I should’ve realized it happened even in a less objective oriented game.

Patrick Lichty had a statement that I thought was quite well put, that it’s all about affect. What is performance art with the body the body removed? This was a question he had going into this foray in the virtual space with performance art. Which was a little eye-opening, and in retrospect once again feels like it should have been more obvious, the fact that artists venture into spaces that they themselves have questions about. But in regards to the body being removed from performance, it’s interesting, ultimately despite having happened in virtual space, it’s easily forgotten that there are indeed people and lives behind the polygons wiggling around on screen, that “it is real, there are stakes, and it’s what’s important for performance art” (in regards to virtual performance art having affect)

Lastly, Bibbe Hansen talked about the idea of community, and the just how enriching and rewarding it’s been to meet all the people around the world. It’s just made me realize that the internet’s ability to do so (in it’s full capacity), is really lost on me and perhaps my generation too (it was also really heartening to see how real it is to her). They grew up in the times before it was possible to, and have entered the world after it in full force as well. It’s no wonder there’s endless praise sung to it’s virtue to connect to anyone online at any moment through a multitude of different avenues.

It was also incredible that she even rubbed shoulders with Andy Warhol himself, ON TOP of being Beck’s mother.

Bibbe Hansen and Andy Warhol

First Assignment 17th August 2017

Posted by Nicholas Makoto on Thursday, 17 August 2017

(function(d, s, id) {
var js, fjs = d.getElementsByTagName(s)[0];
if (d.getElementById(id)) return;
js = d.createElement(s); js.id = id;
js.src = “//connect.facebook.net/en_GB/sdk.js#xfbml=1&version=v2.10”;
fjs.parentNode.insertBefore(js, fjs);
}(document, ‘script’, ‘facebook-jssdk’));

Posted by Nicholas Makoto on Thursday, 17 August 2017

Intro

This first assignment was pretty interesting. Mainly because I don’t usually use social media to broadcast my life and going-ons most of the time, but I do enjoy shooting video; so this was a fun combination of the two. I felt quite freed while shooting the livestream actually. In my opinion, people aren’t expecting a lot of polish during a continuous amateur livestream and hence I didn’t really bother about stability or aesthetics of the video during the transitional points of my wandering around campus. My only worry was maintaining a stable wi-fi connection.

Thoughts

Generally, my decisions of what to shoot were a very spur of the moment, my only real plan being the visit to the library. Thankfully the lobby was a good point to return to for a variety of reasons; it had people packing up some stuff, it had an easy access to an alternate viewpoint and was also the middle zone for going to other areas, leading to a lot of crossovers and cameos in other people’s livestream. An interesting point that was mentioned was that this sort of interaction would be very hard to script. Bringing to mind the long takes from movies usually requiring numerous takes to get ‘right’. While watching the collage of videos I was also wondering about if we could really sync up the videos and the visual that we’d get from multiple POVs diverging and reconverging over time and the multiple angles we’d get of the same scene (shout out pink Llama aka Kendrick Llama). Visually alone, that’d be pretty neat.

Another interesting point that was brought up was how sound mashes more easily than the visuals, being unable to distinguish which video the sound was coming from for the most part. It was also pretty interesting when the videos were being muted one by one and how nice it sounded, like playing with levels on a mixer. As interesting as the audio is, doing this exercise with only audio would probably not hold as much attention due to the lack of coherence the audience can get from purely audio alone, save for very crowded, bustling audio.

Technicals/Conclusion

Sadly, the video Facebook uploaded to my profile seems to have tanked heavily in terms of quality, with the highest setting allowed on the video being 360p. On top of that the bitrate (depending on the amt of movement) was extremely crushing on the quality as you can see in the screenshot above. I’m unsure if the live feed of the stream looked this janky but to me this is not something I’d personally upload or stream with. Using other peoples uploads as a reference, this appears to be an issue that is tied to my device or wifi connection. Another technical issue is that my phone has a problem focusing which causes it to buzz and get stuck in an unfocused blurry edged image; the usual fix being a quick wiggle of the camera, which you can see occasionally during the video along with the overpowering tinny buzzing noise. Technical issues aside, this was quite the enjoyable experience and I’d be keen on doing this again if I could do with with a higher level of quality.

The Slit Scan Effect is the work of both Cher See and myself in trying to achieve the slit scan technique used in photography and occasionally in video.

The visuals that come of this technique are quite fascinating

But it requires quite a technical setup for photography, or a lot of post-processing in video to achieve the effect

Very rarely do we get to see the effect occur with live video, and so we thought it’d be fun to attempt to recreate the effect in Max

Above is the final patcher window, with video input on the left and the different modes into the final output window on the right.

There are 8 variations, stillscan being similar to the photography style of slit scan, each line is being printed into the screen line by line.

Our idea was to store the frames that were coming in and then play them back in slices, each slice being delayed by incremental amounts.

In our attempts to get the final effect, we went through quite a few methods, most of which did not work with us at key critical moments JUST before we’d be able to achieve the effect.

We looked into things such as matrix, matrixset, and the src/usrdisdim nodes.

Finally we found some success in the matrixset node and it’s ability to store frames and play them back

The next step was to figure out how to store the frames in a way that we could delay each individual one by a set amount

This was also another critical moment of getting stuck

Eventually we found a jit.scissor and jit.glue node combination. We found that we could essentially get input media cut and pasted back in rows and columns

Along with a matrixset delay method we achieved our first iteration of the effect

Unfortunately we were unable to get the node to accept more than ~15 inputs/outputs, making the effect not as smooth as we’d have liked

Thanks to an ingenious breakthrough we managed to get multiple instances of the node combo to run simultaneously and thus we increased the number of slices and essentially our final effect.

The effect was pushed to it’s limits with this method in Max, but the processing speed started to chug at 120 slices and prior to that the effect at 60 slices was starting to get unnoticeable gains at first glance, hence this was our end zone.

I will be using the tri-cut mode as the following example.

The bang node triggers the toggle node that counts to 3 and multiplies it by a user-set-amount to achieve our choice of delay for optimal fun/effect

The scissor and glue nodes calculates how to cut and piece the slices back together.

The delay node gets the integers from the previous images multiplied numbers and tells each slice how much to be delayed by

This slice goes back out into the final jit.glue node and pieced back together with the rest of the slices in the final effect.

Though it there were some rather technical methods to achieving the effect, it was pretty satisfying and fun to have been able to recreate the effect through an alternative method that pretty much looks identical to the more technical computive methods.

Cheers all!

The first part of this assignment involved getting the face positioned in the middle of the screen

Audio was recorded and coordinates from the corners of the jit.faces node were used to give an output value to draw upon to indicate the users face within the scene

I wired the left and right triggers to the mid point of the face-tracking square by taking two opposing corners, and for up and down i used to other top and bottom corners to trigger the audio.

The image above is my subpatch sound trigger for the audio.

The next portion involved reading an image file, in this case, an Aphex Twin album cover

The above image shows the final route to achieve the face swap effect in Max!

Below is a video of the effect in action!

Subsequent courses of action

Adding rotation and a stretch effect should the face move would be nice, additionally hooking the effect up to a on/off switch would be nice as well

For the follow up Mirror system, we created a more separate feedback visual with, in my case, my hand pointing towards the detected face!

This was actually pretty fun! I really enjoyed figuring it out.

I ran into a rather large problem where on my windows laptop the file would only play in one direction and be unable to return. Fortunately on the school’s macs worked just fine, and with some minor tweaking it felt pretty good.

On the downside, the jittering of the hand from the tracking is kinda funky, still trying to think of how to solve that!


patches

For this first foray into the world of MAX/MSP we had to create a ‘mirror’ that darkened the closer we got to it.

The invert node was used to flip the image horizontally

The p brightness node is a condense version of the left side of the above image.

Unpacking the four corners of the green box into values to feed into a node for the opacity

Tweaking the scale helped me fine tune the distance that the image fades away at, and I’m quite satisfied with the distance and the current feel/look of the effect.