I Am VeJee

Hello! I’m back again with a new assignment!

So, this time round, we get to do this really cool project whereby we use objects to trigger sounds! And finally I found out the magic behind all those projects where our movement will trigger sounds wahahaha. So the secret is simply… a camera. The camera does wondersssss and now I’m being introduced to the world where there’s endless possibilities!!! Hahaha. 

Alrighty then, here’s the final project!

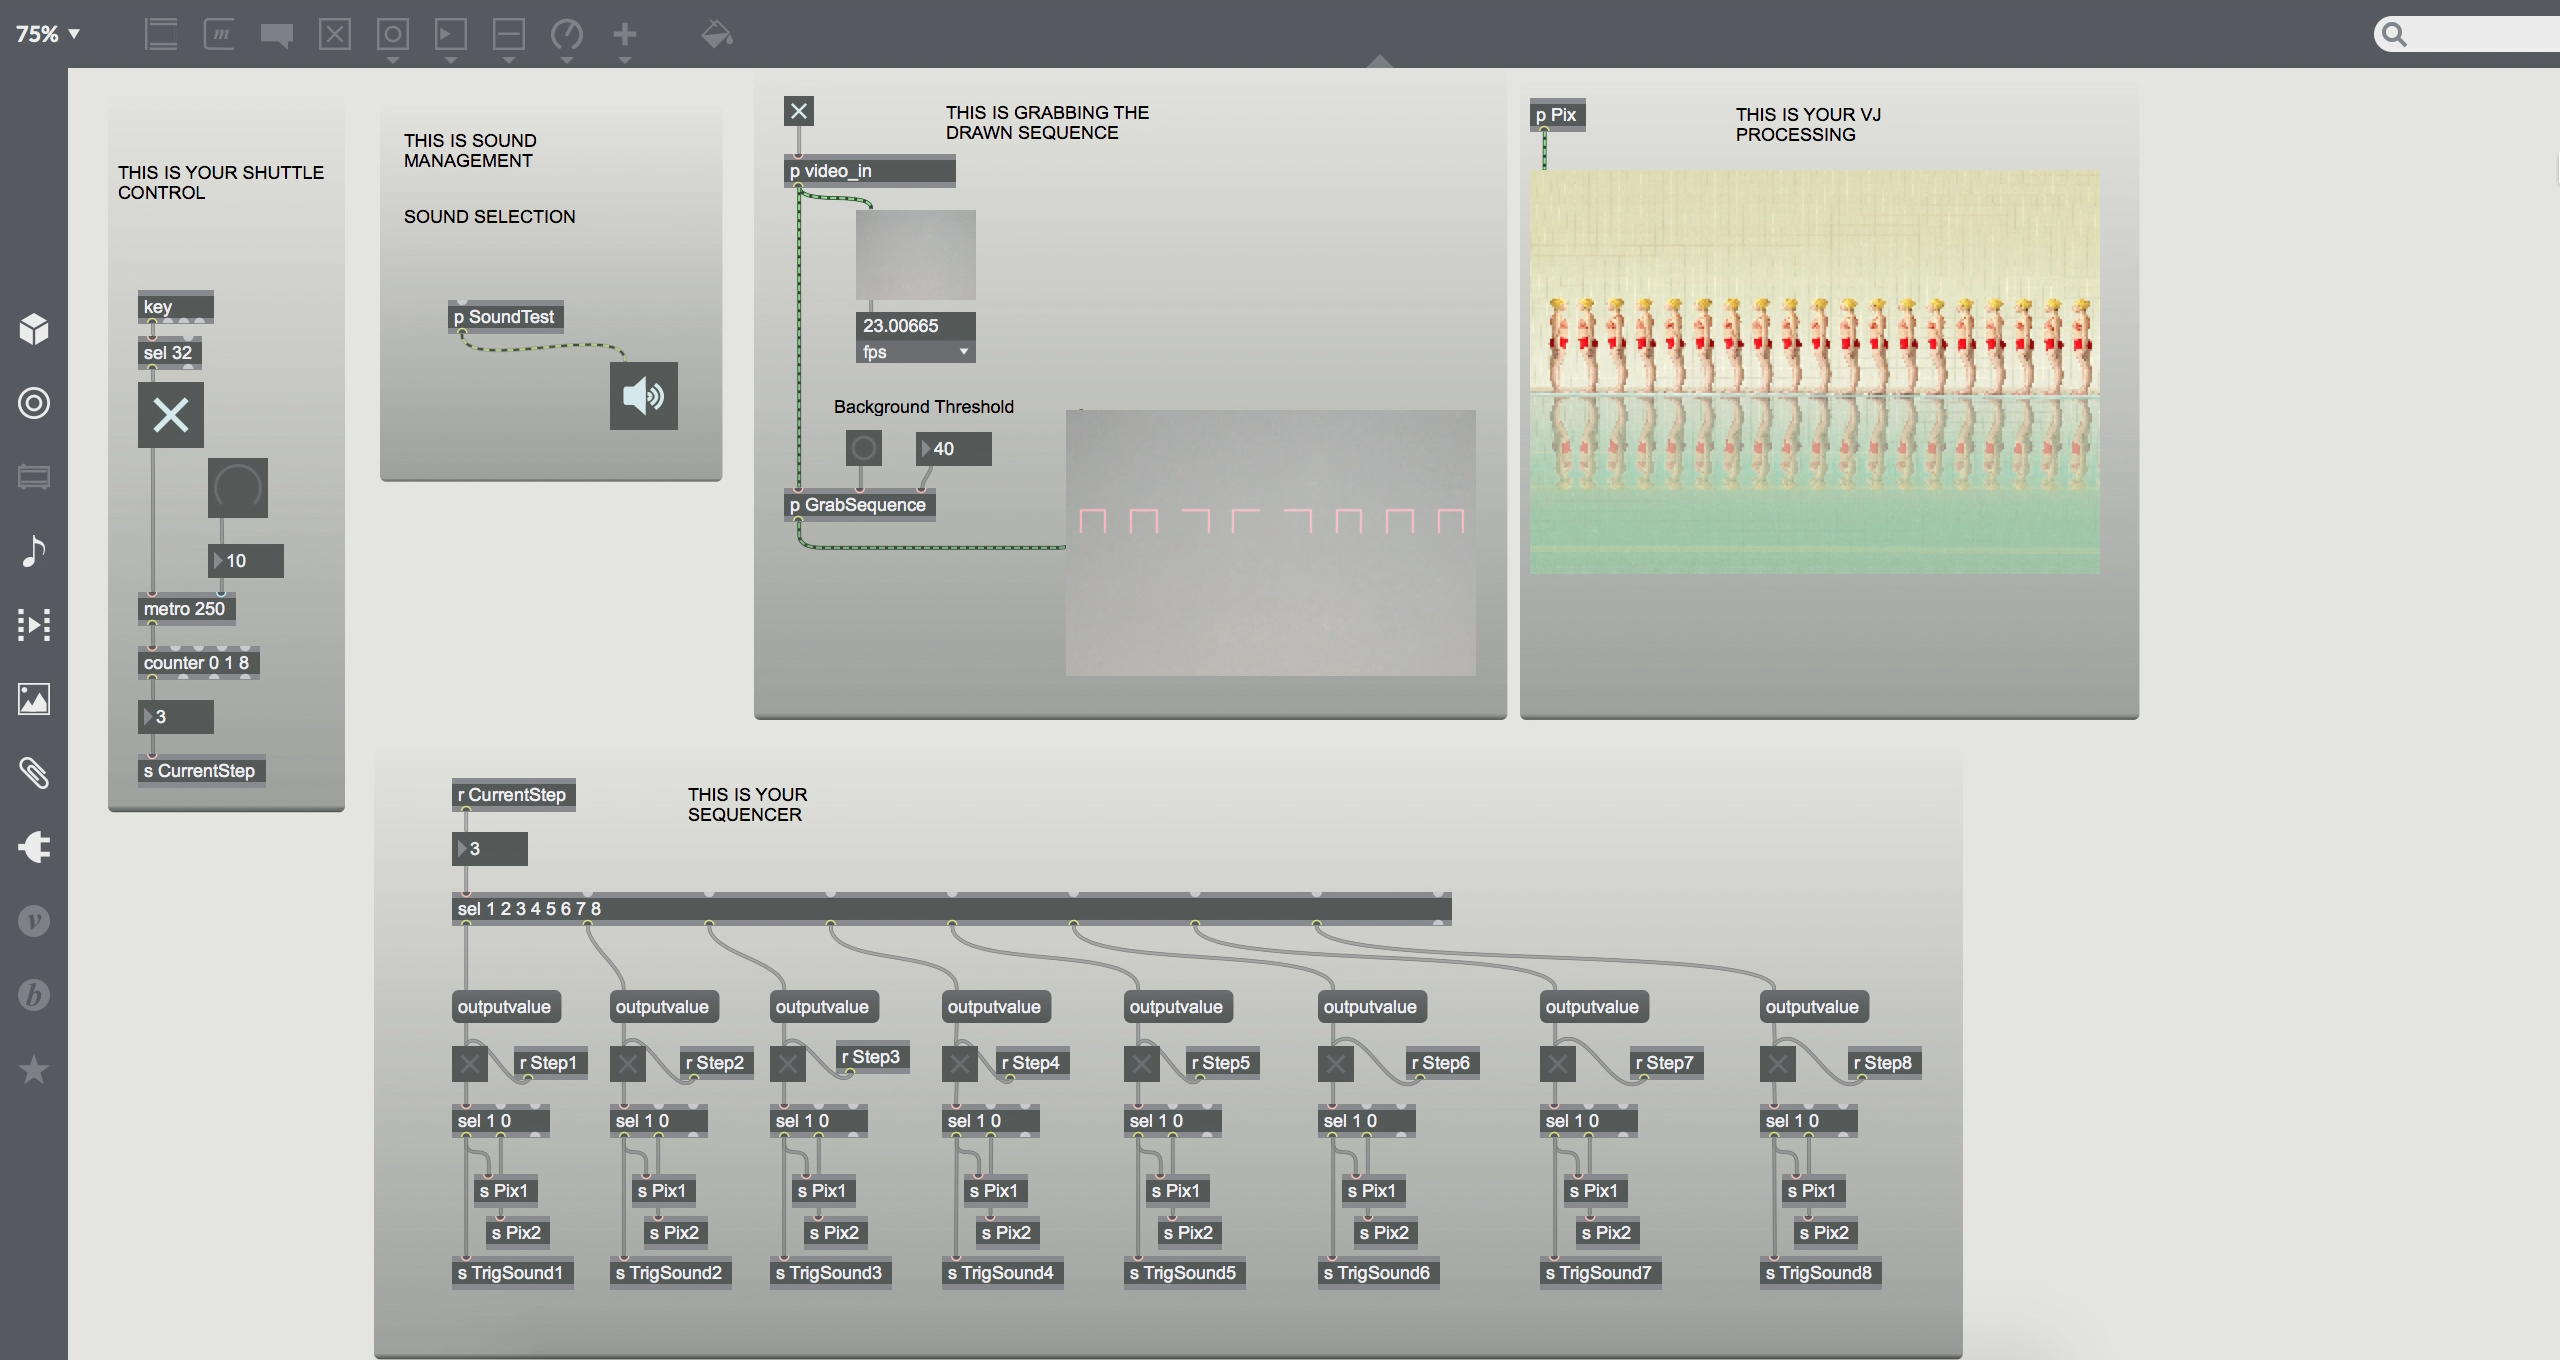
Under pGrabSequence is where I adjusted the motion boxes. At first I was quite overwhelmed with the message that consist of the coordinates because of the numbers hahaha. It’s like numerical overload!! But yeah I sort of figure it so it’s basically for ( 1 10 110 30 90 ) , it means Box 1 ( x, y, x, y), I believe?? Something like that uh

pSoundTest. I didn’t use the playlist as I couldn’t figure out how to sort the audios out for each box. Thus, I resorted to using the Send and Receive method. By receiving the TrigSound, to play the audio!

And there’s this issue I faced, when I remove the item, the audio will continue playing the rest of music and will only stop when it has completed the track. Am I able to cut the music off halfway when I remove the item? 

Overall this project was fun but it took me awhile to figure out how to complete this project, and thank you Chloe’s for lending me a helping hand on this too!!! :))

Here’s the final video for I Am VeJee! 😉

Who Am I?

Hello!

Previously in Mirror, we learnt how face tracking works and now we have to find a way to do a “faceswap filter” on max. One of the issue I faced was that the face tracking bounding box isn’t as accurate as I want it to be, thus the image is not exactly at the right coordinates.

So for this project, I’ve learnt that we can send and receive objects simply by using “s” or “r” and it makes everything so much more organised!


read kim.jpg
But first, we have to put in our image. Simply use read imagename.jpg, don’t forget to press bang! to load the image up.

clear, usedstdim 1, dstdimstart $1 $2, distdimend $3 $4
To refresh our memory, dstdimstart and dstdimend is set the start and end position of where we want the image to be. This matches the x & y coordinates of the detected face.


jit.fastblur @mode 1 @range 2
To soften the image and its edges, we have to use “jit.fastblur @mode 1 @range 2”. If you want the image to be clearer, you have to reduce the value of @mode, to blur it simply increase the value. For range, it soften the edges.

jit.alphablend @mode 1
This merges the masked image and the camera capture. For mode 1, it displays both the mask image and camera capture. If you were to use mode 0, it will just display the masked image.

As you can see here, I tried using different values for jit.fastblur to see its effects.

For jit.fastblur @mode 1 @range 2:  The face is much clearer and defined, edges however need to be softer.

For jit.fastblur @mode 2 @range 3: The face is slightly blurred but we can still see her features, adjusted the range to 3 to make edges softer . This might be a better option.


I felt that my masked image could have been blended even better, as I can still see some of the harsh lines of the image. But when I tried to softened the edges even more, the mask image would lose its features. Anyhow, this was a fun project as I understood the mechanism behind those face swap filters hahaha. Here is the video!

Magic Mirror

Hello!

I’m back in this space of mine again, and here is a new post for the new semester, of a new software called Max MSP. Here’s the of making my first ever Max project – Mirror. Even with LPD giving us the final mirror file I still couldn’t understand it. Of course, I even tried researching online to look for tutorials but guess what, there isn’t much. God how I miss The Coding Train that provides all the knowledge I need. So I had to start from scratch in order to understand how this works! To start of the post, I’ll plop the final video of Mirror here 😉 


So first off, I had to figure out how do I activate my webcam. Apparently it works quite similarly to how I could do it in Processing, just that this has a Open and Close button which allows me to “on and off” my webcam.

jit.pwindow: You’ll need to create this first – its a image & data window, basically the webcam window.

jit grab: Takes the information from the webcam and send it to jit.pwindow

jit.dimmap @invert 1 0: To invert my image from the webcam. The 1 0 basically means horizontal : vertical, it works just like photoshop.

jit.rgb2luma: Grayscale image

cv.jit.faces: The face tracking system (you’ll also need cv.jit.faces.draw)

cv.jit.faces.draw: Where it activates the face tracking system? Something similar to coding – when you show an image, you’ll need to “draw” it to activate it.


Second Lesson into Max, we were introduced to the world of Patchers. It’s the best thing ever as it makes your files even more organised! So here’s the final Mirror that I’ve done 🙂


Overall, Max was fun but quite stressful and confusing as the code used isn’t like “English”, and I kept connecting them wrongly! The jit.grab, cv.jit terms makes it difficult to understand unlike Processing, which we can understand the words. However, Max makes it easier for us to view the entire code as it works just like a mind map. 

I’m excited to see how I can incorporate Max into my future works, though I’m afraid at the same time hahaha. Lets do thisssss