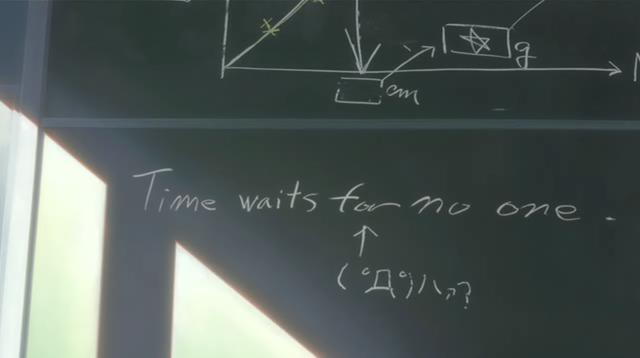
Exhibit Layout and How Moss And Grow Lights Fit in (FYP18)

Overview
Updates for the week would be focused mostly on material testing and more technical aspects of planning.
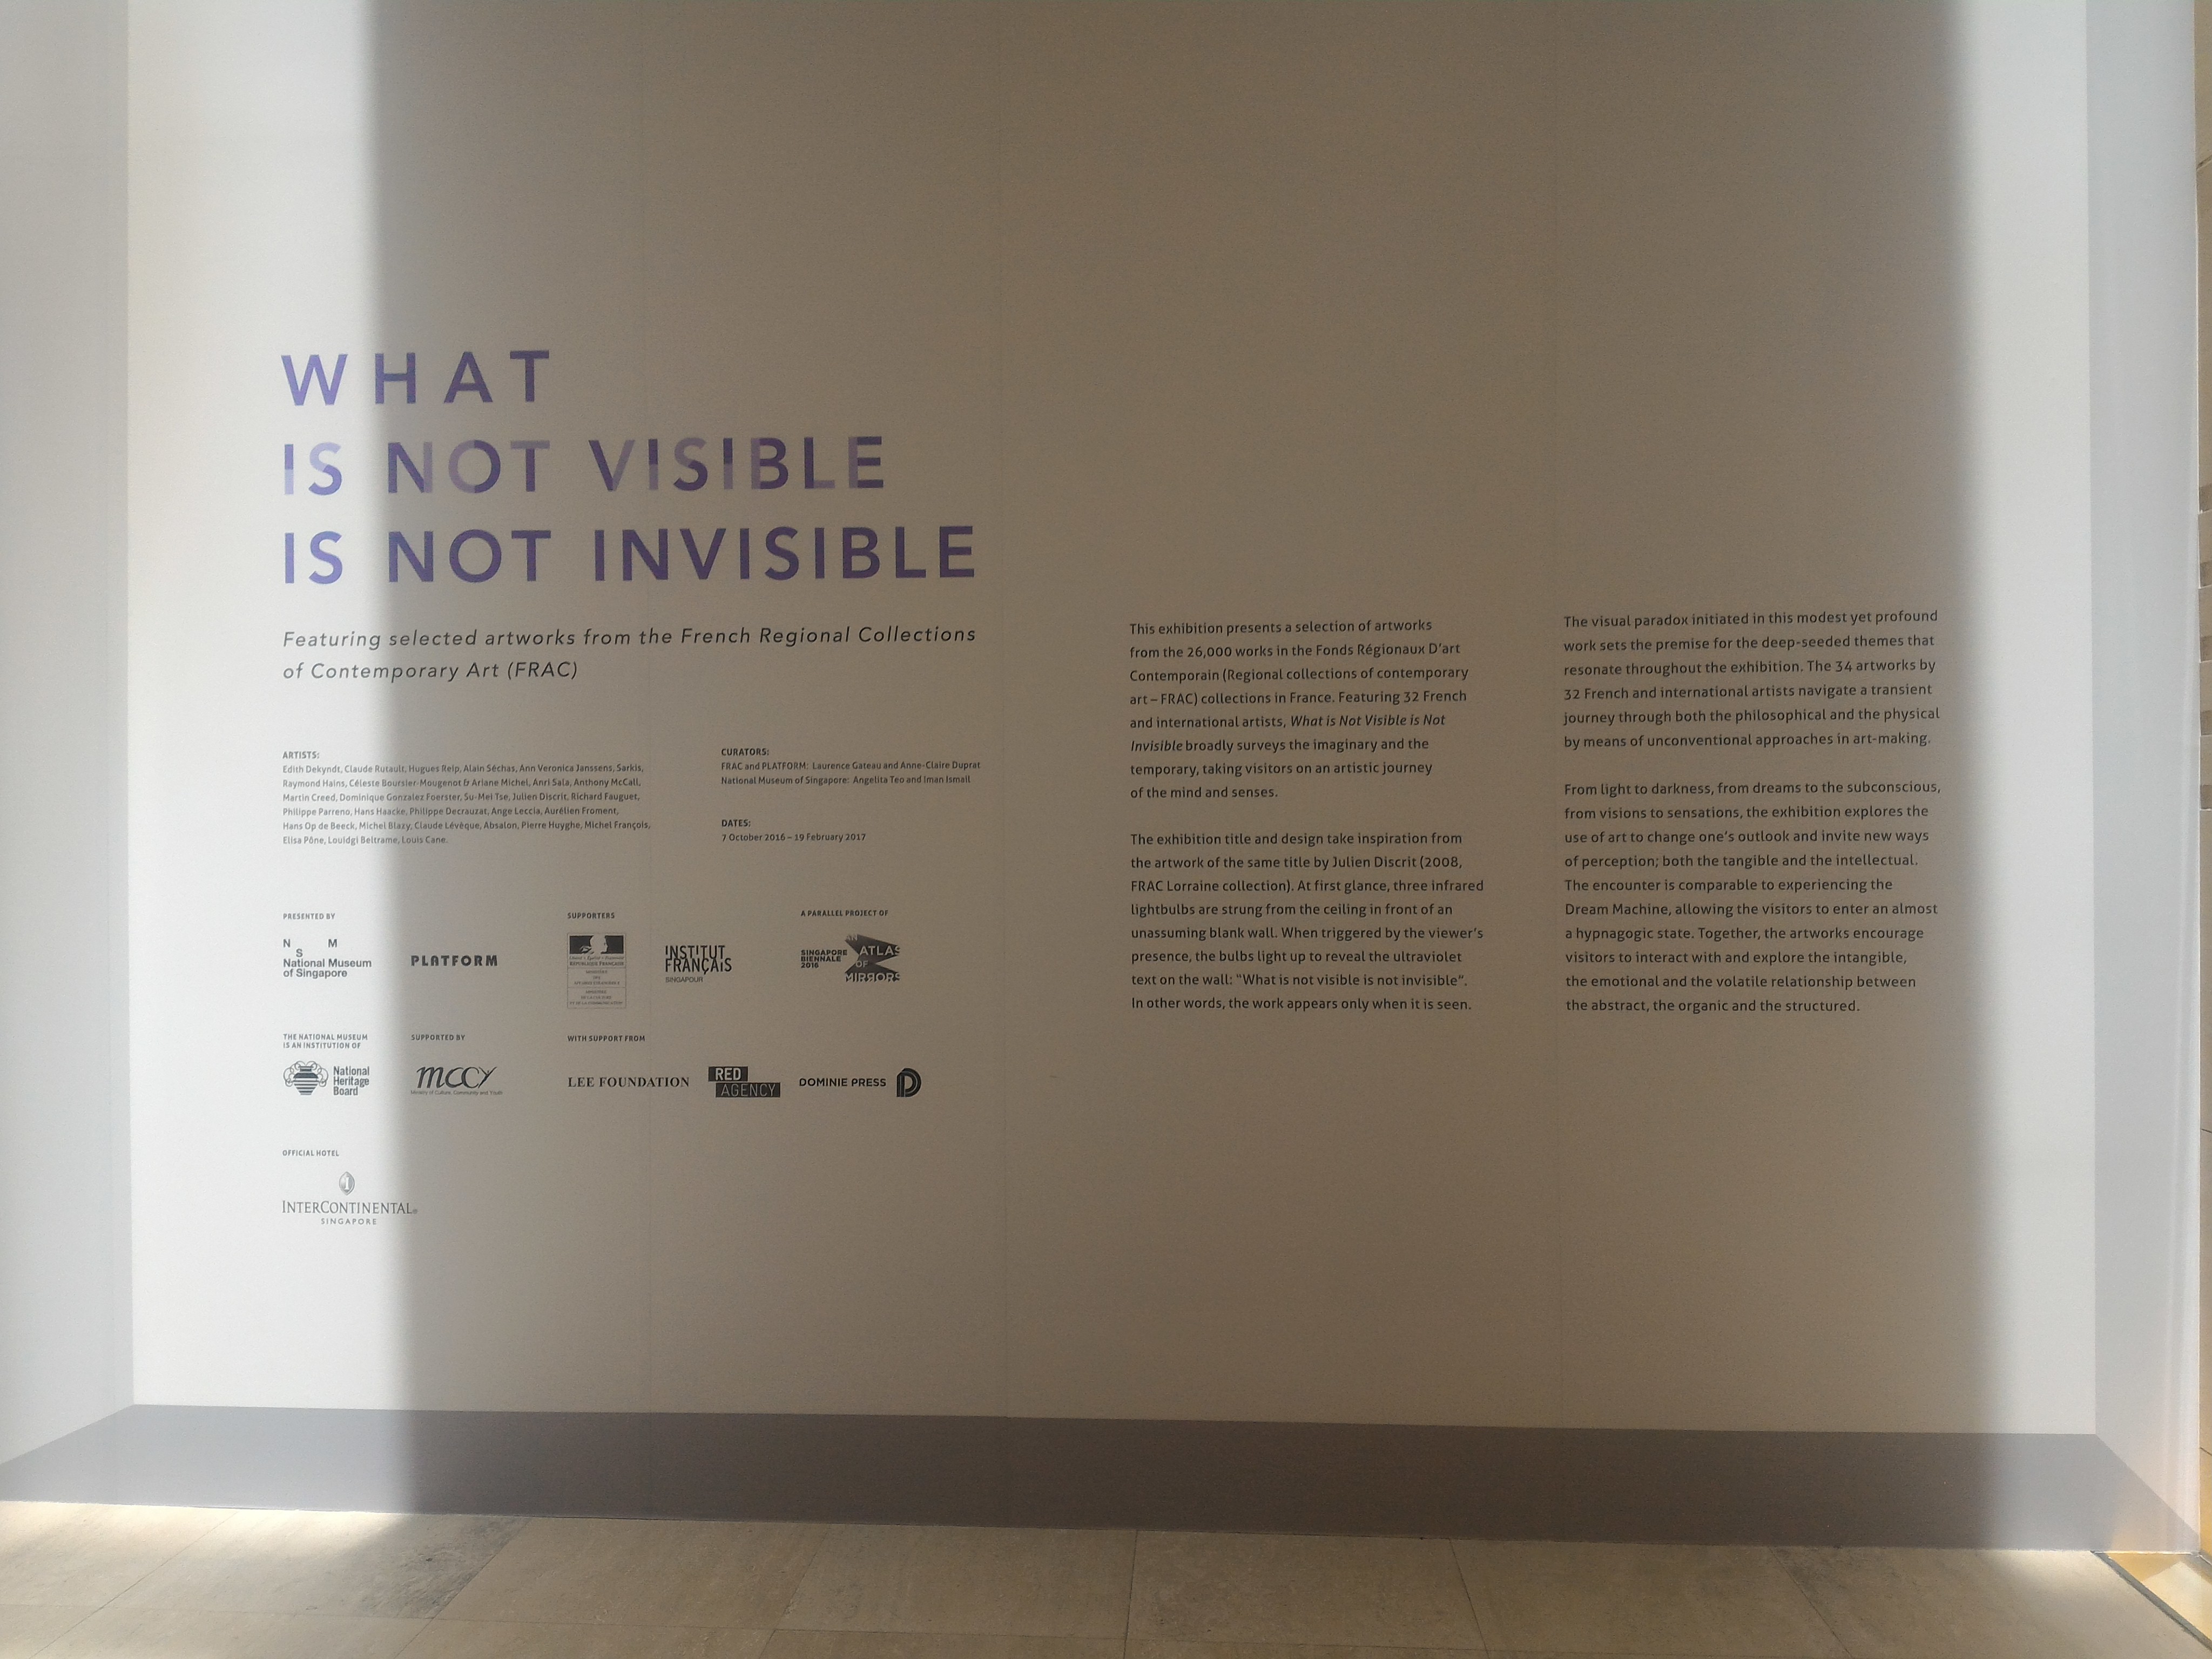
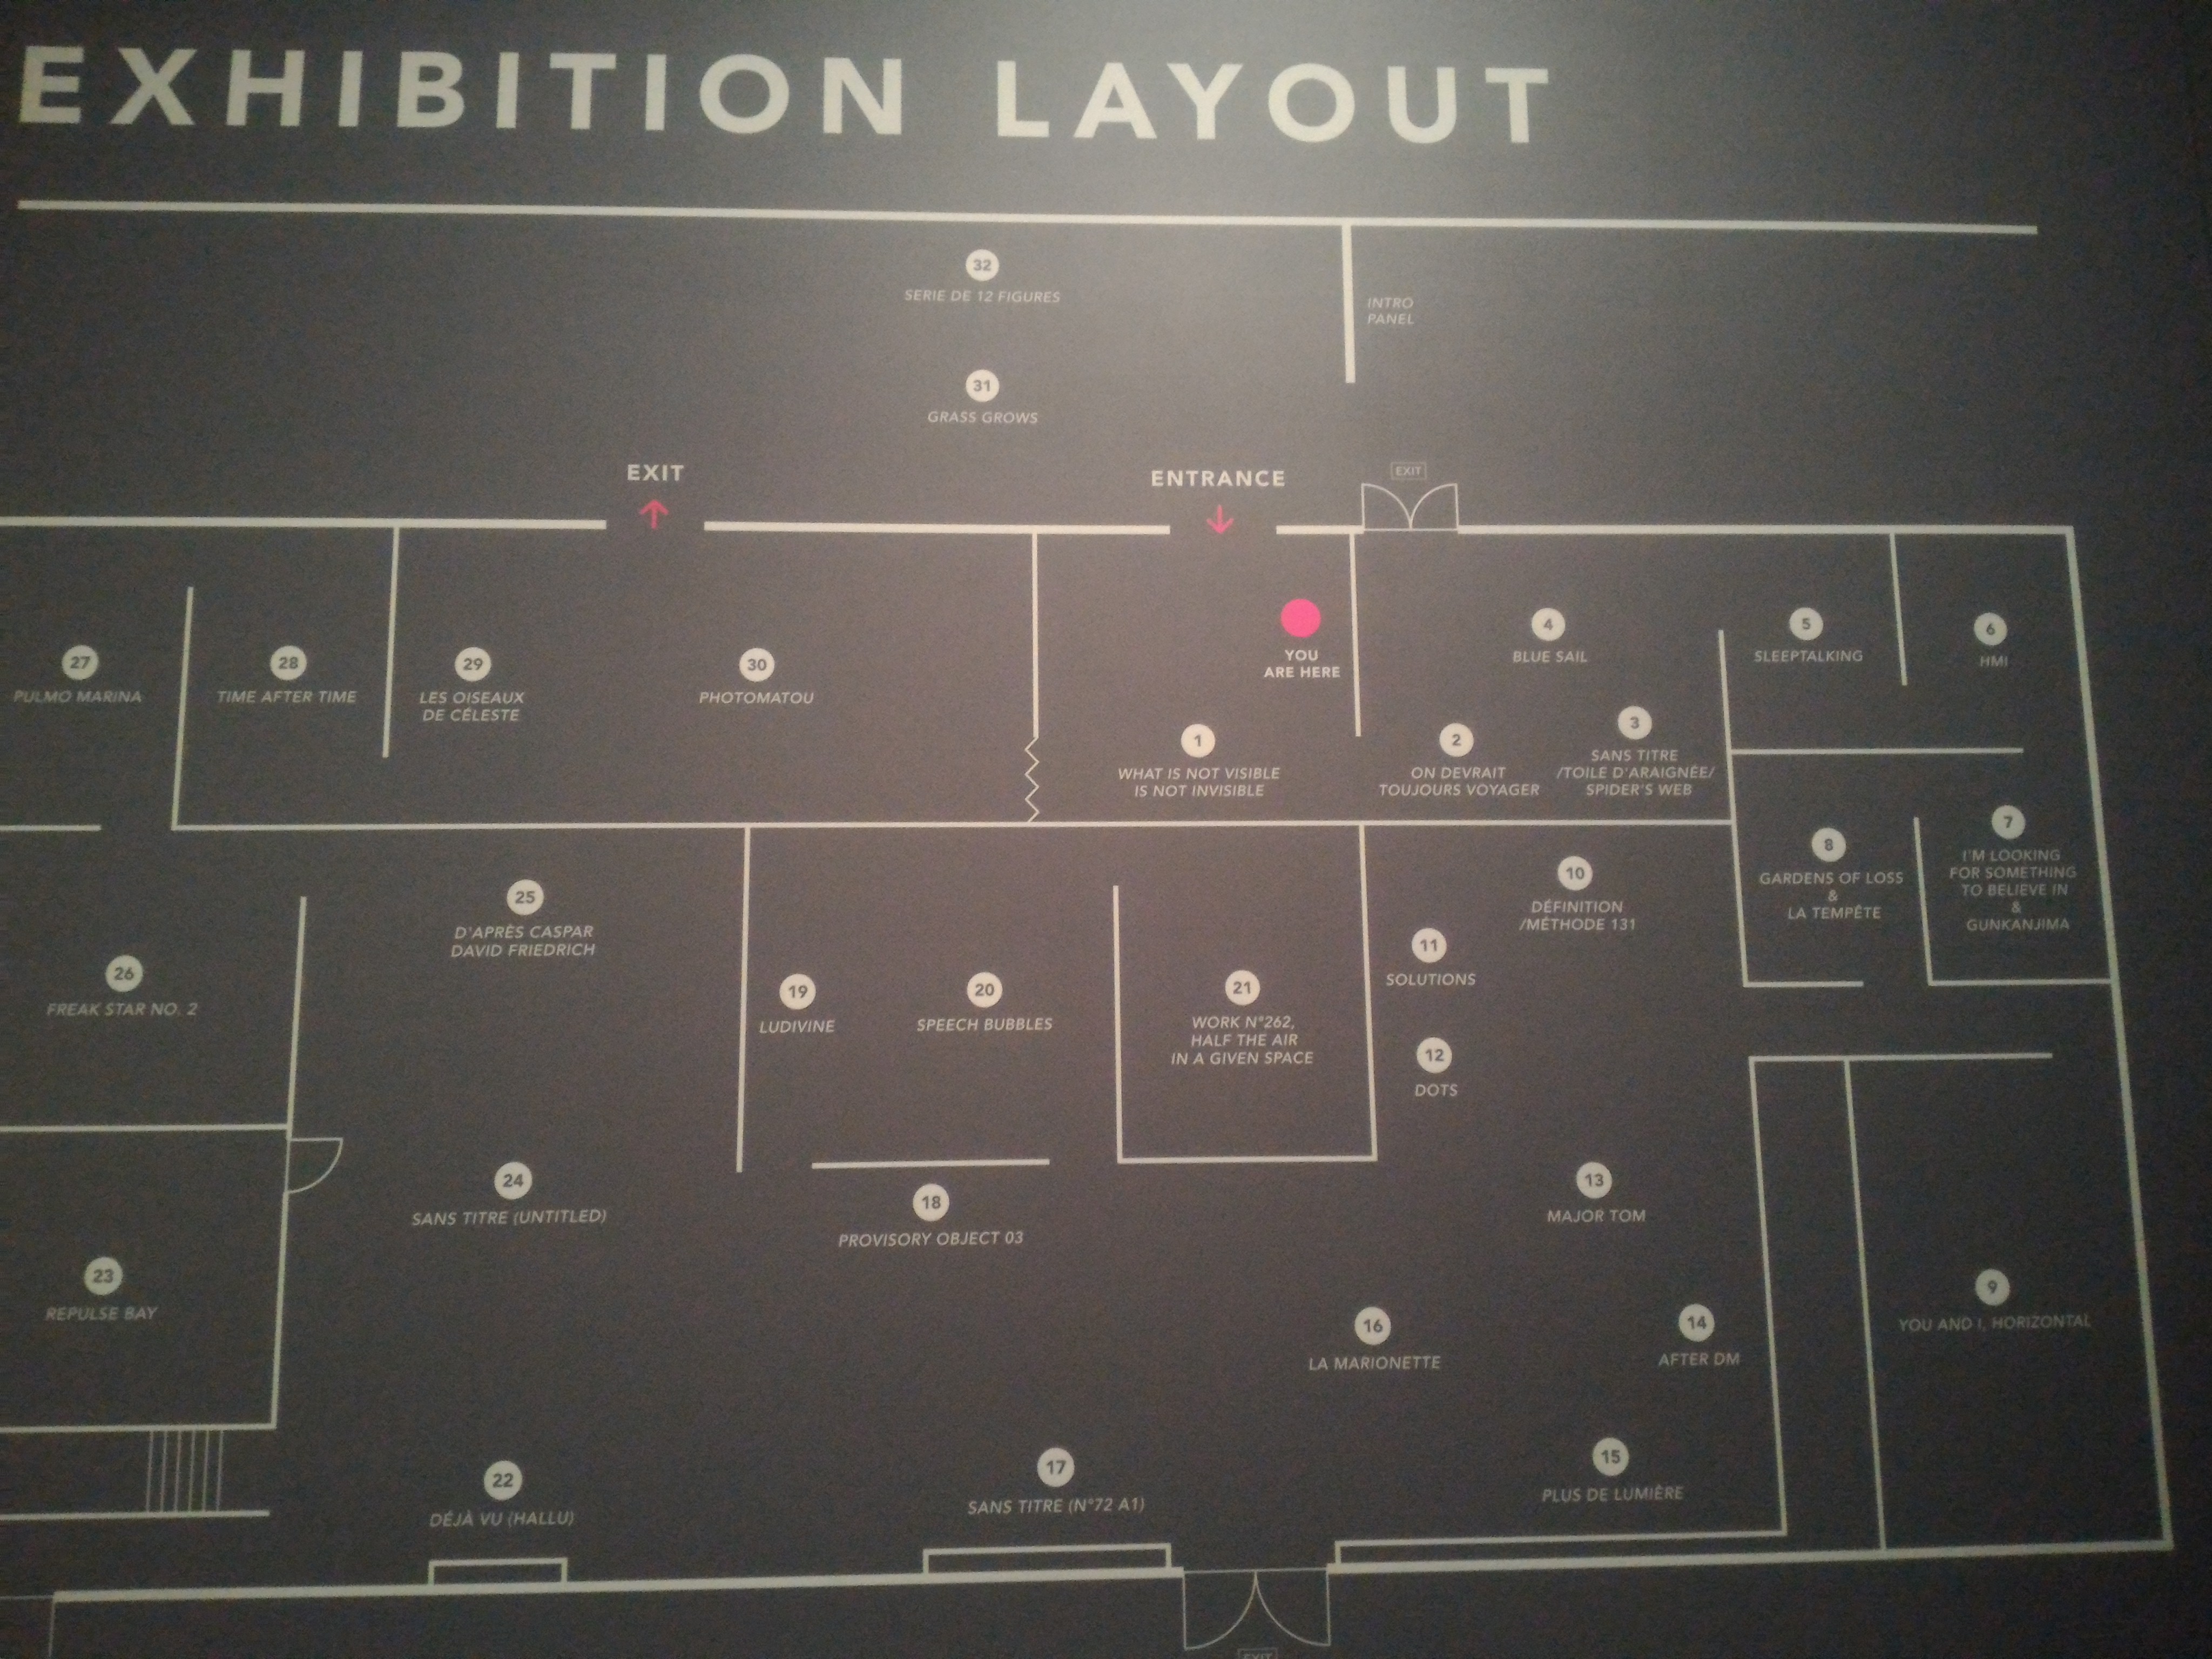

Exhibit Layout
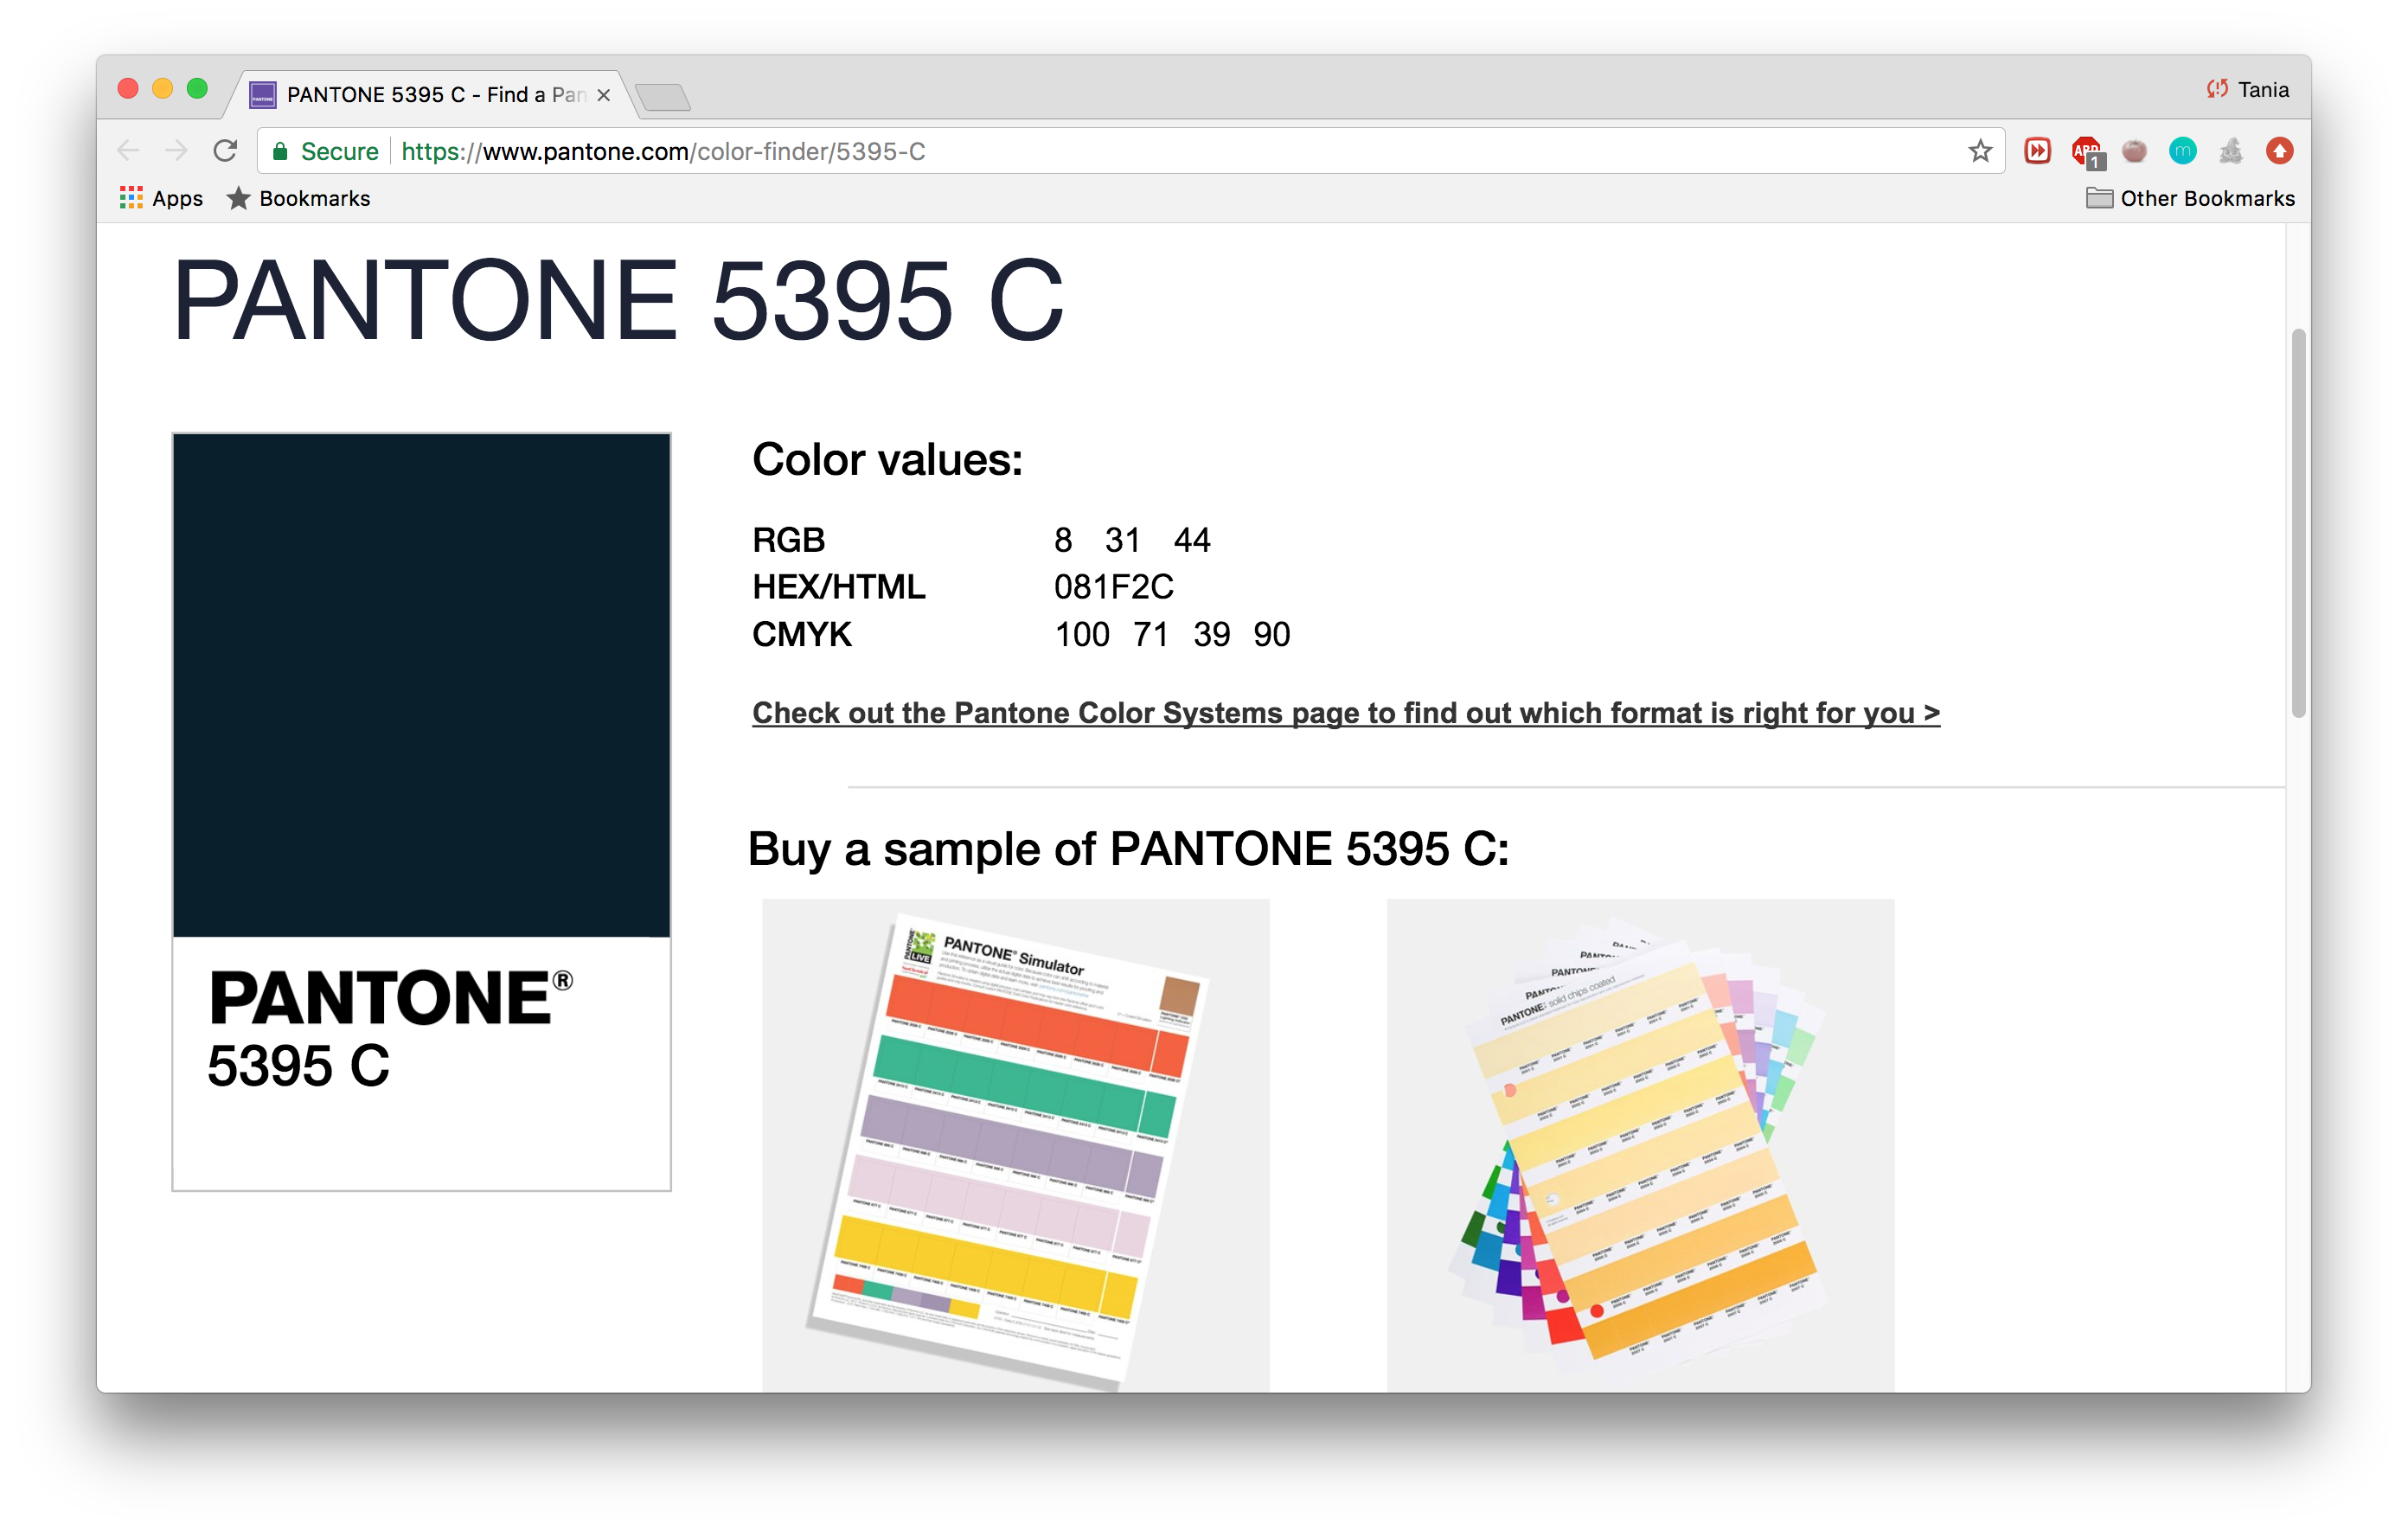
The grad show layout has been finalised! I would be painting the space entirely with the colour Pantone 5395 C (or similar, depending on the colours the contractors provide), with the exception of projection surfaces. I picked this slightly dark navy colour that I thought would be able to complement the purple which the grow light would give off.

I have also “choped” 3 pedestals of different sizing each, one at H (1m for all) x W x L 40 x 40cm (to place previous prototype), another 40 x 80 (for final prototype), and lastly, one with 40 x 100 (to place supporting posters and documentations if any).

More details could be found here: FYP Diagram(BW).


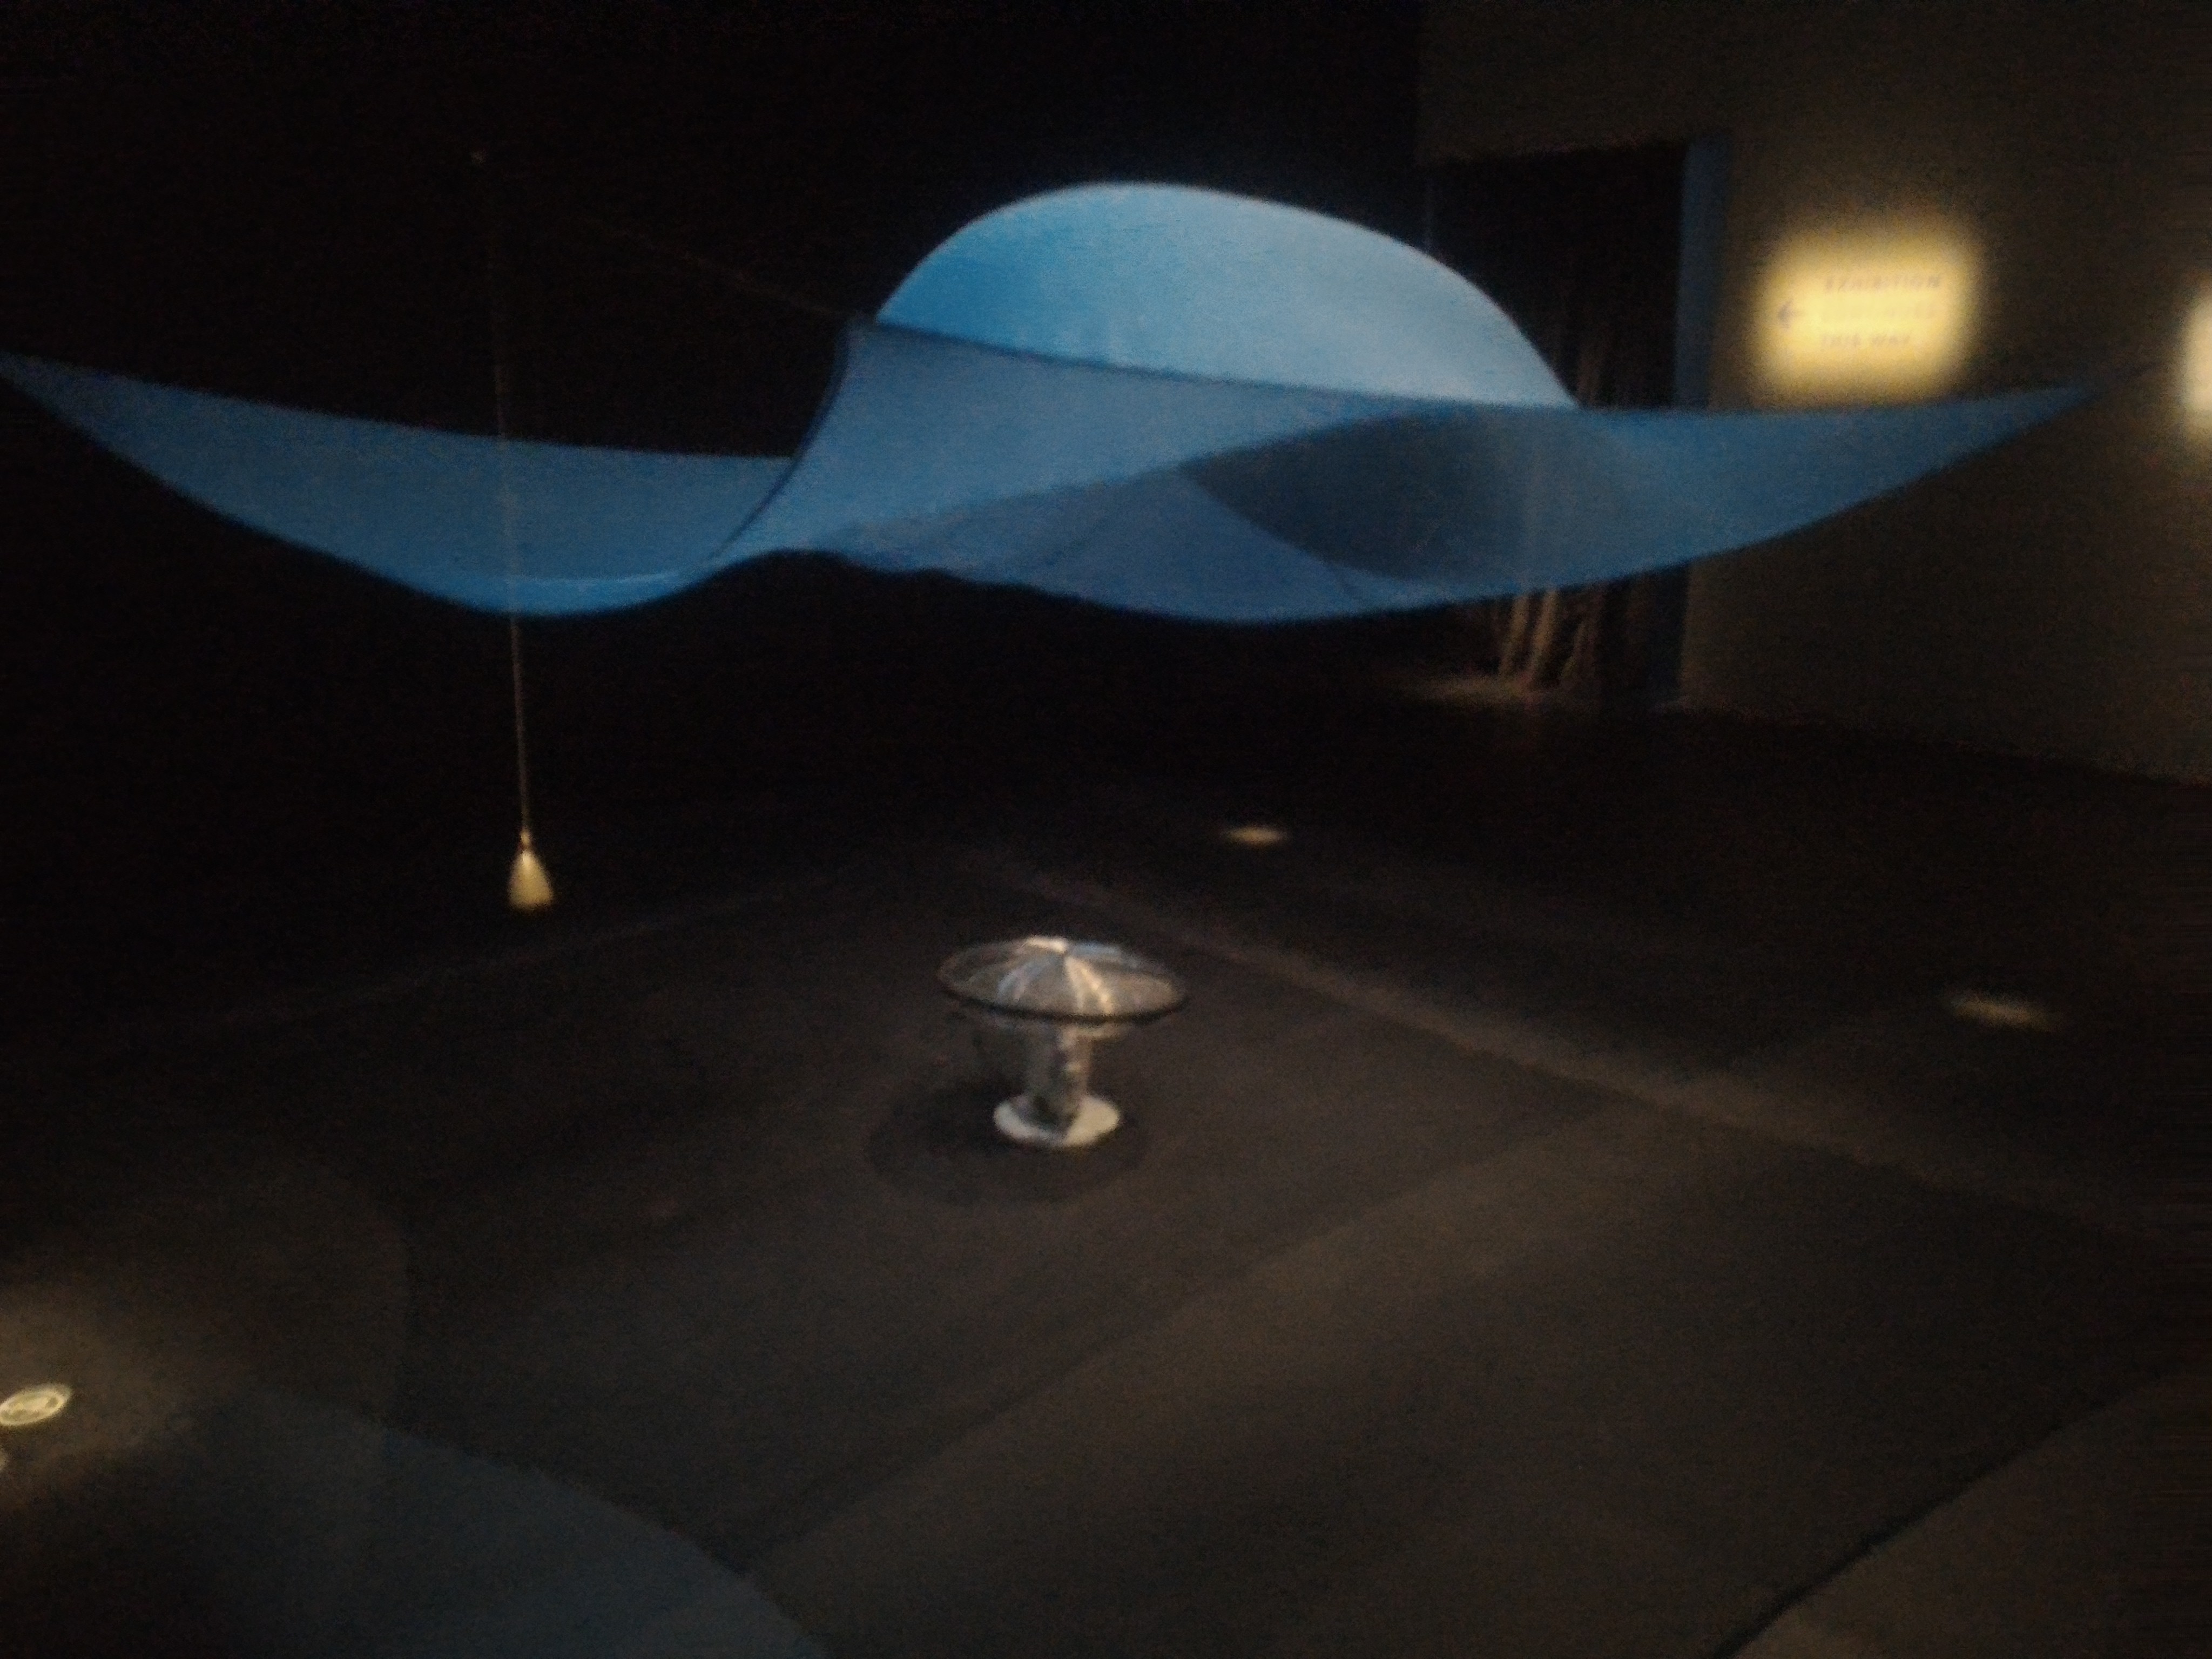
Grow Lights, and What to Do with Them
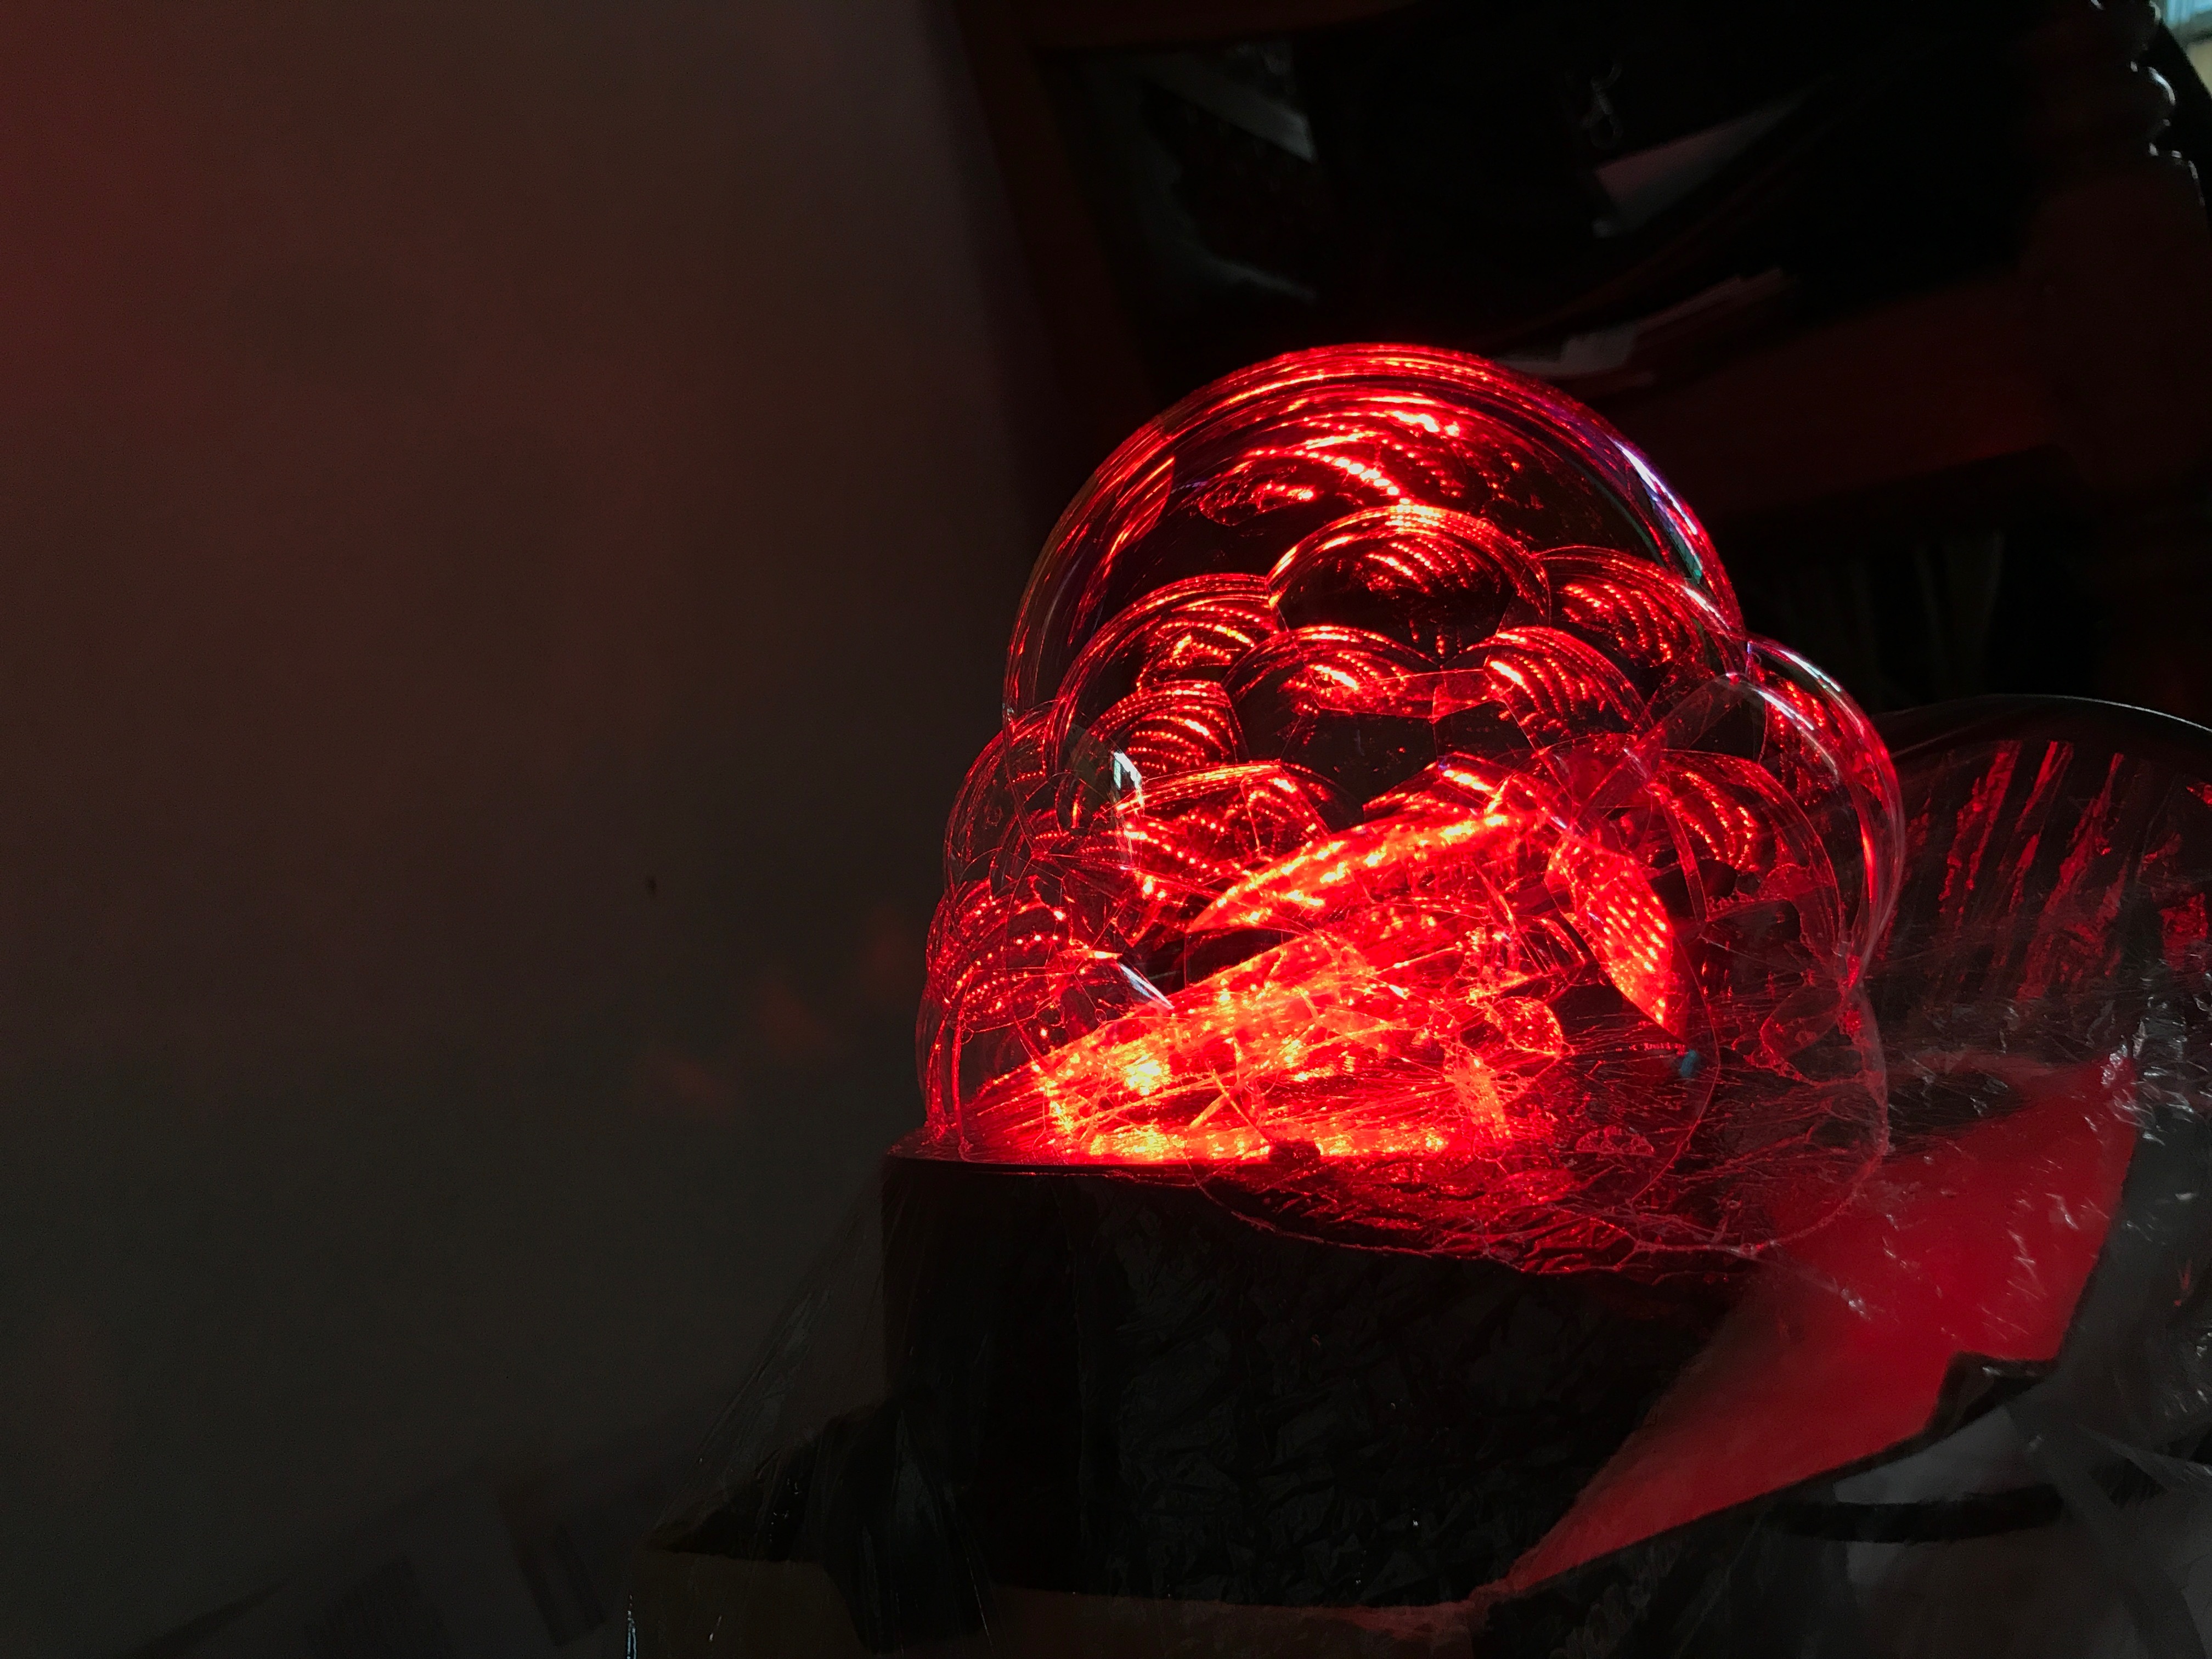
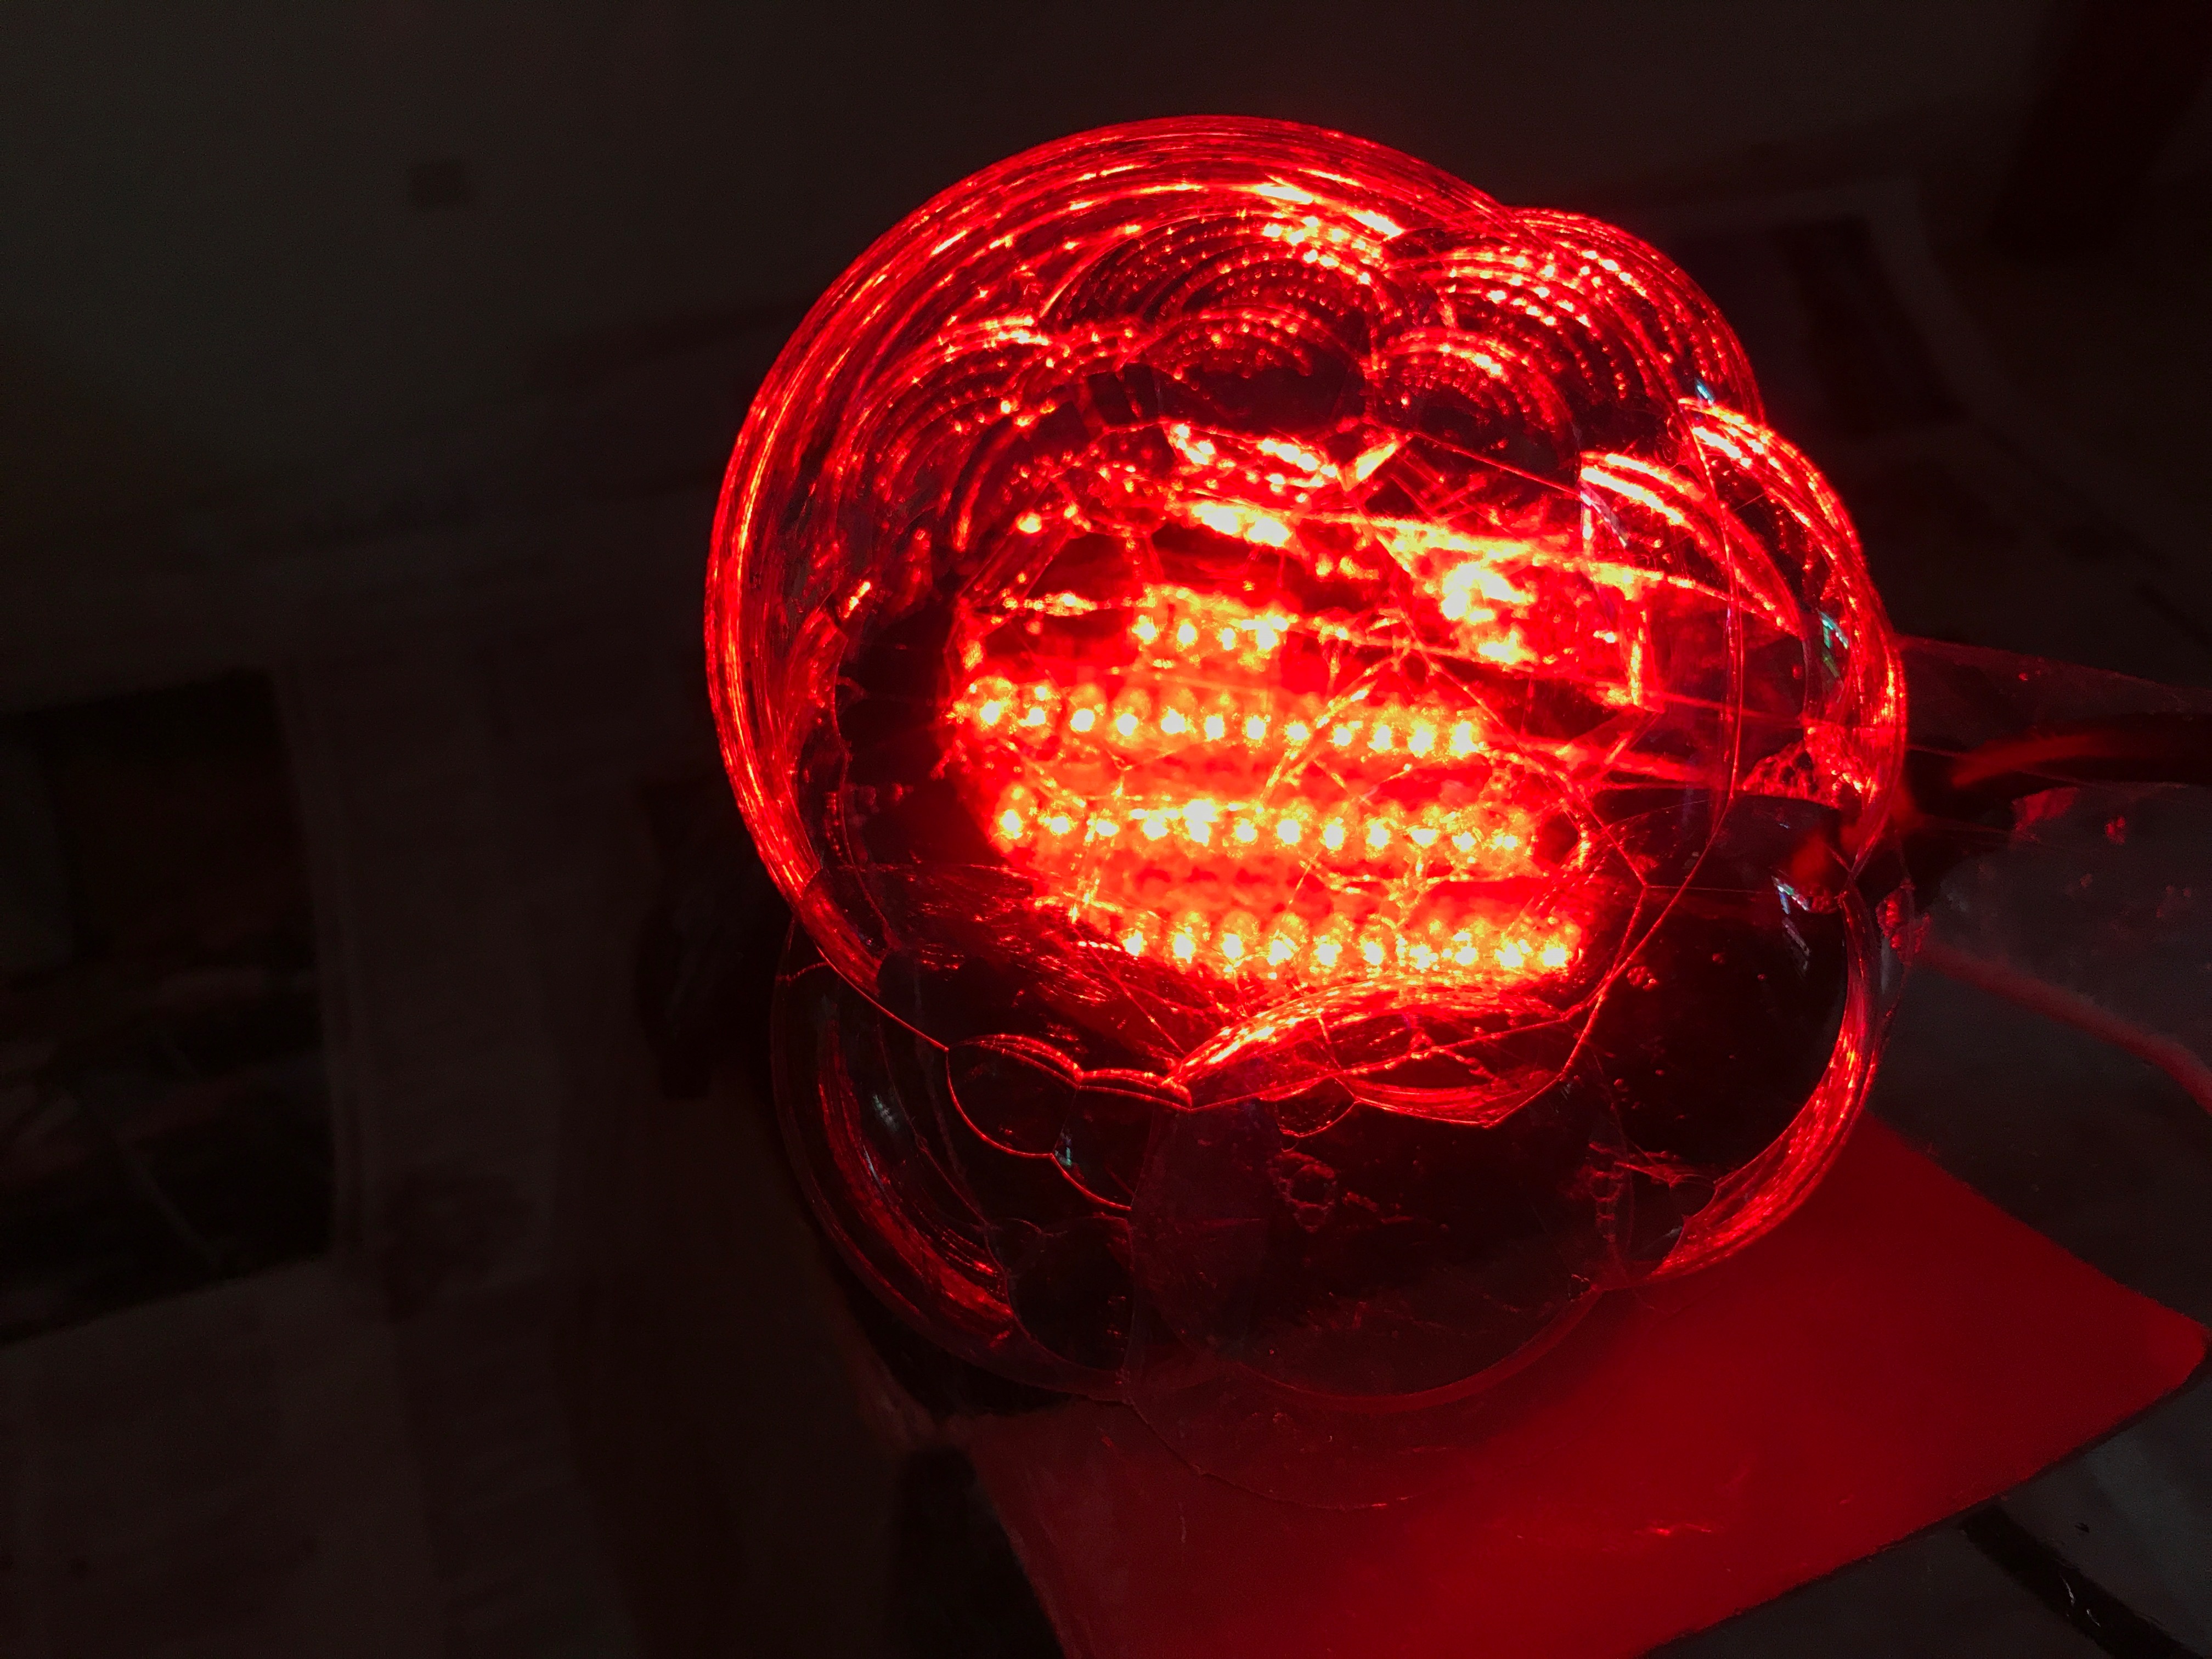
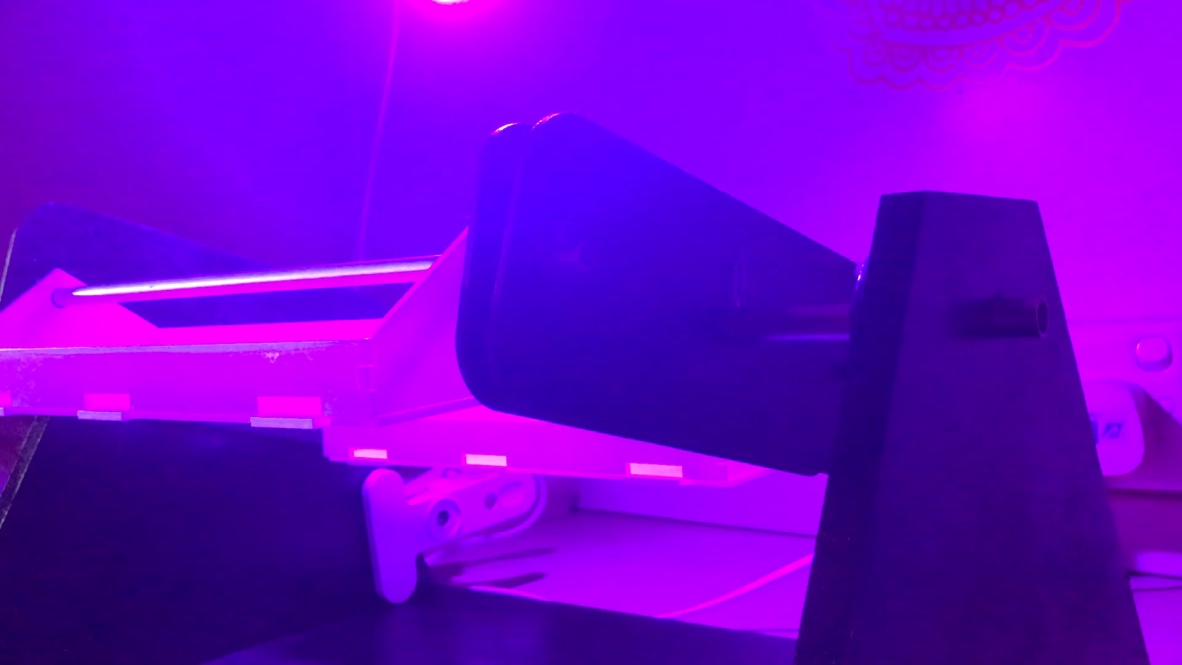
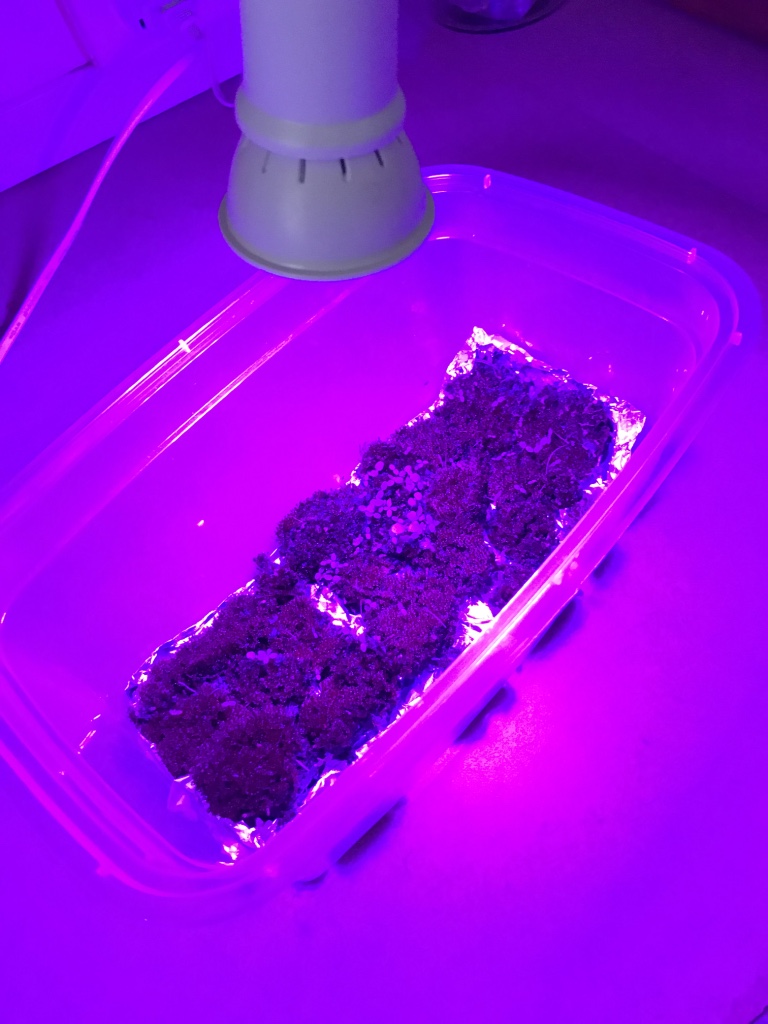
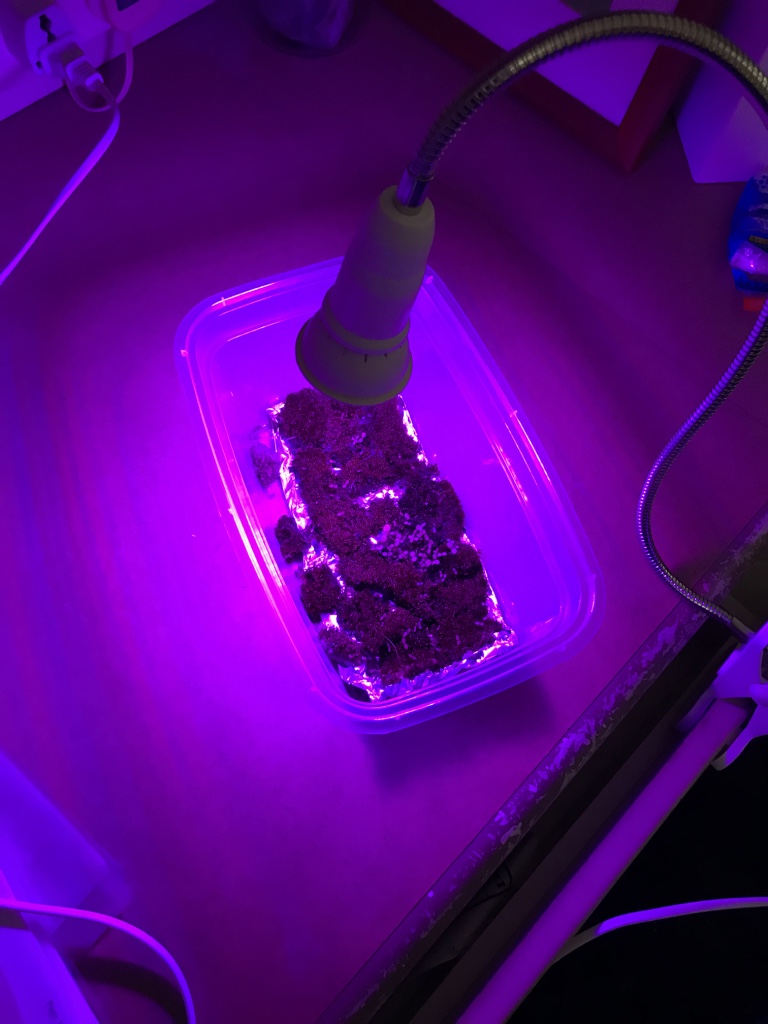
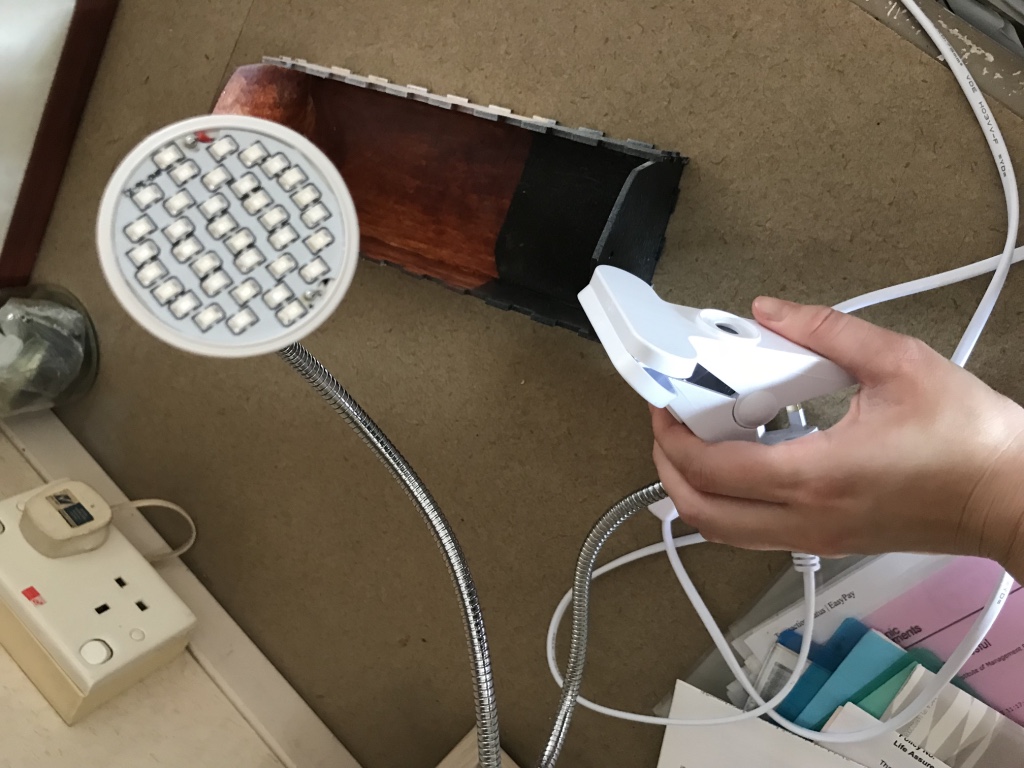
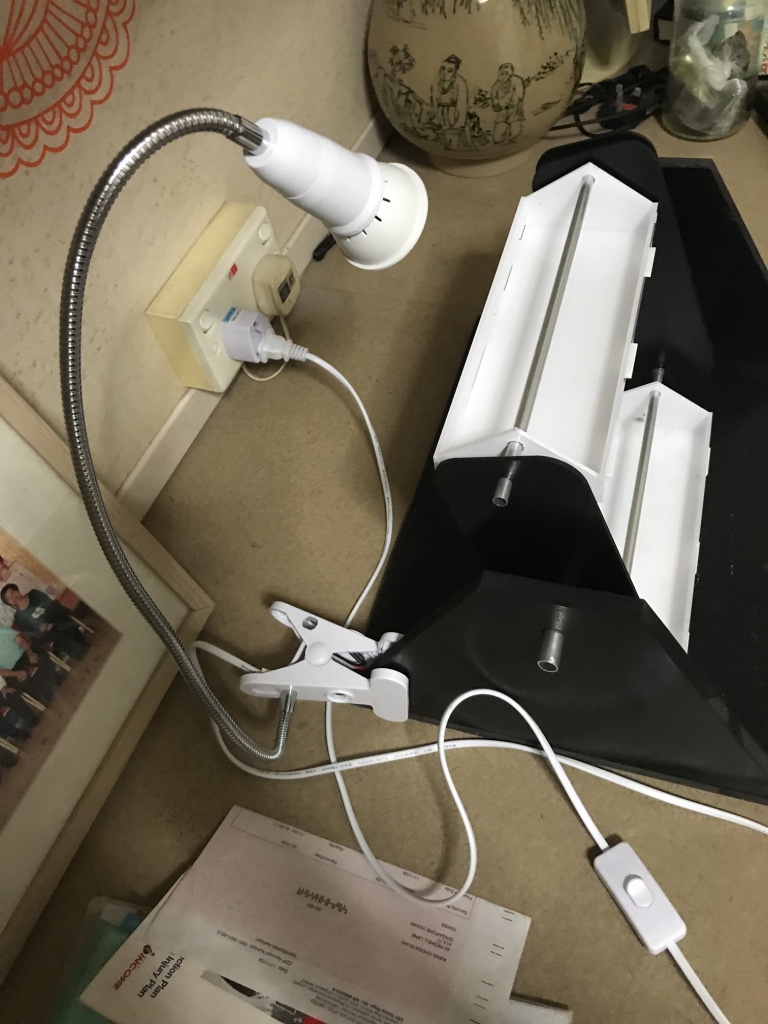
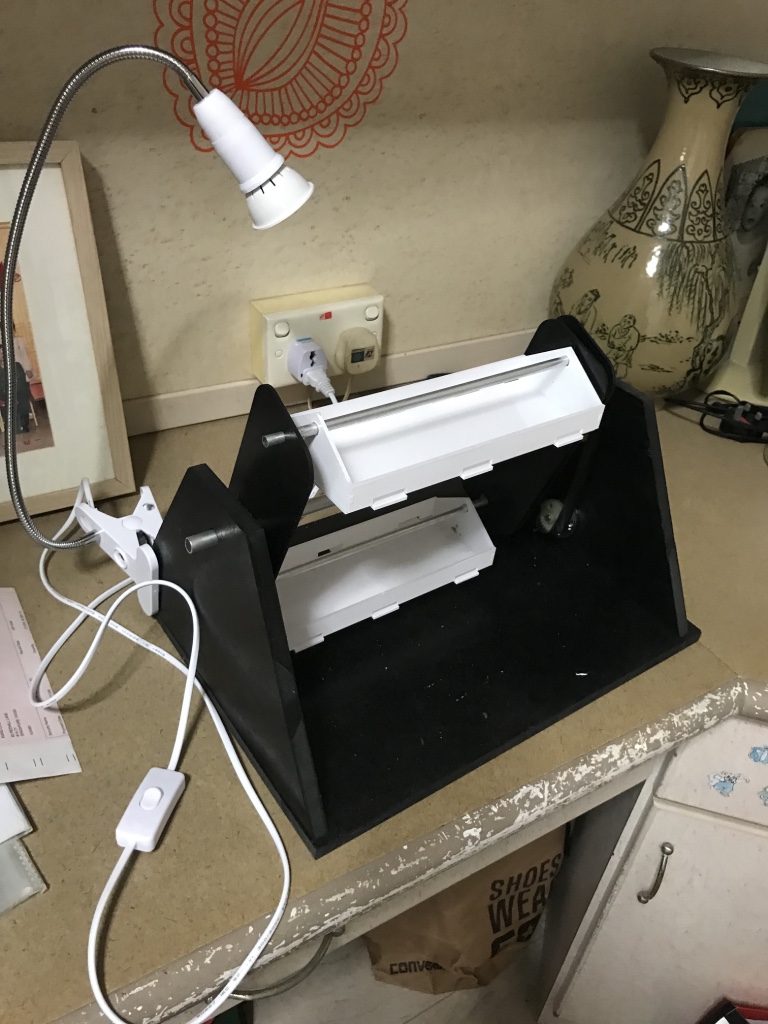
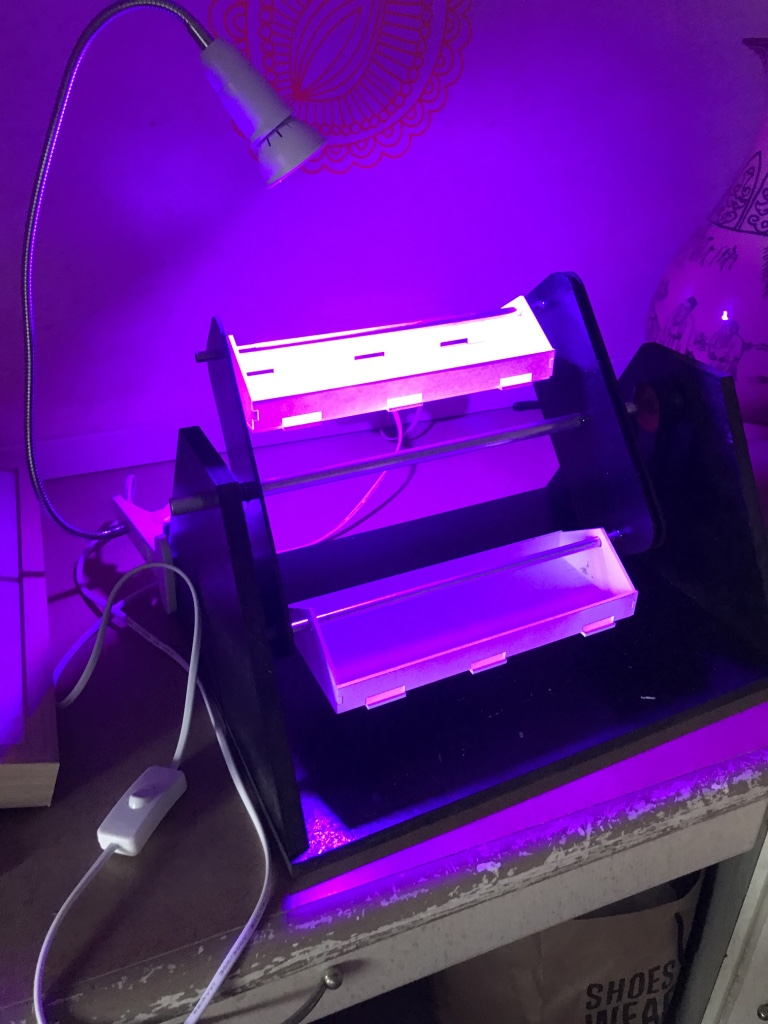
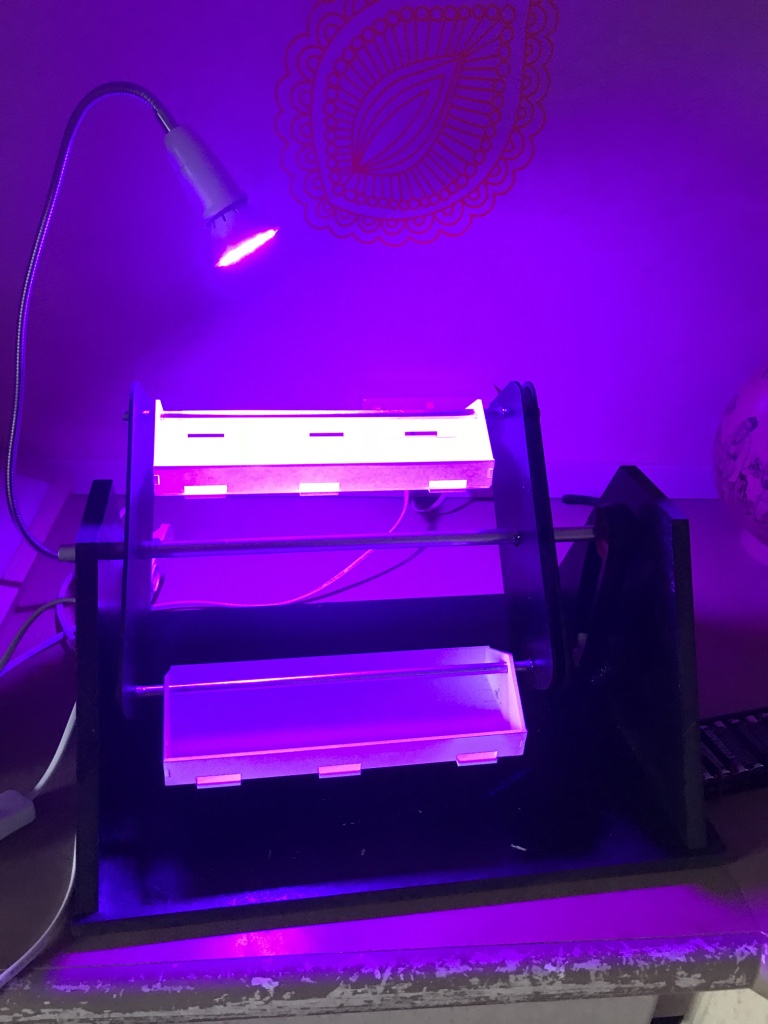
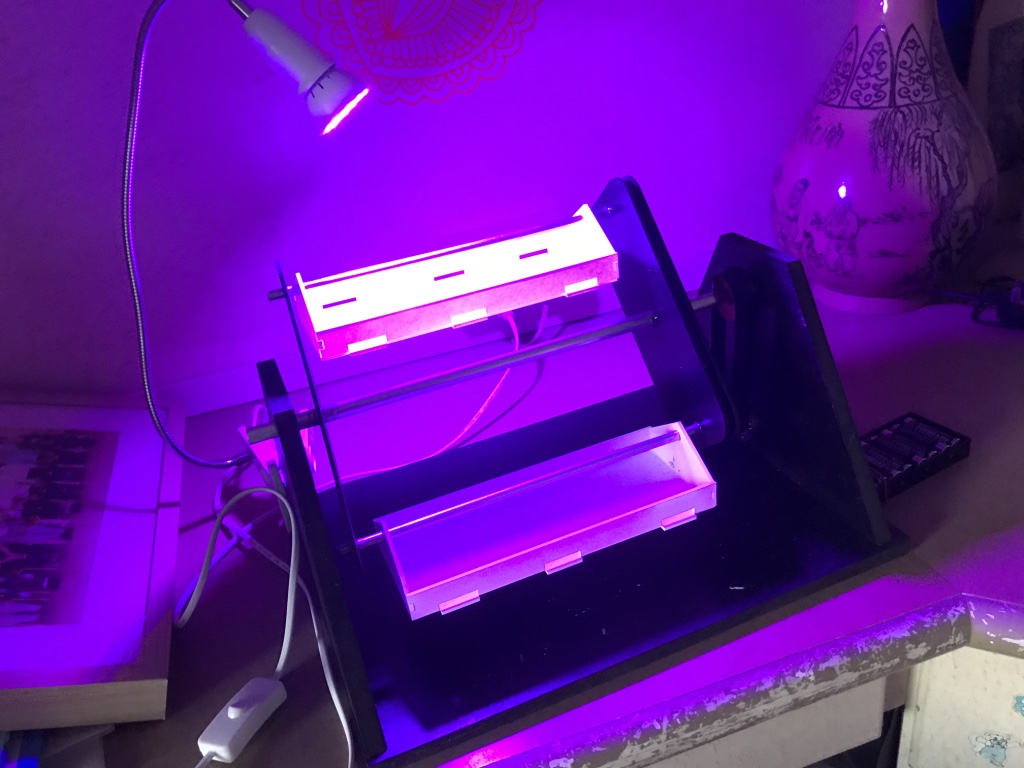
I have finally received my grow lights, way faster than I had expected! However, despite me buying the smaller bulbs, there were many unexpected outcomes which would mar the final aesthetics of the project.

Catalogue of grow lights which I bought (I bought 2)

Some aspects which I did not realise include:

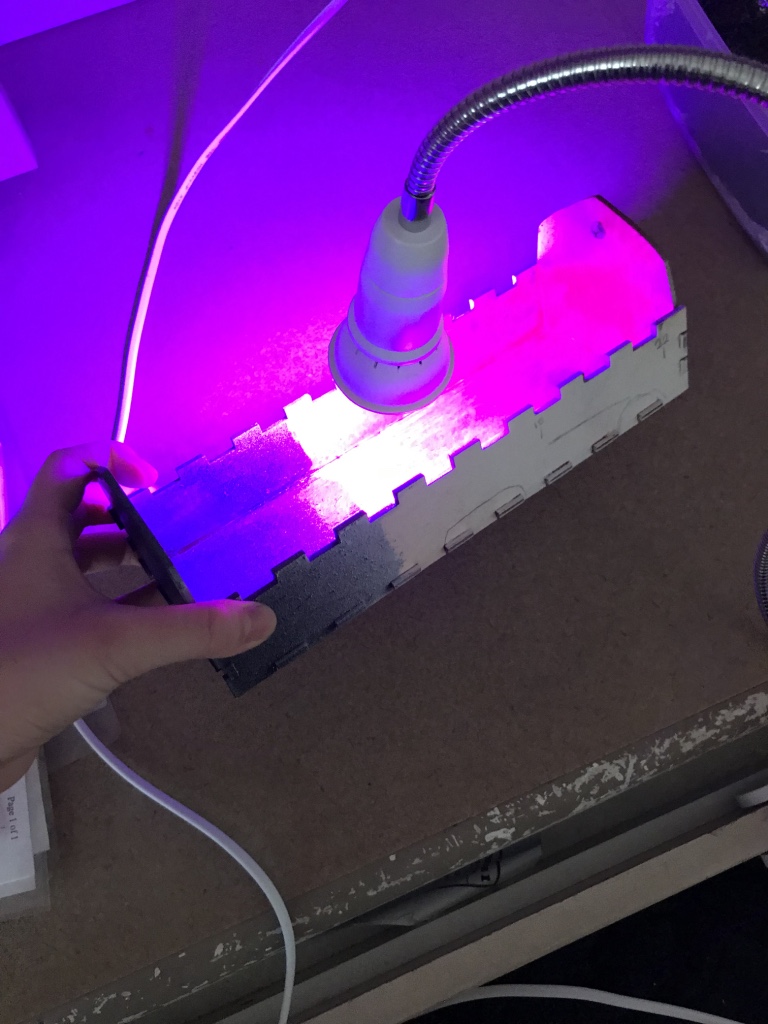
1. Light splashes around the entire machine, and even outside of the moss planters

Surely, this can be mitigated against, through either implementing a lampshade like hood on the bulb itself, or raising the sides of the moss planters (not ideal, as aesthetically it would look bad and incur more difficulties in raising the entire moss bed), but this would simply mean more effort expended into correcting these issues, and risk disrupting the already working machinery/aesthetics

2. Grow light makes… the moss look bad

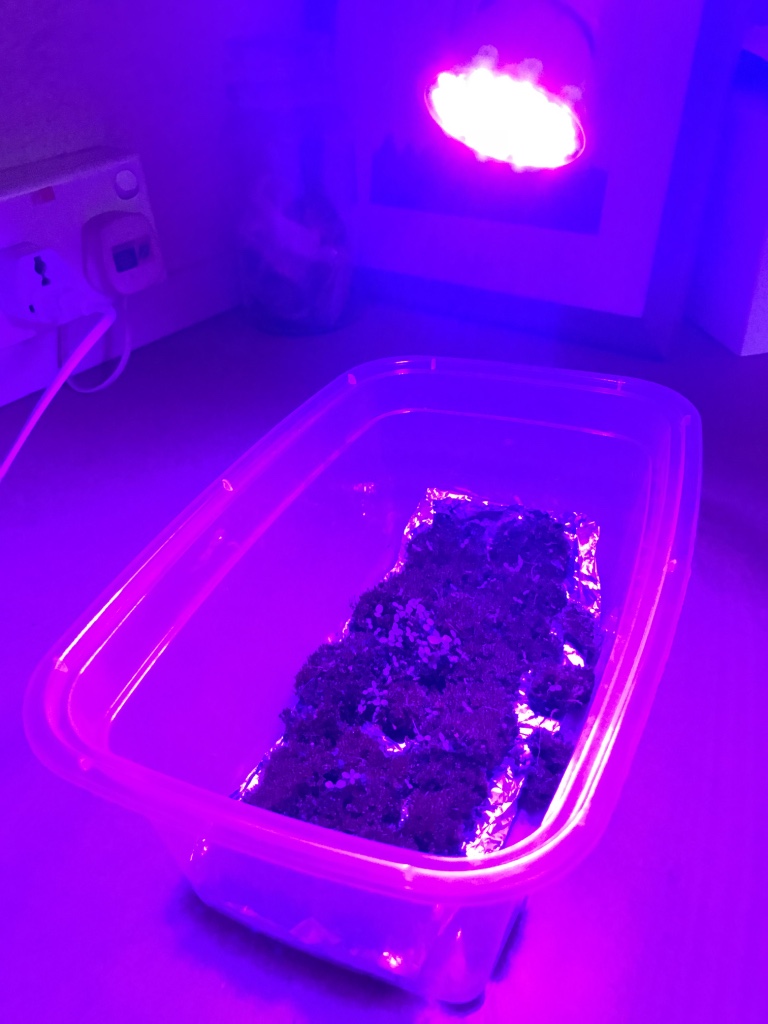
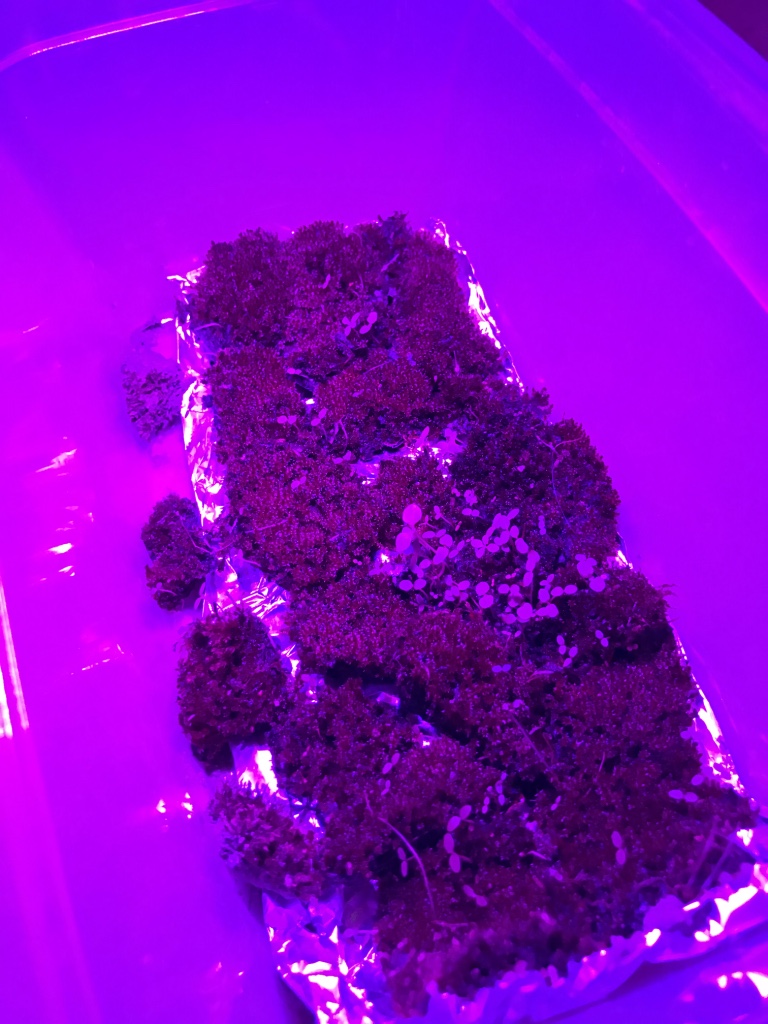
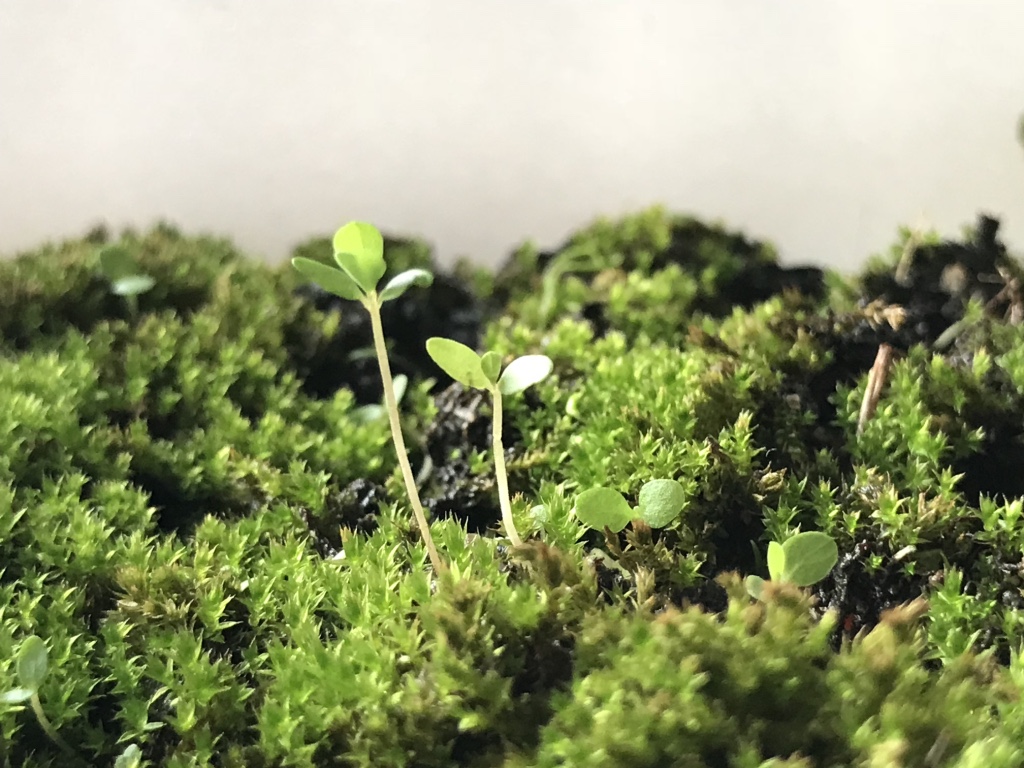
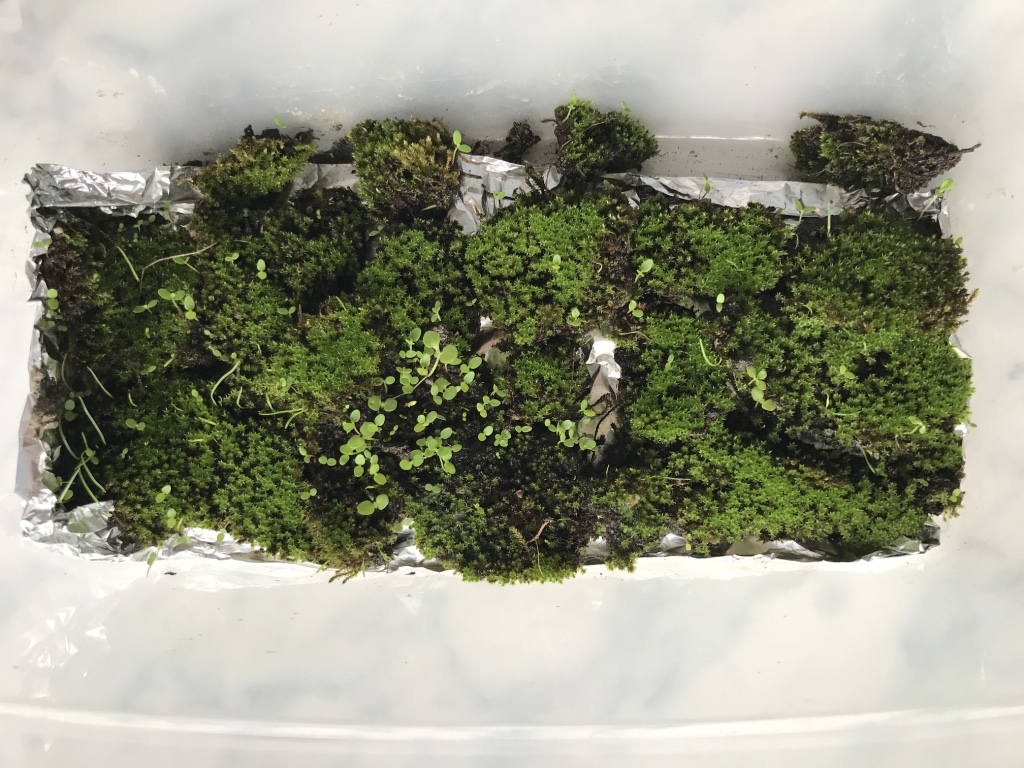
Ever since the presentation, I had re-transferred the moss back to the plastic trays as it makes it easier to grow the moss (in terms of watering, or letting it sun out). Since then, the moss has not advanced much in terms of growth, but there has been an increase in sprouting amongst the moss.

As evident above, the purple from the grow light has overpowered the initial green of the moss. With green, the symbol of freshness, youth and growth eradicated, an eerie feeling takes over the model. I am on the fence about this new enforced aesthetics – on one hand, it strongly pushes forth the idea of the creepy science laboratory theme, and also adds some colour to the otherwise dark space exhibit, but with the green and symbols of freshness lost, I feel that I would need to adjust the exhibit aesthetics slightly.

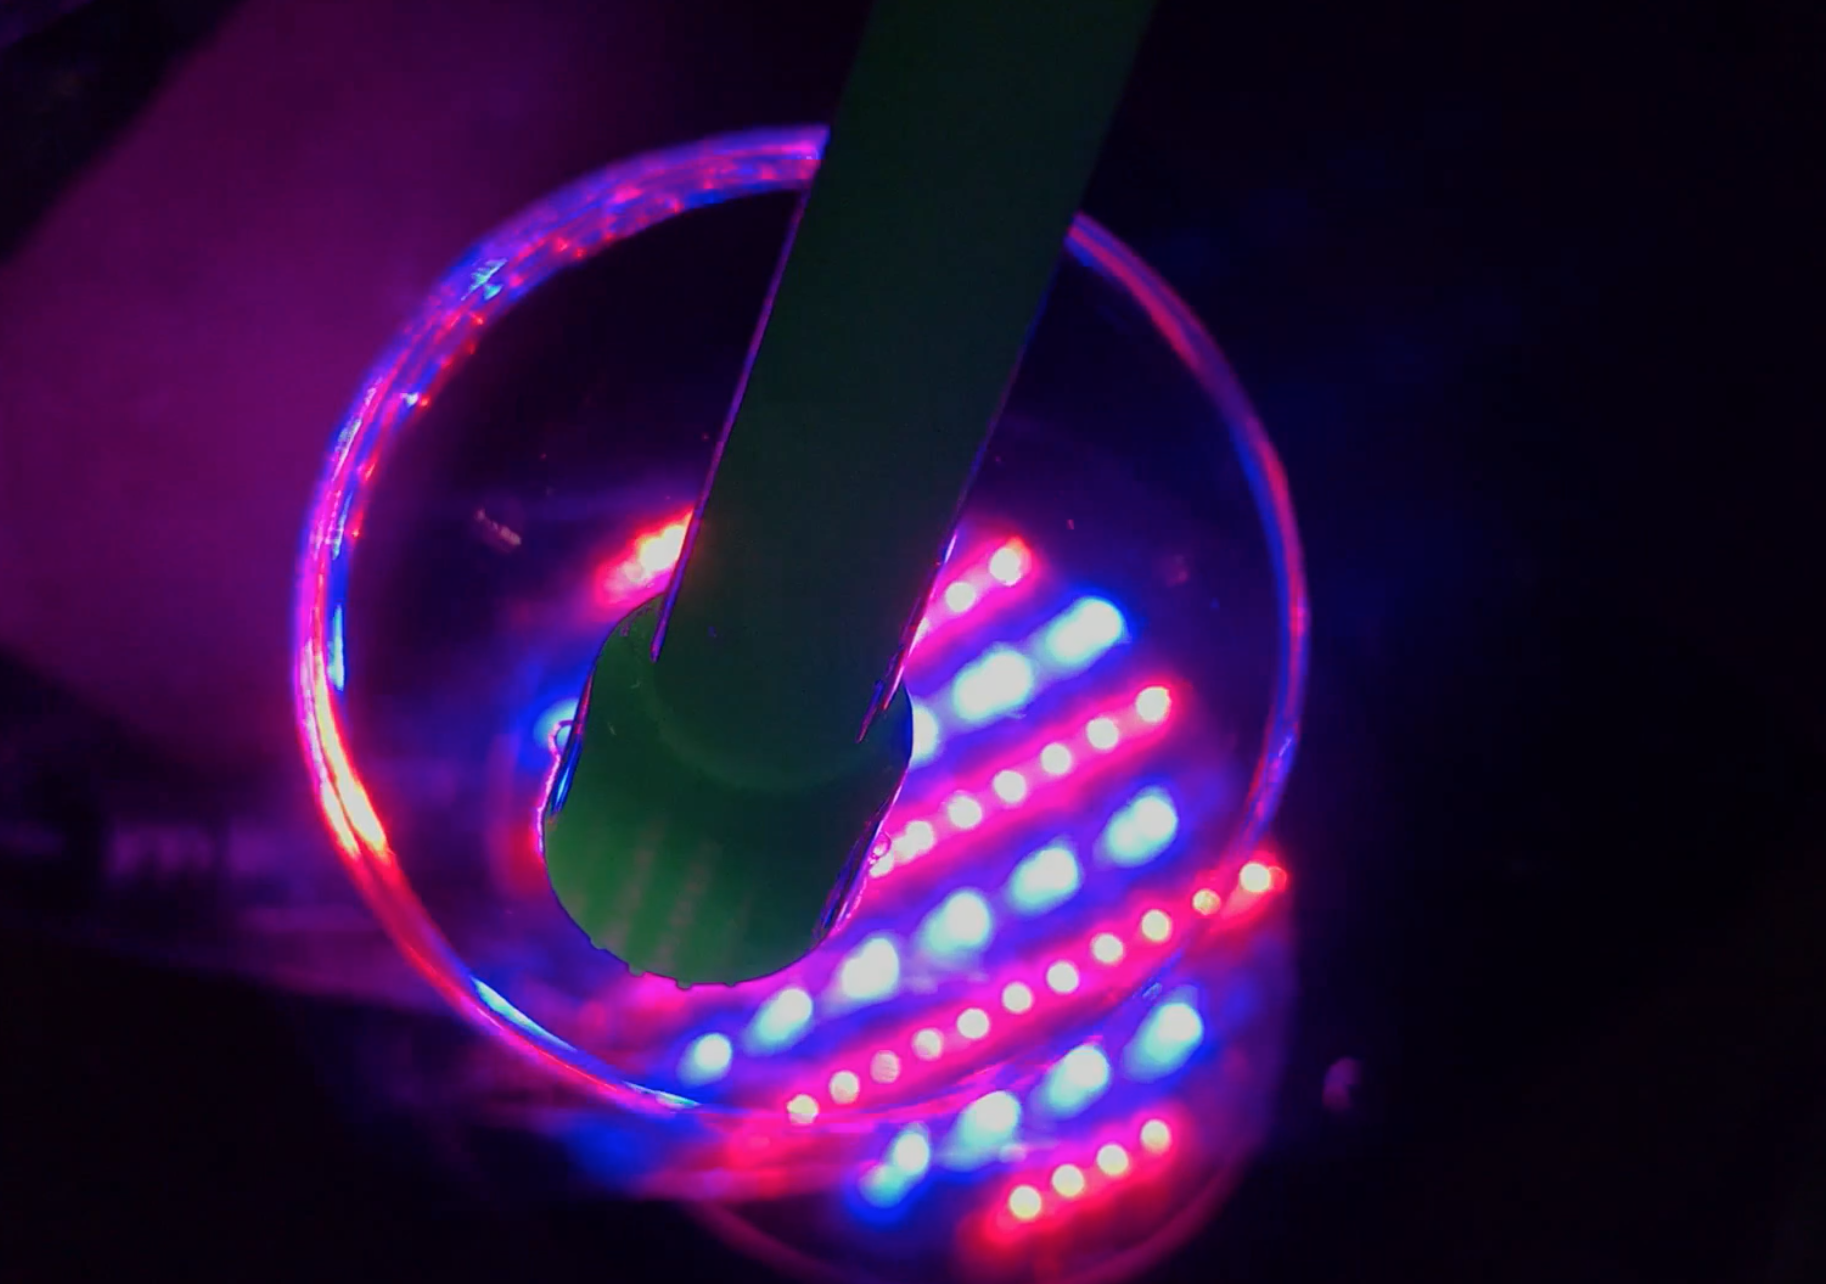
3. Rotating Grow Lights?
Initially, I wanted each grow light to also be in continuous rotating motion, and each grow light was to follow each tray in rotation. However, knowing now that the light splashes around out of the tray planter, the intended effect of seeing each grow light rotate around (as though each was the sun rotating around a planet) would not be as strong as I thought.

I could try to add on the lampshade to minimise the lighting, but I am wary of its construction. For instance, I have not tested the lighting for long hours, and am not sure of the volume of heat it would release (which might potentially, set fire to my lampshade or kill my moss).

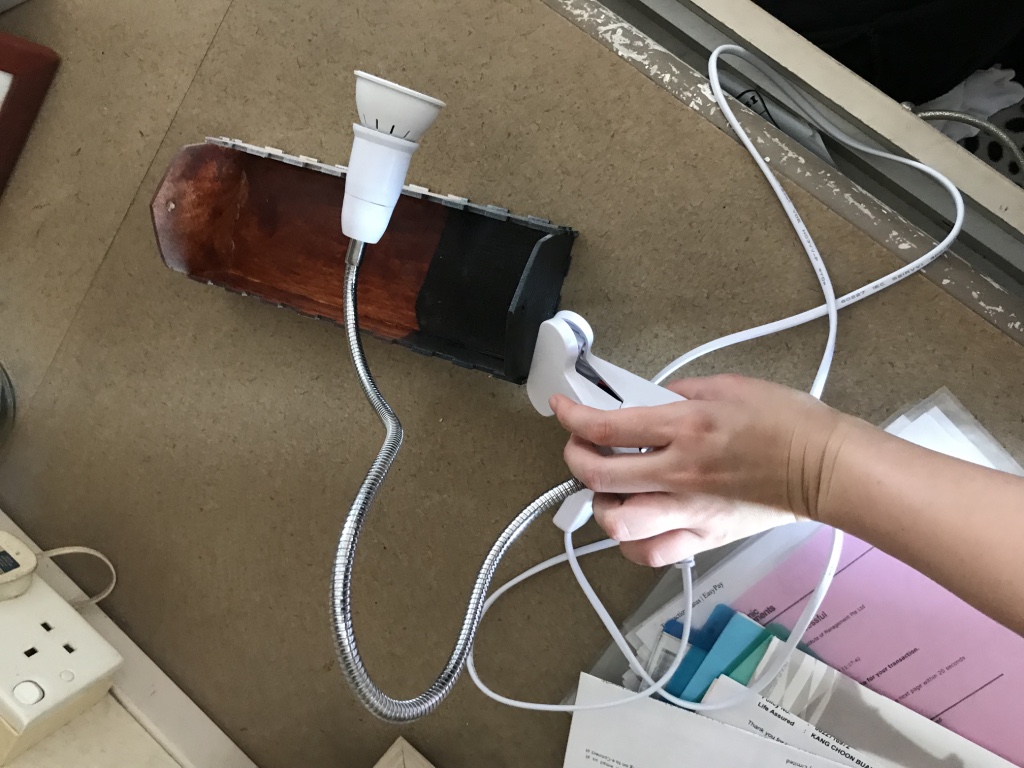
Another consideration would be that for the grow light to rotate, their connecting wires would also have to rotate. This is troublesome for the machinery layout planning, Currently, the grow light comes together with a clip and bendable stem, which would be extremely helpful in positioning it onto the model. As such, I am considering eliminating the rotation of the grow light, despite it being a much more powerful element.

What I have in mind to continue working on

To deal with these, I plan to:
1. Make a lampshade
2. Make my moss machine LARGER (for it to ‘capture’ more of the light spillage)
3. amend the construction of the moss model, as a larger model would require better supportive frame
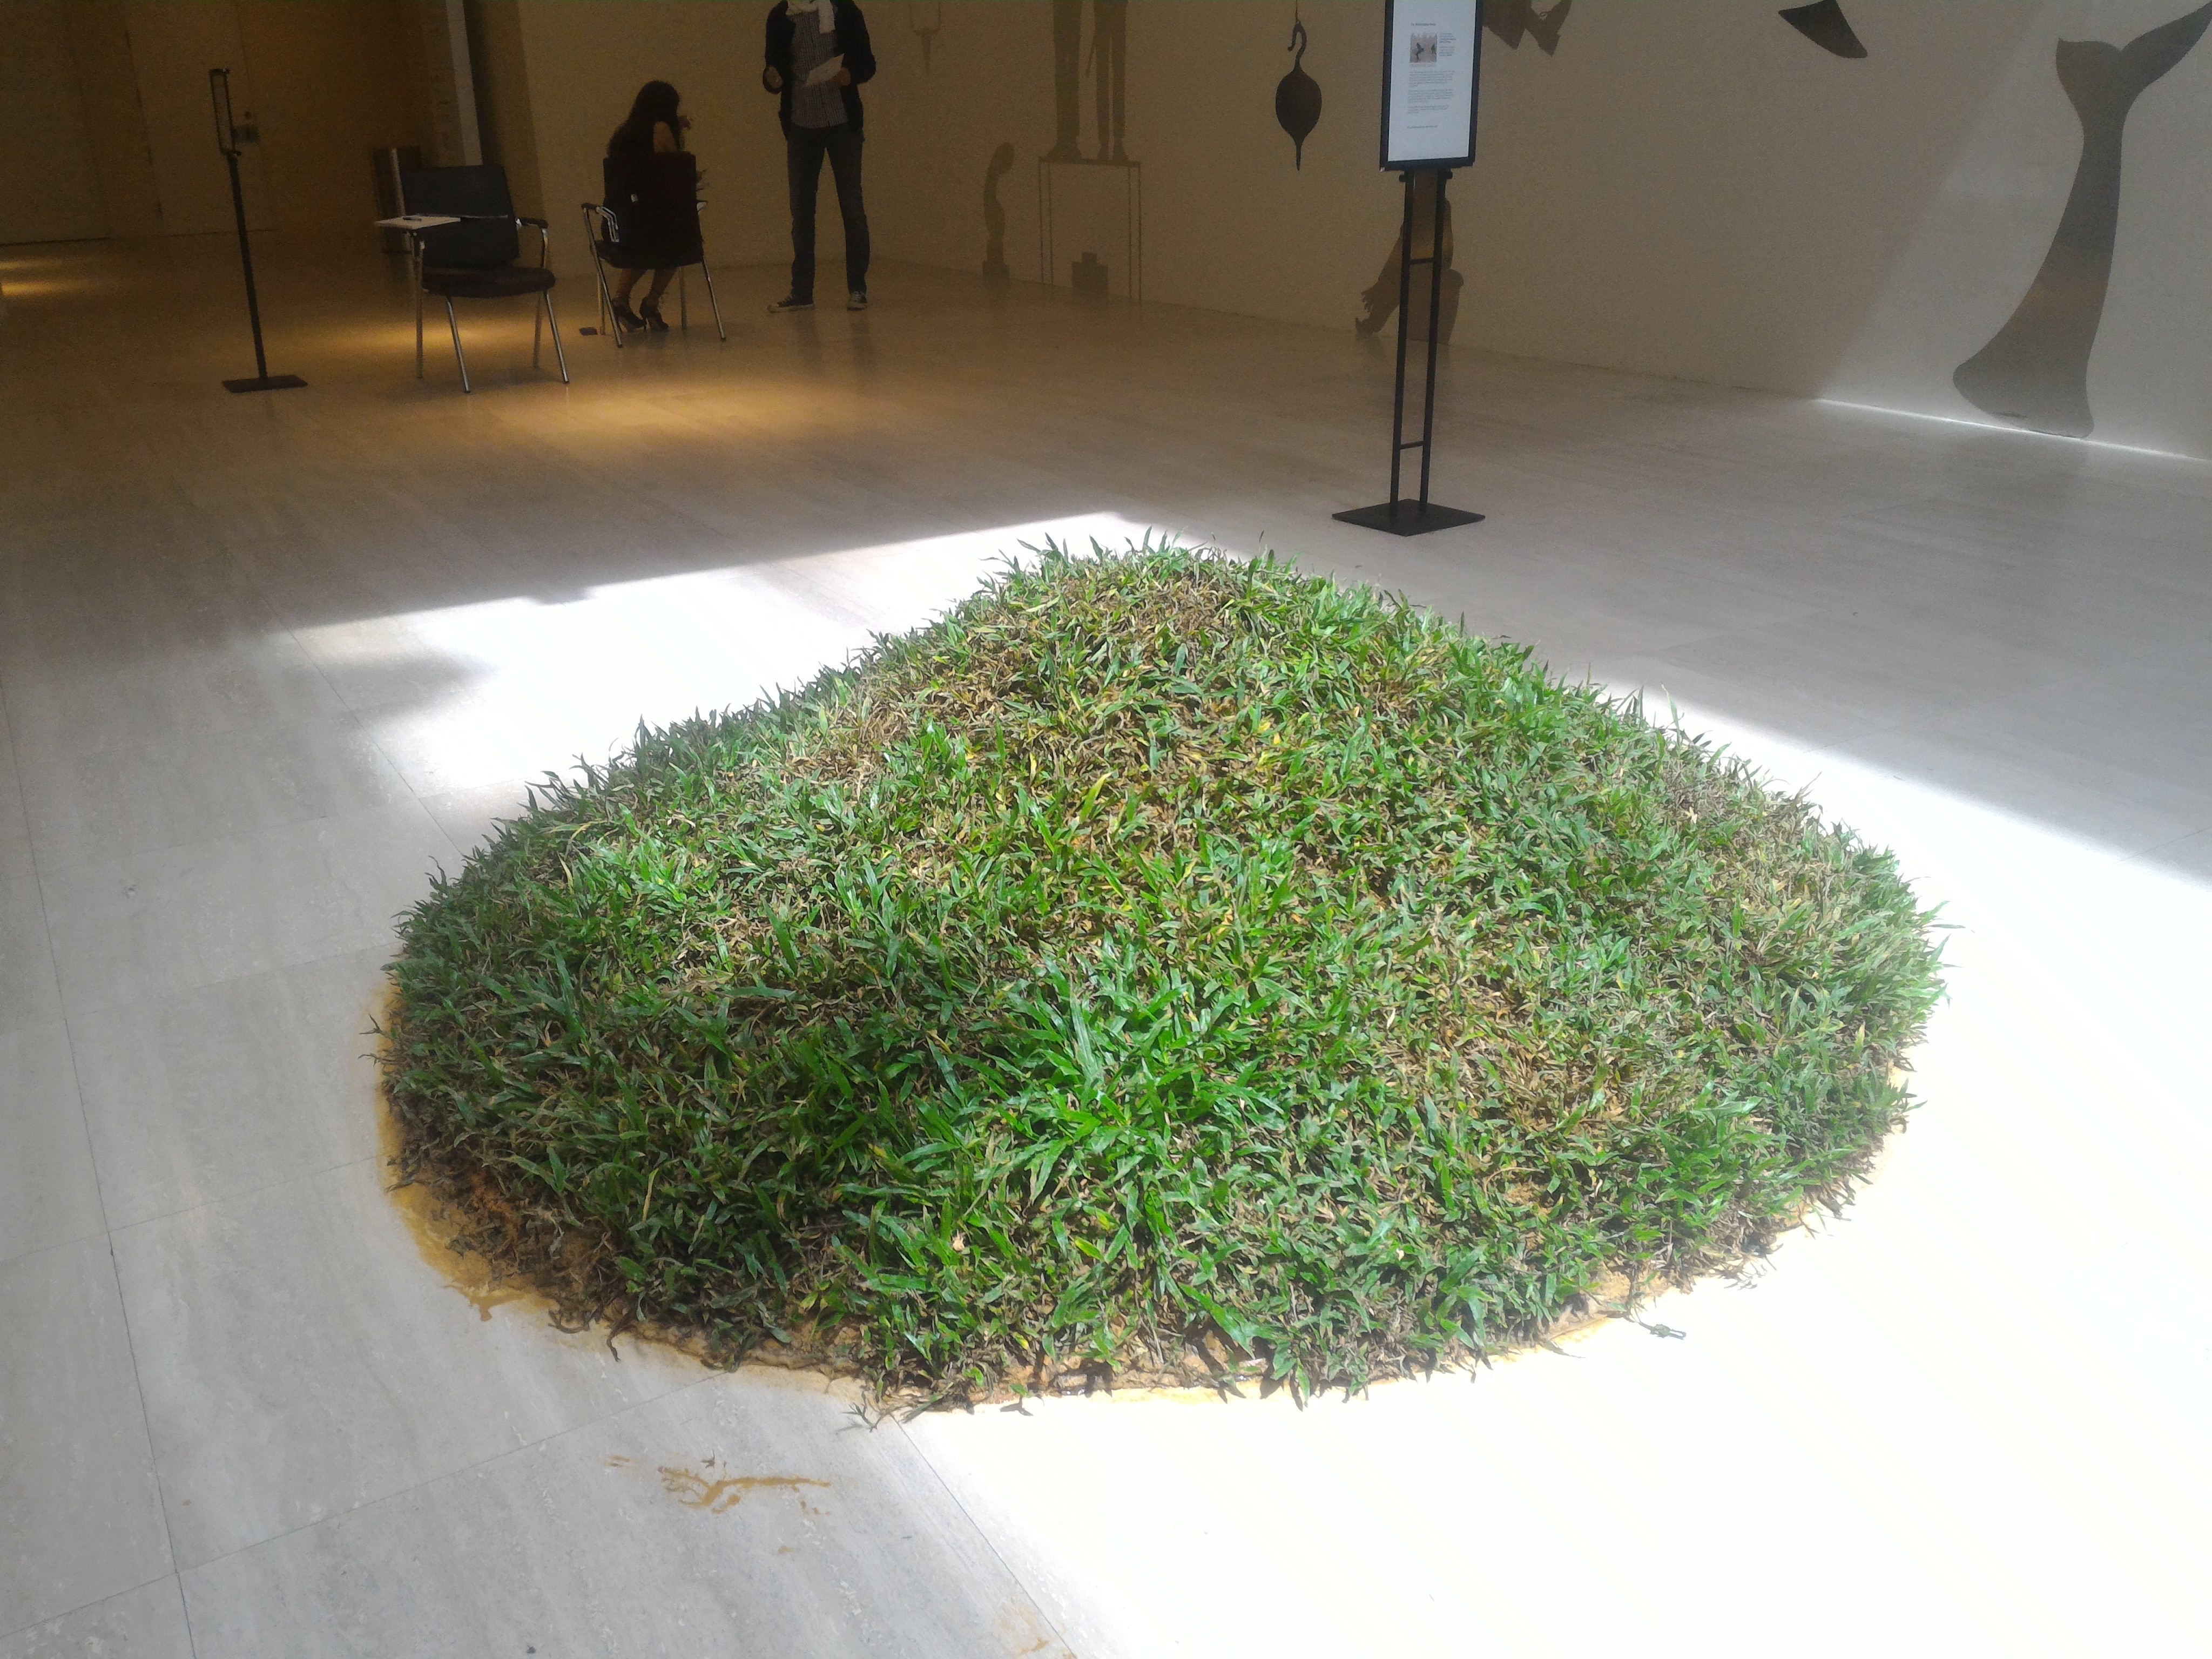

Farming the Moss

Close up of Moss bed

Moss growth has been good! Clearly, a few patches have died out but I attribute that to fungal infection (which luckily did not spread much to the surrounding mosses).

Left: Dead moss patch, but lively sproutlings

In fact, I noticed that the seedlings amongst the moss has had MORE responsive growth than the moss itself (even growing in the direction of the sunlight), and for a start/for statistics for my posters, I have started calculating the number of seedlings sprouted.

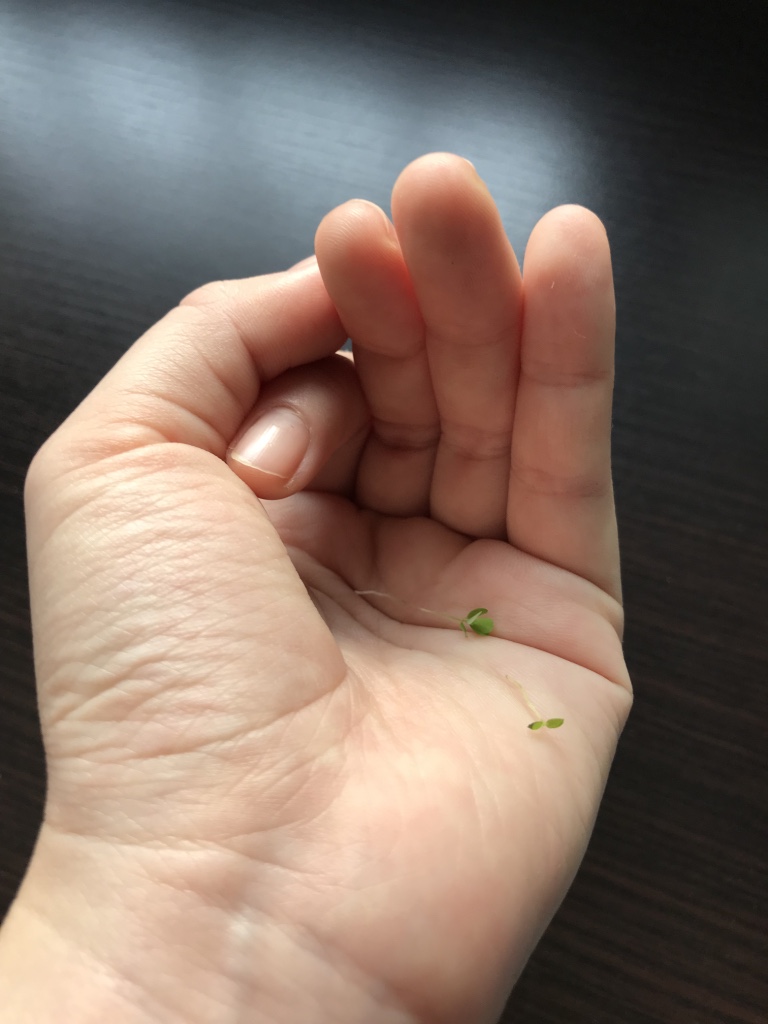
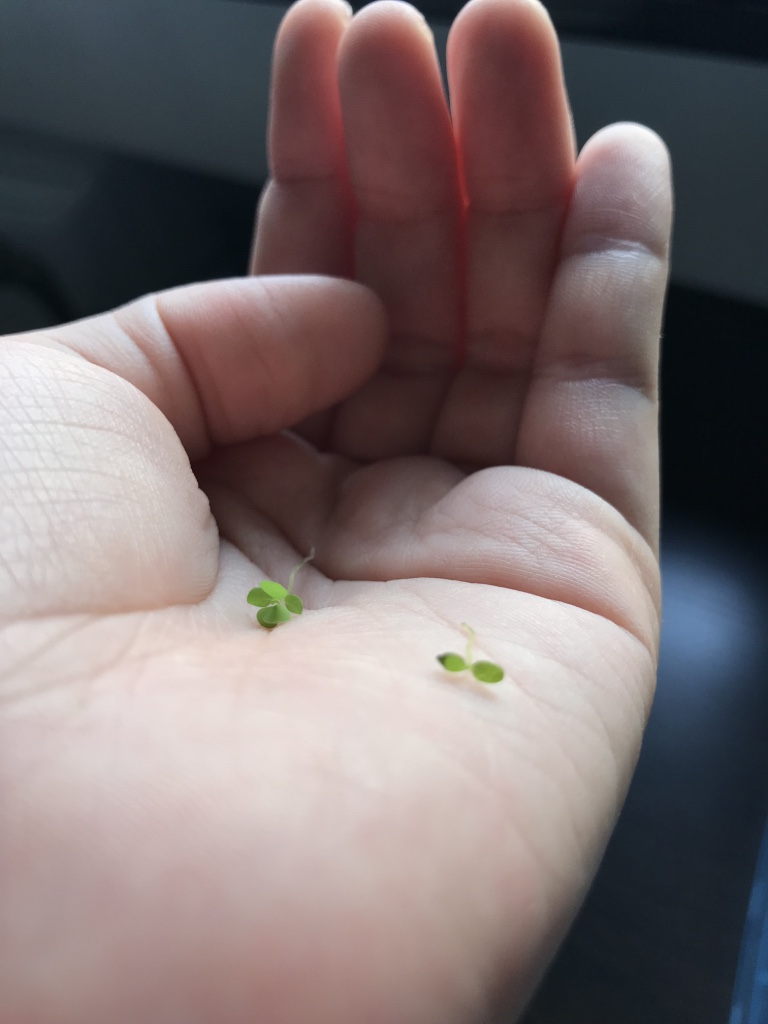
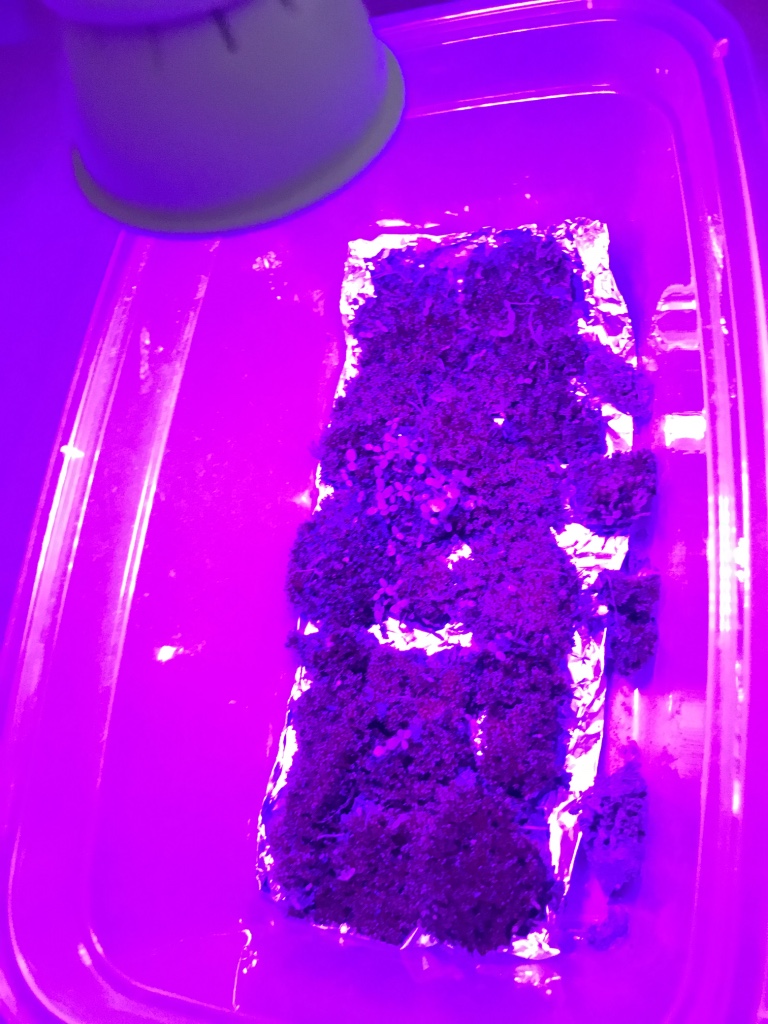
Data for my corresponding posters would be recorded and taken from the moss itself. Some examples of data which would be recording include the specific number and type of seedlings which sprouted in my moss bed. A sample is shown below:

Sample: Data Information Recorded for Posters
Close up: spot the 2 different species of seedlings sprouting

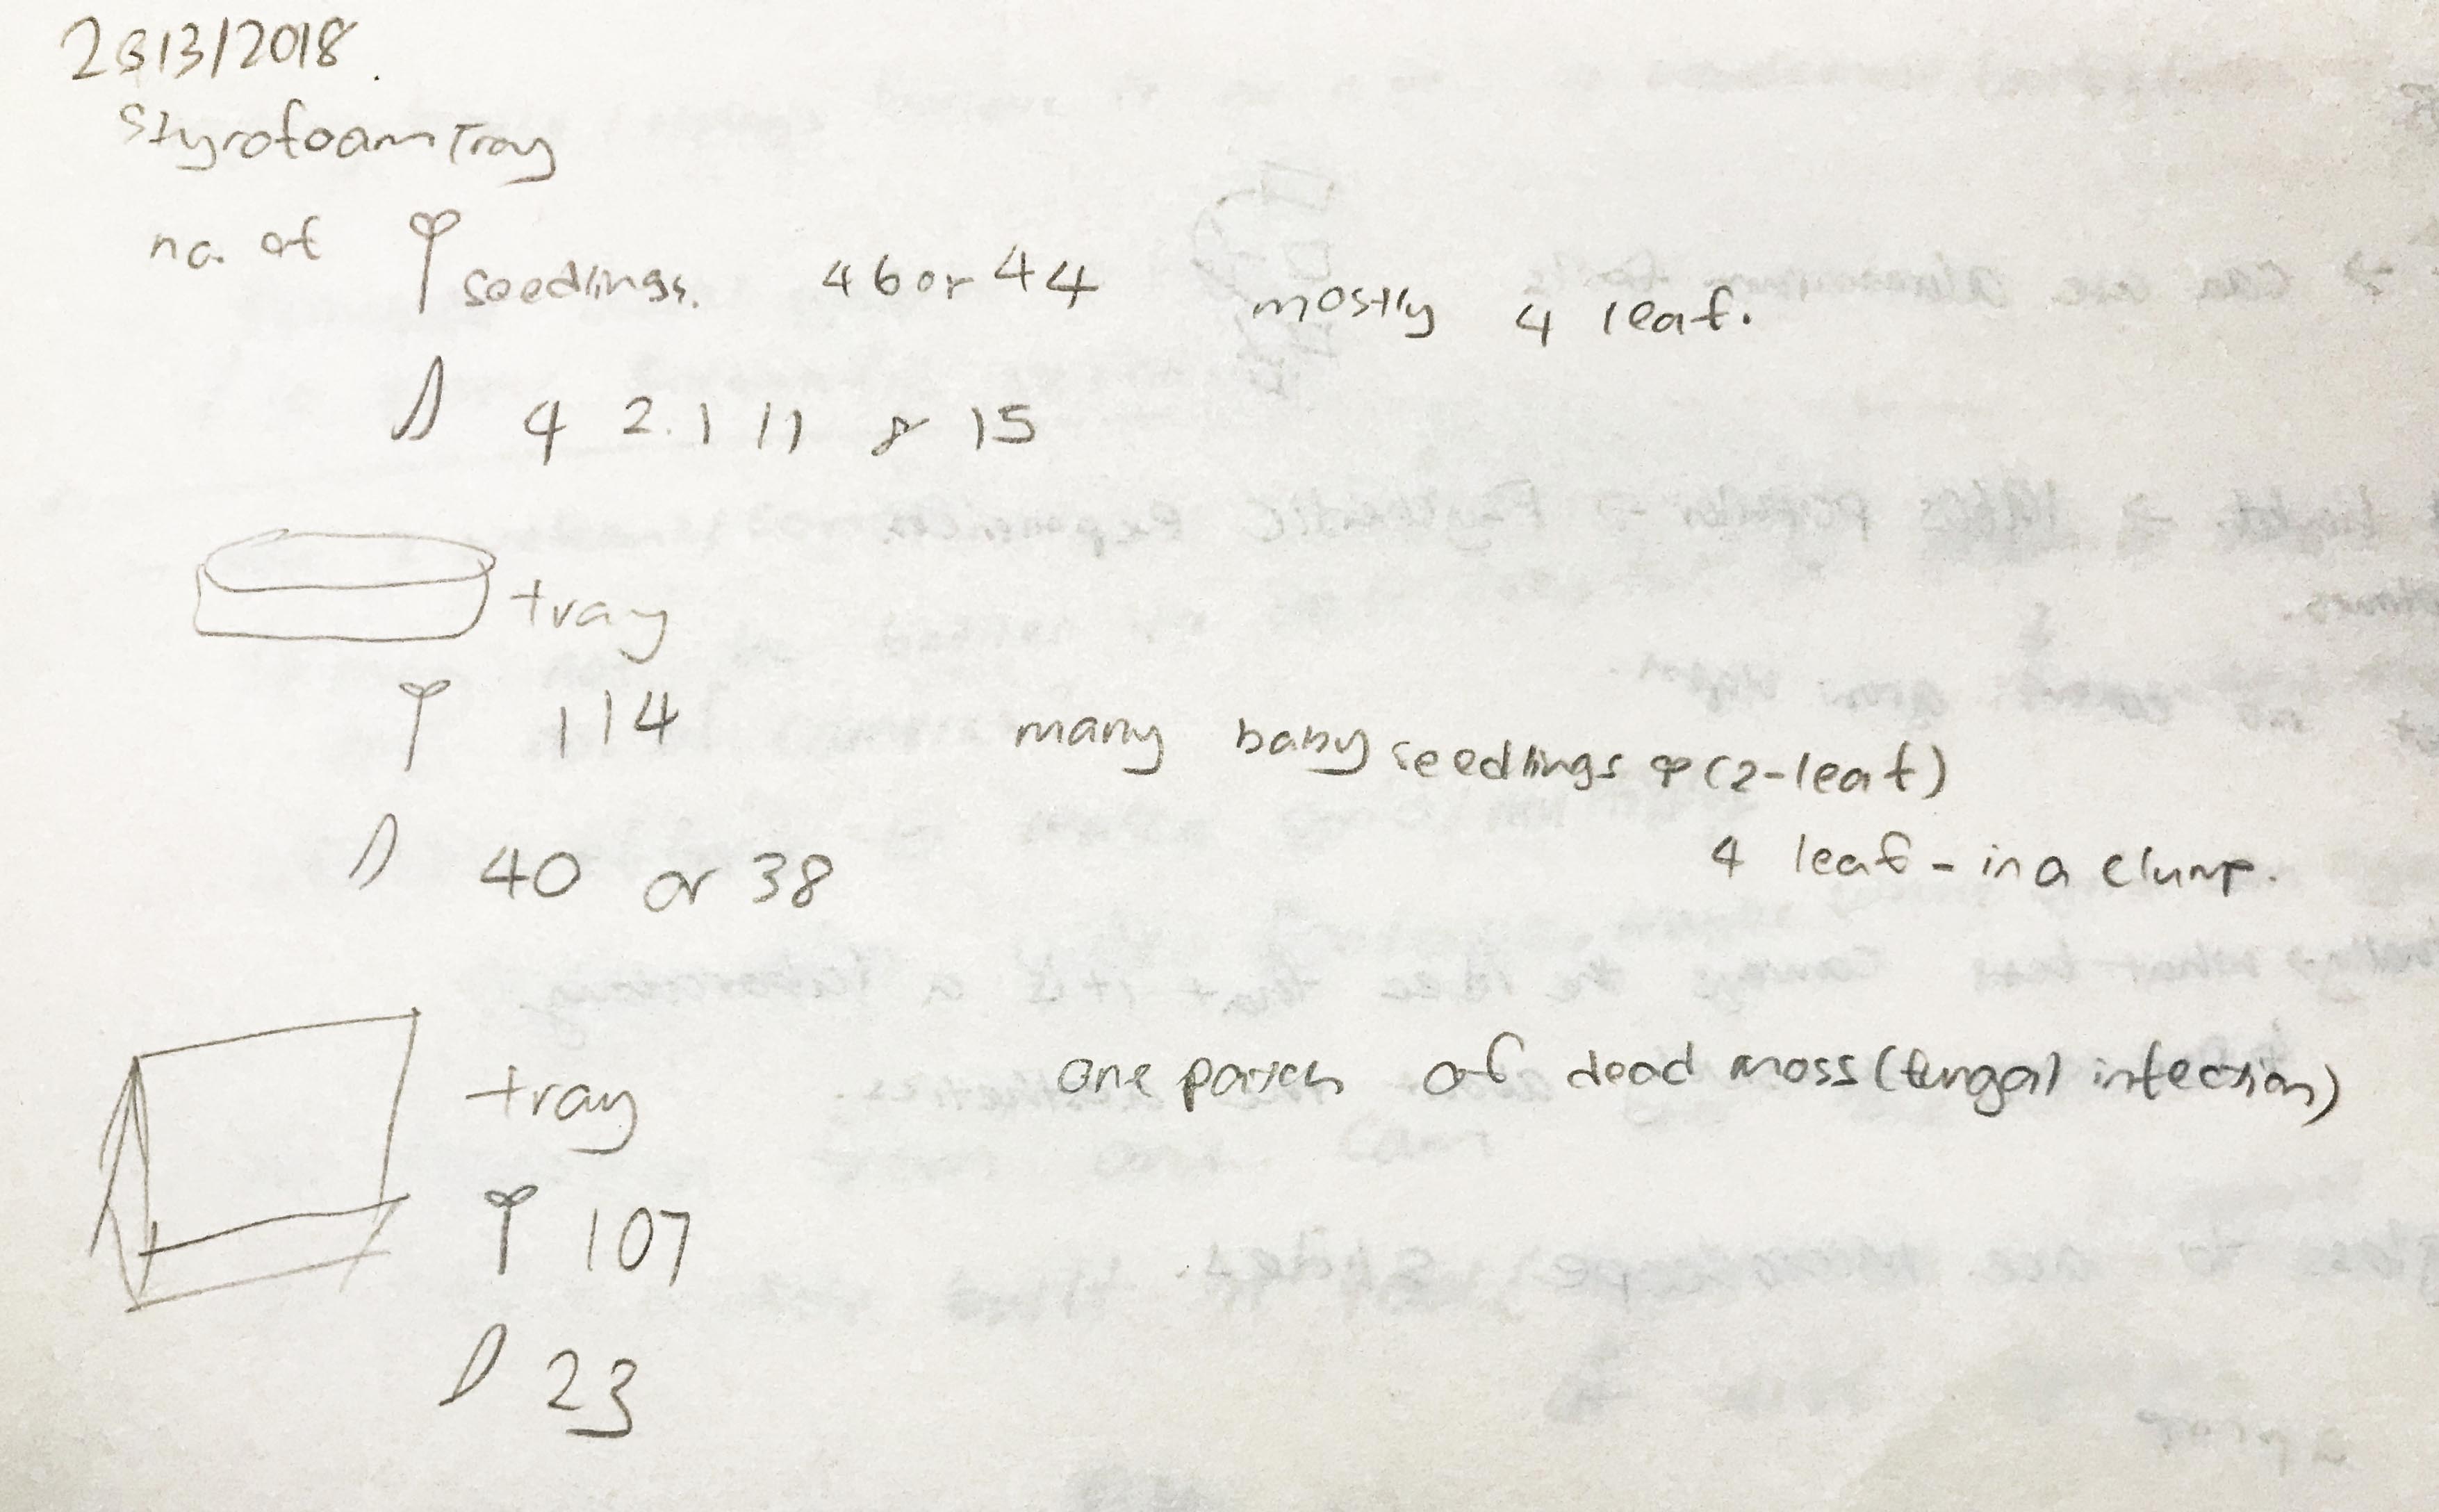
In this instance (referencing the previous 2 pictures), the data I tried to record was the number of single bladed (somewhat like a grass blade) sproutlings and normal 2 or 4 leaved seedlings. I would be continuing to collect similar data, and start working on my corresponding posters as soon as possible. Also, I would try as much as I can to include real data into my posters as I want them to lend some semblance of reality into my entire project, even though the theme was somewhat parodic.


Video Installation and How It Looks Like
Initially, I wanted my video portion of the installation to be more of a split screen format. However, through consultation with prof Randall, I realised that doing it in real time would not be possible with my envisioned 9 screens – which probably meant affixing 9 different working cameras onto the machine itself – due to technical limitations (computer data might mix up the video signals if too many cameras were to be attached to it).

Above would be my initial idea for the projection. However, with this unforeseen circumstance, I might alter it to simply 2 camera input signals, and simply play around with the available effects.


What’s real, and what’s not?

Through my consultation with prof Randall, I realised that I have not truly addressed this particular point within my project. For now, I am aiming at making it as real as possible, but at the same time, I want it to be slightlllyyyyy ridiculous in the sense that scientifically examining the theme of continuity is all but a fruitless attempt as the answer was simply absent in the first place (which ties back to the name of my project, of it being a continual study on the theme of continuity). Also, the “study” of the theme would be borderline parodic, of through the concrete examination of the topic, I attempt to make it “real”?

It seems as of now that this point is still slightly wonky, and I will continue polishing it, but as of now, this is what I have in mind.


Conclusion and Moving On!
After a week’s of deliberation of the final machine’s sizing, I have decided to just work on a similar model of the same size and will start rebuilding the model over the next week. At the same time, I will be starting on creating a series of posters and other exhibit decorative materials.

Meanwhile, for the projection, I would aim to affix the final projection scheme by the end of the next week, and hopefully, create a portion of it.

On Continuity, Time, and Everything Else (FYP18)

Some Reflections on my project
It’s 2018; cue a quick recap on 2017’s highlights: I played about with different materials, tested out several light effects on bubbles, and did a couple of projection tryouts. However, ideation wise, I was admittedly was pretty much stuck, despite my set topic on grief/loss. It was tough to translate the ideas into an actual artwork, and I hit a roadblock before slowly, but surely, losing interest in the topic.

Come December 2017, where I took time off fyp, and expanded my perspectives through chatting with people of different backgrounds. I realised one very prominent theme, of continuity. Be it a person stuck in memories of the past, or someone stuck in ennui, time will continue passing and you will be forced to move on. Personally, it also tied in with my belief that only through hard work from yourself is the only way to get yourself out of this stuck situation. That as a person, one will continually have to push yourself, to continue moving.

In other words,

Screen capture from the movie [The Girl who Leapt Through Time]
Interestingly, I thought that even though we as humans are continuously moving, we do not internalise the present situation of the ‘being’, of the time that it currently passing by us. For the lack of a better word, I’d call this the ‘continuity of presence’ – somewhat similar to the continuity of time, I wish to emphasise on and focus more on ‘presence’. In which, one of the focal mediums by which this presence can be translated would be through time, and these will be the focused topics in my fyp project.

More on the continuity project

Mindmap of said topic

In part, it becomes a development from my previous topic of accepting loss – it’s moving on, and acknowledging the larger presence of the flow of time, or rather, the continuity of time in the larger sphere of things.

In particular, I wished to express this topic, and visualise into an seen experience.

I highlighted several factors of which were the most important for the given topic, and which I will clearly insert into my project.

Continuity of presence operates clearly on 3 different aspects:

  1. Imagined
  2. Independent
  3. Changing

Why imagined?
The flow of time remains a philosophical debate , where as creatures of the world, we come up with our own imagined concept of time to internalise the continuity we experience. It is arguably just an illusion, as our way of understanding this abstraction with our limited perception. According the article, the flow of time is such an conceptual entity that it is understood through the transition between the past, present, and future, whom we mark as individualised points.

Therefore, I’d like to push for the argument that this continuity of presence is an imagined concept.

Why independent?
It is independent of external events, and it can only go forth one way in a fixed trajectory. It goes forward in its own speed, at a rate of 1 second per second.

Why changing?
Say hi to the clique saying: change is the only constant in life.

With continuity, there is progression. Therefore, no matter how minimal, there will definitely be changes that are evident. Movement, or changes, can be shown through continual, evident changes or through highlighting the differences between the previous and present state of matter.

I end this section by the dictionary definition of continuous –

“Marked by uninterrupted extension in space, time or sequence”

These subthemes are what I aim to introduce into my project.


Artist References

Regarding the artist references, I looked at various artists who utilised light as a medium.

Why light? I felt that light (strobe, projection, led bulbs, led strips, neon lights) could be an interesting medium to build upon. Partially, this was because light has a fleeting ‘lightness’, which I thought was similar to the lightness as perceived by the inadequacy of words, speech or objects to quantify the continuity of time.

Olafur Eliasson’s Timeless Garden

According to Eliasson, he saw his works as vessels for experiencing reality, “creating new perceptions of the world” (https://www.modernamuseet.se/stockholm/en/exhibitions/olafur-eliasson/). At the same time, he proposes a dual-self awareness – of what we see, and also of ourselves in the midst of seeing.

It is a matter of becoming aware of what we see, but also of being aware of ourselves in the act of seeing. Or, as the artist puts it, “seeing yourself seeing”, of acknowledging our presence and our participation.

I find it particularly interesting that Eliasson’s approach was not through showing the continuous flow of water, but rather by utilising intelligently the strobe lights, he was able to show that there was changes, albeit frame by frame. By proving the opposite/outcome of change, he shows continuity within the flow of the bigger space.

Teamlab’s Black Wave

Though the teamlab’s concept behind this artwork was not focused on the continuity of time, but rather on generating a force of nature based on hard science and coding, I really liked how this artwork brought about a sense of calm and really allowed visitors to connect with nature, and possibly, reengage unknowingly with the passage of time, and presence of the man made waves.

Joao Costas’ and the wind was like the regret for what is no more

As an outcome of my previous artwork research, I decided to delve slightly deeper into how can one translate ideas into physical installations. One of which was Costas’ wind installations, where he altered the space, drawing attention to wind, and changing it into a sense (sound) which we could experience more knowingly.

Leo villareal’s Cylinder

On Villareal’s biography page, it reveals his inner thoughts and concepts behind his installations. Particularly, I liked how his works explored the physical and dimension of time, both in terms of spatial and temporal resolution. In fact, one might argue that his works and art collective team Nonotak operated on similar principles – the common usage of simple forms and lights to create a more complex structure.

Tokujin Yoshioka’s Lexus

Using optical fibres, Yoshioka created this mirage which I really liked based on my personal preference. As I had done a previous installation using strings, I found this particularly captivating and considered once whether to continue enriching my past string installation into something as large and monumental as Yoshioka’s work.

Ryoji Ikeda’s Test Pattern [100m Version]

Flow: as seen through black and white linear imagery, Ikeda renders data into images.


Perhaps, what I should consider is what aspect of time, space, or continuity which I want to alter into the visual scene?

The Bubble as the Living Organism + DMX Experiment | #FYP

After doing my research, I decided to start small – making just a single bubble. However, I want the singular bubble to pulsate, as though it’s a living organism. When it later bursts, I wish for the feeling of loss to be more pronounced – by initially thinking of it as a living being, one would feel pity, a sense of loss, and sadness (hopefully), as per what they would feel should a real living being dies.

Honestly speaking, when I start thinking of the idea of a singular bubble, the image of the atomic bomb on Hiroshima during WWII comes immediately into mind (hope this isn’t offensive/it isn’t meant to be offensive):

Hiroshima Peace Museum

Partly due to the fact that it has indeed caused many deaths and destruction, but this symbolic model was very arresting – the bright red contrasting with the vast city landscape.

I did consider putting placing a huge singular bubble into a small room, where people would have to squeeze past it to get to the other side – it seems fun, but there were considerations that they might accidentally touch and make the bubble bursting, making it not-so-practical after a while. At the same time, the bubble will pulsate like a pumping heart, giving it life-like qualities.

Thus, remembering Prof Randall’s words to ‘crawl first before I run’, I decided to start small and create a small bubble before I envision it in the whole space. That being said, small seems okay to start with – in my previous research the artwork The Long Now by Varena Friedrich, she too starts small – yet the product was very effective.

Before I thought of this idea, I did a few experiments with DMX lighting. I did want to try using projection on the bubbles, but decided to postpone it as I haven’t had the fog ready to intensify the projecting (but am loaning the projector again today to test it out this weekend).


DMX Chauvet Lighting and Bubbles

I first wanted to beam the light sideways, but the leftover light shone onto the background wall which was very distracting. In addition, there was too much surrounding light from the chauvet lights – thus it was hard to pick out the lighting of the bubbles itself. So, I pointed the chauvet light upwards instead (and risked the cables getting wet but shower caps are always a lifesafer)

I also did experiment with the flickering lights, as seen below. From my tests, a slow strobe could dramatise the effect of the bubbles, but it really was not what I envisioned for the experiment.

Caution! Strobe lighting in the below video!

(Please mute the above video while watching it; sounds of the video does not correspond with the visuals – I’ll explain why later in the post)

Here, there are two different ways of strobing: fast, and slow. I played with different light colours (purple, white, blue) to test out the effects, and particularly liked the purple colour out of all 3 colours.

One thing to note that while it was resplendently pretty, lighting was a considerable issue – the surroundings had to be STARK black else the surrounding light will wash out the lights of the bubble. Another issue was that the medium simply is hard to capture with the camera – the shimmer of the bubbles, how airy it was, and the glint and floaty-ness that it had. This is truly an experience that one has to feel first hand.

In this experiment, a pure red lighting was chosen as I envisioned that the strong lighting would translate into visually powerful bubbles exuding a single colour.

Side view: Chauvet light directly beneath bubble
Top view: Chauvet light directly beneath bubble

To add on to my previous point, only by directly placing the bubbles at the top of the light itself could really bring out the reflective quality of the bubbles. However, this would mean that the bubble has to be either suspended over the light, or that it would have to sit on a flat surface right above the light – whereby the spherical shape of the bubble would no longer be possible.

I did love the reflections of the bubble, particularly here:

Reflection on singular bubble

However, it was very hard to be able to angle one’s sight successfully to view this reflection, and that the structure of the chauvet lights dictate it that each individual RGB colour is seen, rather than the blend of R, G or B to achieve a new colour. This is especially so in the case of the bubbles were the light has to be very close to the bubble and has no affording distance to blend together. I suppose that this limitation could be overcome by directly wrapping the coloured cellophone paper over the light, hence it will not be an important consideration as of now.

I tried using many small bubbles, and one singular bubble to play with the lights. I concluded that while the small bubbles really gave off an airy feel, I would rather use larger singular bubbles as I could more properly play with the bubble medium. It would also be easier to control, and individualise my project rather than the conventional bubble explosion scene.


Sounds of.. Making Bubbles?

I recorded the sound of bubbling and edited it via Audacity. I will show a few samples.

(Please un-mute the video while watching it)

The edited sounds are included in the video, and there are 3 tracks in total.

Track 1: 00:00 – 00:19
Track 2: 00:20 – 01:05
Track 3: 01:06 – 14:20


Next Steps!

To do: make fog machine

Attempt projection surface tryout with singular large bubble

Make a singular bubble machine

Inspiration:


What is not visible is not invisible (Response) / Week 2

Part 1: Choose any current exhibition in Singapore (except for “Future World” at ArtScience), visit it and write a response.  Select particular work(s) in the exhibit which inspire or interest you and do some research to find out how the work was developed and additional information about the artist.

What is not visible is not invisible; National Musuem of Singapore

p_20170121_121116
Entrance of Exhibition at the National Museum of Singapore

What is not visible is not invisible – the title of the exhibition postulates that beyond the 2 distinct opposites of black, a more deep-seeded area of grey exists.

What is not visible is not invisible, 2008 | Julien Discrit Collection 49 Nord 6 Est – FRAC Lorraine Image Credit : National Museum of Singapore, National Heritage Board

The title and design of this exhibition was inspired by the artwork of a similar title by French artist Julien Discrit – a lighted-text installation that lights up only when triggered by motion – paradoxically, the need to make seen the not visible can only be realised after being seen (visible). The exhibition, which features video, installations and sculptures, tries to bring to the surface deeper philosophical themes, through the uncustomary forms of art-making.

The exhibition reveals the not visible: the abstract, through the revisiting of both organic and structured forms of art. The exhibition layout adopted took the form of a fixed path, bringing the audience through a proportionate mixture of video and structural art, ultimately starting and ending with the artwork What is not visible is not invisible.

Exhibition Layout, What is Not Visible is Not Invisible Featuring selected artworks from the French Regional Collections of Contemporary Art (FRAC)
Exhibition Layout, What is Not Visible is Not Invisible
Featuring selected artworks from the French Regional Collections of Contemporary Art (FRAC)

The deliberate placement of that artwork challenges our thoughts, of realising the absence of the not visible firstly through text, but later, through a series of thought-provoking artwork. By touring through the whole exhibition in a circular manner, one walks around the entire physical space, and metaphorically, concurrently expands the philosophical space of understanding.

This post will focus on two artworks in the exhibit, Grass Grows, and Blue Sail by Hans Haccke.


Artist Biography

Hans Haccke (b. 1936) is a German-born conceptual artist whose process and materials are constantly changing. He favours creating minimalist sculptures from industrial materials and found objects. In the late 1950s to early 1960s, he joined part of an international art movement called Zero, where most of the works were monochromatic, geometric, kinetic and gestural. Zero also utilised nontraditional materials such as fire, water, light, and kinetic effects, which are reflected in Haccke’s pieces.

Haccke’s earlier works, Blue Sail, allude to movement, minimal expressions, while Grass Grows uses earthly elements – literally, Earth, and grass.

Despite his status as a conceptual artist, he prefers to label his art as thought provoking, rather than as conceptual pieces.

Blue Sail, 1965

Sculpture Fan, Chiffon blue silk Sail: 272 x 272 cm Edition 1 of 5 Collection of FRAC NORD-PAS DE CALAIS
Blue Sail
1965, Sculpture
Fan, Chiffon blue silk
Sail: 272 x 272 cm
Edition 1 of 5
Collection of FRAC NORD-PAS DE CALAIS

Blue Sail features a fragile fragment of chiffon blue silk floating softly above a fan blowing above situated on the floor, Haccke labels it as a sculpture, questioning the status of art-making and production. The structure of Blue Sail remains nostalgically organic, with undulations unfurling gently, akin to waves of water, but created with non-traditional materials such as chiffon silk, and a fan. It reflects Haccke’s philosophy of debating against compartmentalisation.

According to Haccke,

“A ‘sculpture’ that physically reacts to its environment is no longer to be regarded as an object. The range of outside factors affecting it, as well as its own radius of action, reach beyond the space it materially occupies. It thus merges with the environment in a relationship that is better understood as a ‘system’ of interdependent processes. These processes evolve without the viewer’s empathy. He becomes a witness. A system is not imagined, it is real.”.

– Excerpt taken from Kinetic Systems: Jack Burnham And Hans Haacke (2014)

Thus with reference to Haccke, everything we are exposed to contributes to our view of the world – and with his artwork, he attempts to destroy the conceived status of the forced narrative of a sculpture, expanding and not constraining the borders of art.

Grass Grows, 1969

Hans Haccke Grass Grows, 1969 Installation Earth and Grass Diameter: 200 cm Edition 1 of 5 Collection of FRAC NORD-PAS DE CALAIS
Hans Haccke
Grass Grows, 1969
Installation
Earth and Grass
Diameter: 200 cm
Edition 1 of 5
Collection of FRAC NORD-PAS DE CALAIS

Grass Grows is a unique art piece featuring a mound of grass growing, oblivious to the conditions of the environment. The grass continues to grow, and exist as a system largely segregated from the cold floor of the museum, as an autonomous entity. Haccke uses this organic artwork to question the constitutional constrains of art, of its economic and political conditions.

Installation setup of Blue Sail

Imagined Installation Set-up of Blue Sail. 1965

There are few components in the installation Blue Sail, and set-up is considerably simple – strategic placement of the few materials would help to create the work.

Material count:
Blue Chiffon Silk (x 1)
Strings (x 4)
Fan (x 1)

As for the artwork Grass Grows, the installation setup simply comprises of digging up a perfect round mound of soil, taken from the ‘institutional roof’ where it originally grew at, and placing it in the set position, on the floor. However, the artwork requires the frequent watering, lest the grass dies.

References:

[i] Chau, Christina. “Kinetic Systems: Jack Burnham And Hans Haacke”. Contemporaneity: Historical Presence In Visual Culture, vol 3, no. 1, 2014, pp. 62-76. University Library System, University Of Pittsburgh, doi:10.5195/contemp.2014.57.