Exhibit Layout and How Moss And Grow Lights Fit in (FYP18)

Overview
Updates for the week would be focused mostly on material testing and more technical aspects of planning.


Exhibit Layout
The grad show layout has been finalised! I would be painting the space entirely with the colour Pantone 5395 C (or similar, depending on the colours the contractors provide), with the exception of projection surfaces. I picked this slightly dark navy colour that I thought would be able to complement the purple which the grow light would give off.

I have also “choped” 3 pedestals of different sizing each, one at H (1m for all) x W x L 40 x 40cm (to place previous prototype), another 40 x 80 (for final prototype), and lastly, one with 40 x 100 (to place supporting posters and documentations if any).

More details could be found here: FYP Diagram(BW).


Grow Lights, and What to Do with Them
I have finally received my grow lights, way faster than I had expected! However, despite me buying the smaller bulbs, there were many unexpected outcomes which would mar the final aesthetics of the project.

Catalogue of grow lights which I bought (I bought 2)

Some aspects which I did not realise include:

1. Light splashes around the entire machine, and even outside of the moss planters

Surely, this can be mitigated against, through either implementing a lampshade like hood on the bulb itself, or raising the sides of the moss planters (not ideal, as aesthetically it would look bad and incur more difficulties in raising the entire moss bed), but this would simply mean more effort expended into correcting these issues, and risk disrupting the already working machinery/aesthetics

2. Grow light makes… the moss look bad

Ever since the presentation, I had re-transferred the moss back to the plastic trays as it makes it easier to grow the moss (in terms of watering, or letting it sun out). Since then, the moss has not advanced much in terms of growth, but there has been an increase in sprouting amongst the moss.

As evident above, the purple from the grow light has overpowered the initial green of the moss. With green, the symbol of freshness, youth and growth eradicated, an eerie feeling takes over the model. I am on the fence about this new enforced aesthetics – on one hand, it strongly pushes forth the idea of the creepy science laboratory theme, and also adds some colour to the otherwise dark space exhibit, but with the green and symbols of freshness lost, I feel that I would need to adjust the exhibit aesthetics slightly.

3. Rotating Grow Lights?
Initially, I wanted each grow light to also be in continuous rotating motion, and each grow light was to follow each tray in rotation. However, knowing now that the light splashes around out of the tray planter, the intended effect of seeing each grow light rotate around (as though each was the sun rotating around a planet) would not be as strong as I thought.

I could try to add on the lampshade to minimise the lighting, but I am wary of its construction. For instance, I have not tested the lighting for long hours, and am not sure of the volume of heat it would release (which might potentially, set fire to my lampshade or kill my moss).

Another consideration would be that for the grow light to rotate, their connecting wires would also have to rotate. This is troublesome for the machinery layout planning, Currently, the grow light comes together with a clip and bendable stem, which would be extremely helpful in positioning it onto the model. As such, I am considering eliminating the rotation of the grow light, despite it being a much more powerful element.

What I have in mind to continue working on

To deal with these, I plan to:
1. Make a lampshade
2. Make my moss machine LARGER (for it to ‘capture’ more of the light spillage)
3. amend the construction of the moss model, as a larger model would require better supportive frame


Farming the Moss
Close up of Moss bed

Moss growth has been good! Clearly, a few patches have died out but I attribute that to fungal infection (which luckily did not spread much to the surrounding mosses).

Left: Dead moss patch, but lively sproutlings

In fact, I noticed that the seedlings amongst the moss has had MORE responsive growth than the moss itself (even growing in the direction of the sunlight), and for a start/for statistics for my posters, I have started calculating the number of seedlings sprouted.

Data for my corresponding posters would be recorded and taken from the moss itself. Some examples of data which would be recording include the specific number and type of seedlings which sprouted in my moss bed. A sample is shown below:

Sample: Data Information Recorded for Posters
Close up: spot the 2 different species of seedlings sprouting

In this instance (referencing the previous 2 pictures), the data I tried to record was the number of single bladed (somewhat like a grass blade) sproutlings and normal 2 or 4 leaved seedlings. I would be continuing to collect similar data, and start working on my corresponding posters as soon as possible. Also, I would try as much as I can to include real data into my posters as I want them to lend some semblance of reality into my entire project, even though the theme was somewhat parodic.


Video Installation and How It Looks Like
Initially, I wanted my video portion of the installation to be more of a split screen format. However, through consultation with prof Randall, I realised that doing it in real time would not be possible with my envisioned 9 screens – which probably meant affixing 9 different working cameras onto the machine itself – due to technical limitations (computer data might mix up the video signals if too many cameras were to be attached to it).

Above would be my initial idea for the projection. However, with this unforeseen circumstance, I might alter it to simply 2 camera input signals, and simply play around with the available effects.


What’s real, and what’s not?

Through my consultation with prof Randall, I realised that I have not truly addressed this particular point within my project. For now, I am aiming at making it as real as possible, but at the same time, I want it to be slightlllyyyyy ridiculous in the sense that scientifically examining the theme of continuity is all but a fruitless attempt as the answer was simply absent in the first place (which ties back to the name of my project, of it being a continual study on the theme of continuity). Also, the “study” of the theme would be borderline parodic, of through the concrete examination of the topic, I attempt to make it “real”?

It seems as of now that this point is still slightly wonky, and I will continue polishing it, but as of now, this is what I have in mind.


Conclusion and Moving On!
After a week’s of deliberation of the final machine’s sizing, I have decided to just work on a similar model of the same size and will start rebuilding the model over the next week. At the same time, I will be starting on creating a series of posters and other exhibit decorative materials.

Meanwhile, for the projection, I would aim to affix the final projection scheme by the end of the next week, and hopefully, create a portion of it.

Moss Machine Prototyping (FYP18)

A very, very Quick Catch up!
This post will just be a very brief update on the progress of each different aspects of the installation!

Firstly, let’s talk about the layout! My proposed space would be a slightly rectangular space, with content to be projected/hung/attached/displayed on all 4 walls. My drawn layout can be accessed here: FYP Diagram(edited final).

Planned Layout of each 4 walls of Installation

Otherwise, as seen in the above rough sketch, I would be placing:
1. x 2 projections
2. x 1 moss machine
3. Phamplets, memorabilia

More details could be seen here: Presentation Summarised

FYP Group Presentation with all Professors
Today, the IM cohort had a group presentation with all the IM professors. My presentation slides can be found here: Presentation Summarised


Moss Procurement Updates!

In my last post, I did mention that I would resort to buying the moss! Luckily for me, I chanced upon large quantities of this very amazing moss species on a quick trip to Malaysia which would fit the theme! However, I only managed to smuggle back enough quantities for it for the prototype itself only, and not for the final installation machine.

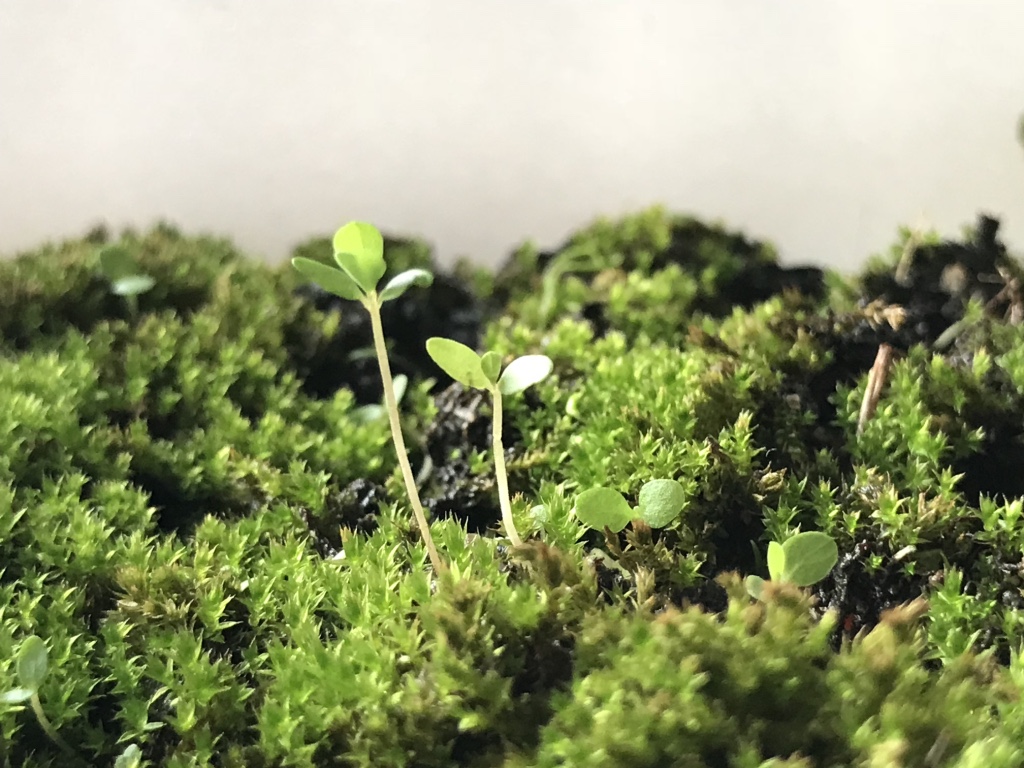
Close up of moss

Referencing the above close up picture of the moss, I wish to draw attention to the individual stalks of each moss head – which gives additional texture and interest to the moss bed – perfect for what I envisioned.

As of now, I have a dilemma of whether to purchase commercially available Holland moss for the final machine or whether to return to Malaysia for the sole purpose of moss collection. Logistically speaking, I am also unsure if the border controls will allow me to ‘mass import’ their local flora back to Singapore.

But for this final prototype, I have decided to affix it with this particular species of moss.


Prototyping

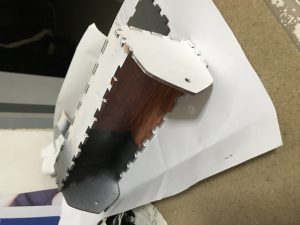
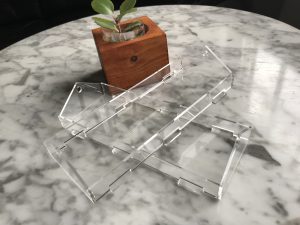
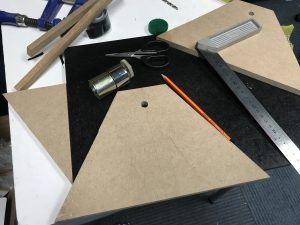
I was pretty worried about the structure and how it would actually hold together, and after having gone through the laser cutting workshop, was actually able to try it out! Here’s my process making in pictures:

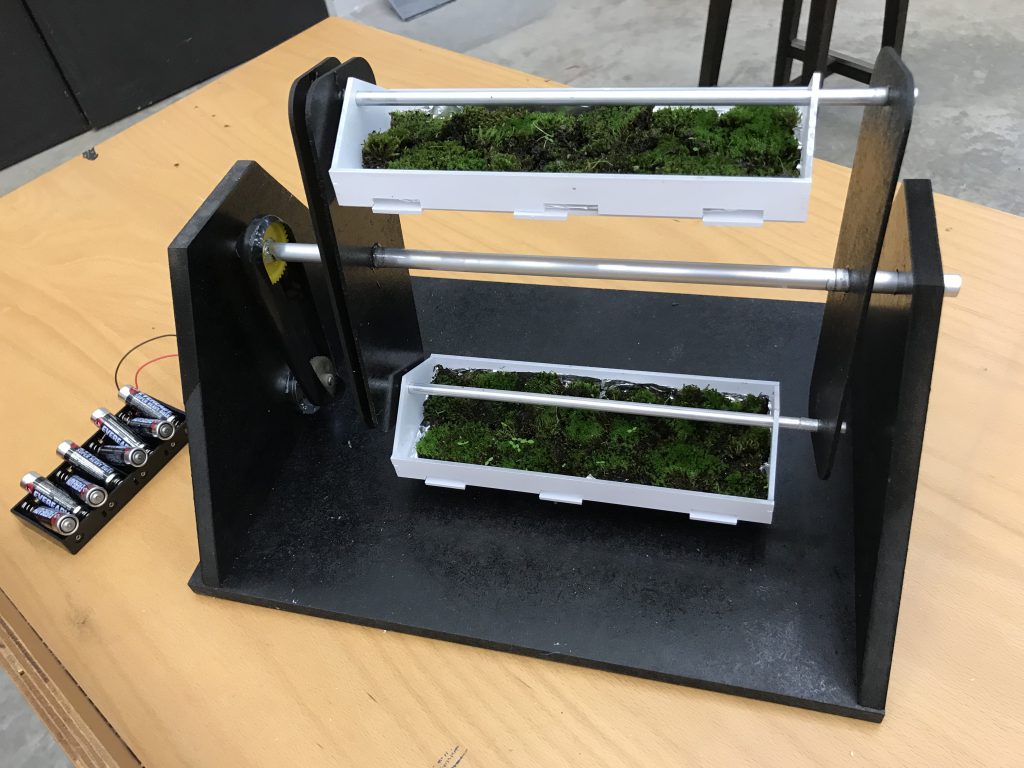
Final Prototype

ps. moss burger is not actually the name of the machine, it’s just some pun injected (from the fast food chain Mos burger) into this otherwise nameless machine!

I envision this to be my final prototype (if possible)! From now thereafter, I would be working on the final machine. It would take some time though, perhaps 2-4 weeks to complete it as I wish to perfect it.

As of now, the speed of the turning it wayy too fast for my liking. I’d be experimenting with gears of different sizes and try to slow the speed down. In addition, I plan to make rotating grow lights (to keep the moss alive) to follow the movement of the rotation. However, it might take some time – my grow lights are currently still being mailed over to me, and is estimated to only reach me 1-2 weeks from now.

For the final machine, I would also make it slightly larger than this prototype. Not too large, as originally thought (initially I wanted it to stand at 1.6m height/5.24 feet) as I am not confident of my construction skills.


Projection Matters

I have not started on this yet, but I plan to project real life camera detection of the moss machine itself.


Supporting Materials (eg. pamplets, posters)

I wanted my final installation look to be a unique mishmash between the science laboratory, and a dark installation space. Above shown are mood-board references of how the final installation might look like – albeit with a slightly different colour scheme of purple, black, white and potentially dark blue.

Research Poster FYP (sample, unfinished)

For instance, this was one of the posters I intend to display within the installation space itself. It would have real data which I collect from my investigations (eg. how many seedlings have sprouted from my moss), but placed in an authentic yet ludicrous way.


Conclusion
Over the next few weeks, I would be prioritising the creation of the machine and projections, as I am quite worried about how it would look like in the actual set up, and would require them to be ready as soon as possible so that I can more accurately plan the actual exhibit space.

I would also continue collecting data from my grown moss to be put into the poster ?

Technical Aspects and more details (FYP18)

Summarised Updates
Apologies for the delay in uploading this post! This post would cover 4 main components (making up the entire project) which I have been working on:

  1. Moss Harvesting
  2. Machine Construction
  3. Ideation/concept
  4. Projection

Let’s start!


Moss Harvesting

Initially, I wanted to harvest my own moss, continually sowing and replicating it such that it would make a mossy bed. Hence, I tried to hunt for actual moss around my neighbourhood as I thought that 1) these species of moss are already acclimatised to our hot climate. Hence, the chances of them dying during the actual exhibition could be lower. 2) Should the mosses harvested die, there is always an abundance of more mosses to be collected from the environment. 3) it was, free.

Thus commenced the witch hunt! (I didn’t pluck mosses from nature reserves/preserved areas so I didn’t flout any laws hopefully).

Out of all these local moss species, I identified at least 3 different species – codenamed species A, B and C. Out of all these 3 species, species A was the rarest (I was only able to find it on a single trunk), whereas species C was the most common but hard to transplant onto a different surface.

Some attributes I discovered from my layman observation of the tree species:

Species A
– rare
– most aesthetically pleasing in terms of moss beauty
– easy to transplant (in terms of scraping it off tree trunk)
– ‘cleanest’: not attached to any root/soil material

Verdict: ❌
Usable for project, but impractical due to difficulty in harvesting

Species B
– common
– barely perceivable height
– extremely hard to scrape off
– ‘small presence’: only a huge and enormous quantity of it would make it look substantial
– aesthetically unpleasant

Verdict: ❌
Unusable due to aesthetics not in line with what I have in mind for the moss visuals

Species C
– VERY common, abundant
– seems very hardy
– slight difficulty in scraping off since it tends to grow on tree roots/wood
– ‘flat’ surface, would prefer another moss species with slightly higher height elevation

Verdict: ✔
Usable, but might experience slight difficulties in creating a ‘blanketed’ moss surface which I had in mind for the final visuals

That being said, I did collect some of the moss in a container and will be monitoring it as my preliminary introduction into the Art of Caring for Mosses. Based on my first few days of caring for the mosses, I realised that they were indeed very hardy – without much water, or sunlight, they were still, green. It was very good news indeed. I will be continuing to monitor the mosses, and am considering setting up an experimental set up of mosses in the dark so as to stimulate present conditions of the moss within the final installation set up.

Thus, I resigned and would attempt to instead buy moss online. Initially I decided against it as this would become a considerable budget for my project but moss as the product was essential to this study, hence the consideration was overthrown.

In the current market, there are very limited sellers selling purely moss for terrarium uses. I could only purchase dry mosses, as I did not want to deal with additional difficulty of submerging the mosses inside water (most mosses are wet mosses, and much more easily available). However, I shortlisted two sellers who might be able to provide Live Holland Moss for the project. It was important to buy live moss, rather than dehydrated or dried moss which cannot be revived for the project.

Side tracking a wee bit – I actually found out the species of moss (haircap moss) which I saw in Japanese gardens, but the local market does not provide sales of this particular moss species.

It was indeed a pity, as haircap mosses are more apparent, and have a slightly more protruded surface/texture which might make the moss carpet seem more lively. Holland moss, on the other hand, had a more grass carpeted surface, making it theoretically easier to blend and create a more even moss carpeted surface.

The two sellers shortlisted are: Ecophonics and Zantelle. The budget for an estimated 17 x 12cm/6.7 x 4.7 inches sized carton of Holland moss (based on size specification given by Ecophonics) would cost an estimated $8. I would imagine that I would need ~8 clumps for each tray I would have (cost: $64 sgd for each tray of moss?).

I will be purchasing the moss soon, along with glow lights (to be confirmed and done by end of this week).


Machine Construction

This was one of the most prevalent aspects of the installation, yet one of the most worrying at the same time. For this machine, I experienced several difficulties in creating the build and rotation mechanism. As an add on from last week’s cardboard mechanism which didn’t work out smoothly enough, I created another more stable structure which I will be partially adopting into the final design.

Prototype 2 of rotation mechanism

Unfortunately, this would require much more time than expected, as there was a delay in purchasing materials and building. In my consultation with Prof LPD, he recommended essential reinforcement of the tray, and rotating arms with flange mounts/bearings, and for the rotating mechanism, implement a gear system which would control the speed and rotate both the tray and the glow lights (as another rotating mechanic entity from the first moss machine).

This gear system would be powered by a solo (for now) powerful motor, namely the wiper motor. The wiper motor is a motor originally used as the windshield wiper, and would be powerful enough to drive the entire gear mechanism. However, visits to sim lim tower to purchase this elusive motor proved to be wasted, and I would need additional time to purchase it online (via Ezbuy or Amazon). In addition, details were missing from my sketch/second prototype, thus I spent the week trying to polish up and make a working sketch and push through with the machine specifics.


Sketches

Actual and final size of machine

(Refer to above figure) The machine would stand at 1.65m, rotate at one rotation for every minute. Each tray would be 52.5 x 15 x 5.5cm/20.6 x 6 x 2.2 inches.

Details: specific gears for machine
Details: Material list for machine

(Refer to above figure) The base of the machine would be created using wood, while the arm would be made using acrylic. The gear (unlike what was sketched) would be only attached to one rotating arm, but I would be inserting a metal rod which will extend towards both rotating arms and provide stability, and hopefully, enough rotational power.

As for the tray, I hope to be able to use acrylic (as it is waterproof and able to take the misting required to water the moss daily), but am unsure of that at the moment as the acrylic might not be strong enough to handle the weight and pressure of the plants, movements and whatnots. It would take testing to iron out these concerns.


Concept

Articulating the Concept

While the last few posts have already written about the concept in different permutations, I have jotted it down to make it more concrete and less airy. Please refer to the above figure on the specifics.


Projection

Sketch of counter sensor of number of rotation of tray

Regarding the projection, I will schedule another OSS post on Friday to talk more about it. As of now, I would be utilising the number of times the trays rotate, and using this data to create imagery to be projected on a singular wall (for now).

I would require one projector for this aspect.


#FYP | The Birth of the Chimera?

[Updated 11/6/17 with clearer diagrams]

Moving on!
After feedback from Prof Randall that perhaps I could concentrate on the concept-building for now, I decided to do so. Without a clear and strong foundation in the conceptual phrase, it might hinder progress.
As FYP’s duration lasts almost a year, it was important to find a project that I am willing to stick with and spoke to me on a personal level. Hence, I charted out topics and areas that I was interested in exploring first.

My Art Preferences
Several topics that I am interested in/want to include in my project:
Repetitive visuals
Playfulness
✓ Surreal, immersive
✓ Change in perception and understanding of object through differing viewpoints
☓ Projection-only visuals (dislike the simple sensor-feedback loop)
☓ Light ‘sculptures’
☓ Lack of meaningful interaction

I compared 2 installations which I visited personally, and tried to weed out ideas which I liked/disliked to better understand my own preferences.

Lee Yun Qin’s Moonflower and Ran Hwang’s Becoming Again; Coming Together

Both Hwang and Lee’s installations were instagram-friendly, and limited in interaction. However, my appreciation greatly varied amongst both works: while I really loved Hwang’s installation, I felt that Lee’s Moonflower was muted, and limited in visual appreciation and engagement value. It also felt more static – perhaps due to the fixated nature of the project, rather than Hwang’s, being more attractive as it relied on other mediums such as projections, sound and assorted visuals.

In addition, I felt that Hwang’s installation had a strong overarching theme over it, in terms of the subject matter and theme. It later contributed to how I appreciated the work, and created meaning about it for myself. Thus, I knew that I did not want to rely on a purely visuals ‘show’ for my own project.


Visualising my Interests

Mindmap: Underlying Ideas and Aspirations

In summary, I thought that this concept was really important and clearly what I want to include in the work:

Basically, I wanted something familiar, yet unusual enough to capture attention, It would give off an eerie level of familiarity. The work will not be too rich in meaning, but enough to provoke thoughts. At the same time, I was reminded very strongly of memory, that ‘what you see is not what it is, but rather a memory of how you want to interpret it, or how you expect it to be’. There is a gap between reality and perception. This is one aspect that I hope to imbue into my project.


The Chimera

An artist rendition of the chimera

The Chimera was, according to Greek mythology, a monstrous fire-breathing hybrid creature of Lycia in Asia Minor, composed of the parts of more than one animal.
– Wikipedia

Mindmap of the topic ‘Chimera’

I thought of the chimera, which was a good character to describe how I see myself and my artwork. As someone who studied science in my pre-tertiary school, later went on to work myriads of part-time job and joined different club activities, I saw myself as a Jack of all trades. Similarly, the chimera, a fearful juxtaposition of different animals, was also a hybrid like me.

My project will after all, be a reflection of who I am both as a person and as an artist. As such, I want to be able to extrude and magnify this quality within my artwork, perhaps of it having different facades to it.


More Technicalities

Project Technicalities: Staying Medium

Medium-wise I’m still a little hesitant in going past the installation format. Of course, I’m still open to any format, but find it hard to present my idea in another way for now. Several ideas I had include placing the artworks into photoframe and create a gallery-esque booth, else creating a gallery ‘haunted house’ version. I also did think of creating a chimera machine-sculpture lookalike but did not like the idea of a contained person.

With reference to the above picture on the right, the thicker lines suggest greater desire to work with the linked object. With FYP being the final and grandest art project I have ever attempted in my life, I want to be able to end it on an ambiguous note – creating hope (through thoughtful questions), yet not finalising on its outcome. Perhaps I would create grander works after this, or perhaps not. The future is unknown.