Final Project: Process Documentation

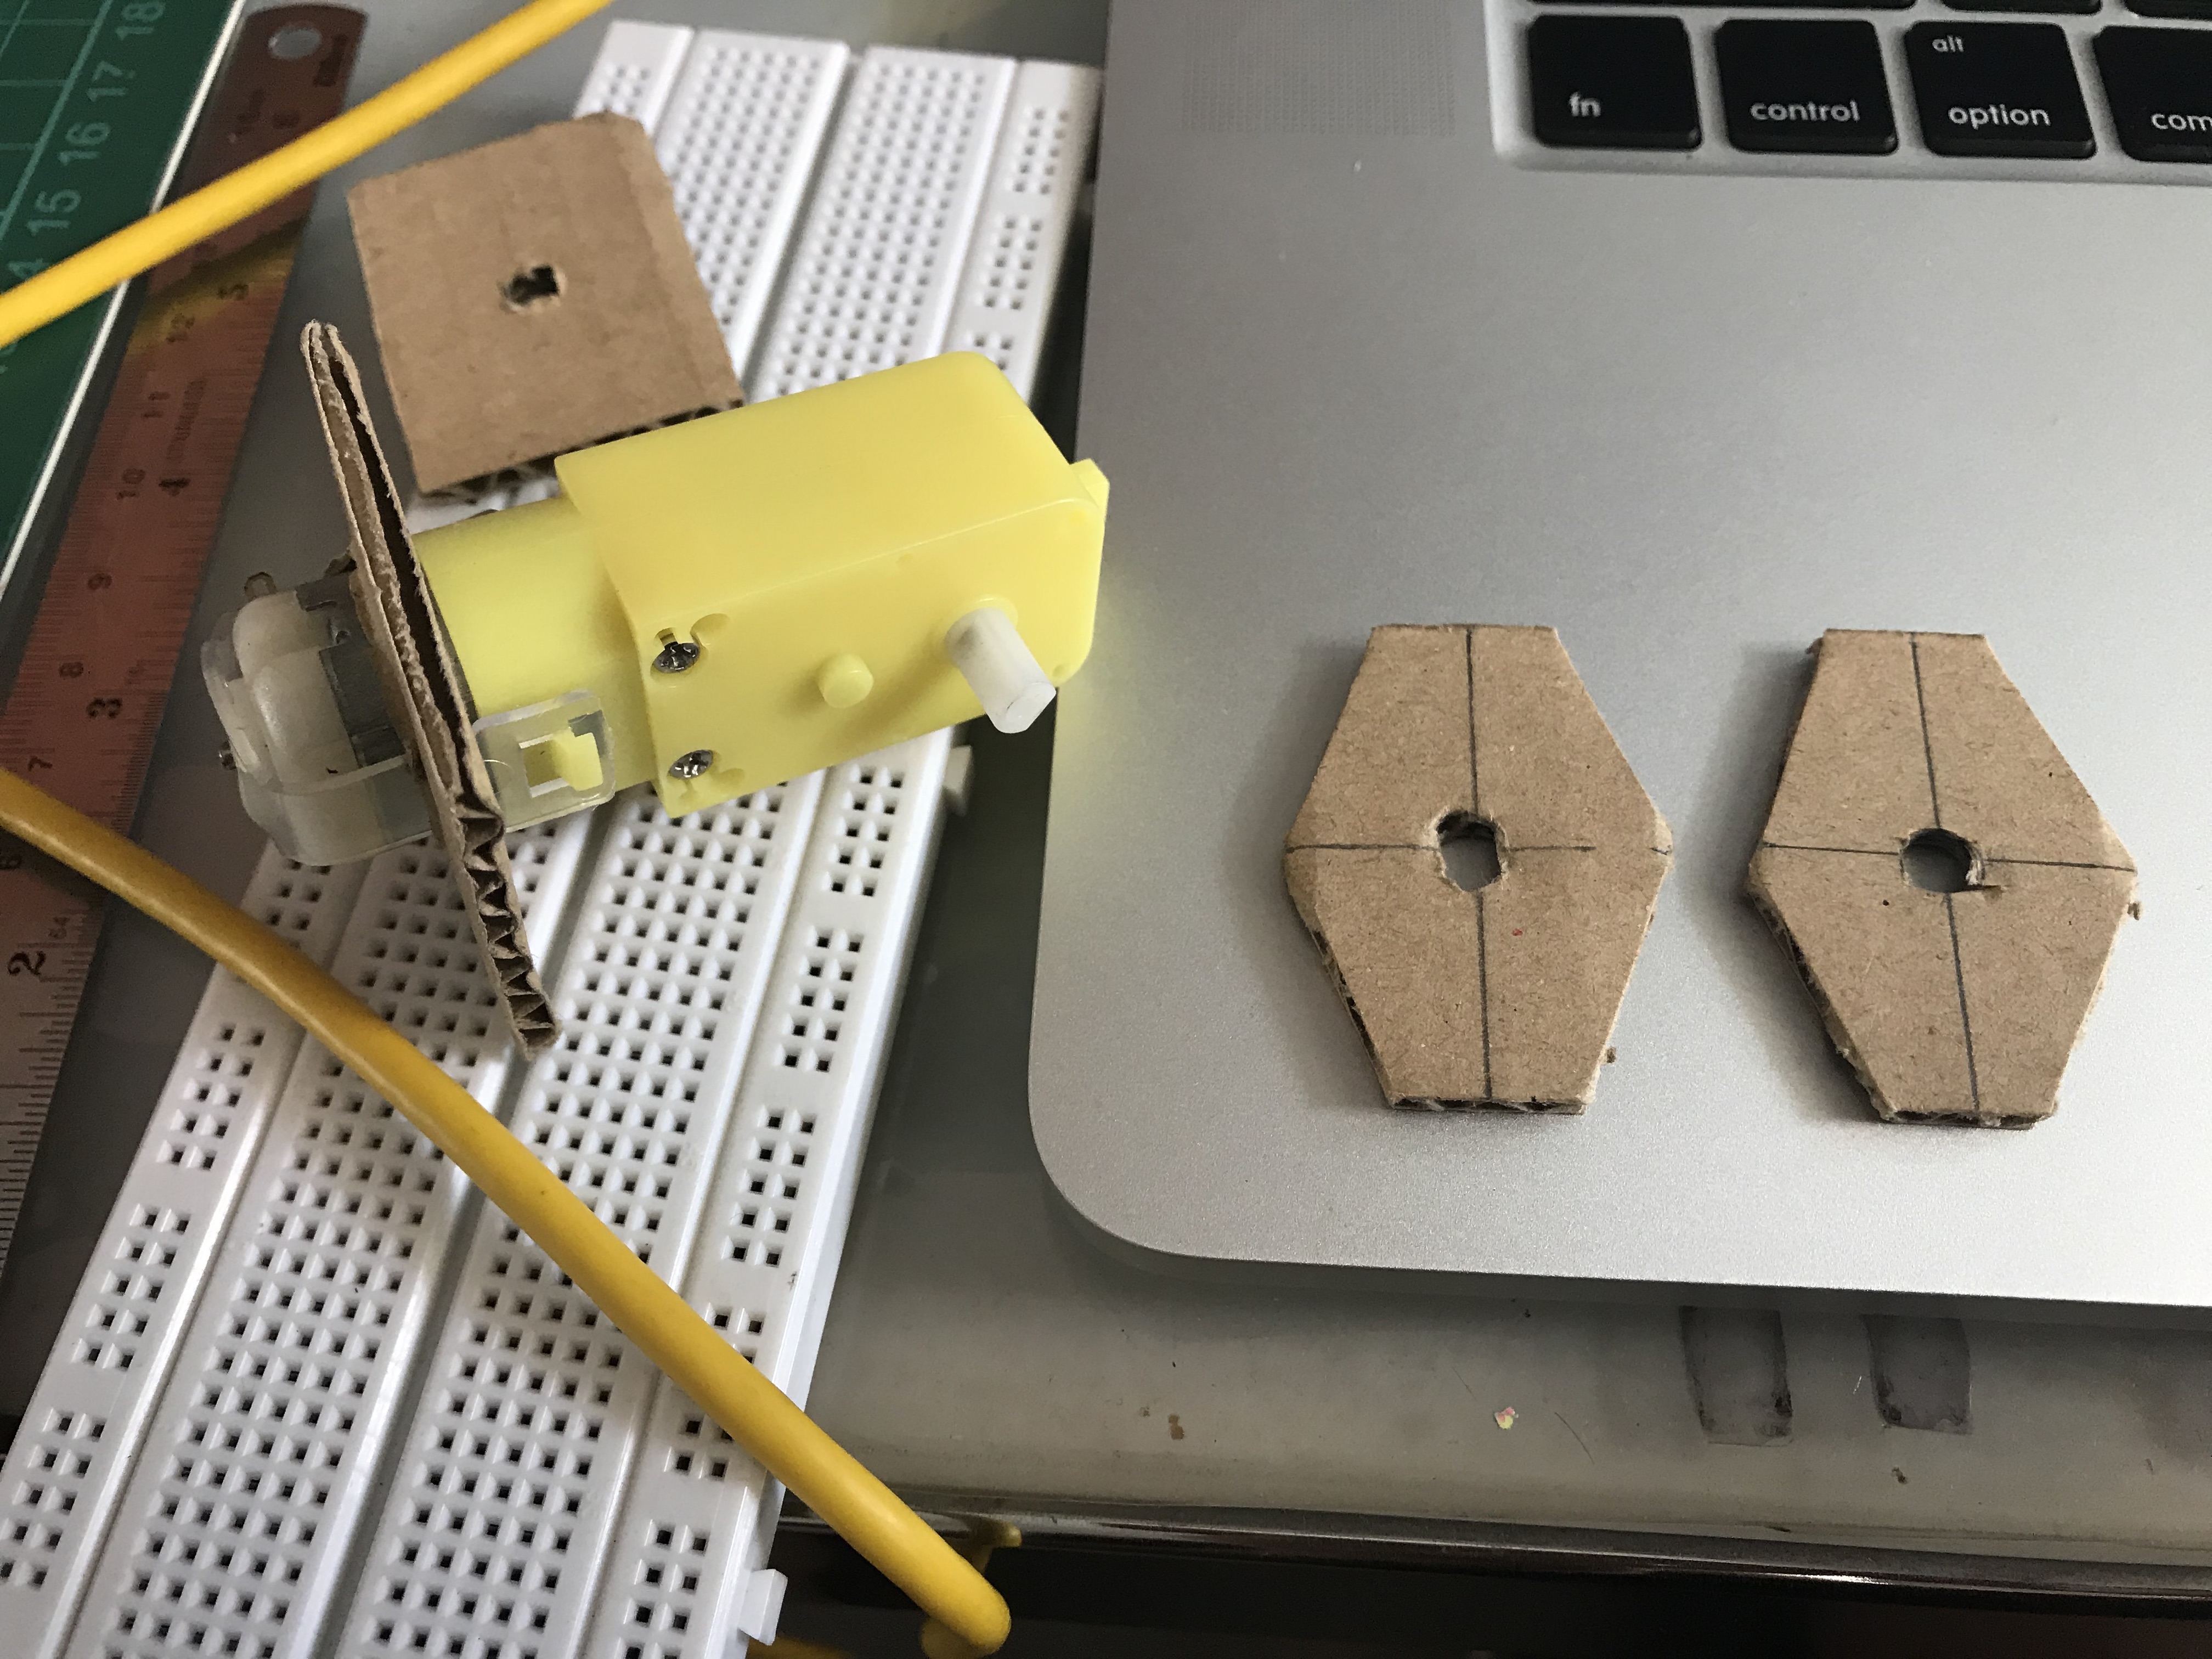
I started building Bob by using cardboard to test its movement. This shape turns out pretty good and it works well as an early prototype. At first one cardboard was enough to make it move but after a few times due to the turning the border of the cardboard was worn off.

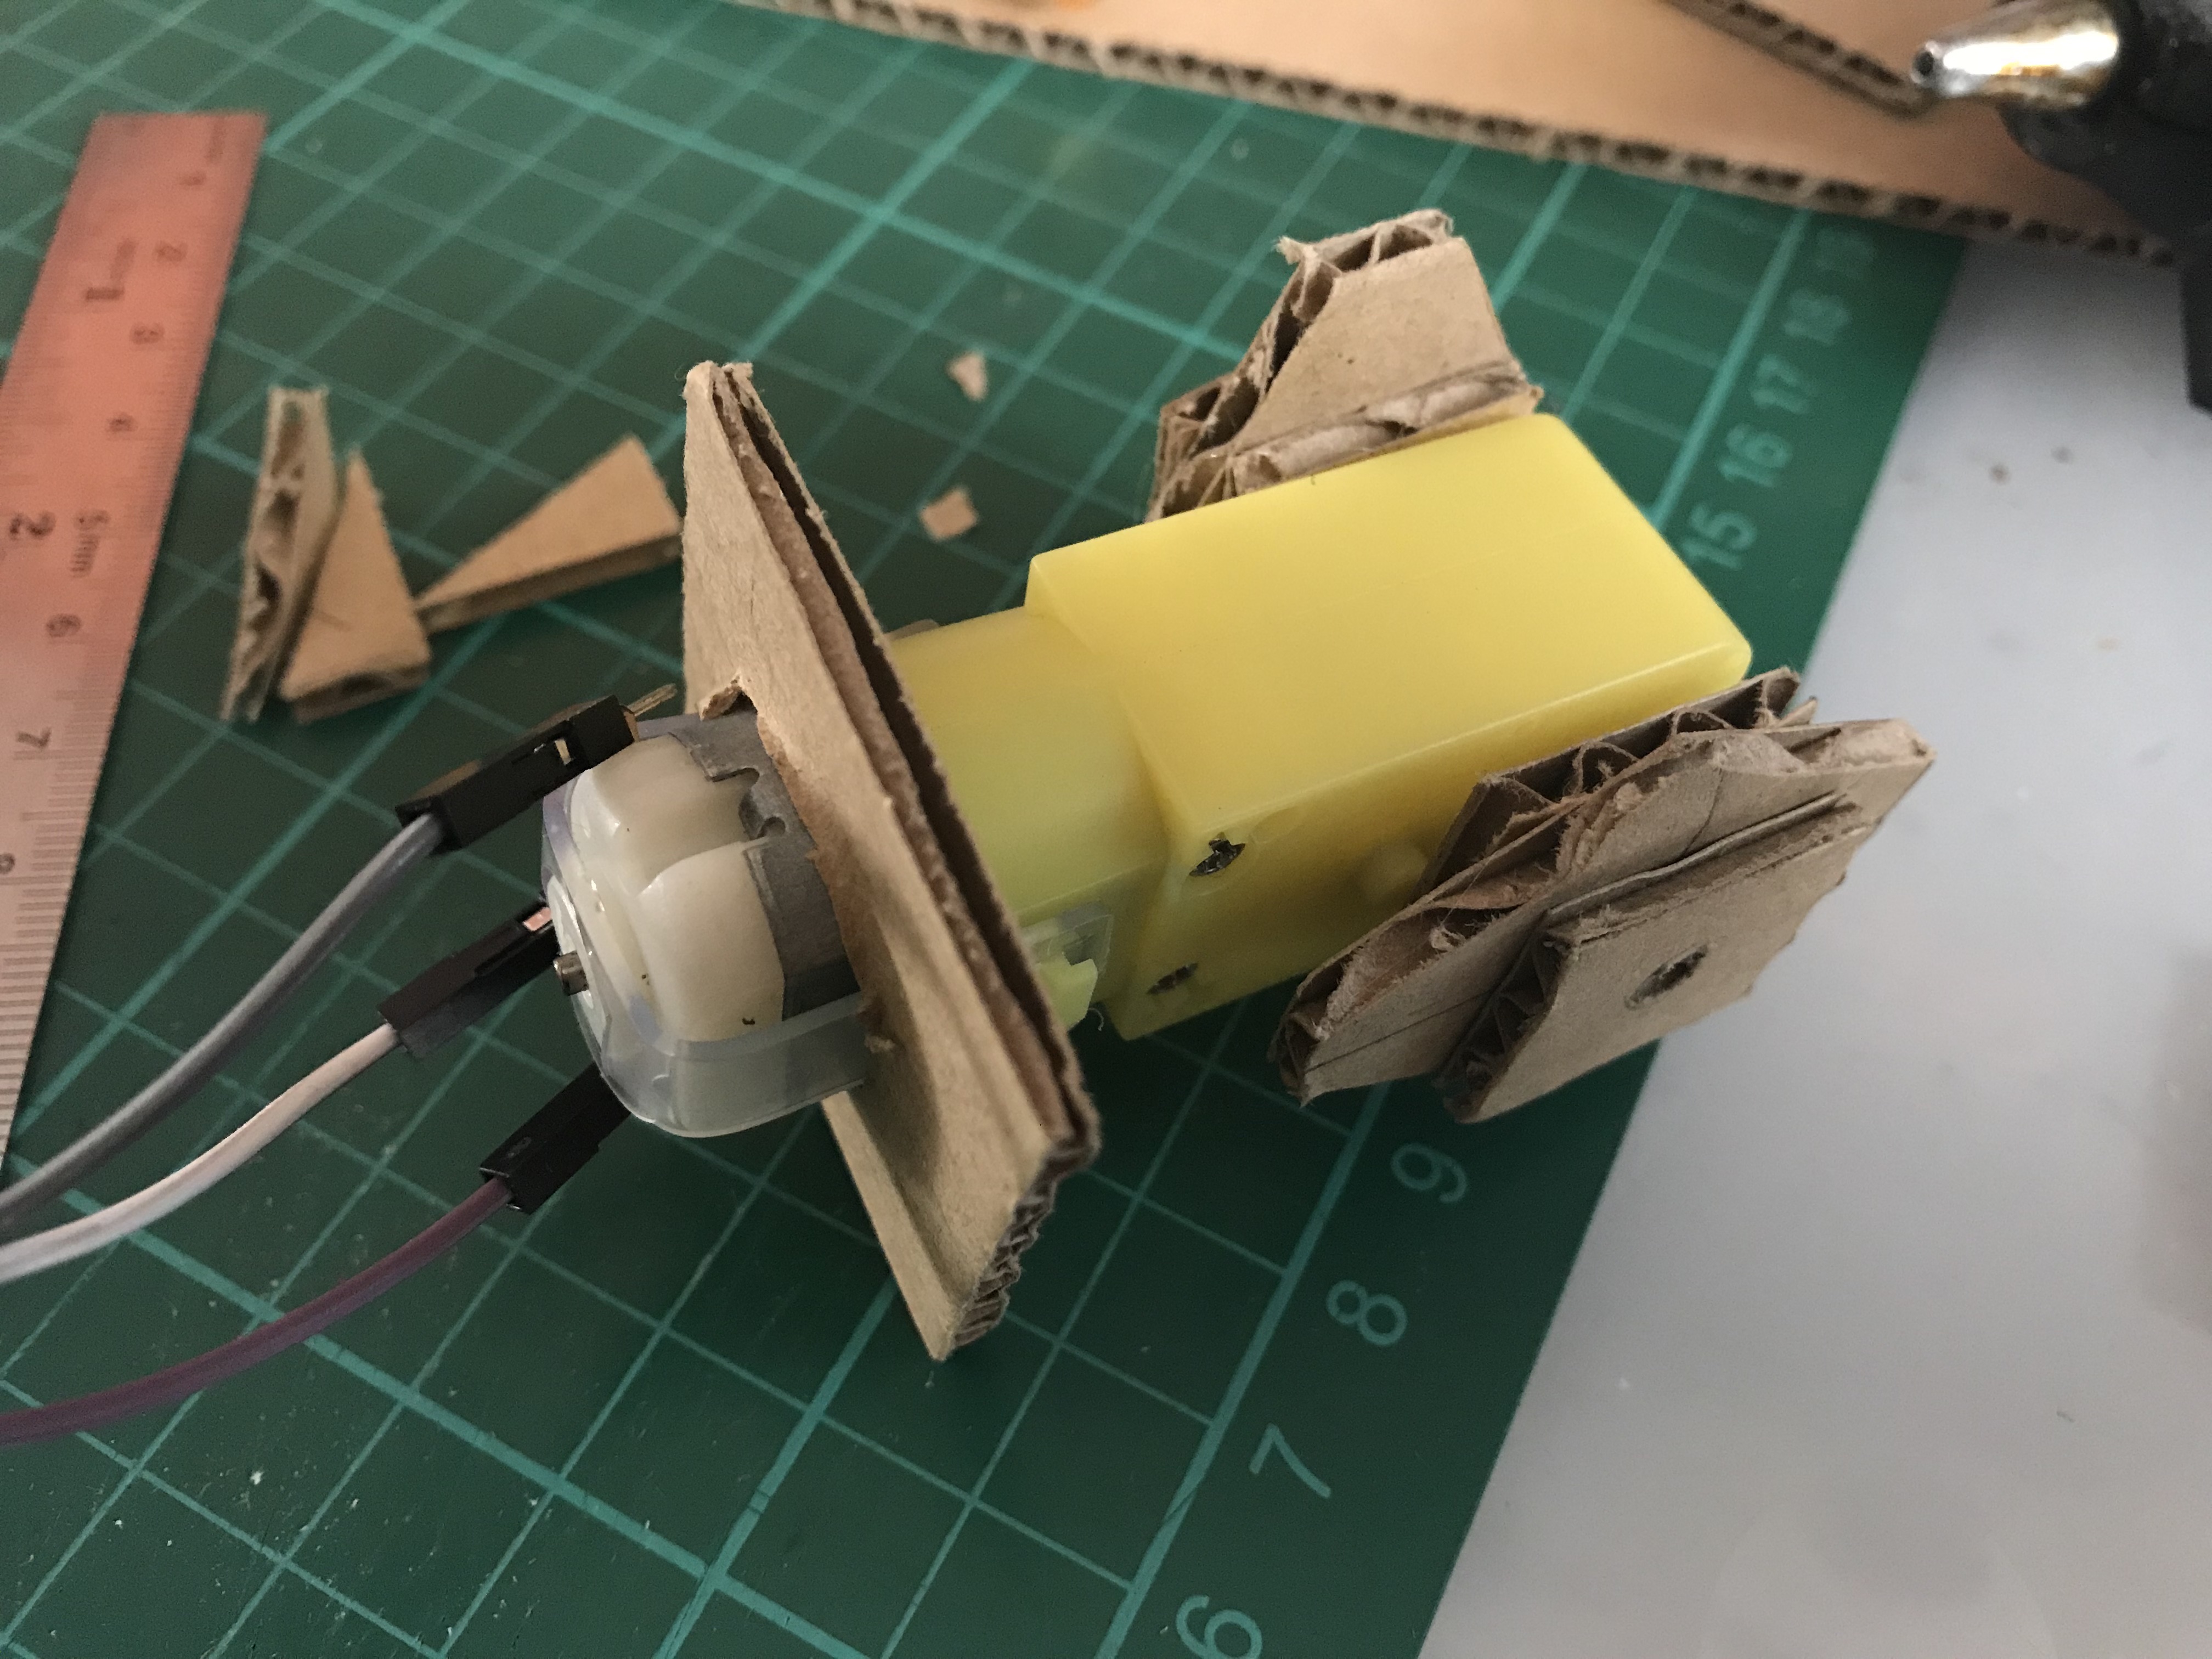
So additional support was added to both side of the wheel that will make the border of the hole stronger. The square cardboard was to support the motor when its moving around.

Next I move on to making the sensor sense and the LED will turn on. After that combining them together making the sensor trigger the motor to run!

Nevertheless, I face some power shortage when I added another DC motor. So I added the motor shield to drive the two motor.

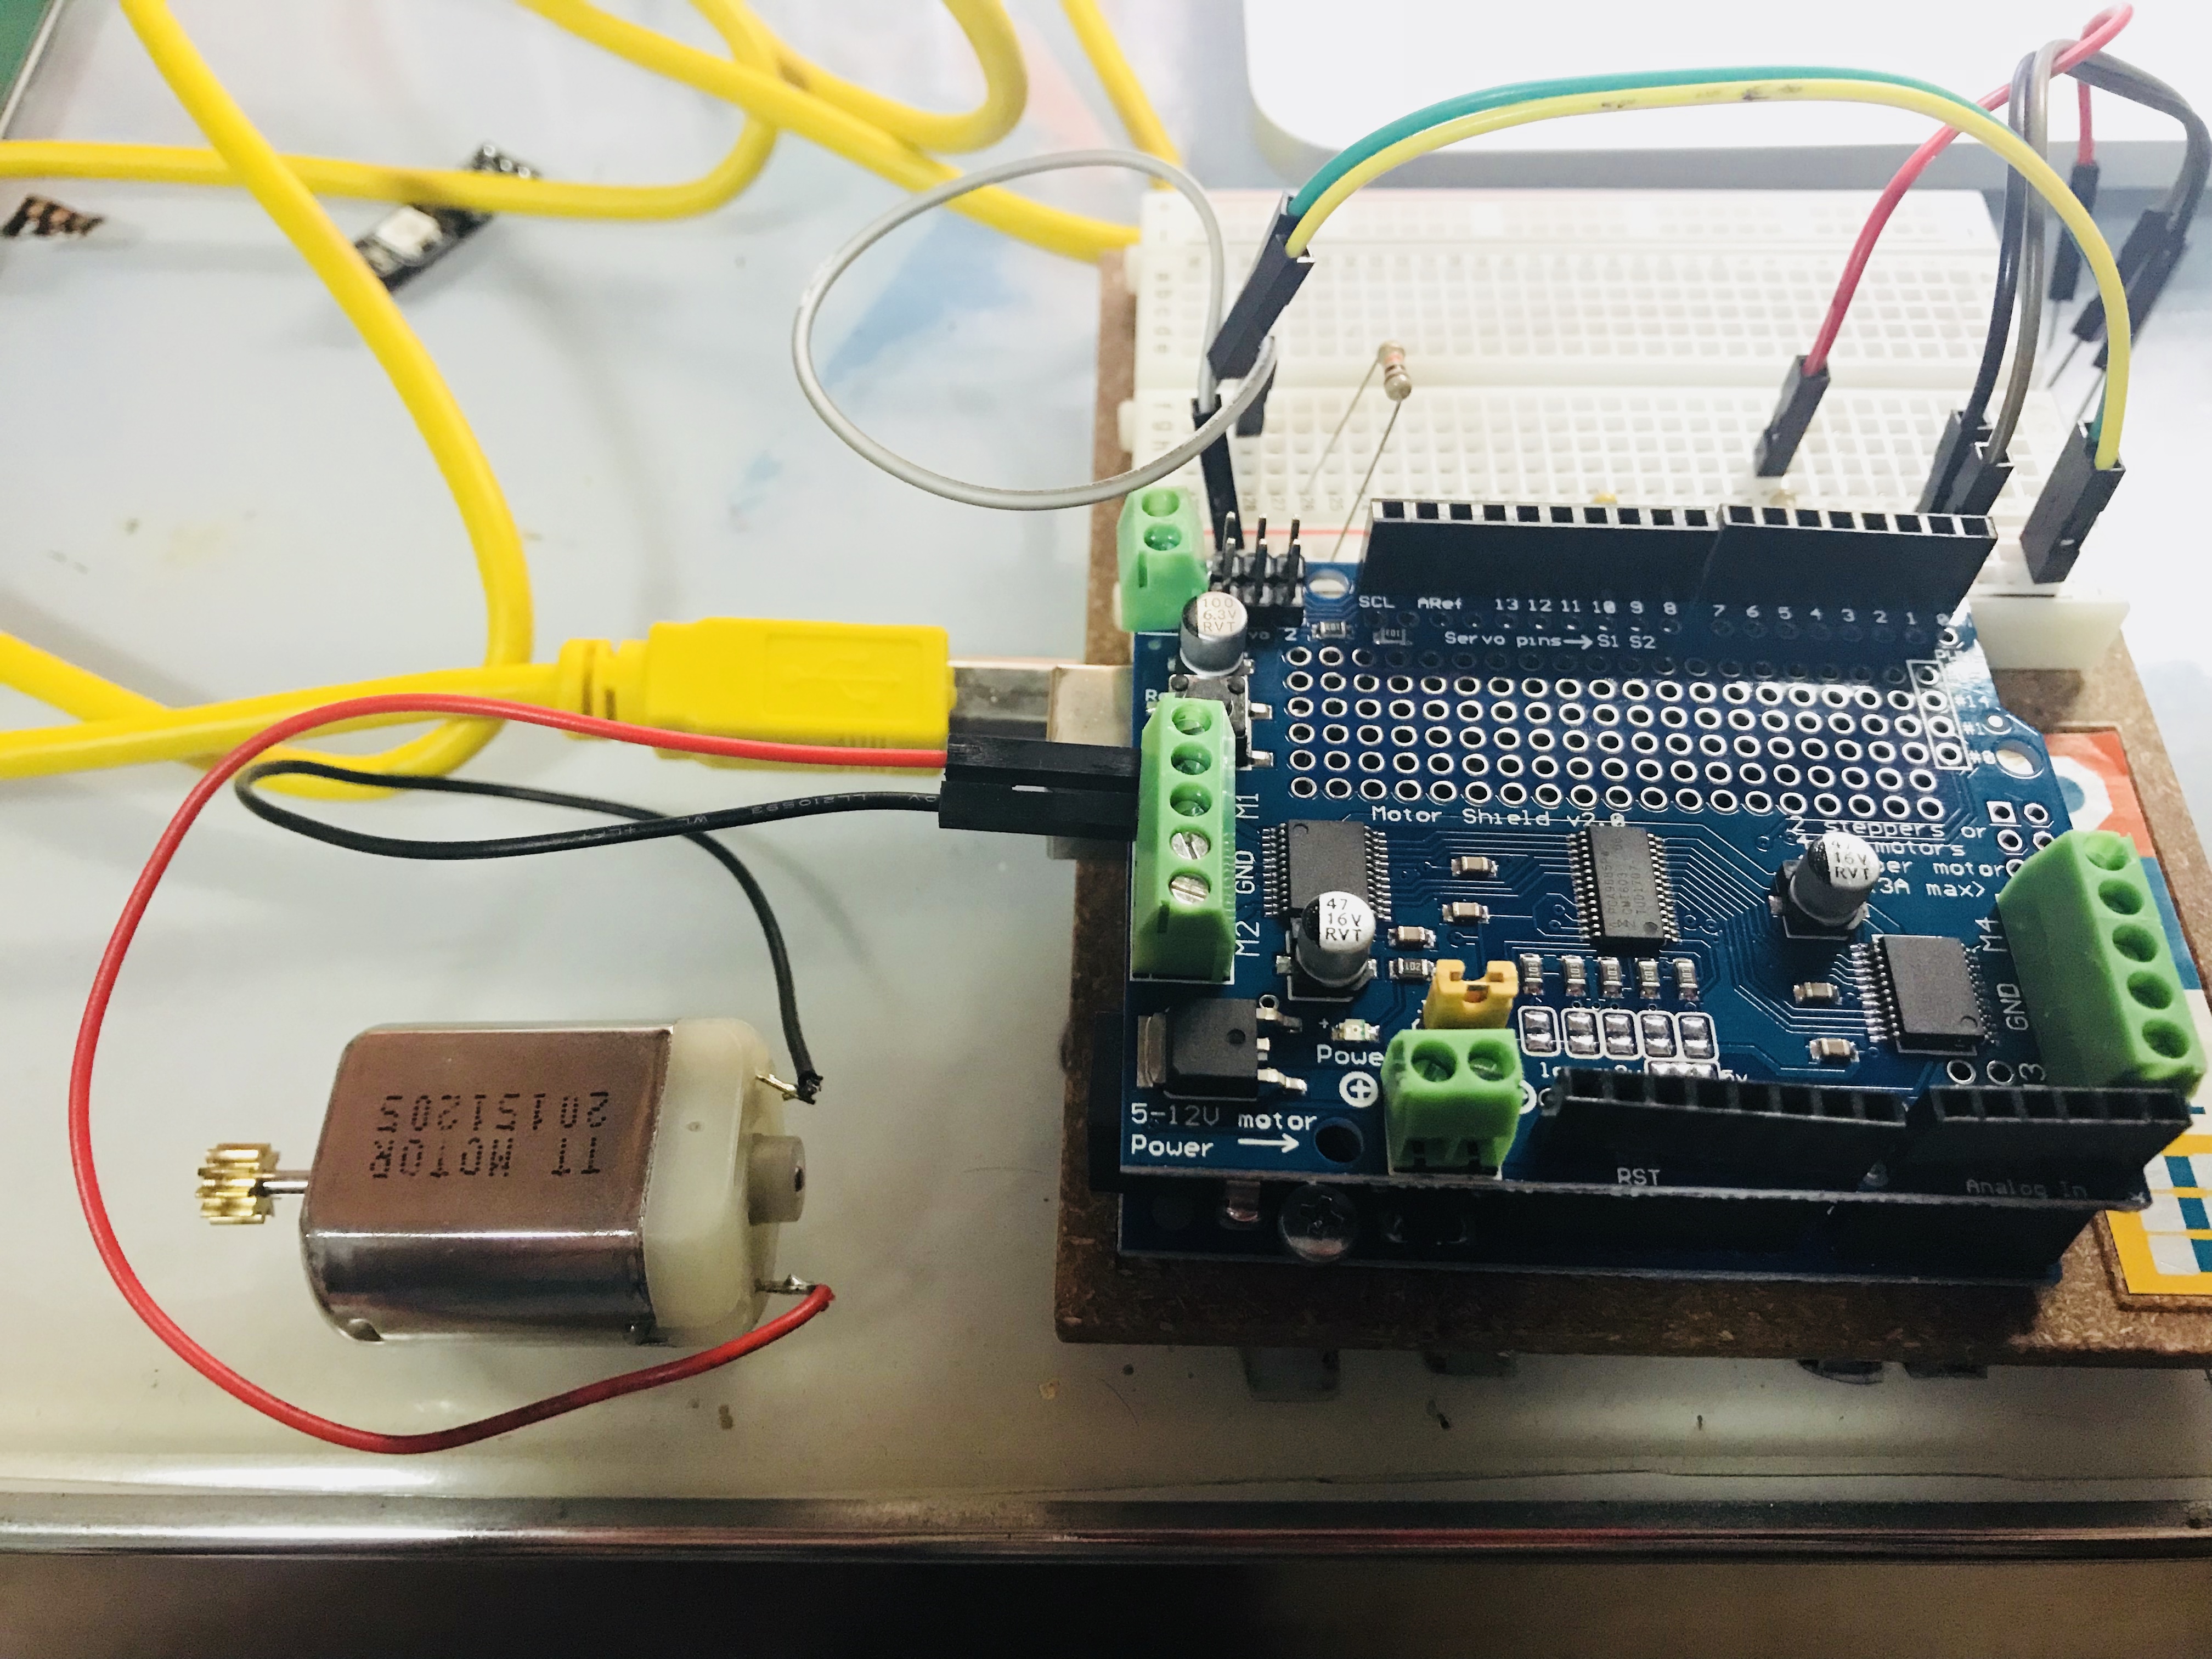
I also laser cut the acrylic to replay my previous prototype material. The box was to house the second DC motor and to support the main walking DC motor!

So in this video, the second DC motor act as a turning motor for the whole devices. There is a problem of the surface was too smooth for the acrylic to move, so I added some glue one the wheels to increase friction. Next I continue to work on the coding where I face problem with.

  • When the button press tuning motor is trigger but the main motor continues to turn. I solve this problem to put under “if” statement under the main motor.
  • The delay in my code cause the button not to detect anything.
    Replacing delay with millies so it counts the time with maths during the timing I wanted. So it doesn’t obstruct the detection for buttons.
  • The sensor keep sensing even when the mouse is moving so in turn it keep moving continuously. Using delay to block out the voltage for sensor in order to turn it off after sensing something.
  • Wiring for the mouse.
    There are many wires needed and it actually was too heavy for the mouse to move for the final product. Probably in future development, wires can change to a thinner version and uses the wire tube cover to secure them together.
  • Actual mouse might be too small to house all my motors.
    Initially, I wanted to house them all inside a real mouse until I found out that the motors added together was too big. So I downloaded a mouse model online, edited some areas and enlarge it but still within hand size.

In conclusion, there are many problem which helps me learn more in this process. Also there is still room for improvement but this project allows me to see that I need to put my focus on small details as well. Such as my button that was place in front to trigger the wheel should not place together with the wire. As a result it kind of block the button that will effect the overall structure.

Device of the Week #04 – Pinokio


Pinokio are a very interesting device, animatronics that likes attention from human. It uses 6 servos motor for its movements, a webcam to track people. It uses  Arduino and processing to generate all the interaction and behaviours.  One of the most interesting behaviours is that Pinokio doesn’t like being turn off, when user turn it off it will trigger the button again to turn itself on! I feel its a very interesting aspect.

The pros is that it has interesting behaviours and it was intriguing to watch even though this is a simple device. However, after awhile it can be bored watching it as it only have a few reactions.

In the video they say it can recognise sounds and like attentions, probably the device can added some interesting reaction such as a dancing lamp or something to create more variation.  Or adding wheels to it to follow human around so improve its immobility. Or even adding use to it such as voice command or clap to turn on the lights so to put it self in a more useful position.

Device of the Week #03 – Pilobolus: Art without authorship

Pilobolus was created for a social experiment on how social dynamic works and how individual can make decision which can affect on the overall result. It explore on how everyone can participate in the art with the combination of effort. They created 250 wired umbrella that can be lit up in different colours and projected all of them on to the screens.

I really like how they use simple device of controlling LED lights result in the aggregation effort in order to make this art work! Giving the audience choice to choose the colours and a togetherness experience which was a different approach from other art.

However, instructions was given to the audience in order to complete the images. I am really curious about what will happen when there are no instruction given so for the audience to explore the art piece themselves. Then it would invite more interaction between them and the results would be diverse as the result will be projected.

In additional, wireless connection could be added in the umbrella devices to link all umbrella together to create variation such as spreading of the light colours like “disease”. Or even it can be sold to the public, when one umbrella cross by another umbrella, it can detect each others and cause the LED to start blinking. As to create small little interesting moments that we might not experience before. Also, when computer recognise each umbrellas as pixel that will create many possibilities such as visual effects of linking all of them together to make an image outline.

In conclusion, Pilobolus had show us how human can work together in group to produce an art piece using the light up umbrella device. The aggregation effects can be use in many ways such as playing games and making a linked outline images.

Final Project: Idealisation #01

One of the earliest form of seat furniture was stool, a simple furniture that we still can see around us. The purpose was simple, providing a resting platform for us. Yet, it has been always been there so I though it will be interesting to play with things abnormally. For the final project, I have decided to build a interactive moving stool! I wanted to explore the concept of Anthropomorphism on an object that are familiar to everybody.

The chair will be added with PIR sensor [passive infrared sensor] to detect the presence of human. When human walk closer the chair will waddle away and giving feedback like “I’m not your stool!”. In this project I hope show that sometimes things are not as what we think, we might jump to conclusion too often or expecting everything to be the same way. In fact in reality it might be really different.

https://docs.google.com/presentation/d/1on49-c23Tuau_oZRWH2FKwXbfIBdSh1EqumaM-Q64f8/edit?usp=sharing

REFLECTION: Human + Art Science Museum

In the Human+ exhibition showcased many interesting projects by artiest, scientists, technologists and designers! One of my favourite piece was made by local student in Nanyang Polytechnic – School of Interactive and Digital Media named, TEASE.

My first reaction from the art piece was “Omg the body parts are so real” it was display with ears, feet and hand. It actually shock me until I felt a bit disgusted, still I took a step forward and touch it. The responds a vary such as laughing or angry depending on how we interact with their physical “body parts”. I really like how they invite interaction from the audience and the reaction from the installation was amusing.

The second part of the installation was presented at the back, capturing the emotions of the audience. I feel that was quite interesting where I spend a bit of time observing the different expression. From this installation reminds me that in real life we would tease each other similarly while the target now is a machine. The experience feel intriguing while if I were to tease a real person it feel more “shiok!” a sheer happiness. I guess is their body reaction and facial expression that cause the feeling in me. Whereas, teasing a machine feels less intimate and feel indifferent because it only react to you depend on your actions.

In conclusion, in future many jobs or even our daily life would involved robots however, I feel the relationship between human and technology was one way. We might really developed a relationship with robots but still they are coded to react to our behaviour. Yet, through installation like this can help us to explore our interpersonal relationship with the machine. I do feel intriguing and even happy to receive a laughing response. Aren’t this contradicting when your conscious tells you that its coded but still you have a emotional reaction.


Device of the Week #02 – Eunoia II

This interactive piece was created by New York based artist Lisa Park uses brainwave sensors. The brain activity would be detect from NeuroSky EEG headset into data and translate to sound wave to create vibration in the pool. There is total of 48 pools with speakers which symbolise 48 different emotions define by a philosopher Baruch Spinoza such as hope, fear, remorse and compassion.

When high frequency brain wave such as frustration would trigger louder sound output while lower meditation would have slower vibration. From the constant changing patterns of rippling, visually display the brain activity from user emotional status.

From this project, it help us to understand more of our brain visually through the data collected. Probably in future this project can develop further for medical purpose to analyse brain or feelings. Especially to understand coma patient brainwave could help them recover better. Or for patient who cannot communicate verbally, we could analyse how they feel and made adjustment accordingly if there is a chart of flow to refer to. I feel there are lots of potential in this project to develop to help people. The overall placement of the project is also aesthetically pleasing in symmetrical placement that reminds me of the connection between our neurons. The strong reminisce between our brain and concept are well thought out.

However the contrast of water ripples are very weak, I almost did not notice at first glance. Viewer might miss the important part of this art piece. Probably adding flicker lights to aid the frequency would be more impressing and eye catching. Or just light to emphasis the movement of water will make the whole artwork more prominent.

Device of the Week #01 – ALPHA – rotator

This alpha rotator was created by françois xavier saint georges, showcased in Amsterdam, Original Dampkring Gallery. The rotator are hung on the ceiling and has 6 arms, each with 26 holes that represents a alphabet. To interact with this device, user will place the pencil in each arms’s hole according to the word they wanted. Upon completion, user will need to push either of the handle above to construct the encrypted message. The pencils will gently draw against the paper that place on the floor. Final outcome of the word become encrypted message are filled with layers of lines, shades that would never be a second same piece.

The holes are designated

The pros of this artwork involved engagement in the viewer and provide them with a different experience in writing. I find it interesting that the artist designate the hole to each alphabet to form a word. At the same time, viewer are given a chance to participate and being an artist themselves by constructing the final piece. Creating the one and only piece instead of the literal writing.

However, the whole process could be quite time consuming although it can be really fun to play with. Probably machine can be implemented to adjust the position of the alphabet by viewer can key in their desire word to a computer and during their turn every thing will be automated. It can be quite interesting to see the machine move itself too! I feel there are also potential in this artwork to be use in group interactive controller. The 6 arms can be change into 3 platform that holds 3 person. They need to corporate together to change the direction of the controller to control the game character. In which it involve balancing and communication with team.

Overall, alpha rotator created a different experience for user to explore in writing making the user an artist. The change of position, a viewer to a creator provides sense of ownership and satisfaction would leave them deep impression.

I also came across this artwork called Study for Fifteen Points. The moving LED caught my attention as all of it are moving in different direction. Yet the later part of the video reveal that at one viewpoint we can see that each LED represent a point of a human walking. I felt this was not much of interactive device but something interesting to share with.


Project 1 – SkinnyMeter [Zi Feng, Bao, Isaac, Su Hwee]


The idea of this project is to abandon the perfect expected image that advertising has given us. We hope to reshape the conventional mindset of being skinny is good while advocating that having a balance is more important. Using the pressure sensor to send their weight at least 45kg will give them a different responds starting from scolding to praising. We are also exploring the possibility of the feedback in which scolding the user which happen turn into a funny moment.

This project refreshed our memory on the serial communication between MAX MSP and Arduino. Setting up the icubex can be quite confusing because there are few programmes to be installed. We also tired both wireless and connected icubex but decided on the connected icubex to save battery. We had calibrate the pressure sensor and split the numbers accordingly. It is divided into 4 stages with our recorded sound feedback;

1/4 Red: Severely underweight and 1/4 lighted LED
2/4 Orange: underweight and 2/4 lighted LED
3/4 Yellow: Good with 3/4 lighted LED
4/4 Green: Very good with all lighted LED.

At first we are able to achieve that with controlling the LED light up one by one and change accordingly by increasing or decreasing one by one. However we found out that the communication between MAX MSP and Arduino was super slow due to our delay.

We solved the problem by using the code from our Professor LPD which did not have any delay. So we send the numbers to control the numbers of LED to light up. We also learn that the Serial.readBytes can be added a new line and in Max the string of integer can be separated by , so Arduino will read it separately.