Link to previous documentation (PROCESS) about making Morrie can be found here.
To be very honest if you find this documentation lacking that is because most of my documentation can be found on the previous post!
Without further ado, let us look at the final Morrie:
MORRIE
<Child’s Best Friend: MORRIE> is a handheld interactive substitute pet which aims to teach children how to treat their pets with proper care. It encourages children to learn how to care for them before getting a real pet.
With pet abandonment and neglect on the rise, along with the abundance of healthcare and time needed to care for a pet, people are becoming receptive to the idea of throwing all their responsibilities with a snap of their fingers- that is, to dump their pets away or simply to put in minimal effort to take care of them. Furthermore, the stressful climate in Singapore’s fast-paced and demanding society leads to pet abuse when their owners vent their frustration on their pets.
I believe that the mindset of taking care of our pets stems from the learning we gain when we are children. With this project, I hope to instill a sense of responsibility regarding pet ownership in children. Children interacting with MORRIE get to experience first-hand how it is like to take care of a pet’s emotional and physical well-being (not in terms of survival needs). This will hopefully pre-empt them about the commitment they have to put in for a real pet.
Interaction with Morrie can be found in the trailer below:
Morrie reacts in four ways:
When it is lonely, it whimpers sadly.
When someone scratches him under the chin, it will wag its tail and head. This is triggered by a stroke sensor using conductive thread!
When someone scratches its head, it will whine happily. This is triggered by the ultrasonic sensor embedded in its collar!
When someone presses it too hard, it will whimper in pain. This is triggered by a Force Sensitive Resistor at its back!
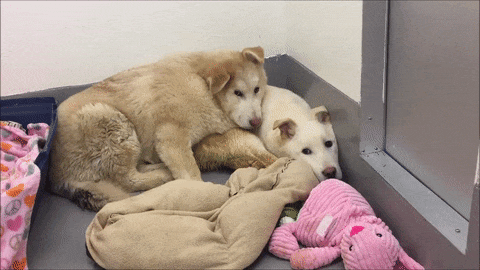
Morrie is placed in a carton box, because that is the stereotypical place where animals are abandoned in. This heightens the sense of “abandonment” Morrie represents, and the need for people interacting with Morrie to “un-abandon” it by giving love, attention and care. Morrie is just a puppy afterall!
MODIFICATIONS FROM PREVIOUS UPDATE POST:
So there were minimal changes since my last presentation about Morrie. The following are updates about what I have done with Morrie:
MP3 MODULE
It was time to get Morrie to bark! After trying my first MP3 Module which had no whatsoever guidance from the internet (they did not have any), Morrie still did not learn how to bark. I spent 3 weeks with this module before going to buy another module and trying it. This module was the DFPlayer Mini MP3 Module. At first, I was elated that it was working! But the current produced by the Arduino was intermittent, which resulted in a weird and loud buzzing noise from the speakers which I could not fix. Furthermore, coding with the module drove me insane because for some reason, it was constantly changing Morrie’s barking style each time I reuploaded the code despite the various barking tracks responding with their respective sensors. Oof.
At last, I went back to Sim Lim and they told me to get another of the same module I got in the first time! They personally tested the module for me and BAM, it turns out that the first module was actually FAULTY and that my code was correct. This was such a bloody waste of time but I am so glad Morrie was finally barking without any weird buzzing sounds…
ZIP!
I sewed a zip onto Morrie’s head, finally! As a result, he looks like an ill puppy (who had just finished having a big head surgery) who needs a lot more care and comfort compared to the average healthy pet. This came as a big surprise that was a happy surprise, because it supplemented my concept.
HAIR GROWTH
I decided to sew more threads that were similar to his fur colour onto Morrie’s head. I hope he gains more confidence from his balding issue.
COLLAR
After feedback from the last class, I decided to make an improved collar for Morrie! I sewed an extra leather pocket for the ultrasonic sensor Morrie has, and it could finally conceal the ultrasonic sensor fully except the black sensor region. It was pretty dope!
Overall it was actually my first time working with so many sensors at once but making an animal turn alive has been so exciting. I love animals, which made this project one of my favourite even though suddenly-malfunctioning codes and components did frustrate me a lot.
If time permitted, I would have made the LED lights work (it didn’t this time because its eyes were too thick to cut through and eliminating it completely was too weird…) but I had feedback that having it absent was better as it might make the dog too artificial looking.
One of my bigger surprises was how squishing all my components into Morrie made him heavier but more real; just like a real puppy! That made him the apple of many’s eyes during the showcase, which I am quite happy about.
In future, I will be certainly working with making more sensors work together and duplicating the same sensors to work in the same code. I will also like to experiment more with other sensors.
Thank you everyone who has guided me and taught me about turning Morrie alive! 😀
For my Final Project, I decided to do a Child’s Best Friend; Morrie. Morrie, named after the teacher from novel “Tuesdays with Morrie” is a handheld interactive substitute pet which aims to teach children how to treat their pets with proper care. It encourages children to learn how to care for them before getting a real pet.
WHY THO- CONCEPT
Pets are getting mistreated and neglected, and this is a rising trend. But pets are a great companion and do not deserve this.
Lack of Education
With pet abandonment and abuse cases on the rise worldwide with a lack of proper education for children (statistics available in my previous post with my powerpoint research), I decided to make a pet that can educate children from young.
Children are being educated about how to take care of their environment and how they should not waste food. They are taught about how they should study hard and not to do drugs. There are so much more. However, in my opinion, the things properly taught to children universally are things that are directly impacting people and their welfare. This is why they are educated to protect themselves.
SPCA Singapore’s Statistics for pet abandonment and health issues
However, issues such as pet neglect are rarely preached even in schools unless the topic rises during class, perhaps due to how it does not directly impact our lives. Environmental Education, Design and Technology, Art and Crafts, Social Studies; but none of these lessons actually touch on animal care (not that I expect it too, it would be weird since it is such a specialized topic, but there should still be education or some sort, somehow). Some preschools do take their kids out to petting zoos and that is when they are reminded to treat the animals carefully, but this is probably one of the only times where children are actually directly taught about taking care of animals. The causes and consequences of mistreating pets are not really preached often.
Furthermore, educating children to take care of pets is a very early step to teaching children how to take care of one another, be it their friends, family, or even strangers. Teaching them that it is okay not to take care of a pet would inculcate an unhealthy culture and mindset in children that taking care of other living things is not very important. Which is bad.
Spoiled Kids
Children in Singapore can afford better things and more things considering that we are a first world country. More children can get what they want, and those who can tend to be more spoiled by their parents. There is a “I want a puppy!” & “You may have it” mentality especially among the younger children.
However, parents spoiling their children to make them happy results in many families being unprepared to take care of a +1 in the family, because they only cared about making their children happy when they bought the pet. This is reinforced by the fact that this +1 in the family cannot speak human language, and thus it is harder for pets and their owners to communicate if the owners are not used to taking care of pets.
Eventually, as our pets grow old, owners tend to run into more issues such as money, health and boredom. They loose interest, or cannot afford spending money on the pet anymore/ do not think that spending money on them is worth it anymore since they are no longer cute pups, or because the health issues in aging pets are too bothersome to take care of.
Stupid people.
Busy Bees
With great work-life progression and a constant need to ramp up your standard of living and quality of life comes a hectic work life with no balance. People tend to have less time to take care of their pets if their hearts are not in it, and they think of it as a chore. Constantly doing Overtime at work or staying back late at school to finish projects also result in pets being neglected and unhealthy, because they do not have the care and attention for them to live healthily.
Speaking on behalf of SPCA which I am a part of, they are tired of receiving abandoned pets on their door steps. They are tired of listening to reasons such as not having enough time to take care of the pet, not being interested anymore, or not having enough financial capabilities to take care of the pet. People need to start learning that impulse buys just for animal cuteness is not going to work out in the long run. Pets are going to need extensive grooming, healthcare and daily needs. Pets should not be neglected and mistreated just because people feel that they cannot take care of them anymore.
An average human being lives for 75 years. Pets only live for 10-20 human years (for felines and canines). They plan to spend their whole life with you, and it is not fair to treat them badly or abandon them just cause you think it is troublesome to have them at one point of your life.
To the parents- please educated your children. Do not brush off the fact your children are throwing their pets up and down like a slinky. Do not ignore that your children are sitting on their doggos and asking them to march forward, my white horse! Please stop your children from squishing the skin and flesh of your pets; the older ones do feel pain. Do not let them grab their pets by their collars or neck; it hurts for them. And do not pluck the fur off your pets, it is so very painful even though they may seem fluffy and in abundance of fur…
The solution to this attitude correction is to teach potential offenders to differentiate the right from the wrong from young. We have to prepare children when it comes to taking care of other living things, and I believe that when it comes to children, using common jargon (language and actions that are very familiar and friendly to children) is beneficial in their learning process and will encourage them to absorb information better, which is why Morrie is born!
Morrie is meant to replicate a pet and help children to experience a simulation about what it feels like to own a pet with the responsibilities that comes along with it, such as not neglecting it (especially since puppies require a lot of attention!). As a substitute pet, Morrie can prepare children for the real deal of taking care of a real pet, so that we can avoid any unwanted pet neglect in the future due to impulse buys.
The reason I chose a golden retriever that is rather generic in appearance is because golden retrievers are known to be gentle and friendly dogs, which are less intimidating and more well-liked for people in general. A generic outlook instead of the funky pet animals found at shopping malls would be able to imitate a pet more.
FINAL IDEA + CLASS PROGRESS
Morrie is an interactive toy, as previously mentioned.
Making use of IKEA’s Gosig Golden Retriever, I modified a generic house pet looking plush toy into something along the lines of an imaginary best friend! I don’t know if Morrie was brought home knowing he was gonna be sliced open and modified the next day, though…
beep boop this is morrie
Morrie is a pre-made soft toy from IKEA, but I have modified its insides. I have cut off open its stomach to add a zip, so that I can plug in my arduino components and batteries. I also cut open the head to ease the input of motors and sensors. For Morrie’s tail, I realized that it was disconnected from the body. Hence, I had to cut it off, make a hole at the bottom of the tail, and then cut a hole at Morrie’s butt before sewing the tail back into the body so that they became one entity.
Afterwards, I used Montenra from IKEA (PVC Pipes in a sense?) to construct a backbone for Morrie. A long piece is stretches from Morrie’s neck to its butt. Then, I secured my servo motors to either ends of the spine, and added a long bone for both servo motors to move Morrie’s head and tail. One of the bones was stuck inside Morrie’s tail, and the other was left in the middle of Morrie’s head. In a sense, Morrie’s bone structure was like an S-Shape.
IKEA’s Montenra PVC Pipes
I plan to (and have currently) incorporated sensors into the doggo for it to react to people/children interacting with it. I will go through this in point form as shown below:
Stroke Sensor:
Making use of normal threads and conductive threads and some help from class, conductive thread is sewn onto the top of Morrie’s head as shown below. This stroking function allows for a sound track to be played through the Arduino MP3 Module once the circuit of the conductive thread is connected.
Basically, what happens here is when someone gently strokes and ruffles Morrie’s head, Morrie will feel happy and bark happily. This shows that Morrie is being cared for and not being neglected.
Ultrasonic Sensor:
When no one is around, Morrie will feel negleted, and Morrie will hence feel lonely. When the Ultrasonic Sensor does not detect a close presence (dignified by the distance it detects), Morrie will start to whine pitifully and sadly, as triggered by the MP3 Module.
However, when someone approaches Morrie, the ultrasonic sensor will pick up the close distance and Morrie will become happily. When this happens, Morrie will continue whimpering in neediness and wag its tail and head in its eagerness for attention. The wagging of the tail and the head is done via Servo Motors control.
Pressure Sensor:
This sensor is meant to remind children that animals do feel pain! When someone presses on or squishes Morrie too tightly, the Pressure Sensor, in this case a Force Sensitive Resistor, will detect a High Pressure threshold. This will result in the MP3 Module triggering a yelp of pain felt by Morrie. This tells Children that they should treat their pets gently instead.
As of now, I have connected the servo motors, force sensitive resistors, ultrasonic sensors, and stroke sensors accordingly in my circuit. However, I seem to be facing an issue with connecting multiple FSRs with different readings. If I cannot fix this issue, I will most likely just be using one FSR on the stomach, because that is where people squeeze animals the most.
My MP3 Module is also not working even though it has been a gruelling 3 weeks of trying to get it to work. I am currently waiting for my DFPlayer to arrive from Taobao, and to see if the player works. Hopefully, it will work, because the sound function and sewing Morrie back up is pretty much what I have left to do.
If there is time, I will be inserting LED lights onto Morrie’s eyes, which will respond to sadness and happiness accordingly. Being neglected and in pain will cause Morrie’s eyes to go off, but being close to Morrie and stroking it will cause the light to blink happily. I will also be attaching a zip to Morrie’s head and a covering for the ultrasonic sensor.
For my Exhibition Specs, Morrie will be placed either at the corner of a pillar to look lonely, or will be exhibited in an “Adopt me” cardboard box or basket where pets are usually abandoned in.
I also considered adding an LED Matrix 8×8, but I decided against it in the end because it might make Morrie look too mechanical, which is against my point of it being a pet simulator.
For Project 2 // Multimodal Project 2, I decided to change my idea away from my LED Calf Compression to a Heating Pad Motivator. This name of my project still remains as <Curing the Couch Potato Syndrome>, and still serves the same purpose but with a haptic output instead of a haptic input this time around!
For this project, I have a white calf compression (which I substituted with a flexible fabric for the low fidelity prototype) which is painted with thermochromatic ink of various colours (supposed to look really pretty and fashionable in a non prototype version). A heating pad is slotted along a calf pocket, and it will be attached to a Force Sensitive Resistor (FSR) which will be strapped beneath the foot.
HOW IT FUNCTIONS:
A lazy person puts this device on with velcro.
Whenever the person is off from their feet, and the FSR (also a pressure sensor) does not detect a force exerted on it, it means that the person is slacking. This will cause the heating pad at the calf to heat up increasingly, and the reversible thermochromatic ink (loaned to me by Professor Galina :D) will start to disappear, turning the calf back to a plain ugly white.
The discomfort of the heat and the lack of desire to wear a plain white calf band around, it should motivate the person to get off their feet to exercise. Once they are on their feet, the FSR will detect the force exerted and will turn off the heating pad. This will result in the heat disappearing (and hence discomfort disappearing) and the colours from the ink will start to return.
The heating pad and the pressure pad are slotted in pockets that will make them invisible to direct vision. A pocket is fitted on the outside for the Arduino, battery and the breadboard. On an actual device, it should be strapped to a covered pocket with smaller and more compact power such as a Lilypad and a smaller battery component that has a on off function. (Unfortunately this time round my components were either malfunctioning or I was just not able to procure them within a week 🙁 )
Below is the Arduino Code for the controls of the Device:
#include <Wire.h>
int pressureAnalogPin = 0; //pin where our pressure pad is located.
int pressureReading; //variable for storing our reading
//Adjust these if required.
int noPressure = 5; //max value for no pressure on the pad
int lightPressure = 500; //max value for light pressure on the pad
int mediumPressure = 600; //max value for medium pressure on the pad
int HeatPin = 5; //pin where heating pad is located
const int pinUP = 255; //max analogue output, heater on
const int pinDOWN = 0; //heater off
Serial.print(“Pressure Pad Reading = “);
Serial.println(pressureReading);
if (pressureReading < noPressure) {
Serial.println(” – No pressure”);
digitalWrite(3, HIGH); // Heater is on
} else if (pressureReading < lightPressure) {
Serial.println(” – Light Pressure”);
digitalWrite(3, HIGH); // Heater is on
} else if (pressureReading < mediumPressure) {
Serial.println(” – Medium Pressure”);
digitalWrite(3, LOW); //Heater is off
} else{
Serial.println(” – High Pressure”);
digitalWrite(3, LOW); //Heater is off
}
delay(100);
}
Finished Product:
Overall the product was not really finished well with unexpected complications. The design of the prototype could have been better done and the paint could have been more structurally planned instead of my experimental slathers. Also, I did not expect the supply of the power to be an issue again alike the previous project… While the code really worked, I put the wires wrongly when I was transferring the wires and switching them around which caused the wire to short-circuit. This resulted in my heating pad heating up which made me assume that the product did work but when I tested it in class, it started to fail. In the end, after rectifying that issue, my heating pad ended up not really heating up well because the digital pin could only supply 20ms worth of power which was barely enough for the heating pad. The total power of the arduino was 100ms which was 5 times the power of what the digital pin could supply, which was why the heating pad could heat up well when it short circuited and ended up bluffing me into thinking the device was working properly. Smh.
When Zifeng gave me the solution of using the relay and explained that the relay could allow me to draw the full power from the 9V batteries I had attached to the device and allow the heating pad to draw the full power through the digital pin, I quickly tried to swop the Relay into the device but oof, my brand new relay turned out to be faulty. 🙁
SHAME ON YOU BRAND NEW RELAY. :((
In the end, my presentation wasn’t the best I could have done but overall I think it was a good chance to experiment with many different mediums because thermochromic ink, relays, pressure sensors and heating pads were components I never interacted with before. Oof.
So <“CAW CAW” Means I Like You> ended up becoming a beta project instead of its main version.
As previously explained in my 1st Documentation of this project, <“CAW CAW” Means I Like You> is supposed to be a visual representation of how someone likes to have their friends around them, emulating a Peacock’s Mating Dance. This project utilizes Arduino, and makes use of Servo Motors to change the wing directions, ultrasonic sensor to detect distances, and LED Strips W2818.
When one is alone, the LED Strips would be facing upwards and will emit a red light indicating animosity. When someone approaches the first person, the ultrasonic sensor will detect the presence of the second person and set the LED Stripped wearable off. In response, the “tail” of LED Strips will move outwards, 90 degrees in opposite angles and the color of the tail will be wiped to green for approval. This indicates that the person hates being lonely, and likes to have his friends around them.
Creating this in view of the brief, it is supposed to be a flashy presentation of the LED Strips that the tradeshow is trying to promote. With its interactivity, people would be more inclined to try out the wearable technology and it would ideally create more fascination with the LED effects it provides.
//Declarations
const int ServoPin1 = 13;
const int ServoPin2 = 12;
const int TriggerPin = 3;
const int EchoPin = 2;
long distance;
long duration;
//LED
const int ledPIN1 = 8;
const int ledPIN2 = 9;
if (distance <=150){
//Spread wings
Servo1.write(180);
Servo2.write(0);
//strip1.show();
//strip2,show();
//rainbow(10);
colorWipe(strip1.Color( 0, 255, 0), 50); // Green
colorWipe(strip2.Color( 0, 255, 0), 50); // Green
delay(1000);
}
else{
//Go back home
Servo1.write(90);
Servo2.write(90);
strip2.show();
colorWipe(strip1.Color(255, 0, 0), 50); // Red
colorWipe(strip2.Color(255, 0, 0), 50); // Green
delay(1000);
}
}
void colorWipe(uint32_t color, int wait) {
for(int i=0; i<strip1.numPixels(); i++) { // For each pixel in strip…
strip1.setPixelColor(i, color); // Set pixel’s color (in RAM)
strip1.show(); // Update strip to match
delay(wait); // Pause for a moment
}
void rainbow(int wait) {
for(long firstPixelHue = 0; firstPixelHue < 5*65536; firstPixelHue += 256) {
for(int i=0; i<strip1.numPixels(); i++) { // For each pixel in strip…
for(int i=0; i<strip2.numPixels(); i++) {
int pixelHue = firstPixelHue + (i * 65536L / strip1.numPixels());
int pixelHue2 = firstPixelHue + (i * 65536L / strip2.numPixels());
strip1.setPixelColor(i, strip1.gamma32(strip1.ColorHSV(pixelHue)));
strip2.setPixelColor(i, strip2.gamma32(strip2.ColorHSV(pixelHue2)));
}
}
strip1.show(); // Update strip with new contents
strip2.show();
delay(wait); // Pause for a moment
}
}
Initially, I had big ideas about having it be a audio visualizer slash music visualizer and having one more static LED Strip in the middle against the back. But I faced multiple issues along the way and had to compromise:
Not enough power to supply 3 LED Strips worth 30 bulbs each. I didn’t know how to increase the power at then, so I had to make do with 3 LED Strips instead.
Problem with Flashy LED Colours; Because of silly me utilizing delays in my code, the flashier light effects I originally intended for did not seem to work. In the end, I had to make do with simpler light effects (Colorwipe instead) to represent what I was trying to do. I made use of red to indicate indifference, and green light for approval.
The circuit kept bloody falling off. I did not have the right materials at then to create a proper pouch and I wasn’t adept enough to solder my wires confidently on a breadboard meant for soldering too. In the end, I was just taping and taping even more onto a piece of cardboard and to the belt I attached the wings to. It fell off right before presentation….
IT WAS SUPPOSED TO BE LIKE A PEACOCK TAIL. But I didn’t procure fabrics in time and made use of white crepe paper instead. While it certainly gave off the right effect, but I had to make the tail two tails instead (because the wrong measurement would tear the paper if my circuit went wonky) and it ended up looking like insect wings.
The color wipe turned out to be a bit laggy. I don’t know why still…
My wonderful cardboard apparatus
Testing it out. Thank you Shah for modelling and Bryan for snapping this pic!
“Is everything ok”
Overall, I was a little proud of myself for being able to make my wearable work somewhat given that it was my first time dealing with these components but I was also disappointed that I didn’t have enough time to make it optimal.