Final Project | Child’s Best Friend Proposal Pitch | “morrie”

Standard

1 WEEK MORE AAAAAAAAHHHHHHH

For my Final Project, I decided to do a Child’s Best Friend; Morrie. Morrie, named after the teacher from novel “Tuesdays with Morrie” is a handheld interactive substitute pet which aims to teach children how to treat their pets with proper care. It encourages children to learn how to care for them before getting a real pet.

Image result for tuesdays with morrie

WHY THO- CONCEPT

Pets are getting mistreated and neglected, and this is a rising trend. But pets are a great companion and do not deserve this.

Lack of Education

With pet abandonment and abuse cases on the rise worldwide with a lack of proper education for children (statistics available in my previous post with my powerpoint research), I decided to make a pet that can educate children from young.

Image result for spca gif

Children are being educated about how to take care of their environment and how they should not waste food. They are taught about how they should study hard and not to do drugs. There are so much more. However, in my opinion, the things properly taught to children universally are things that are directly impacting people and their welfare. This is why they are educated to protect themselves.

SPCA Singapore’s Statistics for pet abandonment and health issues

However, issues such as pet neglect are rarely preached even in schools unless the topic rises during class, perhaps due to how it does not directly impact our lives.  Environmental Education, Design and Technology, Art and Crafts, Social Studies; but none of these lessons actually touch on animal care (not that I expect it too, it would be weird since it is such a specialized topic, but there should still be education or some sort, somehow).  Some preschools do take their kids out to petting zoos and that is when they are reminded to treat the animals carefully, but this is probably one of the only times where children are actually directly taught about taking care of animals. The causes and consequences of mistreating pets are not really preached often.

Furthermore, educating children to take care of pets is a very early step to teaching children how to take care of one another, be it their friends, family, or even strangers. Teaching them that it is okay not to take care of a pet would inculcate an unhealthy culture and mindset in children that taking care of other living things is not very important. Which is bad.

Spoiled Kids

Children in Singapore can afford better things and more things considering that we are a first world country. More children can get what they want, and those who can tend to be more spoiled by their parents. There is a “I want a puppy!” & “You may have it” mentality especially among the younger children.

However, parents spoiling their children to make them happy results in many families being unprepared to take care of a +1 in the family, because they only cared about making their children happy when they bought the pet. This is reinforced by the fact that this +1 in the family cannot speak human language, and thus it is harder for pets and their owners to communicate if the owners are not used to taking care of pets.

Eventually, as our pets grow old, owners tend to run into more issues such as money, health and boredom. They loose interest, or cannot afford spending money on the pet anymore/ do not think that spending money on them is worth it anymore since they are no longer cute pups, or because the health issues in aging pets are too bothersome to take care of.

Stupid people.

Busy Bees

With great work-life progression and a constant need to ramp up your standard of living and quality of life comes a hectic work life with no balance. People tend to have less time to take care of their pets if their hearts are not in it, and they think of it as a chore. Constantly doing Overtime at work or staying back late at school to finish projects also result in pets being neglected and unhealthy, because they do not have the care and attention for them to live healthily.

Image result for spca gif

Speaking on behalf of SPCA which I am a part of, they are tired of receiving abandoned pets on their door steps. They are tired of listening to reasons such as not having enough time to take care of the pet, not being interested anymore, or not having enough financial capabilities to take care of the pet. People need to start learning that impulse buys just for animal cuteness is not going to work out in the long run. Pets are going to need extensive grooming, healthcare and daily needs. Pets should not be neglected and mistreated just because people feel that they cannot take care of them anymore.

Image result for spca gif

An average human being lives for 75 years. Pets only live for 10-20 human years (for felines and canines). They plan to spend their whole life with you, and it is not fair to treat them badly or abandon them just cause you think it is troublesome to have them at one point of your life.

To the parents- please educated your children. Do not brush off the fact your children are throwing their pets up and down like a slinky. Do not ignore that your children are sitting on their doggos and asking them to march forward, my white horse! Please stop your children from squishing the skin and flesh of your pets; the older ones do feel pain. Do not let them grab their pets by their collars or neck; it hurts for them. And do not pluck the fur off your pets, it is so very painful even though they may seem fluffy and in abundance of fur…

The solution to this attitude correction is to teach potential offenders to differentiate the right from the wrong from young. We have to prepare children when it comes to taking care of other living things, and I believe that when it comes to children, using common jargon (language and actions that are very familiar and friendly to children) is beneficial in their learning process and will encourage them to absorb information better, which is why Morrie is born!

Related image

Morrie is meant to replicate a pet and help children to experience a simulation about what it feels like to own a pet with the responsibilities that comes along with it, such as not neglecting it (especially since puppies require a lot of attention!). As a substitute pet, Morrie can prepare children for the real deal of taking care of a real pet, so that we can avoid any unwanted pet neglect in the future due to impulse buys.

The reason I chose a golden retriever that is rather generic in appearance is because golden retrievers are known to be gentle and friendly dogs, which are less intimidating and more well-liked for people in general. A generic outlook instead of the funky pet animals found at shopping malls would be able to imitate a pet more.

FINAL IDEA + CLASS PROGRESS

Morrie is an interactive toy, as previously mentioned.

Making use of IKEA’s Gosig Golden Retriever, I modified a generic house pet looking plush toy into something along the lines of an imaginary best friend! I don’t know if Morrie was brought home knowing he was gonna be sliced open and modified the next day, though…

Image result for ikea golden

beep boop this is morrie

Morrie is a pre-made soft toy from IKEA, but I have modified its insides. I have cut off open its stomach to add a zip, so that I can plug in my arduino components and batteries. I also cut open the head to ease the input of motors and sensors. For Morrie’s tail, I realized that it was disconnected from the body. Hence, I had to cut it off, make a hole at the bottom of the tail, and then cut a hole at Morrie’s butt before sewing the tail back into the body so that they became one entity.

Afterwards, I used Montenra from IKEA (PVC Pipes in a sense?) to construct a backbone for Morrie. A long piece is stretches from Morrie’s neck to its butt. Then, I secured my servo motors to either ends of the spine, and added a long bone for both servo motors to move Morrie’s head and tail. One of the bones was stuck inside Morrie’s tail, and the other was left in the middle of Morrie’s head. In a sense, Morrie’s bone structure was like an S-Shape.

Image result for ikea montera

IKEA’s Montenra PVC Pipes

I plan to (and have currently) incorporated sensors into the doggo for it to react to people/children interacting with it. I will go through this in point form as shown below:

Stroke Sensor:

Making use of normal threads and conductive threads and some help from class, conductive thread is sewn onto the top of Morrie’s head as shown below. This stroking function allows for a sound track to be played through the Arduino MP3 Module once the circuit of the conductive thread is connected.

Basically, what happens here is when someone gently strokes and ruffles Morrie’s head, Morrie will feel happy and bark happily. This shows that Morrie is being cared for and not being neglected.

Ultrasonic Sensor:

When no one is around, Morrie will feel negleted, and Morrie will hence feel lonely. When the Ultrasonic Sensor does not detect a close presence (dignified by the distance it detects), Morrie will start to whine pitifully and sadly, as triggered by the MP3 Module.

However, when someone approaches Morrie, the ultrasonic sensor will pick up the close distance and Morrie will become happily. When this happens, Morrie will continue whimpering in neediness and wag its tail and head in its eagerness for attention. The wagging of the tail and the head is done via Servo Motors control.

Pressure Sensor:

This sensor is meant to remind children that animals do feel pain! When someone presses on or squishes Morrie too tightly, the Pressure Sensor, in this case a Force Sensitive Resistor, will detect a High Pressure threshold. This will result in the MP3 Module triggering a yelp of pain felt by Morrie. This tells Children that they should treat their pets gently instead.

Image result for rage quit meme gif

As of now, I have connected the servo motors, force sensitive resistors, ultrasonic sensors, and stroke sensors accordingly in my circuit. However, I seem to be facing an issue with connecting multiple FSRs with different readings. If I cannot fix this issue, I will most likely just be using one FSR on the stomach, because that is where people squeeze animals the most.

My MP3 Module is also not working even though it has been a gruelling 3 weeks of trying to get it to work. I am currently waiting for my DFPlayer to arrive from Taobao, and to see if the player works. Hopefully, it will work, because the sound function and sewing Morrie back up is pretty much what I have left to do.

Image result for led eyes meme gif

If there is time, I will be inserting LED lights onto Morrie’s eyes, which will respond to sadness and happiness accordingly. Being neglected and in pain will cause Morrie’s eyes to go off, but being close to Morrie and stroking it will cause the light to blink happily. I will also be attaching a zip to Morrie’s head and a covering for the ultrasonic sensor.

For my Exhibition Specs, Morrie will be placed either at the corner of a pillar to look lonely, or will be exhibited in an “Adopt me” cardboard box or basket where pets are usually abandoned in.

I also considered adding an LED Matrix 8×8, but I decided against it in the end because it might make Morrie look too mechanical, which is against my point of it being a pet simulator.

Multimodal Project 2 | Curing the Couch Potato Syndrome (Documentation)

Standard

For Project 2 // Multimodal Project 2, I decided to change my idea away from my LED Calf Compression to a Heating Pad Motivator. This name of my project still remains as <Curing the Couch Potato Syndrome>, and still serves the same purpose but with a haptic output instead of a haptic input this time around!

For this project, I have a white calf compression (which I substituted with a flexible fabric for the low fidelity prototype) which is painted with thermochromatic ink of various colours (supposed to look really pretty and fashionable in a non prototype version). A heating pad is slotted along a calf pocket, and it will be attached to a Force Sensitive Resistor (FSR) which will be strapped beneath the foot.

HOW IT FUNCTIONS:

A lazy person puts this device on with velcro.

Whenever the person is off from their feet, and the FSR (also a pressure sensor) does not detect a force exerted on it, it means that the person is slacking. This will cause the heating pad at the calf to heat up increasingly, and the reversible thermochromatic ink (loaned to me by Professor Galina :D) will start to disappear, turning the calf back to a plain ugly white.

The discomfort of the heat and the lack of desire to wear a plain white calf band around, it should motivate the person to get off their feet to exercise. Once they are on their feet, the FSR will detect the force exerted and will turn off the heating pad. This will result in the heat disappearing (and hence discomfort disappearing) and the colours from the ink will start to return.

The heating pad and the pressure pad are slotted in pockets that will make them invisible to direct vision. A pocket is fitted on the outside for the Arduino, battery and the breadboard. On an actual device, it should be strapped to a covered pocket with smaller and more compact power such as a Lilypad and a smaller battery component that has a on off function. (Unfortunately this time round my components were either malfunctioning or I was just not able to procure them within a week 🙁 )

Below is the Arduino Code for the controls of the Device:

#include <Wire.h>

int pressureAnalogPin = 0; //pin where our pressure pad is located.
int pressureReading; //variable for storing our reading

//Adjust these if required.
int noPressure = 5; //max value for no pressure on the pad
int lightPressure = 500; //max value for light pressure on the pad
int mediumPressure = 600; //max value for medium pressure on the pad

int HeatPin = 5; //pin where heating pad is located
const int pinUP = 255; //max analogue output, heater on
const int pinDOWN = 0; //heater off

void setup(void) {
Serial.begin(9600);
}

void loop(void) {
pressureReading = analogRead(pressureAnalogPin);

Serial.print(“Pressure Pad Reading = “);
Serial.println(pressureReading);

if (pressureReading < noPressure) {
Serial.println(” – No pressure”);
digitalWrite(3, HIGH); // Heater is on
} else if (pressureReading < lightPressure) {
Serial.println(” – Light Pressure”);
digitalWrite(3, HIGH); // Heater is on
} else if (pressureReading < mediumPressure) {
Serial.println(” – Medium Pressure”);
digitalWrite(3, LOW); //Heater is off
} else{
Serial.println(” – High Pressure”);
digitalWrite(3, LOW); //Heater is off
}
delay(100);

}


Finished Product:

Overall the product was not really finished well with unexpected complications. The design of the prototype could have been better done and the paint could have been more structurally planned instead of my experimental slathers. Also, I did not expect the supply of the power to be an issue again alike the previous project… While the code really worked, I put the wires wrongly when I was transferring the wires and switching them around which caused the wire to short-circuit. This resulted in my heating pad heating up which made me assume that the product did work but when I tested it in class, it started to fail. In the end, after rectifying that issue, my heating pad ended up not really heating up well because the digital pin could only supply 20ms worth of power which was barely enough for the heating pad. The total power of the arduino was 100ms which was 5 times the power of what the digital pin could supply, which was why the heating pad could heat up well when it short circuited and ended up bluffing me into thinking the device was working properly. Smh.

When Zifeng gave me the solution of using the relay and explained that the relay could allow me to draw the full power from the 9V batteries I had attached to the device and allow the heating pad to draw the full power through the digital pin, I quickly tried to swop the Relay into the device but oof, my brand new relay turned out to be faulty. 🙁

SHAME ON YOU BRAND NEW RELAY. :((

In the end, my presentation wasn’t the best I could have done but overall I think it was a good chance to experiment with many different mediums because thermochromic ink, relays, pressure sensors and heating pads were components I never interacted with before. Oof.

Multimodal Experience Device | Idea Generation

Standard

MULTIMODAL EXPERIENCE DEVICE

Brief: Equipped with simple sound and haptic (sense of touch and motion), make a device that informs a person about the content of a message without being disruptive to his or her entourage (e.g. meetings).

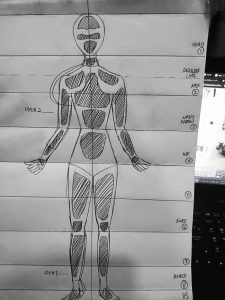
My anatomy lel

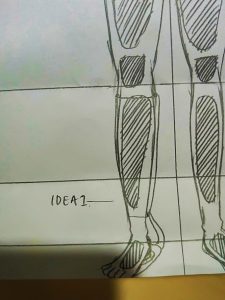
IDEA#1: Don’t be lazy! // Curing the Couch Potato Syndrome

In commemoration of a Singapore Healthy Society!

<Curing the Couch Potato Syndrome> is a project which encourages people to exercise, while this will be informally broadcast to the public. It will utilize an arduino, along with pressure sensors and LED strips. The pressure sensors will be located underneath the feet, sandwiched between protective sponge and fabric to be inserted in shoes. The LED Strips will be slotted into sewn pouches, along a wearable that resembles a shin guard, and will be elastic for ease and comfort.

Image result for leg wrap sports

HOW IT WORKS:

This device is an identifier for lazy people and for shaming them for not moving enough per day. When the person begins the day, they can put on their shoes and along with the pressure sensor pouches (activated by arduino and a portable power source) and also put on the shin guard wearable as shown in the picture. The colour will start off as Red, indicating a dire need for exercise and to shame the person for not having exercised for the day. Time to be active!

As the person goes on about their day, their footsteps will be detected by the pressure sensors underneath their feet. There will be a counter in place, and after hitting a targeted number of steps, the colour of the led strips will start to change. (Considering to do a colour wipe effect for every step taken but see how). The meter is as follows:

Red –> Orange –> Yellow –> Blue –> Green

Red represents the least exercise taken. It tells the public BOO you are so lazy!!

While Green (representing approval) shows that the person has maxed out their targeted footsteps. YAY, you are so active and hardworking! The public is proud of you!

Alternatively, the LED strips can represent a Health or Battery Bar instead. The more you exercise, the more the bar will fill up and when it hits maximum light capacity, it means that the target has been met.

The target steps can be set at the start simply by editing the arduino code and re-inserting it back with the device.

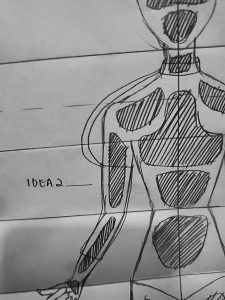
IDEA#2: Don’t touch me I’m scared!

The concept for this idea revolves around traumatized victims who has suffered abuse, be it physical abuse or sexual abuse. These people usually have withdrawal symptoms due to trauma, and find it hard to accept touch from other people in fear of being injured by the violence they faced in the past. However, what normal people don’t seem to realize is these people need to be given personal space and dislike being touched. They continue to touch them casually even in an act of supposed good nature, not knowing that the simple action has caused these past victims to feel uncomfortable.

This is also in inspiration of trains in Japan, where many people are often molested on the sardine-packed trains of Japan. However, due to outrage of modesty and embarrassment (which is something taken very seriously in Japan), they usually will themselves to remain quiet to prevent awkwardness in a place jammed pack with the public, and have to suffer in silence and discomfort by themselves. Also at times, the train is too crowded for them to signal to someone about their situation anyway…

With an aim to be a social awareness therapy device, <Don’t touch me I’m scared!> is a device which utilizes an elastic hand band (for ease of wearing and comfort) which covers the middle arm. This arm band is embedded with removable pressure sensors. This device is connected to a neck ‘bracelet’ that has an LED strip embedded inside it. This resembles a noose, acting as a visual representation of how emotional trauma can affect one’s life very crucially. (i.e. one can be driven to suicide when their emotions have suffered too much, etc…)

Image result for neck metal choker

HOW IT WORKS:

The LED Strip will remain green, but upon someone touching the arm of the person wearing the device, the light will change to red; a silent SOS to the unknown fella about “PLEASE DON’T TOUCH ME SO CASUALLY, I’M UNCOMFORTABLE because I have reasons to be…”.

This reduces the need for a traumatized victim to force herself to voice out her discomfort because a visual cue has been set in place, and also to alert others that they have to be careful about treating this person. I believe that such a device can be potentially helpful as an aid during therapy when victims try to overcome their physical contact trauma.

Project 1: LED Lights TradeShow 2ND Documentation | “CAW CAW” Means I like you

Standard

So <“CAW CAW” Means I Like You> ended up becoming a beta project instead of its main version.

As previously explained in my 1st Documentation of this project, <“CAW CAW” Means I Like You> is supposed to be a visual representation of how someone likes to have their friends around them, emulating a Peacock’s Mating Dance. This project utilizes Arduino, and makes use of Servo Motors to change the wing directions, ultrasonic sensor to detect distances, and LED Strips W2818.

When one is alone, the LED Strips would be facing upwards and will emit a red light indicating animosity. When someone approaches the first person, the ultrasonic sensor will detect the presence of the second person and set the LED Stripped wearable off. In response, the “tail” of LED Strips will move outwards, 90 degrees in opposite angles and the color of the tail will be wiped to green for approval. This indicates that the person hates being lonely, and likes to have his friends around them.

Creating this in view of the brief, it is supposed to be a flashy presentation of the LED Strips that the tradeshow is trying to promote. With its interactivity, people would be more inclined to try out the wearable technology and it would ideally create more fascination with the LED effects it provides.

Source Code for Arduino:

#include <Adafruit_NeoPixel.h>
#include <Servo.h>
#include <NewPing.h>

//Declarations
const int ServoPin1 = 13;
const int ServoPin2 = 12;
const int TriggerPin = 3;
const int EchoPin = 2;
long distance;
long duration;
//LED
const int ledPIN1 = 8;
const int ledPIN2 = 9;

const int numOfLeds = 30; // Number of leds

//Adafruit_NeoPixel pixels = Adafruit_NeoPixel(numOfLeds, ledPin, NEO_GRB + NEO_KHZ800);
Adafruit_NeoPixel strip1 = Adafruit_NeoPixel(numOfLeds, ledPIN1, NEO_GRB + NEO_KHZ800);
Adafruit_NeoPixel strip2 = Adafruit_NeoPixel(numOfLeds, ledPIN2, NEO_GRB + NEO_KHZ800);

//Create a servo object
Servo Servo1; //LEFT
Servo Servo2; //RIGHT

//100 = maxDistance
NewPing sonar(TriggerPin, EchoPin, 100);

void setup(){
Serial.begin(9600);
pinMode(TriggerPin, OUTPUT);
pinMode(EchoPin, INPUT);
Servo1.attach(ServoPin1);
Servo2.attach(ServoPin2);
strip1.begin(); // Initializes the NeoPixel library
strip2.begin();
strip1.show();
strip2.show();

}

void loop(){
//delayMicroseconds(1000);
//int cm = sonar.ping_cm();
ultra();
//int angle1 = (map, 2, 40, 0, 128);
//int angle2 = (map, 2, 40, 0, 218);

if (distance <=150){
//Spread wings
Servo1.write(180);
Servo2.write(0);
//strip1.show();
//strip2,show();
//rainbow(10);
colorWipe(strip1.Color( 0, 255, 0), 50); // Green
colorWipe(strip2.Color( 0, 255, 0), 50); // Green
delay(1000);
}
else{
//Go back home
Servo1.write(90);
Servo2.write(90);
strip2.show();
colorWipe(strip1.Color(255, 0, 0), 50); // Red
colorWipe(strip2.Color(255, 0, 0), 50); // Green
delay(1000);
}

}

void colorWipe(uint32_t color, int wait) {
for(int i=0; i<strip1.numPixels(); i++) { // For each pixel in strip…
strip1.setPixelColor(i, color); // Set pixel’s color (in RAM)
strip1.show(); // Update strip to match
delay(wait); // Pause for a moment
}

for(int i=0; i<strip2.numPixels(); i++){
strip2.setPixelColor(i, color);
strip2.show();
delay(wait);
}
}

void ultra(){
digitalWrite(TriggerPin, LOW);
delayMicroseconds(2);
digitalWrite(TriggerPin, HIGH);
delayMicroseconds(10);
digitalWrite(TriggerPin, LOW);
duration = pulseIn(EchoPin, HIGH);
distance = duration*0.034/2;
Serial.print(“Distance: “);
Serial.println(distance);
}

void rainbow(int wait) {
for(long firstPixelHue = 0; firstPixelHue < 5*65536; firstPixelHue += 256) {
for(int i=0; i<strip1.numPixels(); i++) { // For each pixel in strip…
for(int i=0; i<strip2.numPixels(); i++) {
int pixelHue = firstPixelHue + (i * 65536L / strip1.numPixels());
int pixelHue2 = firstPixelHue + (i * 65536L / strip2.numPixels());

strip1.setPixelColor(i, strip1.gamma32(strip1.ColorHSV(pixelHue)));
strip2.setPixelColor(i, strip2.gamma32(strip2.ColorHSV(pixelHue2)));
}
}
strip1.show(); // Update strip with new contents
strip2.show();
delay(wait); // Pause for a moment
}
}

Initially, I had big ideas about having it be a audio visualizer slash music visualizer and having one more static LED Strip in the middle against the back. But I faced multiple issues along the way and had to compromise:

  1. Not enough power to supply 3 LED Strips worth 30 bulbs each. I didn’t know how to increase the power at then, so I had to make do with 3 LED Strips instead.
  2. Problem with Flashy LED Colours; Because of silly me utilizing delays in my code, the flashier light effects I originally intended for did not seem to work. In the end, I had to make do with simpler light effects (Colorwipe instead) to represent what I was trying to do. I made use of red to indicate indifference, and green light for approval.
  3. The circuit kept bloody falling off. I did not have the right materials at then to create a proper pouch and I wasn’t adept enough to solder my wires confidently on a breadboard meant for soldering too. In the end, I was just taping and taping even more onto a piece of cardboard and to the belt I attached the wings to. It fell off right before presentation….
  4. IT WAS SUPPOSED TO BE LIKE A PEACOCK TAIL. But I didn’t procure fabrics in time and made use of white crepe paper instead. While it certainly gave off the right effect, but I had to make the tail two tails instead (because the wrong measurement would tear the paper if my circuit went wonky) and it ended up looking like insect wings.
  5. The color wipe turned out to be a bit laggy. I don’t know why still…

My wonderful cardboard apparatus

Testing it out. Thank you Shah for modelling and Bryan for snapping this pic!

“Is everything ok”

Overall, I was a little proud of myself for being able to make my wearable work somewhat given that it was my first time dealing with these components but I was also disappointed that I didn’t have enough time to make it optimal.

Device of the Week 1 | Health Devices | Muse Brain Sensing Headband

Standard

Device Chosen:

Muse Brain Sensing Headband by Gaiam Corporation

https://choosemuse.com/how-it-works/

Description of the Device:

The Muse Brain Sensing Headband produced by Gaiam Corporation is a headband utilized for meditation purposes. It makes use of electroencephalography (EEG) sensors to analyze the brain activity.

EEG in general is widely used by neuroscience researchers worldwide. It makes use of advanced signal processing to interpret one’s mental activity which can help to guide control over it. It is often used in hospitals and research institutions to study the brain.

Muse utilizes 7 EEG sensors; 2 on the forehead, 2 behind the ears, and 3 reference sensors. During meditation, brain activity will be monitored and this information is then transmitted to the computer, smartphone or tablet via Bluetooth. The report can then be viewed right after each brain analysis session, showing the brain data. This real-time feedback tells you what is happening in your brain and guides you in achieving peace and calm.

In a way, not only can meditation be more effective with Muse’s guidance, it can also allow one to learn more about their body. Muse also provides guides about sleep, performance, stress reduction and more. Motivational challenges and rewards are also offered to encourage meditation as part of daily routine.

Furthermore, Muse 2, the second version of the first headband, added Photoplethysmography (PPG) and Pulse Oximetry breath and heart sensors on the front, right-hand side of the forehead. PPG is an optical technique that measures blood volume variations. Pulse Oximetry calculates the arterial oxygen saturation in a non-invasive manner. Furthermore, gyroscope (determines orientation) and accelerometer (used to measure non-gravitational acceleration) body sensors can be found behind the ear. The increase in balancing the body and blood flow helps to calm the body easier. On top of that, there is no electrical stimulation.

Muse can detect a range of brain electrical activity and transforms this information into easily understandable experiences for the common masses. Raw brain signals are transformed into many different components such as noise, oscillations, non-periodic characteristics and transient and event-related brain events.

Signal-processing and machine learning techniques are also applied to the brain signal components to control the experience in real time, encouraging more effective feedback for the person meditating.

Convenience of information is also taken into account for with Muse. with MuseDirect available on iOS, it can help to record, visualize and stream EEG and movement sensor data from Muse. This information is retrieved from the raw data and band powers to head movement and rotation. It can be used for neurofeedback, research, art installations, and even education purposes.

Pros & Cons of the Device (Analysis): 

PROS:

  • You can know whenever your mind becomes distracted during a meditation session — Can consciously try to bring your mind back to its calm state from any emergence of unnecessary distraction and improve understanding about your state of mind
  • Impressive Build Quality- Bluetooth, handy, and information can be transmitted over various devices
  • Portable, lightweight and very small
  • Affordable for its function (for a health device that can benefit medically)
  • Not electrically stimulating

CONS:

  • Feedback from veteran meditating users says that the device cannot really distinguish well between a calm mental state and an active mental state
  • Bluetooth connectivity not perfect- connected through wireless to your smartphone.
  • Battery life is not impressive
  • Expensive (high-end headphones price range of $300-ish)
  • Cannot be compared to professional EEG devices (such as hospital ones which cost $10K)

Suggestion for alternate use of the Device and/or modification that would generate a new application, a new artwork, a new design, etc. for the Device: 

An alternate use of the device would be for First Aid and home-medication for people with anxiety issues aka psychological aid.

Anxiety problems is one of the major health concerns that does not always have a medicine. Brainlessly chugging on Xanax is not always going to help especially when the body is starting to be immune to long intakes of such medication.

Having a sister who once had a sort of Autoimmune disease which attacked her brain (anti-NMDA Receptor Encephalitis), it was very difficult to find a way to calm her down during her panic attacks and anxiety syndromes during her recovery phase as her brain receptors had gone wonky. Even if they try to tell themselves not to worry about practically nothing, and to try their best to “calm down”, it almost never really works because the body is not listening to the brain. The whole experience from three years back taught me that Anxiety Issues are a whole new level from physical ailments because it is a mental disturbance, and no one can physically invade the mental and emotional realm if the affected person is not even able to listen and digest anything outside of their own world. It is scary, and having a solution for that would be ideal because it is never easy to find a “solution” to calm someone with anxiety down.

With an upgraded and medically enhanced version of Muse, I believe that it can become a medical aid towards people facing similar issues because Muse can accurately decipher the actual brain state of the patient and pinpoint the issue before giving the right solutions to the patient. This can definitely ease the burden of self-hate from the patient, and also ease the workload of family members and friends who has to take care of these patients.

Another design to upgrade Muse could potentially be an arm-chair version of the device. While massaging armchairs are meant to help the body relax, this experience could be further enhanced if accurate data about how to relax the body is applied to various other parts of the body. While it is obvious that your legs and hands cannot listen to the vocal feedback, Muse Armchair can be modified such that the massage chair applies the right massaging techniques for relaxation right after receiving the real-time feedback from Muse’s physical body analysis.

“CAW CAW” means I like you | Interactive Devices Project 1 1st Sketch & Ideation

Standard

PROJECT BRIEF: 

A major LED manufacturer wants to appeal to the crowd at their upcoming trade shows.

You have to come up with a prototype that will utilize their strips while drawing attention to visitors and triggering ideas to new markets.

Rough Sketch of the Caw Caw Machine

<“CAW CAW” means I like you> (thereafter referred to as the Caw Caw Machine) is a project revolving around the concept of Birds and mating, especially Peacocks. When birds want to mate, they start becoming extra flashy to gain the attention of their female counterparts.

With the brief stating that the device created has to be used to promote the LED lights in upcoming trade shows, what other better way than to flaunt these lights in the flashiest way possible? Like birds and their needs?

The Caw Caw Machine is a belt which has LED light strips (forming a tail) attached to it. When inactive, it will remain unlit, just like a sad and lonely bird who does not have any friends. However, when someone approaches the ultrasonic sensor attached to the belt, the detection will be a replica of a bird being excited and happy that he/she has finally found a new friend and would hence want to attract it. As a result, the tail will open up like a peacock’s tail and the music visualizer will be activated based on the music and start flashing everywhere.

Image result for fat and furry bird mating dance

notice me senpai

This idea can trigger new ideas to the market, such as creating aesthetic devices for other parts of the limbs that can be utilized for light events, parties, and even in clubs. These devices can also be used for performances and aesthetic showcases. The device does not necessarily have to be on a human either; interactive devices with moving LED lights interactions can also be created with this project as a basis, for example for a Chingay Float.

The circuit is made out of three different parts;

  1. Ultrasonic Sensor – This will detect distances. When it detects a certain distance set and below, it will activate the LED Strips and the Servo Motors. When it detects a distance higher than the set distance, the Servo Motors will return to its original position and the Music Visualizer will be deactivated.
  2. Servo Motors – Two of these will be responsible for opening up the tail. Although in theory it should work, but I’m not sure if two Servo Motors can go in opposite directions from the same Arduino…
  3. Music Visualizers with LED Strips – The Music Visualizer will beat accordingly to the tempo of the music like a Madman. Theoretically it should work, but I’m not sure if I can add this to the existing Arduino or whether I need to get an extra power supply..

I would very much have liked to test the whole circuit out (I already arranged it nicely in a way that I think SHOULD work) but after 6 hours of failed attempts in soldering wires to my LED Strips, I kind of gave up for now… I will need to seek further help before I test this theory out again.

Hopefully, I will be able to get everything working on one circuit and one Arduino. Otherwise, I might have to forgo the Music Visualizer portion and focus on making the strips light up and the servo motors to open up only with the use of the Ultrasonic Sensors. Bless my soul.