To view all photos at higher resolution and gifs, please proceed to: https://drive.google.com/open?id=17KCQ7ZUC2A8KgOx18z-wq2roRWGXF5mH


Shao Jie and I initially wanted to come up with an idea that would help someone. Hence after much brainstorming, we decided that the people who needed most help were those were constantly late. We settled on bringing forth a ‘You’re 10 min late already!!!!’ clock.
After our idea pitching, we were told that it was feasible and that we could do up a card board prototype with just 1 hand.
 <gif 1>
Initially the idea was simple, <gif 2>,
all we had to do was code a motor that spins 360 degrees and combine it with another code that moves the motor faster to 90 degrees position when the sensor detects something and moves back when the sensor does not have a reading.
However, we came to realise a lot of problems with this concept.
1. Biggest problem was making the motor spin 360.

2. We wanted for the clock hand to continue moving even when it is moved 15 minutes faster because we wanted it to show the original time when the clock hand reverts back to the original time.
We gave it an extra thought and realise we thinking too much already. We just needed to hack a working clock because it was already moving 360- this would solve the above mentioned problems.
Since at this point we have lessened our load, we decided not to settle and added a buzzer to enhance the user experience.
Materials need for our Micro Project 4:
1. 11 cable ties
2. 1 ultrasonic distance sensor
3. 1 Arduino Uno
4. 1 servor motor
5. 1 1000ohms resistor
6. 1 buzzer


Process of coding:
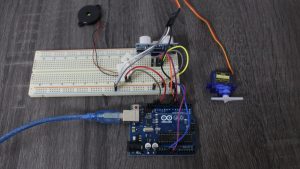
First, we learnt how to code on using a ultrasonic sensor to control a servo motor.

Initial code taken from the internet, the video above, to control the servo motor using ultrasonic sensor.

Code modified to the pins that we connected our sensors and motors to. Problem was that the distance we changed for the sensor to detect was not what we wanted and the servo motor rotated anti clockwise instead of clockwise like a handle of a clock would.

Here we changed the distance at which the ultrasonic sensor will sense a movement as well as changing the rotation of the servo motor to clockwise.

Next we added a delay of 0.3 seconds because due to the ultrasonic sensitivity, the servo motor keeps flickering, random movements/ rotations. The delay solves this issue and stabilises the flickering.
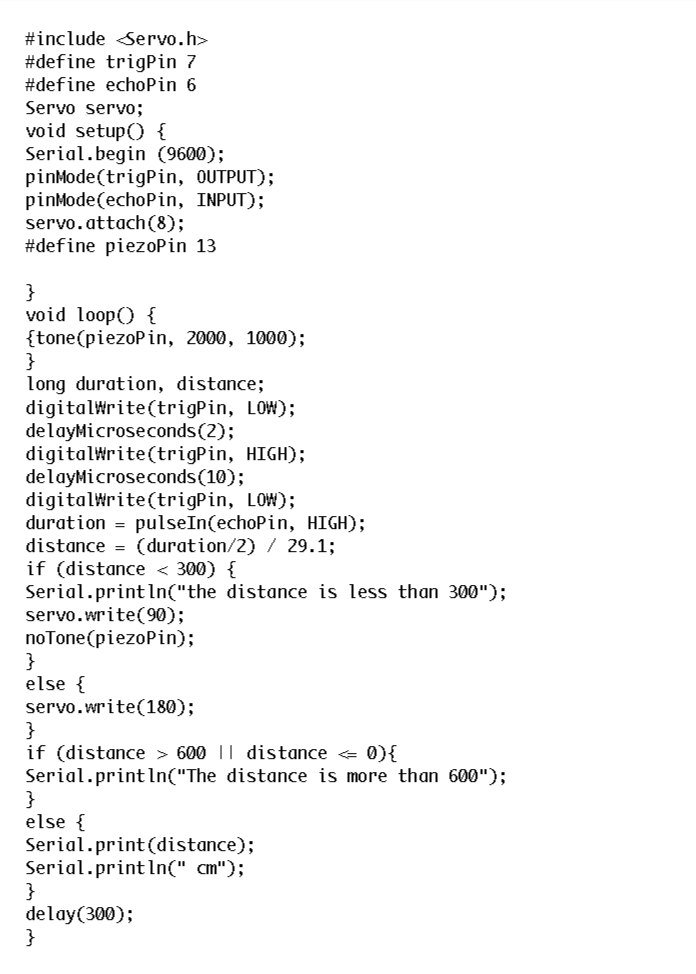
Finally, we added the code for the alarm to alarm when a movement is detected, i.e. the user stands in front of the clock.
Construction:
Materials needed:
1. Another cereal box
2. A lot of masking tap
3. Glue gun


- Cut a square hole for the face of the clock to be stuck into
- Cut 2 circle holes for the sensor to be fitted into
- Stick the bread board to the side panel of the cereal box
- Glue gun the blade of the motor to the gear of the clock
- Ensure the body of the motor is fastened down so only the blade moves
- Seal the box and do minor adjustments in the box to position the other components comfortably
- Insert a portable charger to make it portable
Viola!


Video responses + clock working in-situ:
Reflection:
Dan
- The sensitivity of the clock was the least expected for me personally. In my head, in theory, it sounded right and I never took the element of ‘sensitivity’ ever into consideration. Hence, when the hand started flickering when theres even a slight movement, I panicked. The delay was actually started by another of our friend Rui Hong because we never thought about it and we were kind of stuck at that point.
- The participants were actually kind of confused and I am guessing it is because on a normal basis, you just wouldn’t interact with a clock- its just a mere looking at the clock. However, I also noted that because the sensors actually was visible, people started to reach their hands out towards the sensor. When the hands of the clock started to move, then people were surprised. Most were also confused how we made it. Upon revealing, it took most by surprise at the relatively easy set-up.
- The biggest challenge initially was trying to code an analog clock, especially since most Arduino clocks out there are digital, and made even more challenging when we had the special feature. We also didn’t even have a basis to start with since the motors we had could only go 180 degrees. We eventually overcame that but going back to our original draft and brainstorming again. Next time, we are going to spend more time to develop and come out with a concrete plan before diving heads down first.Personally, I feel the flickering problem could be rectified further if we actually used an IR sensor which I only came to find out after Micro-Project 4. IR sensor, sensing whether someone is there or not, versus an ultrasonic sensor, sensing how far a person is, would help to reduce the varying results and hence the flickering of the hand of the clock.If we really had additional time, maybe we could have an interesting audio module, like a ISD1820 instead of just a buzzer, to further enhance the ‘stress’ factor.
Shaojie
- Our Final Disobedient Object behaves in the way we intended it too, to alarm and to move forward 10mins when it detects someone looking at it by standing infant of it. During the process of making it, it certainly behaved in the way we least expected it to be. The first was actually the servo motor rotating anti-clockwise instead of clockwise like a clock because the code we found on the internet for rotating servo motor using ultrasonic sensor was {servo.write(90);} else {servo.write(0)}. To solve this issue, we needed to understand the whole code before changing the code {servo.write(90);} else {servo.write(180)} to rotate the servo motor clockwise. Also, because the ultrasonic sensor is very sensitive, the servo motor keeps flickering. To solve this, we added a delay and tested out different delay time to best suit our clock which is {{delay(30);}. Besides this, we modified the code to include the alarm as well.
2. From their reaction, our participants were generally intrigued by our object both the concept and the making. They wondered how it was made and were surprised about how we attached the servo motor to the clock.
3. First problem surfaced when we wanted to make the whole object from scratch, using just Arduino and motors instead of having an existing clock. There were difficulty finding a code for using servo motor to make an analog clock as a servo motor can only rotate 180 degrees and not continuous 360 degree. For this we wanted to but another motor but realised we could just buy an existing clock and hack it which will be so much easier to achieve the same results. Hence we scrapped the making the clock part and since we only needed the motor to move about 15 degrees clockwise and anti clockwise, we still can use the existing servo motor instead of buying another. Other problems that surfaced during the process are in 1. which leads to the object not behaving the way we intended. A thing to improve will be the finishing if we were to continue building upon it but since it’s a prototype, cardboard will suffice.