Research Critique: Second Front

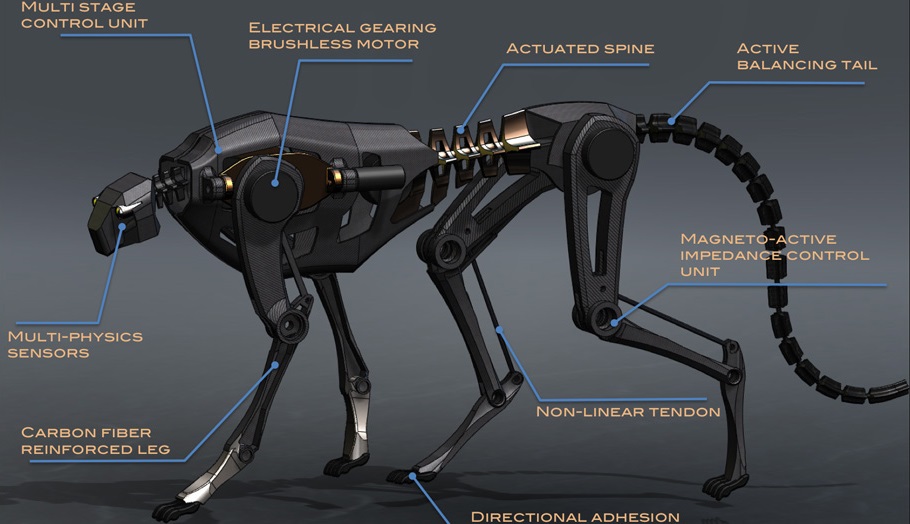
The Second Front performance was extraordinary and unlike anything that we’ve experience in internet art and culture, the performance is entirely within a virtual world(third space) where what was common in the Second Life was totally impossible in the real world that we live in(like physics and such).

To be really frank, I started the research about Second Front by reading the Assignment Post and watching the two video over there, IT MADE EXACTLY ZERO SENSE TO ME, I am like..

WHAT THE SHH IS HAPPENING? WHY DID THEY USE THE HELICOPTER WHEN THE BANK IS RIGHT BELOW THE MANSION? WHY DID THEY SIT ON THE MISSILE HAPPILY? WHERE DID THE MISSILE EVEN COME FROM? WHAT IS THIS FLOATING BALLET DANCER THING?  WHAT IS HAPPENING??
WHHHHHHHYYYYYYYYYYYYYYY~~~~~~~~?

A good piece of art gives you a sense of wonder but a piece of astonishing art make us feel foolish” but I felt really stupid after watching both of the video, because I must be too slow to not get the meaning/message of them. So I carried on in the researches by starting to understand what exactly Second Life is….

Wait… This Second Life is actually a really interesting “Game” that have no boundaries or whatsoever. Users could create their game character anyhow they want, make their character to do anything, build all sorts of structures and items in the game and there are even user using Second Life to raise funds for real life volunteer funding which I think is such a good use of third space as a medium to solve problem in the third world! 


Back to the topic of the work of Second Front

I think what Second Front was doing was really amazing as they are all from different country and meeting, planning and executing the performance in the third space while transcending any laws(physic or social) which is only possible in the third space, Grand Theft Avatar felt like a piece that was drove by the inner desire of human, it started with the characters in the “Evil Genius Mansion” with the dramatic music and I think this is a reflection of us dreaming to be a badass in some point of our life like having super power- able to fly, super strength etc. and in the Grand Theft Avatar scenario, they are the “Rich Evil Genius”(rich because of the helicopter which is totally unnecessary) whom disguise themselves to rob the bank with the “Genius brain” that could unlock the safe to take all the Lindens in there, annnnnnnddddd *Plot Twist* they are trying to portray that they are not evil at all but rather acting as the Robin Hood who steals from the rich and “Give” it to the poor as we can see that the money is all scattered from the helicopter soon after they take flight but if it was the money they were after, scattering the money will be the last thing they do.

I really admire that Second Front is an adult group who are really childish(Just to clarify, being childish is a good thing, like child in their heart still survived) and they could make such wonderful performance in Second Life, when I was much younger, I was a gamer who did things which were really similar to the what Second Front were doing but on a much smaller scale, I remembered that I made my friends to wear a set of costumes in the Massive Multiplayer Online Role Playing Game (MMORPG) called MapleSea but in a private server, we dressed up as the Meso Ranger and went around helping(Disturbing) people.

It was fun to be “Someone else” other than the normal character we used in the game and doing something we normally wouldn’t do with the disguise on, this was exactly what Second Front had done in the Grand Theft Avatar.

I would like to quote Alise Iborg  when asked question about the rehearsal vs Improvisation in their work:

If it is better improvised we will probably do that. Each has its advantages and disadvantages.

With prerecorded performances, we can fine tune and edit out things we don’t want the audience to see. But with improvised performances, the work takes on a life of its own fueled by the creative energy of our players which really shows through.
Also, many times, it’s the surprises and unintended actions that make the work really come alive!

Isn’t this exactly what we learnt in this module? “Also, many times, it’s the surprise and unintended actions that make the work really come alive!”. Alise Iborg is more likely to have an improvised performance than a prerecorded one (its kind of paradoxical as their work was prerecorded and edited, but the content in it seemed really organic and improvised) and this is the spirit of having a performance(live or not) and if we embrace and accept the possibility that things will not go as planned or even planned to have the unplanned happenings, it would make organic pieces which unique and flavorful due to the shift against logical interpretations.

Afterall, Second Front is having fun making these artwork which some were funny, some were totally illogical, but the main thing which we all can learn is to have fun in the process is more important than having the perfect end result, I am sure Second Front laughed out loud when they were executing their pieces while they were like “FLYYY!! MAKE MORE OF THEM FLYYY!!! HAHAHAHAHAHAHAHAHAHAHAHAHAHAHAH!!!!”


Co-Broadcasting Experience and Thoughts.

This Co-Broadcasting thing is definitely new to all of us!
the best part of the co-stream is that we can communicate to each other with very little lag between in comparison to the usual broadcast where there will be atleast 7 seconds with optimal connections. Co-Broadcasting could possibly be used in our final project as our idea for the final project is to go through the barrier of the broadcase and “appear” on the other side of the stream. When doing our two occasion in the Co-Broadcasting, we’ve got some interesting shots and we tried to build towards our final project.

Co-Broadcasting 1:

Posted by Su Hwee Lim on Thursday, 12 October 2017


Co-Broadcasting 2:

Costream test 2 Su Hwee Lim

Posted by ZiFeng Ong on Wednesday, 18 October 2017


This is really interesting as I am shooting SuHwee while she was shooting someone else. it feel like a real time behind of the scene, and SuHwee followed my hand sign in this and it gets really confusing that whose hand is that?


Tiffany doing her dance and we somewhat tried to learn afterwards and I zero talent in dancing. also, there is a minuscule lag over here.


This is a take from our second co-Broadcasting which we focused on testing for Final project. we did the face merge thing like in the adobe connect.


Since we have the same object, we decided to use it as our advantage and “pass” to the other person and merge it on screen so it appeared to connect in the split of the screen.


Another Adobe Connect trick, so now our body parts are not limited to spatial restriction and can travel through the third space. (somewhat)


This is my favourite part of the whole stream. it looks really good as all the detail matches up, even the hands in the watch are the same(of course, its live at the same time).


and we tried to synchronize our movement which is REALLLYYY difficult.


Lastly, as Makoto suggested, the side profile it kind of difficult but it is really interesting if we can get it to synchronize and turn our face. Which we did and had a relative success 


Some Observation I’ve made in the two broadcast.

1 – The lighting is really important, in our first stream, the both video seemed really nice next to each other, but in our second stream, as the lighting is different, it is very difficult for the viewer to believe that we passed the item over since the lighting is way off even when it is the same thing. Like Bao and Makoto’s co-broadcasting, since it was taken in the afternoon, it look really nice because they have similar lighting.

2 – There needs to be communication between both of the broadcasters so that we can coordinate our actions better be simple thing like a count down but we need to think of a way to remove the countdown.

3 – if we want to pass thing over or anything that require the use of the split, we must do it so so both of the broadcaster can slowly merge the object on the split.


Overall, there must be more testing for us to fine tune our actions and the difficulty level will be much higher if there are 4 broadcaster at the same time. Maybe one way is that we can use the co-broadcast as a communication tool instead of the final piece so we will have two phone each, both phone broadcasting at the same time while one is in the co-broadcasting mode and another is on the normal broadcasting mode so that we could communicate through the co-broadcast live.

Interactive Devices Final Project: Obsoleting Instruments Process 2.

After the last post where I’m almost done with the laser reader and there are still improvements to be made to it, but I will focus on other component and will come back to make it sound nicer if I still have time, for now, I need to slowly build towards the completion of Obsoleting Instruments first… I will need to a way to feed the music sheet into the laser at a constant speed, so after some research and thinking, I could use DC motors with gear box that drives the music sheet through a belt

system, so, with that in mind, I purchased some special rubberbands and the belt driver thing, as well as some gears and shafts and the plastic DIY construction pieces to test it out.

First, Since I’ve got the Landline Telephone, i need to clear the little plastic pieces inside to make room for all my components, and I thought it would be a simple task, but MANNNNNN ITS SOOOO INTENSIVE(because i dont have a proper tool to do it)

Theres a Chinese saying “Small knife cuts huge tree” its a torture and yet quite satisfying for me.

its like the loding screen, I can see the final point when doing it, so the hole need to go 1 round. and my finger hurts.


This thing tortured me, I tortured it back. Fair Game.

Slowly, i manage to cut all protruding parts except for the two longest one as i still need to close the top back and secure it.

and then put the belt and the belt wheel to check the distance required to have the just right tension as too tight it will not spin well and too loose it will come off easily.

I tried placing then together so they could sandwich the music sheet, but this is too near and it wont work well

and if I use a gear system, I could do more of the thing, but still need to consider about it.

After I got the usable distance, I proceed to 3D modeling the parts that is required.

The initial concept of the belt system. I know its abit overkill but.. I dont know where will it fail so I decided to give the music sheet full support, also, this was measured according to the belt length, Motor dimensions, phone dimensions, laser dimensions and the music sheet dimension to make sure they all fits. The complex base plate is to enable me to insert the belt after assembly.


I placed some holes to save some material and reduce printing time.

Then split the base into two part so that I can work on half and combine them later, I think it woule be much easier for me this way.. (And I dont have to print 6 hours just for the base.


It worked really well, but there is only one problem, my top cover of the phone could not close as it is slanted, so I have to shift the whole plate to the back, or place the top belt about 40% inwards but I cant just shift both belt wheel as there will be the laser reader there. so…

I will settle on my 6th one for now, since this is only half of the system, I need to get my music sheet up first for me to test the speed of the motor with this system since if half doesn’t work, nothing can work.


Pew Pew PEW. look at dem laZEERRRRR


I supposed it will work if i attach the motors to it. will upload another post once I’ve Progressed more.

ROBOTICS COMPONENTS!! CHEAP CHEAP! COME COME!

First, you will need an EZbuy account, it will be really worth it. Best part, they have collection point from Canteen 2 in NTU!!

Buying from Taobao /EZbuy won’t guarantee the quality, occasionally  will you receive item that doesn’t work but they are CONFIRM 3X to 10X cheaper than Simlim Tower.

Waiting time is anywhere from 5days to 3 week (5 days only if you are really lucky that the seller send your order out the same day and it finished inspection the next day in EZbuy warehouse PLUS you used Express shipping which is $2.99 per 500 gram) if you are REALLY UNLUCKY that the seller gone MIA after you purchase, good luck, but that shouldn’t happen with the link I gave as I bought from them and all is good.


Tutorial here for those who don’t know how EZ buy works,

PCA9685 Motor Driver  <—– CLICK HERE


MG945, MG946R, MG995, MG996R(Get the 996R, I think its the best out of the 4 from some forum I read, but not very sure.) waterproof servo and 30kg servo, I dont’t know how well they work. <—– CLICK HERE

SG5010 Servo They are 180 Degree by default & they are similar to the one above, but with plastic gears which made it lighter and cheaper but don’t last long<—– CLICK HERE 


SG90S, Much Stronger version of the small servo in the Arduino kit & this 1 have all metal gears, but WAY WEAKER than the 2 above <—– CLICK HERE

Arduino Uno Clone. working good with more pins available for soldering  <—– CLICK HERE

ESP32, runs Arduino code and with built-in WIFI and BLUETOOTH  <—– CLICK HERE

Wemos D1, work exactly like Arduino Uno, but with Built-in WIFI <—– CLICK HERE

Lots of plastic gears, metal rods, rubber band belt drive <—– CLICK HERE


Have fun shopping!!

Robotic – Final Project Prototype Part 3 – Understanding the Motors and Power Supply.

For weeks, I’d been thinking that my code was wrong hence I cant move more than 2 motor at the same time or it will corrupt the system….

And in the end, it wasnt my code, as I was using PCA9685 which is a servo driver which I bought online and thought that I could control 16 motors at the same time, Yes, it could and the code can work.. the problem is the power supply. NEVER HAVE A SERVO DRIVER’S MOTOR POWER SUPPLY POWERED STRAIGHT FROM THE ARDUINO!

I finally found out today that was the main reason, when the motor drains too much of the Arduino’s power, it will brownout, causing erratic behaviors in the motors which was my main problem up till now, so instead of limiting myself to code up to two motors to move at the same time, I could potentially move all 16 motors just by finding another power supply.


15:15- 16:10


My Brownout will occur when I run 4 servo at the same time, so 3 servo running simultaneously is the maximum for my current power supply, There are ways which I could solve this problem.

  1. Using a battery which could supply 6V power at 10A or more, after my research, battery are rarely rated at 6V and 10A is just too much for a battery, even if they do, it will drain the battery out really fast unless I am using a HUGE car battery on 12V and step down the supply using a Voltage Regulator.
  2. Using Multiple battery at 5 V or 6V and parallel them to increase their current, since this will be the most expensive out of all option, the only way possible to get this done is to series 4xAA battery and parallel multiple group of 4xAA to create a powerbank, the downside of this will be the voltage drop overtime due to lesser power in the battery.
  3. Using a power adapter with the 5V or 6V at 10A, and this will probably be more feasible due to the availability of 10A power adapter in the market, or I could use a 12V 10A power adapter along with a Voltage Regulator and step down it to 6V. I think this will be relatively doable because it will have a stable supply and I do not have to worry about recharging my battery, moreover, I might be able to supply power to my Arduino at the same time too.
In conclusion

I will try to find suitable power adapter along with voltage regulator, if this still don’t work as well as i thought it would work, I probably can use a capacitor to increase the current rating(I am still not sure how does this work, but I’ll figure out)

Robotic – Final Project Prototype Part 2 – Compacting Mechanical Systems.

After the Study model of the last part, where I stopped at the lever system and realize that it is not as strong as it should be, my improved method is to use 2 servo to do the same action, After a long time trying, I found out that the overall height of the servo will still be as high and as big as a standard MG 966R servo motor, and the MG966R will provide significantly higher torque than 2x SG90 at roughly the same height.

So my new solution to this is to use the heavier and stronger MG966R as the feet motor. Since they are relative big, I need a system to fully utilize the height and the movement of motors to make it as compact as possible. Since the center of the turtle shell is usually the tallest part, it make sense to stack the first rotating joint (the shoulder) above each other to greatly reduce the total size of the turtle by making it slightly taller.

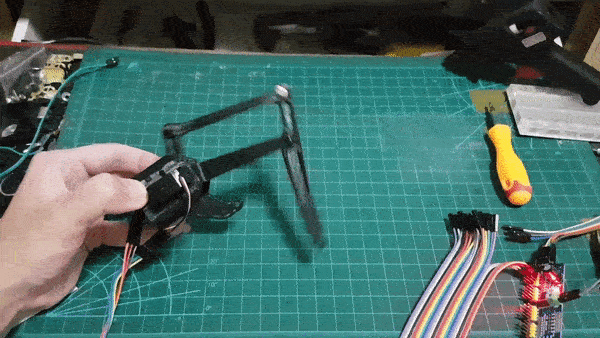
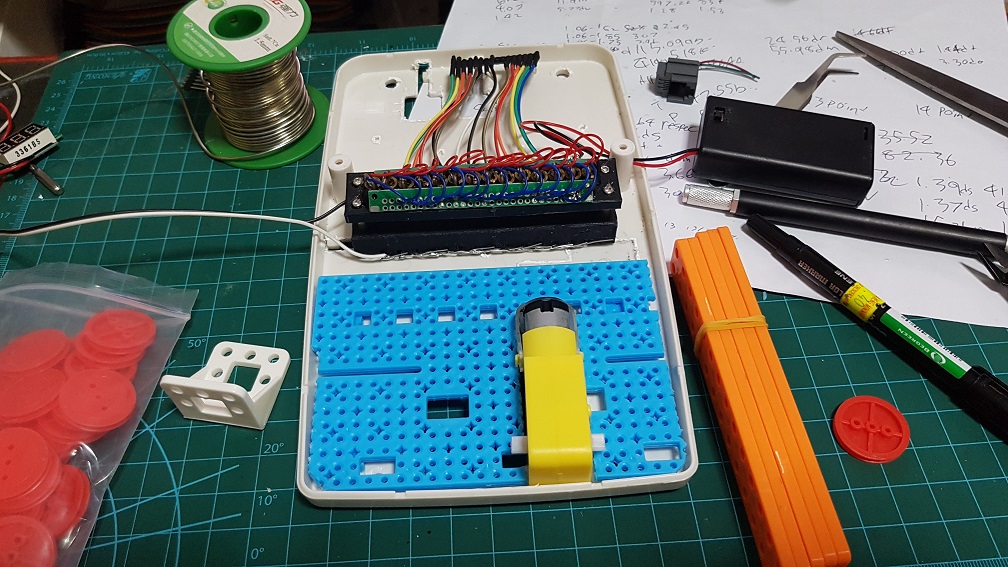
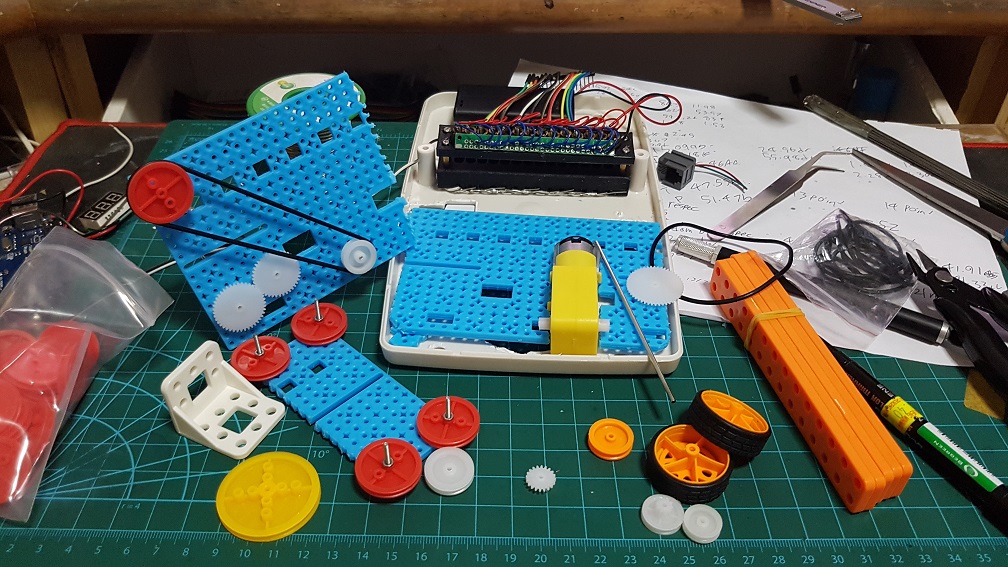
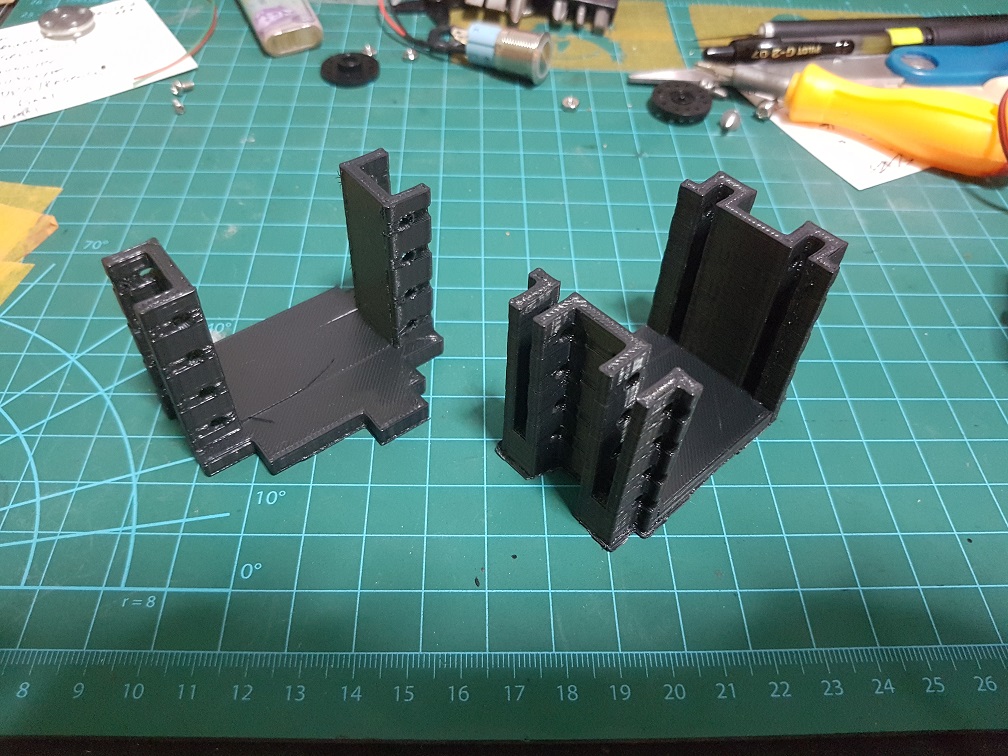
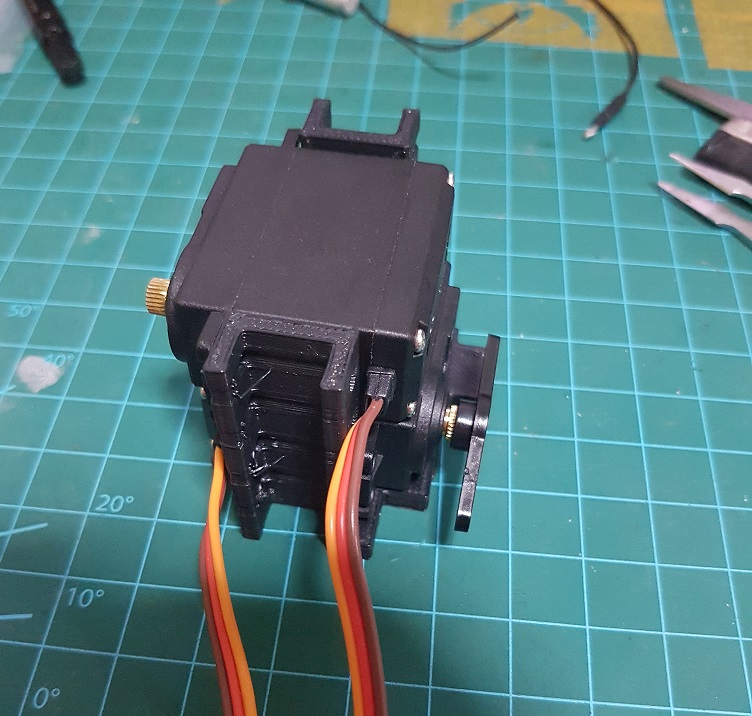
Prototype of stacking the Shoulder motors, I’ve realized that the left motor should be at the bottom and right motor should be at the top as one will spin clock wise and other will spin counter clockwise to make it the same height when their pivot are not centralized.


Improved prototype of the system which reduces the shakiness of the Shoulder Motor(which is important as Shoulder is the first joint, if this vibrates, it will be amplified become very obvious in the feet.)

Un-centralized joint of the Shoulder Motor to Arm connector will result in centralized and same height of both left and right arm when in horizontal(walking) and vertical(back in shell) even when the shoulder motor are stacked(different height). Look at the green dot which is where the center of arm motor going to be.


after countless of testing to get the perfect balance of height in horizontal and vertical, this system should be able to progress into what I will use in the final, there are still improvements to be made in the base height of the Shoulder Motor as when the Arm spins, it will still touch the ground.

for now, it probably can walk and hide like this..

Next up is to further refine this system and find the suitable system for the Elbow joint.


Interactive Devices Final Project: Obsoleting Instruments Concept.

The speed of our advancing technology and the technology that is getting obsolete are on the same pace, 15 years ago, we were using Floppy Disks, 10 years ago, we were still using Compact Discs and the millennials now does not know what a Floppy Disk is. We still see CDs now but they are getting obsolete really soon as there are lesser devices playing them now.

Choosing of the Best Appliances.

For this project, I want to give new life to daily objects which are on the path of becoming obsolete by making them a musical instrument, there are many common appliances that are in this category and should be ancient in a few years time –

VCR
CRT TV( Cathode Ray Tube or also known as the old Fat TV)”
Remote Controllers
CD and all devices which plays them
MP3 Player
Old Gaming Console
Top Loading Washing Machine
Landline Telephone
Fax Machine
Public Payphones
Answering Machine
Slide Projector
Dial-up Modem
Basic Alarm System
GPS Units

Bold are appliances which are totally possible for this project since I want to make musical instrument and they naturally produces sound in their normal usage context.

Green are appliances which are Bold and their normal usage context have the interactions when the user use them, which make them exactly what I could use for INTERACTIVE DEVICES.

Image result for old gaming consoles

Since the signification of a Gaming Console is different for every individual, people plays different consoles and different game or not at all, it is difficult for me to create something that all the end user(during the End Of Year Show) will resonate with.

Image result for landline phone
The best of all will be the Landline Telephone as I am sure that most of the end user will have some interaction with it some point in their life and the basic function of a Landline Telephone is to receive a call or to make a call, this resulted in almost the same user interaction throughout the globe – making a call or when the Phone Ring = Pick up.


And the Instrument that I have in mind…

After my researches on musical instruments,
I’ve decided to use the musical box concept where the user could play music by inserting a sheet of musical notes and it will play music digitally.

This could be done by using a set of lasers and photo resistors to read the musical notes on a clear piece of plastic scrolling through the system.

There are 14 sets of Laser and Diodes due to the research I had done on music theory(not posted yet as it is still an ongoing research) whereas there are 8 notes in an octave but only 7 different notes in an octave C D E F G A B C, so by placing 2 octave next to each other, there will be 14 white keys C D E F G A B C D E F G A B as I chose to omit the last C so that it looks visually completed from the looks of piano keys.

And what about the black keys? since I don’t want to add in 10 keys for the major and minor (black), I could use a combination of the adjacent white key to produce the sound of a major and minor. For example if I want the C♯(D♭) key, I could have CD shaded at the same time to produce a C♯(D♭) sound.

Flow of usage

  1. The phone will look like a normal phone with an exception of a slot to insert the musical sheet into the system in the body of the phone.
  2. Nothing can be done when the phone does not ring or the user does not make a call.
  3. Scenario 1 – Phone Ring -> User pick up phone -> voice command user to insert the music sheet -> User insert music sheet -> the phone pull the music sheet -> User listen to the music.
  4. Scenario 2 – Phone does not ring -> User Pick up the phone -> User hear the *toot toot toot* tone of the land line phone -> User dial some number on the number pad -> User hear the tone of an outgoing call -> Voice command user to insert music sheet -> user insert music sheet -> phone pull the music sheet -> User listen to music.


Robotics – Biologically Inspired Robots: Research part 1

What is Biological Inspired robots? First lets break the words into pieces.
Biology – The natural science of studying Life and Living Organism.
Robots – A machine capable of carrying out a complex series of actions automatically.
we could see that the Robotic studies has a lot to learn from the Biological side as most of the nature elements are refined through the years and it should be one of the most efficient way of doing things.

There are 2 methods from nature where robotic could potentially learn from which are

  • Imitating mechanisms found in nature (velcro)
  • Studying organizational principles from the social behavior of organisms(Swarming)

Imitating mechanisms found in nature

Bionics/Bio-mimicry(biomimetics)

In robotics, bionics and biomimetics are used to apply the way animals move to the design of robots. Bionic Kangaroo  by Festo was based on the movements and physiology of kangaroos and one of the most well known Bio-mimicry of a bird was by Flying Machine by Leonardo Da VinciImage result for leonardo flying machine

There are many different variation of the bionics which replaces missing human limbs and they try to make it as close as the real ones, by producing a joint at where a joint should be, and although it might take awhile to get used to it, the technology is getting better over time and we are starting to go past the “Replacement of missing limbs” to “Enhancing human parts” since some of the Bionics worked better than our current limbs. *360 rotation of all joint? count me in.

This really inspired my projects in the turtle idea the spot is also an quad-pedal robot and I really love how it moves, maybe I could incorporate the idea of it into the turtle.

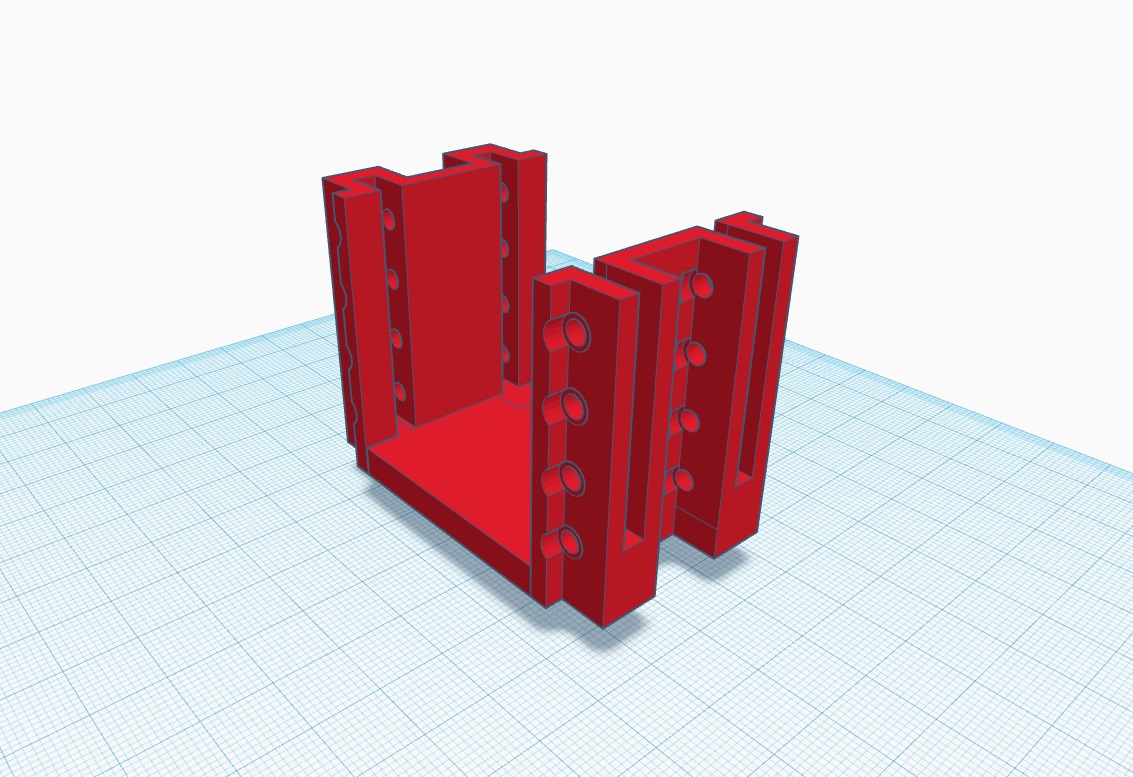
Notice how it move 1 foot at a time when turning and how it walks.


Studying organizational principles from the social behaviour of organisms

From the behaviors of ants, one ant may not be much and does not do much, with simple rules given to each type of ants, a society of ants will be able to do so much more and is really efficient. Hence on the idea of collective artificial intelligence in swarming in ants, fishes or birds, we could see the potential by using swarming in robotics by using local rules and global behaviors could allow us to scale the robotic ability into a scale unimaginable to us. 10 swarming robots could work, but 10 thousands swarming can do so much more, each individual robots just have to know where its immediate neighbors are.

The studying of insects like ants could really benefit the field of science and robotics.

This remind me of something that is in Big Heroes 6

Inspiration from this?
ANTS.
DEFINITELY ANTS.

I’ll end this part of research here and if I have anything more to add, I will add them in another part afterwards.


Interactive Devices – Device of the week 3: Electric Paint Lamp Kit

Conductive paint had been here for some time and the application for seemed to be really a next level to interactive devices. This is an example of the usage of a conductive paint, Electric Paint Lamp Kit.

The Conductive Paint Lamp Kit is a simple product which springs from the novelty of Conductive Paint and what made it so special is that it is the most basic element of any circuits- forming connections between parts. With conductive paint, we could form electric circuits on any paintable surface which means the possibilities are only restricted by the surface and our imagination, In the Lamp Kit, it uses only simple Light up board, some printed paper and Conductive Paint in different combination to form 3 different variation of lamp, if we were to use other modules of sensors or output, I am sure that it would be really fun to play with these.

Like for example, if we were to use projections on top of the conductive paint on a wall, it would be like so.

This is definitely an interesting project to be done and would be possible for us to complete with our current knowledge after some explorations.

Another project which latches on the idea on a set of more advanced conductive paint is this, the Electroluminescent (EL) Device.

The Electroluminescent Strips could be created by using a few layers of different paints.

and how to create that exactly could be found here:

In Conclusion

The element of interaction within the Lamp kit not only acts like a Lamp, it is also a DIY kit which the user would participate in making it into a final product which gives the user a sense of involvement and increase their liking on the product as it was made by them. Maybe I could incorporate this idea of involvement into my final project where the users could create something that runs in the system which I created.

Also, Conductive Paint seemed really interesting to play with it and the potential of it is endless, we should be able to see better Conductive Paint and Conductive Paint Projects in the market really soon and I probably will purchase one to play with and maybe make it into a project or something.


Robotic – Final Project Ideas, Researches and Prototypes.

A Continuation from the previous Idea and Research, Part 1 where I wanted to do an Animatronic Turtle.

The Difference between a Turtle and a Tortoise is that all Tortoises are turtle and not all turtles are tortoise. Generally, Tortoise live on land and turtle lives in water most of the time, with exceptions which I’ll not go into. However in my Project, I’ve decided to use “Turtle” as I simply prefer the sound of Turtle more than Tortoise.

First thing.

How do Turtle/Tortoise walk?

Tortoise are cute! and the way they walk naturally are quite robotic =D

the “Hand” are much longer and the “feet” are much shorter in comparison. 
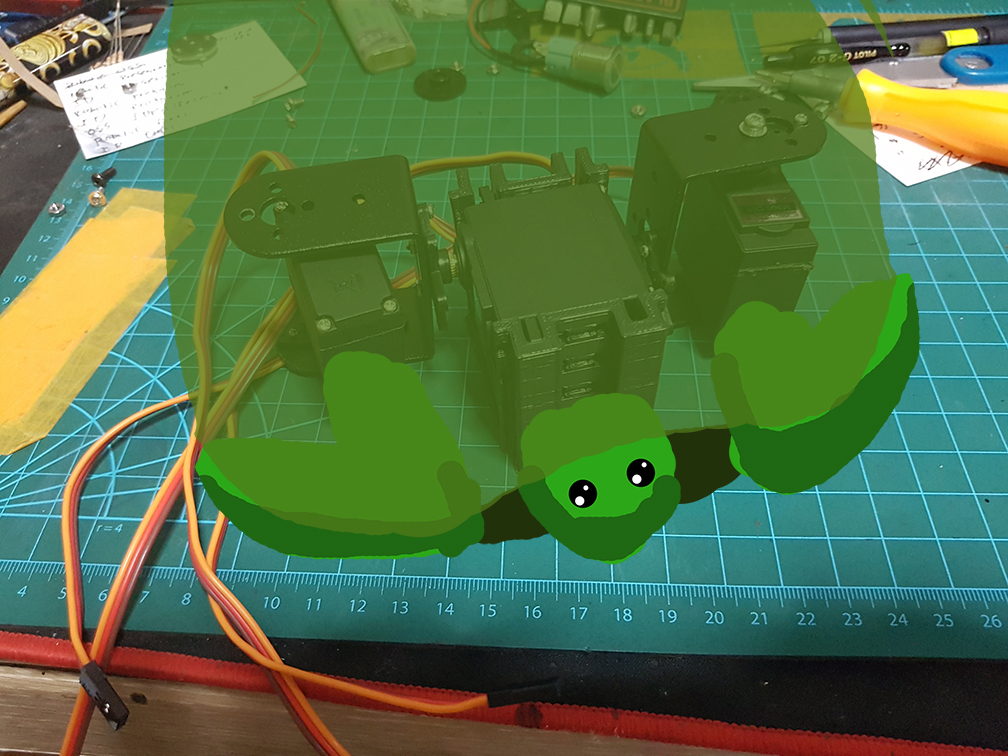
This is how a Tortoise retract its head, by bending its “neck” inwards. maybe I could emulate this.


29:43 – 30:20 where they talk about the locomotion of the tortoises

I could use a lever system to move the front and back legs so that I could use smaller motor and all 3 motor placed in the shell so the overall weight of the feet will be greatly reduced to allow me to use smaller/weaker motors.

From my research I’ve done and found this EEZYbotARM on Thingiverse which I could use it to study the mechanics I could potentially use in the feet of the Turtle.

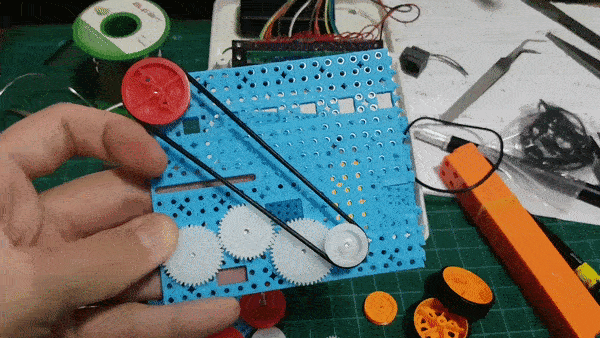
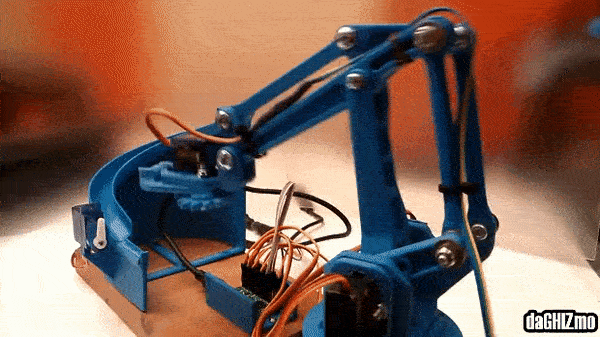
The two motor is at the base of the mechanical arm(Typebot), in comparison to our typebot, 
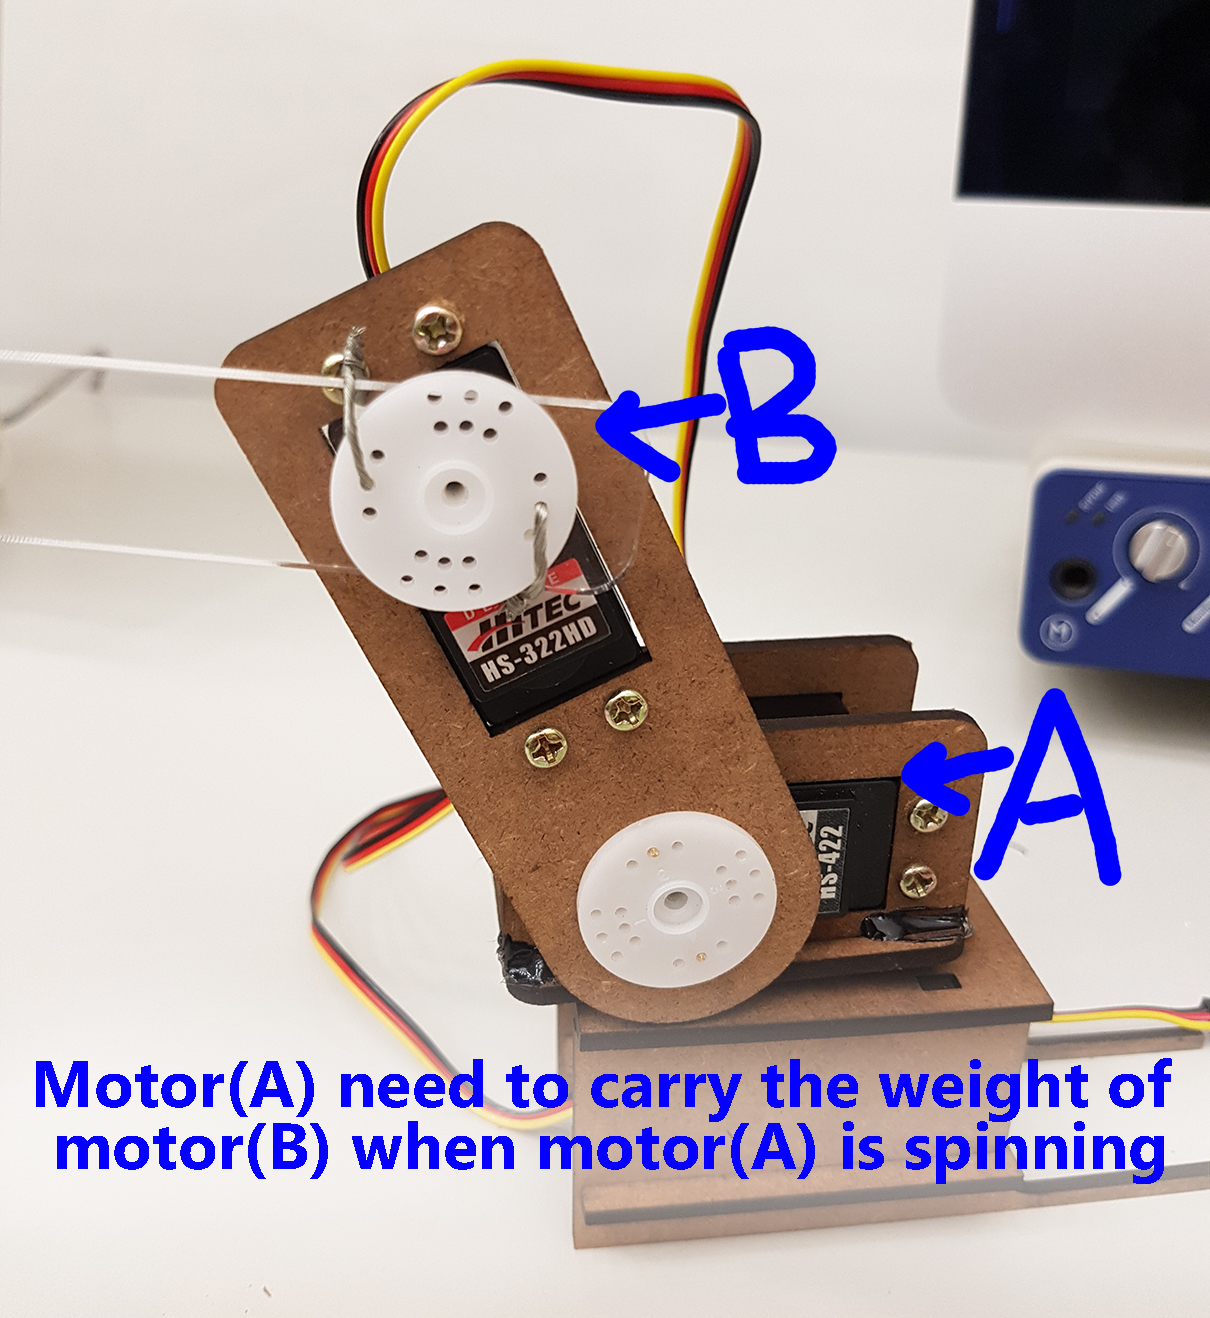
This Typebot system is less efficient unless the torque of the motor far exceed the weight of the system and only a when there is a short (A) to (B) distance(longer fulcrum, more torque needed to turn it)

So to understand how fully it works and if there are any restrictions to this lever system, the best way is to having a study model to study how I could incorporate it into my Turtle. I also purchased a few servo few weeks ago and they also arrived so I used them in the study model.

The movement is really smooth and the movement coverage is definitely good enough for my turtle, However this system could barely carry its own weight as the base is relatively heavy, this Lever system could work great as a Type bot kind of project because doesn’t need to carry the base of the robotic arm, in my opinion, this probably wont work in my Turtle since each leg will still carry its motor weight because they are all in the shell, so having Motor(A) not carrying Motor(B) is of less importance since Motor(A) and Motor(B) will ultimately carry the weight of (A)+(B)+the mount+components+the shell in the end.

In Conclusion

I’ll need to find a more efficient system or use a bigger motor to do the work of lifting everything in the shell along with the motors and still able to cover the movements. Now my main concern will be

Weight of motor VS its Torque
Size of Motor (slightly bigger motor will result in MUCH BIGGER TURTLE which I’ll try to avoid as I wanted a COMPACT turtle, not a monster.)
Movements of motor especially within the shell.