Introducing my 4 main characters and user persona for my couch potato support group kit!

From left to right, we have Bludger Bob, Shortcut Sarah, Deadbeat Danny and Loafer Laura! 🙂

Photoshop mock ups and items

Box design of the kit!

A welcome card upon opening the kit!

Deadbeat Danny energy drink and convenient pee bottle!

Loafer Laura’s personalised sleeping eye mask!

Bludger Bob’s high cut socks he can wear to and fro from work and to work without ever changing!

Ankle socks are available too if Bludger Bob has a preference

Cup noodles for Shortcut Sarah in the kit so she would never ever have to cook again!


Reflection Post:

Through this semester in Illustration for Designers, I am glad to know that I have progressed as an artist as well as an individual in this module.

I started off with an art direction that I am very familiar with and branched out slowly to other methodologies and art styles I wanted to experiment with. Though my progress is slow, I am very proud to have tried something new to me instead of sticking with something I am very familiar with. For instance, task 2’s editorial illustration which I explored a clean layering kind of art style; and for task 3, illustrating using minimal colour pallete and a quirky hand drawn art style. Both of which I used a Wacom tablet to illustrate which is something I don’t do often. Having Ms Lisa’s guidance and our lovely classmate’s comments and feedback, it made the learning and exploring process less daunting.

The lessons I felt were the most valuable and new to me are the idea brainstorming ones. Through the activities in class, I have learnt new ways to generate creative ideas and that ideas are not a one off thing, but something that can be built on and generated with inspirations all around us. I really liked the use of creating a user persona as my potential target audience and how to create an effective mood board.

Thank you everyone for the lovely time in this elective! I had a great time and I hope you guys too! ;D


Click the link below to see the process work that goes behind the making of these items!

DV2002: Assessment #3 – Applied Illustration (Process)


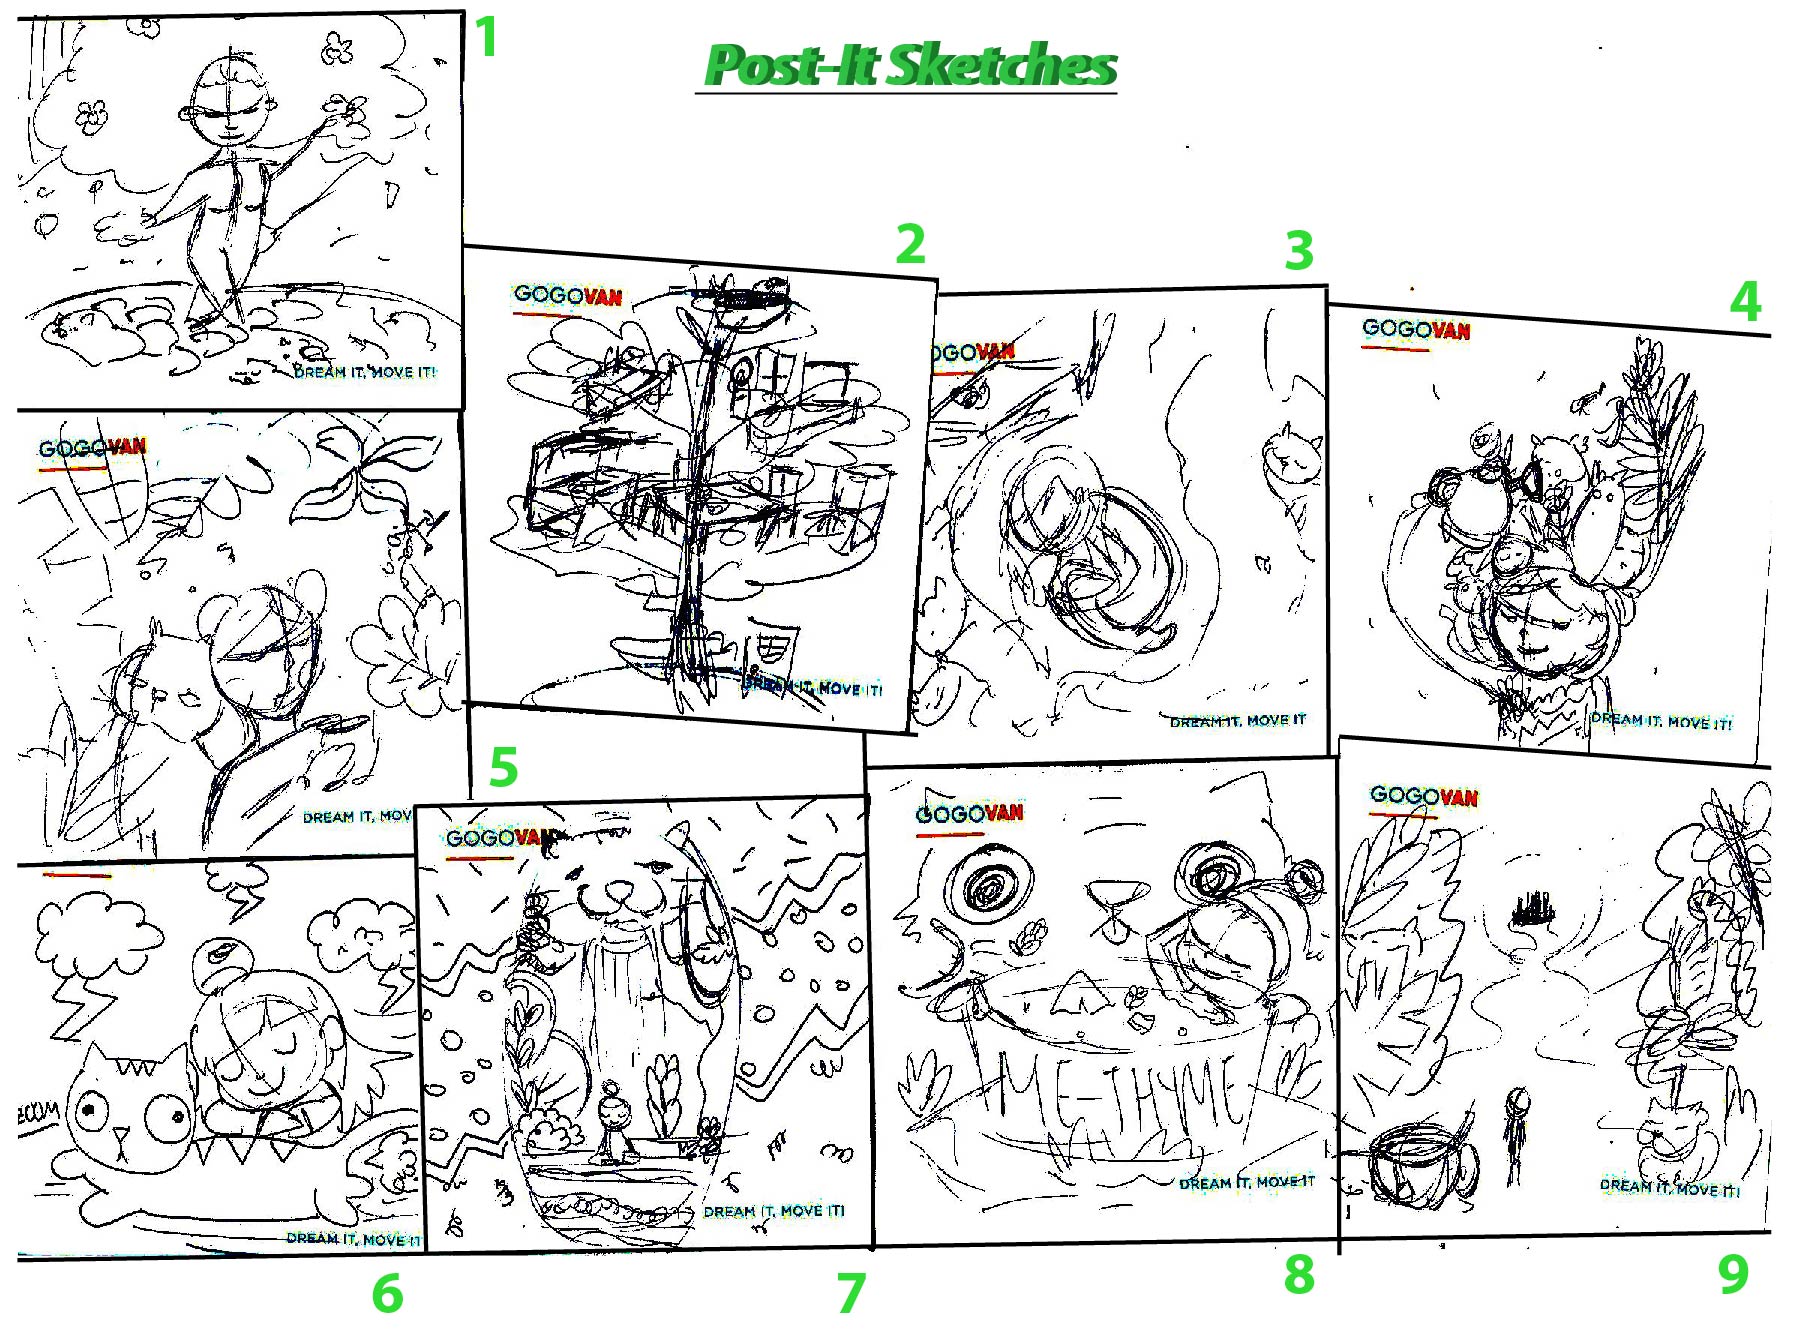
After that 15 min brain storming activity Ms Lisa had us try during class I felt was really useful, not only do i get to look around and have greater inspiration for ideas, i get to move around instead of sitting down!

From that walk, i generated this idea where i can do a fictional event like a Couch Potato Support group! A Couch Potato Party where we congratulating failure and have a very Tongue in Cheek approach to it! 😀

According to Cambridge dictionary, ‘Couch Potato’ describes a person who watches a lot of TV and does not have an active life.

The reason as to why I chose this topic is because I am pretty sure everyone of us has this ‘Couch Potato’ moments once… well… twice… OKAY FINE PERHAPS EVERYDAY OF OUR LIVES. AHEM. Okay and so I thought it’ll be fun to celebrate and encourage this unproductive behavior which is highly discouraged, by ENCOURAGING IT through this fictional event.

Instead of using literal metaphors of a couch and a potato, I thought of illustrating the characters for this project through exaggeration and relatability with the audiences.


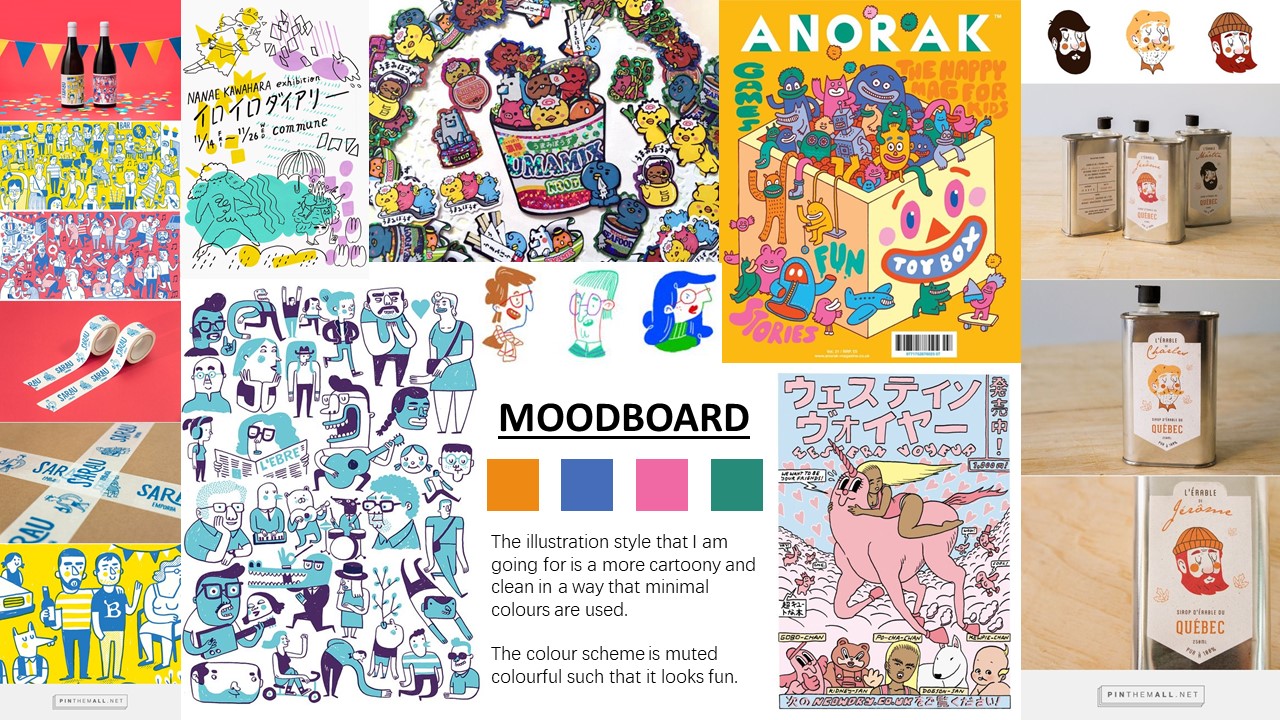
Style & User Personas

One of the things that I struggled with this assignment was to convey the tone of voice.

My ‘Couch Potato Support Group’ kit is for lazy people who don’t want to get off the couch to CONTINUE being at their hibernative mode.

And to create a loud and packaging design for it to attract buyers seems to be a little contrasting with the theme… Hopefully it turns out well!

The idea I have is to illustrate 5 characters of varying age groups and gender who are representations of this couch-potato behaviour in everyone.

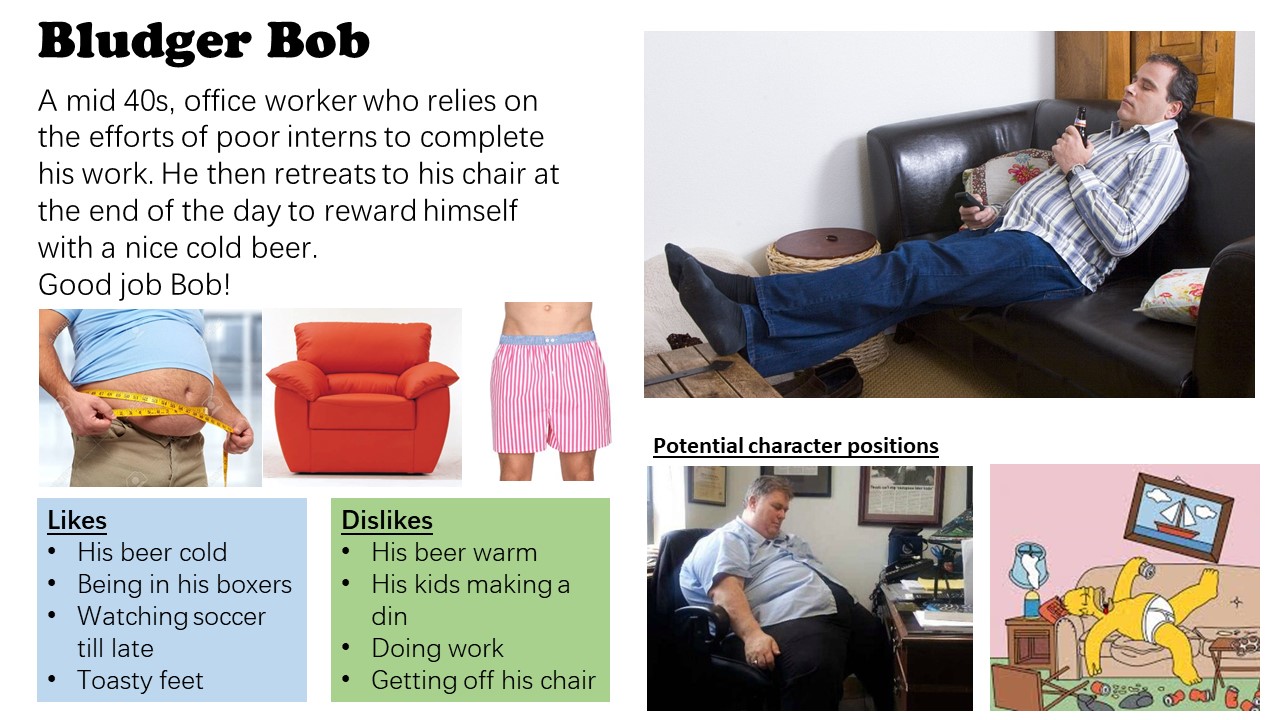
1st up, we have Bludger Bob

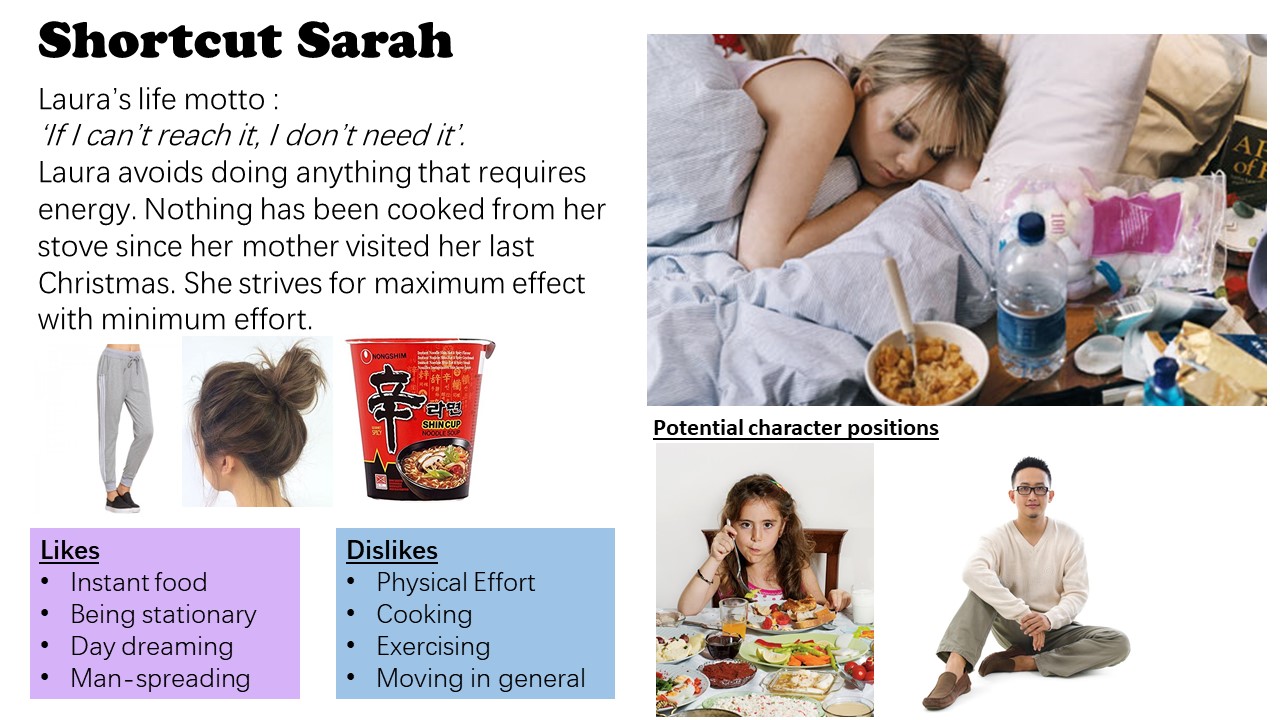
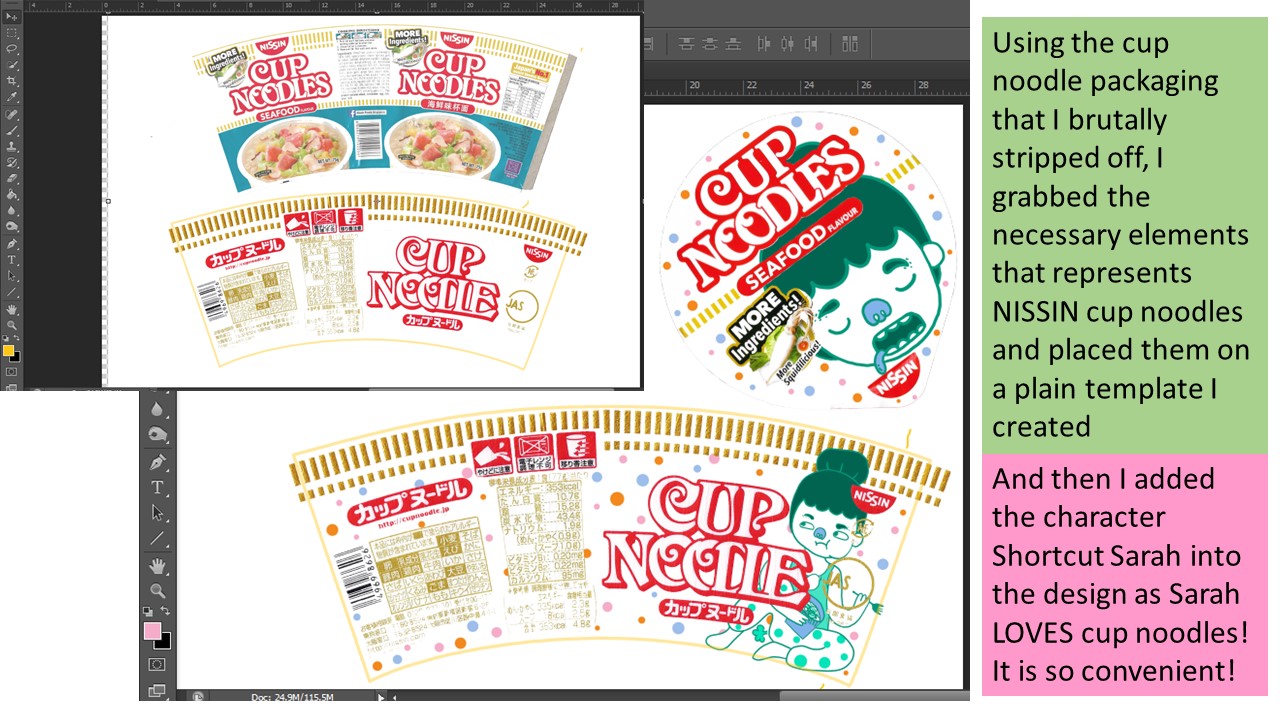
2nd , we have Shortcut Sarah

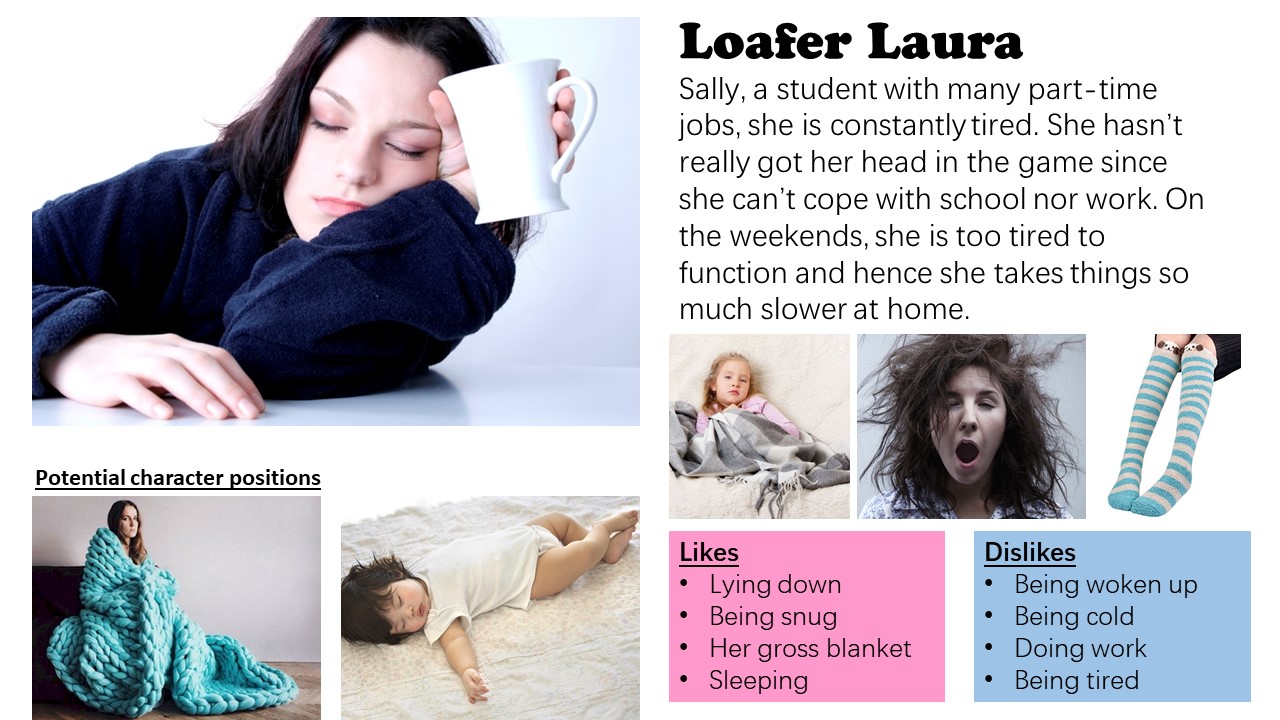
3rd, we have Loafer Laura

Lastly we have Deadbeat Danny.

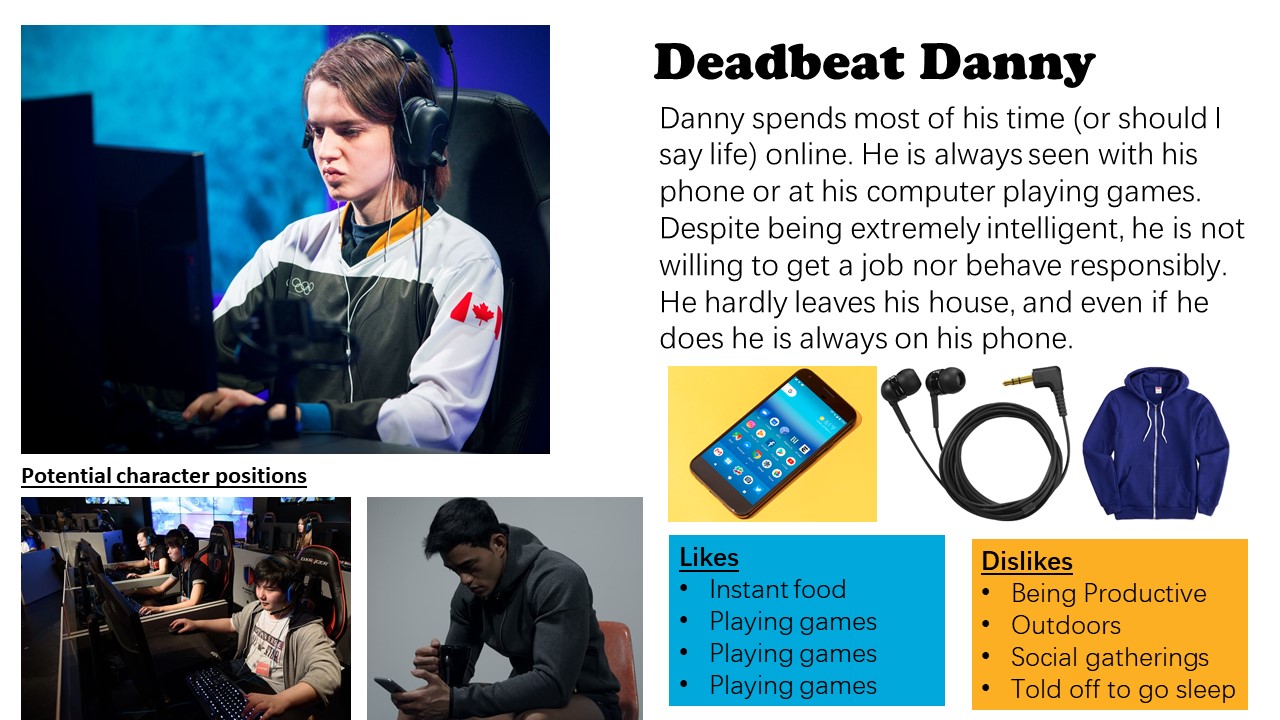
The common traits that all of them have are that they are lazy and avoids doing any form of work.

The characters are also the user persona audiences as well.


Methodology

I tried to illustrate my characters using both Adobe Photoshop and Adobe Illustrator to compare first. Learning from my previous assignment 2 incident, I made a sudden switch from 3 weeks worth of Adobe Illustrator progress to work in Adobe Photoshop instead just days before the submission, mainly because working on Illustrator was not going very well for me and I was not willing to give up. Hence, I thought it’ll be a good lesson learnt to try out both software to see which would bring about more convenience and which would bring about the best form of illustration I wanted to achieve.

I sketched them out on paper first, and then I brought it to both software. Afterwards, I decreased the opacity of the image and used it as like a tracing paper for me to use my Wacom pen to draw over.

The first character I illustrated was Bludger Bob.

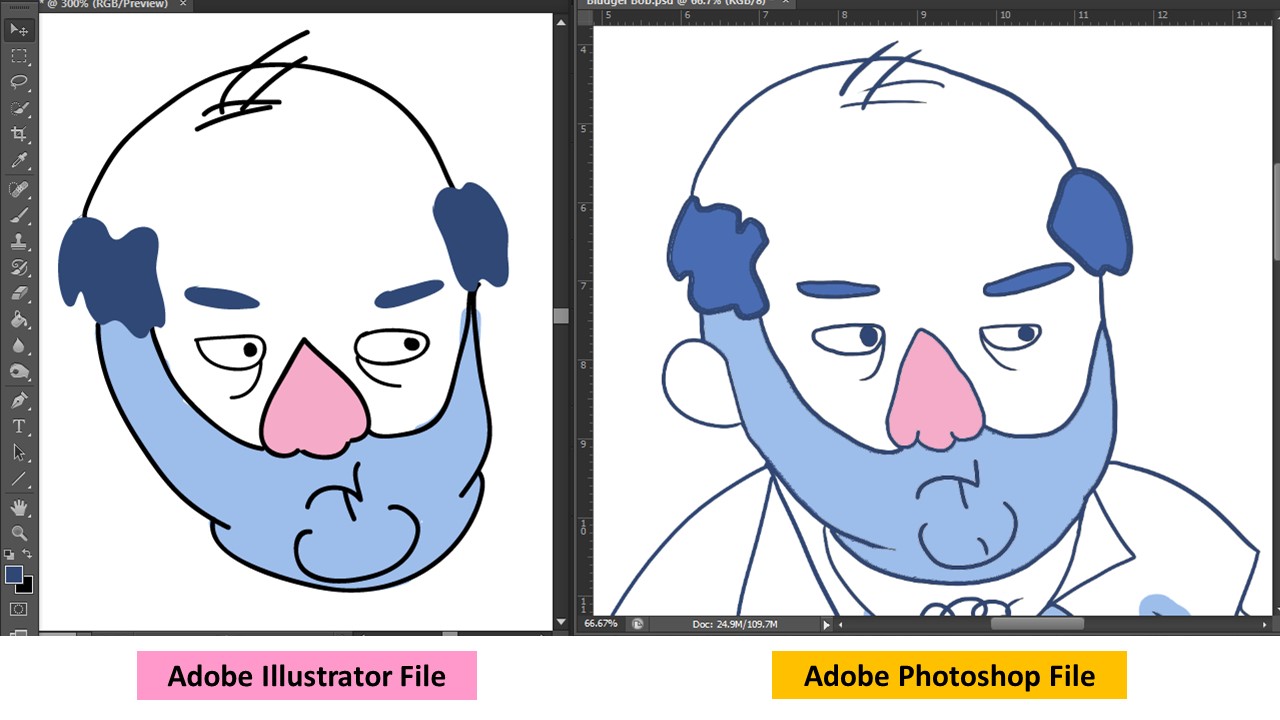
As you can see, the way it was illustrated varies a lot on both software.

Adobe Illustrator

(PROS)

I liked how clean the lines are and that I can transform the paths or toggle each vector points to my liking

I can resize the character without having to worry it will be pixelated or not.

(CONS)

Colouring was not easy as ‘Live Paint’ only worked for closed paths and using a brush tool to colour behind the lines resulted in very clean bulbous shapes that did not fit within the spaces I wanted to.

I did not have very good control over the outlines when I drew it out with a Wacom pen as they ‘round off’ to a certain shape I did not ask for. And the paths are not closed which I have to manually find the paths and close it. Which was much of an inconvenience.

I don’t like how Bludger Bob looks like here, he looks like a melted plastic blob..

Adobe Photoshop

(PROS)

It is easier to colour because there is more control over the paint bucket and brush.

Line work has more character.

Layers made it easier to try different kinds of colours

(CONS)

I cannot change the outline color once I fill in the colors via paint because they are all in 1 layer. Such that if I have to erased and make amendments to the outline after coloring it in, I cannot.

One of the issues I faced was that when I filled the colours in using bucket tool, there are spaces left uncoloured or that the lines has this white outline, which i resolved by painting it over in a separate layer below


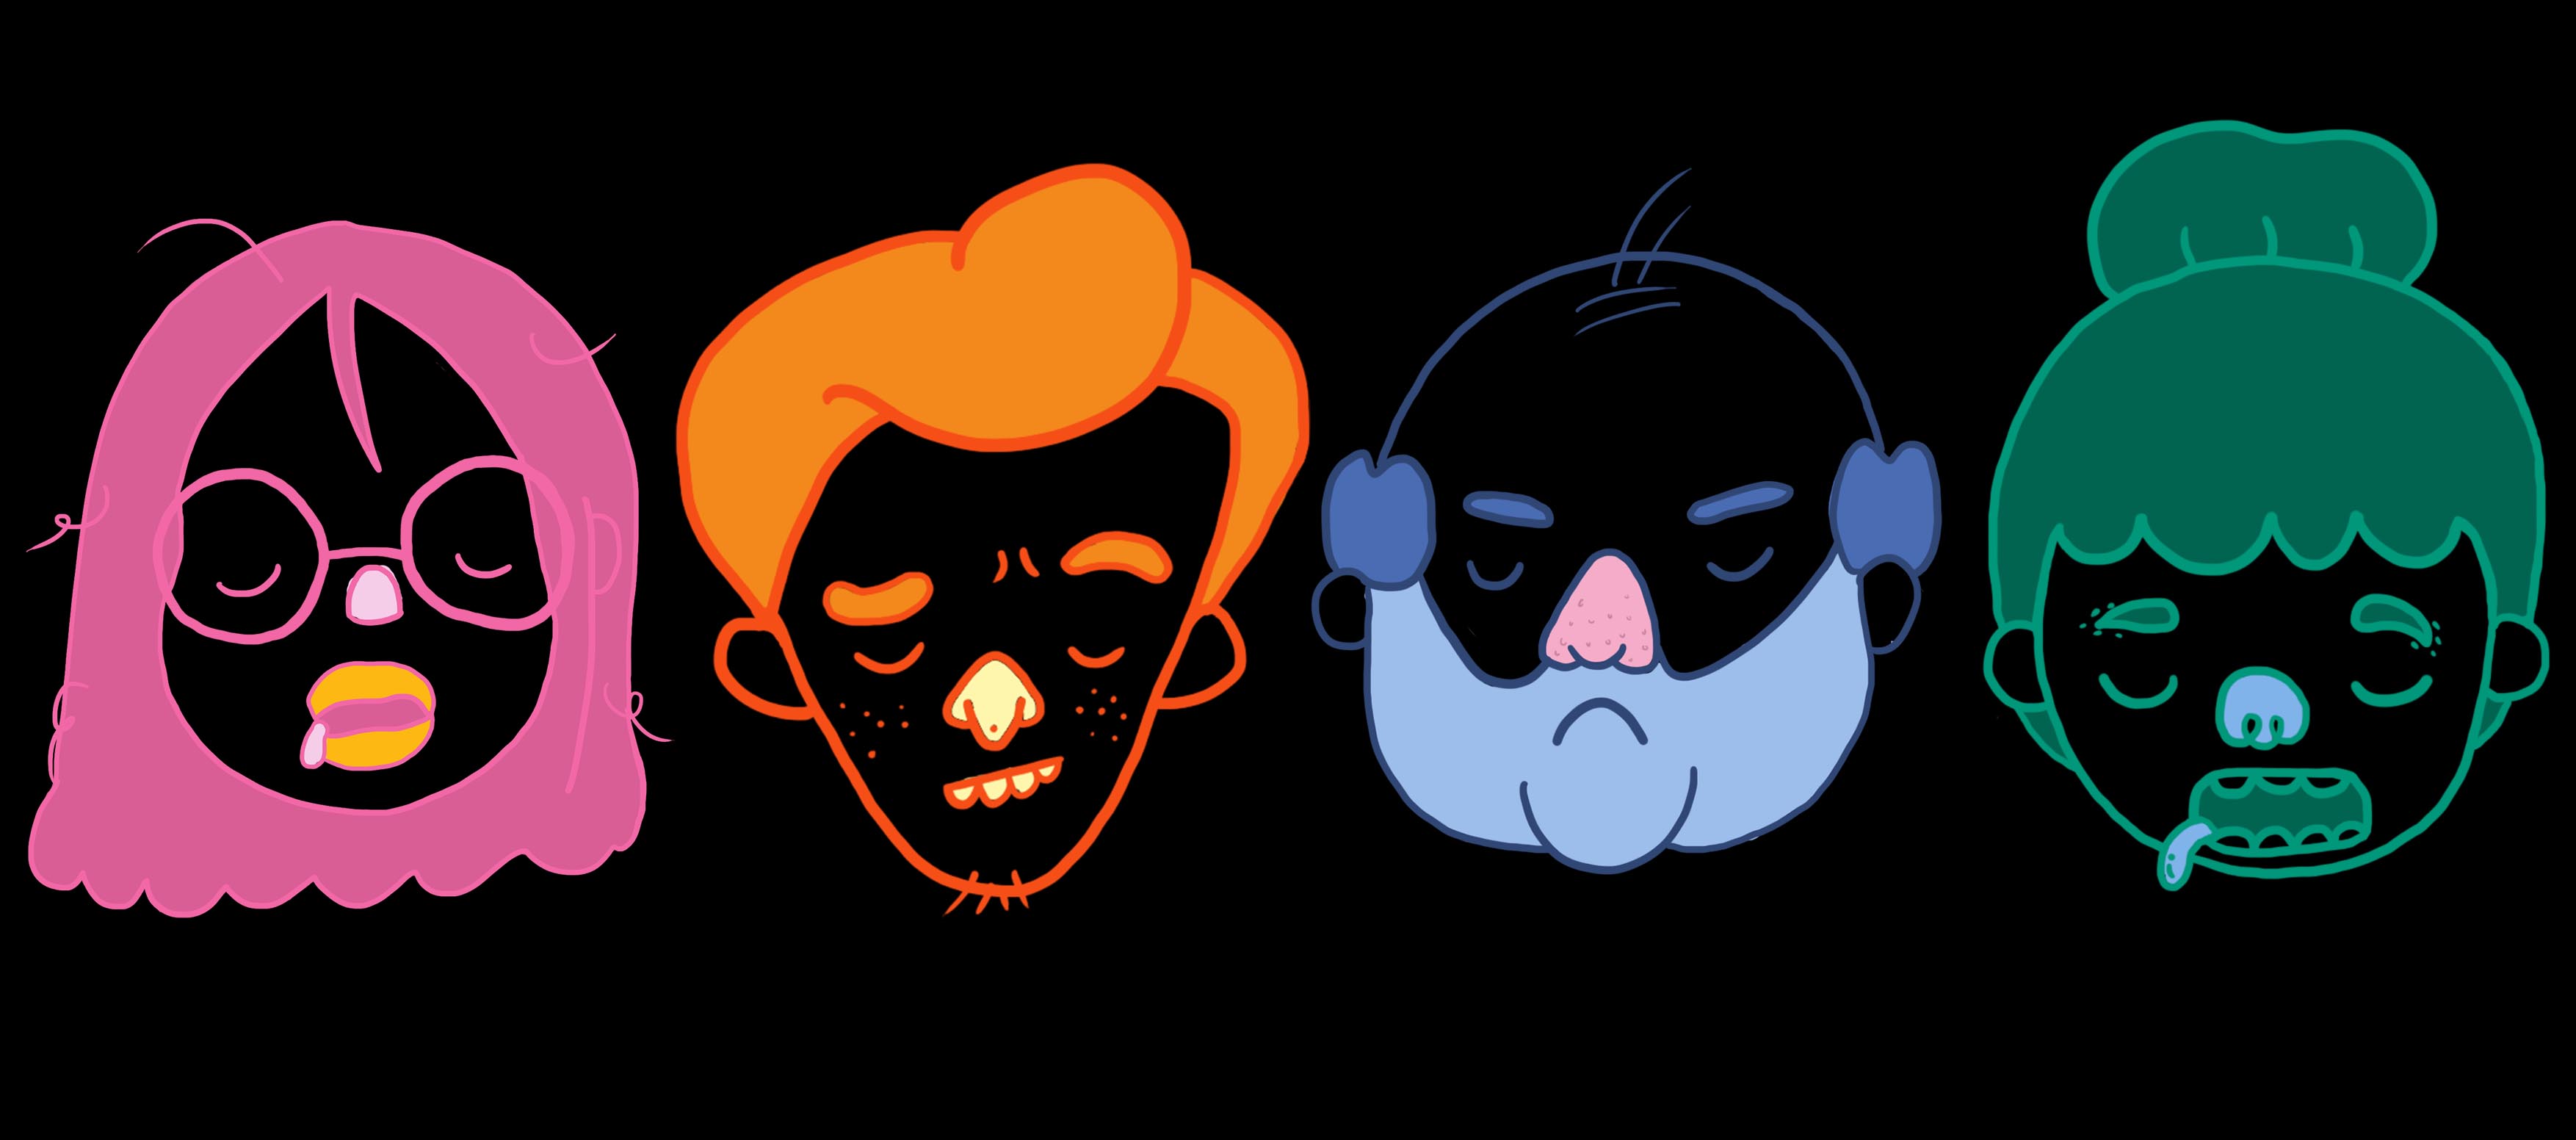
Eventually I chose Photoshop to illustrate my characters and these are the 4 i have created.


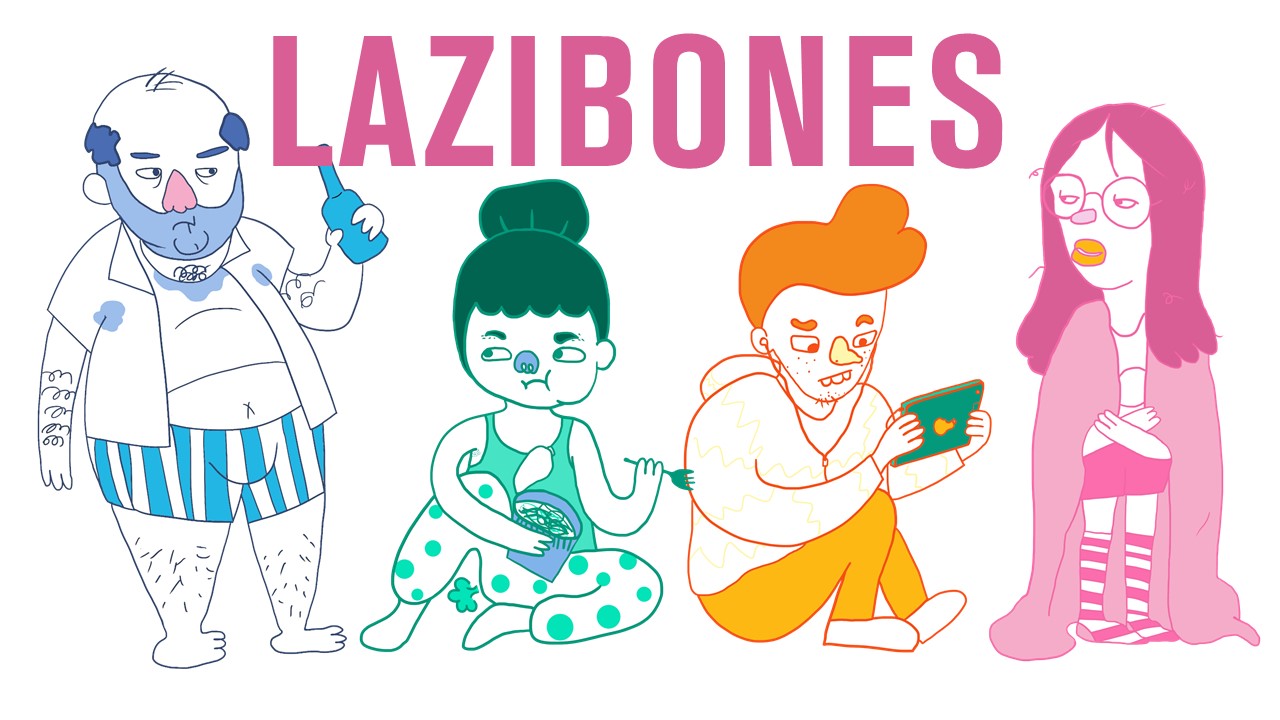
  • These 4 are the main characters that i have illustrated based off the user persona i have created above!
  • Their colors are based off the mood board colors I have chosen as they seem bright and fun on packagings!
  • I varied the tone of each color for each character because it is easier to work on, and it gives the subject matter more character and personality.
  • Each character has a little bit of color from the following one so that each character is not that isolated, but cohesive with the rest as well. For instance, the orange on the Loafer Laura (Pink Girl) brings our attention to Deadbeat Danny (Orange boy) and so on 🙂

Packaging

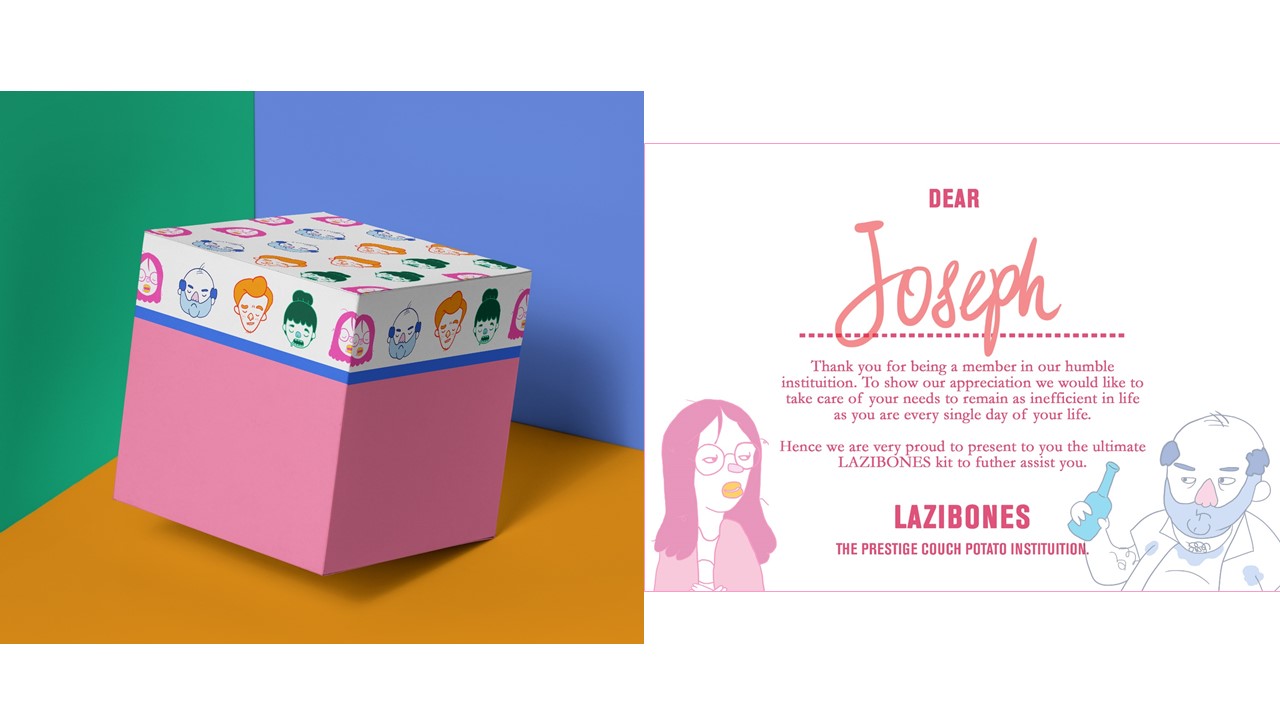
I did a mock up of the box kit design and a welcome card just to tie the whole Lazibones Kit together.

I came up with 4 different sleeping eye mask designs for Loafer Laura who loves to sleep.

The pieces with names are customizable to the customer’s request! Making it a very personalized gift for the ones who need to catch some shut-eye

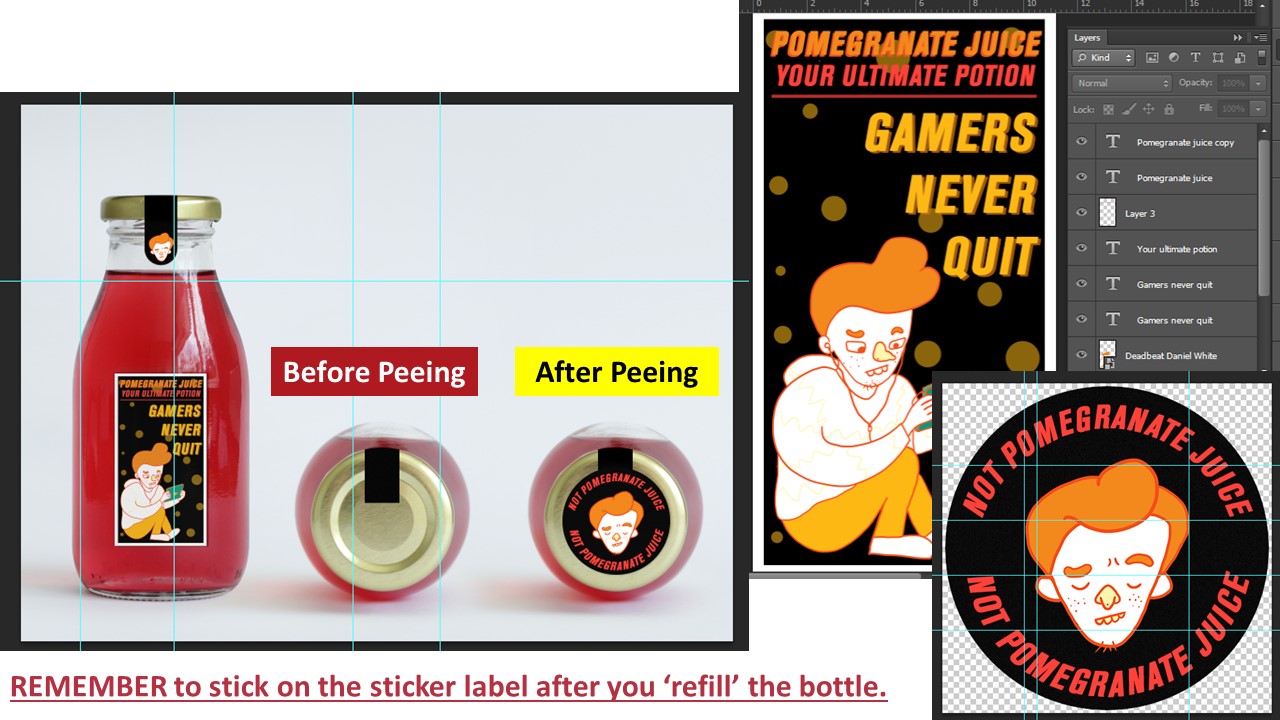
Idea for this drink comes from fictional characters in games where they take potions to regain their ‘health’.

Deadbeat Daniel who is addicted to games would regain his ‘health’ through this drink and conveniently pee back into this bottle when he is done because the game he is playing cannot end and the toilet is too far.

Oh and don’t forget to place the sticker on the lid to remind himself that his newly filled bottle is no longer pomegranate juice! 🙂

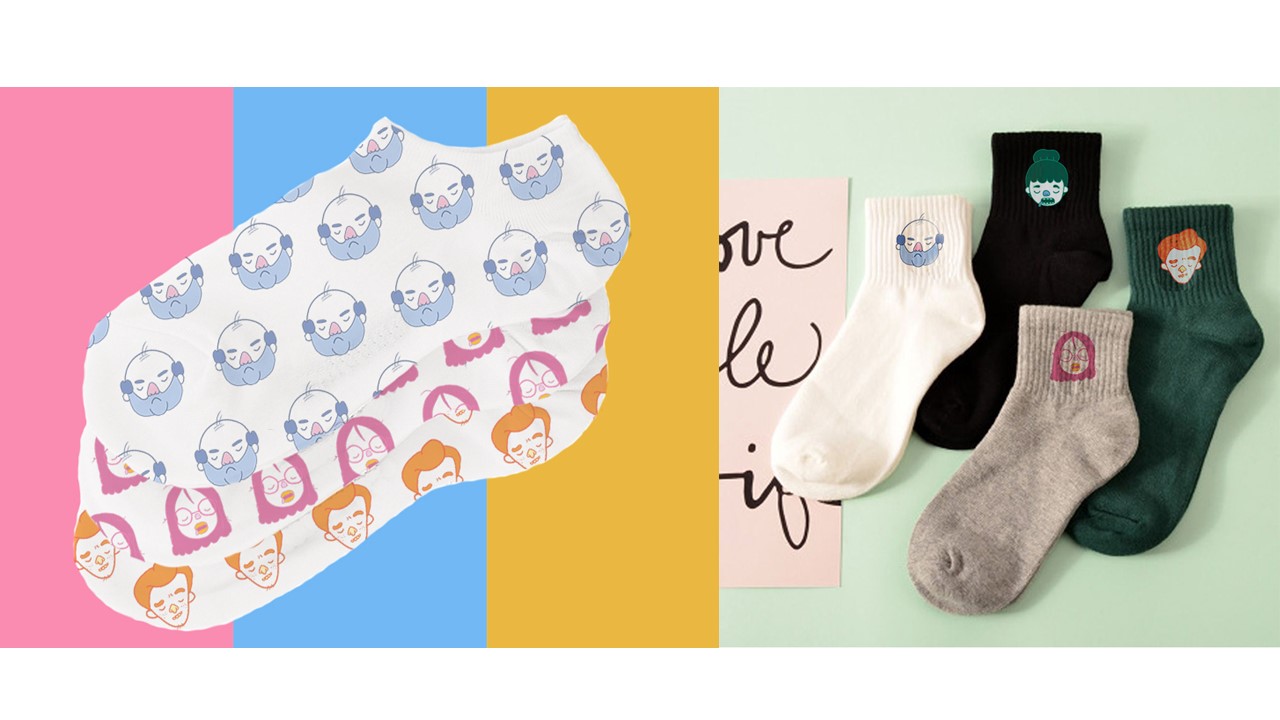
And for Bludger Bob who sits on his couch the moment he reaches home from work, fret not as he can wear these socks back home from work and to work the next day without changing!

These socks keep feet from sweating in Bob’s work shoes and keeps his feet warm at home while watching TV!

Socks are available in different designs as well in the case if Loafer Laura or Deadbeat Danny wants to wear them as well!


Critique Session + Feedback and Edits

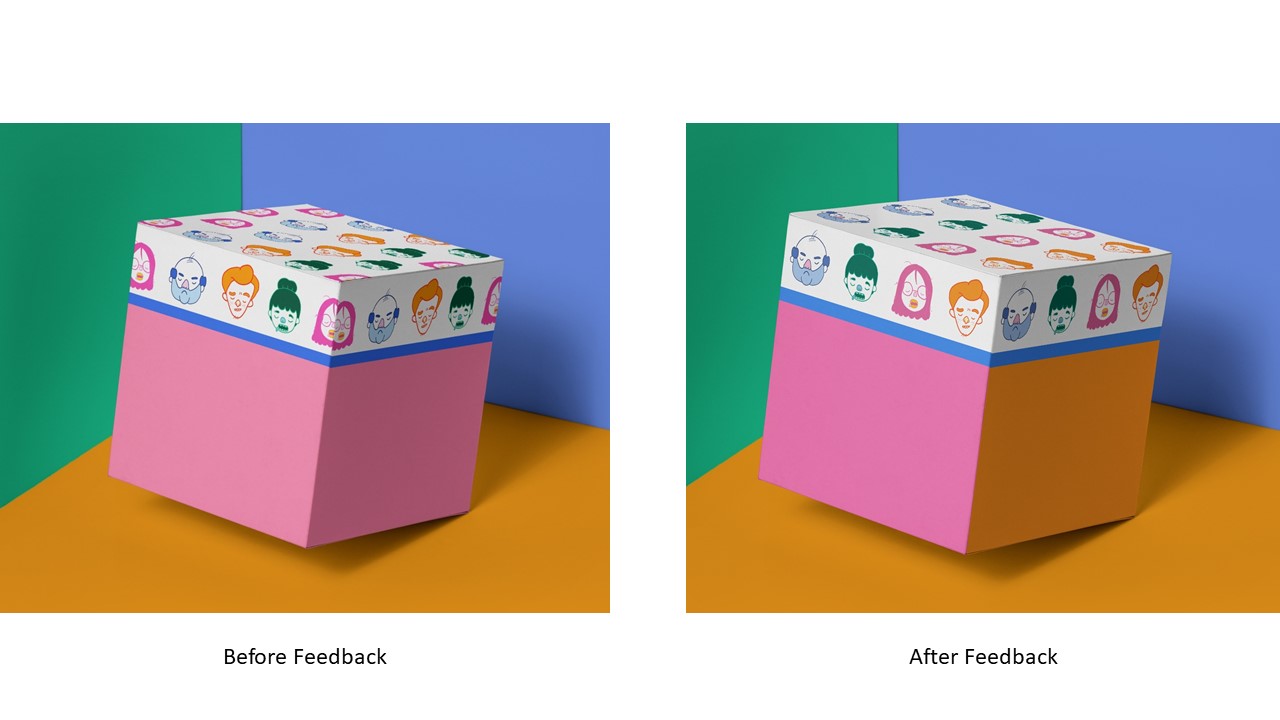
After the feedback, it was suggested that I make amendments to the box design such that the characters’ face don’t get cut off at the edges, and change the colour on the sides of the box.

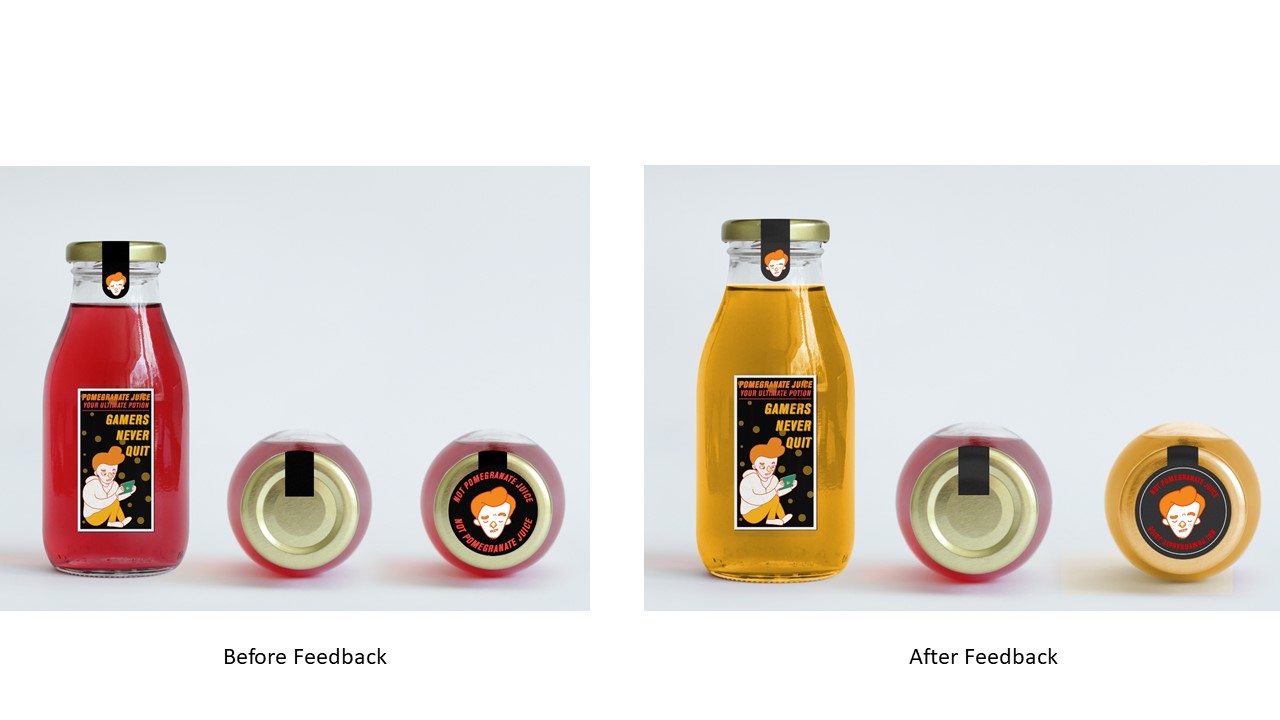
And also, for the drink and pee bottle for Deadbeat Daniel, it would have been more convincing to change the colour of the liquid to yellow to be more convincing. 😉

The middle drink is still left red to show that Pomegranate juice is still inside unlike the bottle on the right that is newly filled with pee.


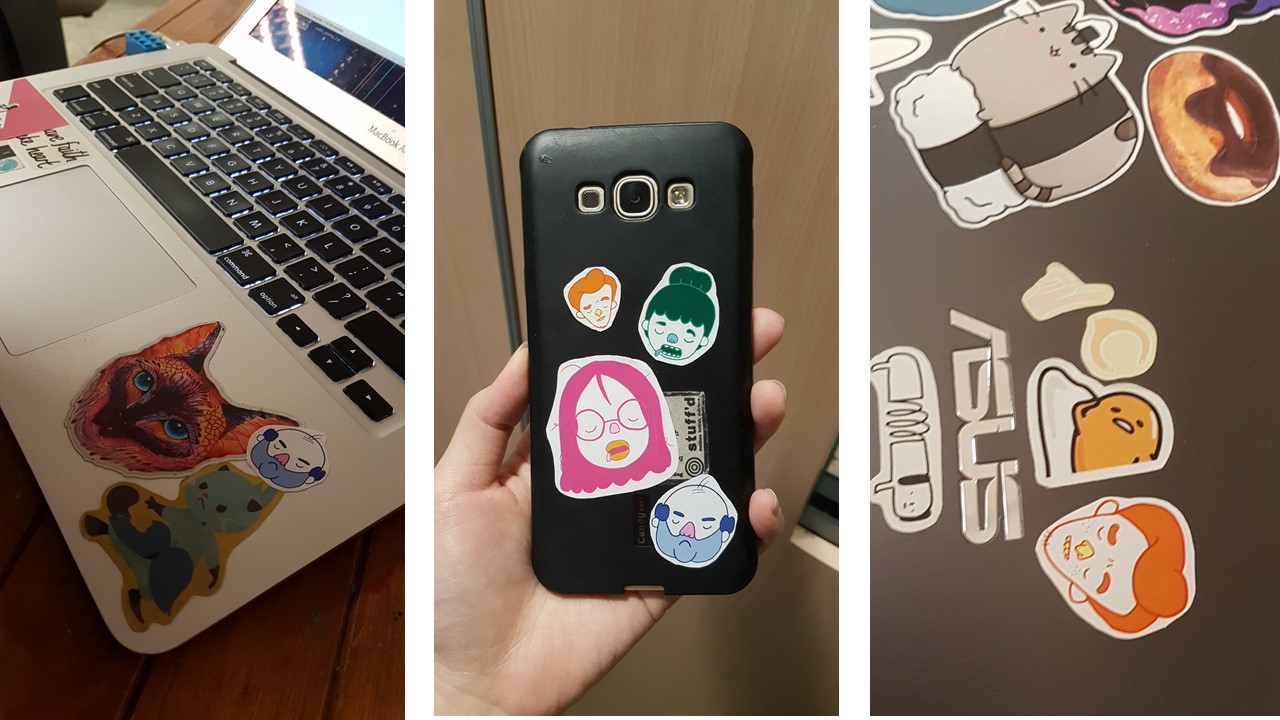
I gave out some stickers I printed for fun and I was very touched to see that my classmates like them :’) It is one of the best feelings in the world when they paste it on their laptops and even their phone <3

Click the link below to the final post for this final assignment!

DV2002: Assessment #3 – Applied Illustration (FINAL + My Reflection)

Lets get on with the process of making the cover editorial illustration!


I drew out my designs on paper first and I tried using transparencies to create individual elements to play around with layers.

And then I scanned my designs in and tried to image trace it, however, because I used pencil, the lines were not very clear which resulted in unjointed lines.

I resulted to vectoring the area, and ‘clipping masked’ the designs I wanted to be in.

I set up the tonal values of the colour schemes to create depth for layering.

This is the progress I had when I vectored the designs, and I used the image on the extreme right for atmospheric perspective reference, and a constant reminder to my absent minded brain that “THE DARKER IT IS THE CLOSER IT IS TO THE FRONT”.

Miss Lisa introduced to me Johnny Duddle’s Gigantausaurus which uses the creation of atmospheric perspective with plants. *Inner voice “THE DARKER IT IS THE CLOSER IT IS TO THE FRONT”.

Johnny Duddle’s Gigantausaurus


UPDATE 23/3/2018

I am about to make a very big risk, and that is to restart this again.

Halfway through the illustration I feel that the progress is very forced and something is amiss.

The vectoring and masking of the patterns did not carry out a raw and crisp feel that I wanted, and using Adobe Illustrator made it harder for me to bring forth the aerial perspective that I wanted to achieve. Layering was very tedious on Adobe Illustrator.

Because looking my composition as a whole and after some analysis and feedback from more people, my illustrations did not make a lot of sense as the huge cathead waterfall was very domineering and evoked a more cat-centraled message than the ‘Empathy- self love’ message that I wanted to evoke.

Hence, I totally discarded my vector progress and outlines that were done in Adobe Illustrator, and restarted an updated design.

I am moving to Photoshop and drawing everything from scratch again. 🙂

This is a more up close view on the new designs I did on Photoshop, the layering done via Photoshop was so much easier than Adobe Illustrator. The art direction as closer to the reference image that I wanted to achieve and I am very pleased with it. 🙂

I replaced the initial cat head with the mountains to create more depth and a more tranquil environment for relaxation in the Terrarium, using the image on the right for reference.

After layering and drawing out the illustrations through my Wacom tablet, i ended up with this!

I decided to have the background to be purple and orange to create a sun-set mood and also to create more contrast against the paler and more earthy colors.

I  then clipping masked the shape of the terrarium onto the illustration.

Trying out different background colours for the varoom magazine for submission!

Magazine mock up look and feel

Magazine mock up look and feel

Magazine mock up look and feel


After presenting the work to the class on submission day, some feed backs were given and i made necessary amendments to the work!

  1. Glass reflection was suggested to be added onto the terrarium to create a more 3D look.
  2. Shadows for the ladder and changing the perspective more will give the ladder more depth
  3. Changing the background color of the magazine to blue will bring about a more relaxed and tranquil feeling.

I found the feedbacks given to be very useful and really aided in bringing out the best in my work! 🙂
Stay tuned for the final post to see the final submission piece for this assignment!

Click the link below to see the FINAL post for Task 2!

https://oss.adm.ntu.edu.sg/yseng001/dv2002-assessment-2-editorial-illustration-final/


Theme: Empathy

I chose the Empathy as the theme.
And Self-love as the topic.
Because many of the times we are so caught up with our hectic daily life schedule, we tend to forget doing what we love. Genuinely caring for ourselves physically and mentally, such that we detach ourselves from the world and retreat to our safe haven to recharge.

User Persona

  Mood boards

Art/Style Direction

Thumbnail sketches

  1. Idea of a Bonsai plant, self love is like a growing plant, illustrated by the fusion of the girl as the plant, and the leaves as the hair.
  2. Tree layers as the compartments in a house!
  3. Girl rests in the hollow of a tree, recuperating under the embrace of nature.
  4. Girl waters herself, her hair consisting of plants and cats.
  5. Girl and cat leans back to back each other and looks at the floating plants and motifs they like ( Eg. Tea, cat food).
  6. Girl rests on a giant flying cat in the hectic external life.
  7. Girl rests inside a terrarium with a cat waterfall behind. External patterns act as noise and distractions. She is in her safe haven
  8. ‘Me-Thyme’. Cat throws ingredients into boiling soup pot which acts as a bath tub for the girl.
  9. Girl wanders off into a mystical forest (Alice in wonderland concept) from her city life.

Welcome to the second assignment posting for Illustration for Designers! 🙂
So stoked to be able to be able to work on an editorial illustration, which I find that would be greatly practical for future use!

The brief states that…

We are commissioned to create an illustration for the front cover of The Associate of Illustrators bi-annual magazine, ‘Varoom’. Each of the edition is themed and we are to choose one of the following 3 themes.

  1. Style
  2. Empathy
  3. Obsession

Before I jump into the task, let me do some research as to know what ‘Varoom’ is all about!

Varoom
Varoom is the globally leading illustration magazine featuring a unique combination of industry insight and critical analysis of the field of illustration.

Varoom probes audiences to  comment and discuss on the contemporary illustrated image in depth. It features: Interviews with illustrators, image-makers and designers as well as critical articles by leading commentators.

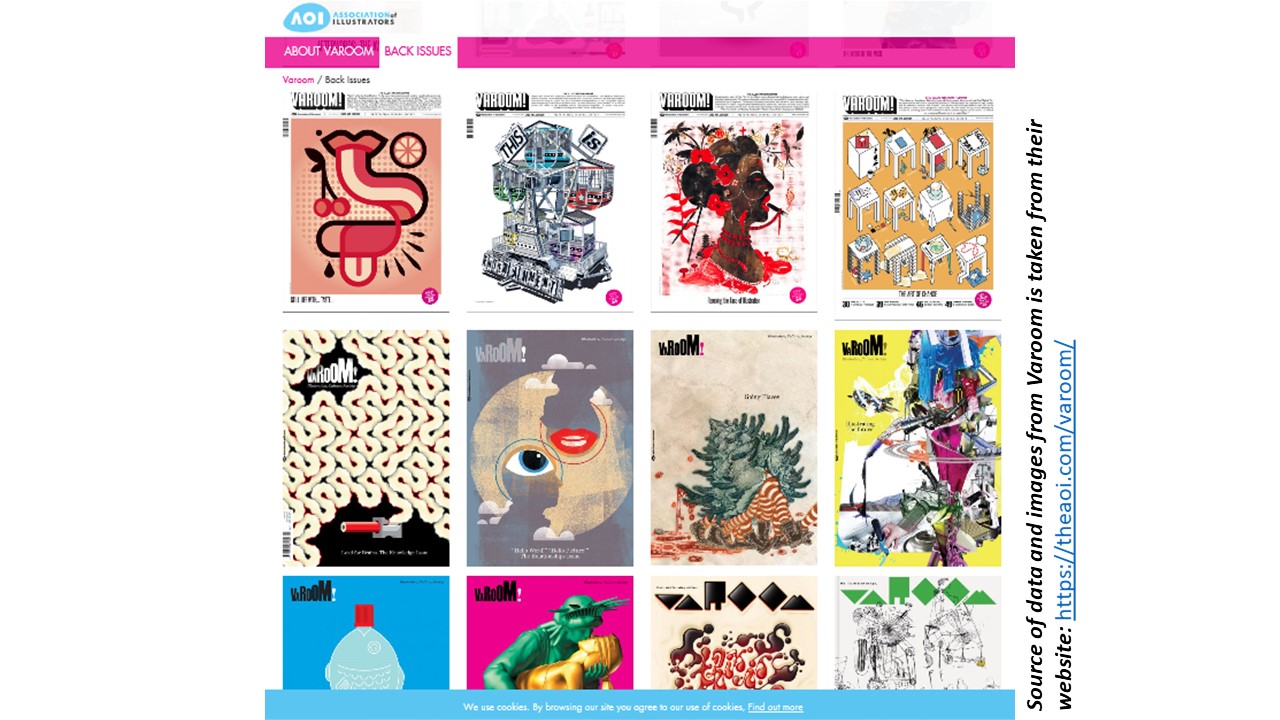
This is just some of the cover issues of the magazine.
I realized that every issue varies so much in style and form of illustration. This may be due the fact that the illustrators are not fixed.
The brand seemed very versatile and open to various forms of editorial illustrations.
I think that as long as the illustration fits the theme and probes the audience to think in depth, it sends an indirect message on contemporary articles.

What is editorial illustration?

Every day, print media such as  newspapers and magazines print illustrations alongside their articles to illuminate some element of the concepts for the reader. Essentially, an editorial illustration is based on a theme that may  not be explicitly written out. But the contextual meaning and theme is prominent through the visuals.

Source: http://payload21.cargocollective.com/1/3/97647/2733141/irina_yudina_rencor2.jpg

Sarah McIntyre on David Roberts’ His Royal Tinyness written by Sally Lloyd Jones.

Activating your left and right brain.


During the presentation for this assignment, I was glad to see that my classmates and Ms Lisa found my composition amusing, and lovely feedbacks to improve my work was given!
I made some changes based on the feedbacks given and the main change was the color of the lizard on the meat so that it balances the composition better.
Hence, this is the FINAL submission piece for this assignment!
 I really enjoyed this assignment because I was taking baby steps to steer away from my usual form of illustration and using a Wacom tablet to draw my portrait instead of doodling and scanning in, while also doing surrealistic photo montages which is something I do enjoy!
I look forward to the next assignment! 🙂
To see my research process and my methodology for this piece, click the link below!
Cheers,
Seng Yi Ling

For our first assignment, we are tasked to create a stylized A3 self portrait exploring the concept of visual narrative, considering how we can best represent ourselves in order to express our personality and unique character; experimenting with stylization.

LETS BEGIN!


Methodology

I started out by narrowing down my list of words from the mind map on things I like and things I don’t like.

My mindmap, concept and little sketches

Mood Board

Based on my mood board which I made while surfing Pinterest, my initial art direction was to use photo montage background for the things I don’t like and illustrative doodles inside my glasses for things that I do like. And then for the self portrait I would like to do it in a sketchy continuous line technique.
But while testing the fusion of the 3 different styles together: Photo, Doodling, and Sketchy lines; They look like a terrible mess.
I then tried another approach, which to abandon one of the styles and just stick mainly to 2 styles, the photo montage being one of the two.
I tried to do the doodling technique and the sketchy lines and I felt that the latter suits my theme and choice of items better.
 Hence I chose to use Photomontage and Sketchy lines to do my portrait.
Artist References

My artists references are not really fixed, but more of I went looking around and extracted things I liked from each artwork I see and I try to marry them together.

Taken from: https://www.google.com.sg/search?dcr=0&tbm=isch&sa=1&ei=opx6WvOlLcrqvASCiKzgDg&q=picasso+blue&oq=picasso+blue&gs_l=psy-ab.3..0l10.1105.3667.0.3804.5.4.0.1.1.0.81.306.4.4.0….0…1c.1.64.psy-ab..0.5.332…0i67k1.0.6qED0Hacj40#imgrc=tEE2P5jy7Fb32M:&spf=1517984936724

I liked the feelings evoked from Picasso Blue period painting. The hue is already an indication of the somber mood, which reinforces the feelings evoked by the subject matter’s expression.
I liked this photo I saw on Pinterest where the subject figure is framed beautifully in the picture, the items beside her complements it really well. and I would like to emulate that composition by framing myself with the things I don’t.
And all the while, I really enjoyed making funny surrealistic photo montage compositions! @surrealismodipendenza2 being one of the Instagram accounts I drew inspirations from.
Depth
Because one of my art direction was to use photo montage, I studied how I can create depth using flat images.
I realized that for landscapes, the receding mountains are lighter in shade as compared to the one closer to us, which are much darker.

Image taken from : http://www.cqcn88.com/mculture.asp

And in this surrealistic photomontage, I realized that by overlapping the images, depth is also created.

Image taken from : https://coyotegallery.wordpress.com/2014/05/11/pat-hopkins-surreal-photomontage/

Lines
I used varied line thickness to create more texture and emphasis on the portrait. Thinnest lines being the light and contours on my face.
The choice of brush has a little opacity, so when it overlaps, it creates an even brighter line.
Colors
I was quite in a dilemma for the color choices and eventually I made many drafts just to see which stands out the way I want it more, and what works best.
My overall composition I wanted it to be vertically symmetrical and framed with the photo montages of things I liked and disliked. The subject figure acts as a central axis.
That initial intention to use black and white (Number 1 to 3) for the background to represent disdain for the things I like kind of drowned the whole composition, and the focal point in the glasses are really small.
Number 7 was pretty funny to me (Noodle hair and babies as my shirt), and the focus was clearer. But the line work for my self portrait was obscured :(.

Number 4 and 6 were too glaring and drawing attention away from the central figure. (A friend commented that the colors were like the after effects of taking drugs…).

Eventually I chose color composition Number 5 because the blueish hue made the overall artwork comforting to look at, sufficient attention can be placed in the central figure and the items in the glasses.
In the background, I placed images of things that I dislike: Meat, flowers, lizards, ghosts and a huge potato as a nimbus.
And in my glasses, I placed the things I like in it: Dolls, cucumber and noodles!
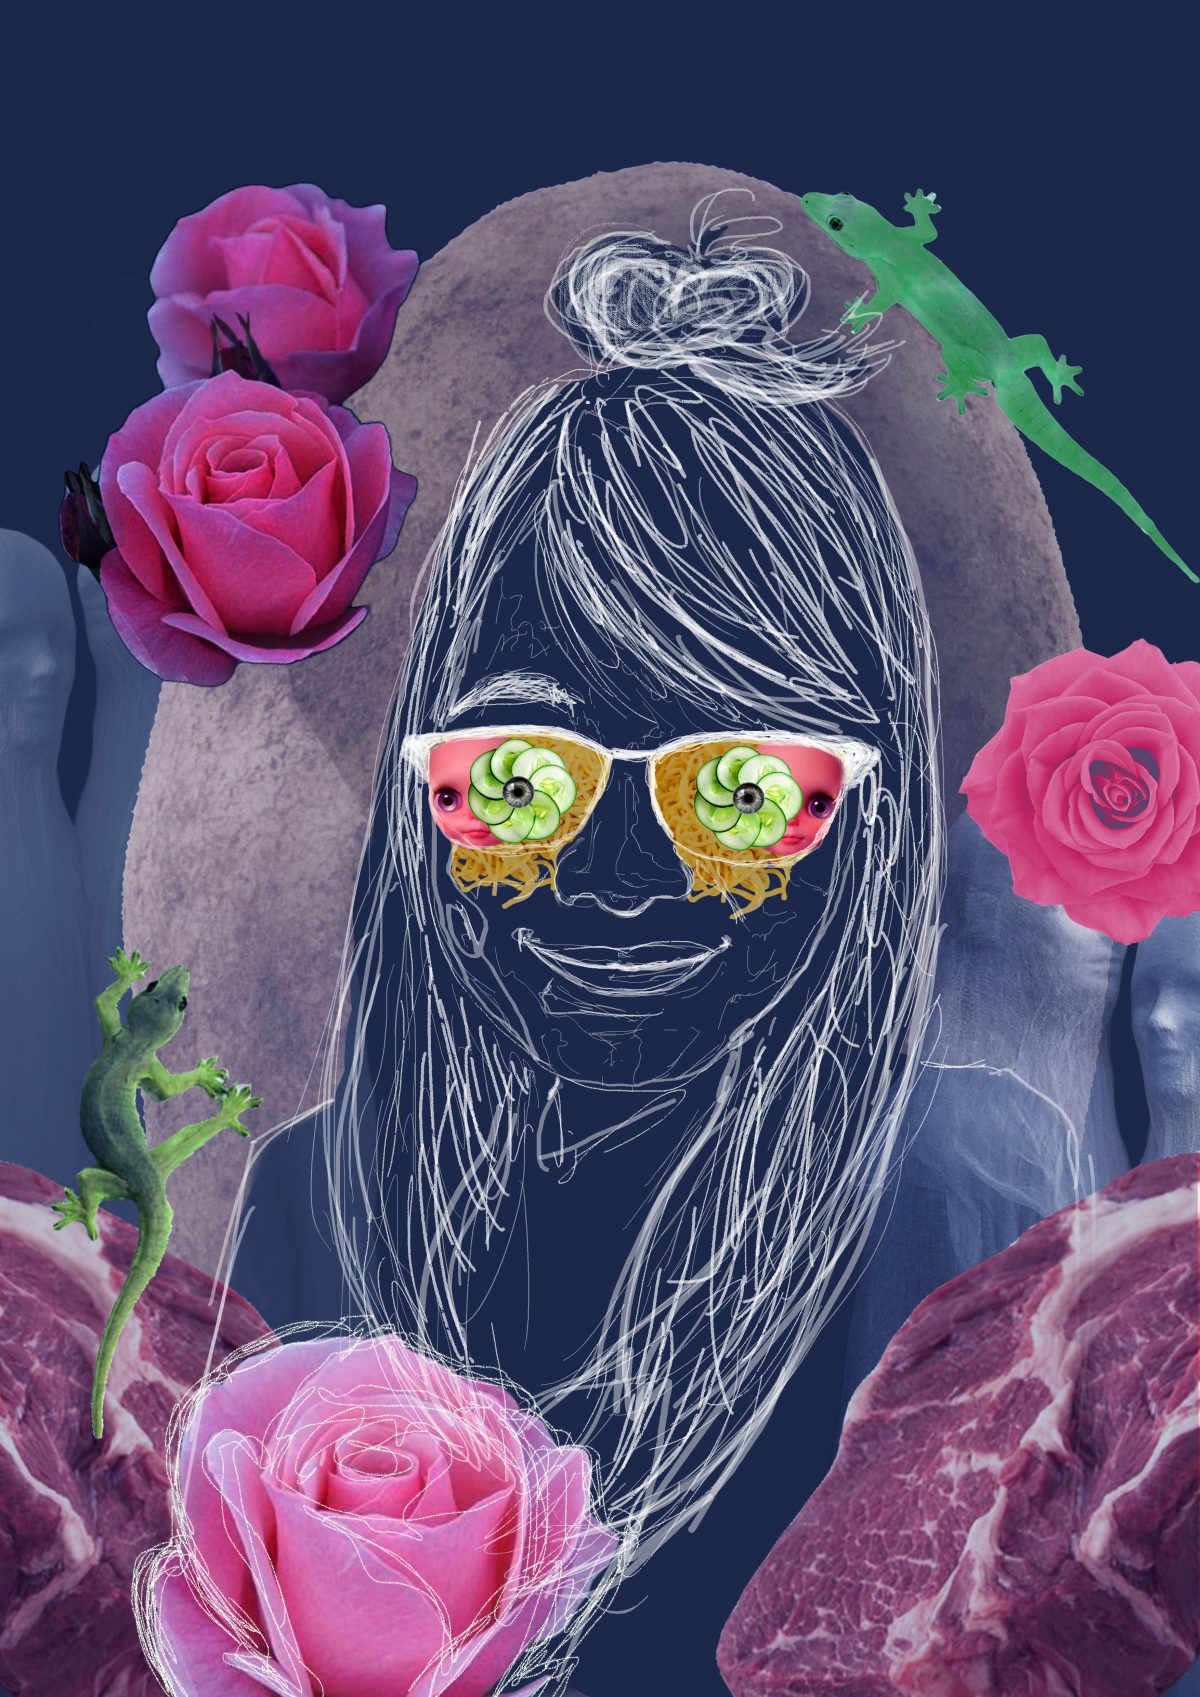
The color pallet I eventually chose is Complementary colors  (Orange, Red and Green) with its saturation increased to create contrast against the bluish hue for the background and stand out against the white lines for the sketchy illustration.

To see the final submission, click on the link below!

This is the first post for DV2002: Illustration for Designers! I hope through this module, I will be able to be more expressive through my illustrations and adventurous in my learning journey! Lets go~


(22 January, Week 2)

We were given a class activity to draw our classmates and it was really fun! I drew my friend Rachel using continuous line drawing as we were given a short time, I figured this method was the fastest and more realistic form of illustration! 🙂

My drawing of my friend, Rachel Ng


(29 January, Week 3)

We also had some practice in class where we learnt how to critiqued effectively as a illustrator and a viewer. It was really interesting to know what we thought of each other’s randomly chosen images!

The image I randomly chose was this :And applying what was taught, this is my Visual Analysis on Image 7:

  • Lines are smooth and clean, as though created using vectors.
    The image is a front view of a bicycle and it is illustrated in its simplest form. The subject matter is vertically symmetrical.
    The negative and positive space is used to make the image of the subject matter. So much so it does not have definitive lines.
  • The color pallet is made from 3 colors: Yellow, White and Black. Yellow being the most striking color draws attention, black creates area of emphasis for this image, drawing attention to information that matters. And white creates a sense of breathing space.
  • Hierarchy of the image has a definitive order and creates visual movement for the eyes to follow based on the scale. The reader’s eyes move from the main subject figure (bike), the title, sub header and body text, and lastly the date.